3 BPMN Actions
- 3.0 Execution Modes for BPMN Actions
- 3.1 Create entity
- 3.2 Update entity
- 3.3 Delete entity
- 3.4 Send Notification
- 3.5 Send Email
- 3.6 Send Newsletter
- 3.7 Create PDF
- 3.8 Reset Dynamic form
- 3.9 Cycle Rows
- 3.10 Reset Conditional Fields
- 3.11 Link Entities and Link Static Entities
- 3.12 Transfer Relations
- 3.13 Insert Table Row and Insert Product Row
- 3.14 Copy the Products Block
- 3.15 Call External Web Service
- 3.16 Cycle Related Records
- 3.17 Import Actions from...
- 3.18 Cycle Records
3.0 Execution Modes for BPMN Actions
For each BPMN action configurable within the processes (Figure 1), one of the following execution modes can be selected:

Figure 1
- Standard -> the action is executed the moment the process reaches the Action Task where it is configured; naturally, the process always waits for the action to complete before proceeding with the subsequent actions defined in the flow.
- Background -> the execution of the action is delegated to a cron job or worker; therefore, it is not executed the moment the process reaches the Action Task where it is configured but is instead placed into a specific queue. Naturally, the process still waits for the action to complete before proceeding with the subsequent actions defined in the flow; consequently, in this specific case, this constitutes a genuine "interruption" of the process.
It is recommended to use this mode in the following scenarios:
- when you need to execute an action that may affect a significant number of records.
For example, a Cycle Related Records action followed by an Update Entity action executed on 100 records.
- when you need to execute an action involving a relatively small number of records, but updating those records triggers additional processes.
For example, a Cycle Related Records action followed by an Update Entity action executed on 20 records, where each updated record triggers one or more additional processes.
- when you need to execute multiple actions in sequence that, taken together, may require several seconds to complete, potentially leaving the browser page unresponsive.
For example, a workflow containing a combination of Create Entity, Update Entity, Send Email, Send Notification, validation checks, and their corresponding gateways.
Whenever Background mode is selected, the system immediately closes the loading page and displays the detail view of the record you were working on, together with an "Updating..." message (Figure 2).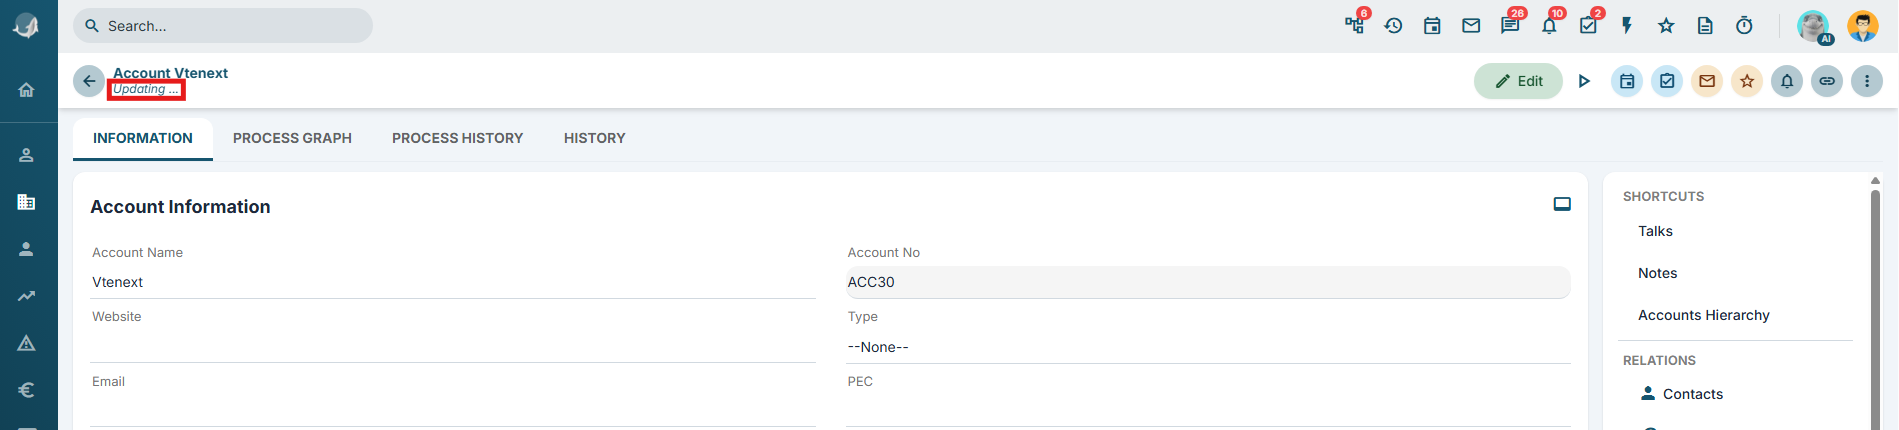
Figure 2
As of version 26.07.1, the message has been made more dynamic and precise by including an indication of the action being performed at that exact moment. (Figure 3)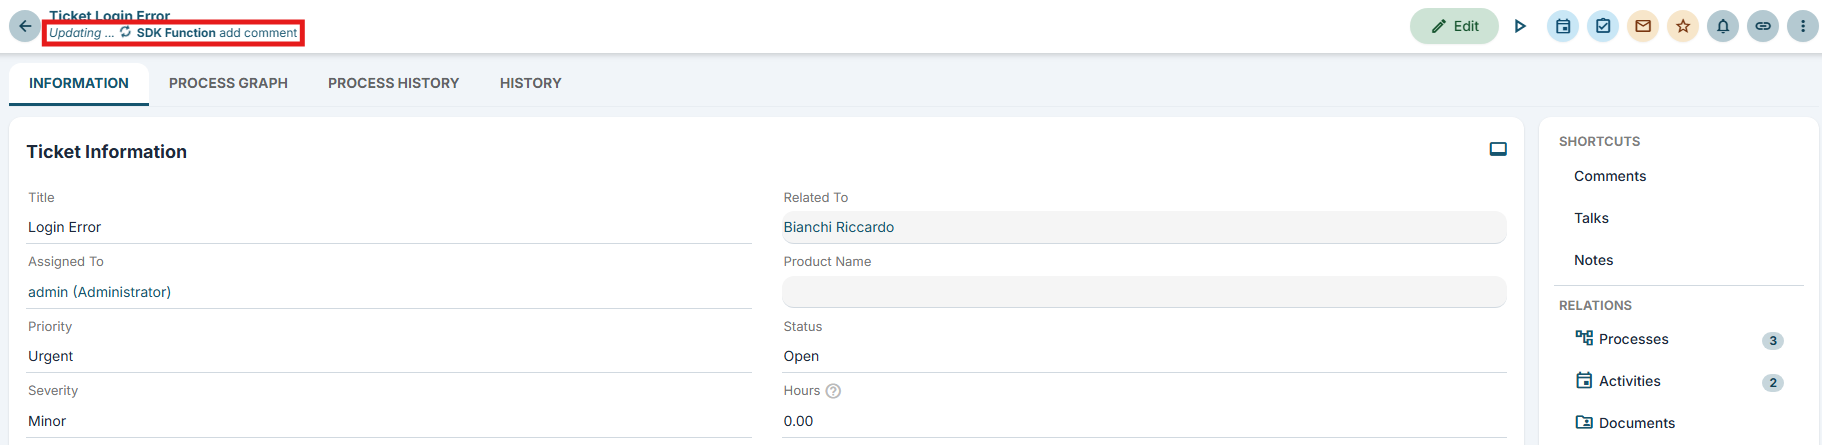
Figure 3
Once all the scheduled activities are complete, the system will automatically reload the page, causing the aforementioned text to disappear.
3.1 Create entity
This action allows you to create records for entities within the system (standard or custom modules).
For each individual field, you can set a static or dynamic value (i.e., one derived from the entities involved in the process itself) (Figure 1).
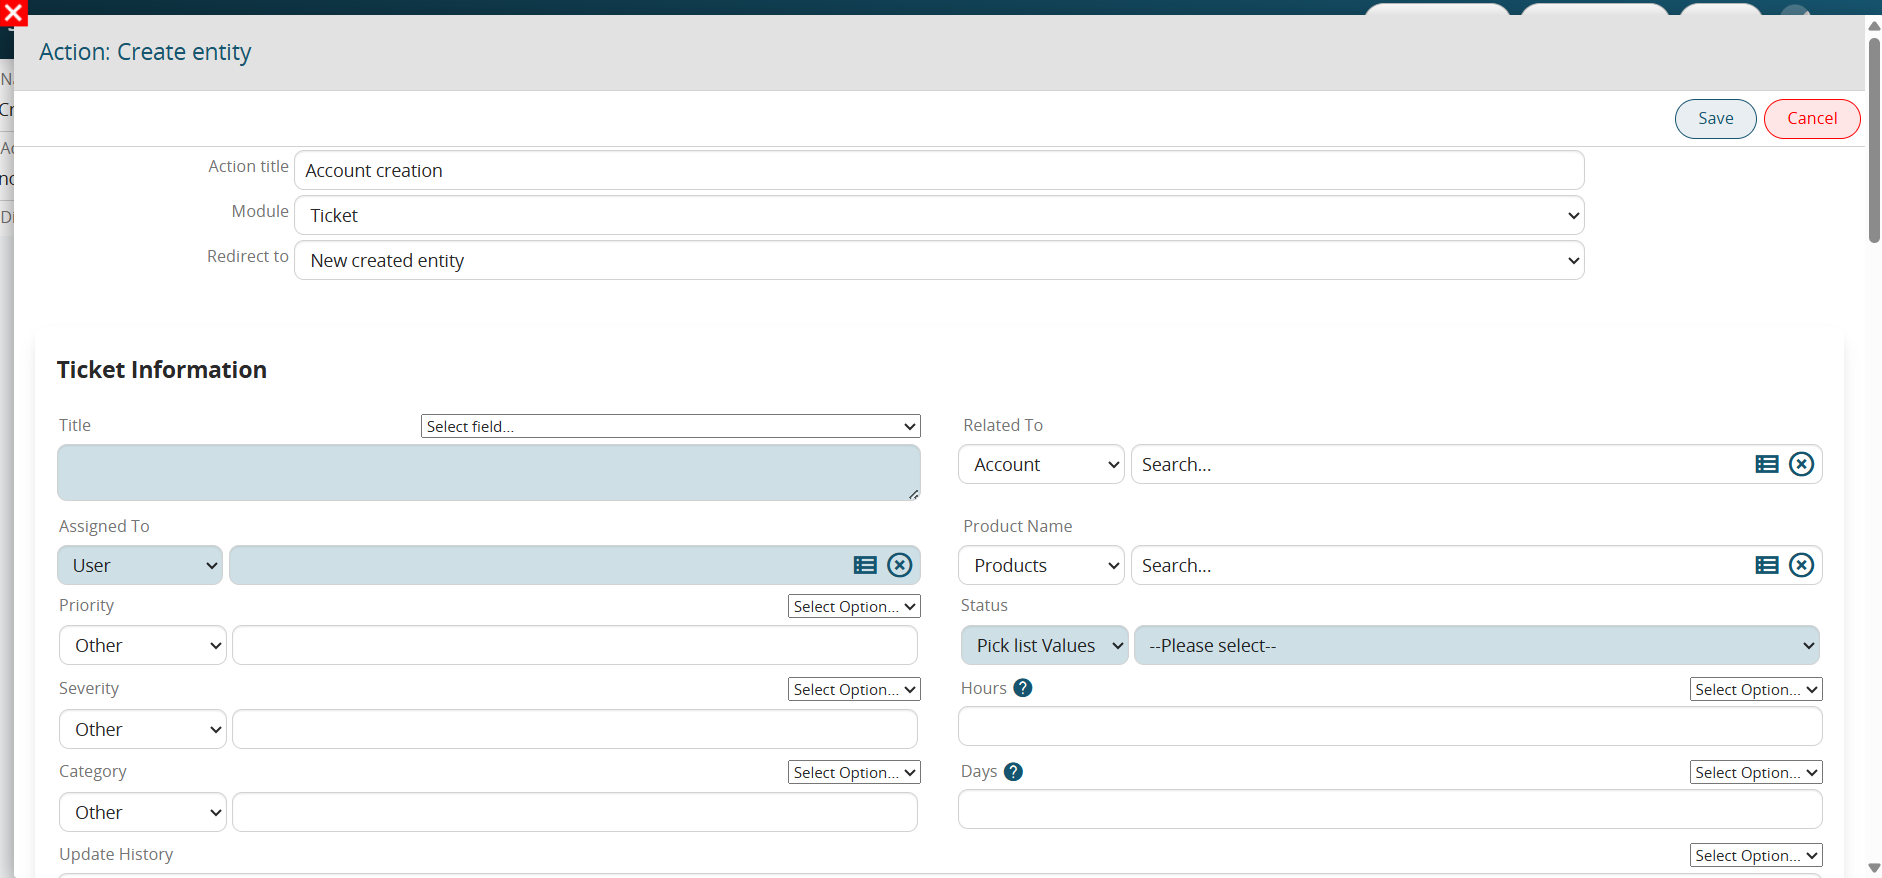
Figure 1
To select a dynamic value, the system provides a "Select option" picklist, from which you can access the entity fields of the modules involved in the process (Figure 2).
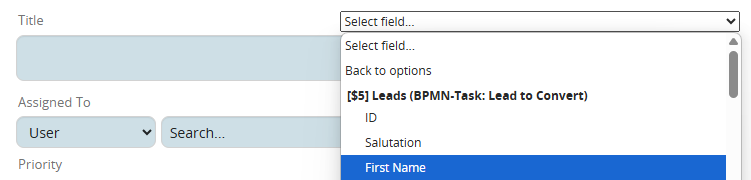
Figure 2
NOTE: For "Picklist" and "User" type fields, to use the "Select option" field, you must first select the "Other" item from the picklist available on the left (Figure 3).
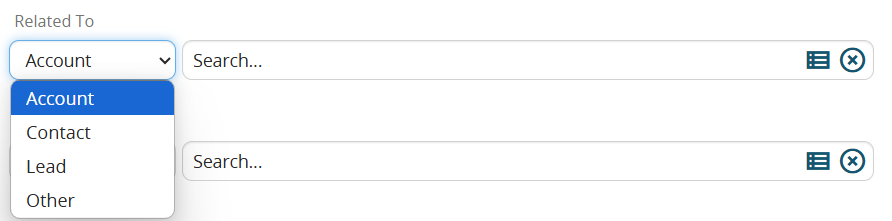
Figure 3
NOTE: The system automatically applies a filter based on the source field from which the "Select options" picklist is being accessed; consequently, it will only display fields with a data type compatible with the source field.
For example, if you wanted to insert the content of the text-type "Surname" field from the Leads module into the "Linked to" field of the Customer Support module, the system would not make that field available, as it only allows the selection of columns from "Related to" type table fields. (Figure 4)
Figure 4
Furthermore, the "Create entity" action also allows us to trigger a redirect to the newly created entity or to an entity involved in the process. (Figure 5)
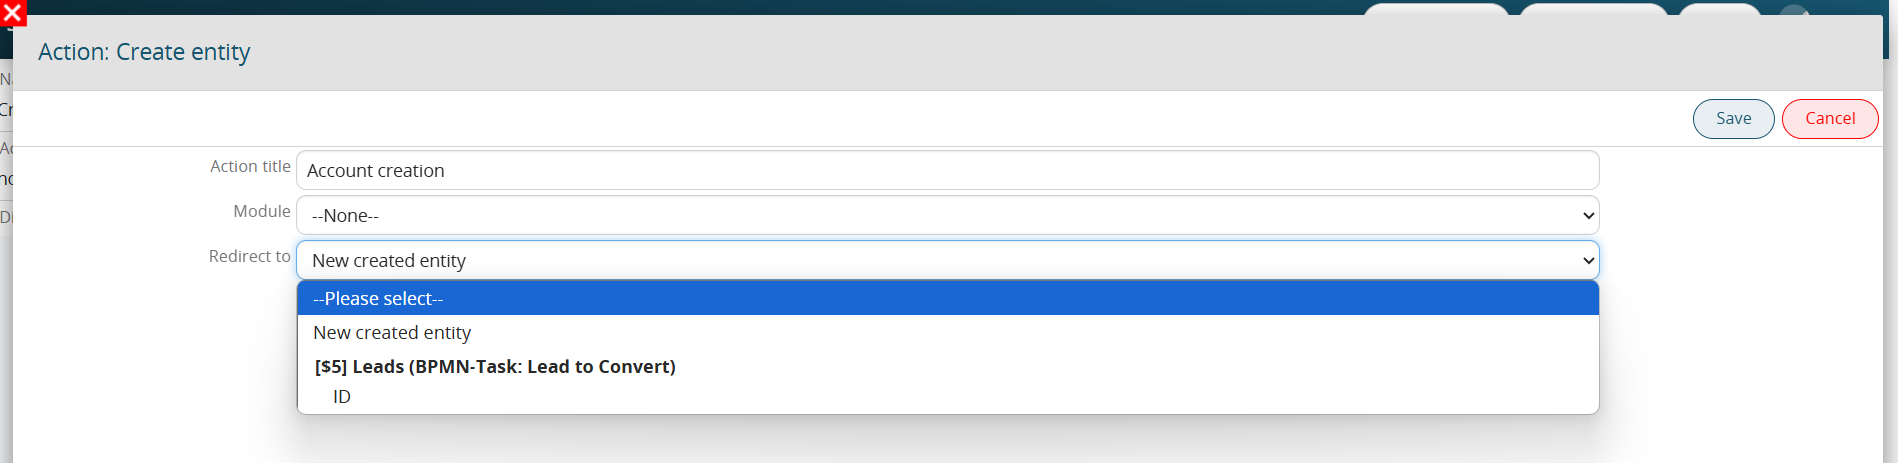
Figure 5
Clicking the "New entity created" button redirects the user to the new record created during this specific action.
Conversely, selecting the ID of one of the other entities involved in the process redirects the user to the record for that specific module.
Creating Calendar Events: "Notify" function
As of version 26.04, it is possible to configure and enable the sending of automatic reminders via the dedicated section. (Figure 6)
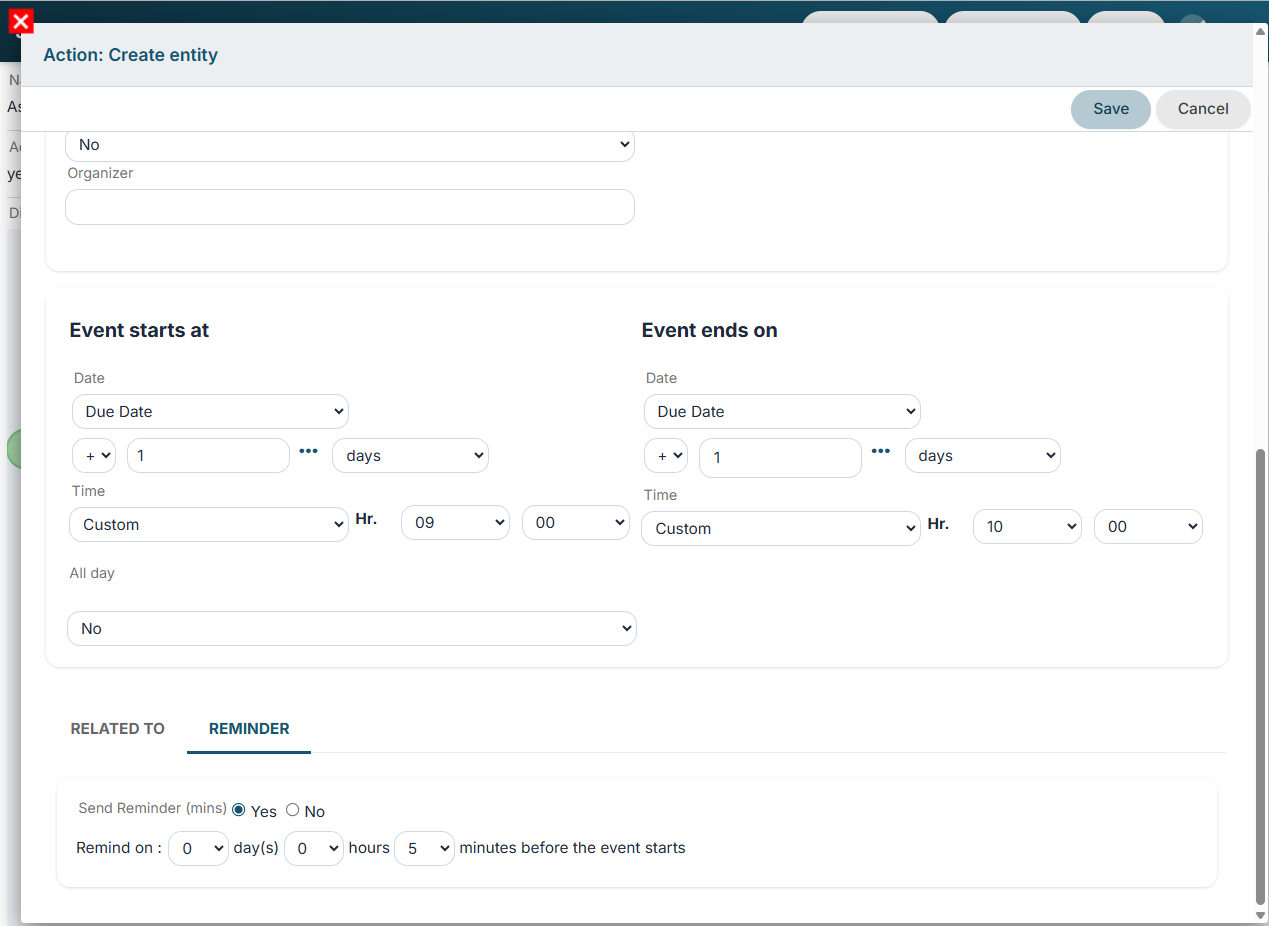
Figure 6
3.2 Update entity
This action allows updating an entity (instance of a module) directly involved in the process or otherwise an entity related to them.
Static or dynamic values (thus taken from the entities involved in the process itself) can be reported for each individual field.
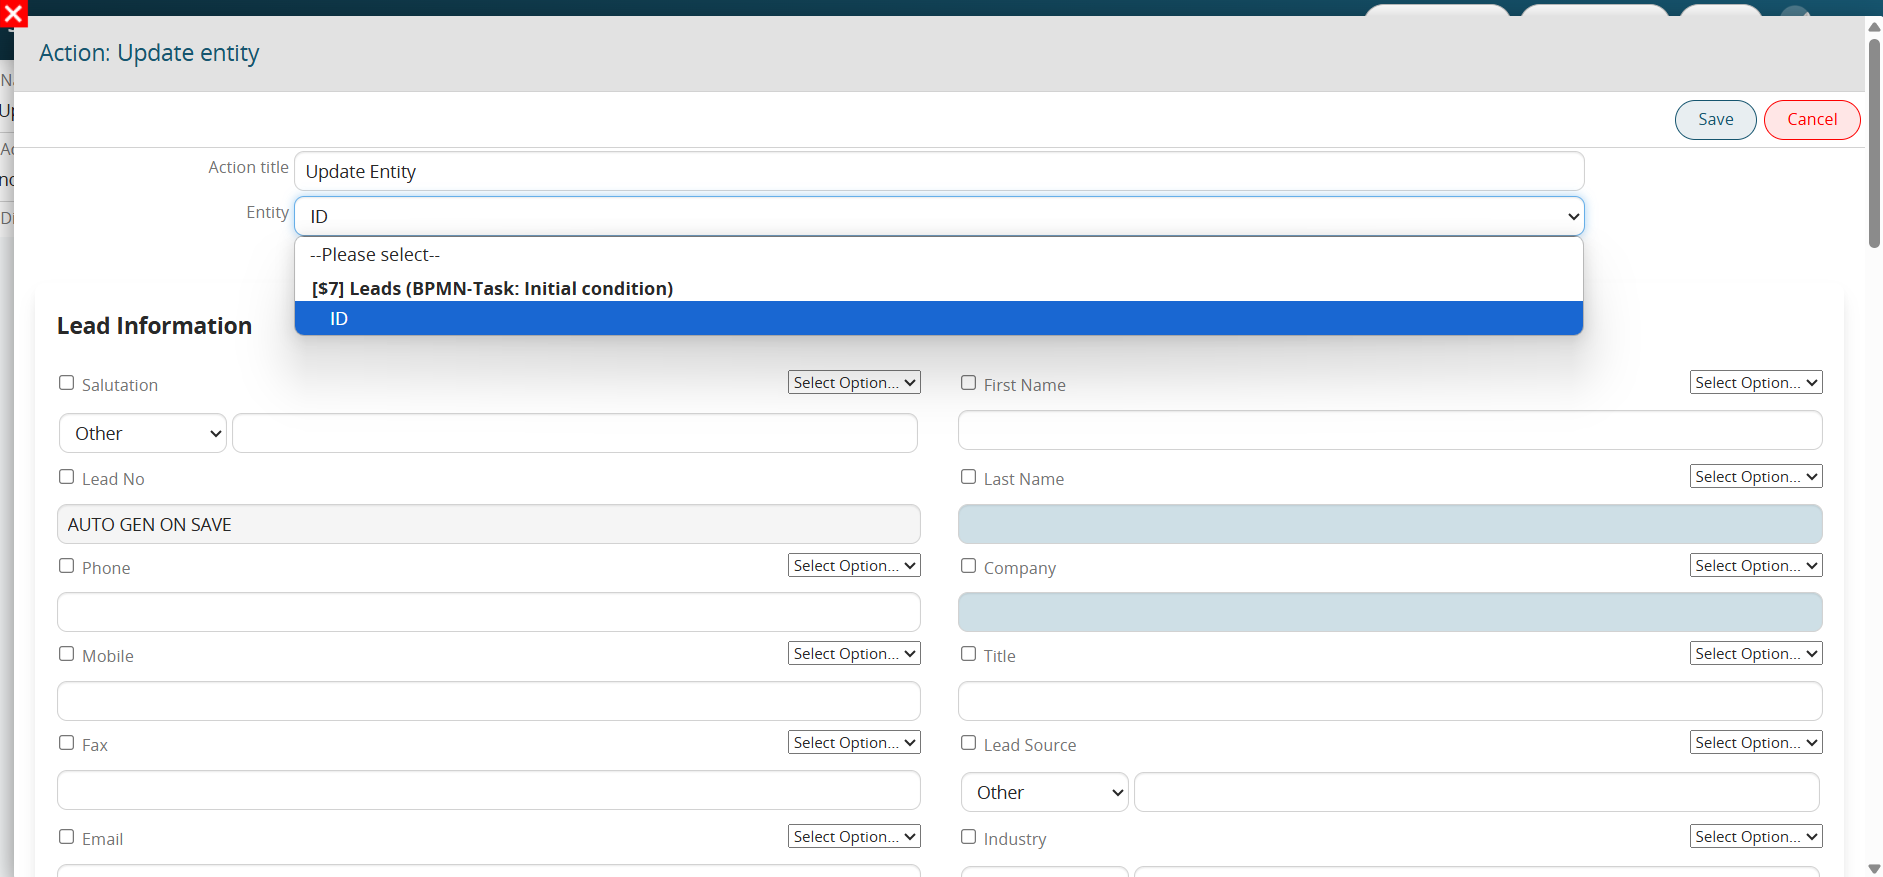
Figure 1
To select a dynamic value, the system provides the “Select Option” picklist from which the entity fields of the modules involved within the process can be accessed (Figure 2)
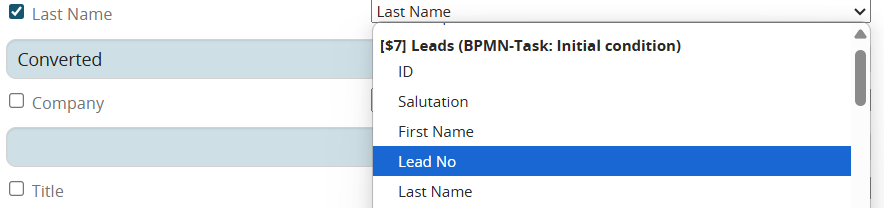
Figure 2
CAUTION: For the “Picklist” and “User” type fields, in order to use the “Select Option” field you must first select the “Other” picklist item available on the left (Figure 3)

Figure 3
PLEASE NOTE: the system automatically performs a filter based on the source field from which the “Select Options” picklist is being consulted, consequently it will only show fields whose type can be accepted by the source field.
If, for example, within the “Connected to” field of the Customer Care form I wanted to enter the contents of the “Last Name” text type field of the Lead form, the system will not make that field available, this is because it will only allow selection of the columns of the “Related to” type table field. (Figure 4)

Figure 4
As of version 24.08, it is also possible to update fields of type “Related to” created within dynamic process helper forms (Figure 5)
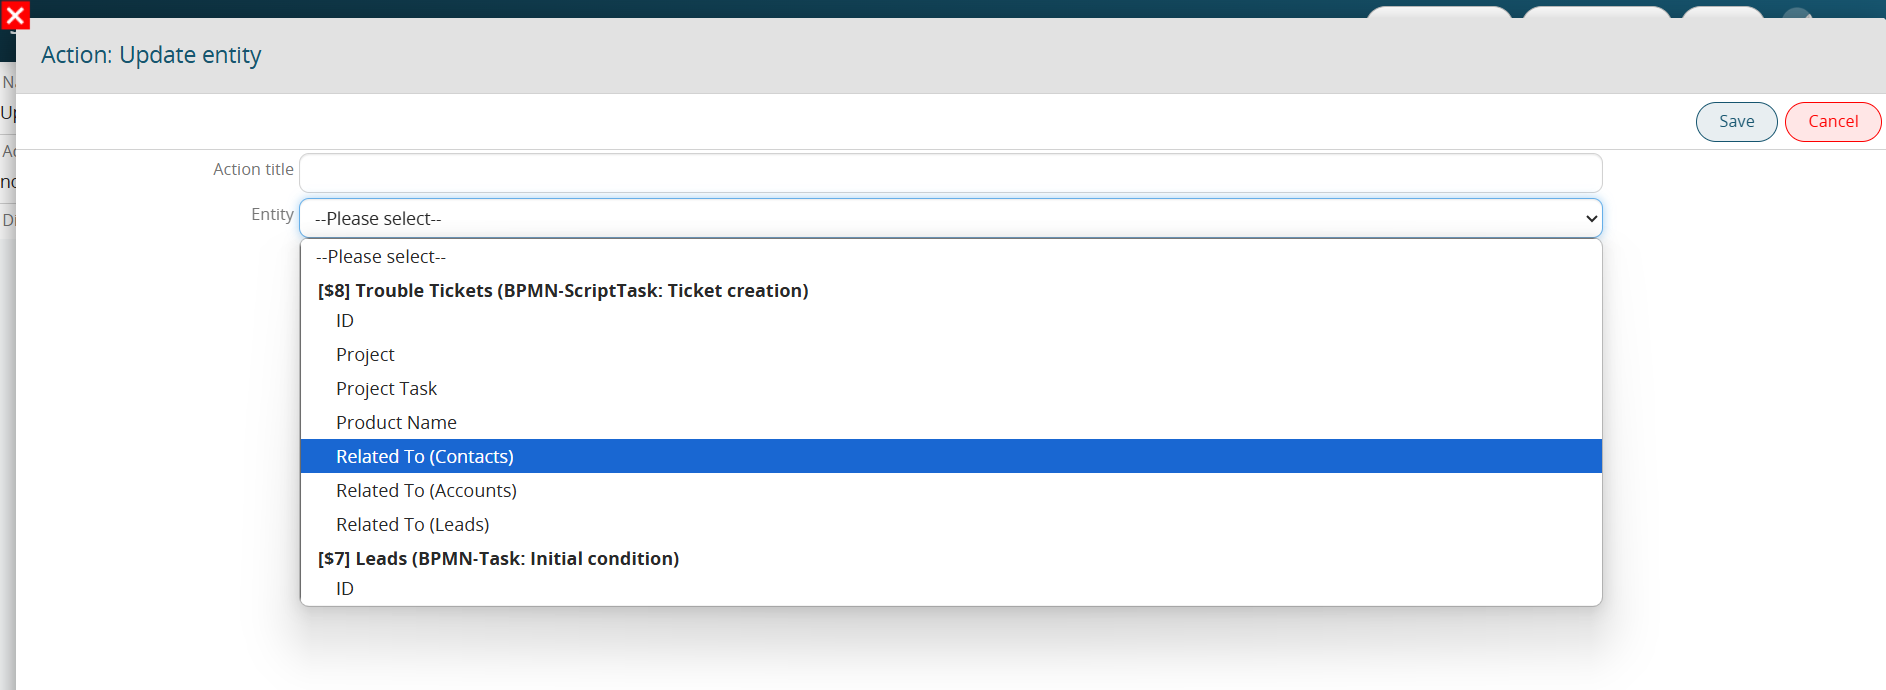
Figure 5
3.3 Delete entity
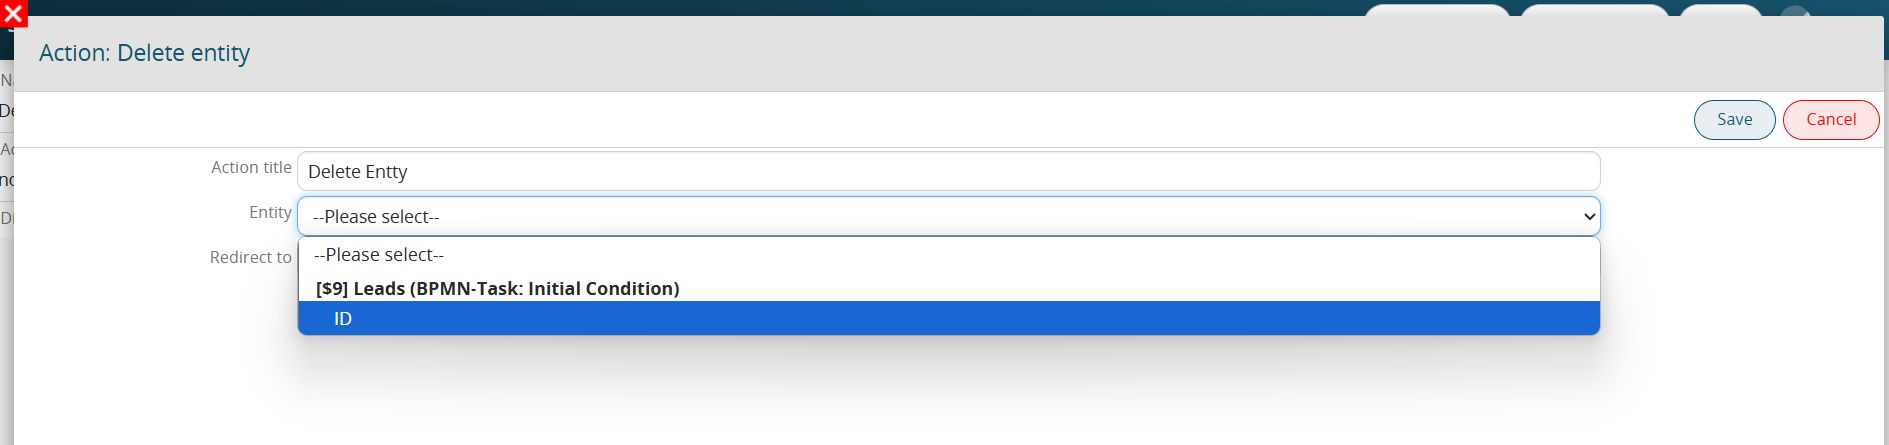
This action allows you to delete an entity (module instance) involved within the process.
PLEASE NOTE: The record deleted by this action is not completely deleted from the Data Base but is placed in the “Trash” section.
To prevent the user from encountering an error message (being on a deleted record), the redirect function is usually used to redirect the user to a new (newly created) or existing instance.
3.4 Send Notification
This action allows internal notifications to be sent to system users viewable in the “Notifications” section marked by an icon depicting a bell in the top right menu.

Figure 1
MAIN FIELDS
- Description -> represents the body of the notification; specific text can be set with static and/or dynamic data belonging to the entities involved in the process.
- Created by -> represents the user who will turn out to be the creator of the notification (sender)
- Assigned to -> represents the user who will turn out to be the recipient of the notification
- Attached to -> represents the entity (instance of a module) to which the notification will be attached
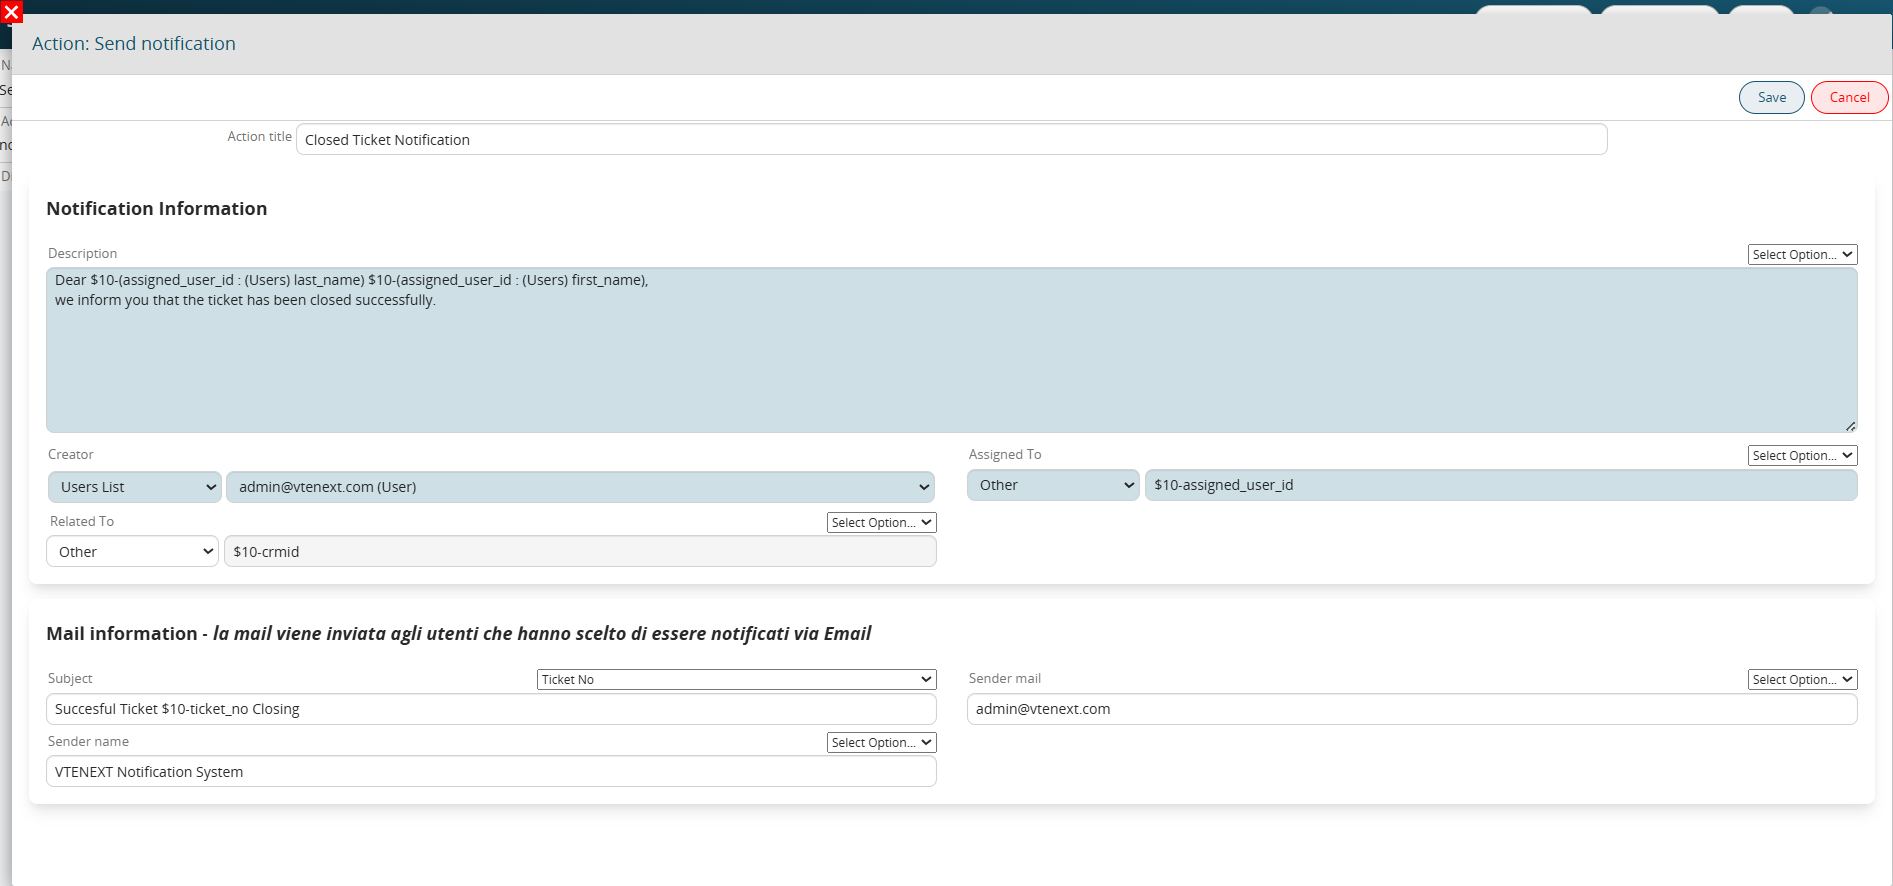
Figure 2 (click on the image for a higher graphic resolution)
Depending on the user’s preferences, notifications can be sent as real internal notifications in the mode described above or as classic emails (Figure 3)
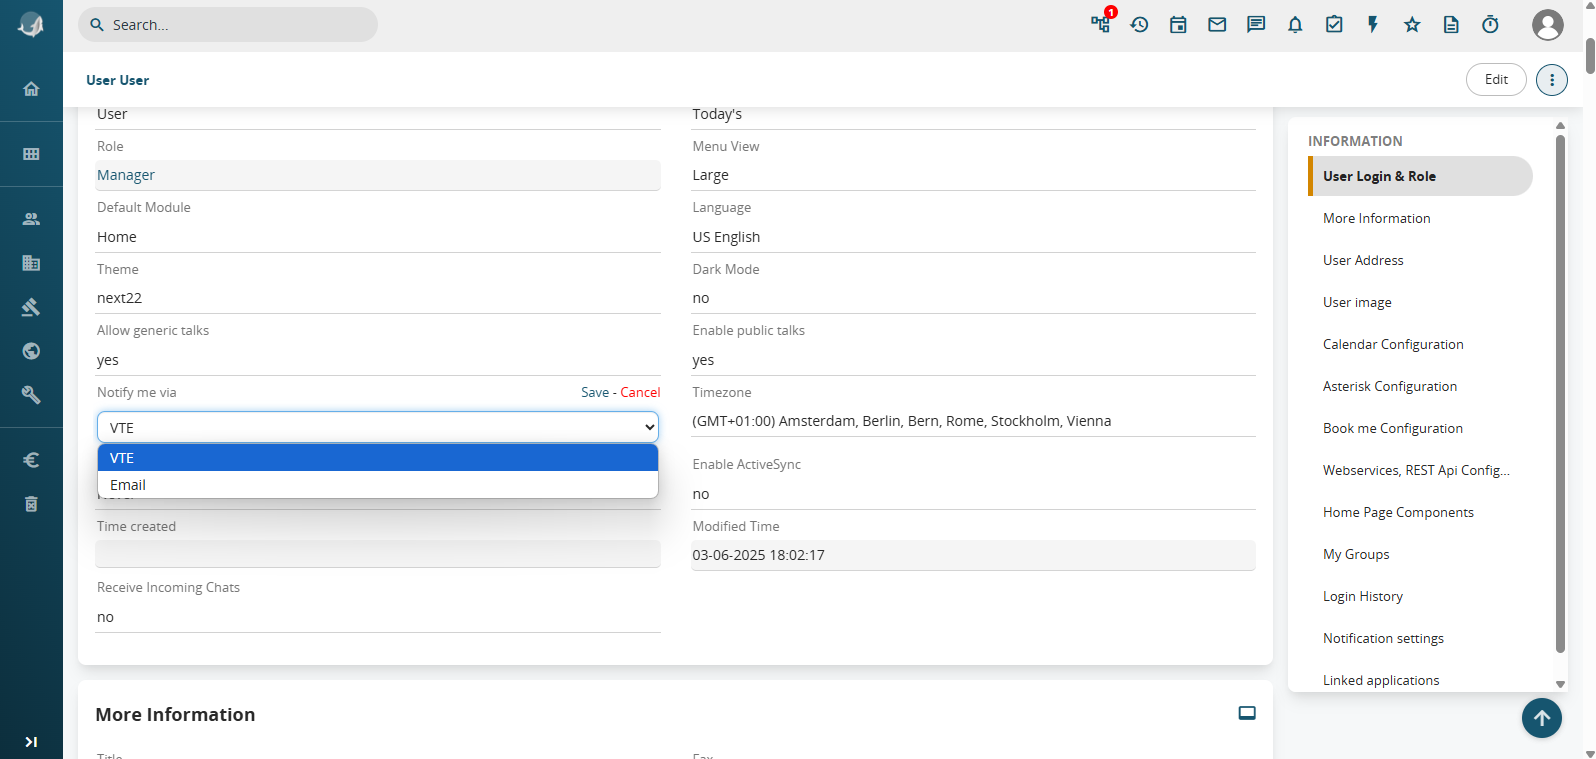
Figure 3
If the "Email" mode has been set, the following additional fields must be filled in (Figure 4)
- Subject -> represents the object that will be sent to the mail
- Sender mail -> represents the sender’s mail
- Sender name -> represents the alias relative to the sender

Figure 4
3.5 Send Email
This action allows you to send automatic emails with the possibility of attaching documents and linking the mail to an entity (standard or custom) in such a way that it remains historicized.
In the body of the email, it is possible to report on the classic static and/or dynamic values other general functions such as the current date/time, the link to the desired entity (internal for users or external for portal-side customers) (Figure 1)
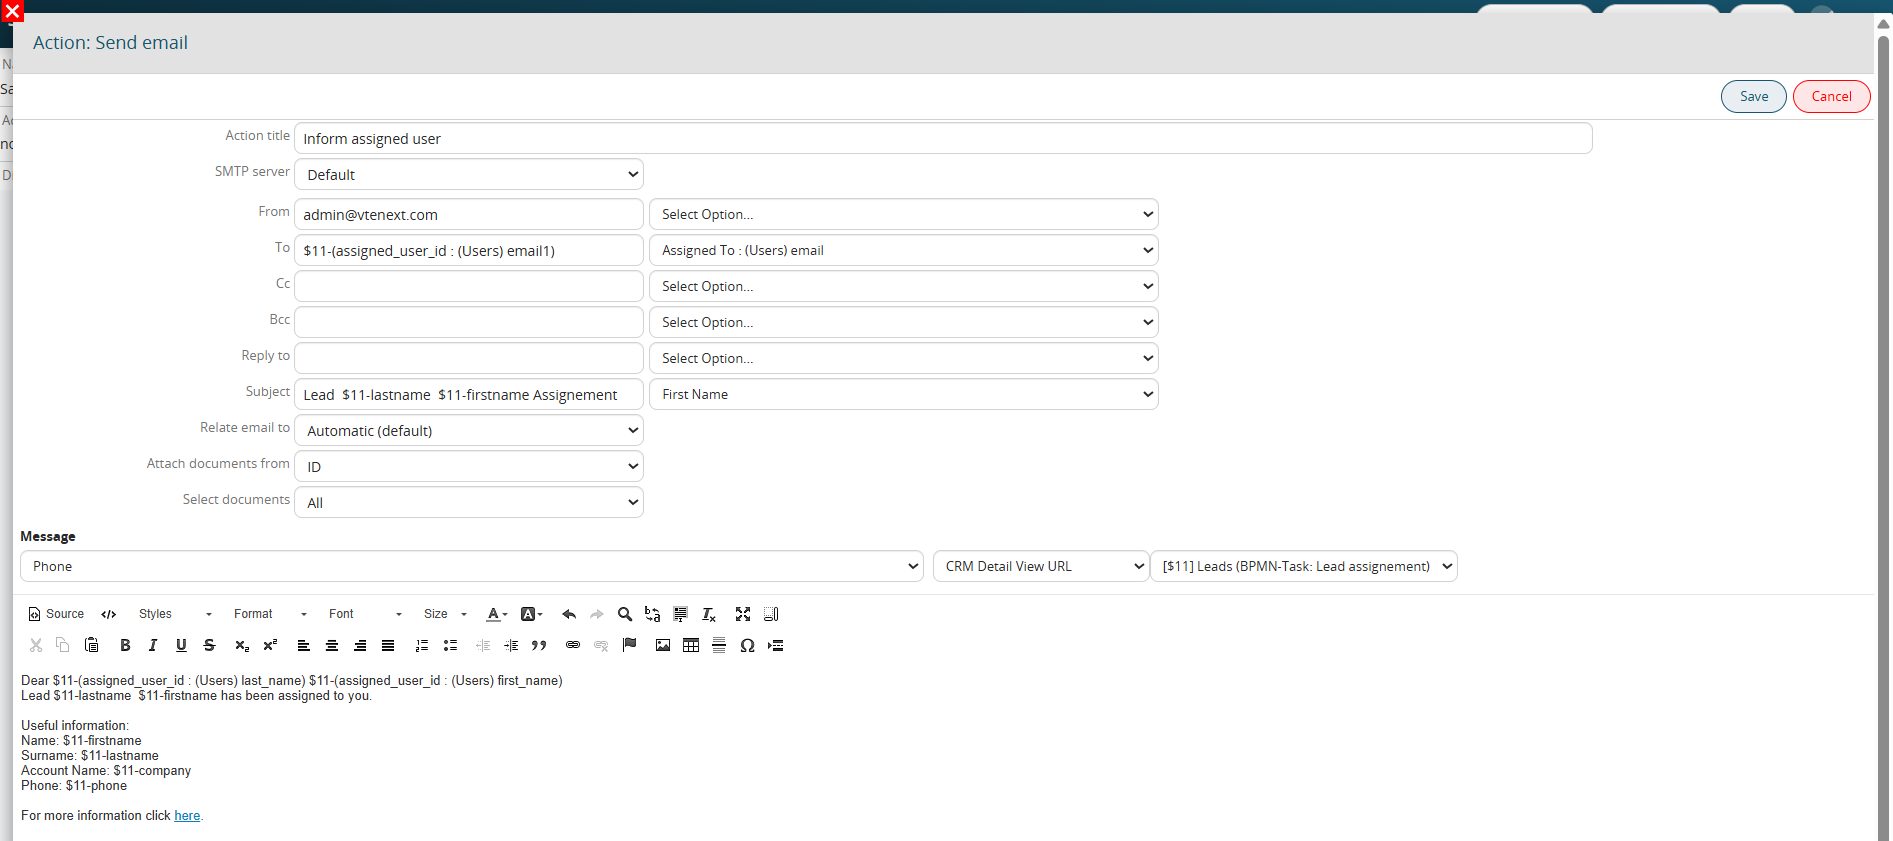
Figure 1 (click on the image for a higher graphic resolution)
MAIN FIELDS
- SMTP Serve -> from version 23.08 you can specify how to use the outgoing mail server account to be used as sender. (Figure 2)
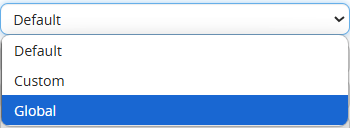
Figure 2
- Default -> in the case that in the module Messages of the user indicated there is a configured account, the system will use the server associated with it, in the case that no account is configured the system will use the server present in
Settings -> Mail Server.
- Custom -> you can configure an outbound mail account directly within the email sending action. (Figure 3)
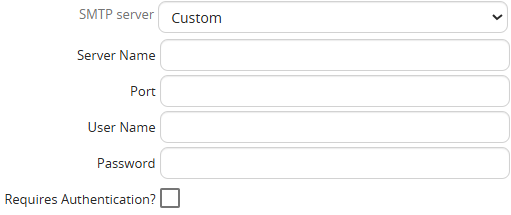
Figure 3
- Global -> the system will use only the server configured in Settings -> Mail Server.
In addition to the three modes described above, you can select one of the accounts configured in the Messages module for the currently active users on your system.
-From -> represents the sender of the mail
-To -> represents the recipient of the mail
-CC -> represents copied addresses
-CCN -> represents the addresses in hidden copy
-Reply to -> represents the address to which a possible answer to the automatic mail would be sent
-Subject -> represents the subject of the mail
-Link email to -> it is possible to indicate the entity to which to link the automatic mail.
The item "Automatic (default)" allows to associate the mail with the entity on which the process has been triggered
-Attach documents from -> you can select the entity from which to take the documents linked to it and attach them to the mail.
By clicking on "All" the system will attach ALL documents related to the entity. (Figure 4)
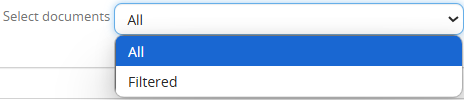
Figure 4
Ticking the "Filtered" the system will attach documents that meet the conditions inserted in the section "Conditions" (Figure 5)

Figure 5 (click on the image for a higher graphic resolution)
3.6 Send Newsletter
This action allows you to send a newsletter directly from the process, linked to a static or dynamic campaign defined in the "Campaign" field.
KEY FIELDS
- Campaign -> defines the campaign associated with the newsletter to be sent.
Depending on the scenario, you can select one of the following options:
- Create new every time -> the system creates a new campaign each time the process runs.
- Create and then reuse the same campaign -> the system creates a campaign only the first time the process runs, then reuses that same campaign for subsequent runs.
- Existing -> allows you to select an existing campaign.
- From process -> allows you to select a record from the Campaigns module involved in the process.
- Sender Name -> the alias for the newsletter sender.
- Sender Address -> the email address of the newsletter sender.
- Recipients -> allows you to select static records or records from entities directly involved in the processes.
Note: Records from the Accounts, Contacts, Targets, and Leads modules can be selected.
- Subject -> the subject line of the newsletter.
- Email Template -> the email template used as the newsletter body.
- Body -> Using the editor, you can modify the body by inserting static/dynamic text or HTML/CSS code.
As of version 26.04, the following configurable fields have been added:
- Language -> allows you to specify a reference language.
- Reply To -> allows you to enter an email address to which any replies to the newsletter sender will be directed.
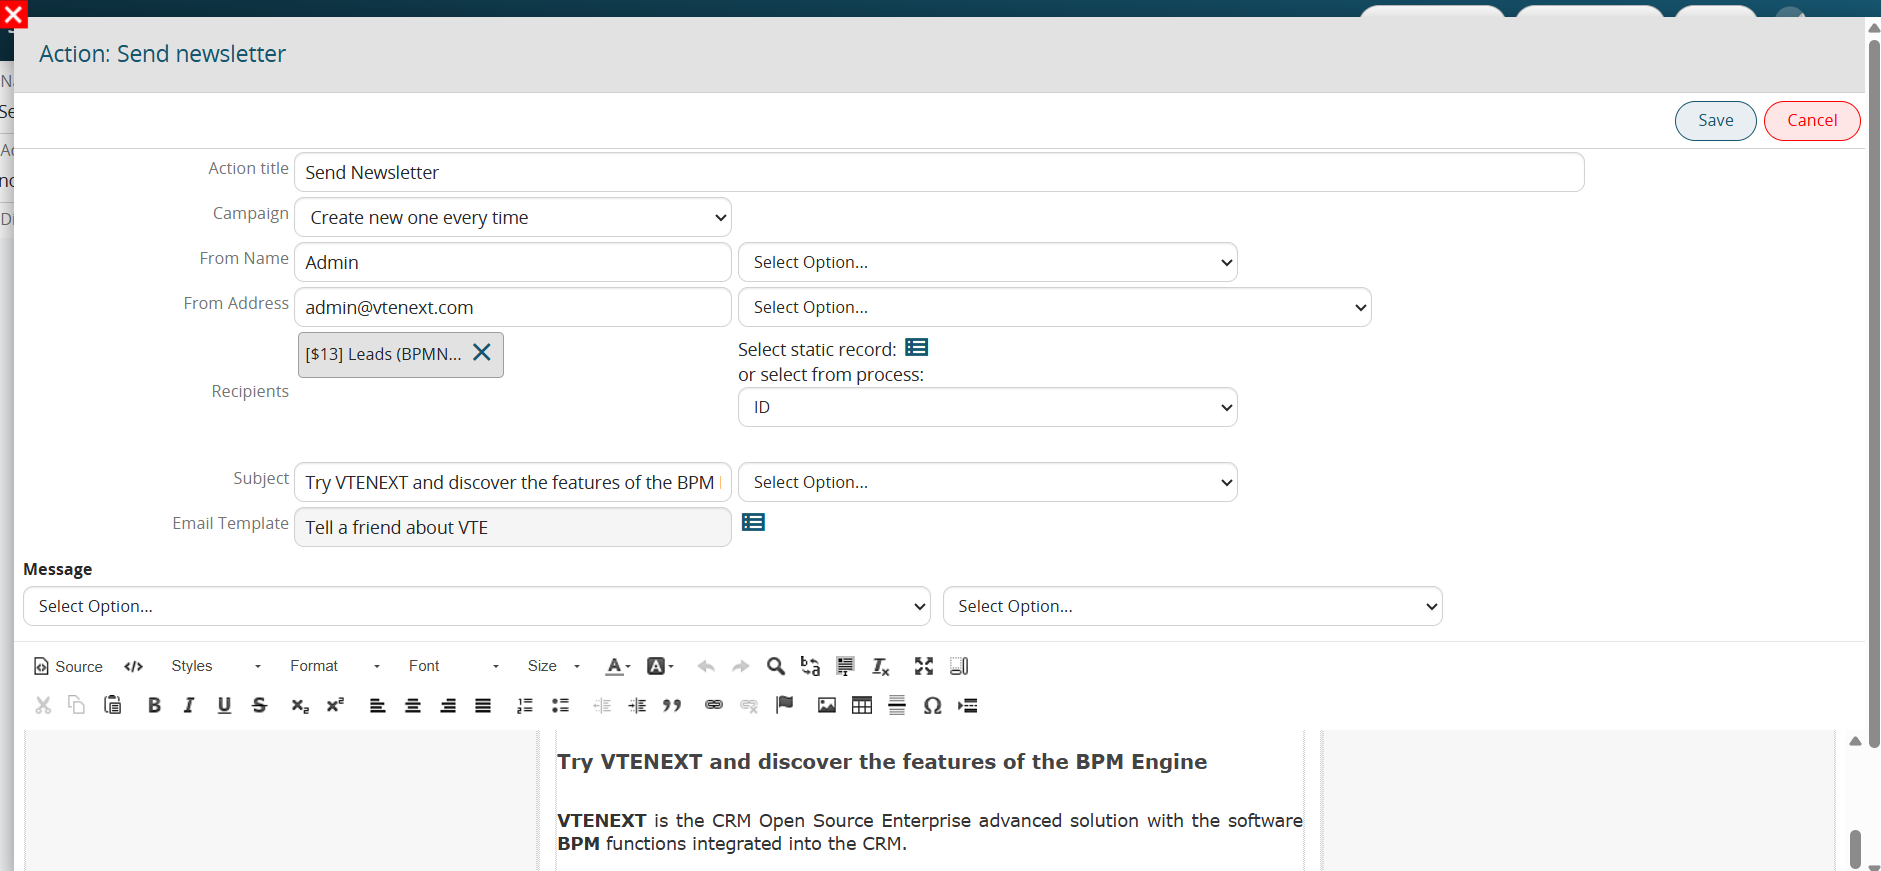
Figure 1
3.7 Create PDF
This action allows you to create a PDF document using a template defined in the "PDFmaker" section.
MAIN FIELDS
- Entity PDF document -> allows to select an entity on which to generate the PDF.
N.B: it is not possible to select an entity (instance of a module) if there is no PDF Template related to it
- Title PDF -> indicates the title of the PDF
- Relate PDF to -> represents the id of the entity involved in the process to which you want to link the PDF
- Language PDF template -> represents the language of the PDF Template (Italian or English)
- Assigned to -> represents the assigned user of the PDF
- PDF Template -> allows to select one of the templates available for the selected entity.
- Documents folder -> allows to select the folder where you want to save the PDF
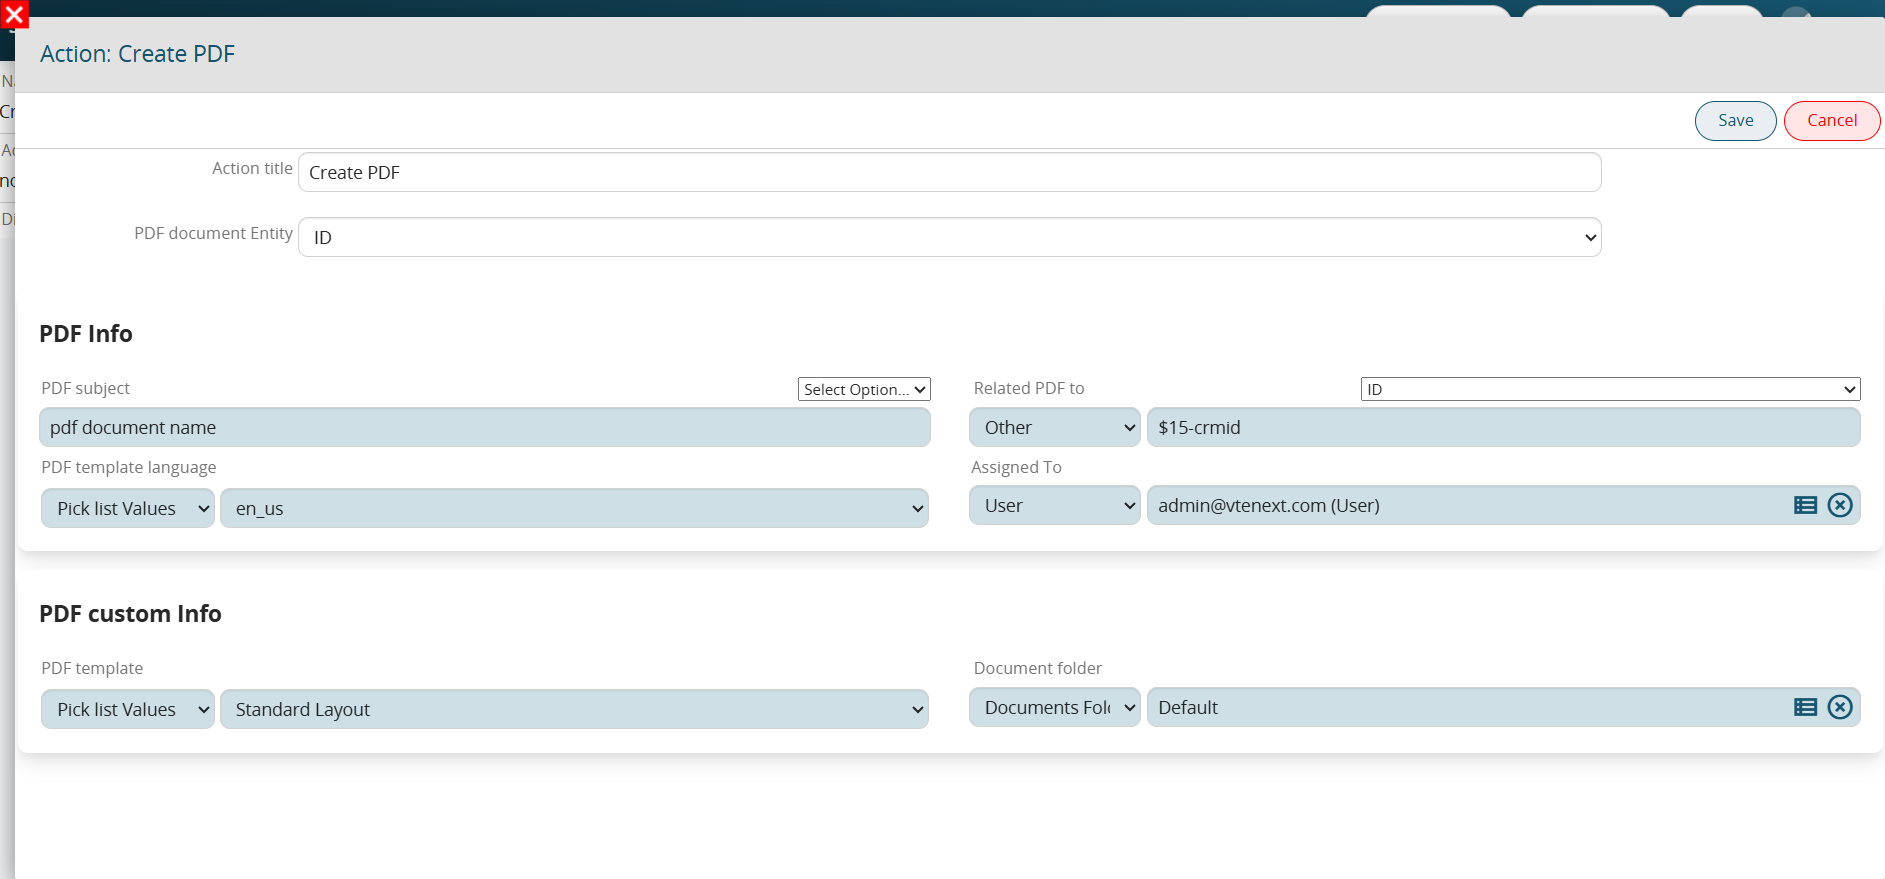
Figure 1
3.8 Reset Dynamic form
As of version 25.02.2, it has been renamed "Reset dynamic form."
This action relates to the use of the Process Helper and allows you to clear the values entered into the dynamic form's fields during the filling-out process.
It is primarily used to enable the dynamic form to be filled out again.
By default, any default values established prior to the actual completion of the dynamic form will be restored. (Figure 1)

Figure 1
However, to completely clear the contents of the fields in the dynamic form—ignoring any default values entered prior to actually filling it out—you must check the “Clear field” box. (Figure 2)

Figure 2
USAGE EXAMPLE
To better understand how it works, an example is provided below showing the use of a dynamic form reset action to handle the potential re-entry of the "Service Date" field in a dynamic form.
The field in question has today's date as its default value. (Figure 3)
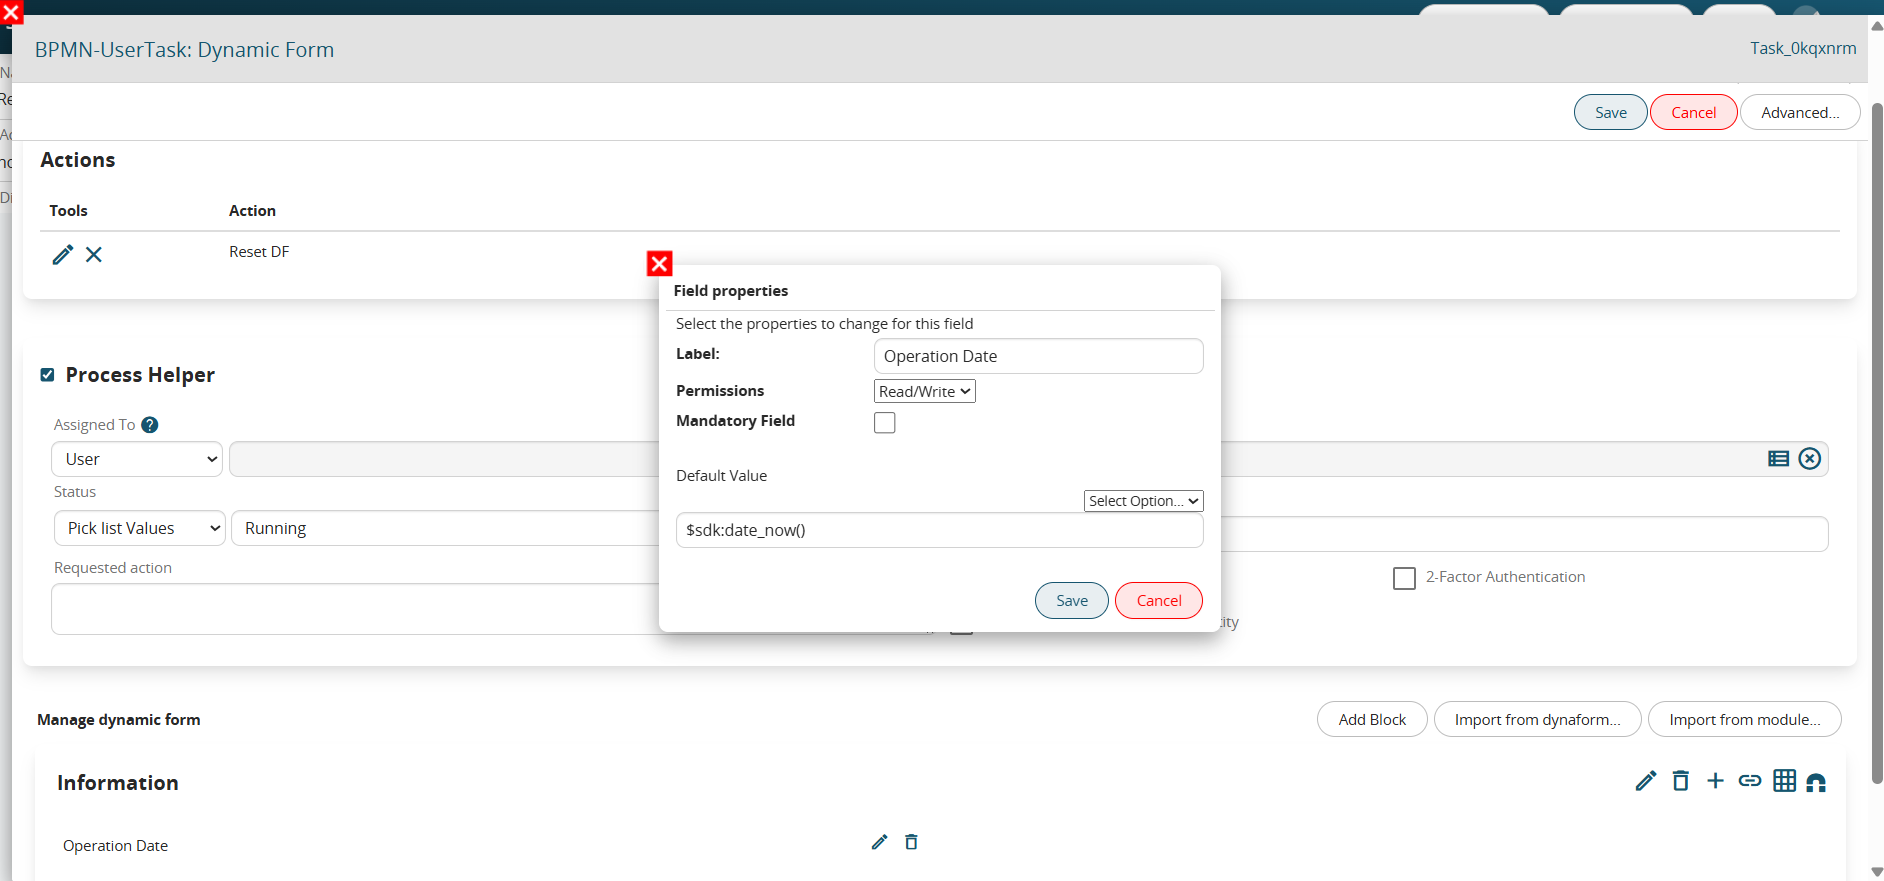
Figure 3
When filling out the dynamic form, the user can modify the field content by manually entering the actual intervention date if it differs from today's date.
If the dynamic form needs to be refilled for any reason, configuring a "reset dynamic form" action (BEFORE configuring the process helper) without selecting the "Clear field" option will cause the system to remove any intervention date entered by the user and revert to today's date.
Conversely, configuring a "reset dynamic form" action (BEFORE configuring the process helper) while selecting the "Clear field" option will cause the system to remove both any user-entered intervention date and the default date (today's date), effectively presenting the user with an empty field.
3.9 Cycle Rows
This action allows you to cycle and then dynamically manage the rows of a table field or a product block.
NOTE: If there is no product block or table field in the main entity involved in the process and its related modules, the action will not be visible in the list of actions selectable via the "New Action" button.
For details on how to use the fields of the product block or the cycled table field within processes (e.g. value "Current") we recommend you refer to chapter 10.1 of the process manual.
For each cycled row, one of the following operations can be carried out:
Send email
Allows you to send an email for each row that meets the conditions set in the "field conditions" section. (Figure 1)
To consider all the rows, just leave that section unfilled.
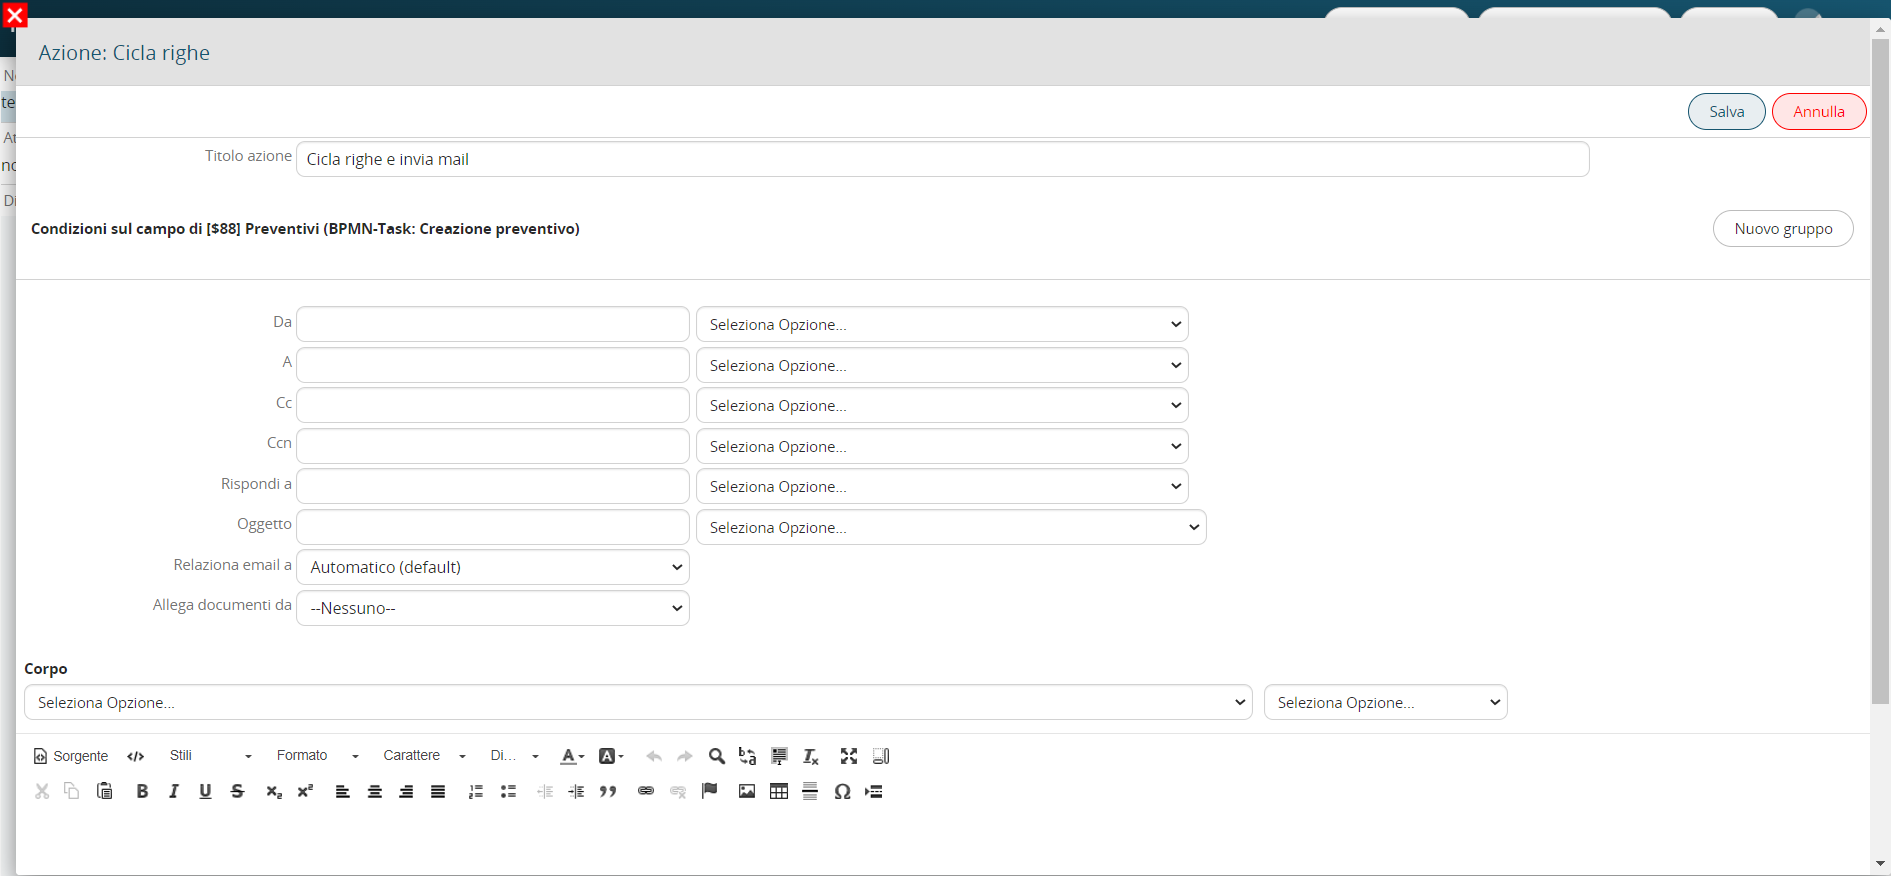
Figure 1
Create entity
Allows you to create an entity of any module (standard or custom) for each row that meets the conditions set in the "Field conditions" section. (Figure 2)
To consider all the rows, just leave that section unfilled.
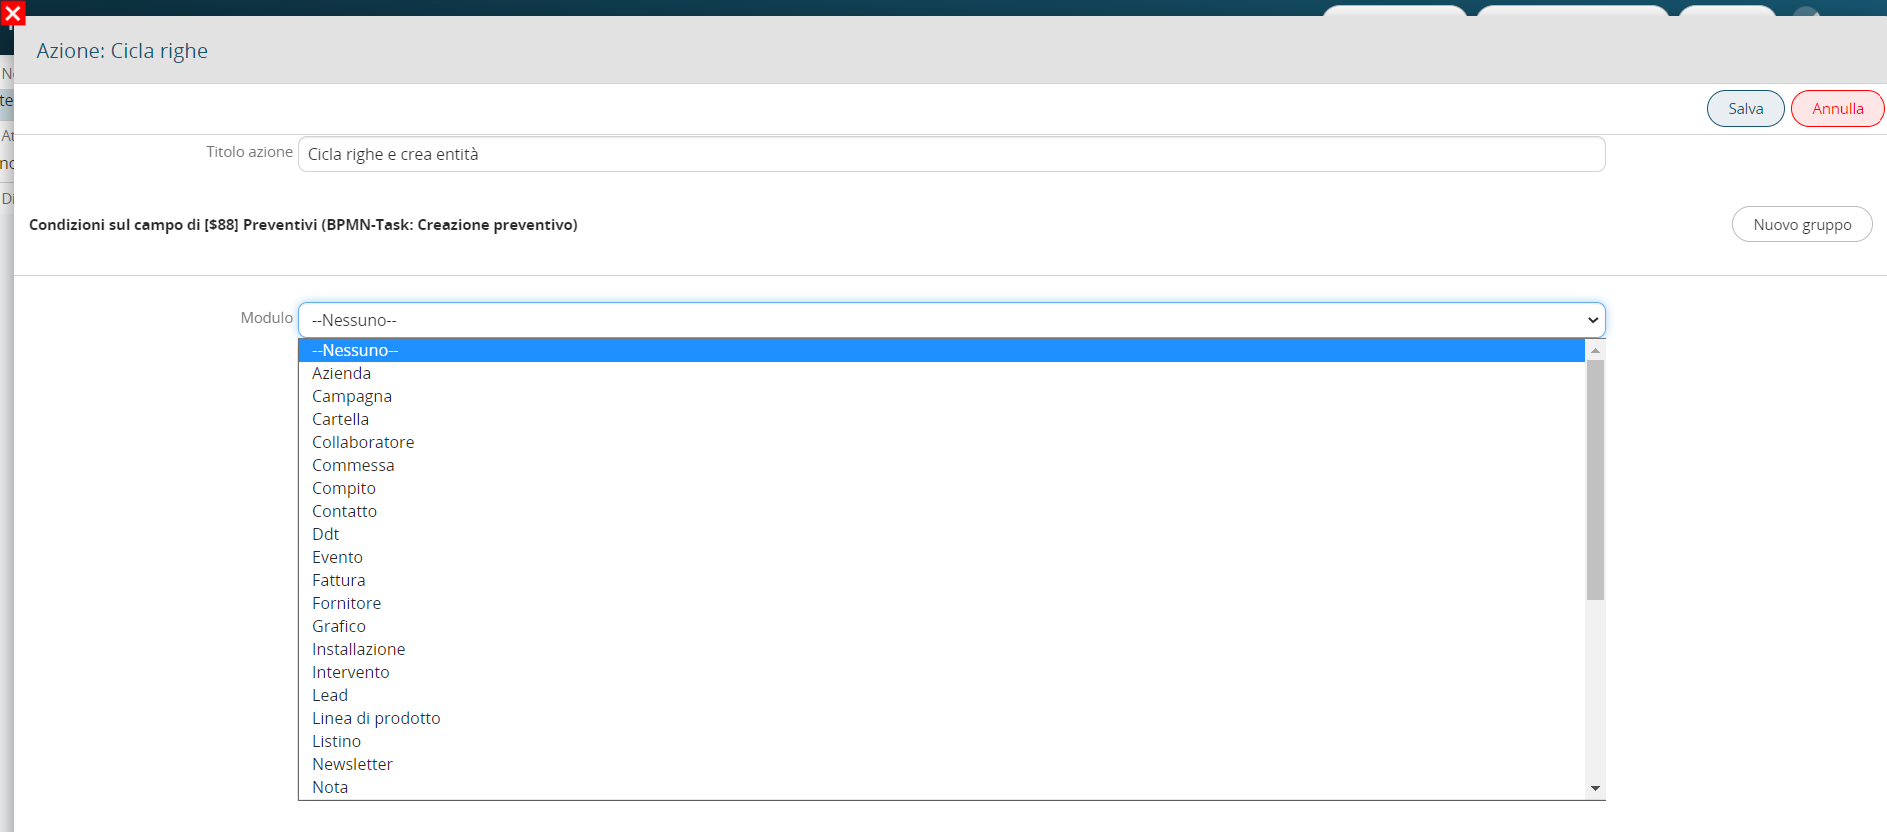
Figure 2
Update entity
Allows you to update an entity involved in the process for each row that meets the conditions set in the "Field conditions" section. (Figure 3)
To consider all the rows, just leave that section unfilled.
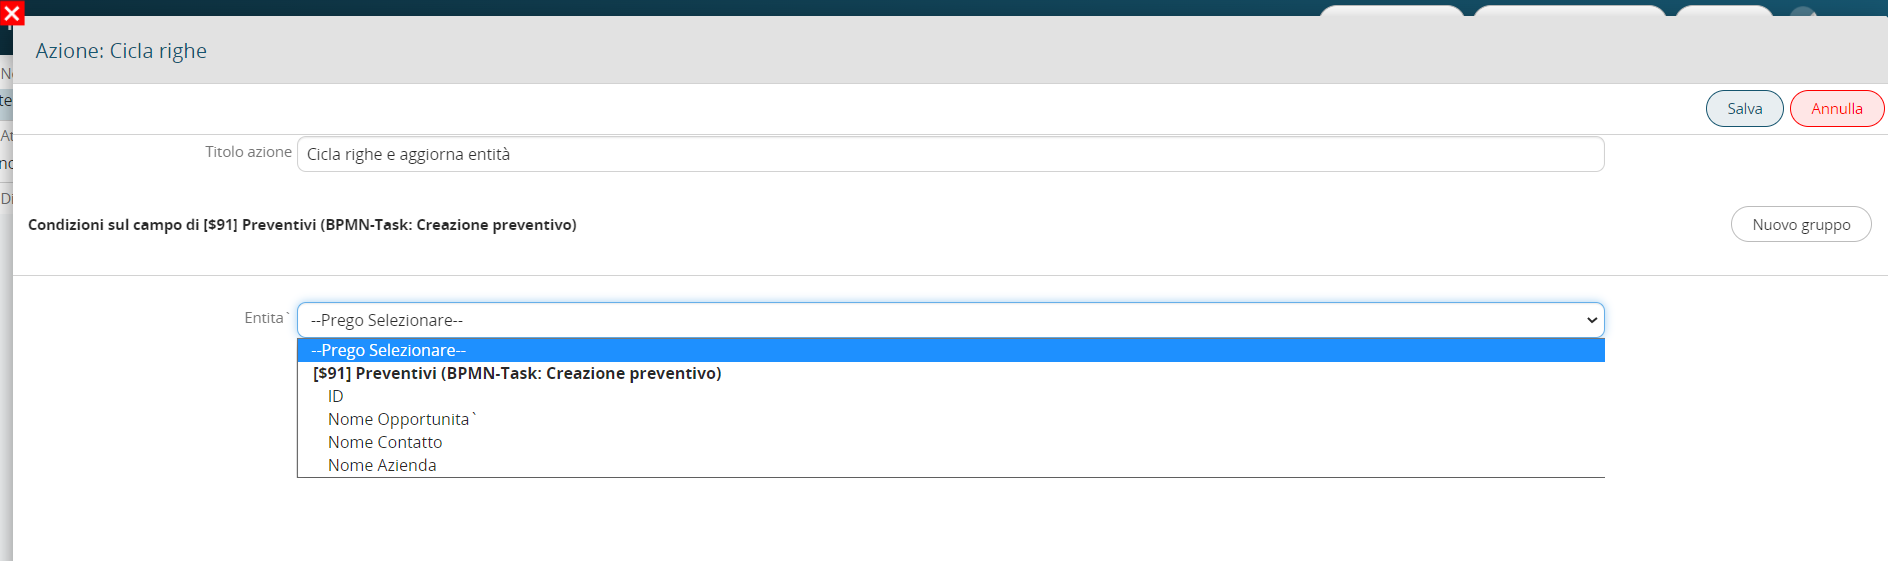
Figure 3
Send notification
Allows you to send a notification for each row that meets the conditions set in the "Field conditions" section. (Figure 4)
To consider all the rows, just leave that section unfilled.
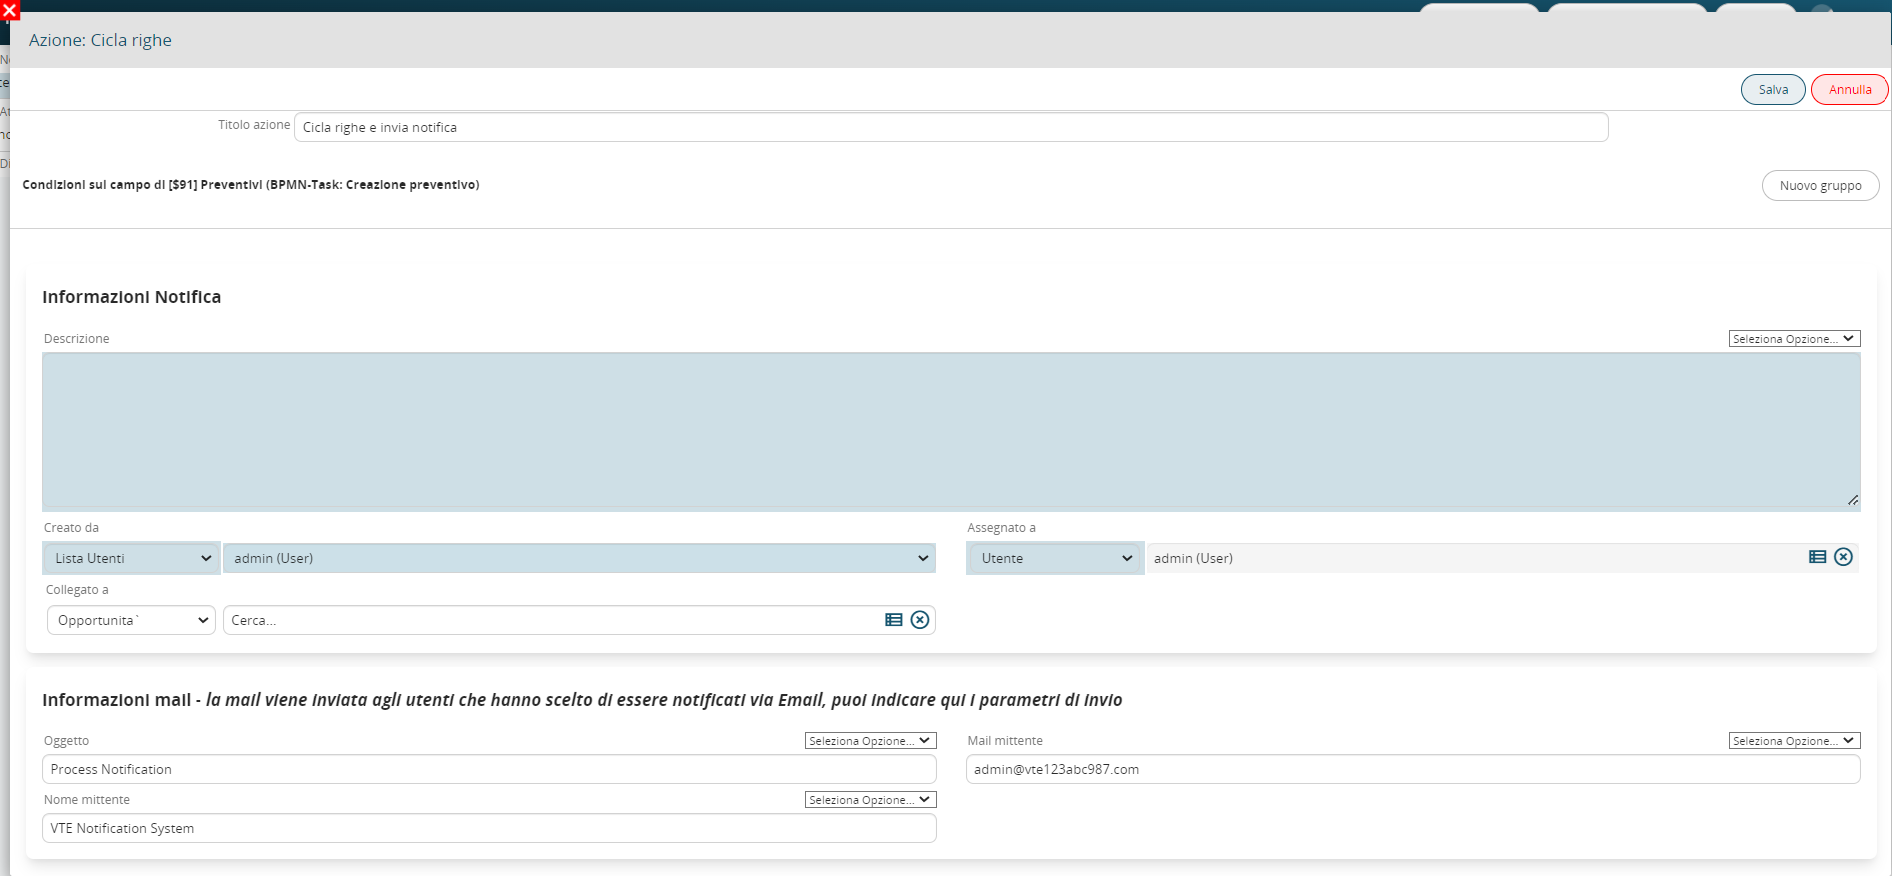
Figure 4
Insert table row
It allows to insert a row in a table field present in the entities involved in processes or in the form of process helpers for each row that meets the conditions set in the "Field conditions" section. (Figures 5, 6 and 7)
To consider all the rows, just leave that section unfilled.
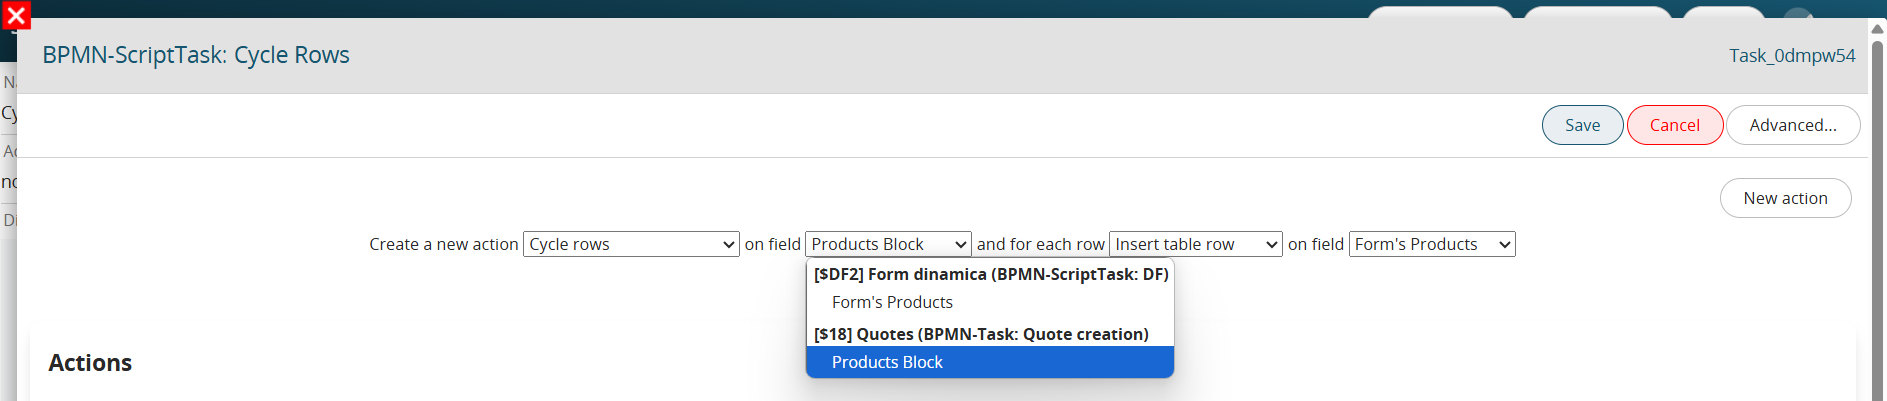
Figure 5
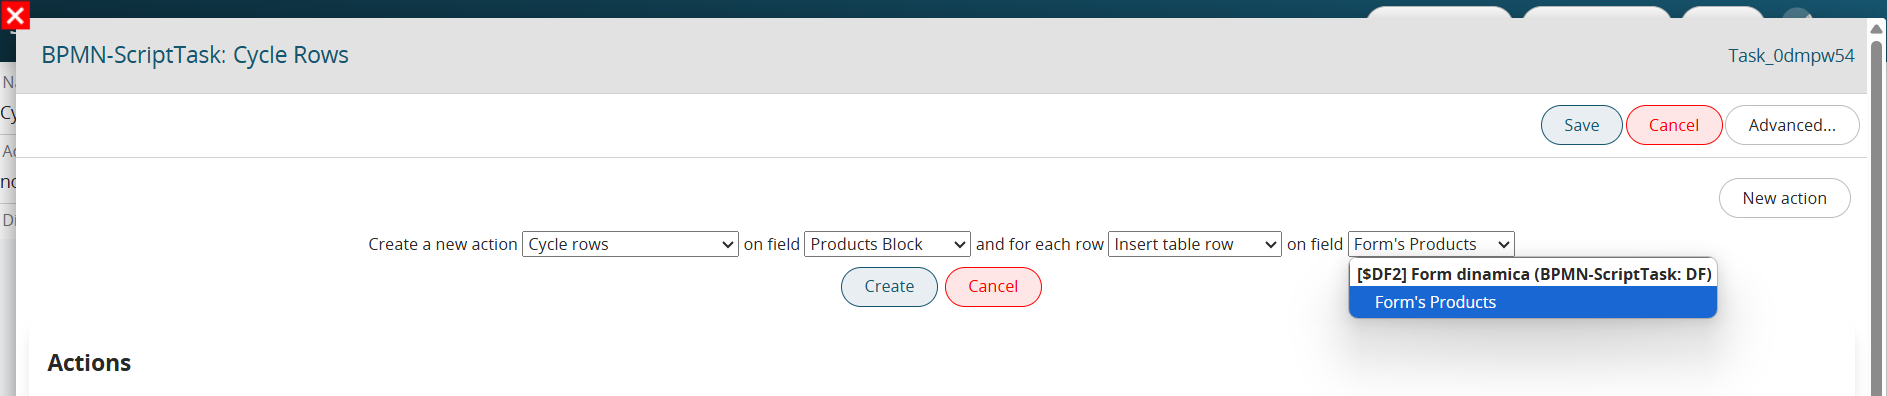
Figure 6
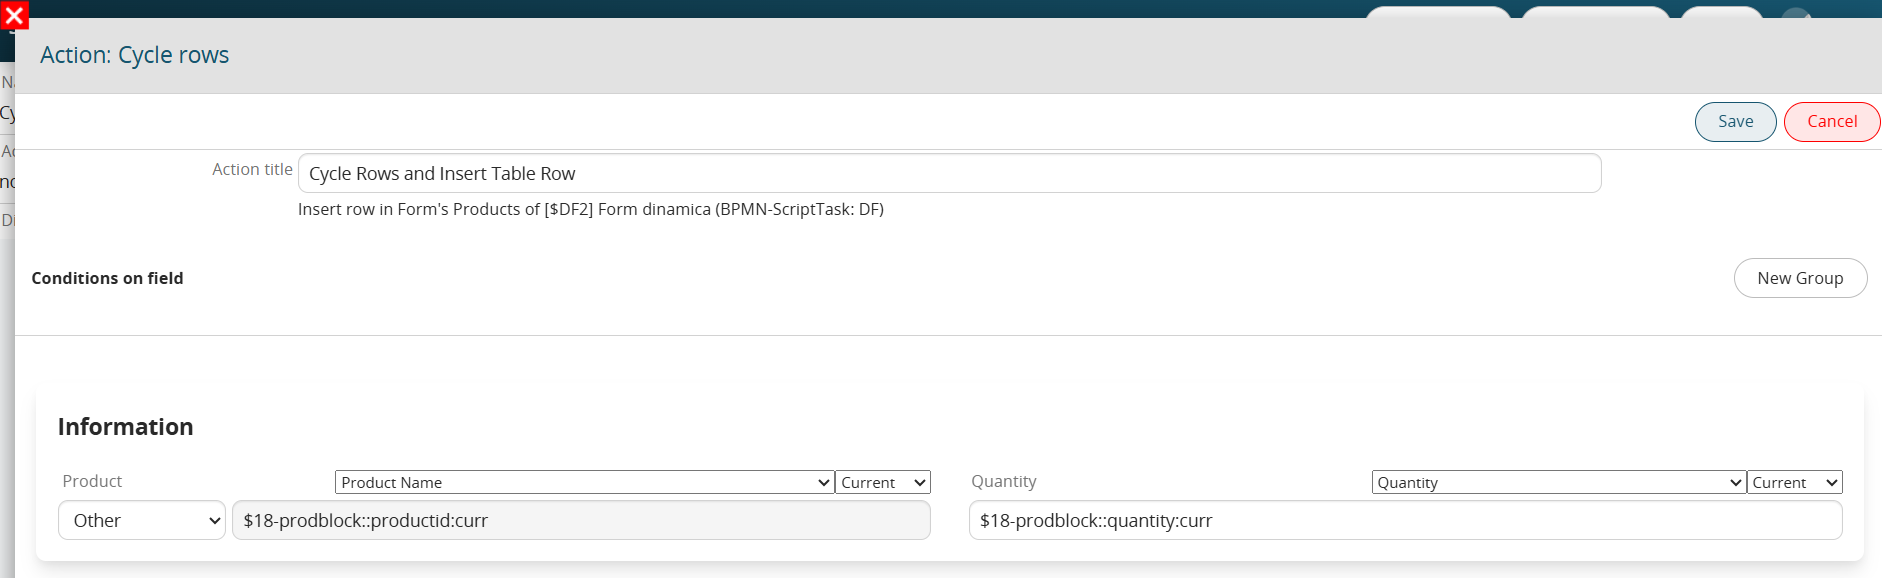
Figure 7
Insert product row
Insert a row in a product block present in the entities involved in the processes for each row that meets the conditions set in the "Field conditions" section. (Figures 8, 9 and 10)
To consider all the rows, just leave that section unfilled.
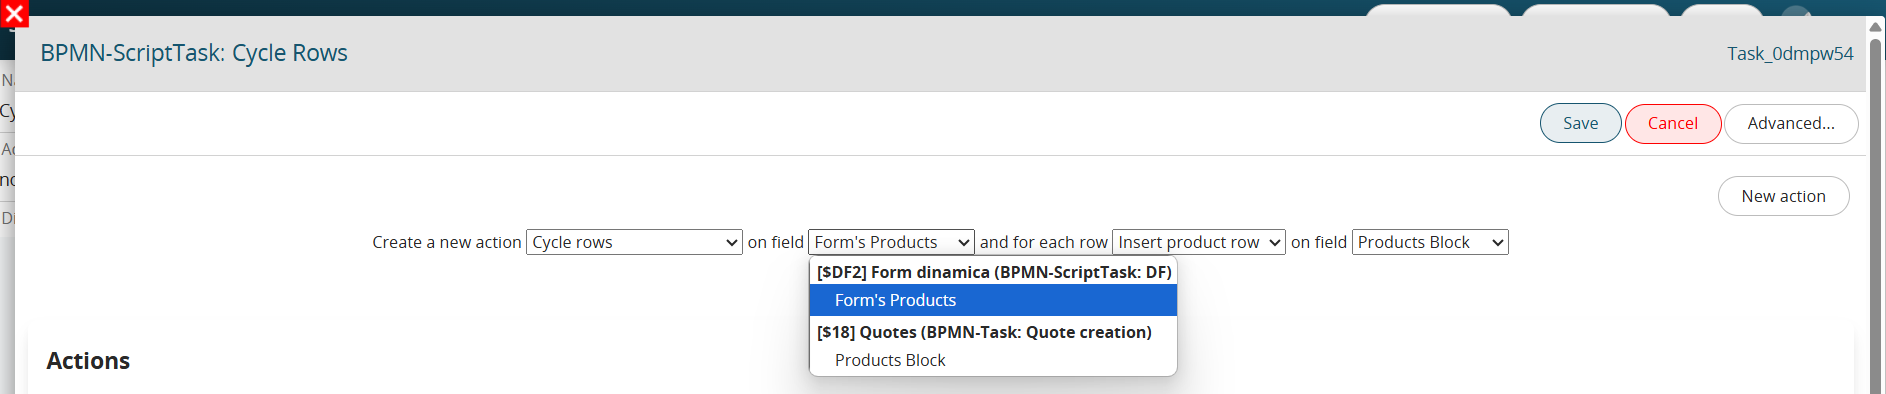
Figure 8
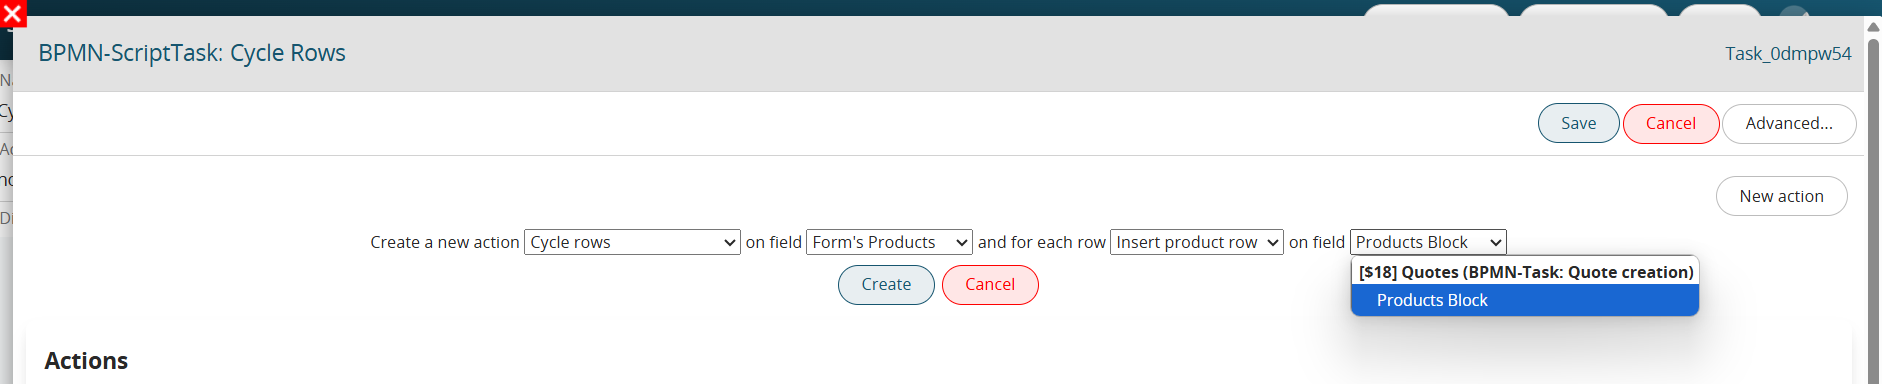
Figure 9
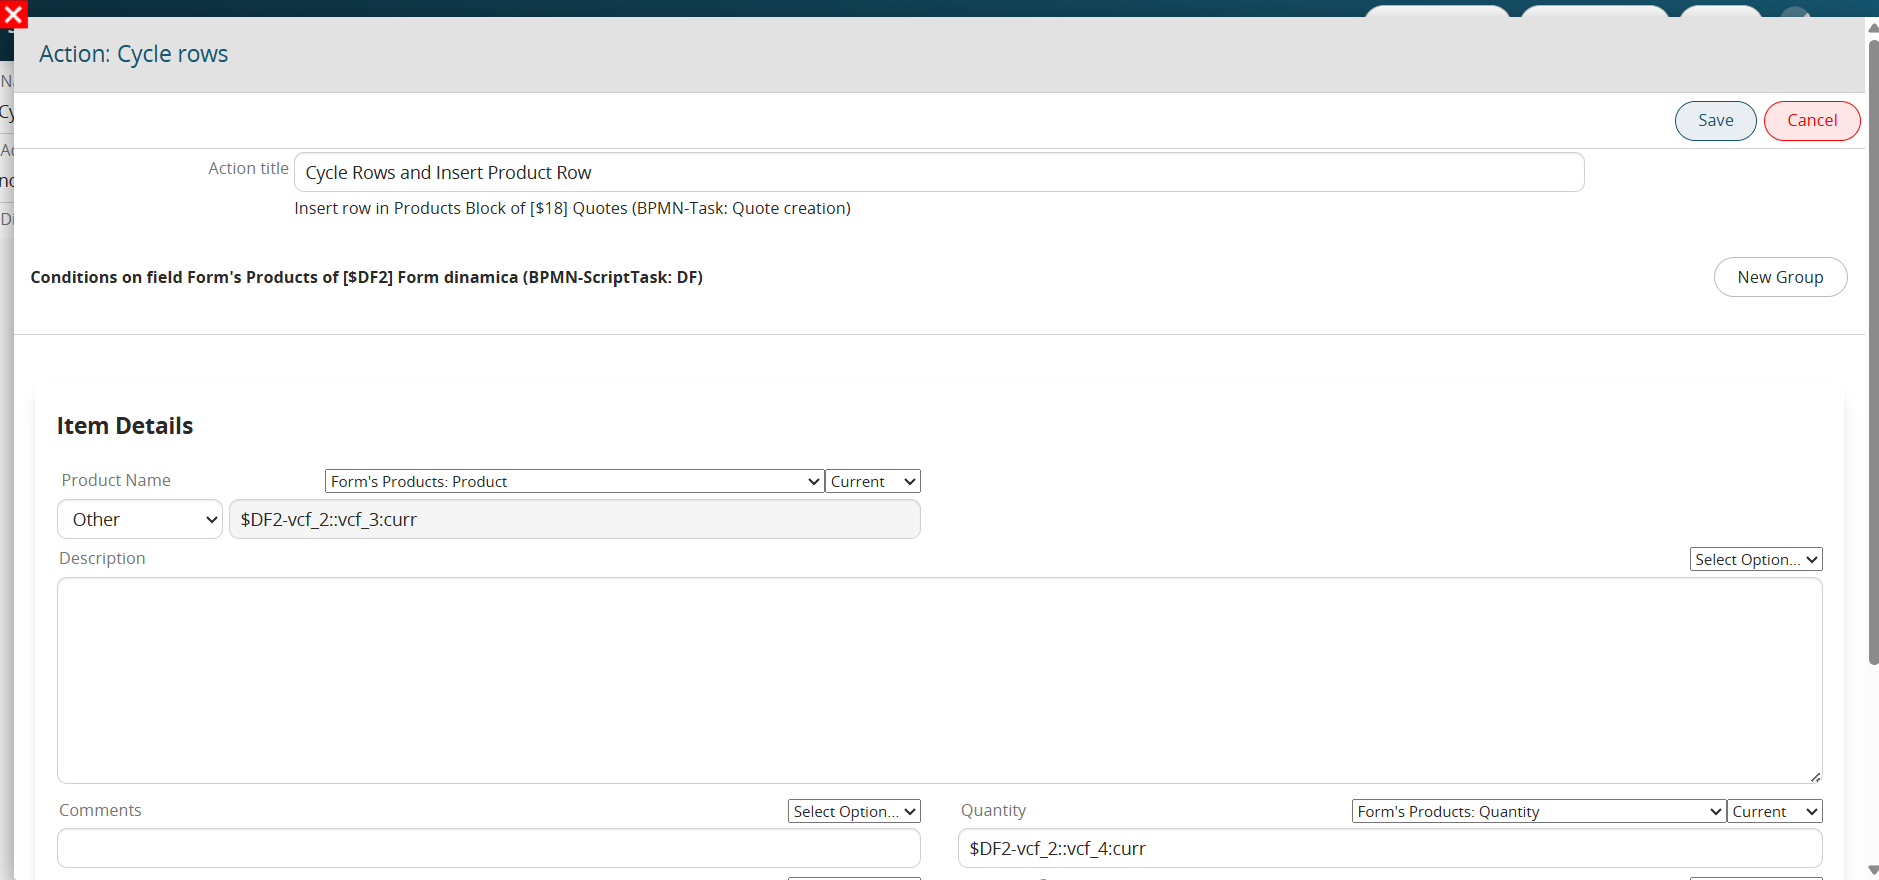
Figure 10
Delete product row
Allows you to delete a row in a product block present in the entities involved in the processes for each row that meets the conditions set in the "Field conditions" section. (Figure 11)
To consider all the rows, just leave that section unfilled.
NB: This option will only be present if you are cycling the rows of a block products.
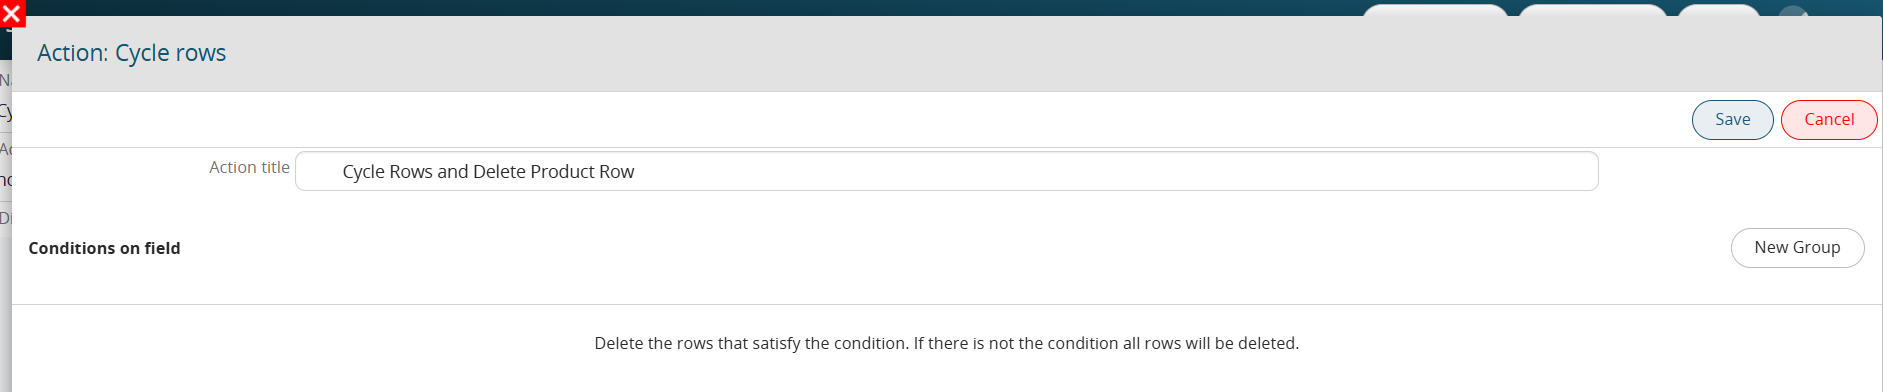 Figure 11
Delete table row
It allows to delete a row in a table field present in the entities involved in processes or in the forms of process helpers for each row that meets the conditions set in the "Conditions on the field" section. To consider all the rows, just leave that section unfilled. (Figure 12)
NB: This option will only be present if you are cycling the rows of a table field.
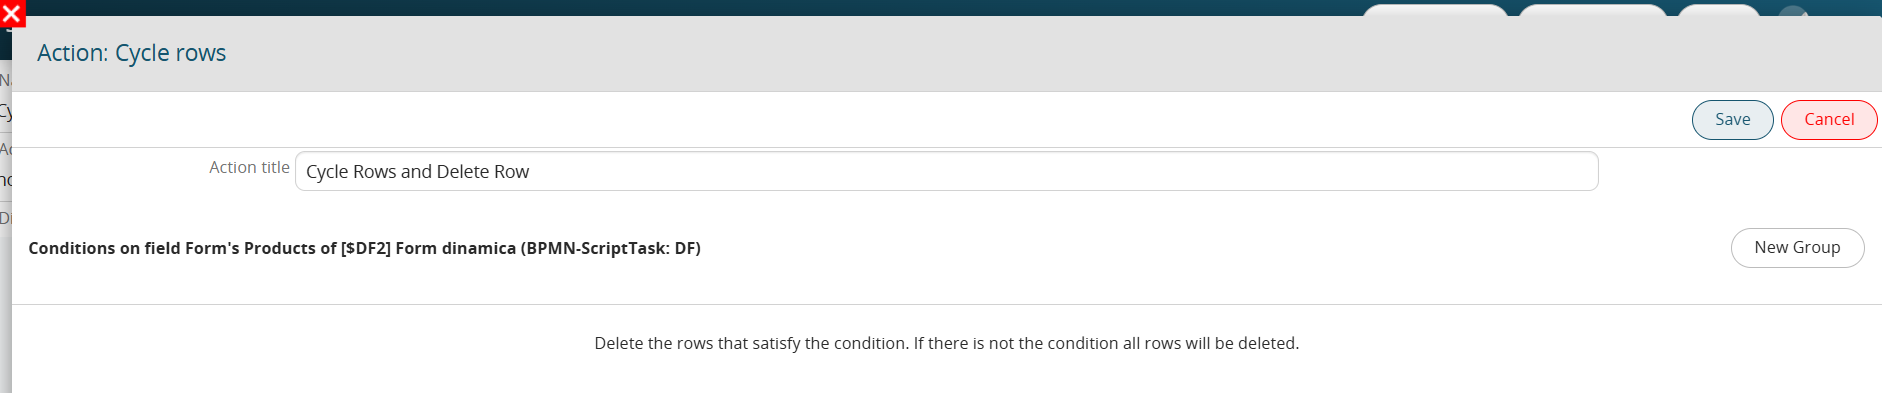
Figure 12
Function SDK
It allows to execute an SDK function of type Action for each row that meets the conditions set in the "Field conditions" section. (Figure 13 and 14)
N.B: this feature is only available from version 25.02 onwards.

Figure 13
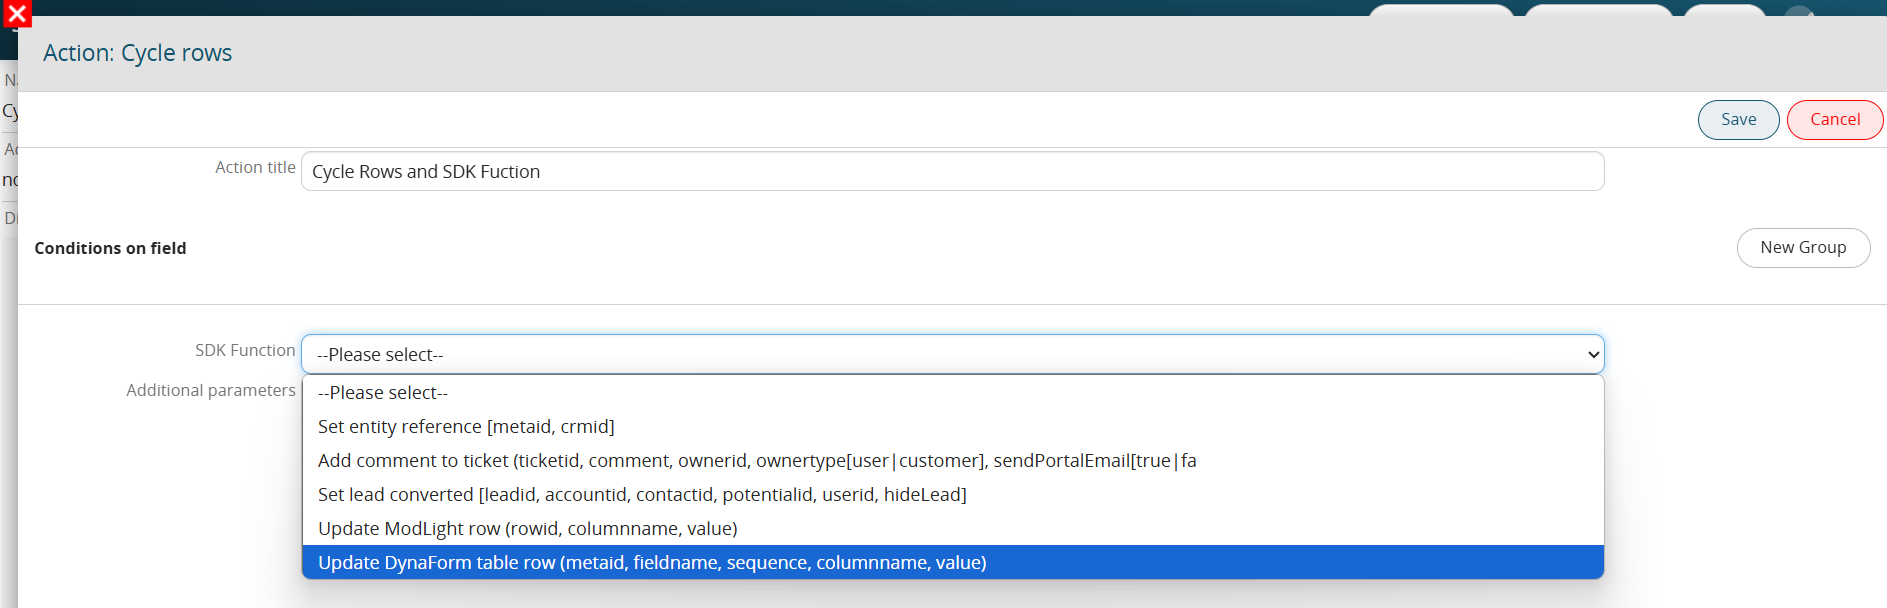
Figure 14
3.10 Reset Conditional Fields
This action refers to the use of process-side conditional fields.
In fact, it is possible to set conditional fields on the selected entity (involved in the process) or based on the Dynamic Forms present in the process.
In the case of conditional fields on the entity, these prevail over administrator-set conditional fields.
The latter are disabled until the end of the process or an action task "Reset conditional fields". (Figure 1)
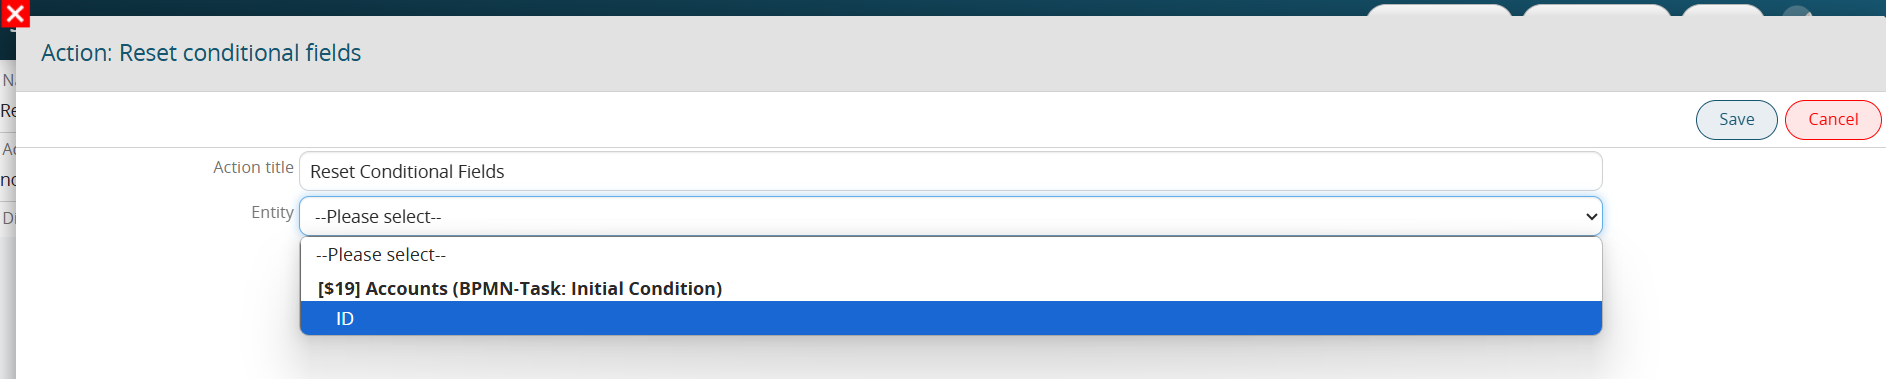 Figure 1
3.11 Link Entities and Link Static Entities
LINK ENTITIES
This action allows to relate between them 2 dynamic entities that present a relation N - N.
The 2 entities do not present a field related to each other, but the relation to N. (Figure 1)
 Figure 1
LINK STATIC ENTITIES
This action makes it possible to relate one or more static entities among those proposed to a dynamic process entity.
It is useful for example to relate entities common to more than one case of the flow itself, e.g. Report the same document (privacy statement, checklist, etc.) (Figure 2)
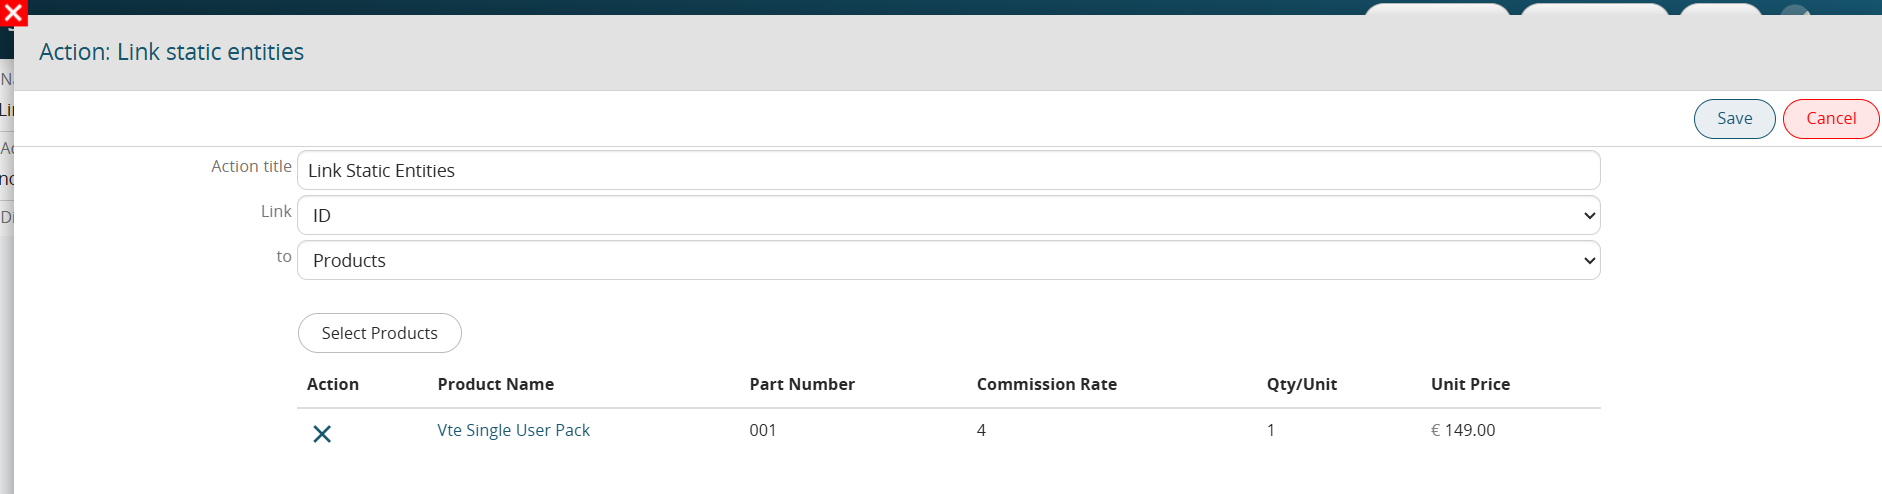
Figure 2
3.12 Transfer Relations
This action allows to transfer/copy related entities from one entity to another in the process.
In the case of relationship 1 - N records will be transferred, while in the case of relationship N - N records will be copied.
This action is useful in entity conversion flows where the original entity is converted to another and therefore all entities related to the old one can be transferred/copied into the new one. (Figure 1)
Ex. In a process of conversion from lead to contact/company all the entities that were linked to the old lead can be transferred/copied to the new contact/company.
Finally you can delete the lead without losing therefore all the actions that were connected to it.
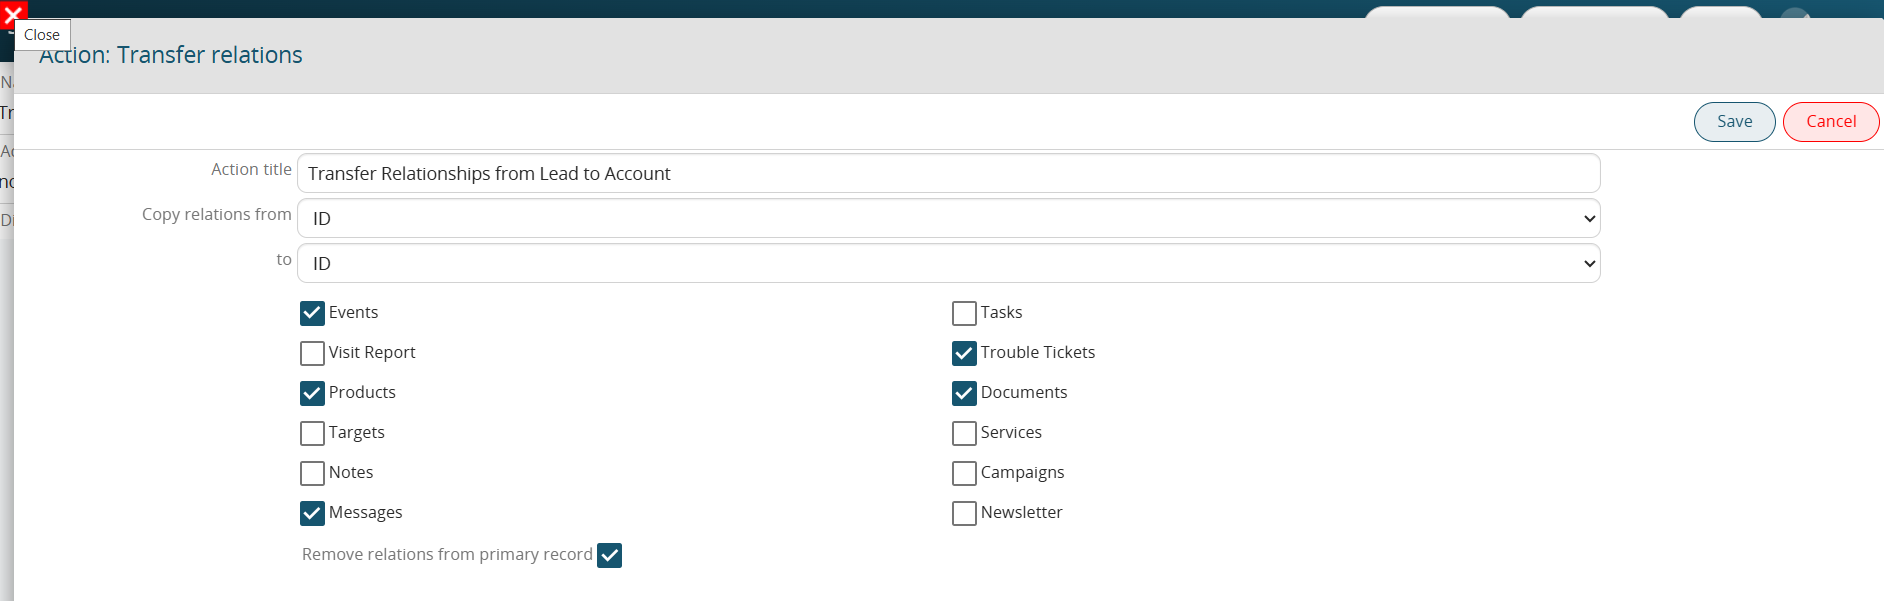
Figure 1
3.13 Insert Table Row and Insert Product Row
INSERT TABLE ROW
This action allows you to insert rows in a table field (Figure 1 and 2)
NOTE: if there is no table field in the main entity involved in the process and its related module, the action will not be visible among the list of actions selectable via the "New Action" button.
The values entered can be static and/or dynamic (taken from the entities involved in the process).
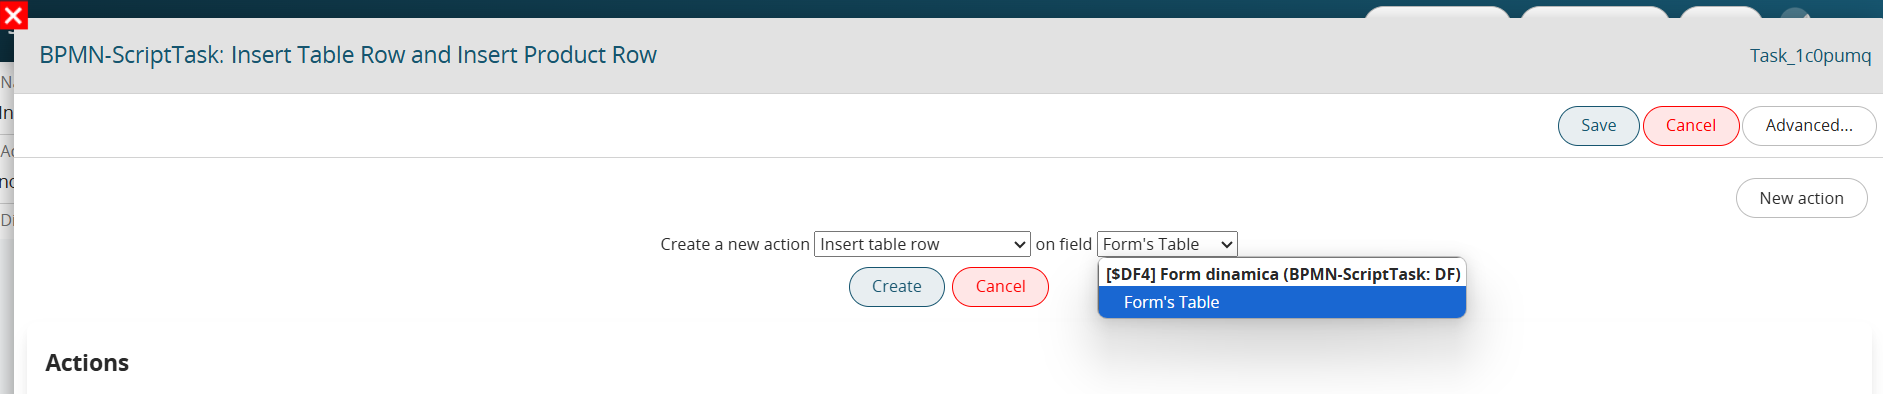
Figure 1
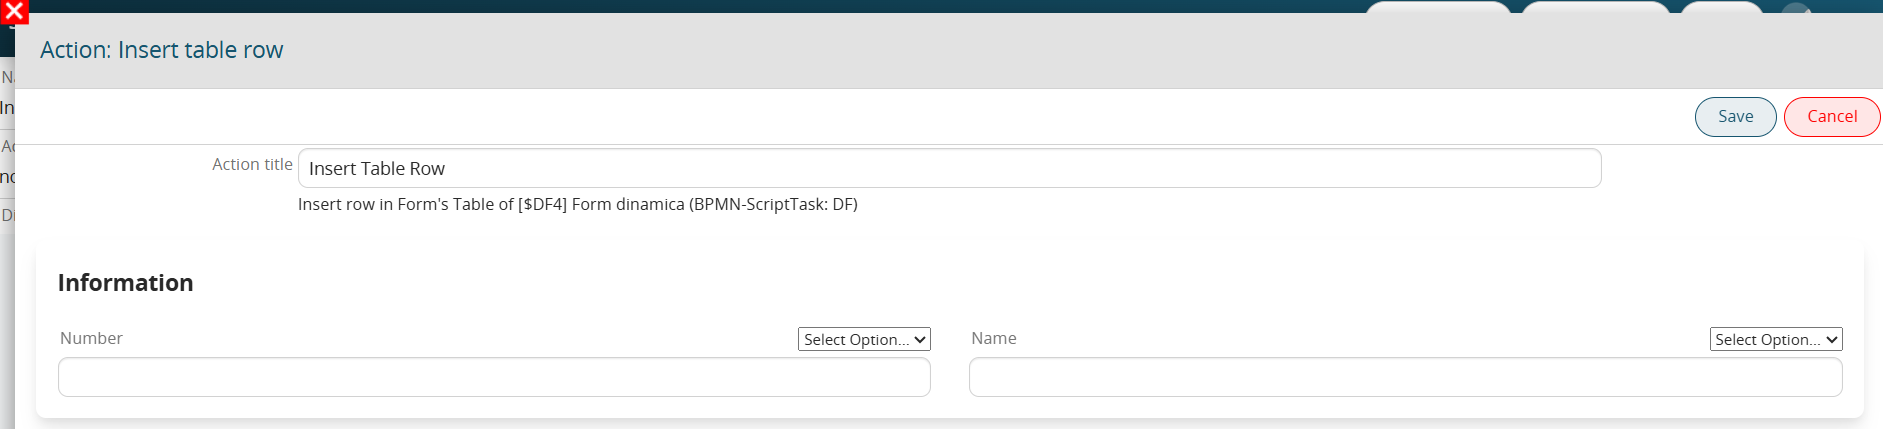
Figure 2
INSERT PRODUCT ROW
This action allows you to insert rows in a product block (Figure 3 and 4)
NOTE: if there is no product block in the main entity involved in the process and its related module, the action will not be visible among the list of actions selectable via the "New action" button.
The values entered can be static and/or dynamic (taken from the entities involved in the process).
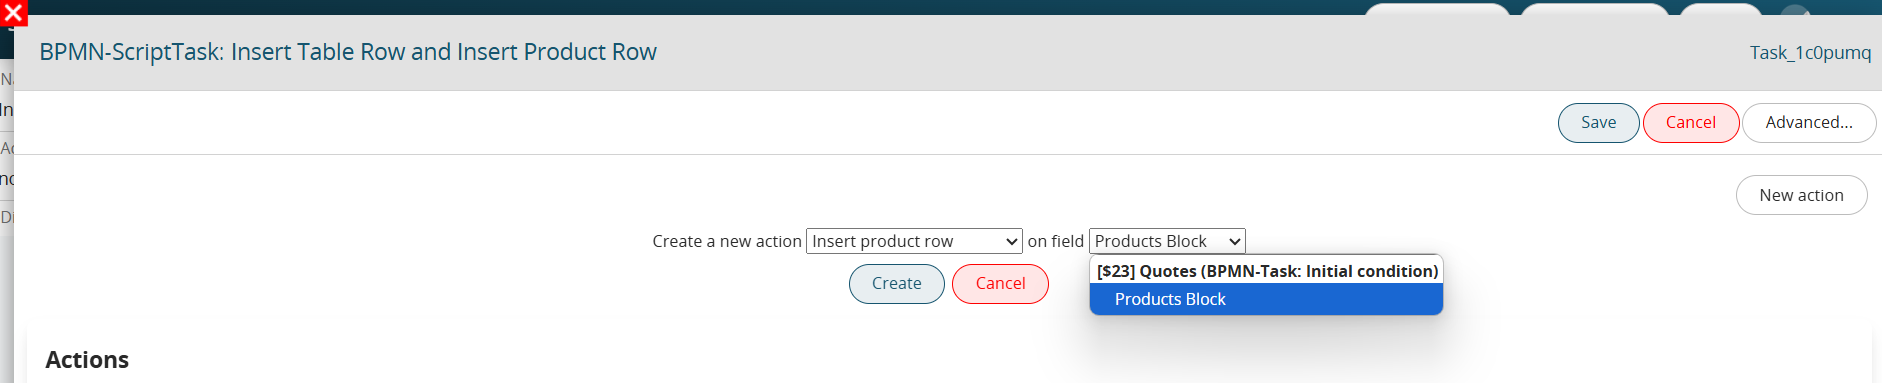
Figure 3
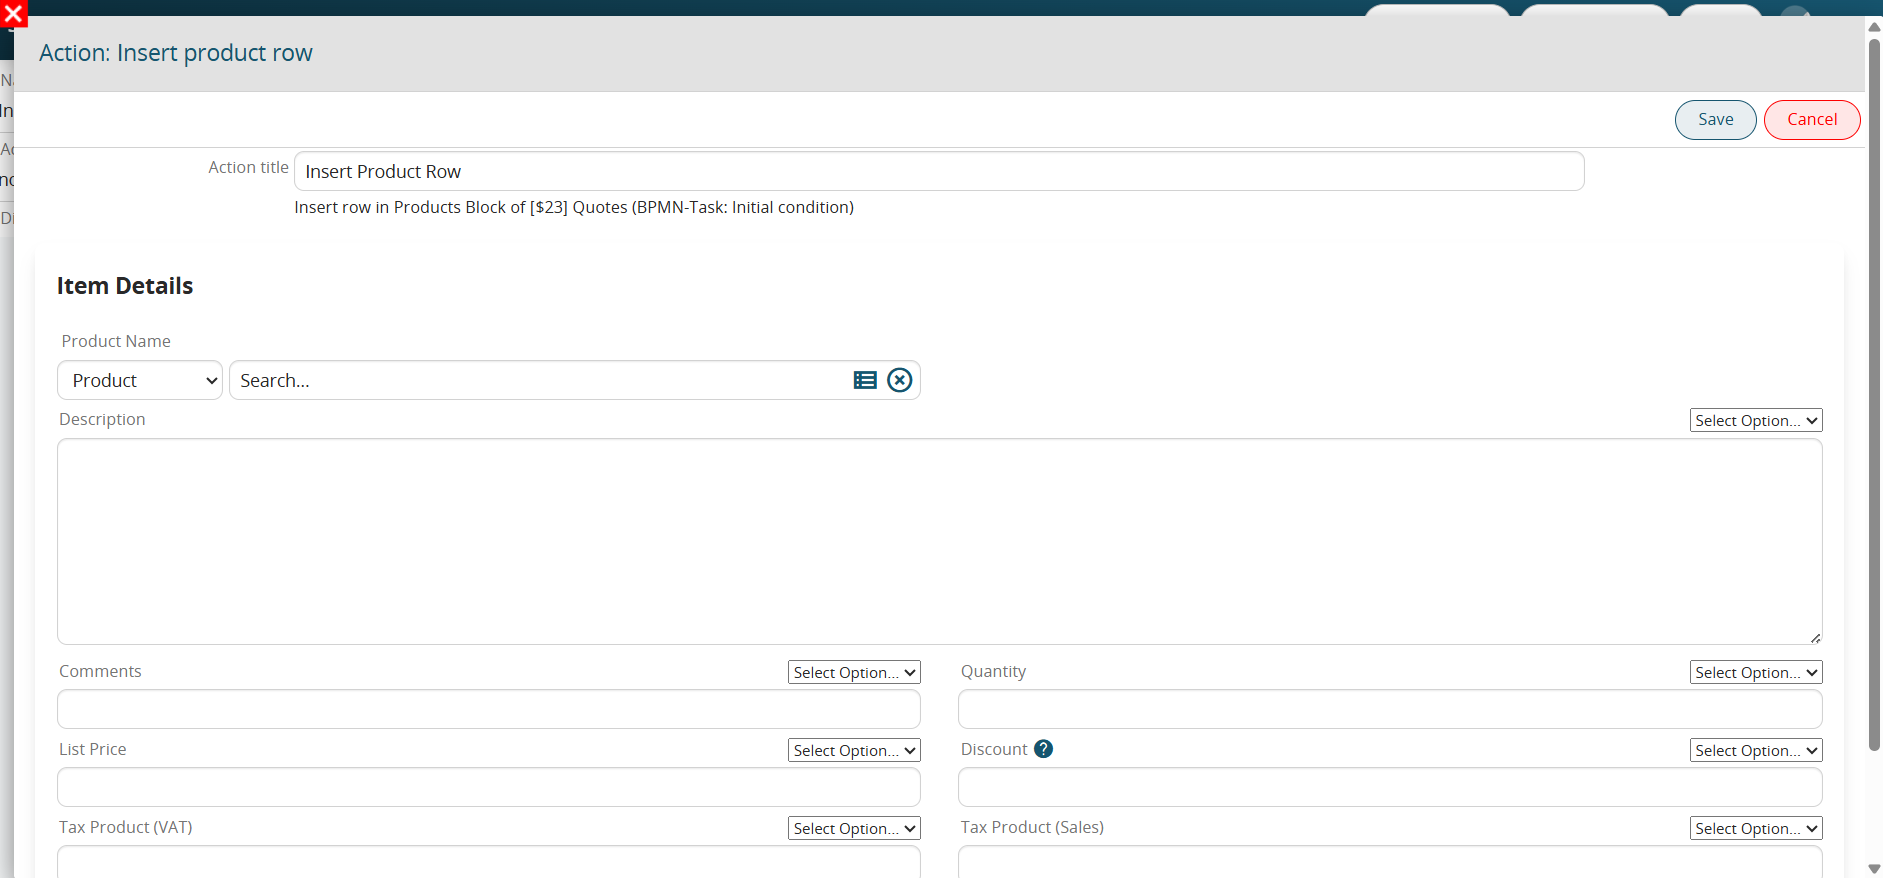
Figure 4
3.14 Copy the Products Block
This action allows you to copy the product block between entities involved in the process. (Figure 1)
N.B: both entities must have a product block.

Figure 1
All the fields present in standard will be copied automatically, instead custom fields will only be copied if there is a specific mapping within the "Field Mapping" section that can be configured directly from the products block of the Layout Editor of the module involved. (Figure 2)
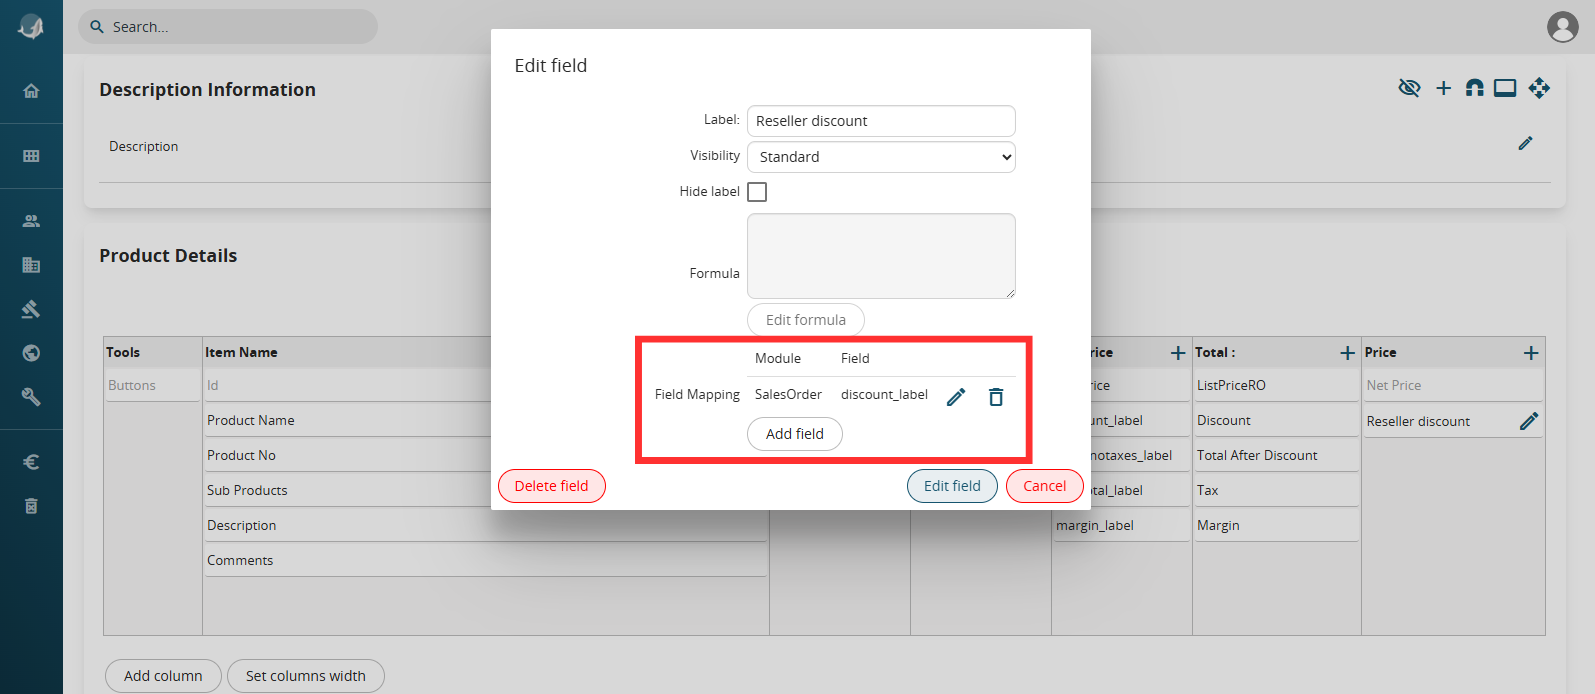
Figure 2
3.15 Call External Web Service
Allows you to call an external REST-type Web Service previously configured in Settings -> Business Process Manager -> REST Webservice. (Figure 1 and 2)
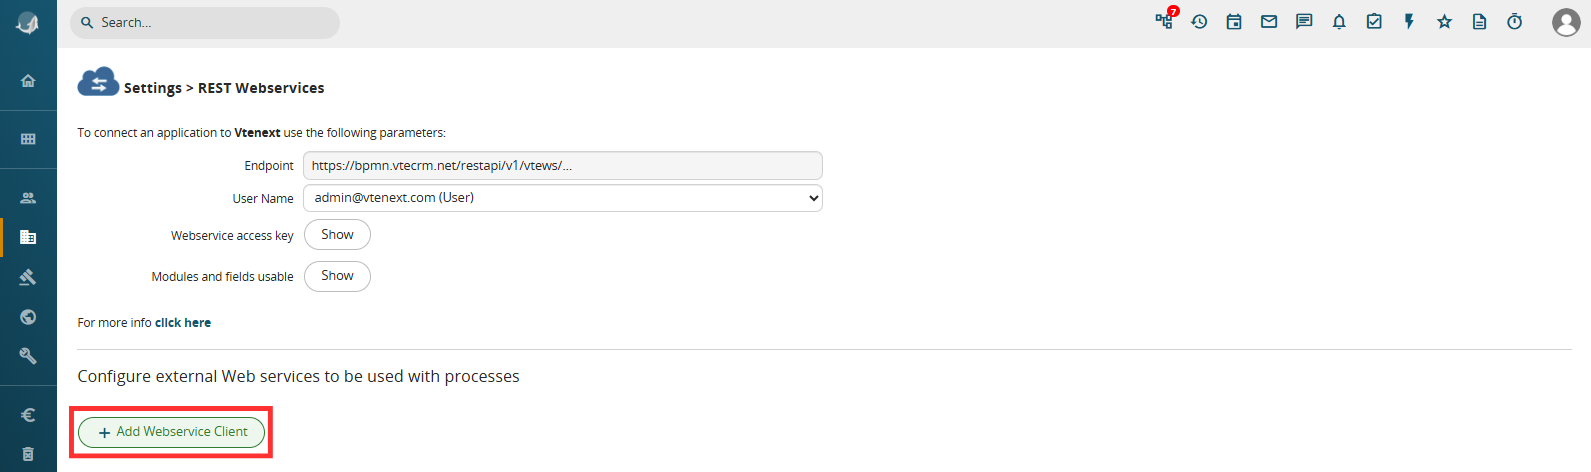 Figure 1
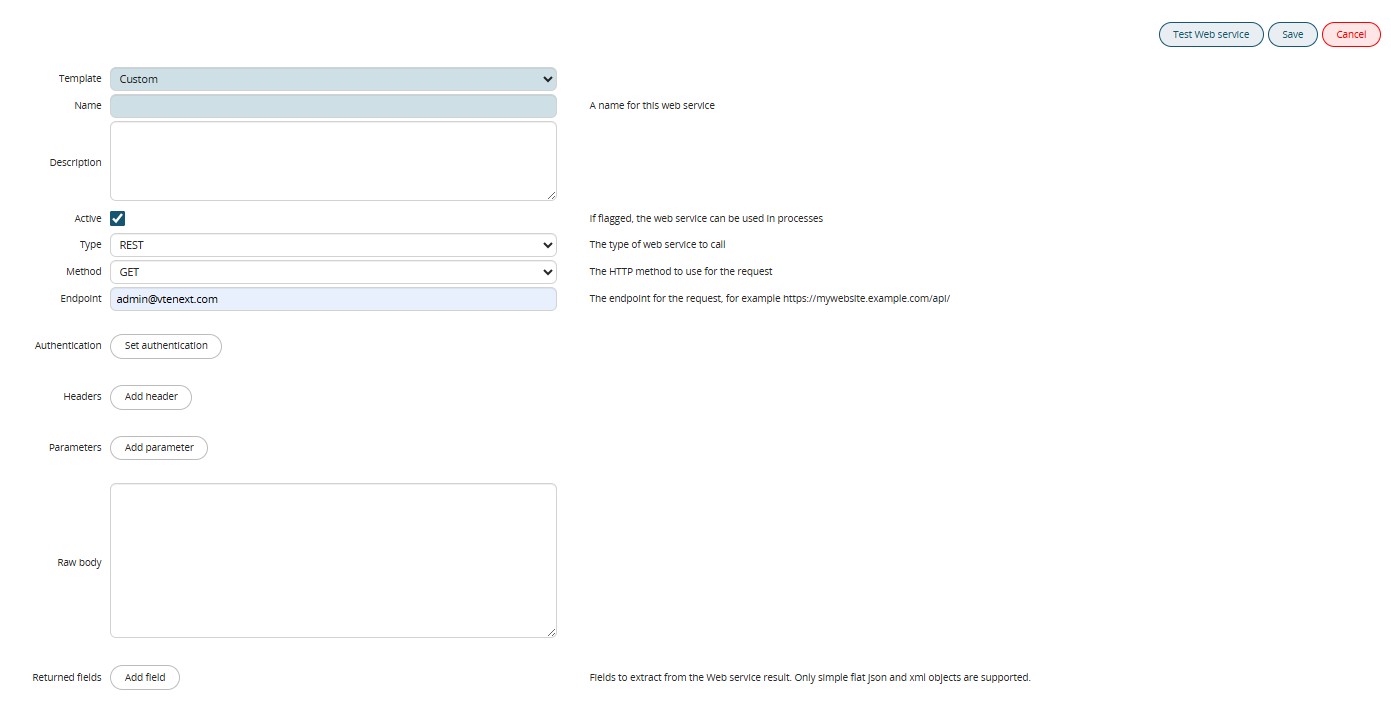
Figure 2
- Name → Allows you to define a name for the WS we are configuring, useful for:
1) making its selection easier and more intuitive on the process side
2) making it easier to recognize in the list of WS for possible modification on the interface side
- Description → Allows you to define a description for the WS we are configuring, useful for entering detailed specifications regarding its operation
- Active → If set, allows its use on the process side
- Type → Allows you to define the type of WS to call; currently, only "REST" is available.
- Method → Allows you to define the HTTP method to use for the request. You can select one of the following values: "GET", "HEAD", "POST", "PUT", "DELETE", "OPTIONS", "PATCH"
- Address → Allows you to define the endpoint of the WS we are configuring, such as https://mywebsite.example.com/api/
- Authentication → Allows you to define the authentication method used to invoke the WS, specifically:
1) Basic: Allows you to define a username and corresponding static password with which the WS will perform authentication
2) Bearer (OAuth2): Allows you to perform two-factor authentication
- Client ID: Represents the ID used to access the application
- Client Secret Authentication: Represents the secret key used for proper authentication
- Private Key Authentication (PEM or JWK): Allows you to upload a PEM or JWK file representing the private key used for proper authentication
- Scope: Allows you to define the scope, i.e., which operations are permitted by the system (read-only, write-only, or read/write)
- Token URL: Allows you to define the URL to use as the token
- Headers → Allows you to define the header parameters required by the WS we are configuring
Typically, the need for These parameters depend on the structure of the WS and are therefore defined in its dedicated documentation.
- Parameters → Allows you to define the input parameters required by the WS we are configuring.
Typically, the need for these parameters depends on the structure of the WS and is therefore defined in its dedicated documentation.
- Raw body → Allows you to pass a single string in JSON format containing all the input parameters required by the WS we are configuring.
Usually, the need to map this section depends on the structure of the WS and is therefore defined within its dedicated documentation.
- Return Fields → Allows you to save N parameters returned as output from the WS.
Usually, the need for these fields depends on the WS structure and is therefore defined in its dedicated documentation.
In the case of complex responses (object with multiple attributes) it is possible to perform a multi-level extraction (indicating the returned field name and attribute, e.g. object.attribute, object.list.0.attribute).
Let's consider the following JSON as an example:
{
"object1":{
"attribute1" : "value1",
"attribute2" : "value2",
"attribute3" : "value3",
},
"object2" : "value4"
}
To directly obtain the value of the "attribute2" parameter as a response, you will need to perform the configuration shown in Figure 3.

Figure 3
- Test Web Service button → Allows you to run a test call, returning a popup with the Return Code, Response Message, Status, and the expected Output from the WS.
Therefore, once the WS has been configured in Settings -> Business Process Manager -> REST Web Service, it will be possible to call this WS within processes (Figures 4, 5, and 6).
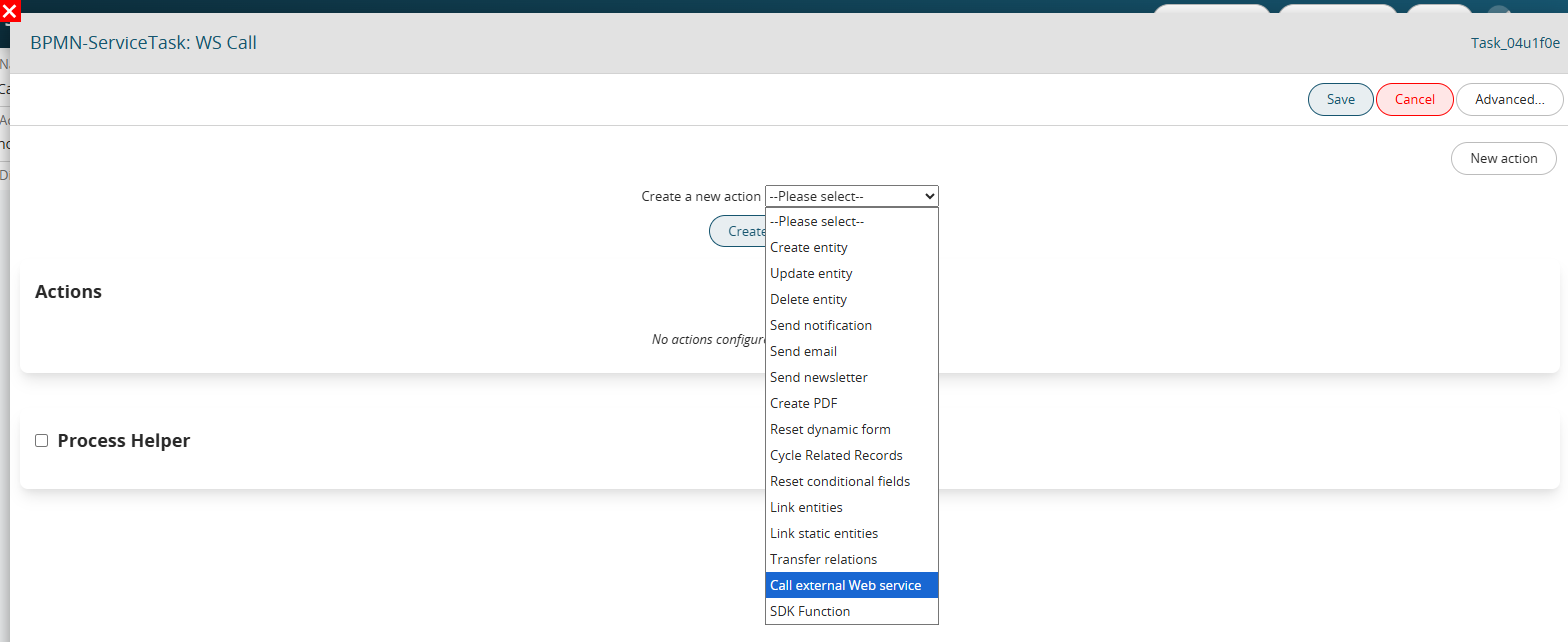
Figure 4
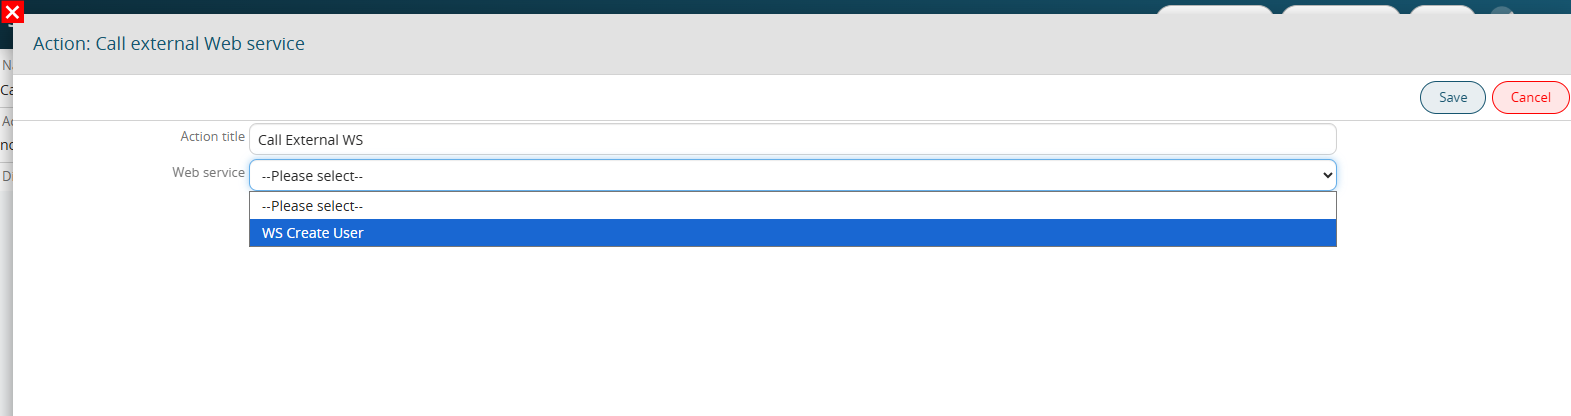
Figure 5
To better explain how to configure this action within a process, an example of configuring a WS call is shown below.
The goal of the process is to generate, upon activation of a collaborator on Vtenext, a user on an external system associated with it.
The WS requires input of JSON with the following structure:
{
"firstname": "Mario",
"lastname": "Smith",
"type": "Internal Employee",
"email": "mariorossi@test.com",
"status": "Active"
}
If successful, the response code = 201 will be returned, along with a JSON output containing several variables, including the ID of the created user. Below is an example of the JSON:
{
"firstname":"Mario",
"lastname":"Smith",
"type":"Internal Employee",
"email":"mariorossi@test.com",
"status":"Active",
"id":"532",
"createdAt":"2025-07-03T13:05:11.752Z"
}
First, in Settings -> Business Process Manager -> REST Web Service, we perform the initial configuration. of the WS (Figure 5)
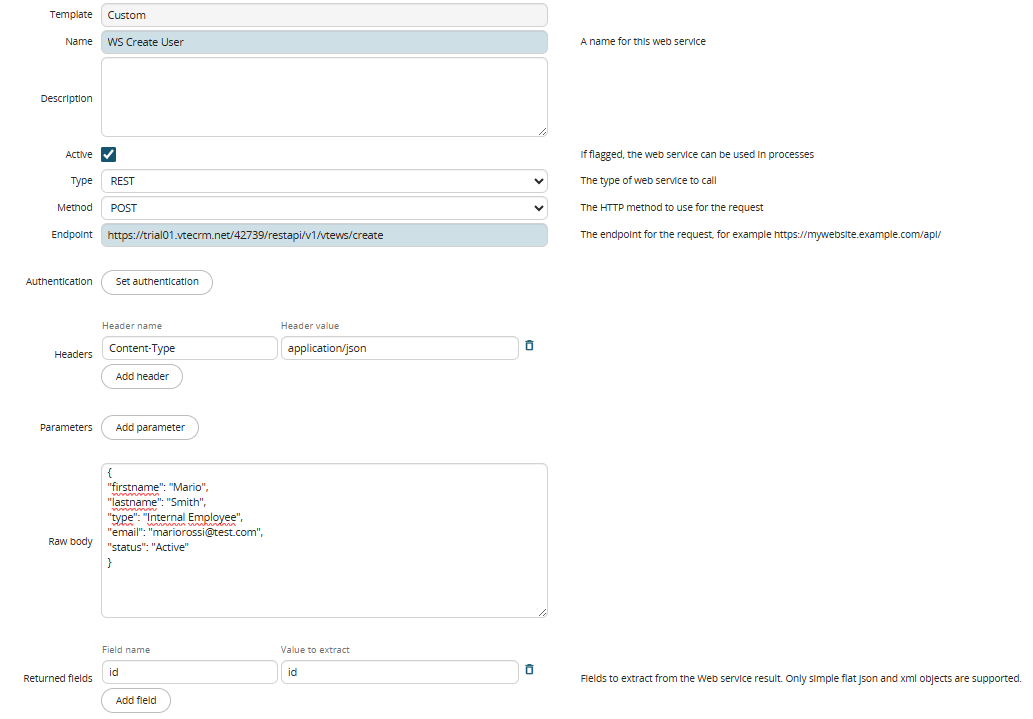
Figure 6
Next, we create a process having the flowchart shown in Figure 6:

In the "WS Call" ServiceTask, we configure the external WS call action. (Figure 7)
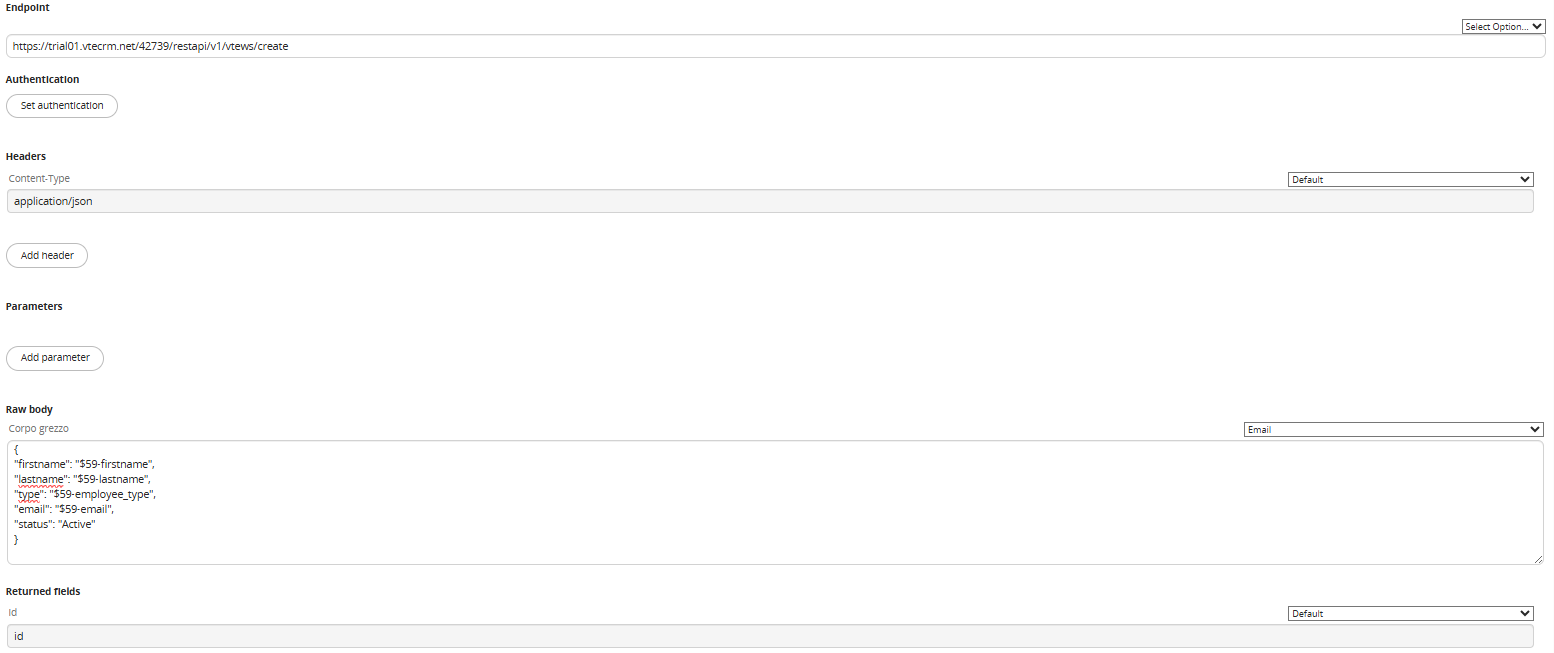 Figure 7
The system automatically returns all the elements configured in Settings -> Business Process Manager -> REST Webservice.
In addition, you can define additional Headers, Parameters, and Return Fields, allowing you to pass dynamic values from the records involved in the process.
WARNING! → In some cases, the Header parameters inherited from the configuration performed in Settings -> Business Process Manager -> REST Webservice will be set to blank by default (Figure 8).

Figure 8
Therefore, for the WS call to work correctly, you must select one of the "Default" options available in the "Select Options" picklist at the top right of each field. (Figure 9)

Figure 9
In the Raw Body, we modify the original JSON by dynamically inserting the content of the fields in the Collaborator form associated with the process.
In the "Historicize WS Response" ScriptTask, we activate a process helper and create four text fields in its dynamic form (Figure 9).
In fact, the default WS call returns the variables "Response Code," "Response Message," and "Successful Outcome?" (1 if the call was successful, 0 if it was unsuccessful).
Finally, we create the "id" field, in which we will store the expected output from the WS in question, i.e., the external ID of the created user.
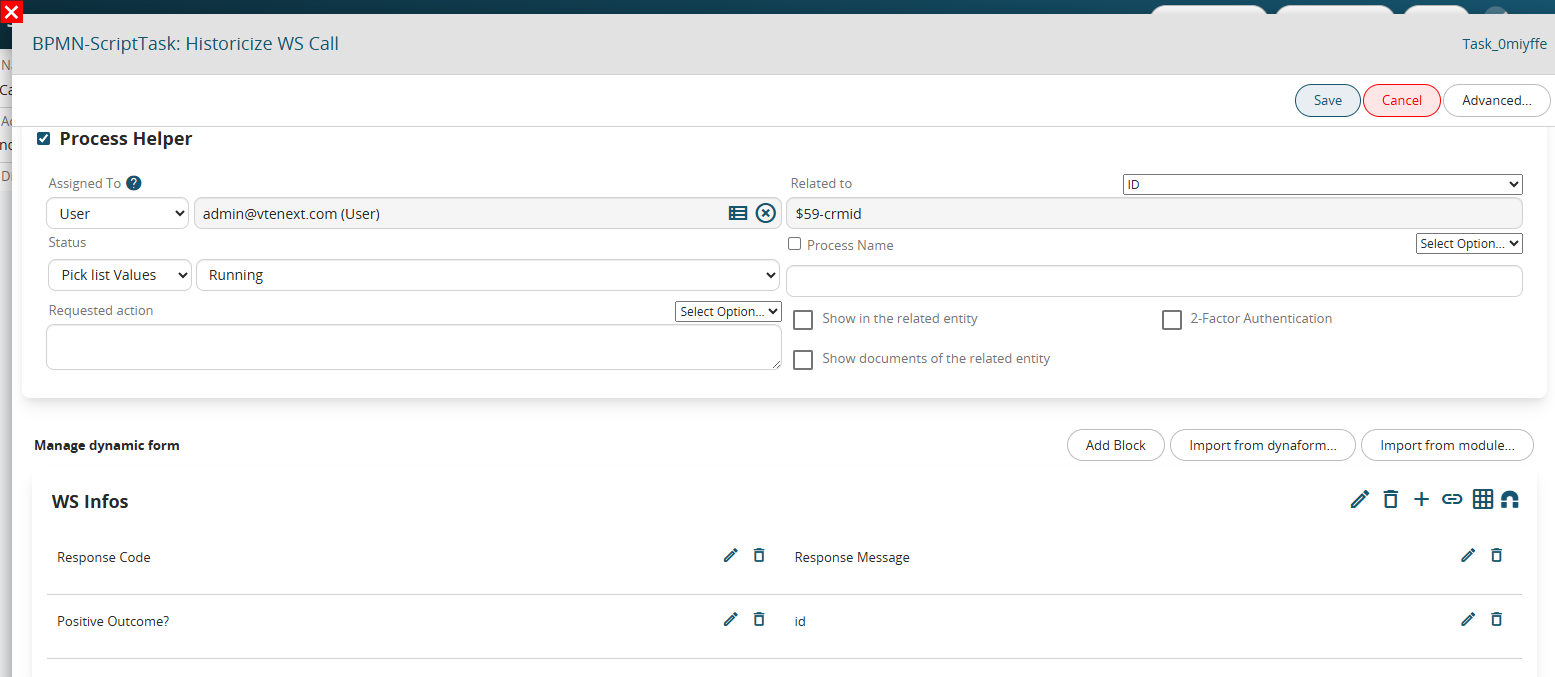
Figure 10
To map the content, within the "Select Options" picklist, the system provides a dedicated section for WS calls with their corresponding metaID (Figure 11).
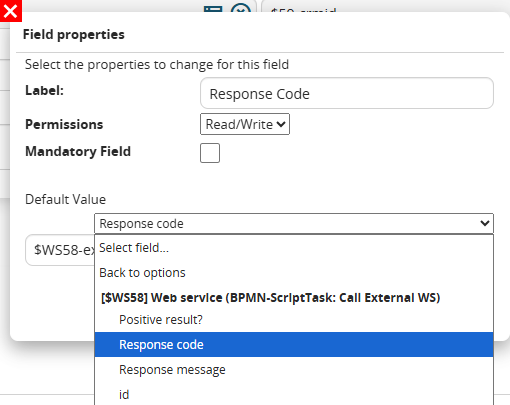
Figure 11
In the "WS Call Check" task, we check the contents of the "Response Code" and "Successful Result?" fields and route the process into two different branches (Figure 12).
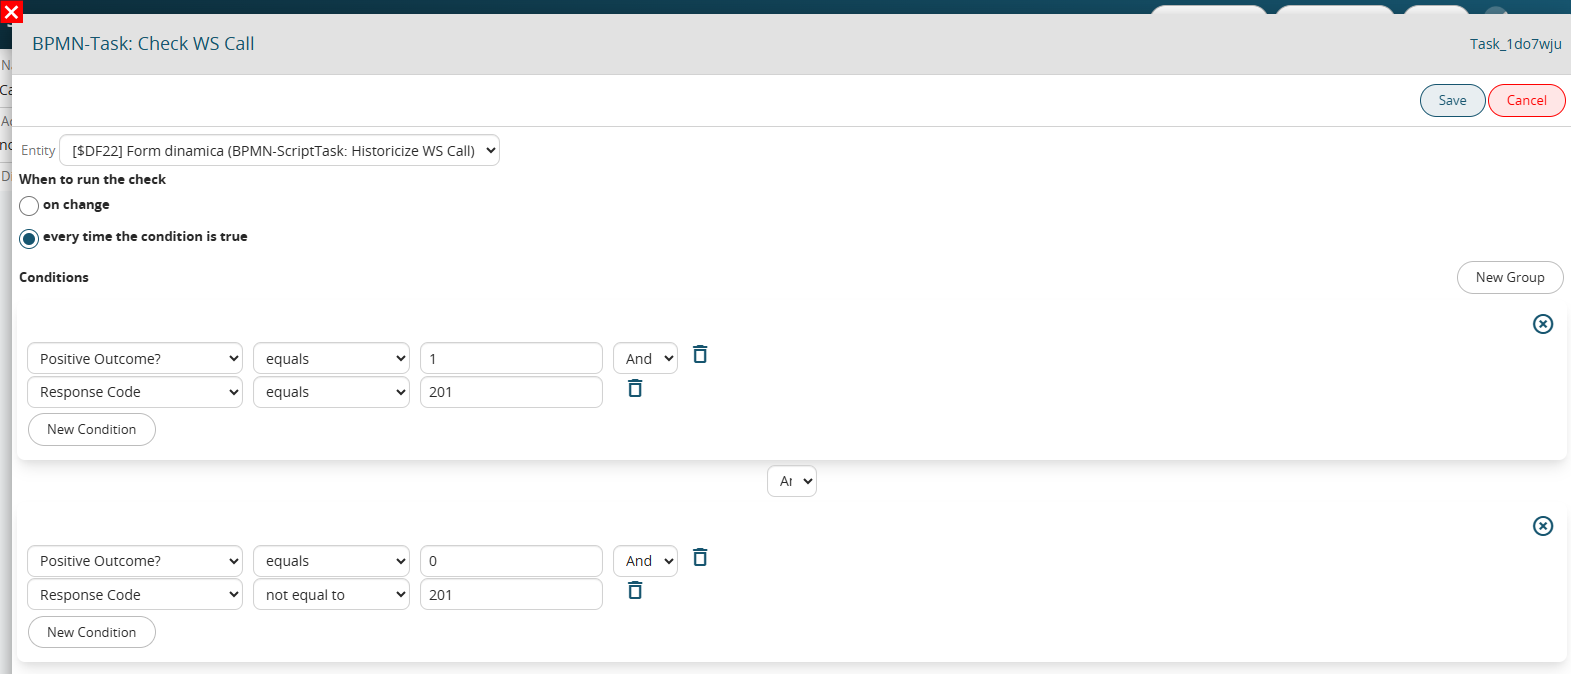
Figure 12
The final "OK" and "KO" ScriptTasks shown in the process flowchart can be configured as desired, for example, to log the WS output (i.e., the ID of the user created in the external system) in a dedicated field in the employee's profile, or to send an email/notification to the IT department in the event of a failed call.
3.16 Cycle Related Records
This action allows you to use records (instances of a module) that have a 1- N or N - N relationship with the starting module.
In order to use the data of the records cycled within the action, the system provides (in the "Select option" picklist) a dedicated section (Figure 1)
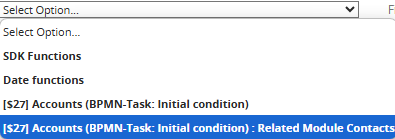
Figure 1
By clicking on the specific section, the system allows you to quickly select one of the fields present in the related module being examined (Figure 2)
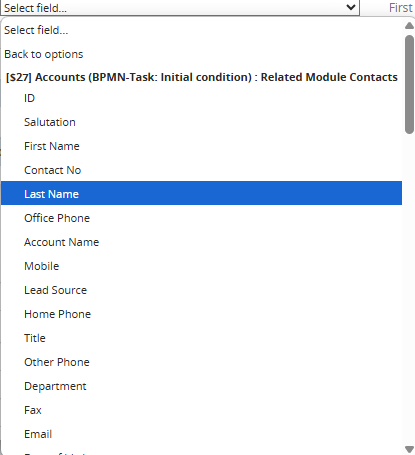
Figure 2
NOTE: the system automatically performs a filter based on the starting field from which you are consulting the "Select options" picklist, consequently it will only show the fields whose typology can be accepted by the starting field.
If, for example, inside the "Member of" field of the Company module you wanted to insert the content of the text type "Address" field, the system will not make this field available, this is because it will only allow you to select the "Related to" type fields.
Once you have selected the field of the related module you are cycling, a further picklist will be presented to the right of the "Select options" field, from which you will be able to select one of the available items (Figure 3)
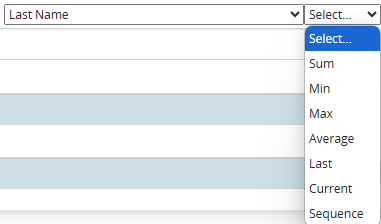
Figure 3
- "Sum" -> only for fields of type Number, Currency and Percentage, allows you to obtain the sum of ALL records of the related module concerned (connected to the starting module).
ATTENTION! -> This item ignores the conditions entered in the "Conditions" section.
To learn more about managing the partial sum of the records of the related module concerned (connected to the starting module), see chapter 9.1 of the process manual.
PLEASE NOTE: this item will still be available for other types of fields but, logically, it will not produce any results.
- "Minimum" -> only for fields of type Number, Currency and Percentage, allows you to obtain the lowest value among ALL records of the related module concerned (connected to the starting module).
ATTENTION! -> This item ignores the conditions entered in the "Conditions" section.
PLEASE NOTE: this item will still be available for other types of fields but, logically, it will not produce any results.
-"Maximum" -> only for fields of type Number, Currency and Percentage, allows you to obtain the highest value among ALL records of the related module concerned (connected to the starting module).
ATTENTION! -> This item ignores the conditions entered in the "Conditions" section.
NOTE: this item will still be available for other types of fields but, logically, will not produce any results.
-"Average" -> only for Number, Currency and Percentage fields, allows you to obtain the average value of ALL records of the related module concerned (connected to the starting module).
ATTENTION! -> This item ignores the conditions entered in the "Conditions" section.
PLEASE NOTE: this item will still be available for other types of fields but, logically, it will not produce any results.
-"Last" -> allows you to obtain the value of the last record of the related module concerned (connected to the starting module).
ATTENTION! -> This item ignores the conditions entered in the "Conditions" section.
-"Current" -> allows you to obtain the current value, i.e. the value of the record of the related module concerned (connected to the starting module) that is being cycled at that precise moment
ATTENTION! -> This item is the only one that respects the conditions entered in the "Conditions" section.
-"Sequence" -> allows you to obtain the value of a specific record (if present) of the related module concerned (connected to the starting module).
ATTENTION! -> This item ignores the conditions entered in the "Conditions" section.
To indicate the exact number of the record, you will have to fill in the field that will be presented on the right and finally click on the dedicated button (Figure 4)

Figure 5 (click on the image for a higher graphic resolution)
For each cycled record, you can perform one of the following operations:
Send email
Allows you to send an email for each record that meets the conditions set in the "field conditions" section. (Figure 6)
To consider all the records, simply leave that section unfilled.
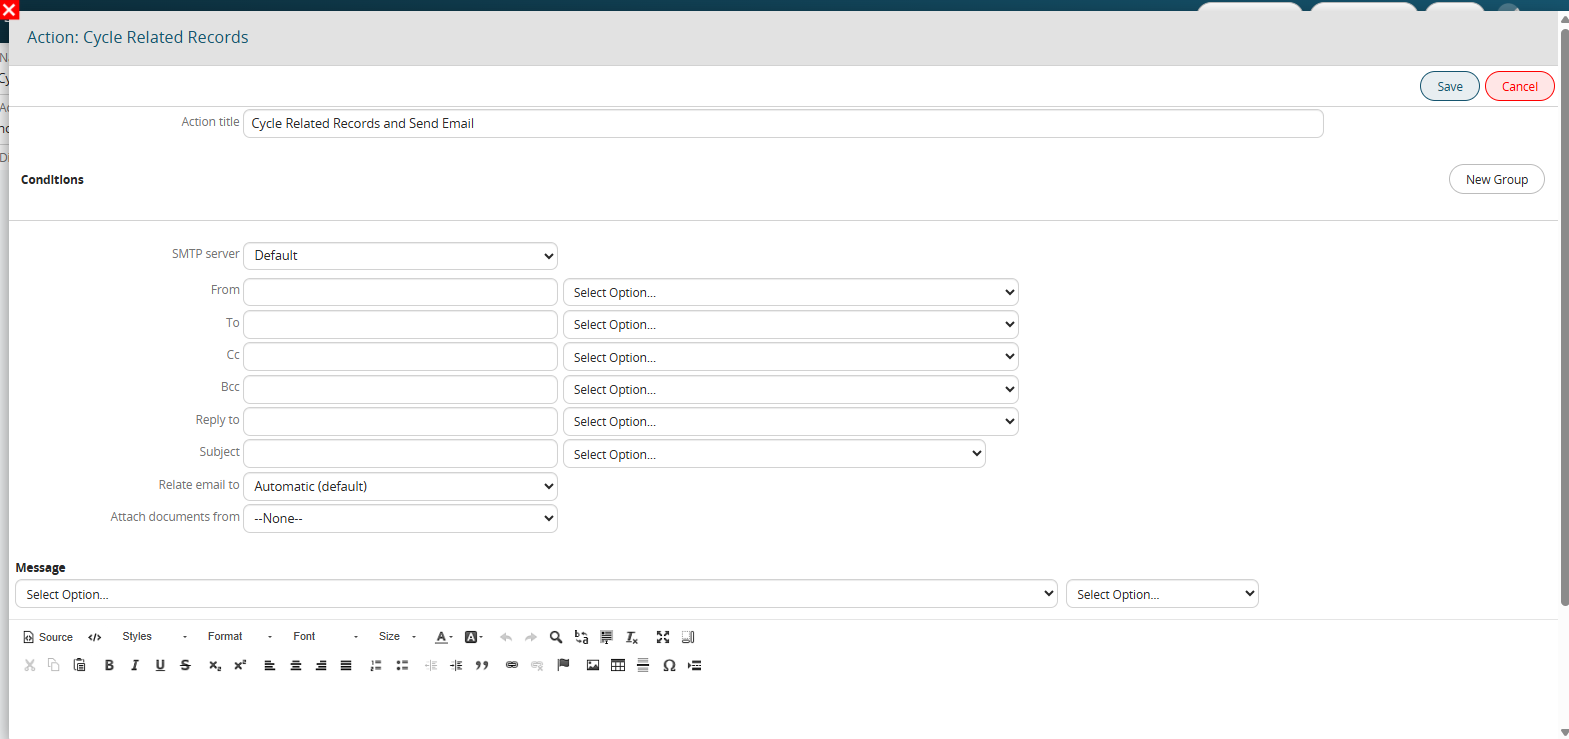
Figure 6
Create entity
Allows you to create an entity of any form (standard or custom) for each record that meets the conditions set in the “Field conditions” section. (Figure 7)
To consider all records, simply leave that section unfilled.
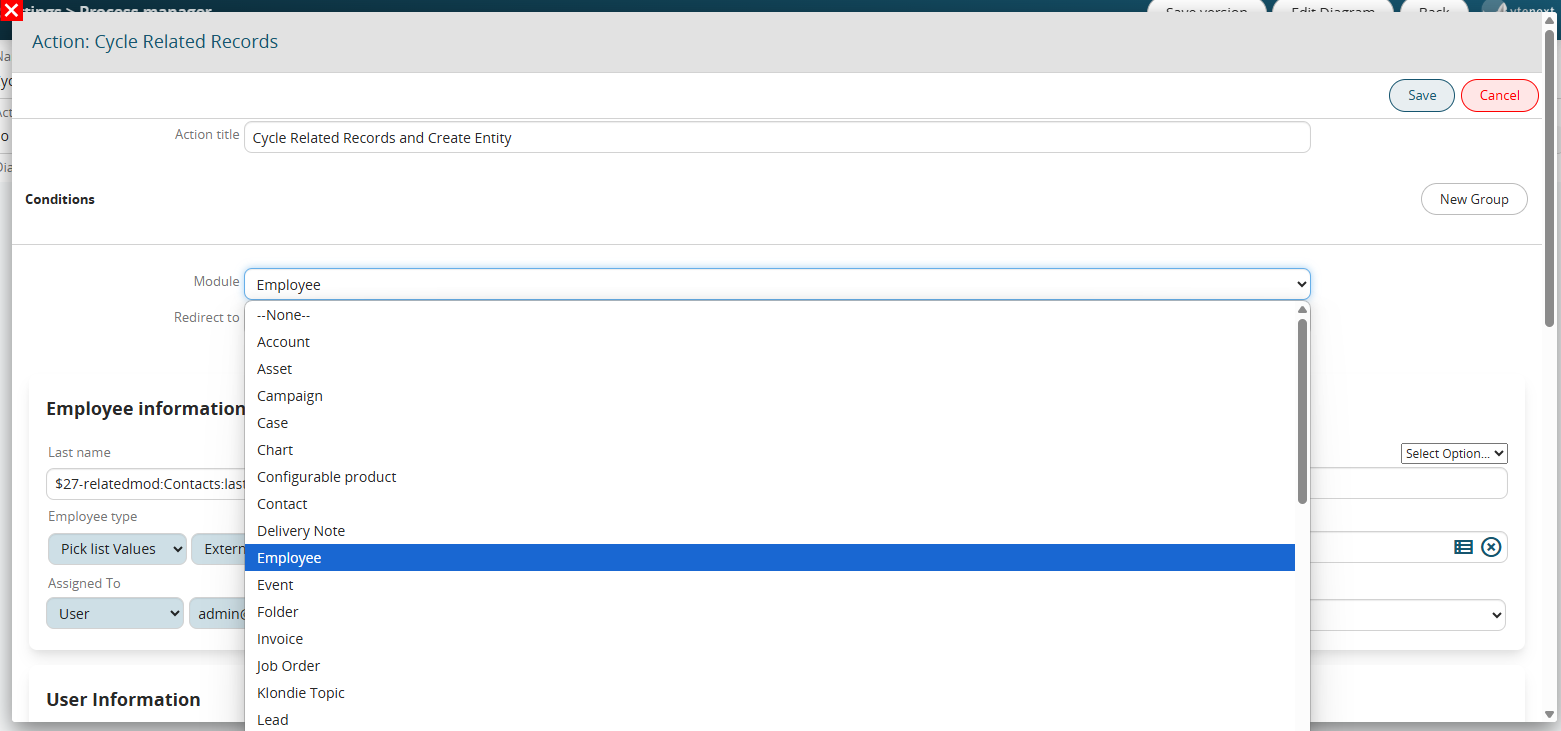
Figure 7
Update entity
Allows you to update an entity involved in the process for each record that meets the conditions set in the “Conditions” section. (Figure 8)
To consider all records, simply leave that section unfilled.

Figure 8
Send notification
Allows you to send a notification for each record that meets the conditions set in the “Field conditions” section. (Figure 9)
To consider all records, simply leave that section unfilled.
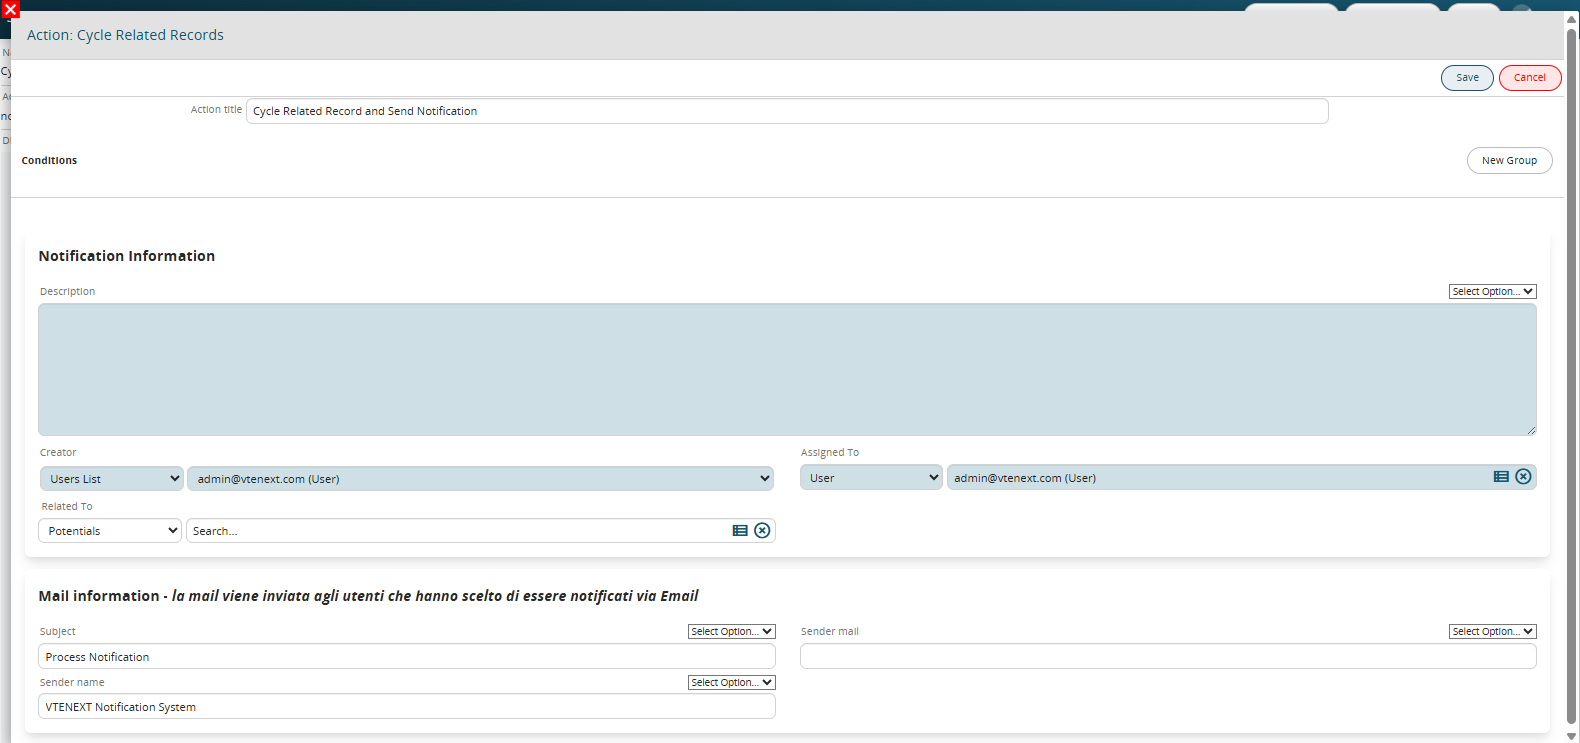
Figure 9
Insert table row
Allows you to insert a row in a table field present in the entities involved in the processes or in the process helper forms for each record that meets the conditions set in the “Field conditions” section. (Figures 10 and 11)
To consider all the records, simply leave that section unfilled.

Figure 10
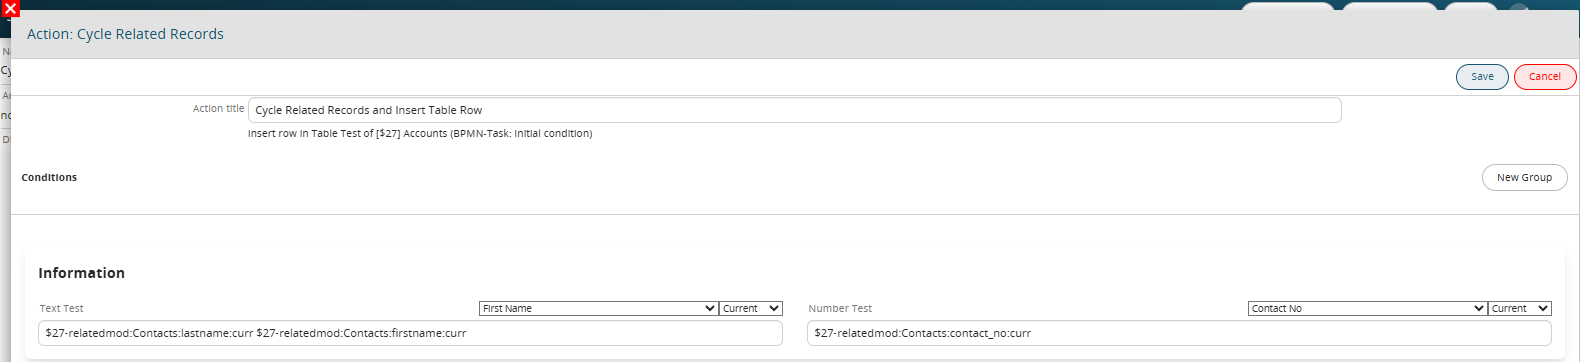
Figure 11
Create PDF
Allows you to create a PDF for each record that meets the conditions set in the “Field Conditions” section. (Figure 12)
To consider all records, simply leave that section unfilled.
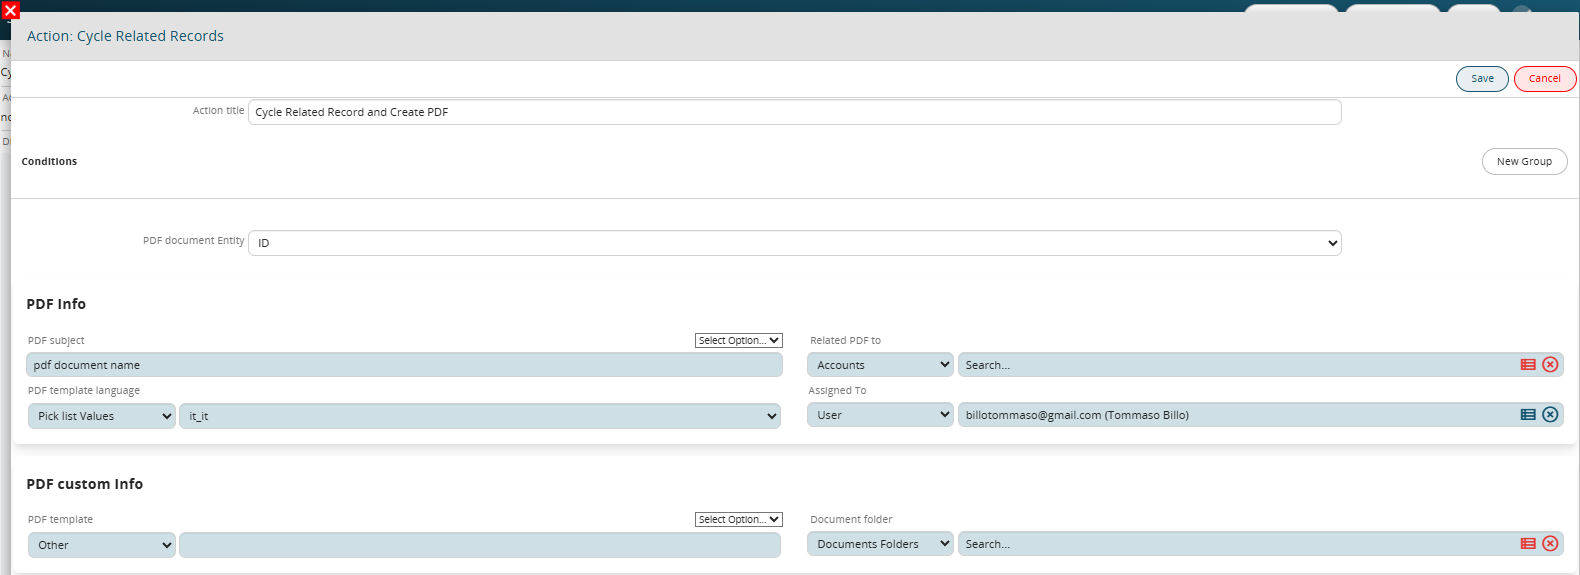
Figure 12
SDK Functions
Allows you to launch an SDK function of the Action type for each record that meets the conditions set in the “Field Conditions” section. (Figure 13 and 14)
N.B.: this feature is only available from version 25.02 onwards.

Figure 13
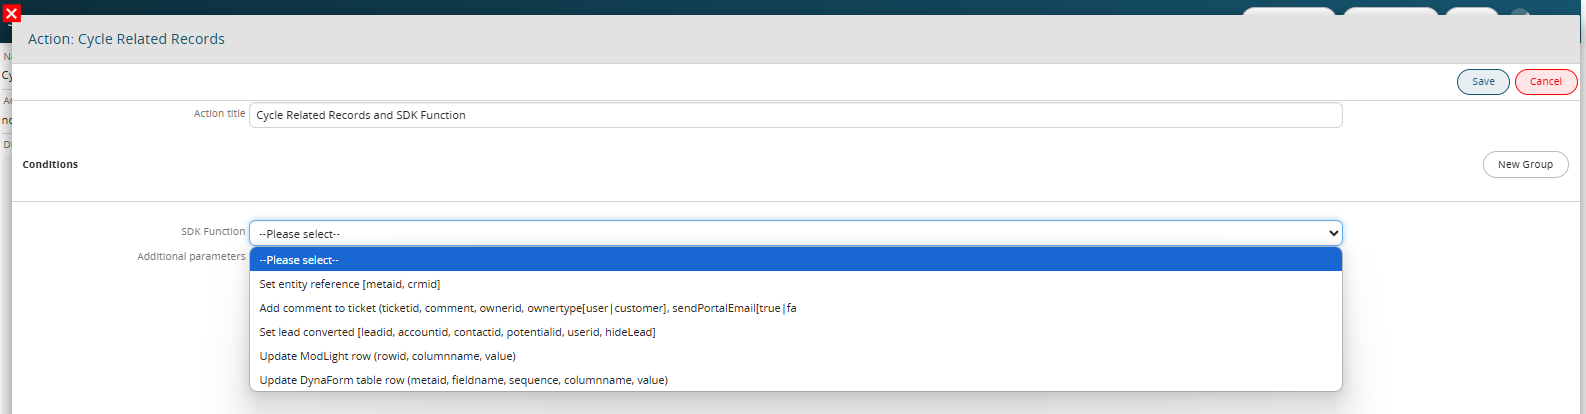
Figure 14
3.17 Import Actions from...
This feature allows you to duplicate an action that has already been configured, either within the same Action Task or in another task within the same process.
It is a highly useful and practical tool when you need to create an action similar to an existing one, as it avoids the need to reconfigure its entire content from scratch.
To duplicate an action, click the "Import actions from..." button located at the top right of each Action Task. (Figure 1)
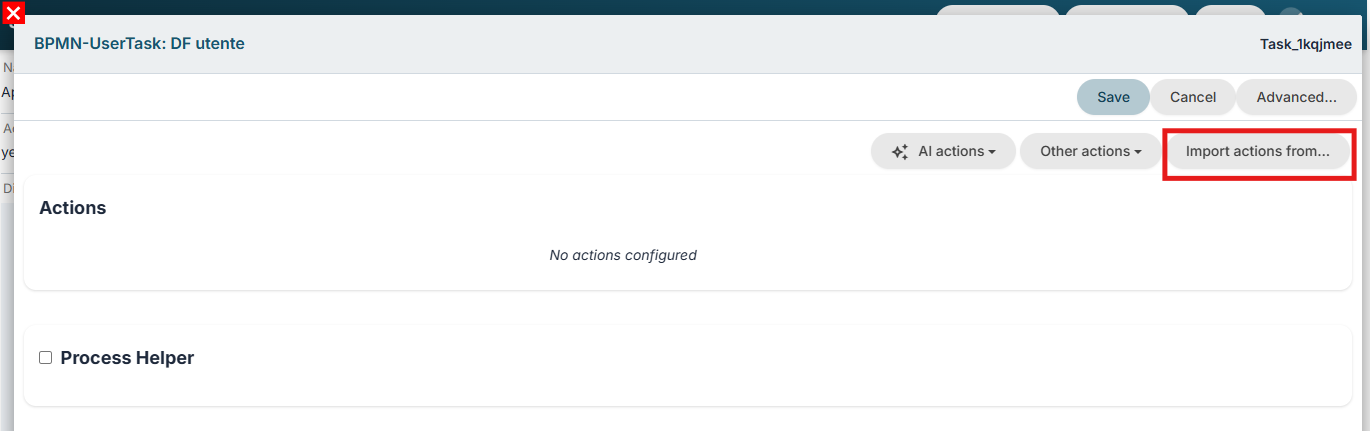
Figure 1 (click the image for higher resolution)
The system will display the list of all actions configured within the process, and you will be able to select those to be duplicated—including multiple actions simultaneously, if necessary. (Figure 2)

Figure 2 (click the image for higher resolution)
Upon saving, the newly selected actions will be generated, and the tag [imported] will be added to the Description. (Figure 3)
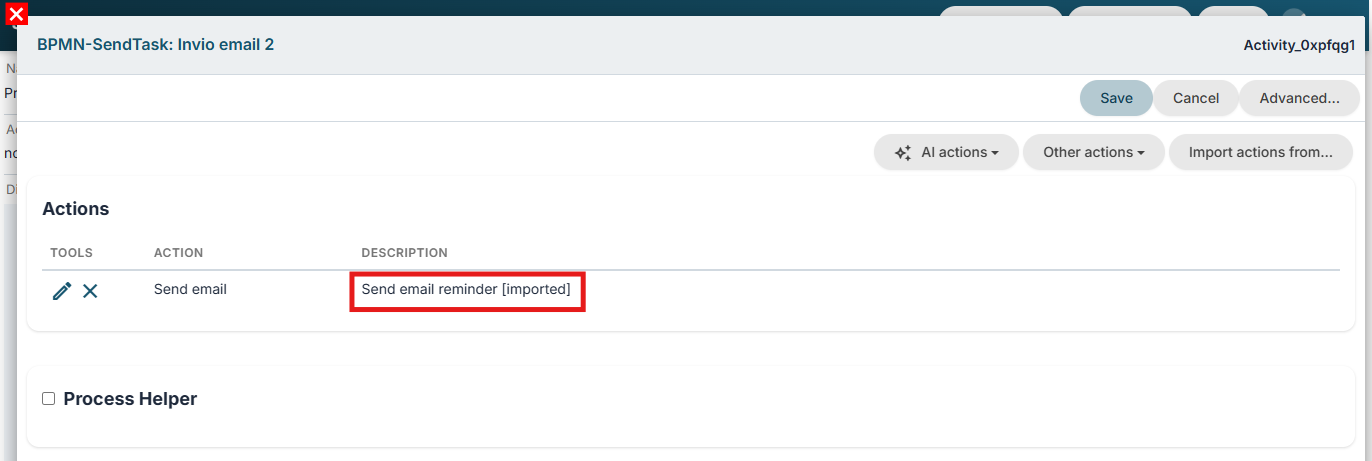
Figure 3 (click the image for higher resolution)
At this point, you can make the necessary changes to the content of the newly duplicated action by entering edit mode for that action.
3.18 Cycle Records
Starting with version 26.07, an action has been implemented that allows you to use records from a specific module without that module necessarily being part of the process itself.
Furthermore, unlike the "Loop Related Records" action (see section 3.12 for details), the module records do not even need to be related to the main entity involved in the process.
Simply put, it can be compared to a database query targeting the content of a specific module.
When the "Loop Records" option is selected from the "Other Actions" picklist, the system prompts you to choose the module to iterate over and the specific action to perform on each record in the loop.
As previously mentioned, you can select any standard or custom module available in the CRM. (Figure 1)
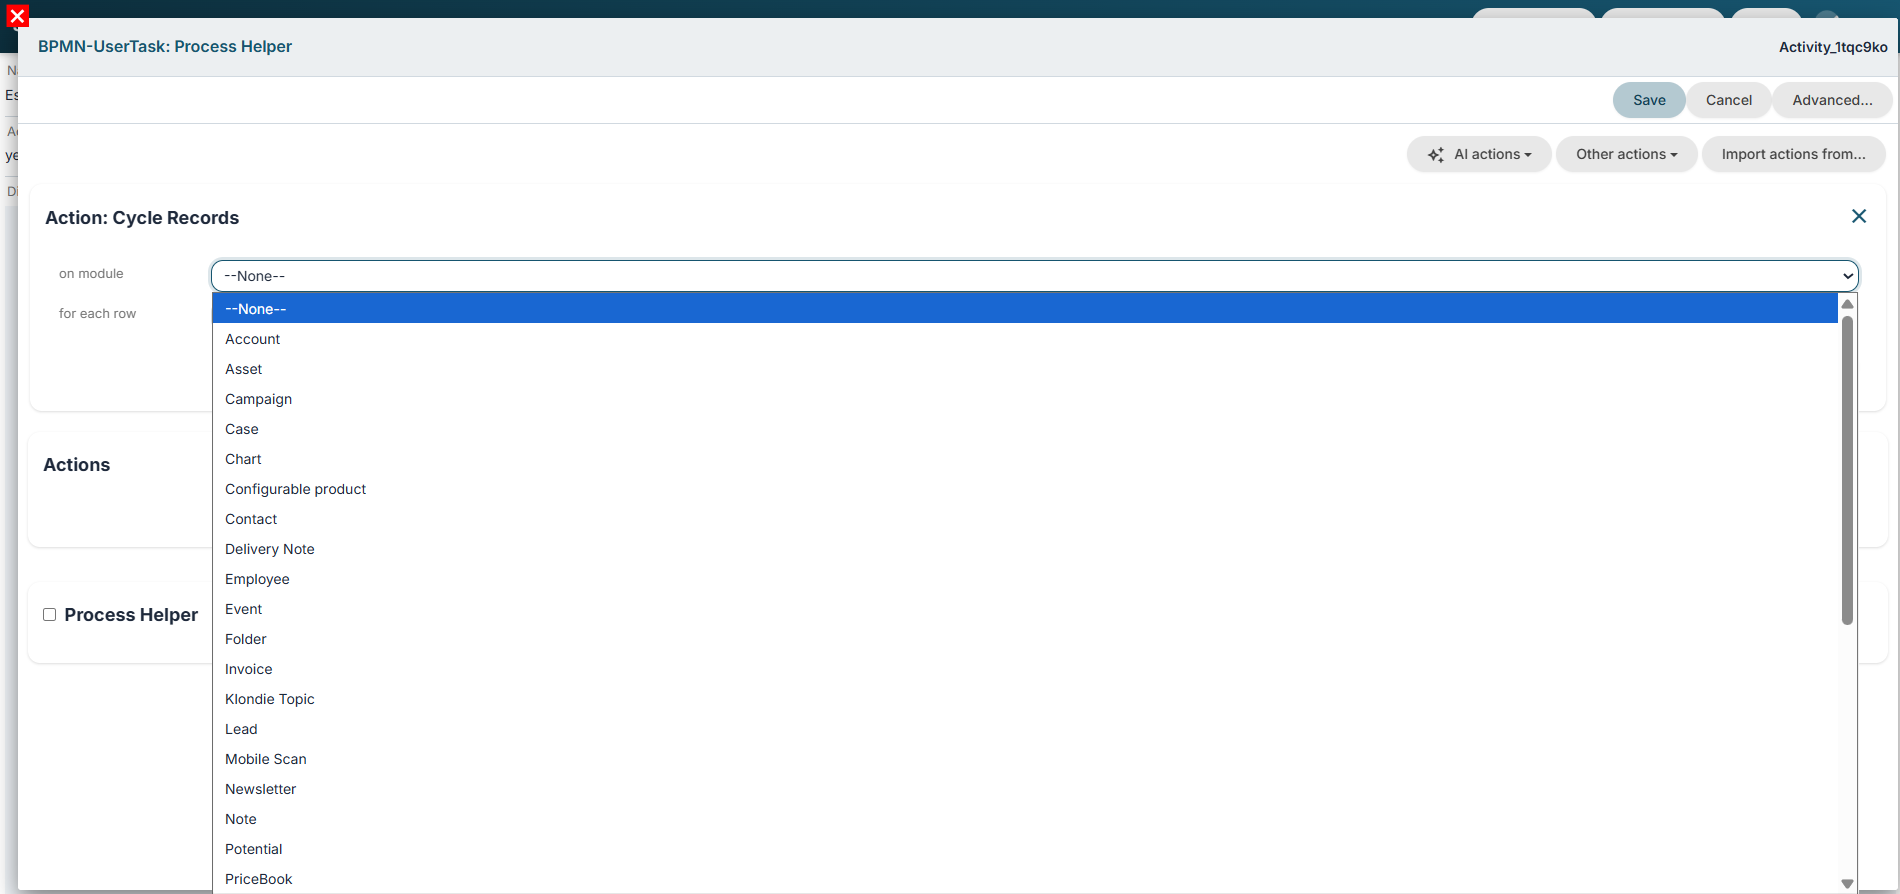
Figure 1
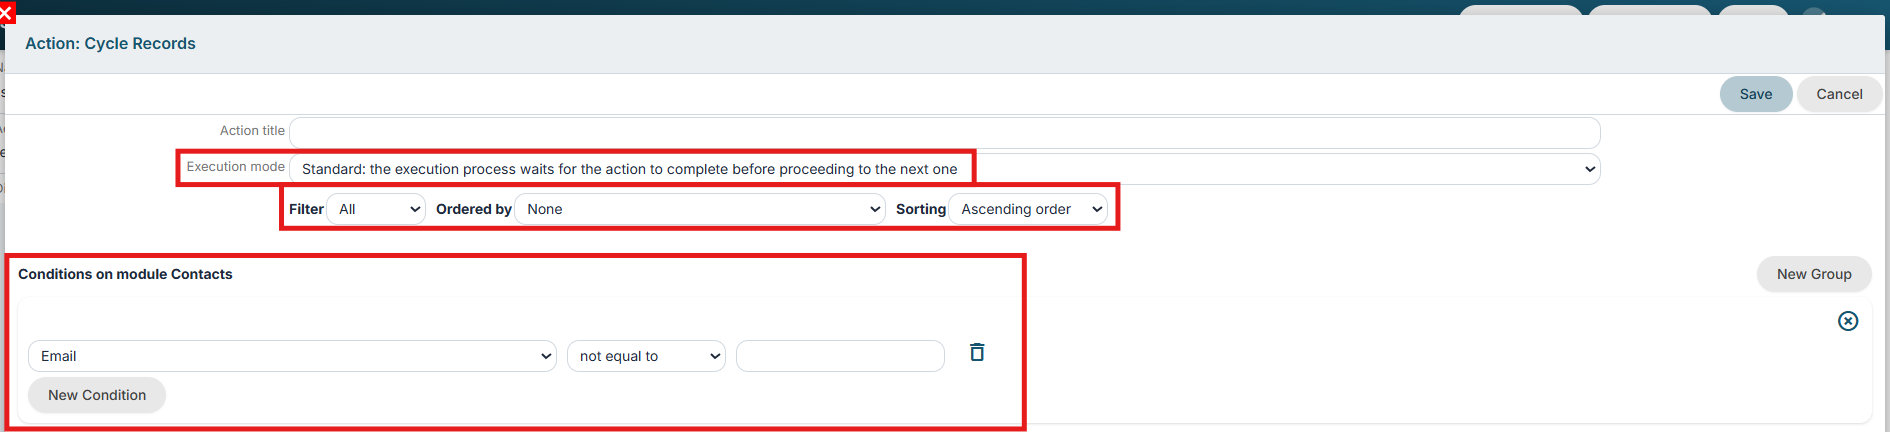
Clicking the "Create" button displays the actual configuration screen for the cycle action, where you can:
- Define the execution mode for the cycle action; for further details, refer to section 3.0. (Figure 2)
- Set a filter that the system will use as a starting point to retrieve the records to be cycled; the "All" filter is selected by default. (Figure 2)
- Define and apply additional conditions based on the fields of the module whose records are being cycled. (Figure 2)
- Configure the details of the action to be performed for each iterated record; the available options are as follows:
Create entity
Allows you to create an entity from any module (standard or custom) for each record that meets the conditions set in the “Module conditions” section and the filters inherited as a base. (Figure 3)
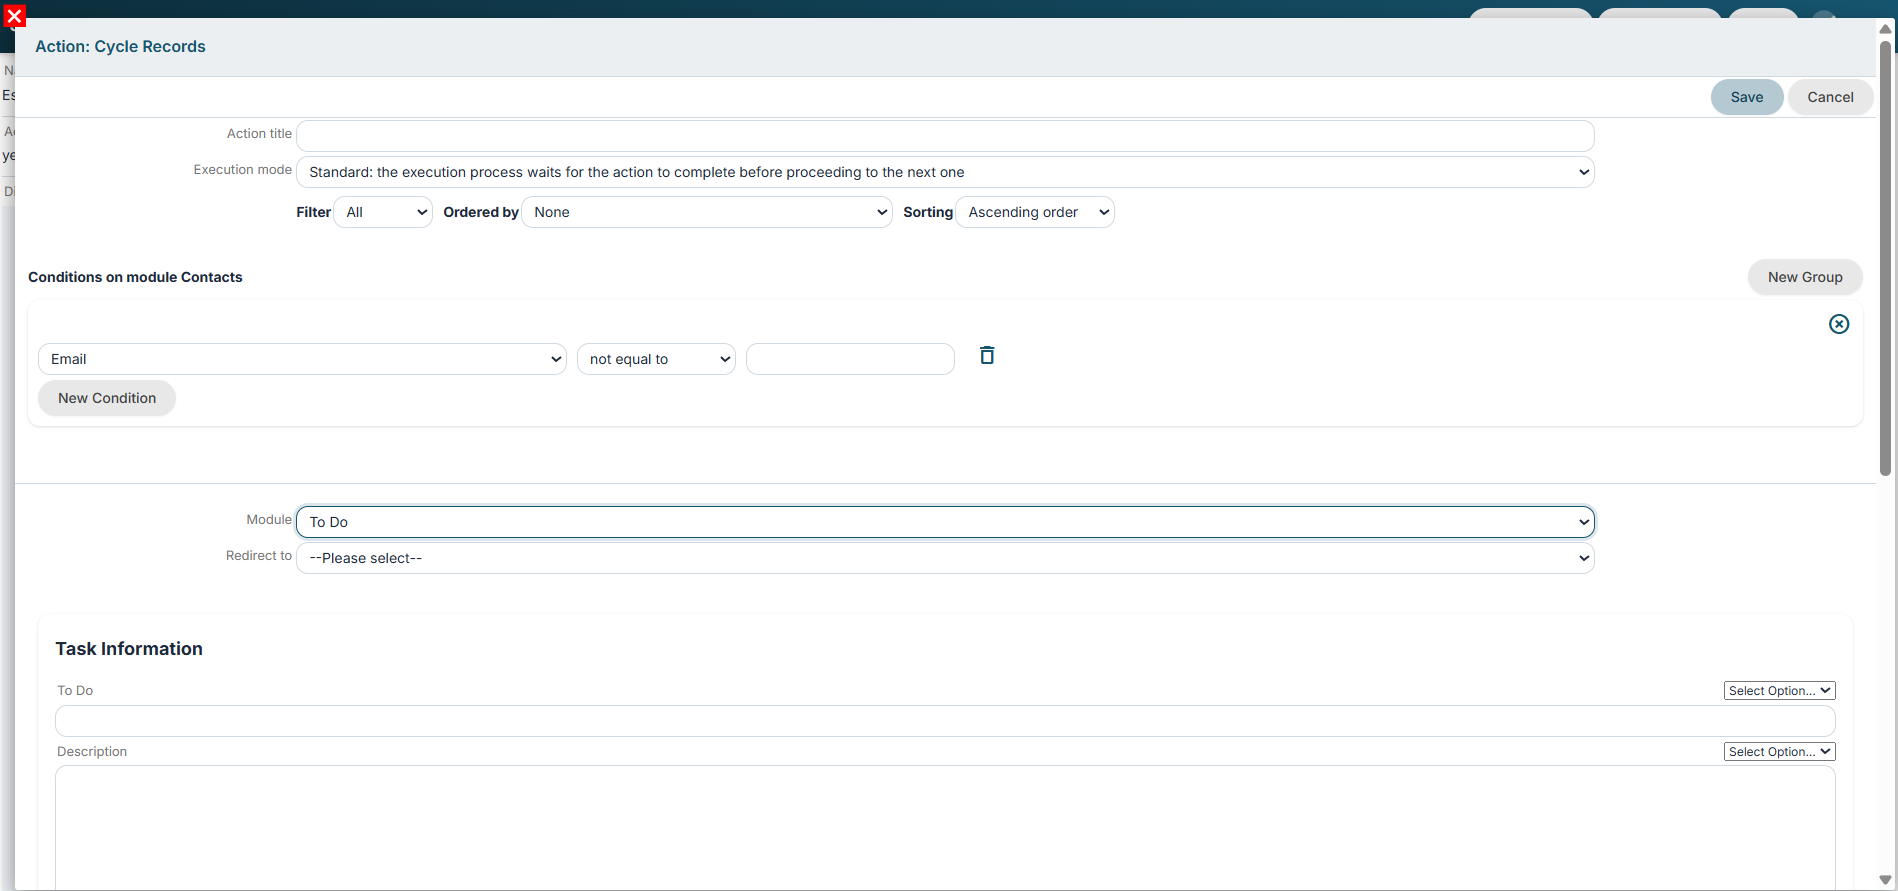
Figure 3
Update entity
Allows you to update an entity involved in the process for every record that meets the conditions set in the “Form conditions” section and the filters inherited as a baseline. (Figure 4)
Among the options available in the Entity picklist, the ID of the record currently being processed can be selected via a dedicated section that does not use a meta-ID.
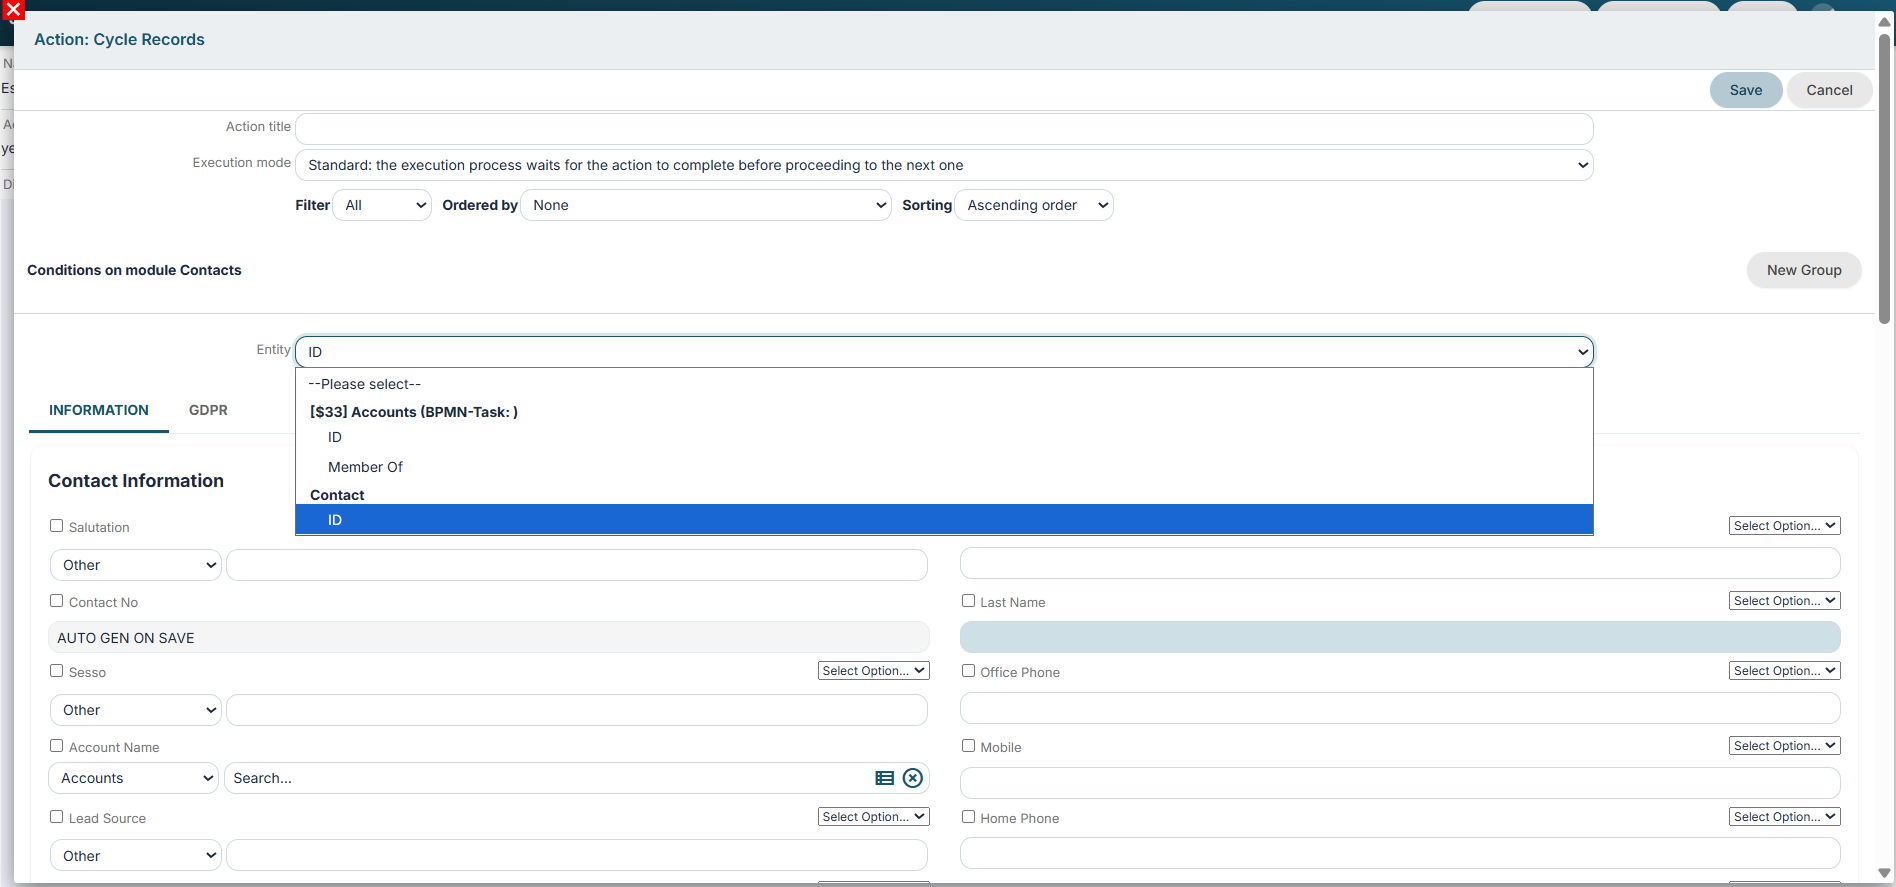
Figure 4
Send email
Allows you to send an email for each record that meets the conditions set in the “Form conditions” section and the filters inherited as a baseline. (Figure 5)
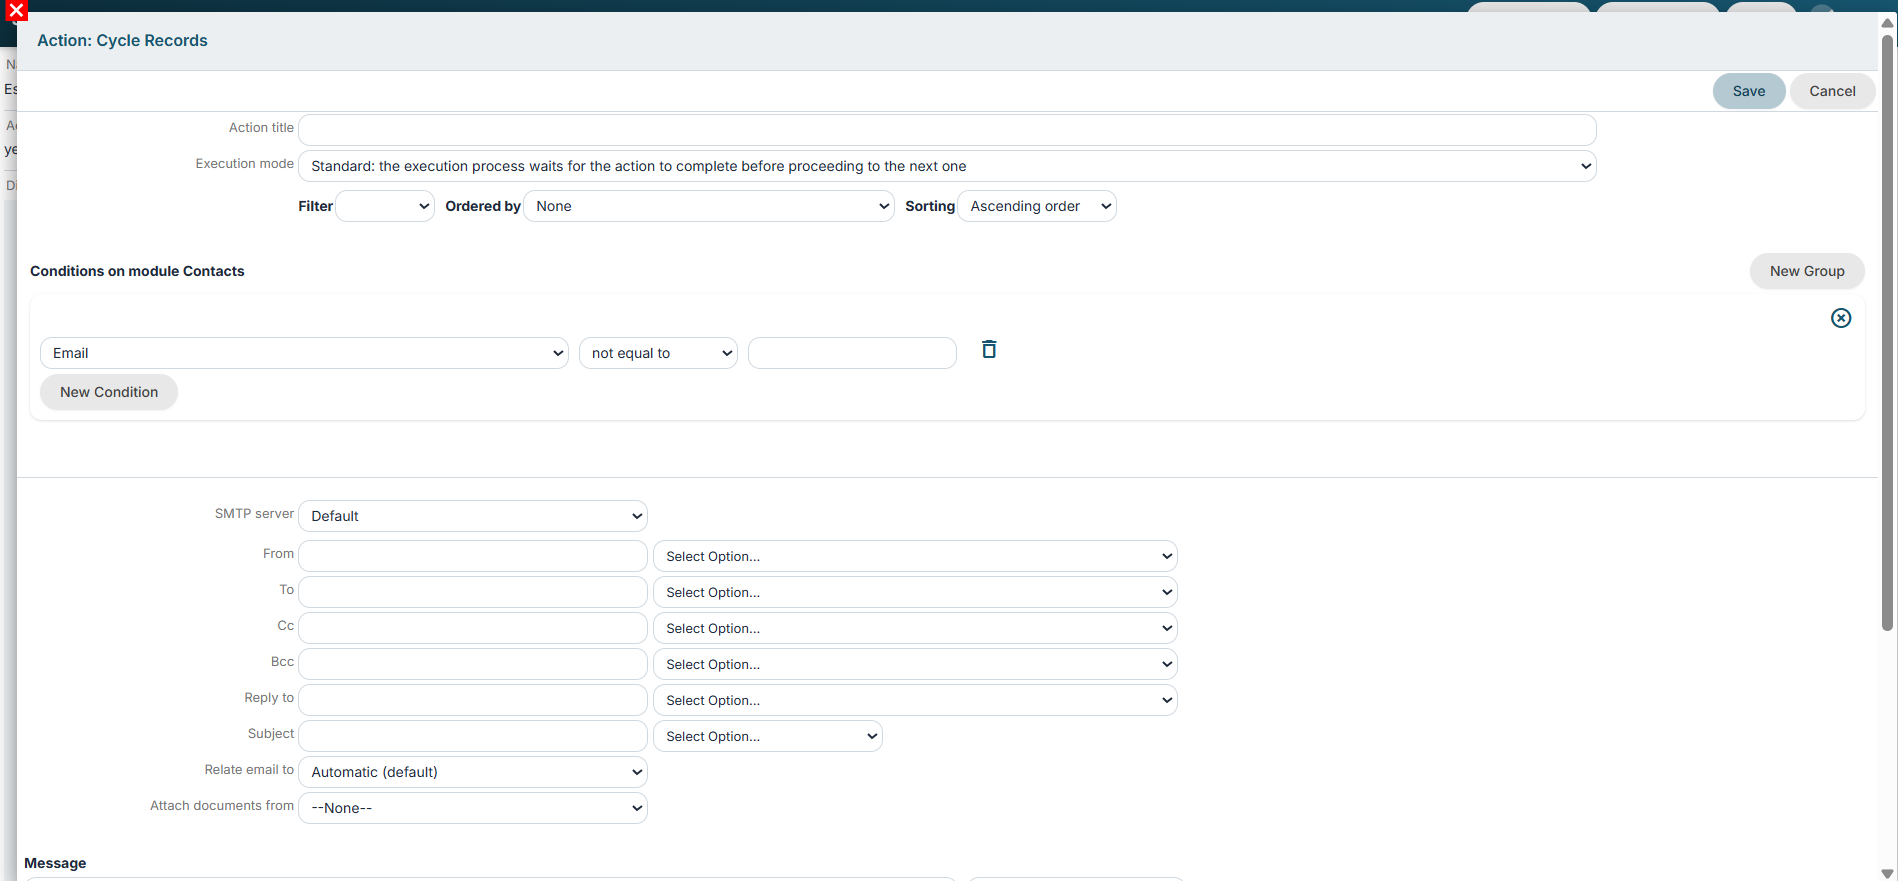
Figure 5
Sending a notification
Allows a notification to be sent for every record that meets the conditions set in the “Form conditions” section and the filters inherited as a baseline. (Figure 6)
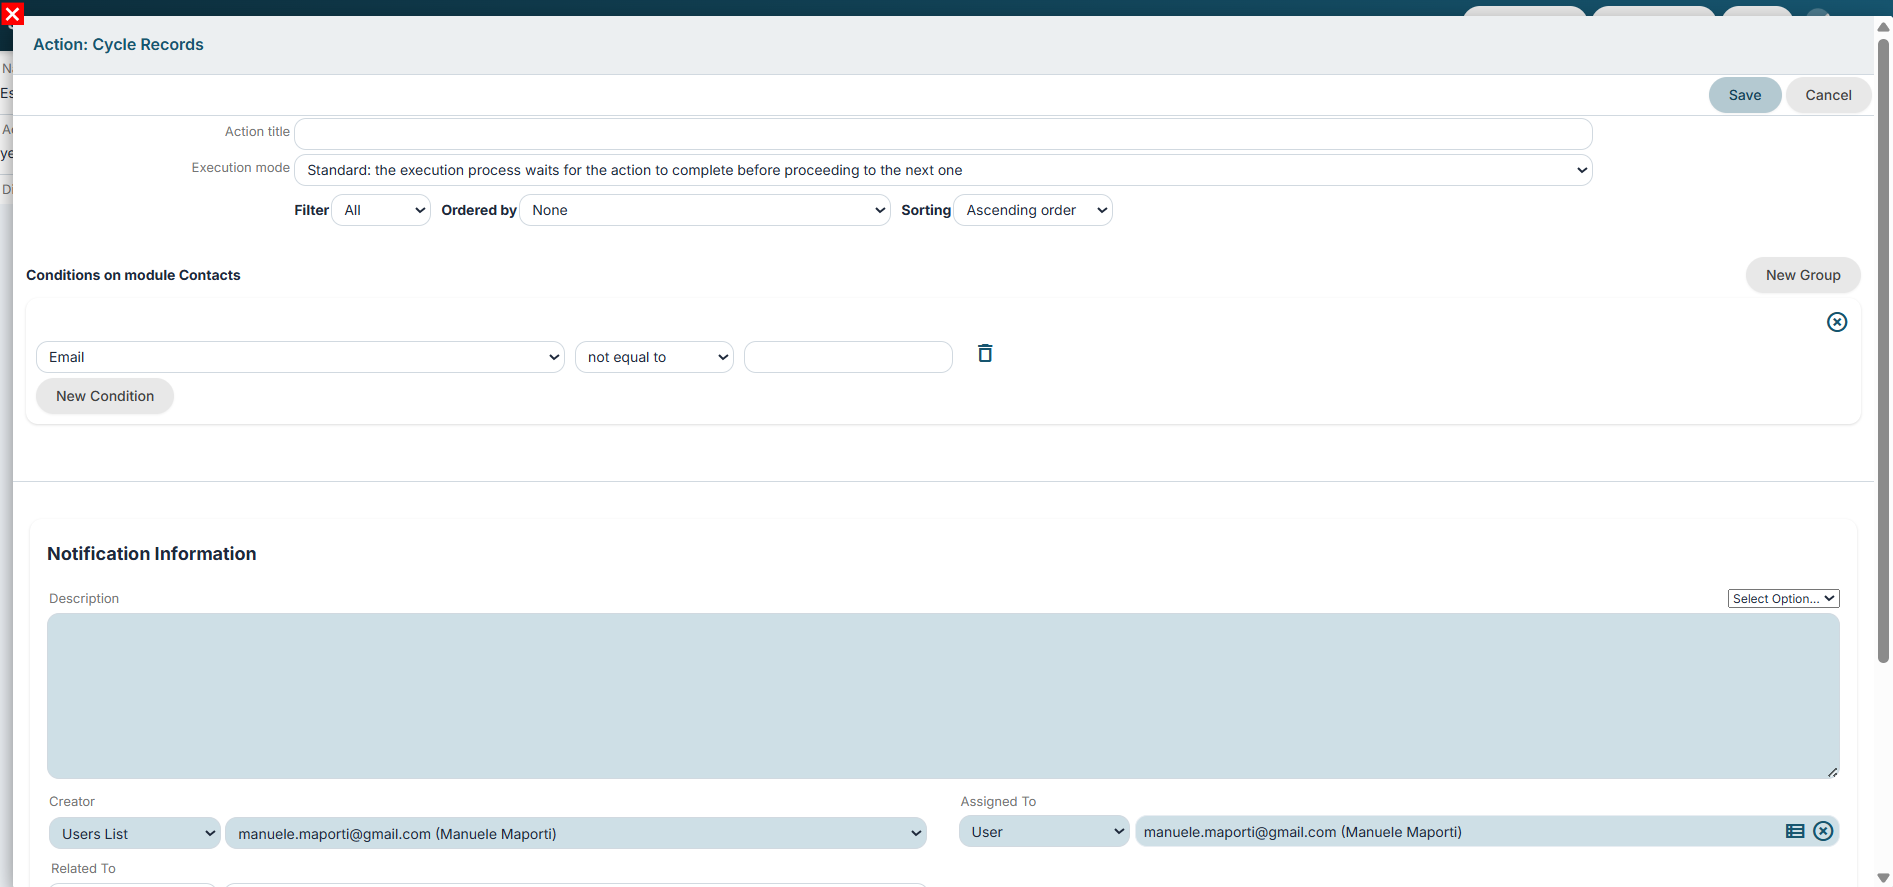
Figure 6
Create PDF
Allows you to create a PDF for each record that meets the conditions set in the “Form conditions” section and the filters inherited as a baseline. (Figure 7)
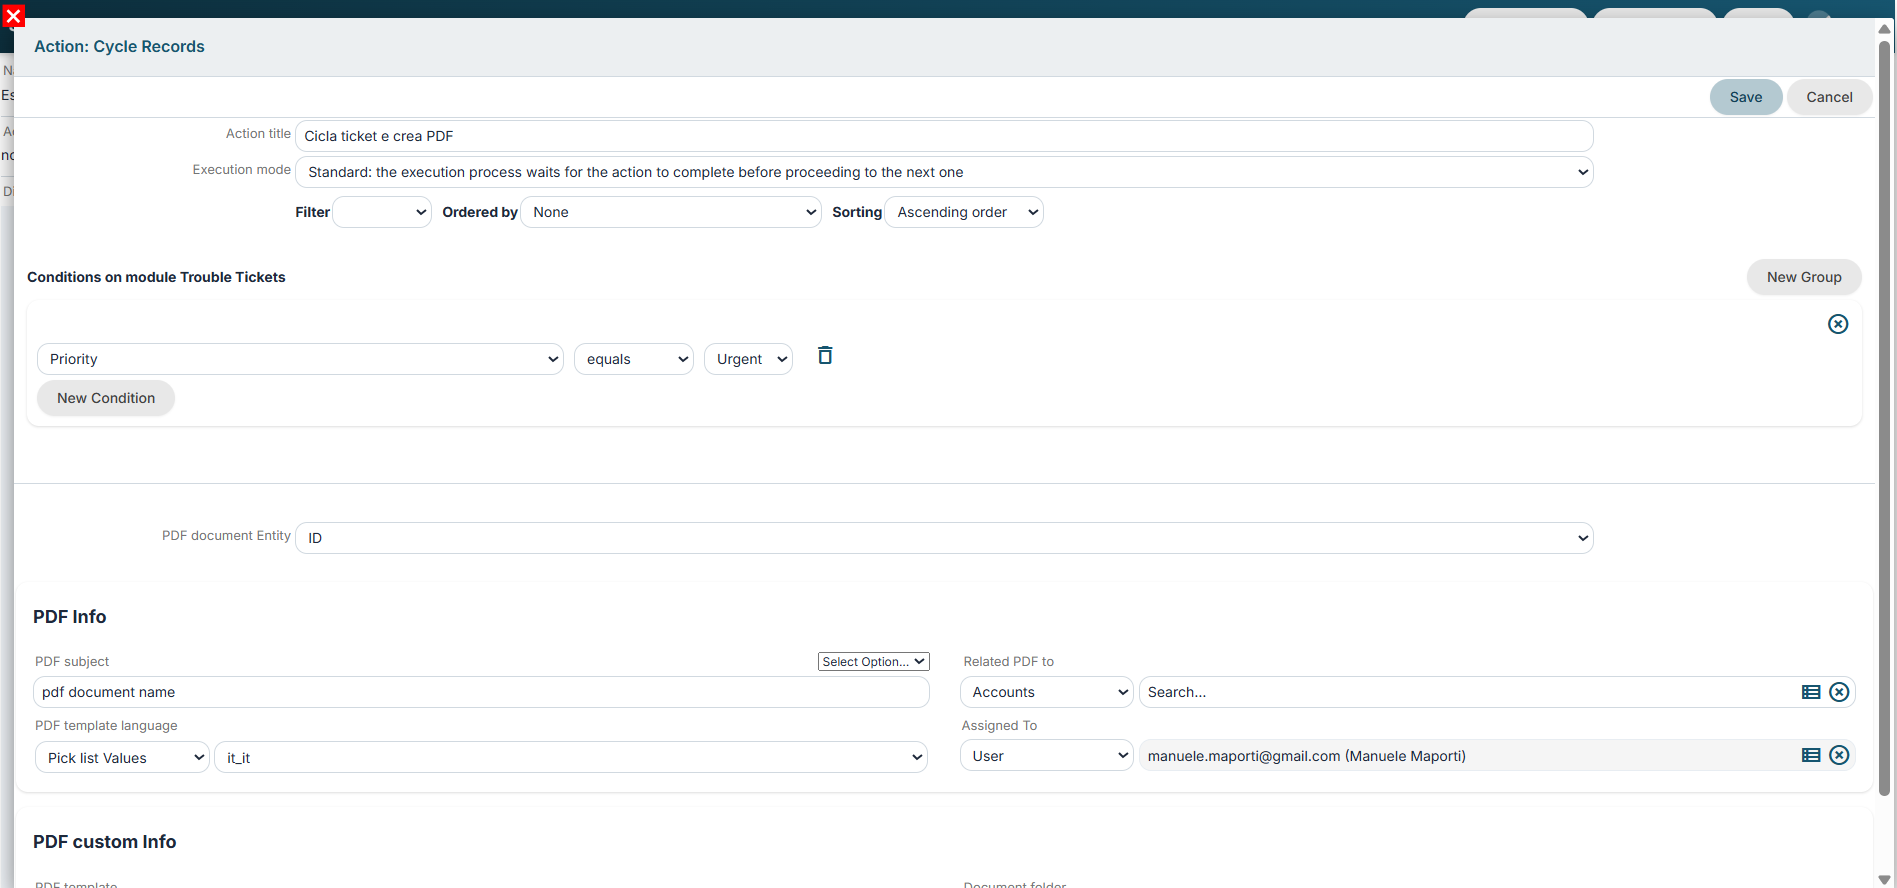
Figure 7
SDK Functions
Allows you to execute an SDK function of the "Action" type for each record that meets the conditions set in the "Form conditions" section and the filters inherited as a baseline. (Figure 8)
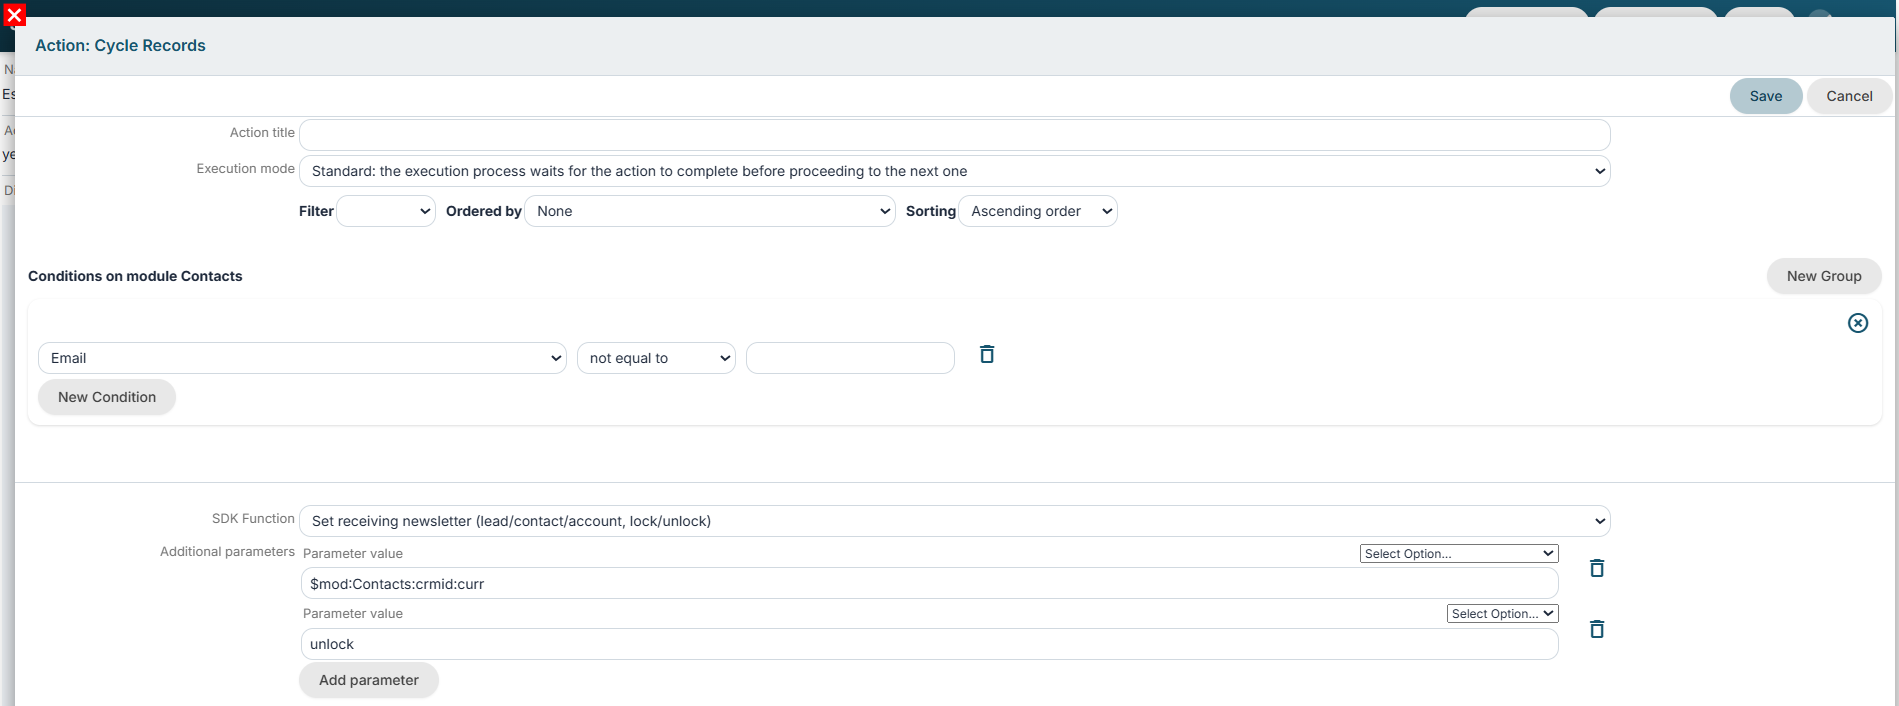
Figure 8
Call tool process
Allows you to launch an active tool process for each record that meets the conditions set in the “Form conditions” section and the filters inherited as a base. (Figure 9)
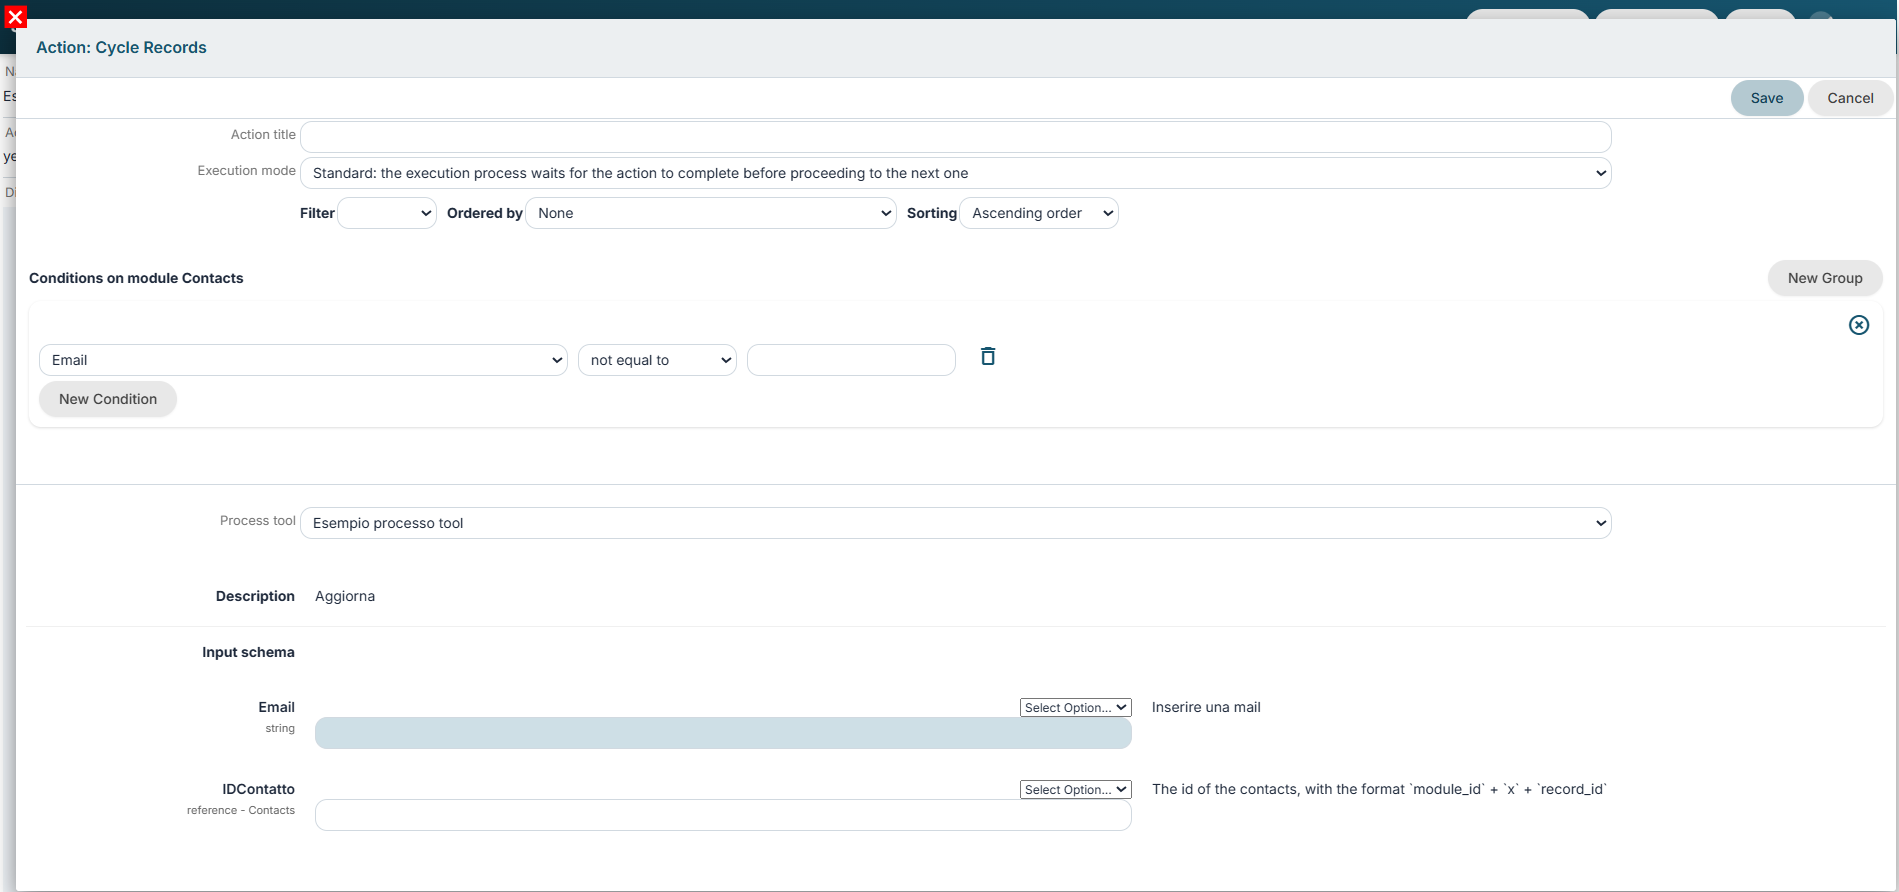
Figure 9
To utilize the contents of the fields in the form being iterated over, the system provides a dedicated entry in the "Select Option..." picklist labeled $mod (Figure 10).
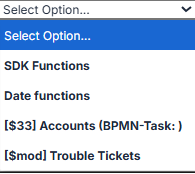
Figure 10