8 Advanced Process Configuration
- 8.1 Configuring an Advanced Process - Managing Installation Renewals
- 8.2 Activating an Advanced Process - Managing Installation Renewals
8.1 Configuring an Advanced Process - Managing Installation Renewals
FLOW DESCRIPTION
When creating a new installation, the process will be triggered and will wait until the “Next renewal expiration date” is reached.
Once the established time condition has been verified, the process will present a process helper in pop-up mode and will request its completion by the installation assignee.
If the renewal is confirmed, a new renewal will be created, the “Next renewal expiration date” of the installation will be updated and finally the timer will return to wait until the “Next renewal expiration date” just entered is reached.
Otherwise, the process will end after updating the installation with the renewal refusal reason entered by the user.
RENEWALS MODULE:
In order to better historicize all the renewals performed, we create a “Renewals” module with an N to 1 relationship with the “Installations” module and composed of the fields shown in Figure 1
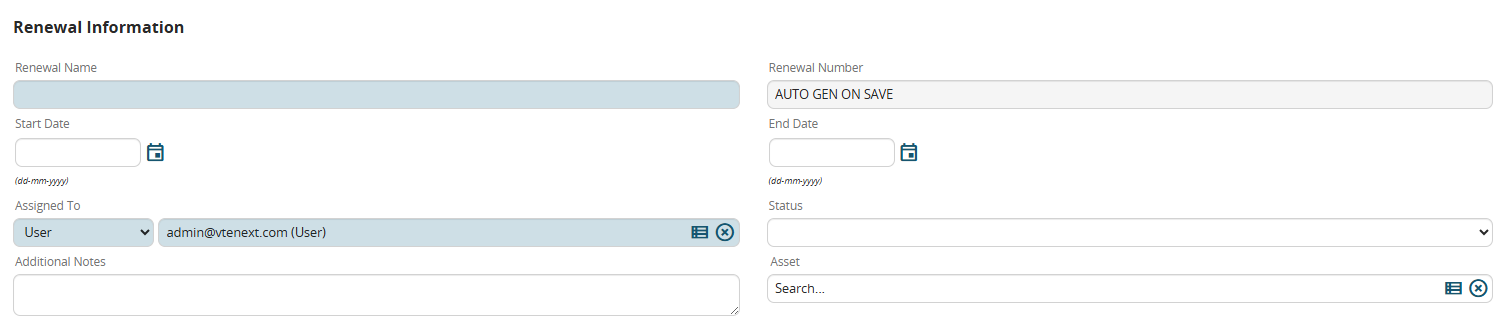
Figure 1
INSTALLATIONS MODULE REQUIREMENTS:
In the “Installations” module, we create the following fields:
-”Next renewal expiration date” (date field)
-”Reason for refusal of renewal” (text area field)
ELEMENTS REQUIRED IN THE PROCESS
To do this process, we will need the elements listed below:
-Condition Task
-Action Task
-Timer Intermediate Catch Event
-Gateway
-End Event
If their operation is not clear, we recommend first consulting chapter 2 of the process manual.
FLOW DIAGRAM CONFIGURATION
We use the elements mentioned above to set up a diagram like the one shown in Figure 2
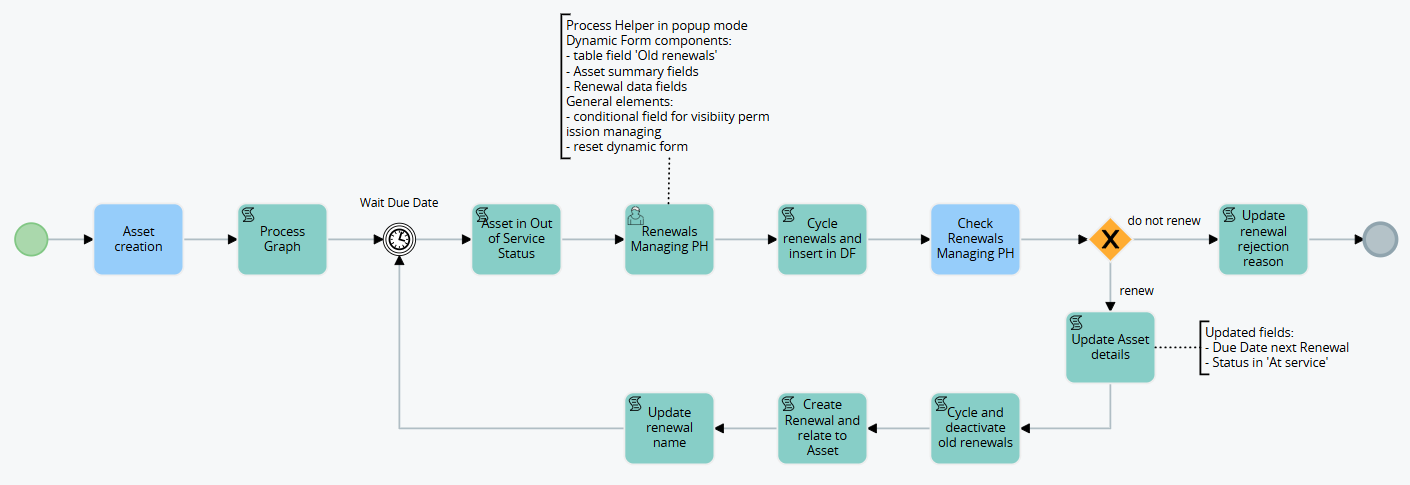
Figure 2
CONFIGURATION OF INDIVIDUAL ELEMENTS OF THE FLOW
Let's proceed with the configuration of the individual elements that make up the process flow.
Let's start with the Condition Task "Create new installation".
In the "When to run the check" section, select the "At creation" option to start the process only when the installation is created.
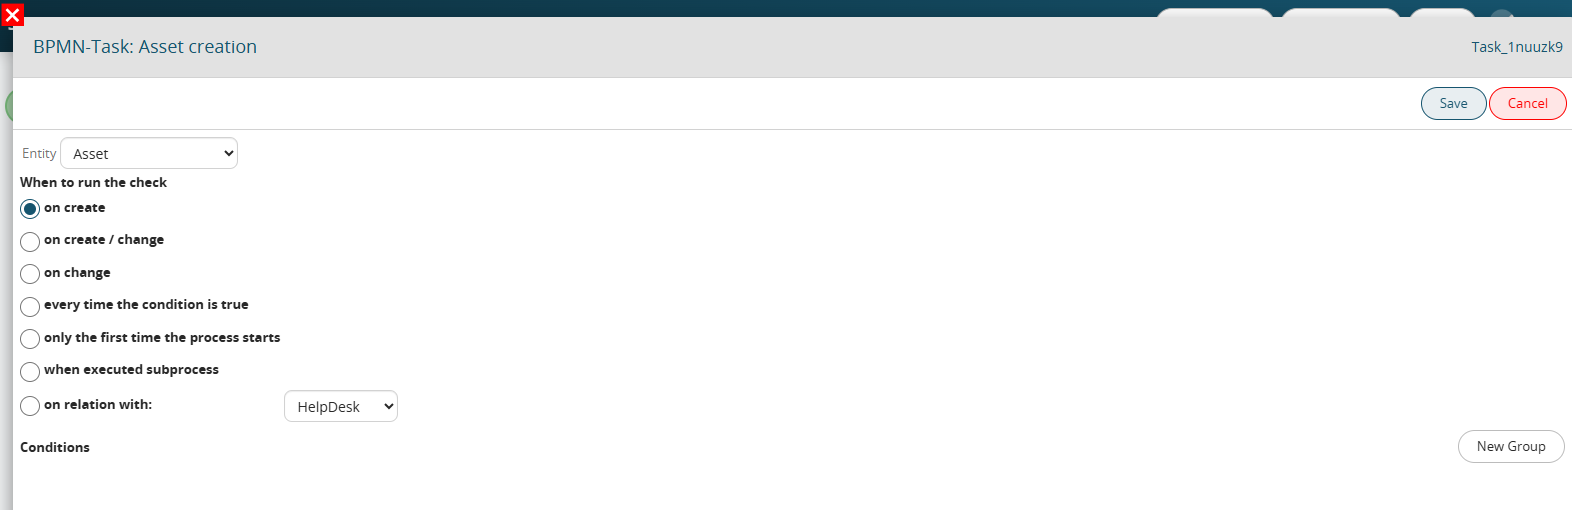
Figure 3
In the “Process Graph” ScriptTask we configure a process helper that we will use to be able to display the process graph in the “Process Graph” tab of the connected entity (see Figure 4).
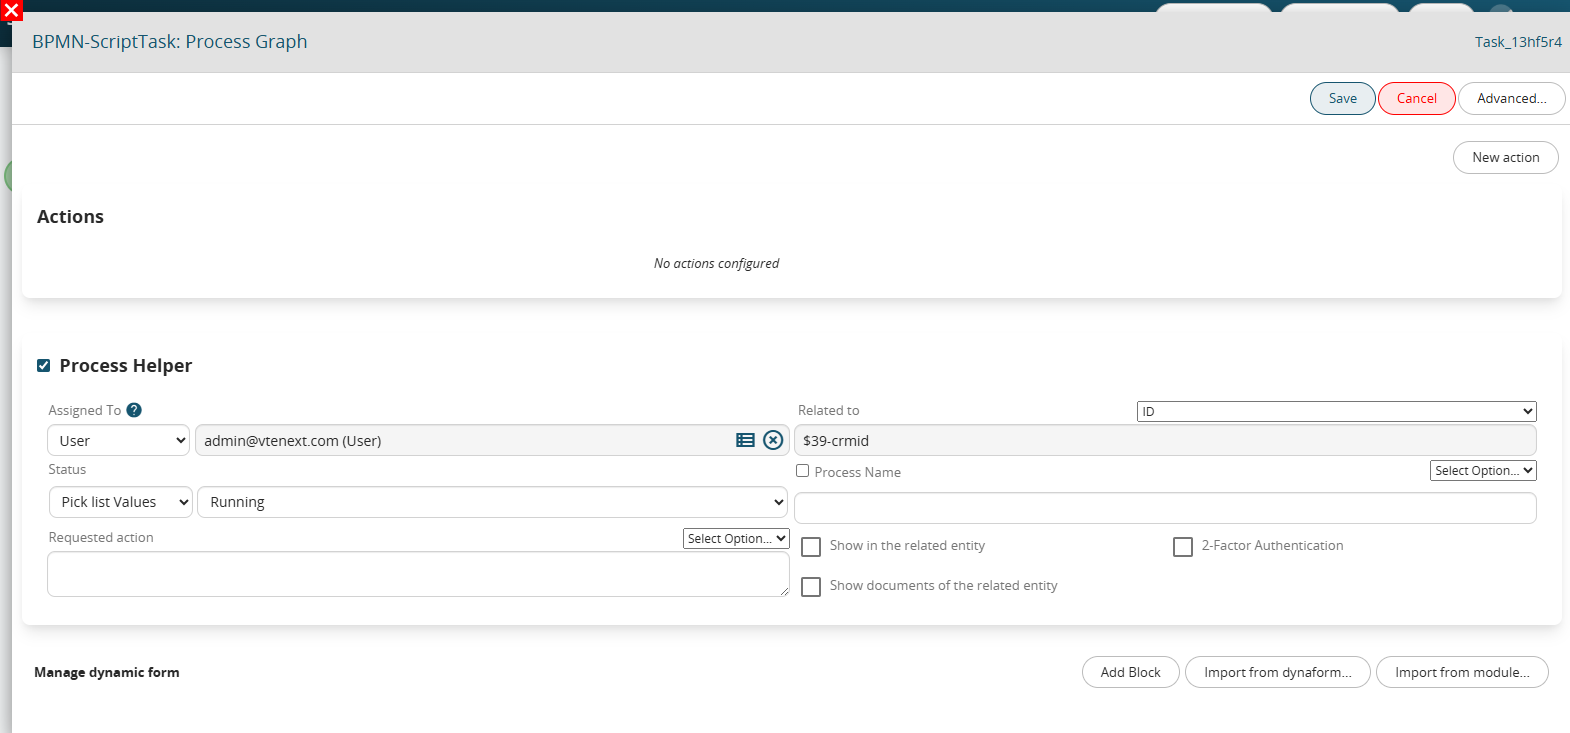 Figure 4
In the Timer intermediate catch event we set the following configuration:
Wait 0 “Before” “Other” → variable “Next installation renewal date” (see Figure 5).
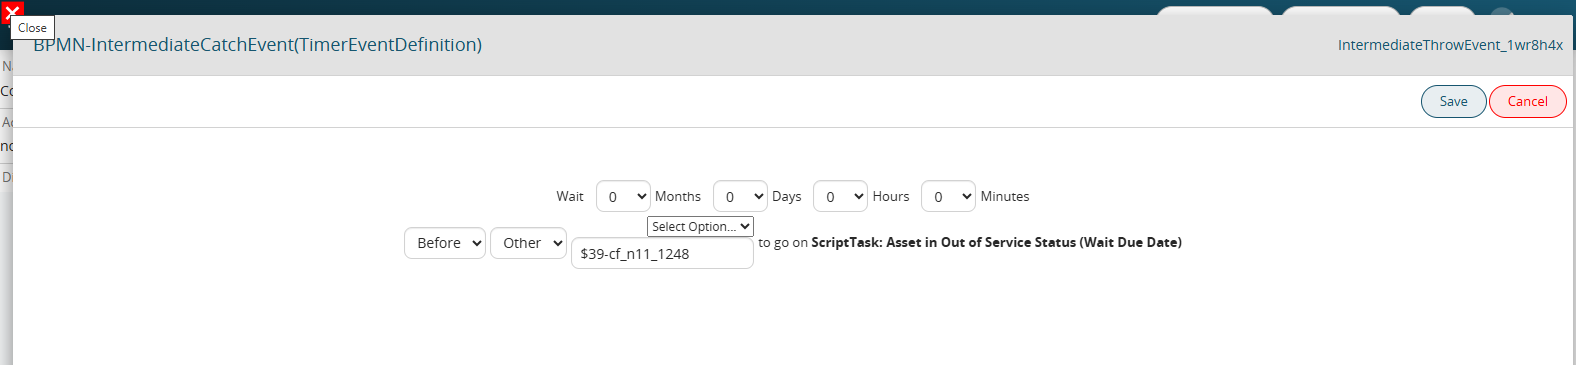
Figure 5
In the ScriptTask “Update installation status to Out of Service” we configure an Update Entity action to set the installation status to “Out of Service” (see Figure 6)
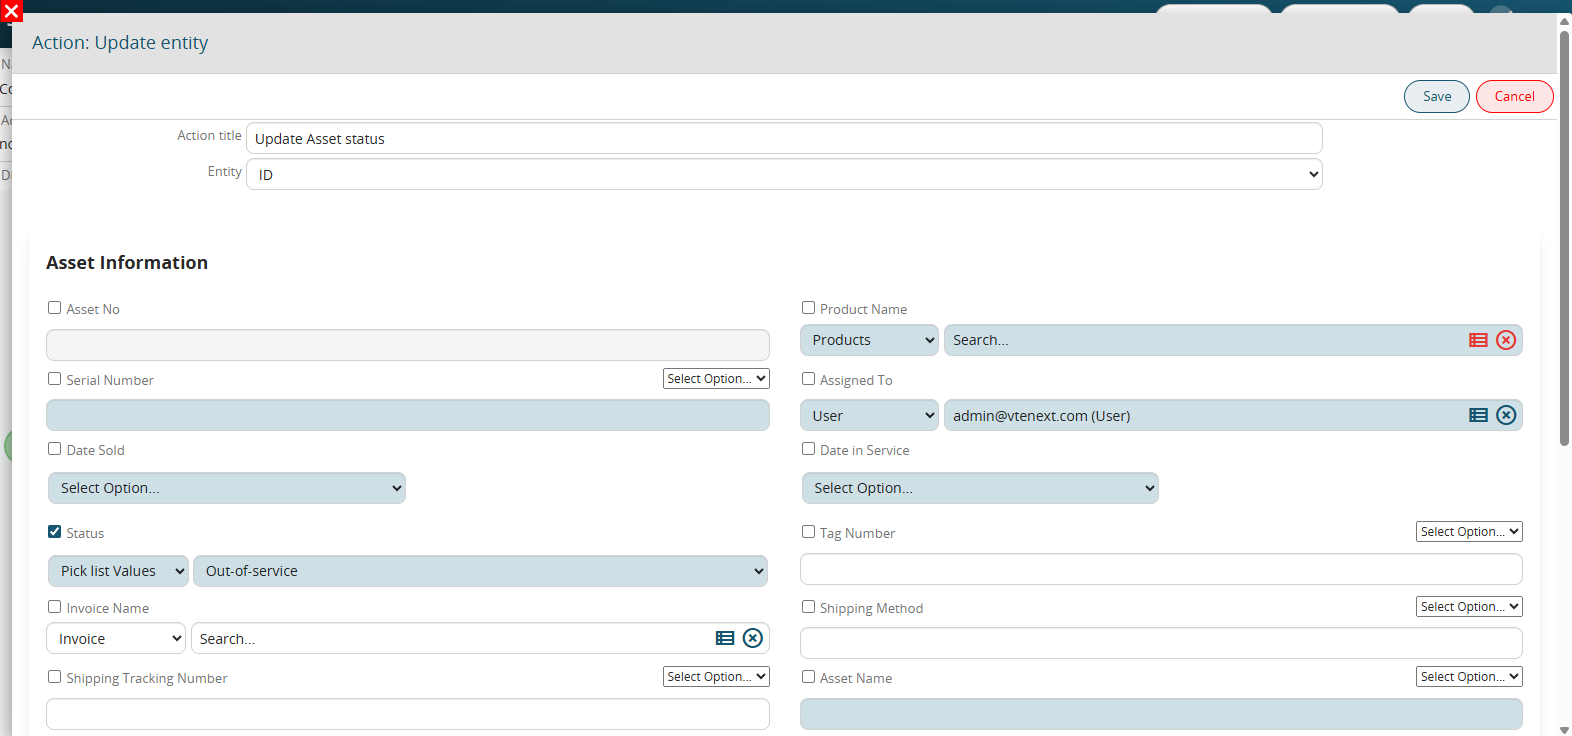
Figure 6
In the UserTask “PH renewal management” we configure a process helper in order to request the user for the information necessary for managing the renewal.
“Process Helper” block configuration:
-in the “Assigned to” field we insert the assignee of the installation
-in the “Linked to” field we insert the installation ID
-in the “Process Name” field we indicate the name that will be assigned to the process in this specific step, then we insert the static part “Renewal Management” followed by the value of the “Installation Name” variable
-in the “Requested Action” field we insert a brief description of the activity to be performed
-we check the “Show in the linked entity” checkbox to activate the process helper popup mode
The result will be the one shown in Figure 7.

Figure 7
Dynamic form configuration:
In the dynamic form we create the following blocks:
A) “Installation Information” block (see Figure 8) with the following fields:
1 “Installation Name” (text field)
2 “Company” (picklist field)
3 “Date to service” (date field)
4 “Status” (picklist field)

Figure 8
B) “Renewal Information” block (see Figure 9) with the following fields:
1 “Renewals” table field (see Figure 10) with the following columns:
1.1 “Renewal Name” (text field)
1.2 “Start Date” (date field)
1.3 “End Date” (date field)
1.4 “Additional Notes” (text area field)
N.B: We set the read-only permissions in both the table field and the individual columns since only past renewals will be reported in it
2 “Action” (picklist field) with the following values: empty, “Renew” and “Do not renew” (see Figure 11)-“Number of Months for Renewal” (number field)
3 “Additional Notes” (text area field)
4 “Reason for Renewal Refusal” (text area field)

Figure 9
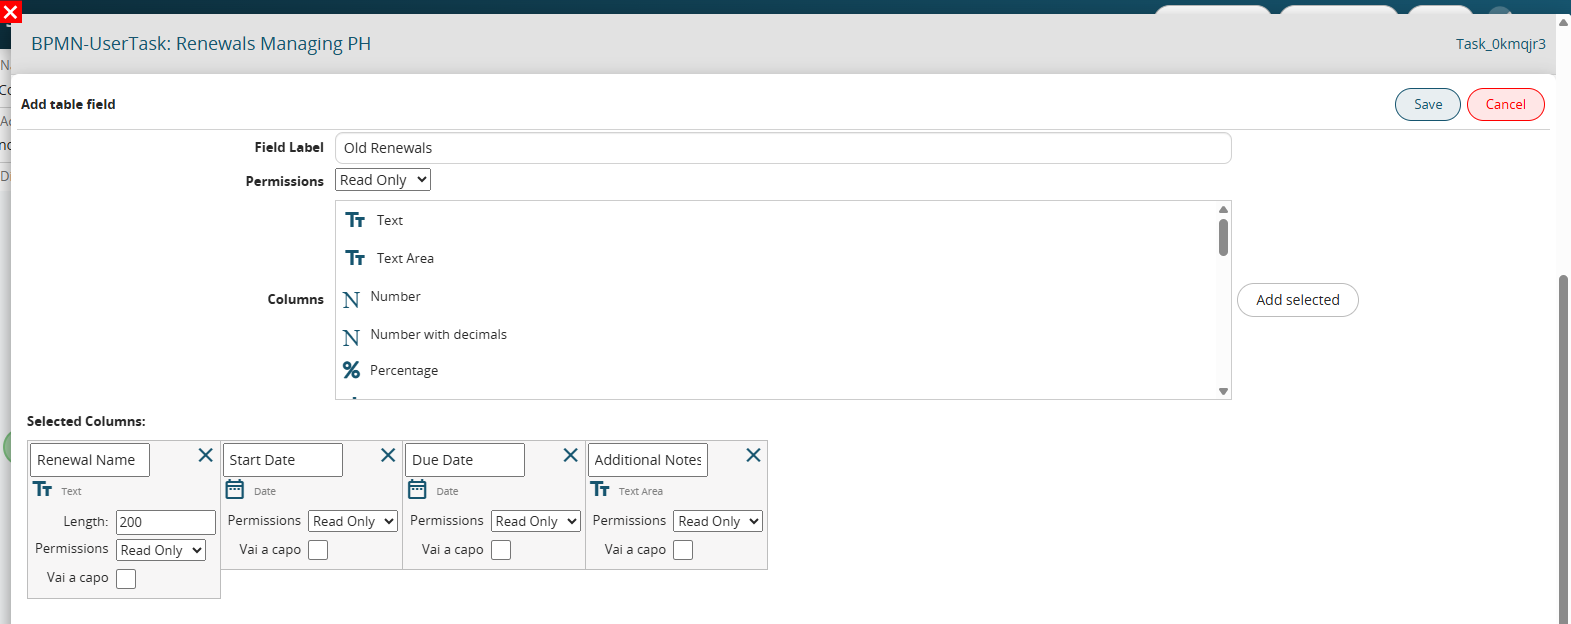
Figure 10
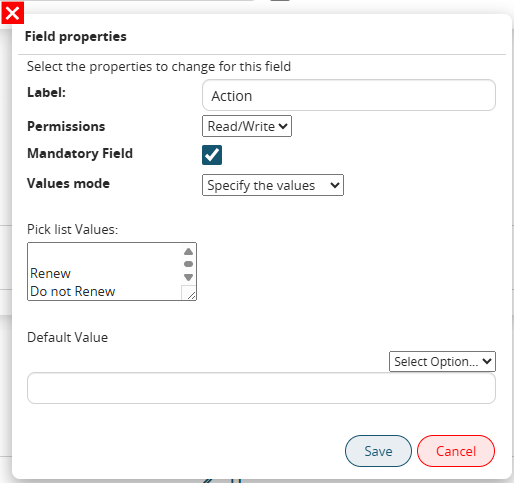
Figure 11
Dynamic Form Reset Action Configuration
Let's create a "Dynamic Form Reset" action so that at the next renewal the process helper can be filled again as the values of the fields in the form will be reset (see Figure 12).
 Figure 12
Conditional fields configuration on dynamic form
Let's set up a series of rules to manage the visibility permissions of the form fields in order to provide the user with a clearer and more efficient filling experience.
So let's create the following rules:
-if Action equals Do not renew hide Number of months Renewal, Additional notes and put mandatory Reason for refusal of renewal (see Figures 13 and 14)
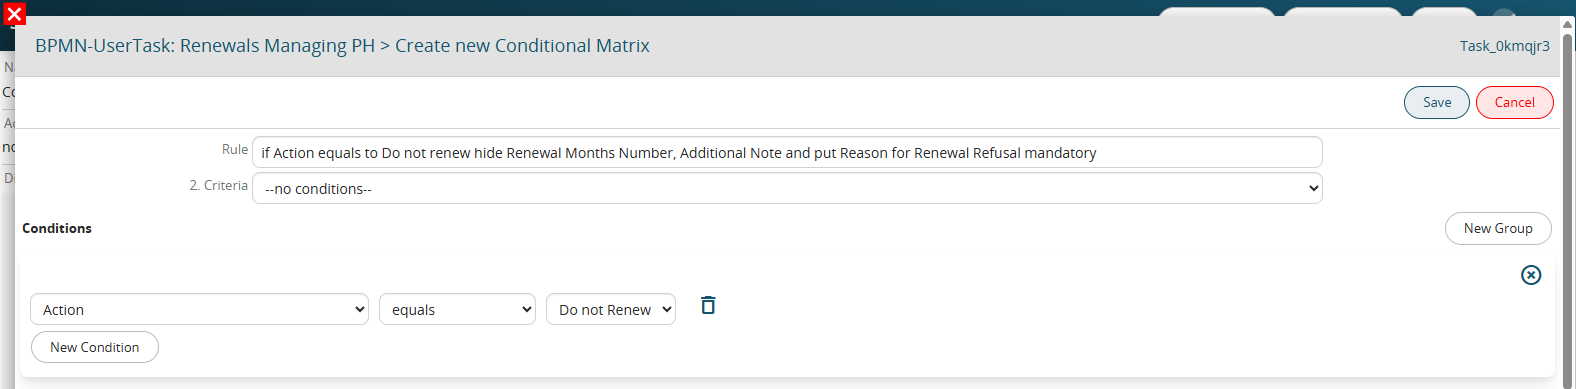 Figure 13

Figure 14
-if Past Renewals table field has 0 rows hide it (see Figures 15 and 16)
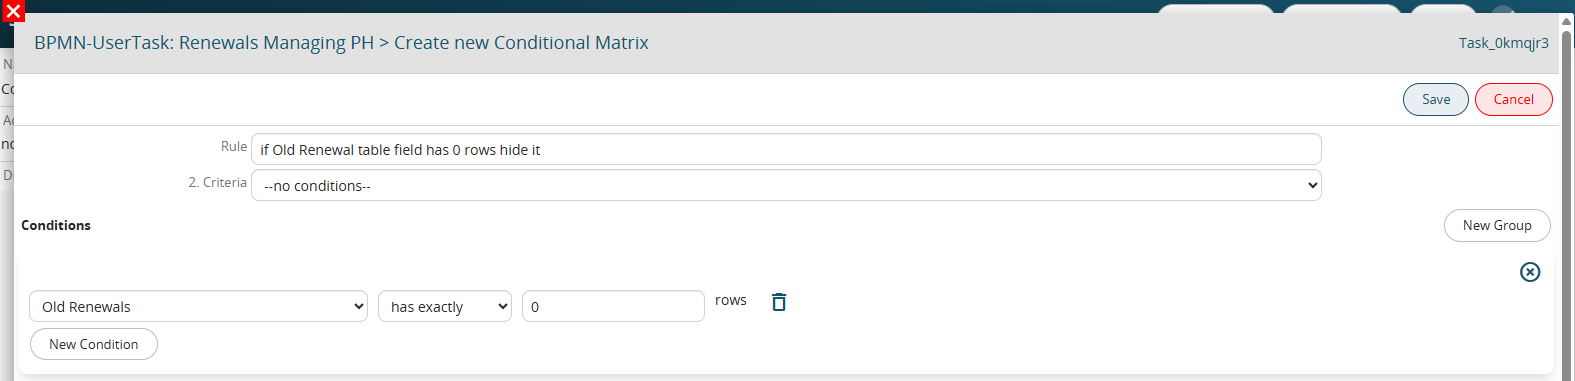
Figure 15
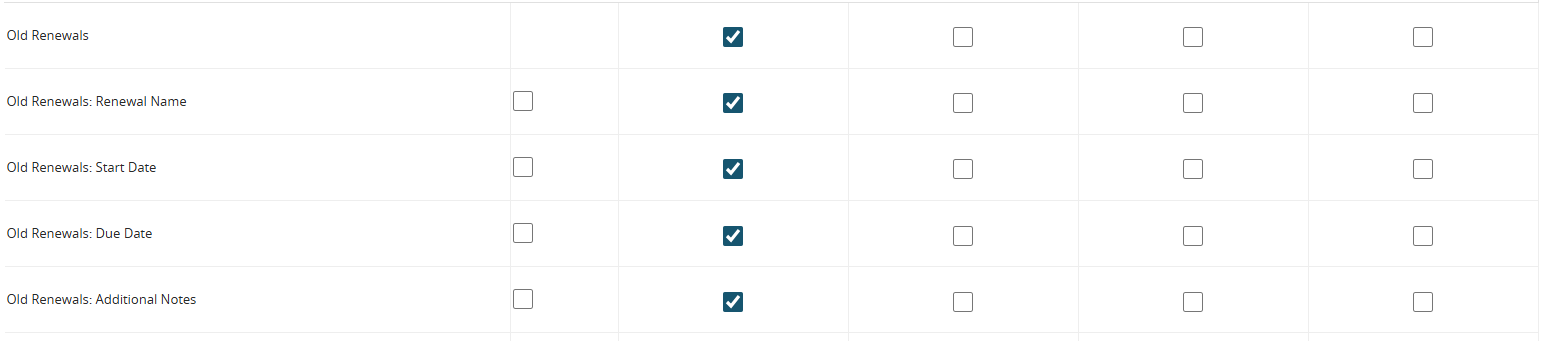
Figure 16
-if Action equals Renew, set the Number of months of renewal as mandatory and hide the Reason for refusal of renewal (see Figures 17 and 18)
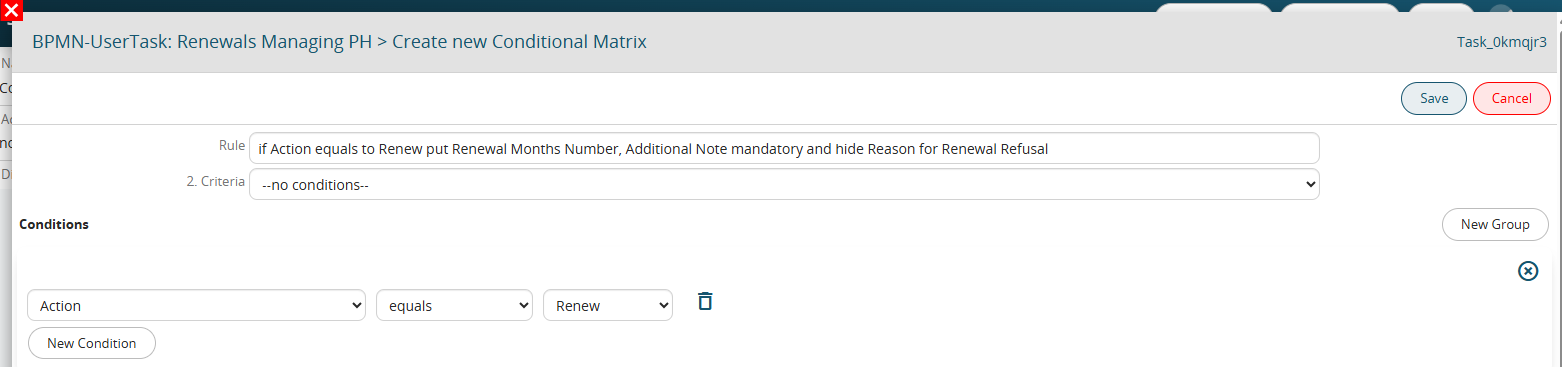
Figure 17
 Figure 18
-if Action equals empty hide Number of months Renewal, Additional Notes and Reason for Renewal Refusal (see Figures 19 and 20)
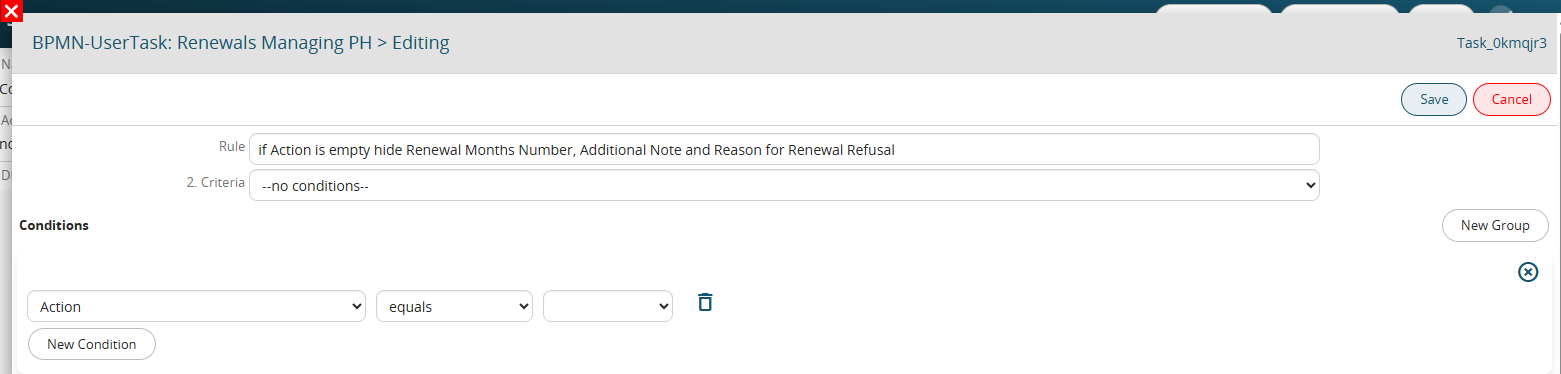
Figure 19

Figure 20
In the ScriptTask “Cycle renewals and insert into dynamic form” we configure an action to cycle related records and insert into the table field “Past Renewals” to give the user visibility of all past renewals (see Figure 21).
Then in each column of the table field we insert the “current” value of the corresponding fields of the Renewals form (see Figure 22).
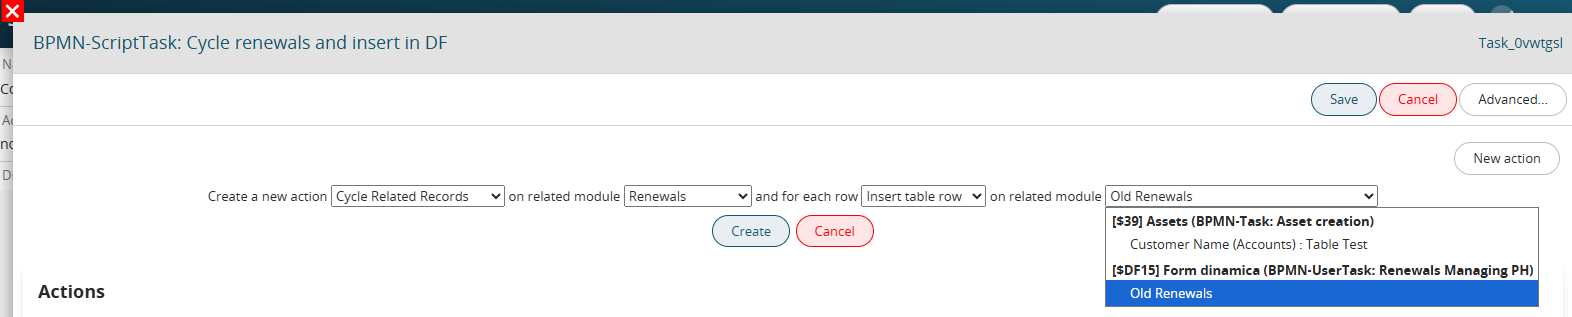
Figure 21
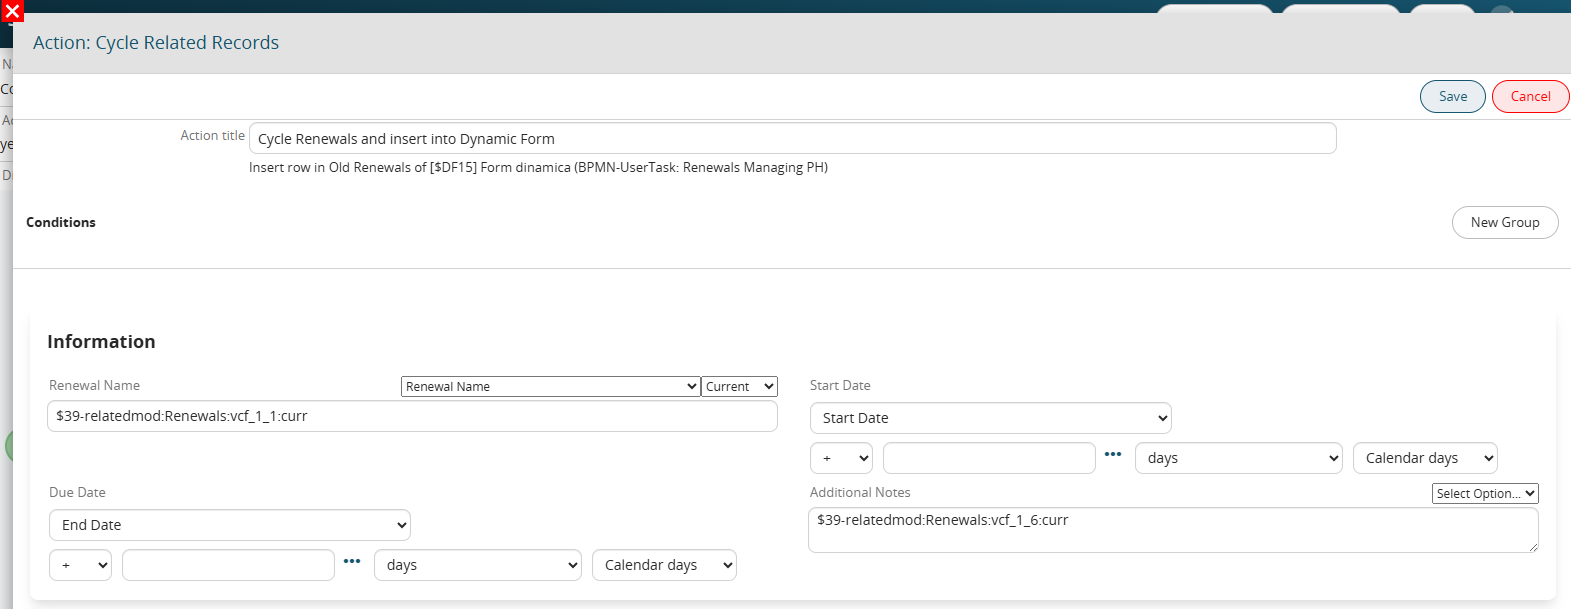
Figure 22
In the Condition Task “PH renewal management control” we are going to perform a check on the “Action” field of the process helper form to direct the process in the branch related to the value entered by the user (see Figure 23)
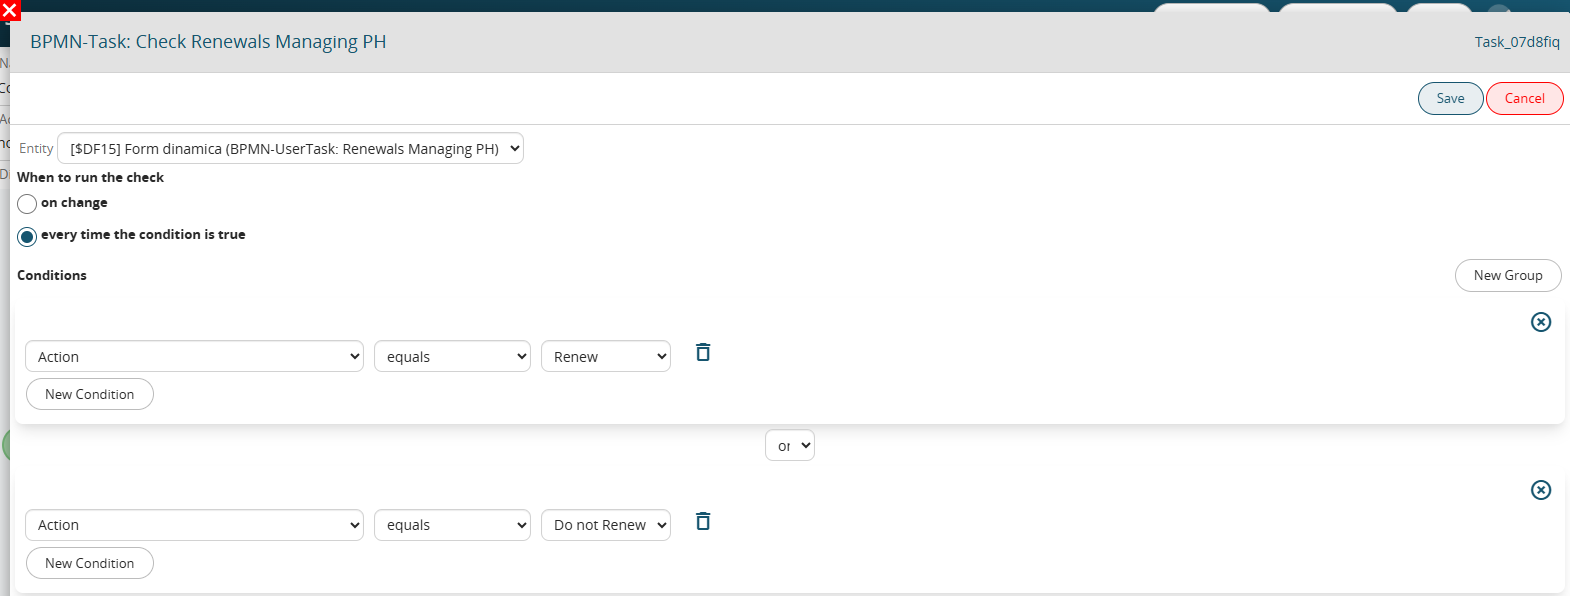 Figure 23
In the next gateway we associate each group of conditions (inserted in the previous task) with the corresponding branch to follow (see Figure 24)

Figure 24
Configuring the elements following the “Do not renew” branch
In the “Update renewal refusal reason” ScriptTask we configure an update entity action to update the “Renewal refusal reason” field of the installation with the content of the “Renewal refusal reason” field of the process helper form (see Figure 25).
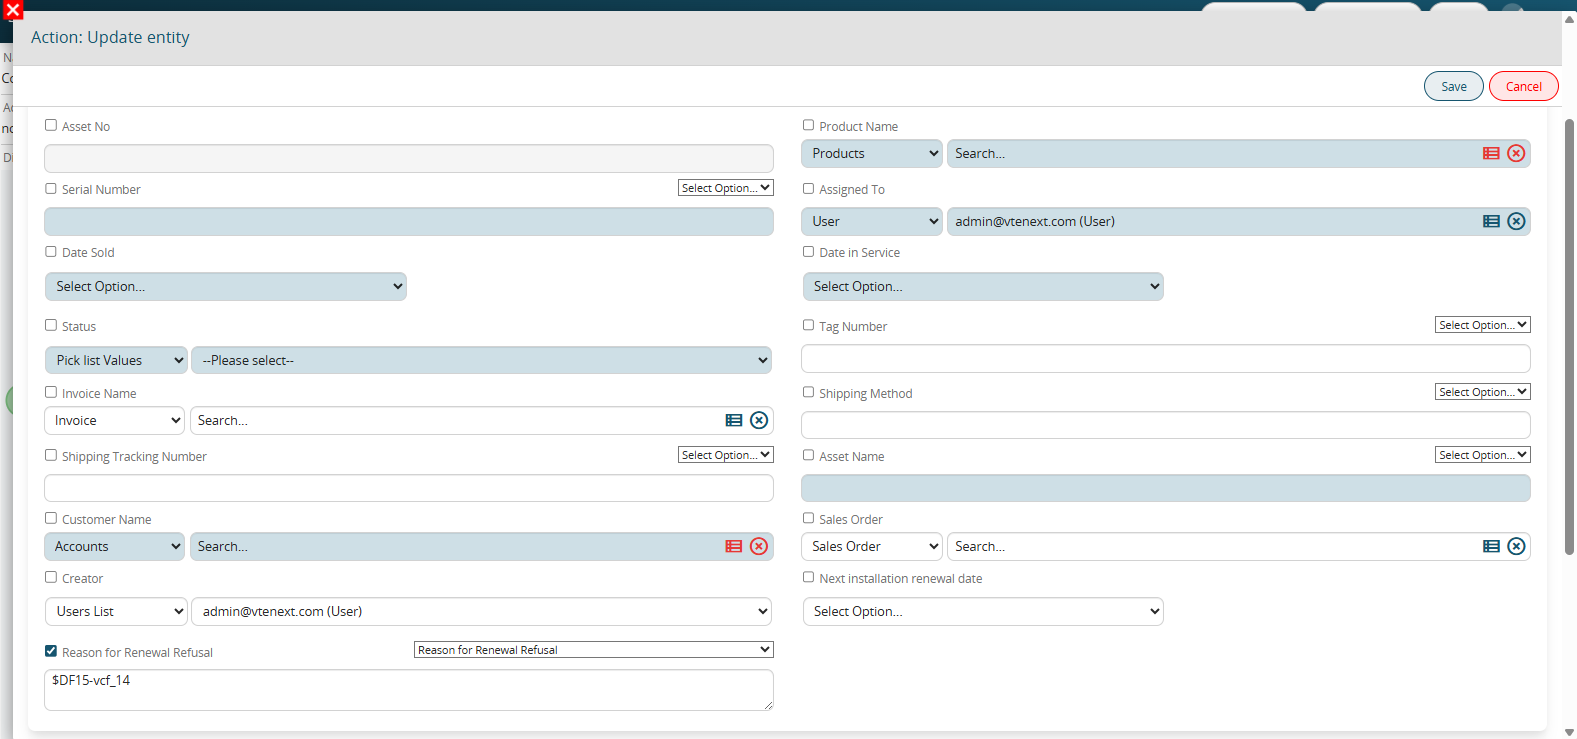
Figure 25
The endEvent must also be configured, because we have involved a process helper in the process, so it is necessary to activate a process helper inside it to set the process status to “Terminated” (see Figure 26)
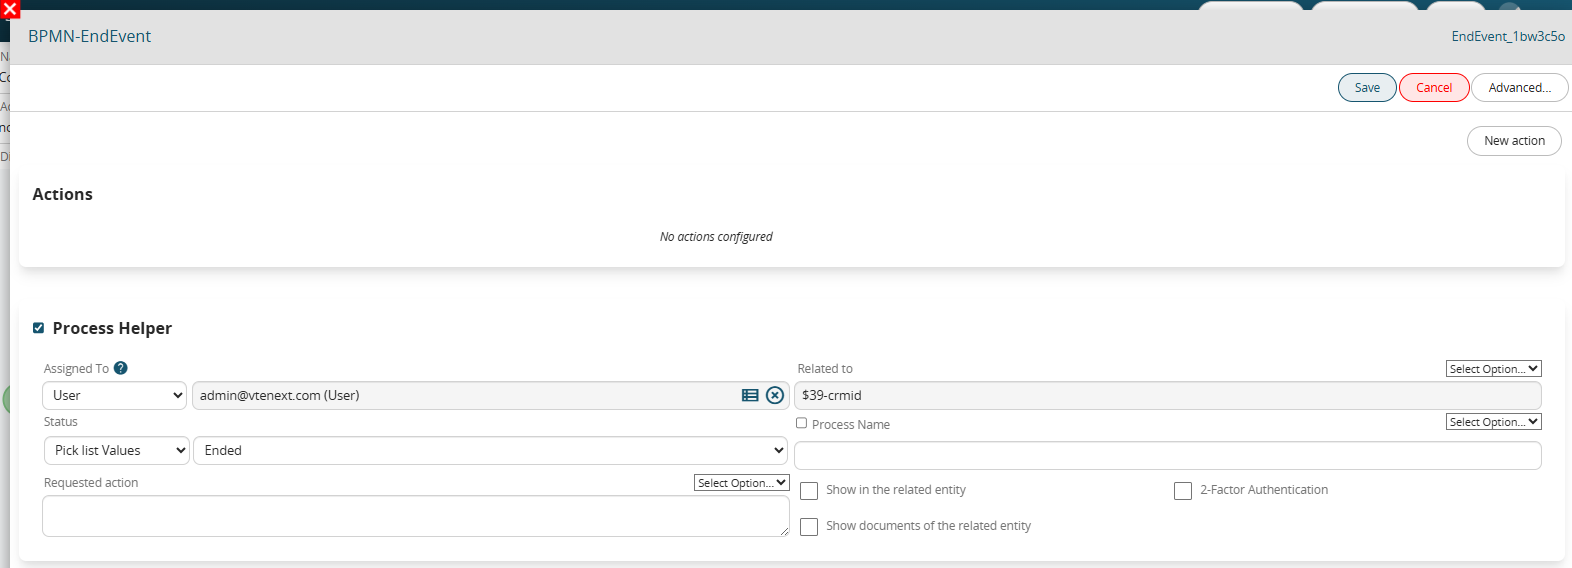
Figure 26
Configuring the elements following the “Renew” branch
In the “Update installation data” ScriptTask we configure an update entity action to update the value of the following fields (see Figure 27):
-“Next renewal expiration date”: Now + variable of the “Number of months Renewal” process helper form
-”Status”: “In Service”
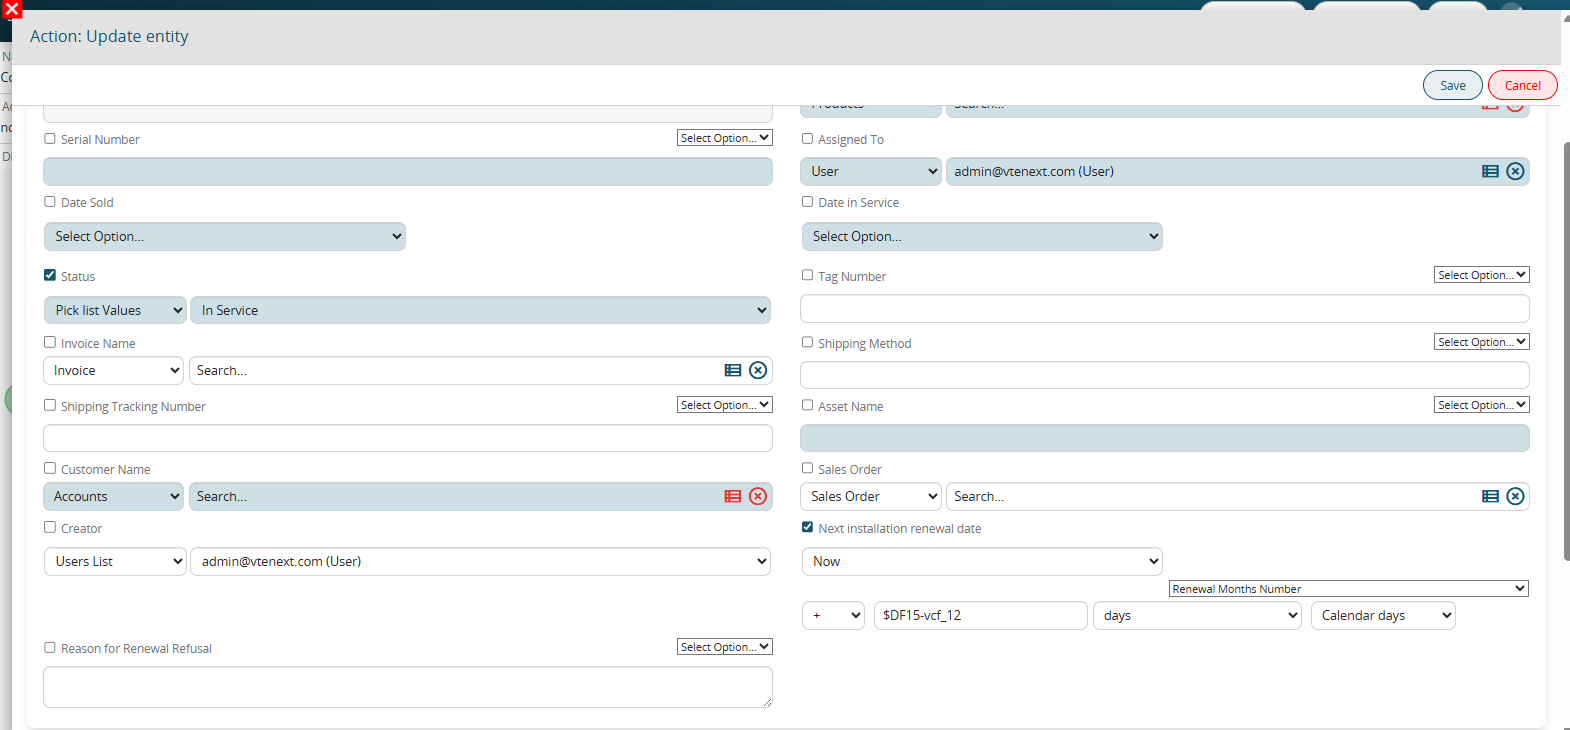 Figure 27
In the ScriptTask “Cycle previous renewals and deactivate them” we configure an action “Cycle related records and update entities” to update all renewals linked to the installation by setting their status to “Inactive” (see Figures 28 and 29)
 Figure 28
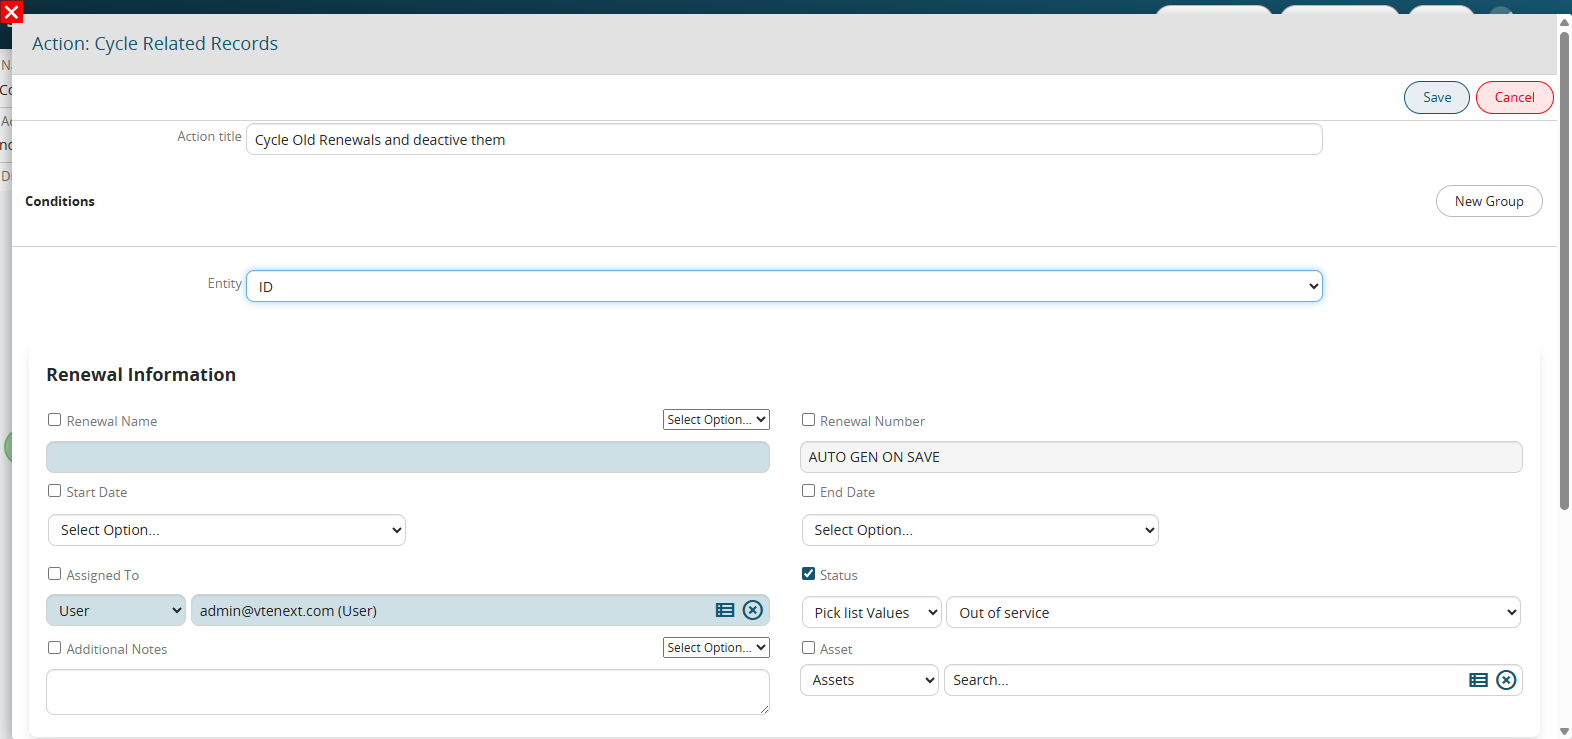
Figure 29
In the “Create renewal and link it to the installation” ScriptTask we configure a create entity action to create a renewal form record and link it to the installation (see Figure 30).
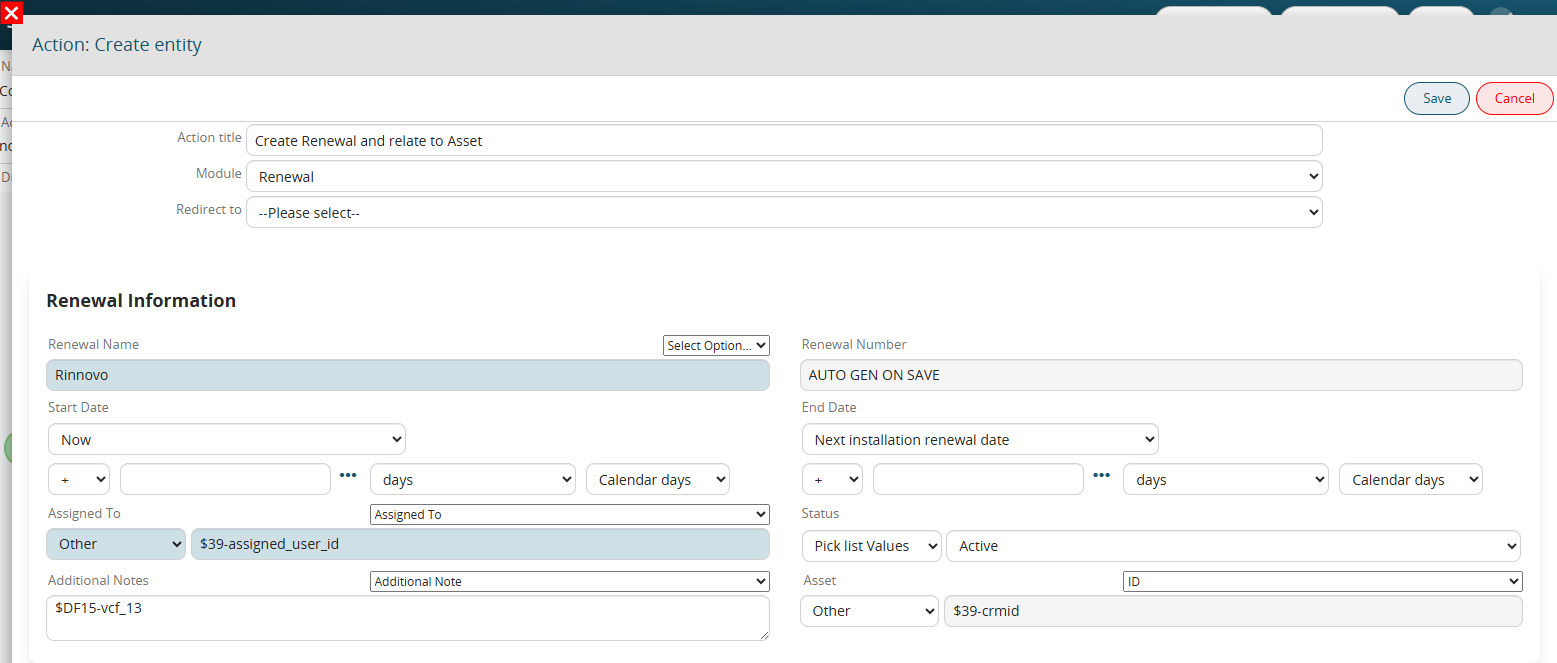 Figure 30
In the ScriptTask “Update renewal name” we configure an update entity action on the renewal to update the “Renewal Name” field by inserting the contents of the field itself and then the contents of the “Renewal Number” variable.
In this way, each renewal that will be created will have a first part composed of the word “Renewal” and a second part composed of a progressive dynamic number (Renewal Name). (See Figure 31)
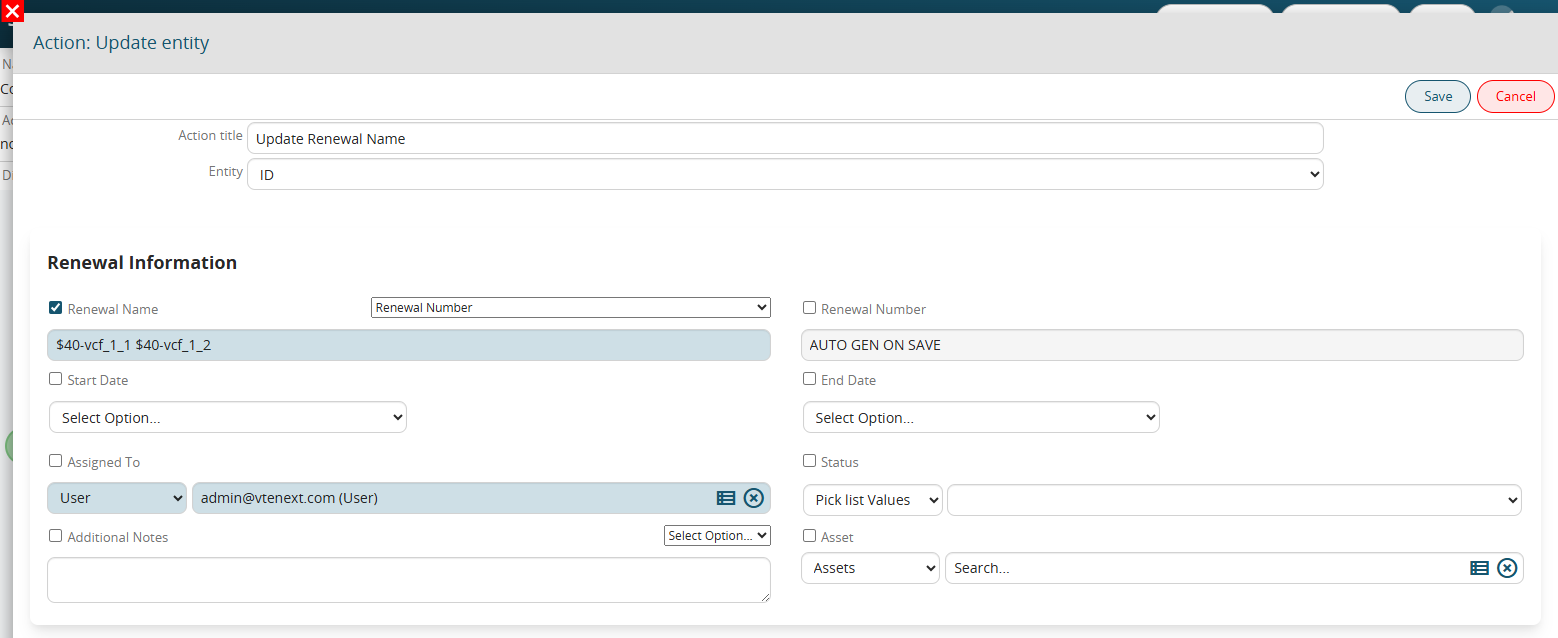
Figure 31
8.2 Activating an Advanced Process - Managing Installation Renewals
Now let's proceed with the vision of the process in action.
We then create a new installation by entering the required information (see Figure 1).
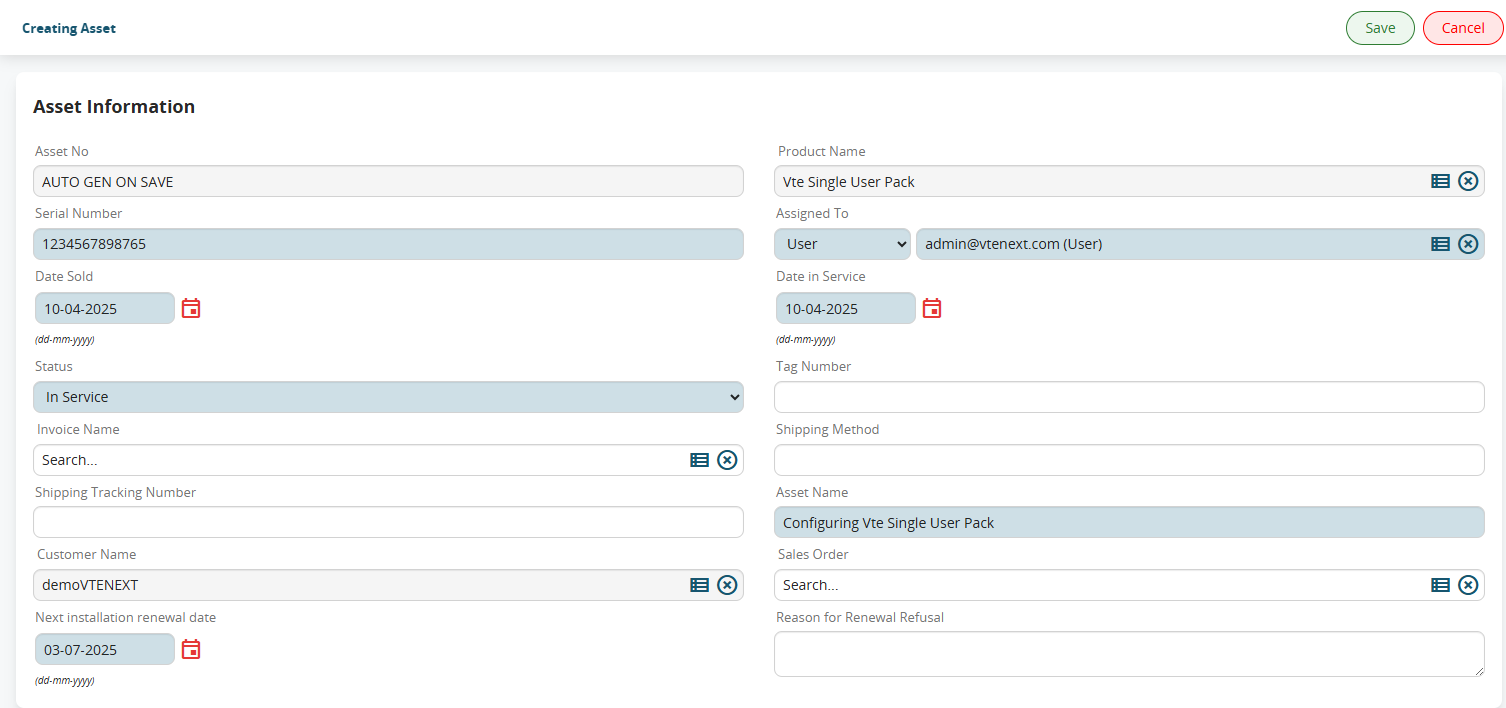
Figure 1
After saving, the process will start by positioning itself on the timer to wait for the “Next renewal expiration date” to be reached (26-02-2022).
In fact, by observing the process graph, we can see that the timer in the diagram is surrounded by a blue outline. (see Figure 2)
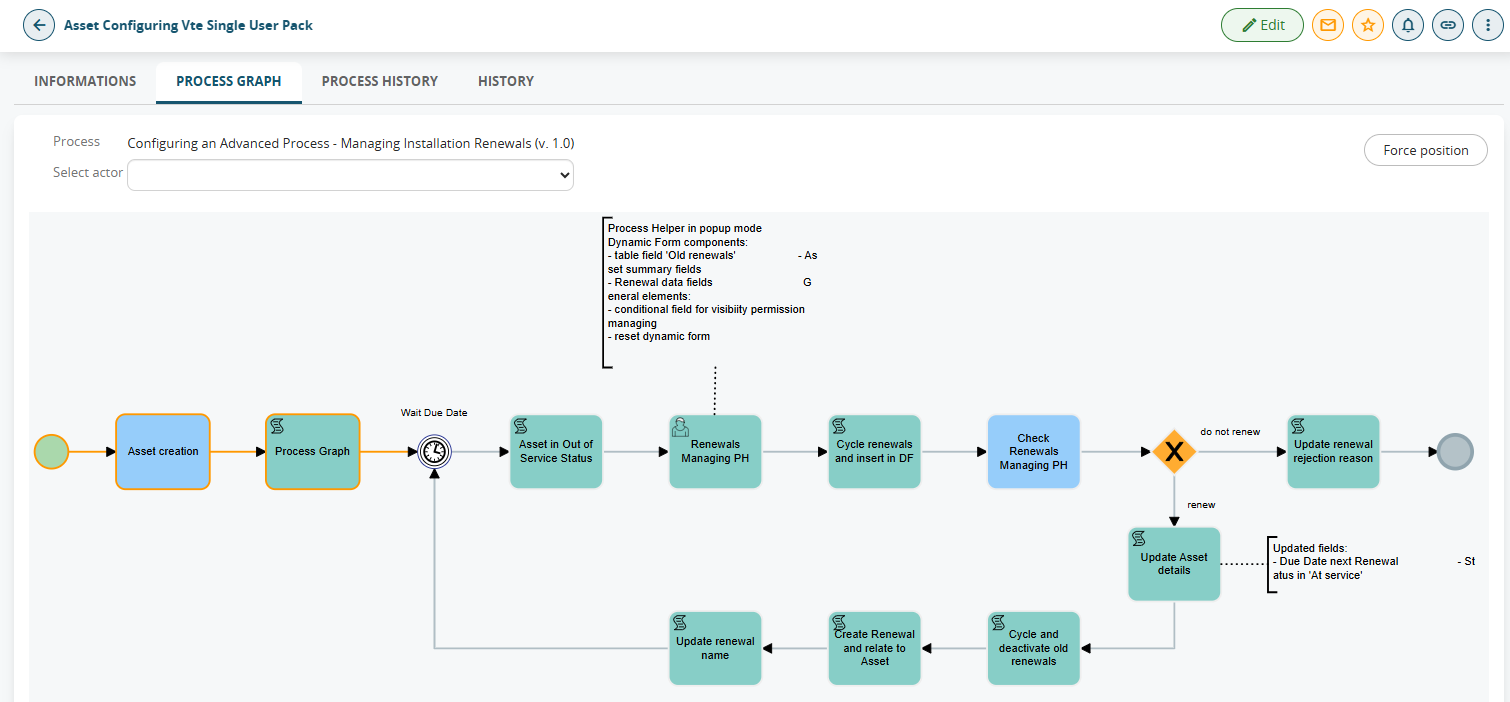
Figure 2
Once the expiration date is reached, the process will automatically set the status to “Out of Service” and present a task to the installation assignee to fill out the popup to manage the next renewal.
The popup can then be filled out by clicking on the “Fill Out” button to the right of the task (see Figure 3)
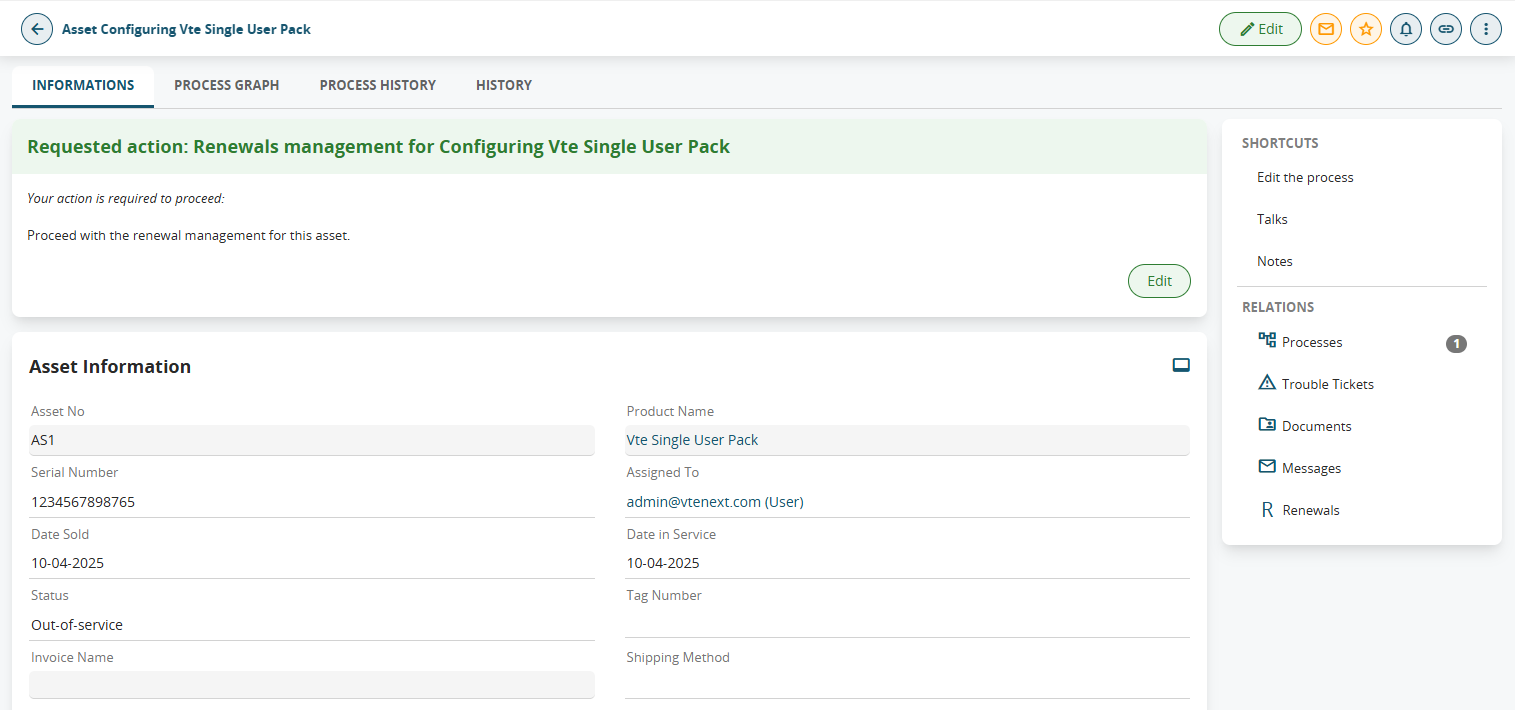
Figure 3
However, the task described above will only be visible by entering the installation registry, for this reason it is possible in this case to compile the process helper through the "Processes" section reachable from the menu at the top right. (see Figure 4)

Figure 4
In fact, it shows all the pending processes assigned directly to the user or to any groups to which he belongs, so just look for the line with the following information (see Figure 5):
-process name: “Server Installation Renewal Management 1”
-connected to: “Server Installation 1”
After that, just click on the pencil to the left of the process name to be able to fill in the process helper that will be displayed as if we were editing a module.
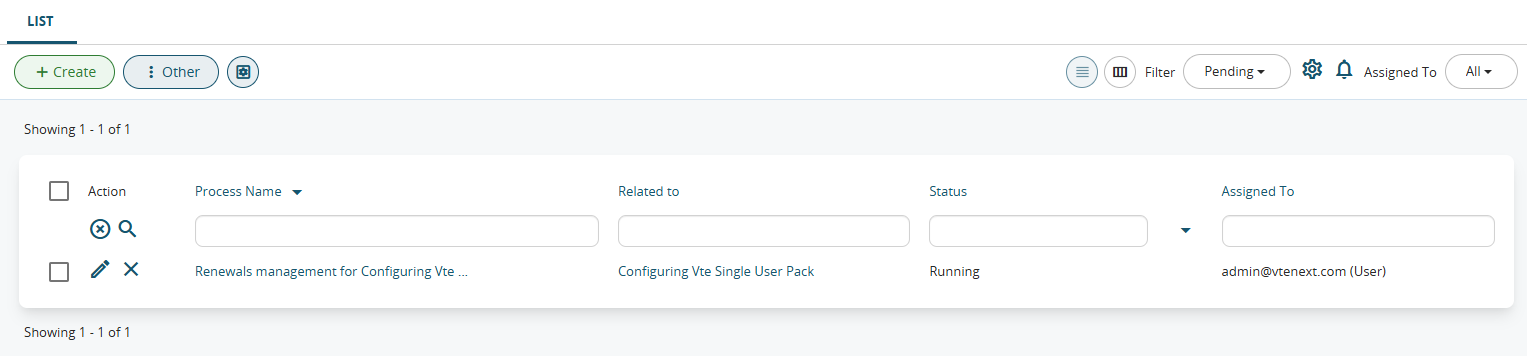
Figure 5
Once on the process helper form, the user will find themselves in front of the screen shown in Figure 6.
Based on the value of the Action field, the previously created conditional fields will be activated, which will manage the permissions of the form fields involved in the rules.
N.B: Since no renewals have been made yet, the Past Renewals table has always been hidden through the conditional fields.
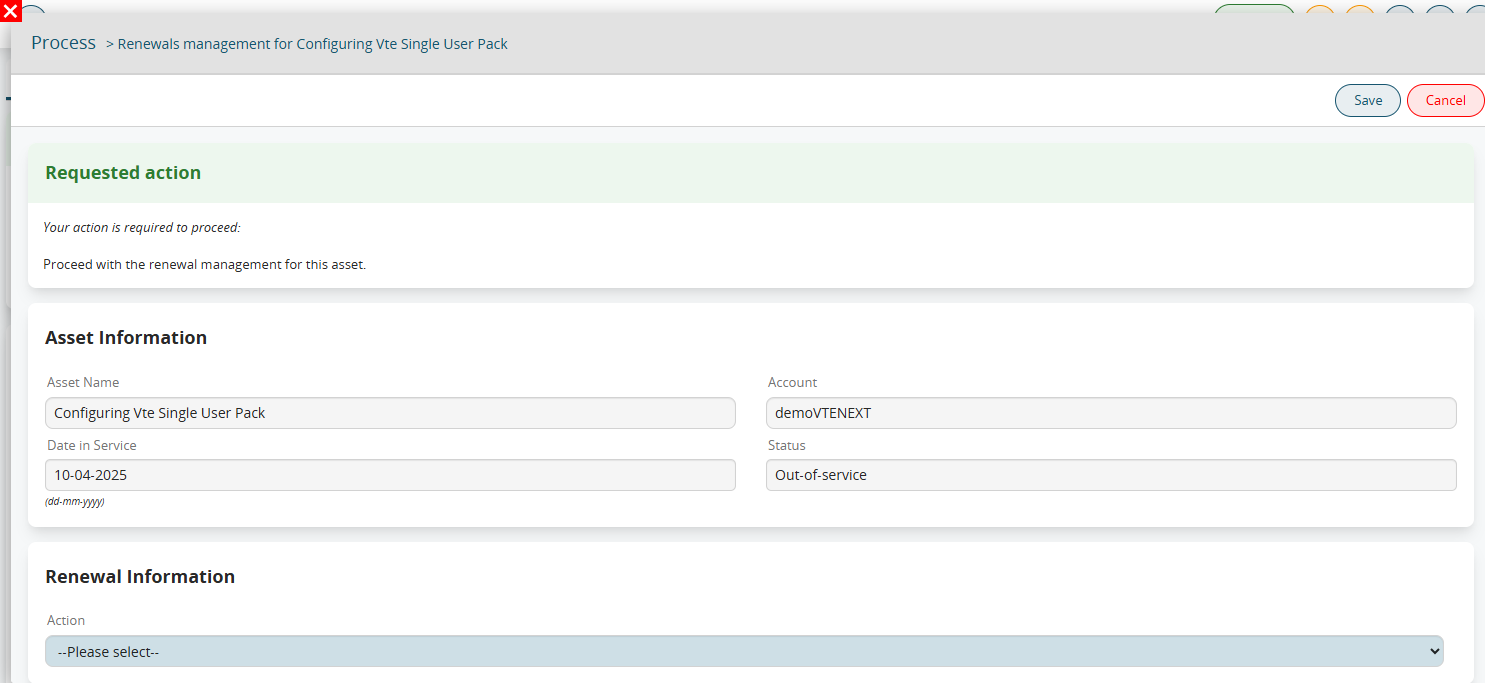
Figure 6
If you want to simulate a renewal of the installation, click on the “Renew” value, in this way the system will show us the fields “Number of months Renewal” and “Additional notes” (see Figure 7).
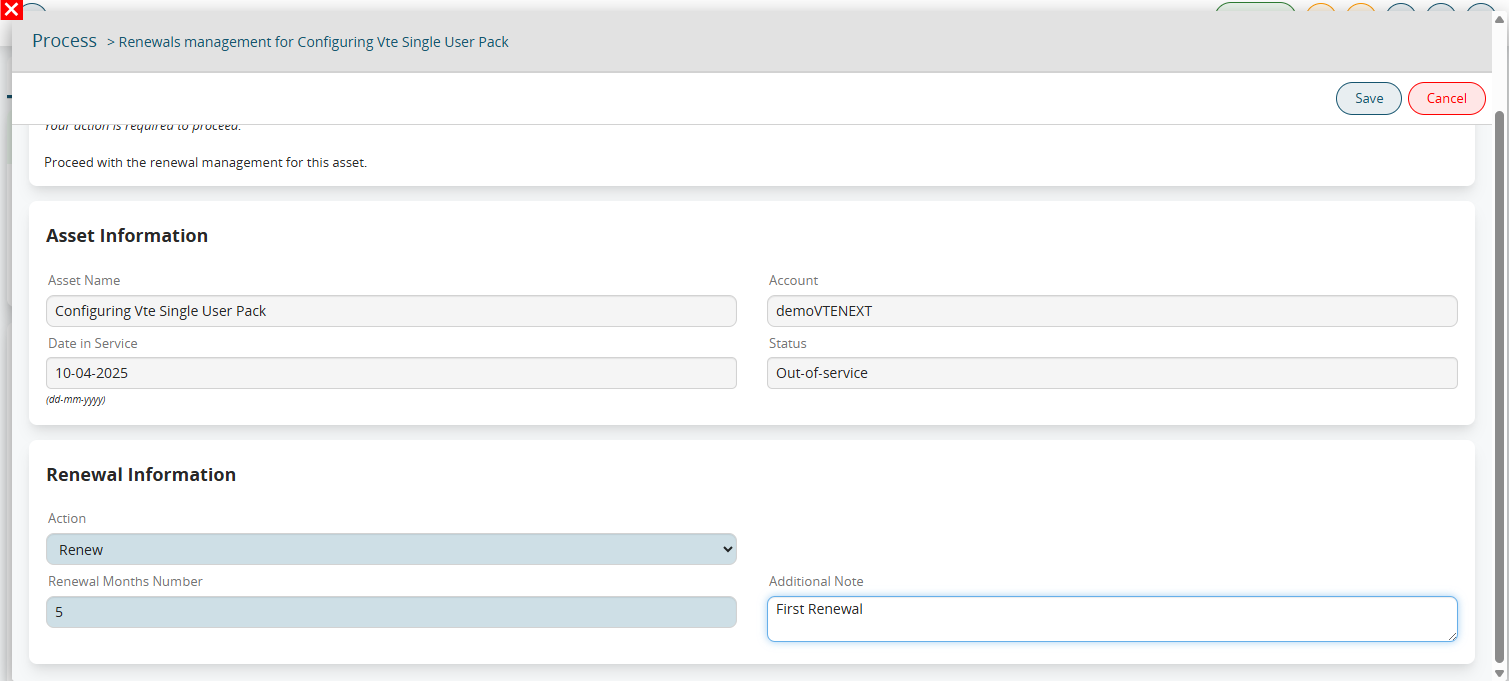
Figure 7
Once the 2 fields mentioned above are filled in, we save and the process will generate a renewal that will be automatically related to the installation (see Figure 8).
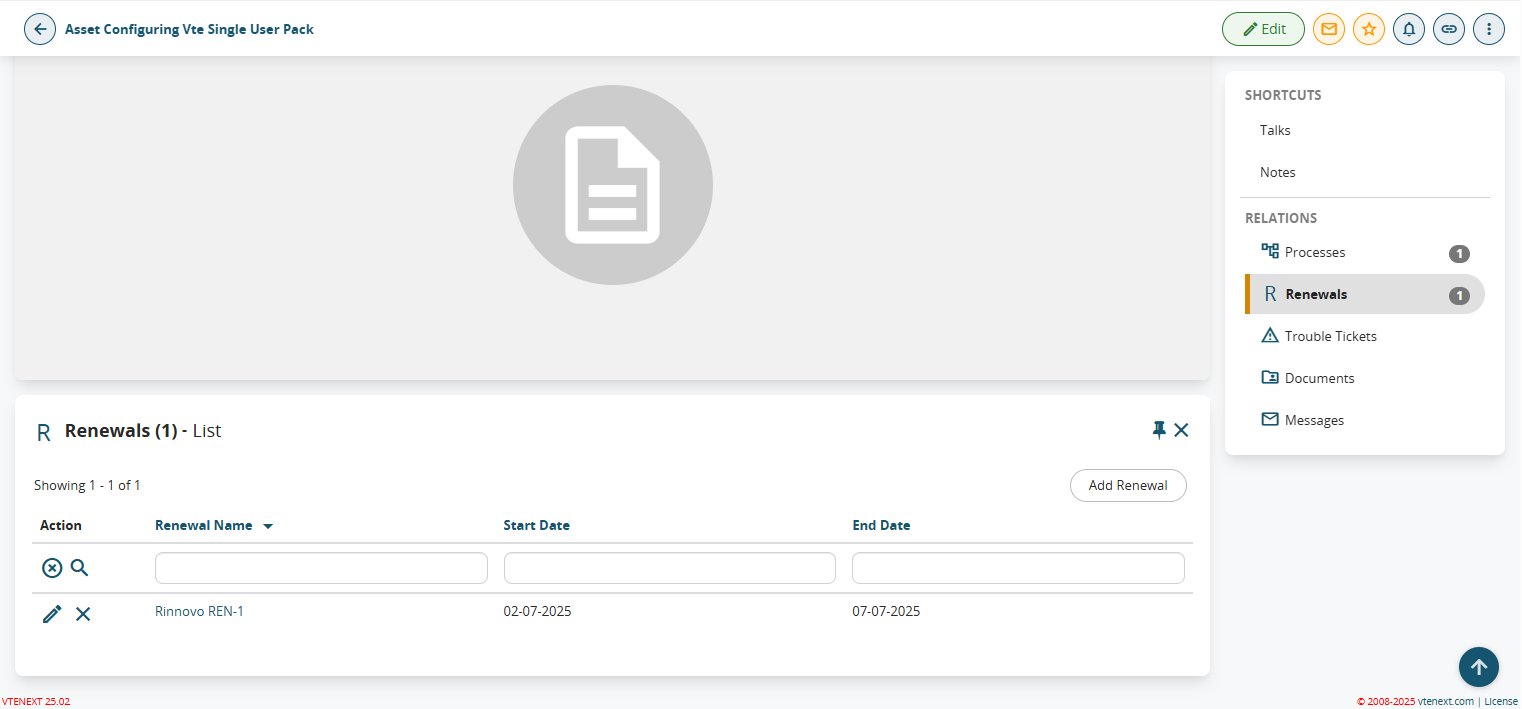 Figure 8
From the first renewal onwards the process helper will display the Past Renewals table field as shown in Figure 9
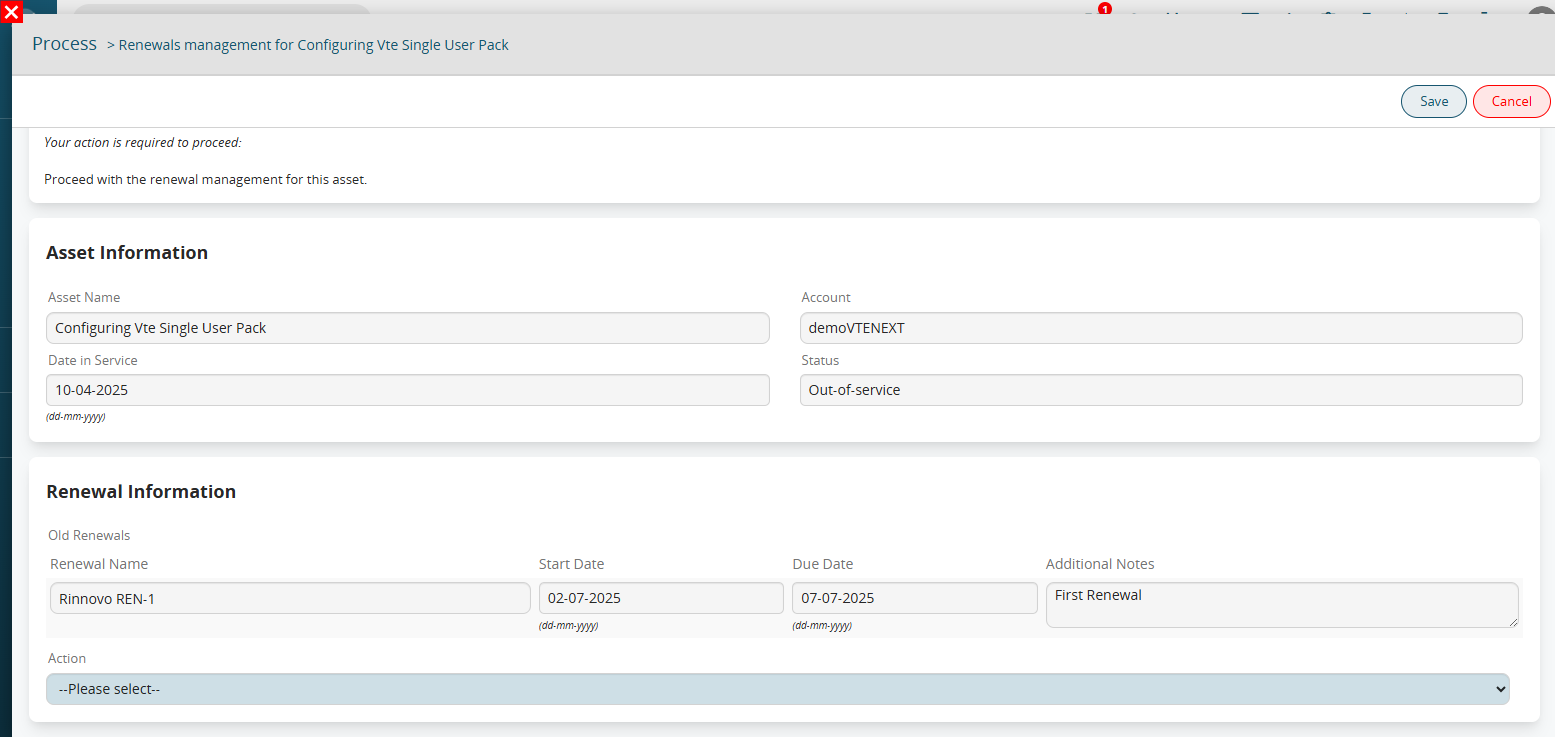 Figure 9
Simulating instead of not wanting to renew, we click on the value "Do not renew", the system will ask us to enter a reason for refusing the renewal (see Figure 10).
Upon saving, the "Reason for refusing renewal" field of the installation will be populated.
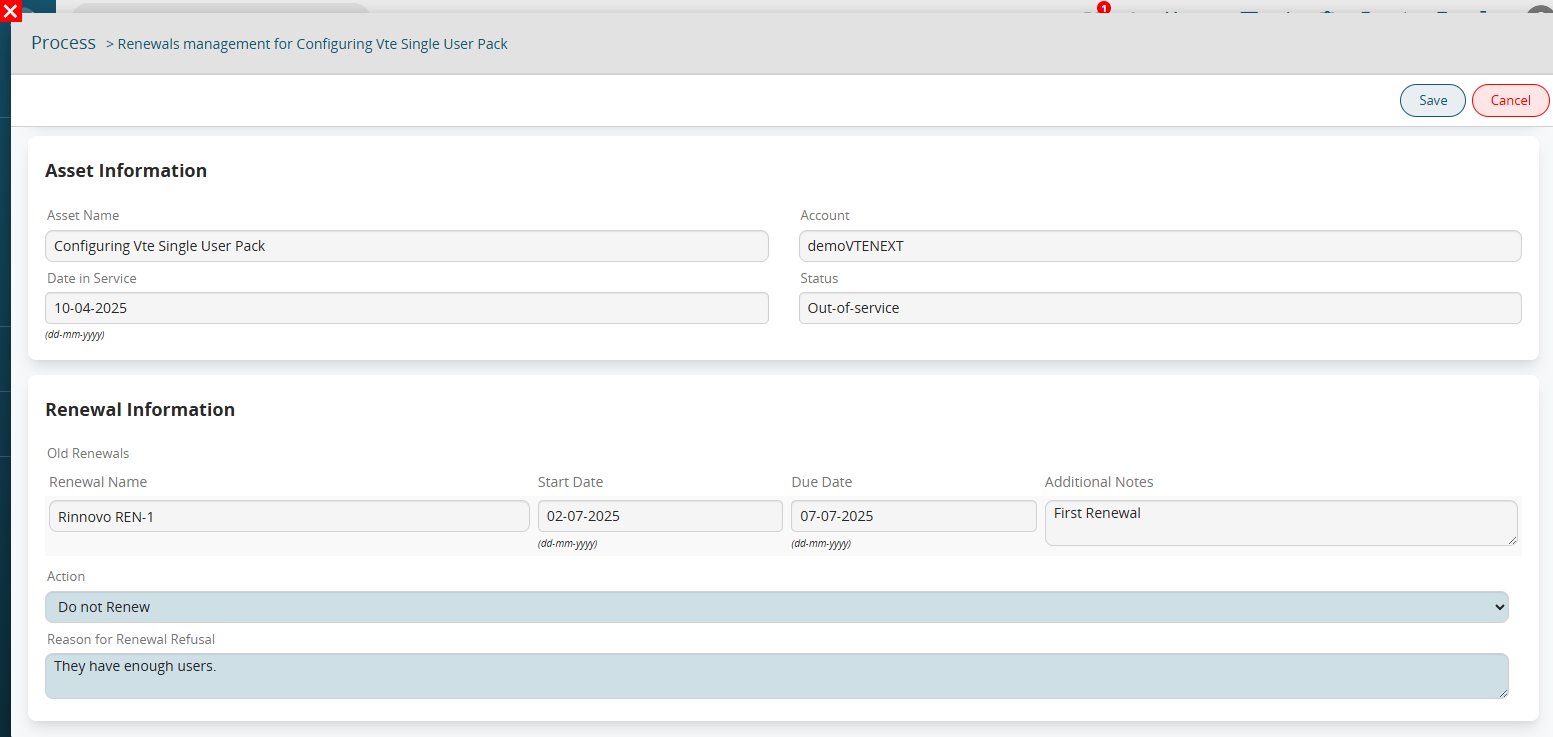 Figure 10