| [ ](https://usermanual.vtenext.com/uploads/images/gallery/2025-05/OHtimage.png)[](https://usermanual.vtenext.com/uploads/images/gallery/2025-05/q7wimage.png) | [START EVENT E TIMER START EVENT](https://usermanual.vtenext.com/books/business-process-manager-manual/page/21-start-event-e-timer-start-event) |
| [](https://usermanual.vtenext.com/uploads/images/gallery/2025-05/85Pimage.png) | [END EVENT](https://usermanual.vtenext.com/books/business-process-manager-manual/page/22-end-event) |
| [](https://usermanual.vtenext.com/uploads/images/gallery/2025-05/q1jimage.png) | [INTERMEDIATE / BOUNDARY EVENT TIMER](https://usermanual.vtenext.com/books/business-process-manager-manual/page/23-intermediate-boundary-event-timer) |
| [ ](https://usermanual.vtenext.com/uploads/images/gallery/2022-03/symbology-generale-5.PNG)[](https://usermanual.vtenext.com/uploads/images/gallery/2022-03/symbology-generale-6.PNG) | [EXCLUSIVE GATEWAY E PARALLEL GATEWAY](https://usermanual.vtenext.com/books/business-process-manager-manual/page/24-exclusive-e-parallel-gateway) |
| [](https://usermanual.vtenext.com/uploads/images/gallery/2022-03/symbology-generale-7.PNG)[ ](https://usermanual.vtenext.com/uploads/images/gallery/2022-03/symbology-icons-list-service-task.PNG) | [CONDITIONAL TASK E ACTION TASK](https://usermanual.vtenext.com/books/business-process-manager-manual/page/25-conditional-task-and-action-task) |
| [](https://usermanual.vtenext.com/uploads/images/gallery/2025-05/aZkimage.png) | [CONNECTORS](https://usermanual.vtenext.com/books/business-process-manager-manual/page/26-connectors-connectiong-object) |
Normally, tools return results in a format suitable for interpretation by an LLM model. Therefore, the response should be reviewed and processed before being included in a workflow.
Example of a response from the `web_search_exa` tool to the question: “What is the certified email (PEC) address of VTENEXT?” ``` Title: Contatti - vtenext CRM + BPM URL: https://www.vtenext.com/it/contatti/ Published: 2021-01-28T21:00:22.000Z Author: N/A Highlights: info@vtenext.com Viale Sarca, 336/F 20126 Milano (MI) Tel (+39) 02 3790 1352 P.I. 09869110966 Registration Number MI – 2118732 --- Title: Fatturato Vtenext Srl (MI) – Scarica Bilanci e Visure Camerali Ufficiali URL: https://www.companyreports.it/vtenext-srl-09869110966 Published: N/A Author: N/A Highlights: **Indirizzo** Viale Sarca, 336/F - [Milano (](https://www.companyreports.it/comune/milano "Vedi le aziende del comune di Milano")[MI](https://www.companyreports.it/provincia/milano "Vedi le aziende della provincia di Milano")) ... ** ** ... ## **Visura Camerale di Vtenext Srl** La visura camerale di **Vtenext Srl** fornisce una panoramica completa dell’assetto legale e societario dell’impresa: sede legale, capitale sociale, oggetto sociale, elenco soci, cariche in corso e indirizzo PEC. La visura è disponibile in formato ordinario o storico ed è scaricabile in tempo reale da **CompanyReports.it**. ### **Bilanci e Documenti Aziendali di Vtenext Srl** ... PEC * ... * Email PEC * Codice di fatturazione ... ```json { "@context": "https://schema.org", "@type": "Organization", "name": "CompanyReports", "url": "https://www.companyreports.it", "logo": "https://www.companyreports.it/dist/img/companyreports-logo-new.webp", "contactPoint": { "@type": "ContactPoint", "contactType": "sales", "email": "info@adcapital.it" } } ... { "@context": "https://schema.org", "@type": "LocalBusiness", "name": "Vtenext Srl", "legalName": "Vtenext Srl", "image": "https://www.companyreports.it/og-image-Fatturato%20Vtenext%20Srl%20%28MI%29%20%E2%80%93%20Scarica%20Bilanci%20e%20Visure%20Camerali%20Ufficiali.jpg", "vatID": "09869110966", "taxID": "09869110966", "foundingLocation": "MI", "foundingDate": "2017-04-04", "isicV4": "6201", "knowsAbout": "Produzione di software non connesso all'edizione", "address": { "@type": "PostalAddress", "postalCode": "", "addressLocality": "Milano, Italy", "addressCountry": "IT", "addressRegion": "MI", "streetAddress": "Viale Sarca, 336/F" }, "keywords": "Vtenext Srl fatturato, utile Vtenext Srl, perdita Vtenext Srl, risultato Vtenext Srl , andamento Vtenext Srl, partita iva Vtenext Srl , bilancio Vtenext Srl , visura Vtenext Srl, 09869110966, Partita Iva 09869110966, Codice Fiscale 09869110966, DUNS Vtenext Srl, D-U-N-S Vtenext Srl, Report Aziende per fatturato" --- Title: VTENEXT S.R.L. SOCIETA' BENEFIT 03641400233 - Visurissima.it - Le informazioni a portata di click URL: https://www.visurissima.it/aziende/VTENEXT-SRL-SOCIETA-BENEFIT_03641400233.html Published: N/A Author: N/A Highlights: Indirizzo completo ... VIA ALZANA 2/C, 37040 ARCOLE (VR) ... crmvillage@pec.it ... Scopri Email Scopri --- [...] ``` # 3.A.3 Call Agent This action allows you to send a request to an agent that has been previously configured in Settings > AI Tools > Agents. Once one of the available agents has been selected, all the elements configured in Settings > AI Tools > Agents are loaded automatically and can be customized. The agent is able to perform tasks automatically based on the enabled tools and the knowledge sources available through RAG and LLM. The **System Prompt** can be modified, while operational instructions must be entered in the **User Message** field.The Output Fields section already includes the response content field by default, allowing the agent's output to be used in subsequent process steps. Below is an example where the agent is requested to find a solution to a customer support request received through a ticket, using the user\_manual tool, and write the solution as a comment. [](https://usermanual.vtenext.com/uploads/images/gallery/2026-07/MKXimage.png)Figure 1Additional information is added to the prompt written by the user to provide the context of the request, such as the entities involved in the process, including their name, module, and CRM ID (crmid). This allows the agent to understand which CRM entity the request refers to. If needed, process variables can be used to make the request even clearer. Example: Add a comment to ticket $15-crmid suggesting a solution...
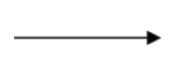
# 3.A.4 Call Process Tool This action allows you to execute a [process tool](https://usermanual.vtenext.com/books/business-process-manager-manual/chapter/16-tool-processes). Once the desired tool has been selected, the expected Input Parameters are loaded and can be configured using process variables, as usual. Unlike sub-processes, this action does not have the same limitations and can be called multiple times within the same process and also from different processes. Below is an example of a tool call used to add a comment to a ticket. The parameters are those defined in the process tool, which in this case are the ticket ID and the comment text. [](https://usermanual.vtenext.com/uploads/images/gallery/2026-07/xnGimage.png) # 3.A.5 Examples Below are some example applications showing how these new tools can be integrated into processes. --- ### Web scraping This process, triggered when a new company is created, calls an agent that is requested to search online for information about the company and populate the corresponding fields in the company record. The agent must have an enabled web search tool (for example, web\_search\_exa) and the VTENEXT MCP Client tools enabled in order to access the module structure and update the record. [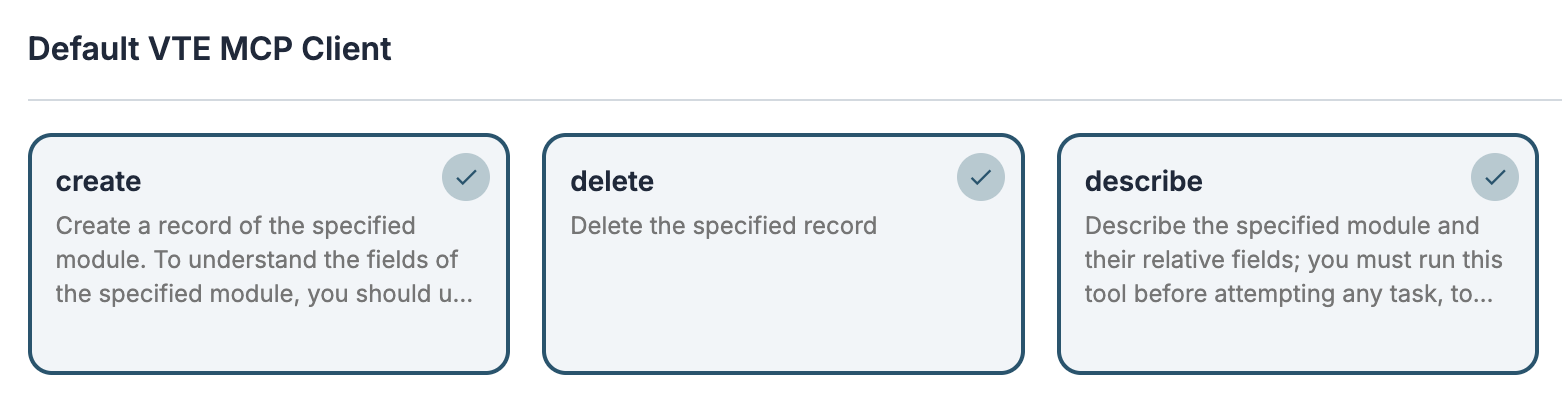](https://usermanual.vtenext.com/uploads/images/gallery/2026-07/NQCimage.png)[](https://usermanual.vtenext.com/uploads/images/gallery/2026-07/screenshot-2026-07-09-alle-09-22-05.png) The process starts when a company is created and executes the Call Agent action. [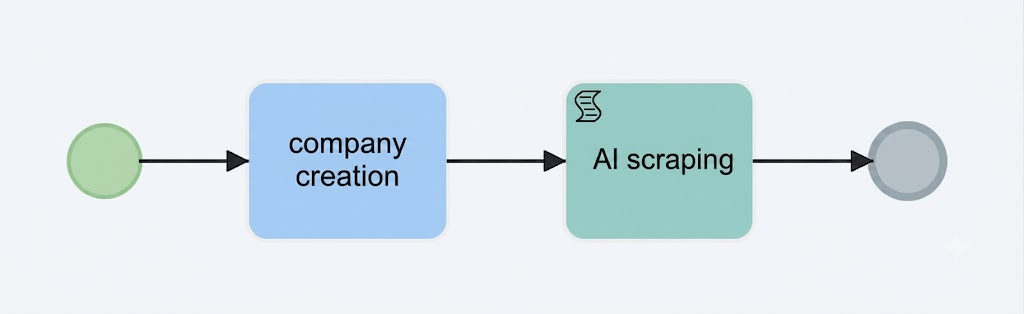](https://usermanual.vtenext.com/uploads/images/gallery/2026-07/CRzimage.png) In the **User Message**, I request the agent to search online for the required information and populate the corresponding fields in the company record. I also request the creation of a contact for the Chief Executive Officer. [](https://usermanual.vtenext.com/uploads/images/gallery/2026-07/p9Oimage.png) If the **Background** execution mode has been configured in the process action, after saving the record the system will notify you that the record is still being updated. Once the process is completed, the browser page will automatically refresh. [](https://usermanual.vtenext.com/uploads/images/gallery/2026-07/oP3image.png) From the **History** tab, you can view the fields that have been updated. [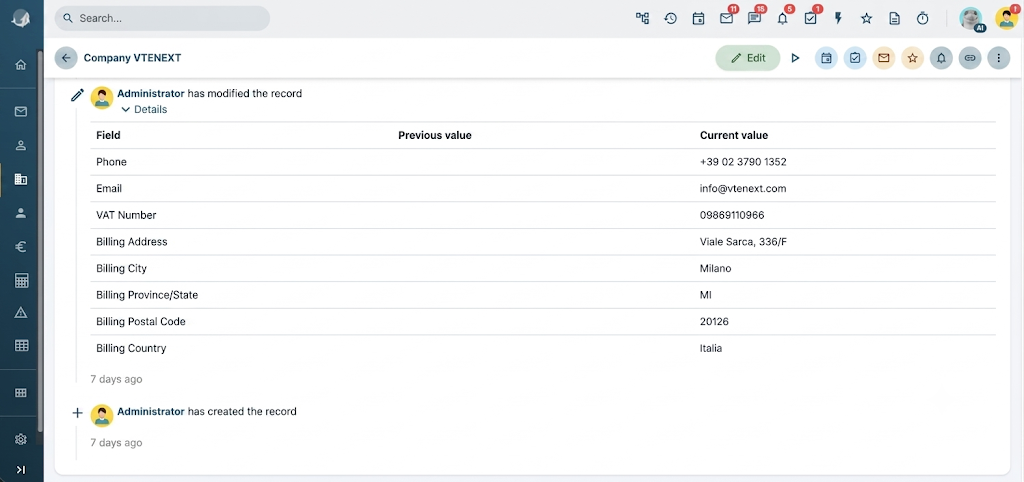](https://usermanual.vtenext.com/uploads/images/gallery/2026-07/uEEimage.png) ##### Closed Customer Support In this example, we implement a process that automatically replies to technical support tickets outside office hours, informing customers that the office is closed and attempting to provide a solution to their issue. ##### Tool add\_comment First, we create a process tool to add a comment to a ticket. The tool requires the following input parameters: - Ticket ID - Comment [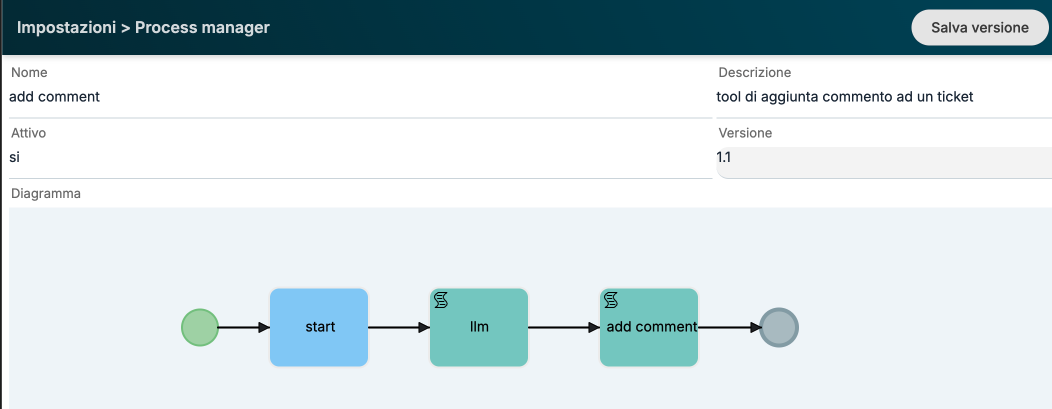](https://usermanual.vtenext.com/uploads/images/gallery/2026-07/iGKimage.png) [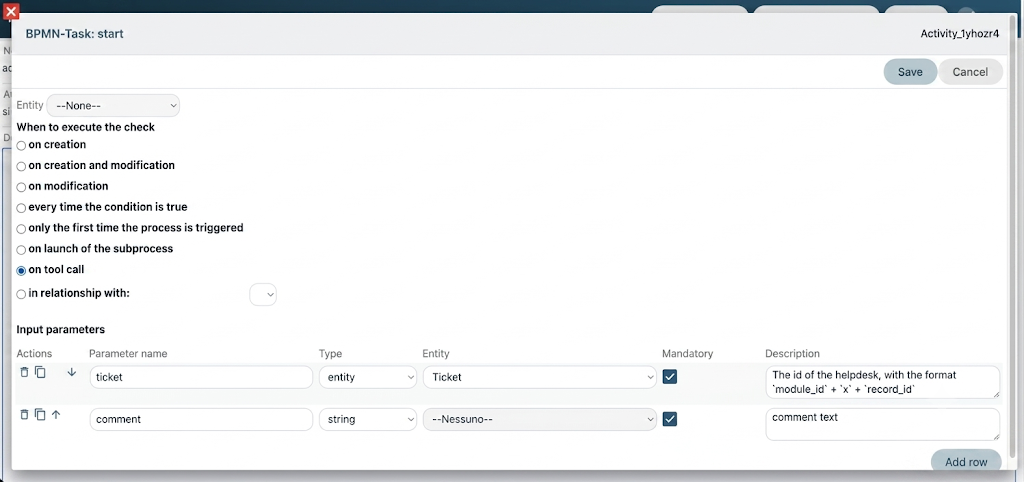](https://usermanual.vtenext.com/uploads/images/gallery/2026-07/kX7image.png) In the second step of the process, we execute an LLM call to rework the comment text by applying a specific style. [](https://usermanual.vtenext.com/uploads/images/gallery/2026-07/8Jdimage.png)In this case, it is sufficient to use only an LLM instead of an agent, since no tools are required. We only need to leverage the language capabilities of the model.
Finally, we use the SDK Add Comment function by mapping all the required fields. In this case, we set the ownerid parameter with the ID of the Kitt user. By setting the ai parameter to true, we force the addition of an informational note at the bottom of the comment indicating that the text was generated using AI. [](https://usermanual.vtenext.com/uploads/images/gallery/2026-07/W1dimage.png) The add\_comment tool must therefore be enabled for the agent that will be used in the following steps, together with the user\_manual tool and/or any documents configured in the RAG section to provide the knowledge required to generate a solution. [](https://usermanual.vtenext.com/uploads/images/gallery/2026-07/X03image.png) ### Implementing the Process on Tickets We can either implement a new process or integrate the new AI features into an existing one. In this example, we use an existing process that, when a ticket is created, sets the SLA based on the ticket priority. [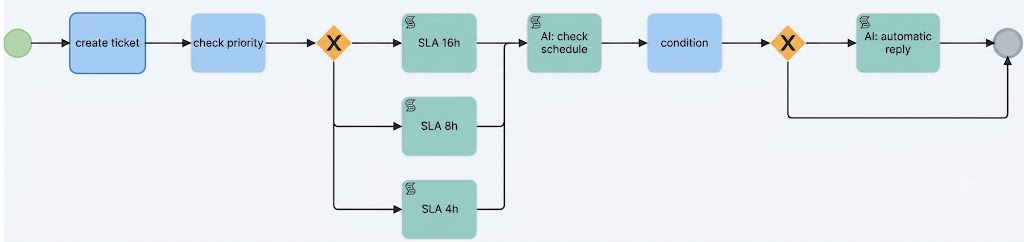](https://usermanual.vtenext.com/uploads/images/gallery/2026-07/0mRimage.png) In the **AI: Check Office Hours** task, I execute a call to the agent using the following prompt: ``` The company is open Monday through Friday from 9:00 AM to 1:00 PM and from 2:00 PM to 6:00 PM, excluding public holidays. If the ticket was created during business hours, return the string "open"; otherwise, return "closed". Return exactly one of these strings and do not include any additional text, explanations, or headings. ``` I then configure the dynamic form with a field populated by the response returned by the LLM. [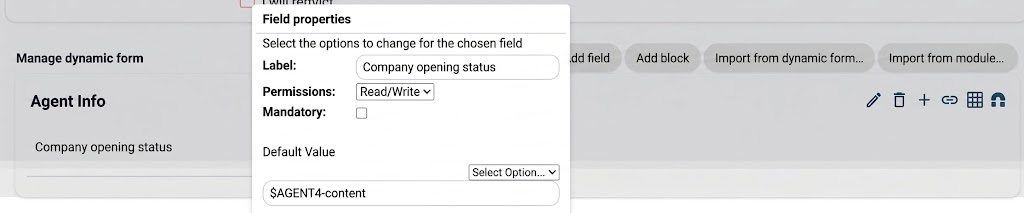](https://usermanual.vtenext.com/uploads/images/gallery/2026-07/VKZimage.png) Next, I configure the condition based on the value of the dynamic form field and set up the following gateway so that, if the agent returns **"closed"**, the process proceeds to the **AI: Automatic Reply** task. [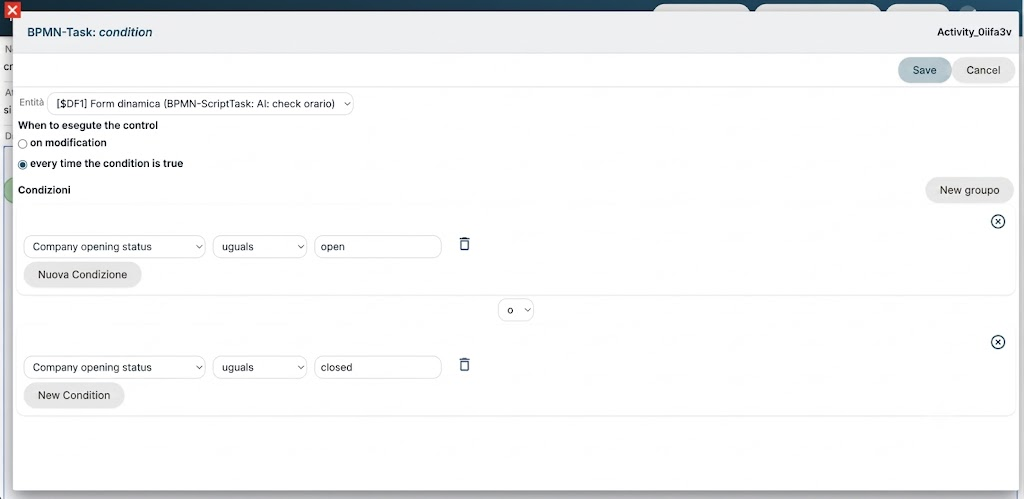](https://usermanual.vtenext.com/uploads/images/gallery/2026-07/Z6limage.png) In the final task of the process, I first call the add\_comment tool to inform the customer that the office is closed. I then call the agent to generate and add a proposed solution to the issue [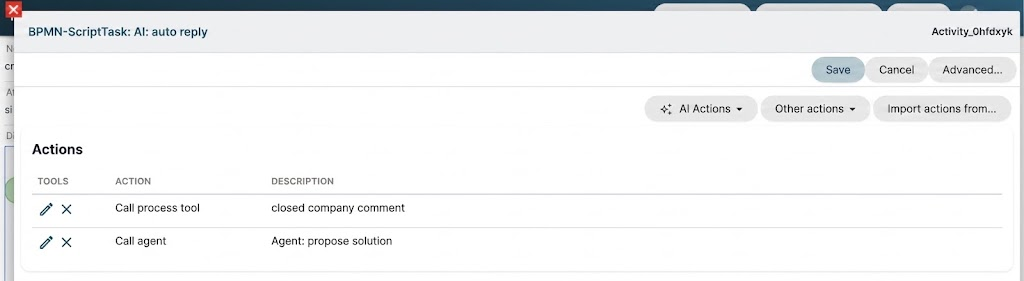](https://usermanual.vtenext.com/uploads/images/gallery/2026-07/aacimage.png) [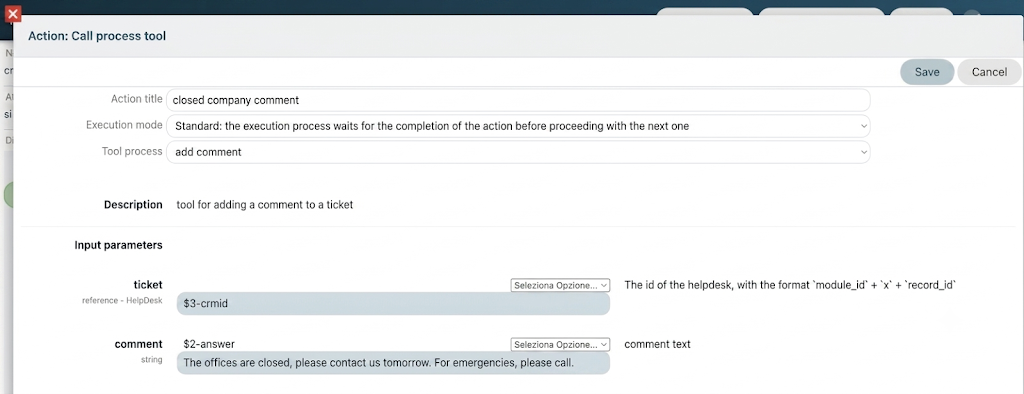](https://usermanual.vtenext.com/uploads/images/gallery/2026-07/QGPimage.png)The comment entered here will then be reworked by the LLM as part of the process tool.
Agent Prompt: ``` aggiungi un commento con il tool add_comment proponendo una soluzione al suo problema cercando in user_manual. Nel testo non usare mai titoli o codice markdown, restituisci solo testo semplice. ``` ##### Test We can test the process by creating a ticket during closing hours with the title “Login Failed” and the following description: *"Good morning, this morning I am no longer able to log in to vtenext. Could you please check this urgently?"* Comments similar to the following will be added: [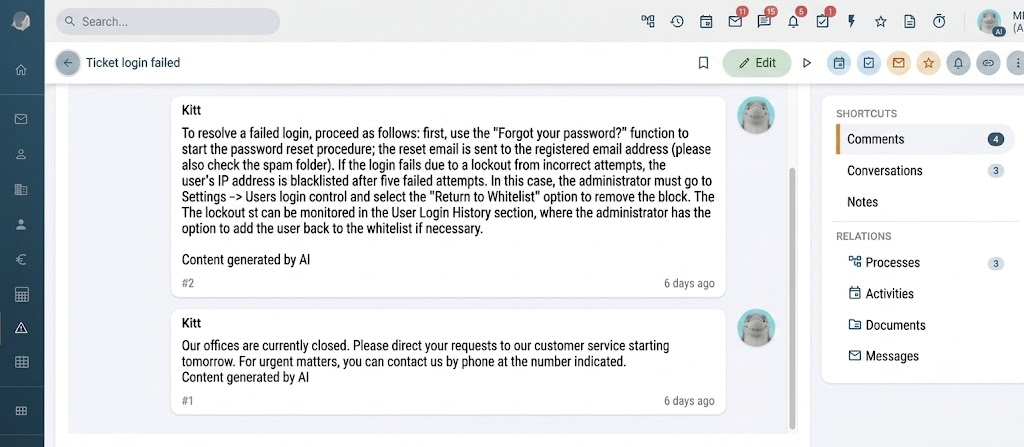](https://usermanual.vtenext.com/uploads/images/gallery/2026-07/qXBimage.png) # 4 Process Helper: Header Field Configuration # 4.1 Assigned to It represents the assignee of the process helper, so in our case the user who will be shown and asked to fill in the dynamic form (Figure 1) [](https://usermanual.vtenext.com/uploads/images/gallery/2025-06/RP9image.png) Figure 1 Based on the value set in the initial picklist, it is possible to insert different types of assignees (static or dynamic), namely: \- **User** → allows you to select a static user existing in the CRM (see Figure 2) [](https://usermanual.vtenext.com/uploads/images/gallery/2025-06/6kKimage.png) Figure 2 \- **Group** → allows you to select an existing static group in the CRM (Figure 3) [](https://usermanual.vtenext.com/uploads/images/gallery/2025-06/Cppimage.png) Figure 3 \- **Other** → allows you to select a user or dynamic group by fishing from the modules involved in the process (Figure 4) [](https://usermanual.vtenext.com/uploads/images/gallery/2025-06/OIgimage.png) Figure 4 \- **Advanced** → Allows you to define a different assignee (static or dynamic) when certain conditions occur. To proceed with the configuration, click the button with the 3 horizontal dots (Figure 5) [](https://usermanual.vtenext.com/uploads/images/gallery/2025-06/oqcimage.png) Figure 5 Next, by clicking on “Add rule” (Figure 6) and then on “New group” (Figure 7), you can indicate the various conditions on the fields of the modules involved in the process. [](https://usermanual.vtenext.com/uploads/images/gallery/2025-06/SVwimage.png) Figure 6 After clicking the “Save” button (Figure 8) you can indicate the assignee who will be selected when the previously entered condition occurs (Figure 9). Once saved, to insert a new rule you will have to click the “Add rule” button again, instead you will have to click on “Save” to proceed with the configuration of the process helper. [](https://usermanual.vtenext.com/uploads/images/gallery/2025-06/pEqimage.png) Figure 8 [](https://usermanual.vtenext.com/uploads/images/gallery/2025-06/Zuvimage.png) Figure 9 \- **Email** → allows you to define an address (static or dynamic) to which an email will be sent containing a link to a landing page from which it will be possible to fill out the dynamic form (Figure 10) [](https://usermanual.vtenext.com/uploads/images/gallery/2025-06/iV9image.png) Figure 10 Once this item is selected, additional fields will appear within the process helper to collect the minimum information needed to send the email (Figure 11) [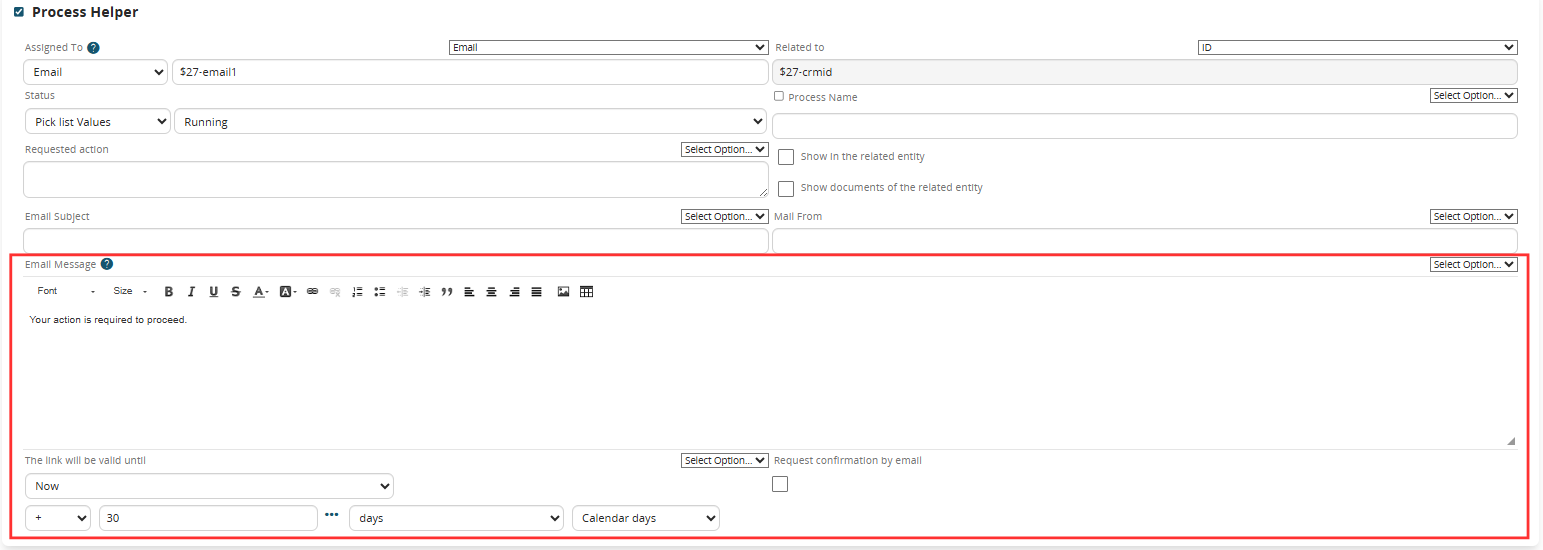](https://usermanual.vtenext.com/uploads/images/gallery/2025-06/qclimage.png) Figure 11 Specifically: \- **Mail subject** → allows you to define the subject of the email to be sent to the assignee \- **Mail sender** → allows you to define the sender of the email to be sent to the assignee NOTE: it must be the address of the account configured in Settings → Other settings → Mail Server \- **Mail message** → allows you to define the body of the email to be sent to the assignee (to which the link to access the landing page and fill out the dynamic form will be added) \- **The link will be valid until** → allows you to define a maximum validity time of the link to access the landing page and fill out the dynamic form \- **Request confirmation by email** → allows you to send a further email after filling out the dynamic form in order to show the summary of the data entered and possibly give the possibility to modify them (Figure 12) [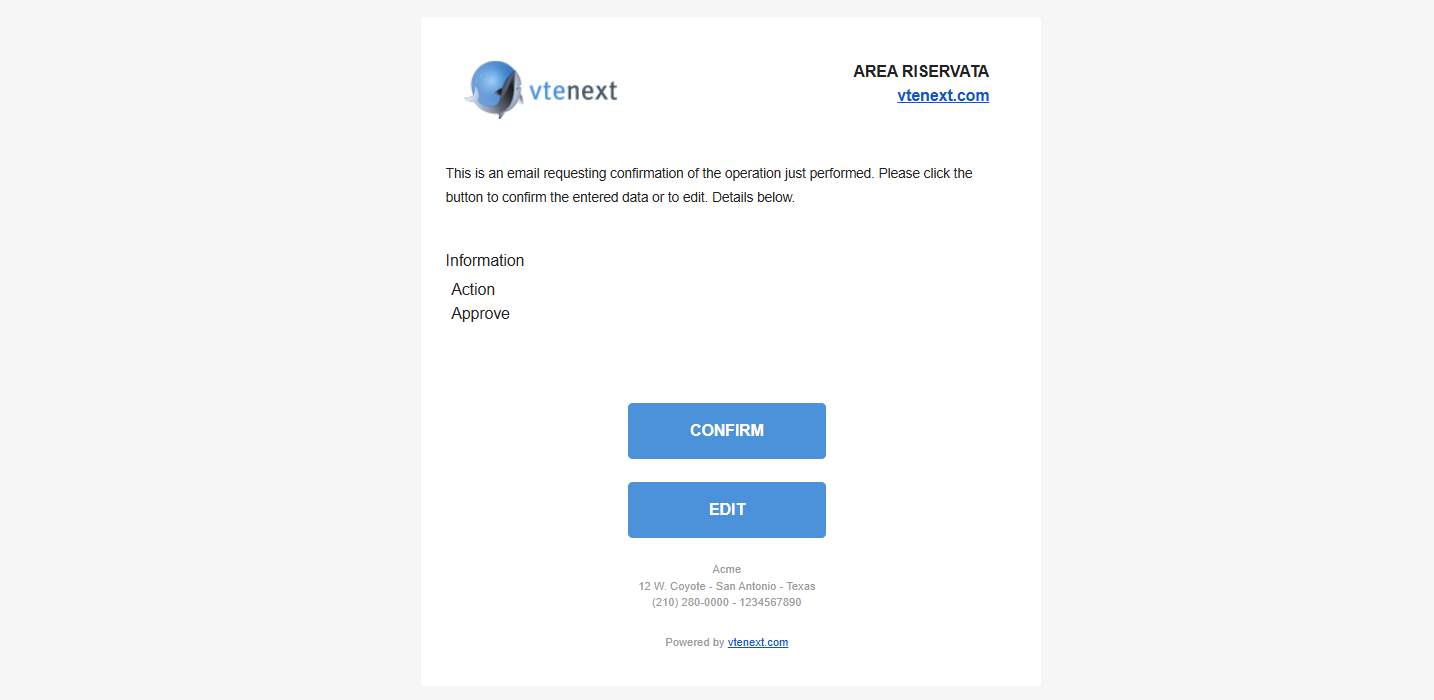](https://usermanual.vtenext.com/uploads/images/gallery/2025-06/00Himage.png)Figure 12 \- **Business Portal** → allows you to define the ID of a Contact or Company that must be associated with a Business Portal user (Figure 13). [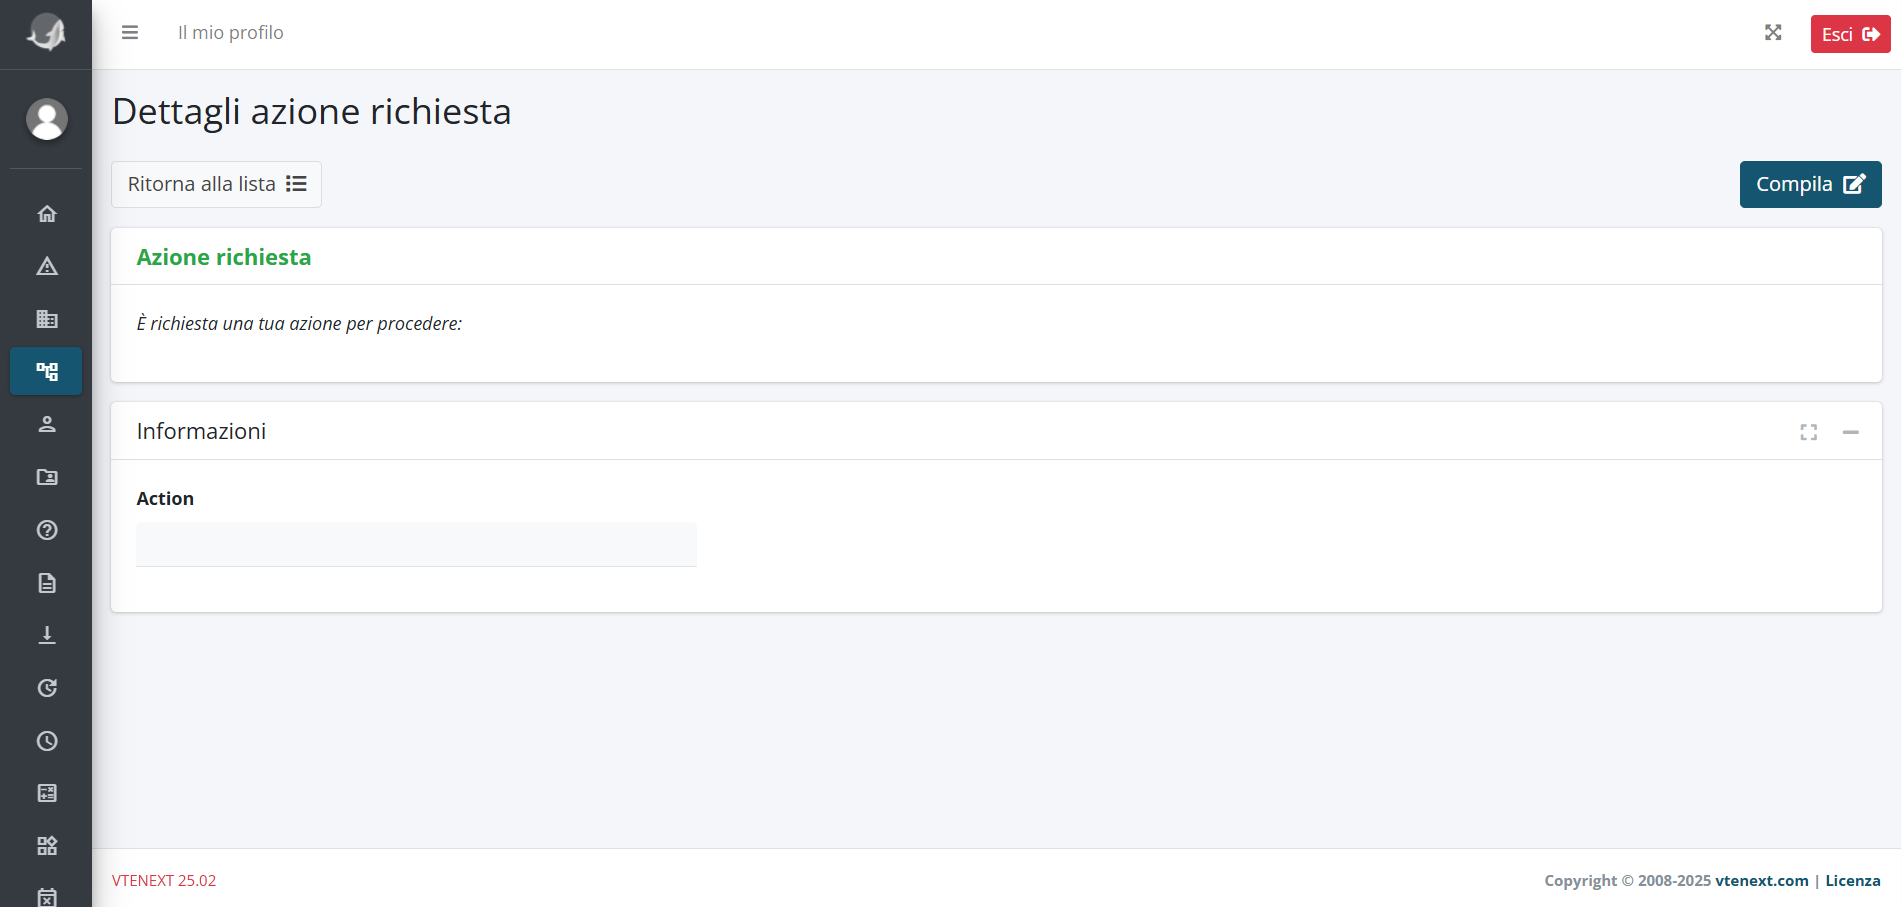](https://usermanual.vtenext.com/uploads/images/gallery/2025-06/screenshot-2025-06-10-180546.png) Figura 13 # 4.2 Related to It represents the specific record to which the process helper will be attached and on which the dynamic form will be displayed (Figure 1). P.S.: As it is a relationship field, only the IDs of the relevant records can be entered into it. [](https://usermanual.vtenext.com/uploads/images/gallery/2025-06/Un8image.png) Figure 1 As of version 26.04, the content of this field is automatically populated with the crmid of the main entity involved in the process. # 4.3 Status It represents the status of the process, the value “In progress” is automatically proposed (Figure 1). [](https://usermanual.vtenext.com/uploads/images/gallery/2025-06/VTJimage.png) Figure 1 NOTE: from the moment a process helper is activated within a process, from that moment on the management of the state becomes “manual”, therefore it will be managed until the end through the use of other process helpers. Specifically, within each single configured EndEvent, it will be necessary to activate a process helper to force the state to “Terminated” in order to correctly close the process (Figure 2). Otherwise, the process will still end its flow but the “Status” will remain “In progress” creating potential inconveniences for the assigned users. [](https://usermanual.vtenext.com/uploads/images/gallery/2025-06/f5Mimage.png)Figure 2 [](https://usermanual.vtenext.com/uploads/images/gallery/2025-06/TYdimage.png) Figure 3 # 4.4 Process name It represents the Name of the process (which by default will always be the one defined in the “Name” field of the process). By inserting a value in this field it will be possible to temporarily modify the name of the process in order to insert a title more appropriate to what is requested from the user in this specific step of the flow, in order to give a further indication to the assignee of the process helper (Figure 1). [](https://usermanual.vtenext.com/uploads/images/gallery/2025-06/qljimage.png) Figure 1 # 4.5 Requested action It represents a free text field that will be shown to the user assigned to the process helper. It will be possible to insert precise indications on the activities that must be carried out by the user (Figure 1 and 2). [](https://usermanual.vtenext.com/uploads/images/gallery/2025-06/47qimage.png)Figure 1 [](https://usermanual.vtenext.com/uploads/images/gallery/2025-06/exTimage.png)Figure 2 # 4.6 Show in related entity flag Allows you to generate a preview mask that can be viewed directly from the detail of the record connected to the process helper (Figure 1 and 2) To proceed with the compilation of the dynamic form, you will have to click on the “Compile” button. [](https://usermanual.vtenext.com/uploads/images/gallery/2025-06/fomimage.png) Figure 1 (click on the image for a higher graphic resolution) [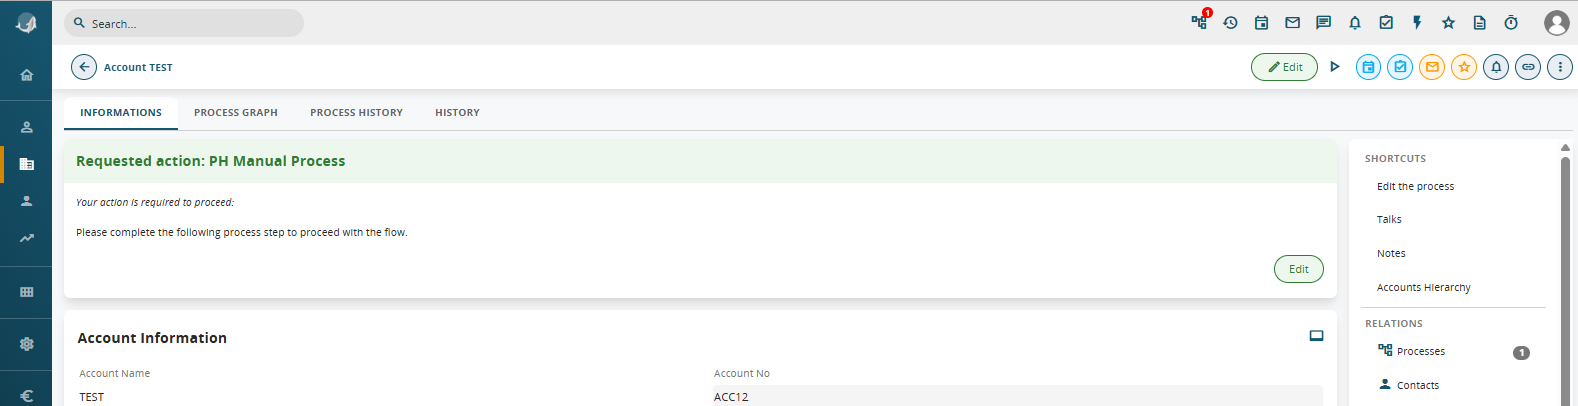](https://usermanual.vtenext.com/uploads/images/gallery/2025-06/h1Dimage.png) Figure 2 (click on the image for a higher graphic resolution) # 4.7 2-Factor authentication flag Allows you to request 2-factor access to confirm and save the data entered in the dynamic form of the process helper (Figure 1, 2 and 3). In order to use it, the user assigned to the process helper must have 2-factor authentication activated in their user preferences. For further information on the activation procedure and the related usage possibilities, see chapter 2.7.2 of the Vtenext general manual. [](https://usermanual.vtenext.com/uploads/images/gallery/2025-06/uGfimage.png)Figure 1 (click on the image for a higher graphic resolution) [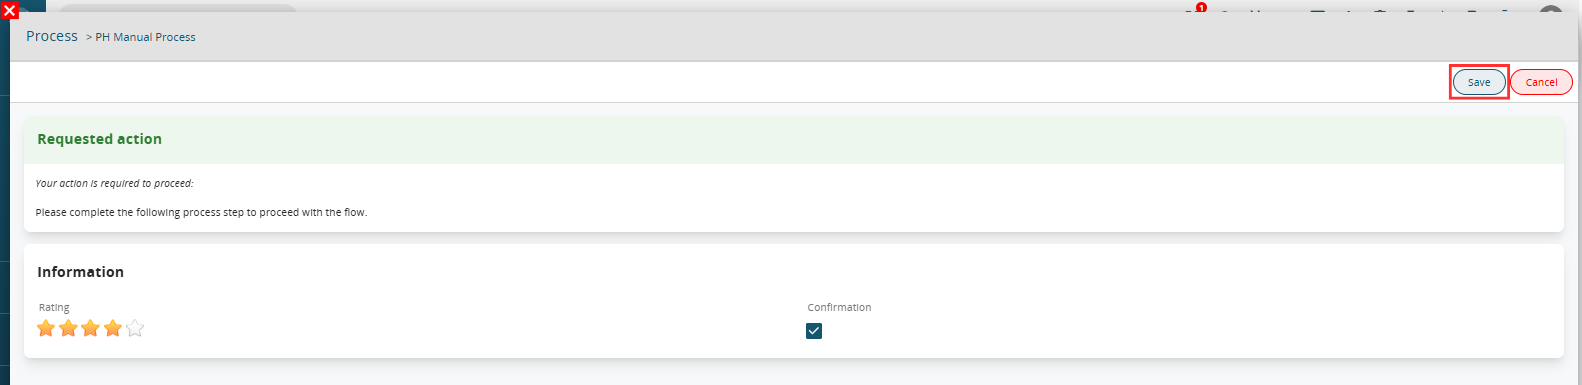](https://usermanual.vtenext.com/uploads/images/gallery/2025-06/04pimage.png) Figure 2 (click on the image for a higher graphic resolution) [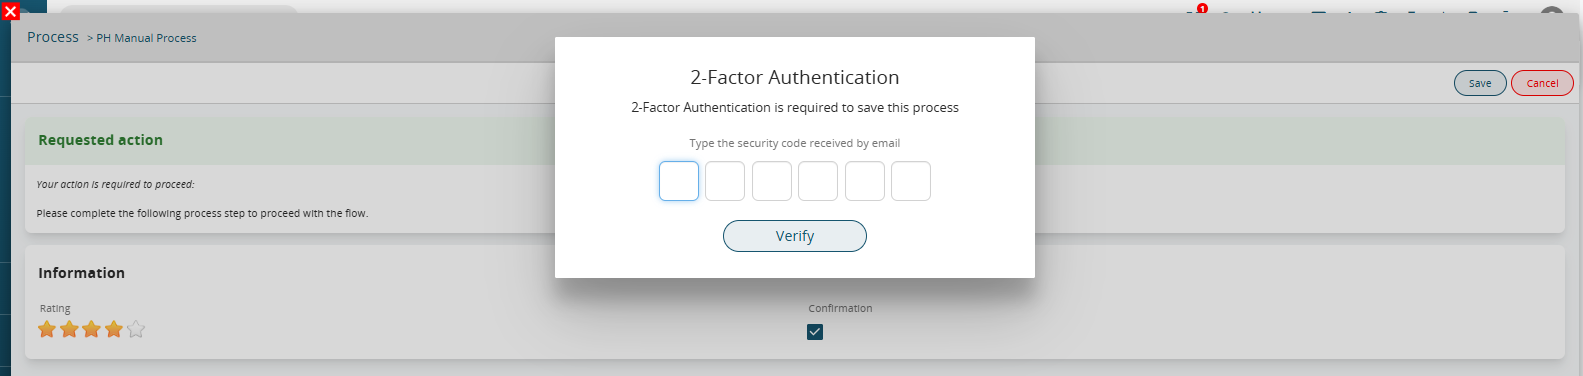](https://usermanual.vtenext.com/uploads/images/gallery/2025-06/jfnimage.png) Figure 3 (click on the image for a higher graphic resolution) # 4.8 Show documents of the related entity flag Allows you to view all the records in the "Documents" module related to the entity (instance of a module) connected to the Process helper, then inserted in the "Linked to" field. (Figure 1) [](https://usermanual.vtenext.com/uploads/images/gallery/2025-06/IETimage.png) Figure 1 (click on the image for a higher graphic resolution) This feature is more effective in dynamic forms where the "Show in linked entity" flag has been checked, as the documents will be shown in an additional section within the popup. (Figure 2) NOTE: even if there are spaces inside the additional section to perform filters on the various columns, in practice this is a feature that is not currently supported, so to search for a specific document it is recommended to manually scroll through any N pages present. [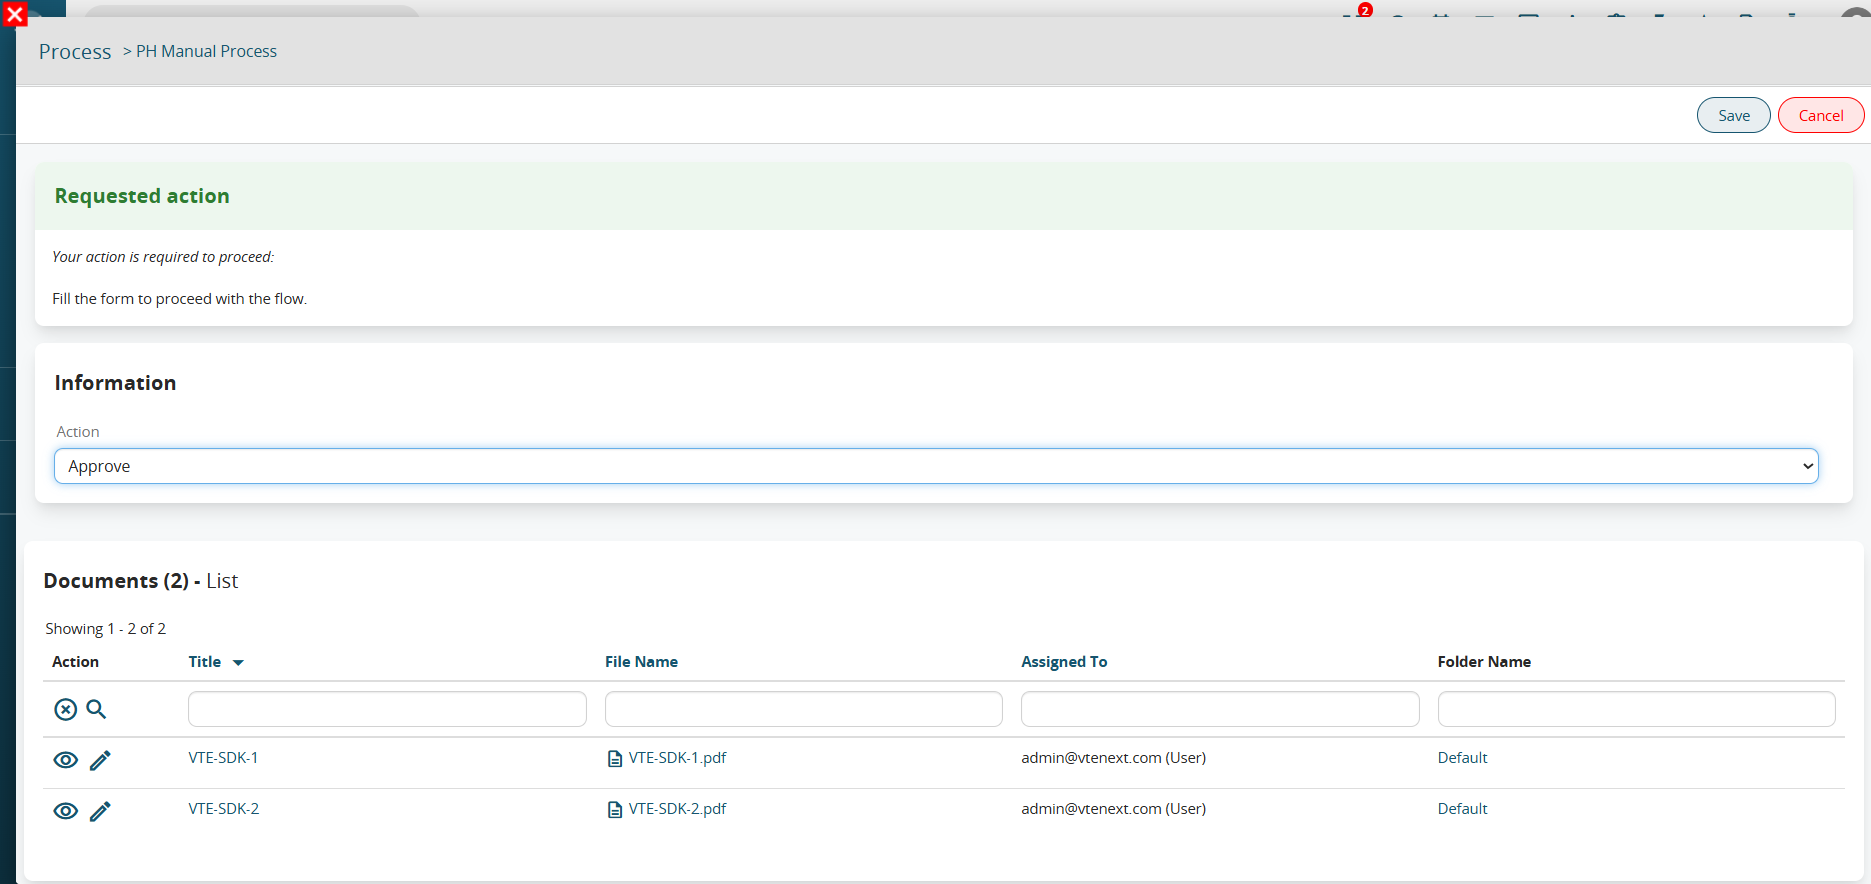](https://usermanual.vtenext.com/uploads/images/gallery/2025-06/oxeimage.png) Figure 2 (click on the image for a higher graphic resolution) Instead, in dynamic forms where the "Show in the linked entity" flag has NOT been checked, to view the documents you will have to access the record detail of the Processes module (Figure 3 and 4). Alternatively, you can look at the documents directly from the record linked to the process helper. [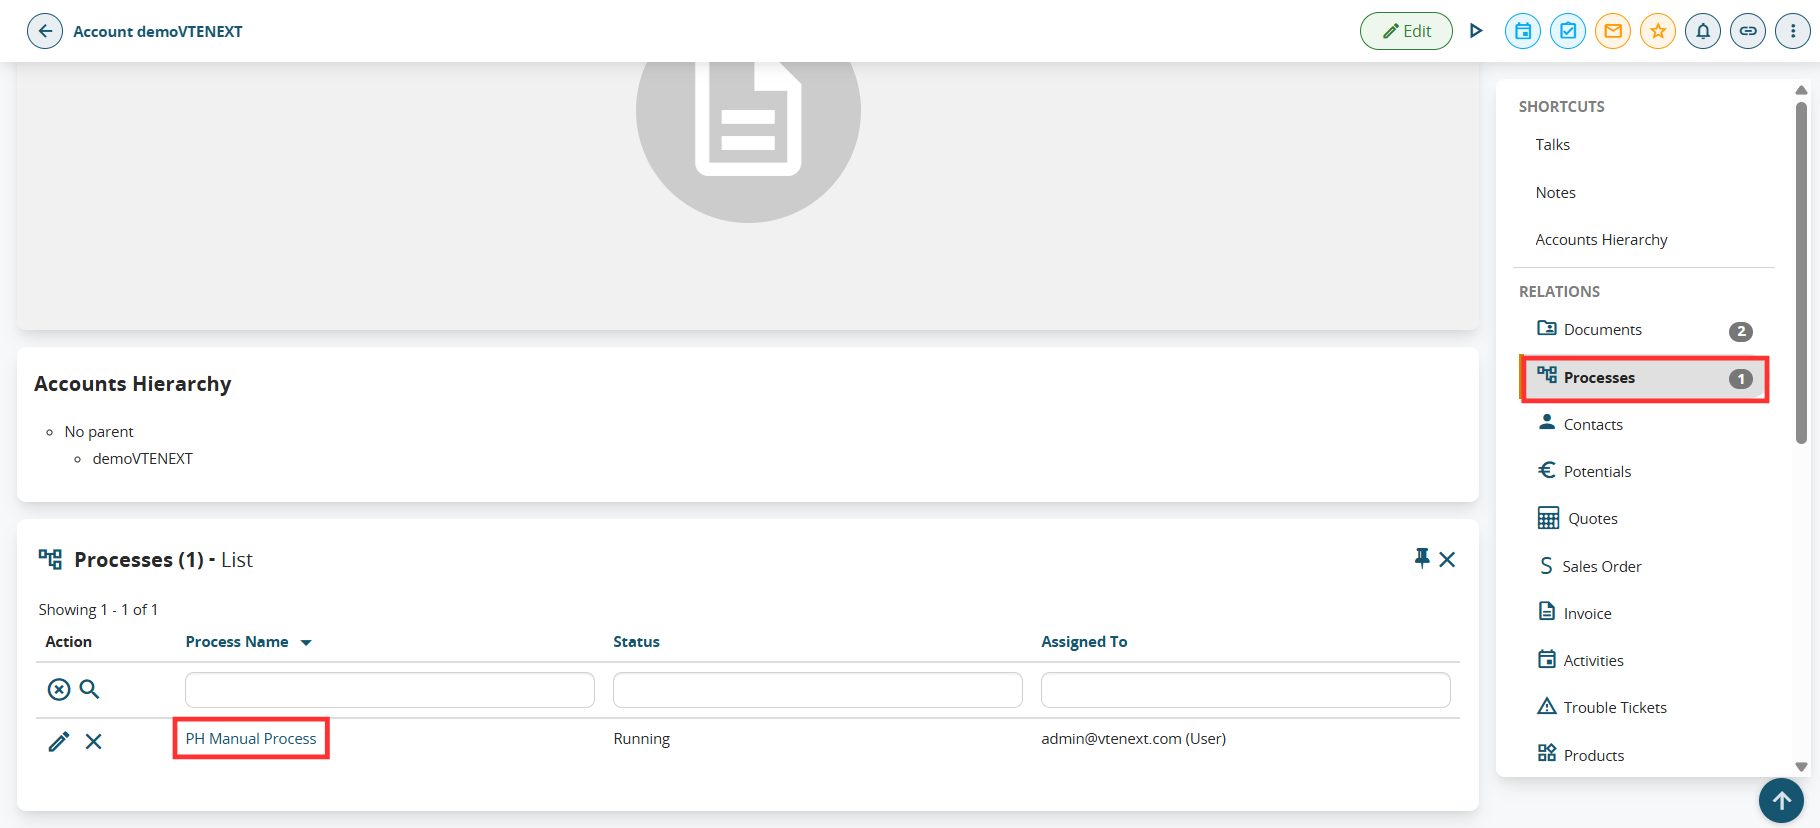](https://usermanual.vtenext.com/uploads/images/gallery/2025-06/BV5image.png)Figure 3 (click on the image for a higher graphic resolution) [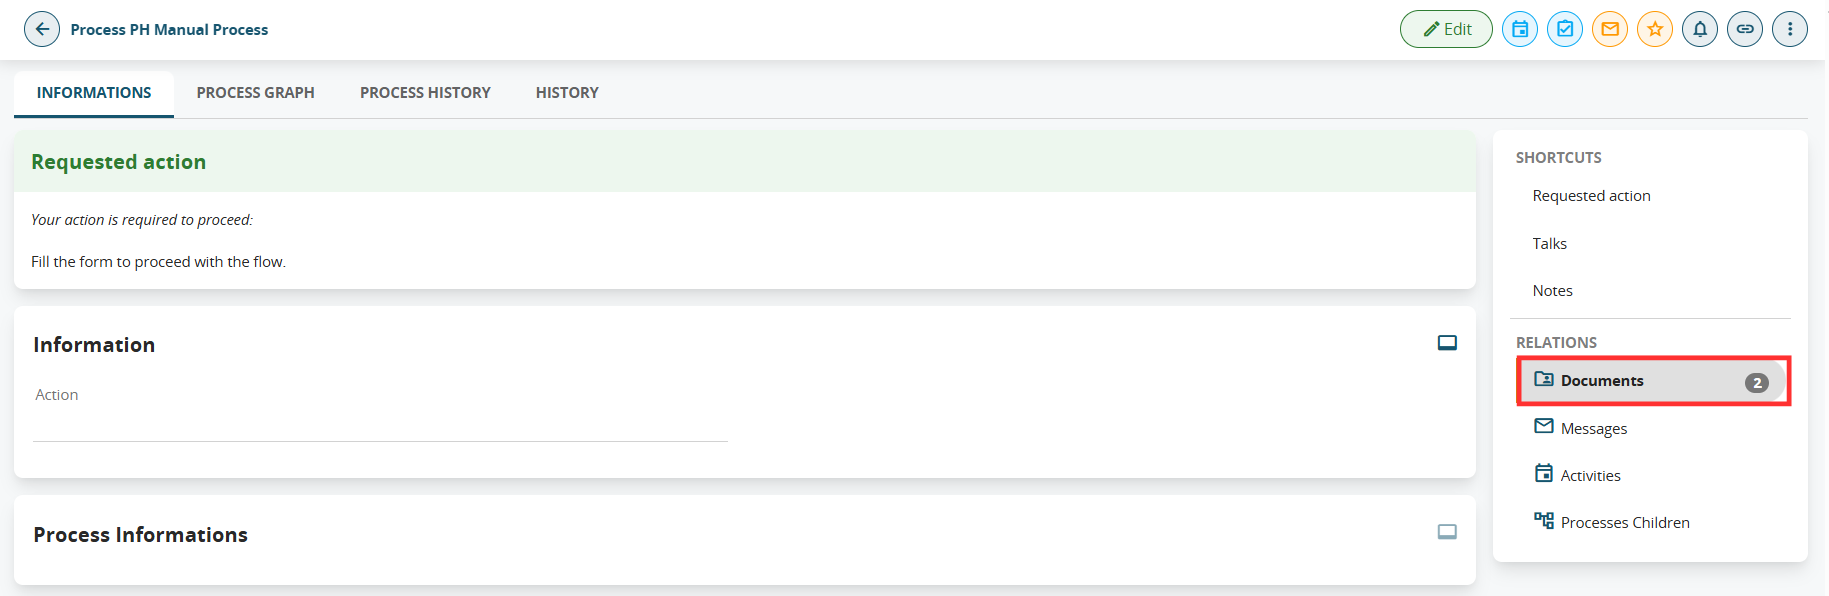](https://usermanual.vtenext.com/uploads/images/gallery/2025-06/XFSimage.png) Figure 4 (click on the image for a higher graphic resolution) # 5 Process Helper: Dynamic Form Configuration # 5.1 Configure Shortcuts This feature allows for the creation of custom buttons that differ from the standard "Fill Out" button; they are designed to simplify and accelerate the handling of procedures requiring simple, direct user input—such as when confirmation is needed to proceed with the workflow or to direct it along a specific branch. (Figure 1) [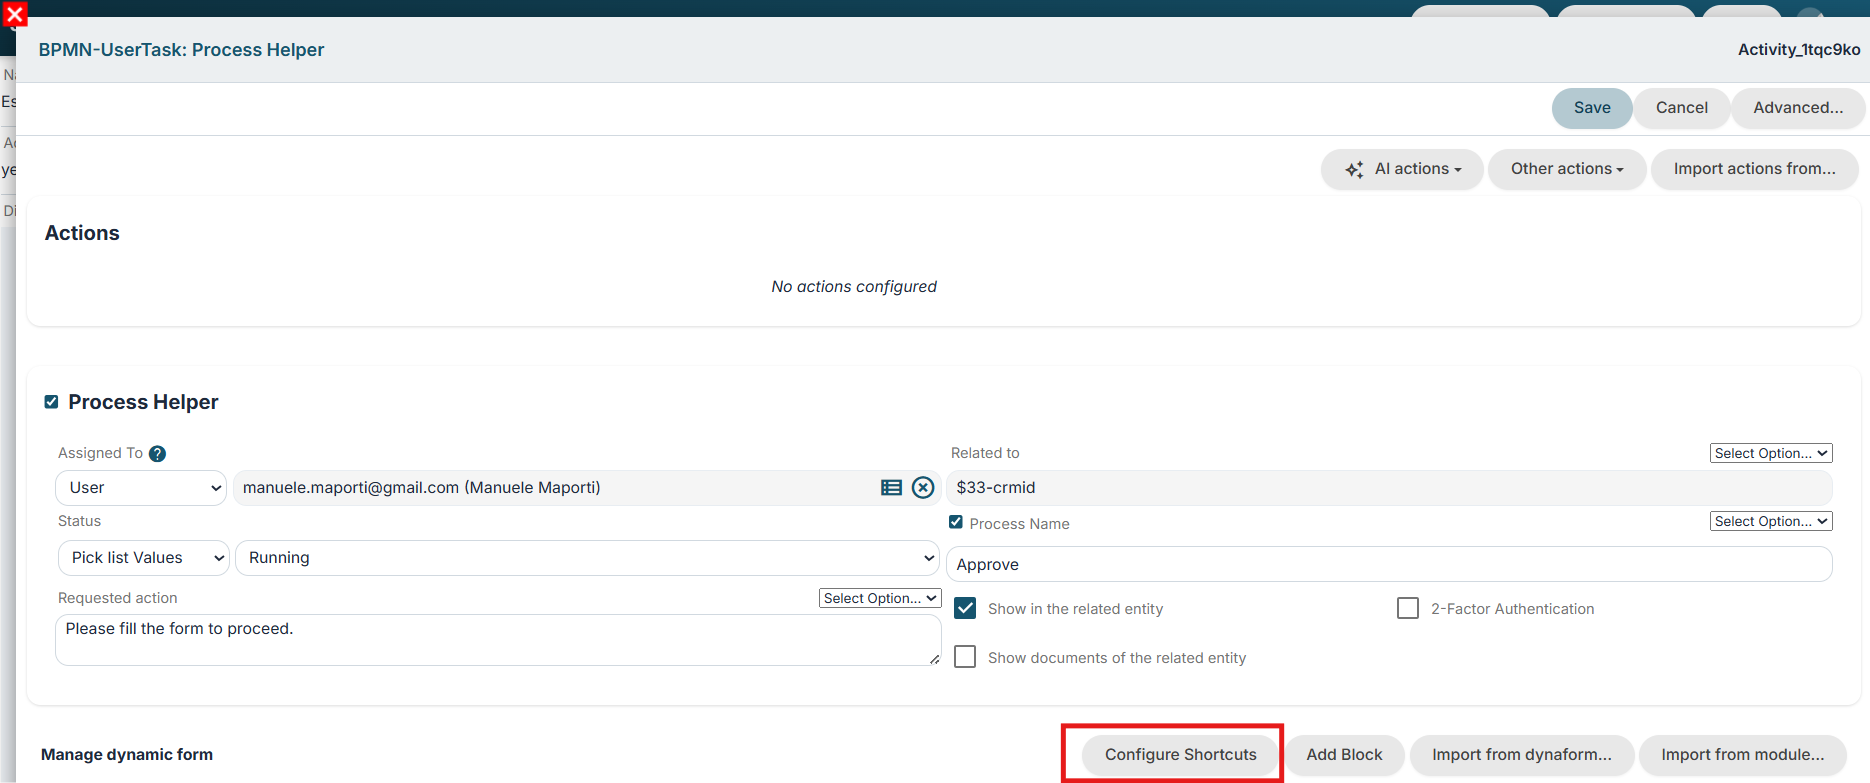](https://usermanual.vtenext.com/uploads/images/gallery/2026-07/vzJimage.png) Figure 1 Clicking the "Configure Quick Selection" button displays a table where the desired buttons can be configured. (Figure 2) Specifically: \- "Label" column -> represents the name displayed on the button \- "Value" column -> \- "Style" column -> represents the color in which the button is displayed \- "Confirmation" column -> enables a double-confirmation step by displaying an additional pop-up when the button is clicked [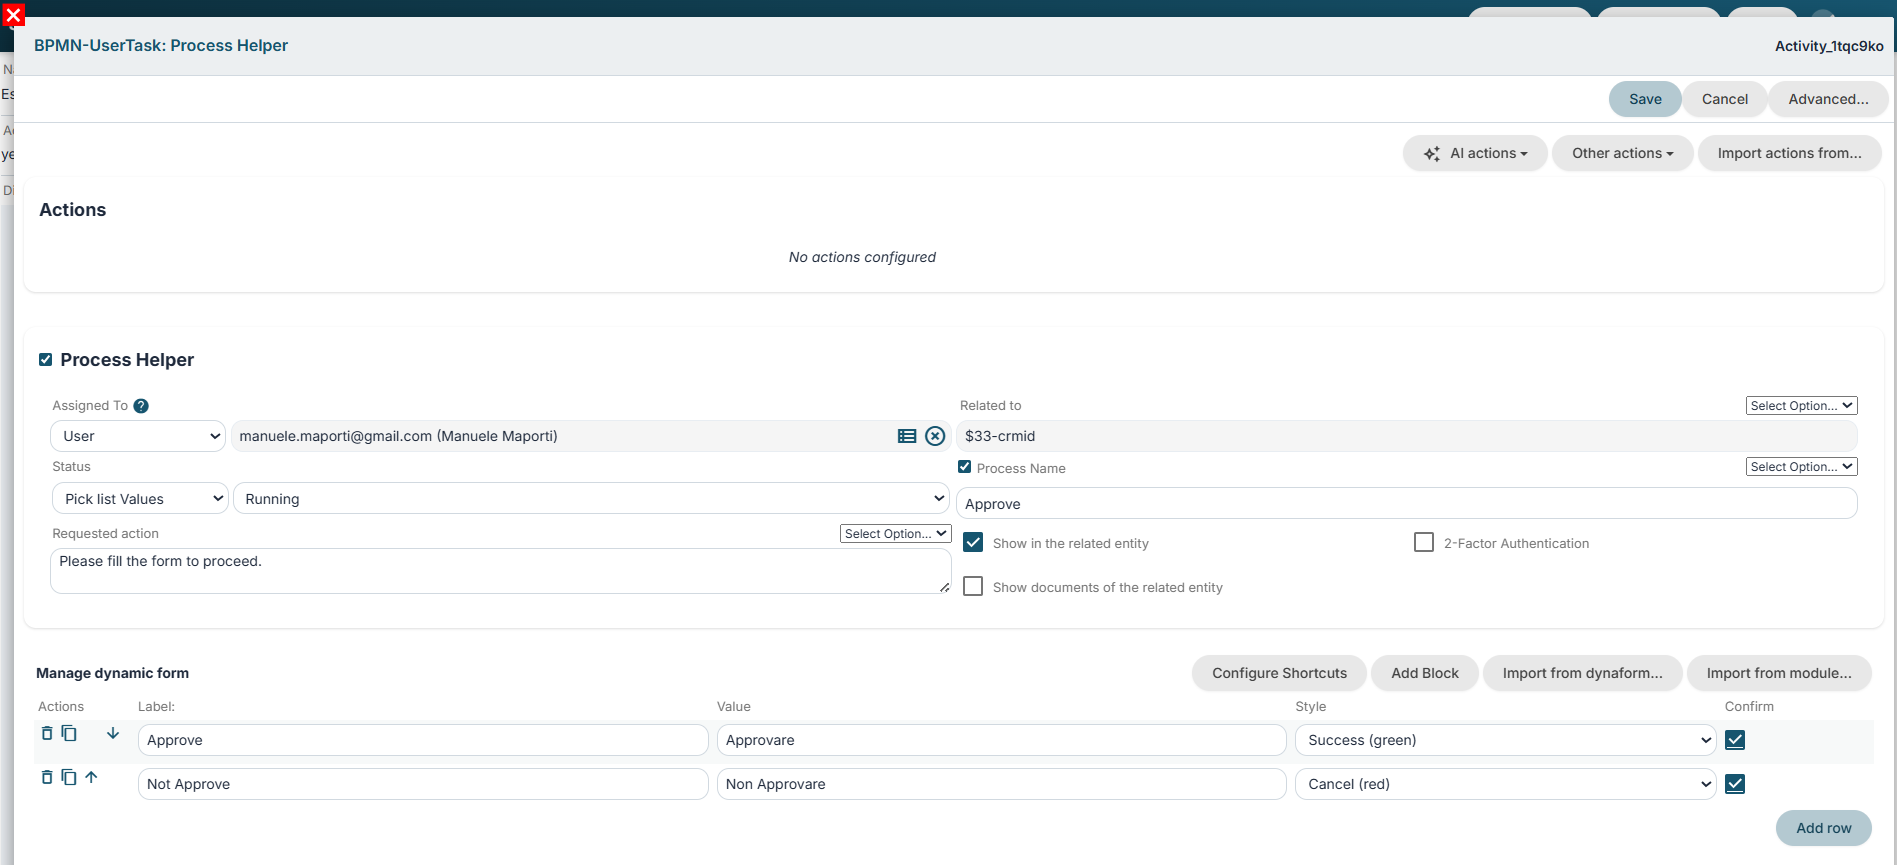](https://usermanual.vtenext.com/uploads/images/gallery/2026-07/qH2image.png) Figure 2 To view a practical example, consult Chapter 6.2. # 5.2 Block and field management It allows the creation of real customized forms aimed at receiving and historicizing the data entered (in this case) by CRM or external users (Figure 1). [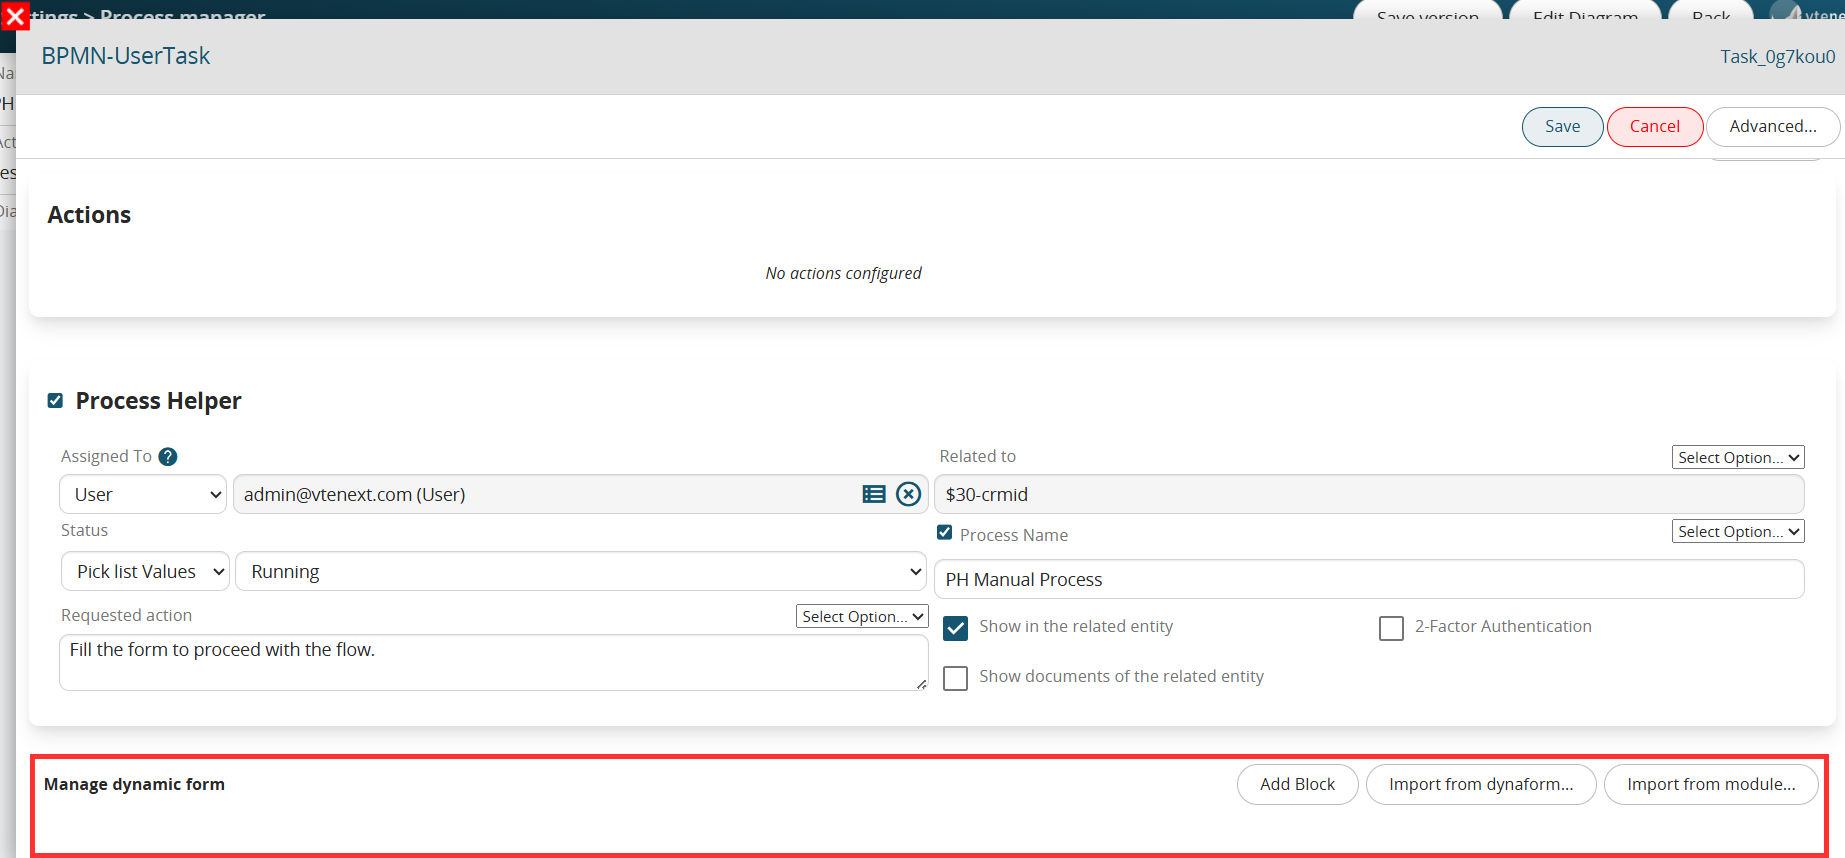](https://usermanual.vtenext.com/uploads/images/gallery/2025-06/U4Zimage.png) Figure 1 The configuration interface is identical to the Layout Editor section used for configuring modules (chapter 17.7 of the Vtenext general manual). **“ADD BLOCK” BUTTON** Using the “Add block” button, it will be possible to create a block, or the “base” within which individual fields or tables can be created (Figure 2). [](https://usermanual.vtenext.com/uploads/images/gallery/2025-06/WVhimage.png) Figure 2 Once a block has been created, a series of buttons will be made available to the right of the block name for creating/moving/deleting individual fields within it (Figure 3). [](https://usermanual.vtenext.com/uploads/images/gallery/2025-06/QVoimage.png) Figure 3 Specifically: \- **Edit** button → allows you to change the block name (Figure 4) [](https://usermanual.vtenext.com/uploads/images/gallery/2025-06/WJoimage.png) Figure 4 \- **Trash** button → allows you to delete the block (Figure 5) [](https://usermanual.vtenext.com/uploads/images/gallery/2025-06/99yimage.png) Figure 5 \- **Add field** button → allows you to create a field of one of the different types available (Figure 6), for further information see the section “Custom field types” of chapter 17.7 of the general Vtenext manual [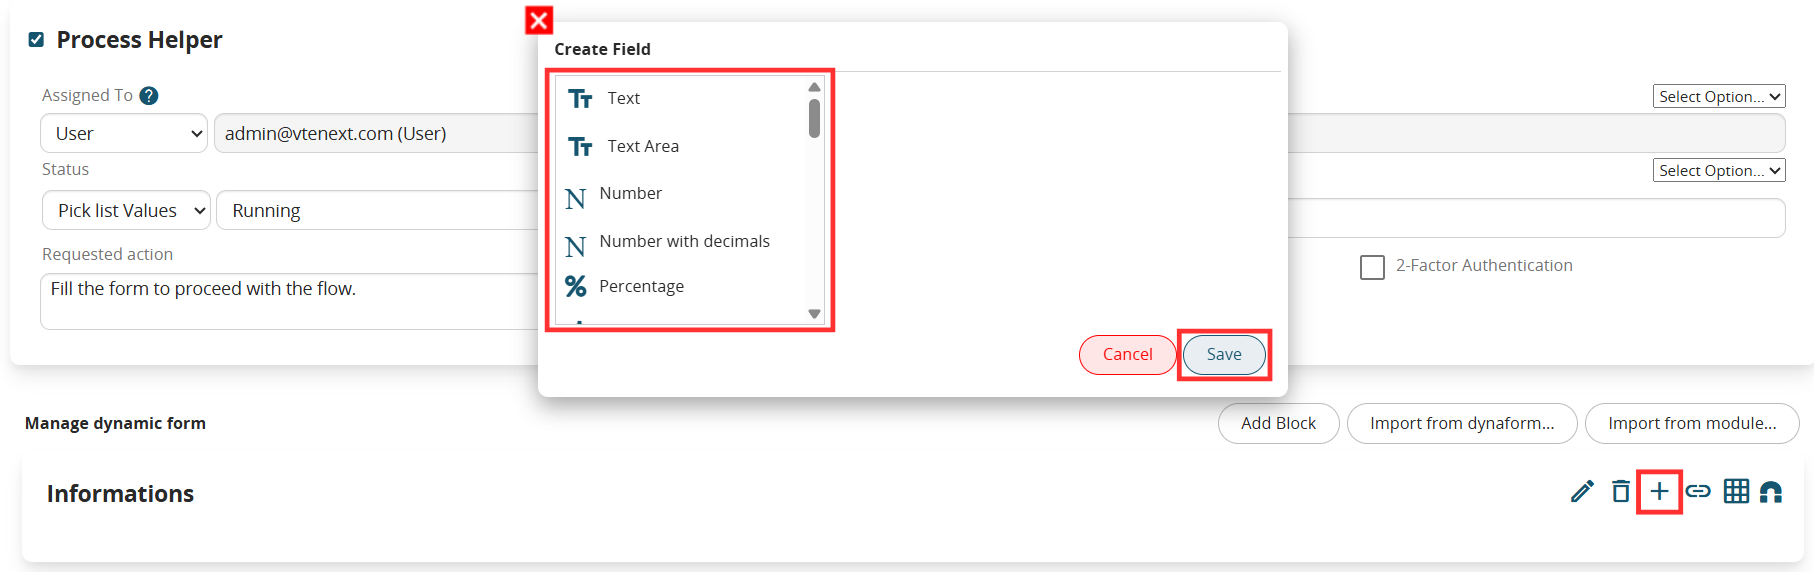](https://usermanual.vtenext.com/uploads/images/gallery/2025-06/xiyimage.png) Figure 6 \- **Add relation field** button → allows you to quickly create a field of the “Related to” type (Figure 7) [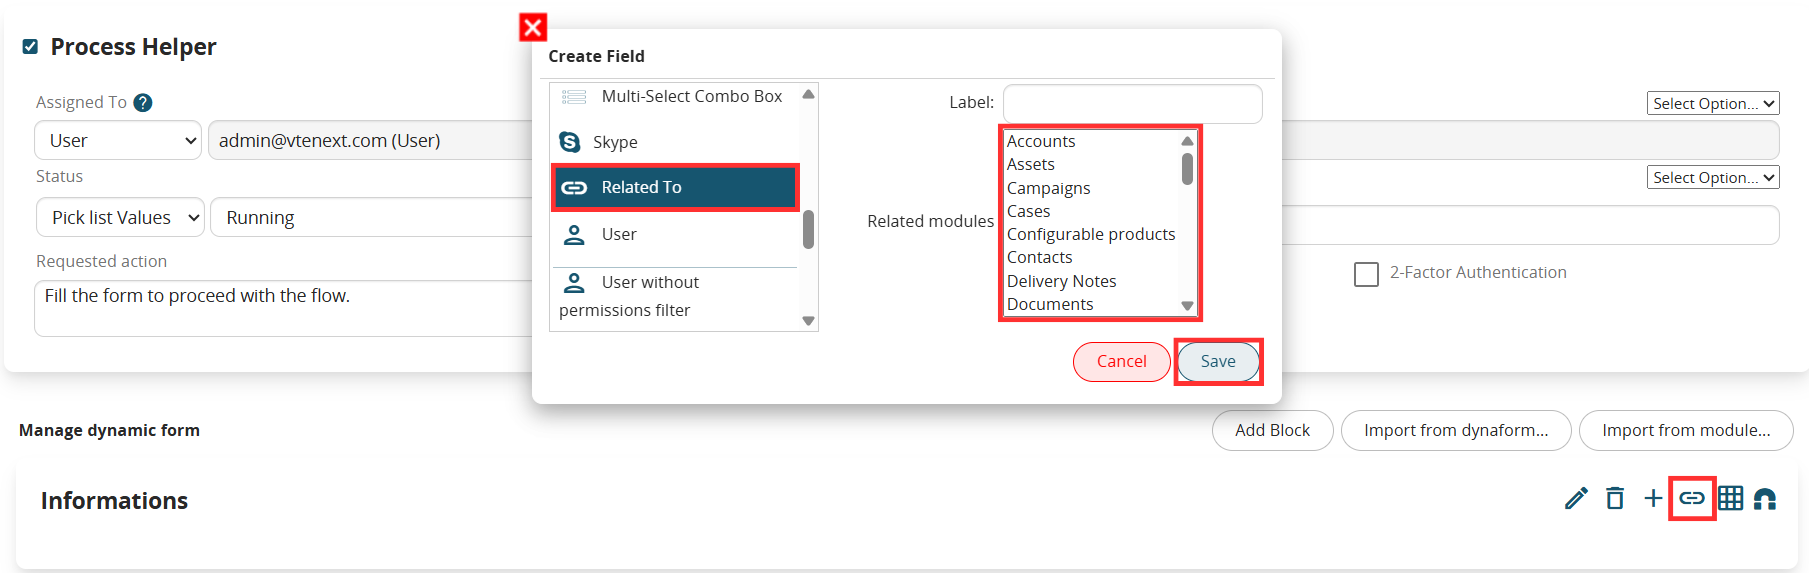](https://usermanual.vtenext.com/uploads/images/gallery/2025-06/eDWimage.png) Figure 7 -**Add Table Field** Button → allows you to quickly create a table field (Figure 8 and 9) [](https://usermanual.vtenext.com/uploads/images/gallery/2025-05/fGVimage.png) Figure 8 [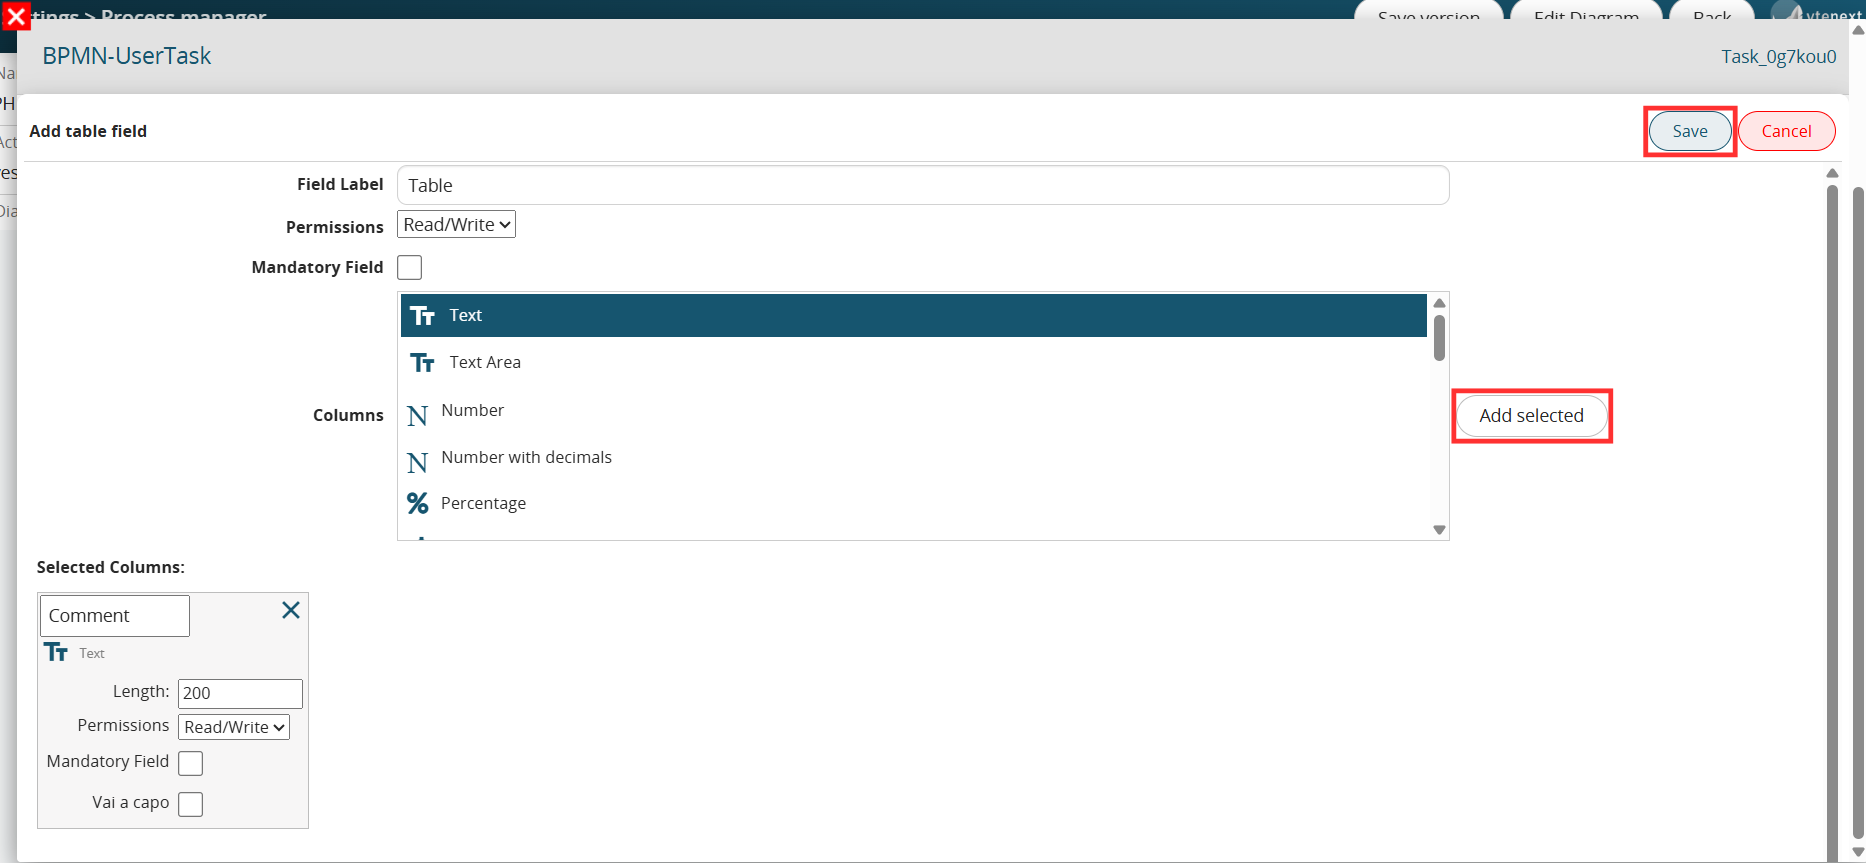](https://usermanual.vtenext.com/uploads/images/gallery/2025-06/xmDimage.png) Figure 9 -**Move Fields** button → allows you to move individual fields from one block to another of the same dynamic form (Figure 10) [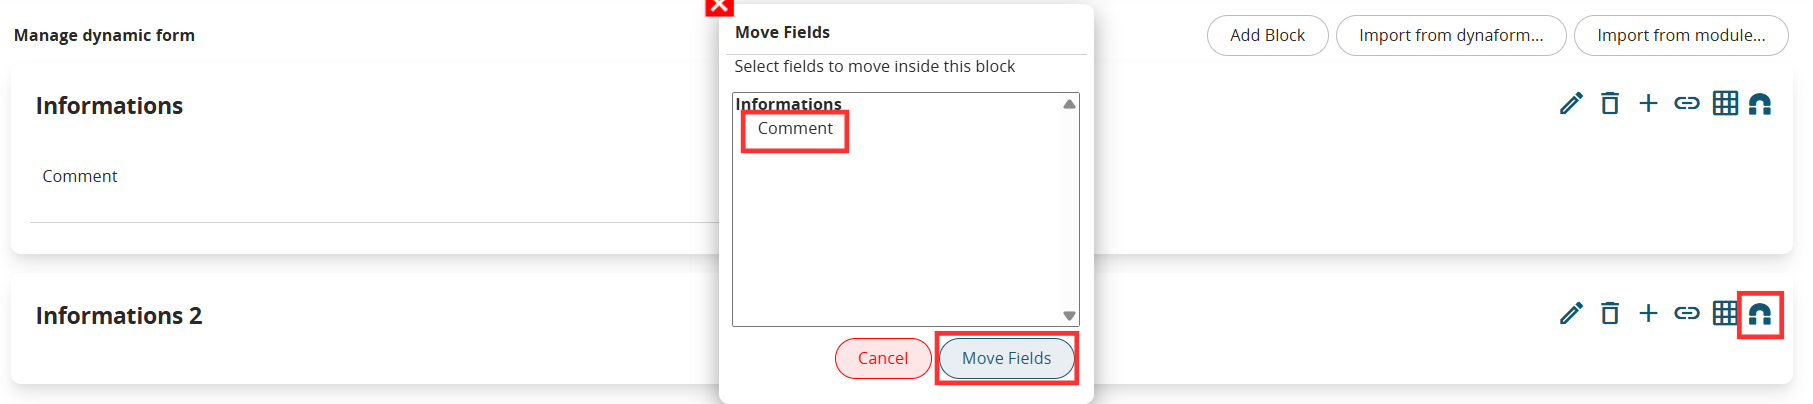](https://usermanual.vtenext.com/uploads/images/gallery/2025-06/hLsimage.png) Figure 10 # 5.3 Managing Properties of Individual Fields To manage the properties of individual fields in the dynamic form, you will need to click on the “Edit” button to the right of the field name (Figure 1) [](https://usermanual.vtenext.com/uploads/images/gallery/2025-06/OiIimage.png) Figure 1 Specifically, you can manage the following properties: - Default Permissions → by filling in the “Permissions” picklist you can select one of the following items: “Read / Write”, “Read Only”, “Hidden” (Figure 2) [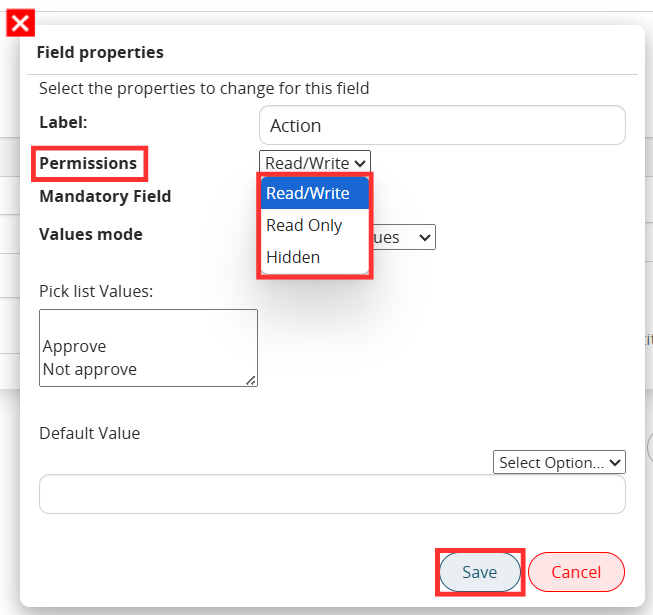](https://usermanual.vtenext.com/uploads/images/gallery/2025-06/LYoimage.png) Figure 2 To set mandatory permissions instead, you will have to select the “Mandatory” flag (Figure 3) [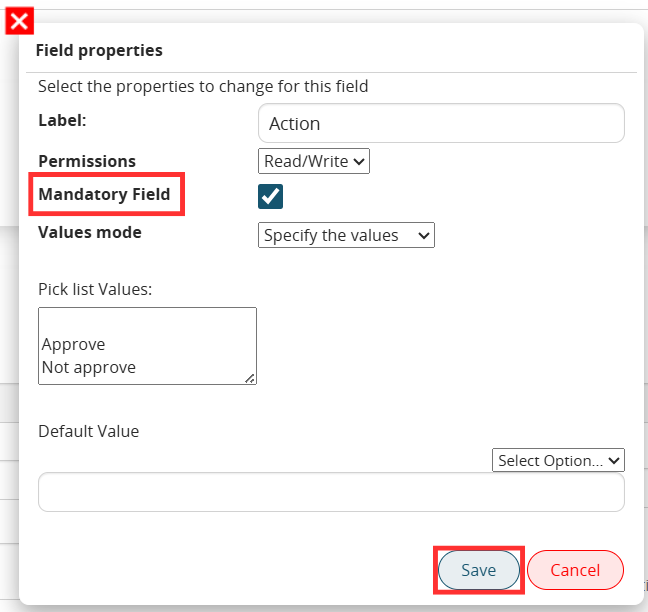](https://usermanual.vtenext.com/uploads/images/gallery/2025-06/1nBimage.png) Figure 3 \- Default Value → by filling in the “Default Value” field it will be possible to indicate a static or dynamic default value (by choosing from the “Select Option picklist”) (Figure 4) 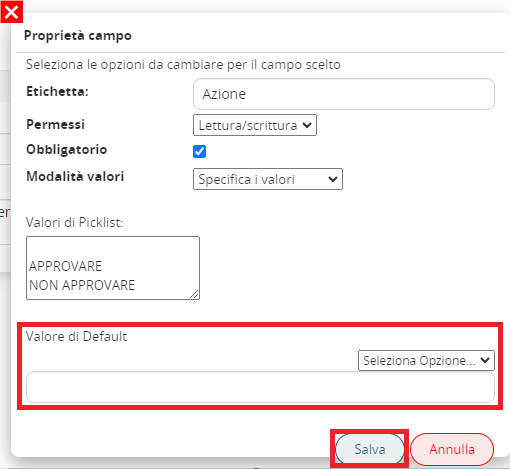 Figure 4 \- Values mode → this is an exclusive feature for “Picklist” type fields. It allows you to choose whether to specify static values as components of the picklist (by selecting the “Specify values” item, Figure 5) or whether to inherit the values of an existing picklist on one of the modules involved in the process or present in the CRM (by selecting the “Inherit from a field” item, Figure 6). [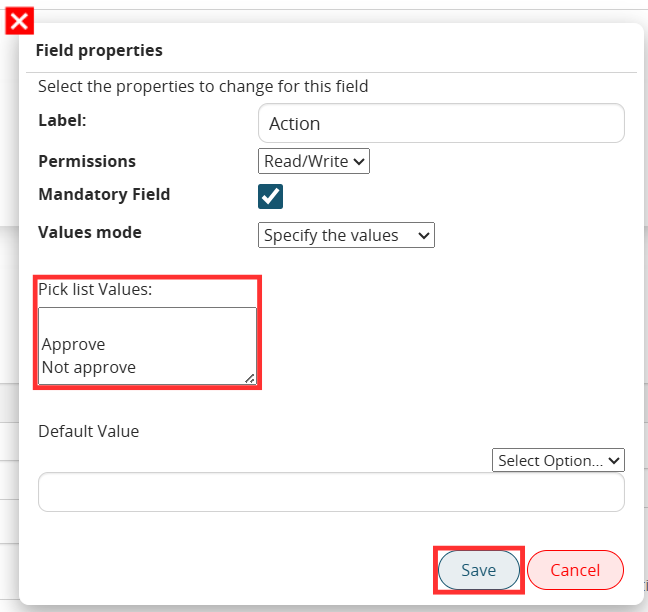](https://usermanual.vtenext.com/uploads/images/gallery/2025-06/LCHimage.png) Figure 5 [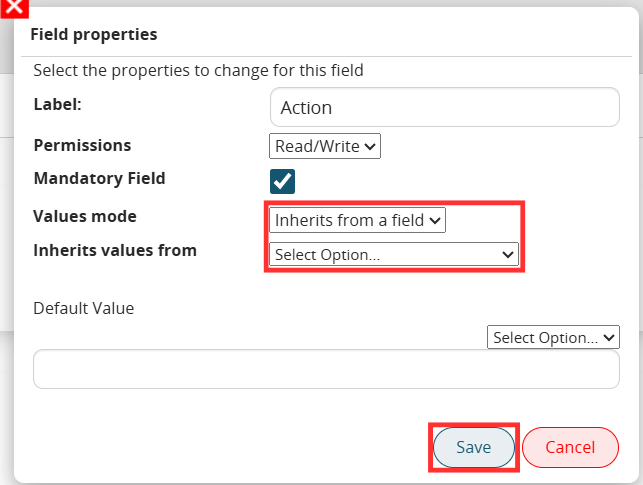](https://usermanual.vtenext.com/uploads/images/gallery/2025-06/yDFimage.png) Figure 6 NOTE: within the processes it is possible to separate the process into different branches that are traversed by the flow based on the conditions that occur within it. For this reason, when configuring this functionality, it is good to pay particular attention to the sources from which we are going to obtain the values to inherit. In fact, in the case in which the values of a field are inherited by fishing it from an instance involved in the process, it must be ensured that that instance is actually always involved in the entire path that then leads to the process helper, otherwise there is a risk that the system will not return anything because, in that specific branch traversed by the process, the instance of that module does not exist. For example, if the process is divided into 2 different branches, in which in the first there is a create entity action on the companies module and in the second instead the process helper that we are configuring, if we go to fish the values to inherit by pointing to the company created by the create entity action we will not obtain any value, this is because in the path that leads to the process helper that company is not created. So in this case we will have to point to the variables linked to the generic modules present in the CRM (Figure 7) [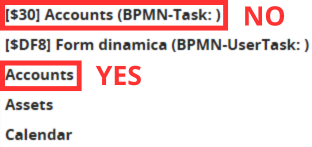](https://usermanual.vtenext.com/uploads/images/gallery/2025-06/hkLimage.png) Figure 7 # 5.4 Import Block from Dynamic Form If the necessary blocks and fields already exist within another dynamic form, using the “Import from dynamic form...” button it will be possible to insert a copy of the block of a dynamic form present within the process into the dynamic form (including the fields present within it, Figure 1). [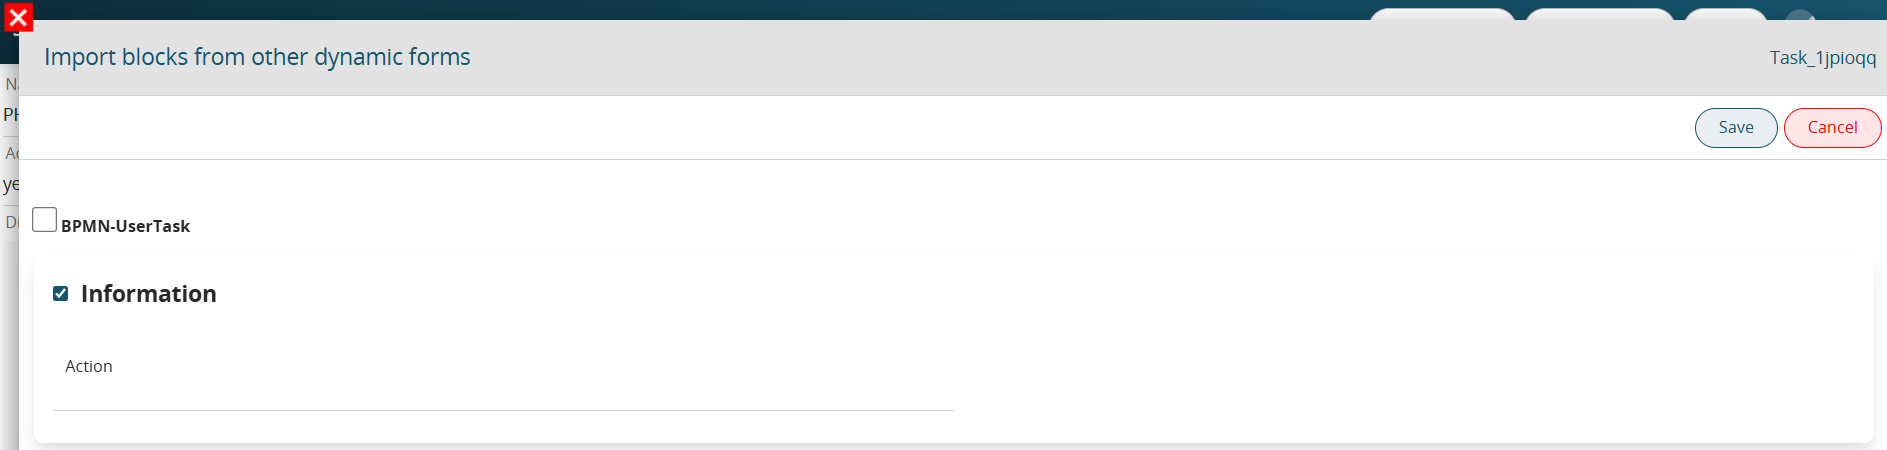](https://usermanual.vtenext.com/uploads/images/gallery/2025-06/qQGimage.png) Figure 1 NOTE: All fields will be created with the following properties: -Default Permissions → Read Only -Default Value → variable that points to the content of the dynamic form field from which the copy was made # 5.5 Import Block from Module In the event that the necessary blocks and fields already exist within a module (standard or custom), using the “Import from module...” button it will be possible to insert a copy of the block of a module involved in the process into the dynamic form (including the fields present within it, Figure 1). [](https://usermanual.vtenext.com/uploads/images/gallery/2025-06/lhRimage.png) Figure 1 NOTE: All fields will be created with the following properties: -Default Permissions → Read Only -Default Value → variable that points to the content of the field of the form instance from which the copy was made # 5.6 Advanced Section This section allows you to set advanced rules to manage the permissions for the fields of the dynamic forms involved in the process. To access them, click the "Advanced" button available within any Action Task (Figure 1). [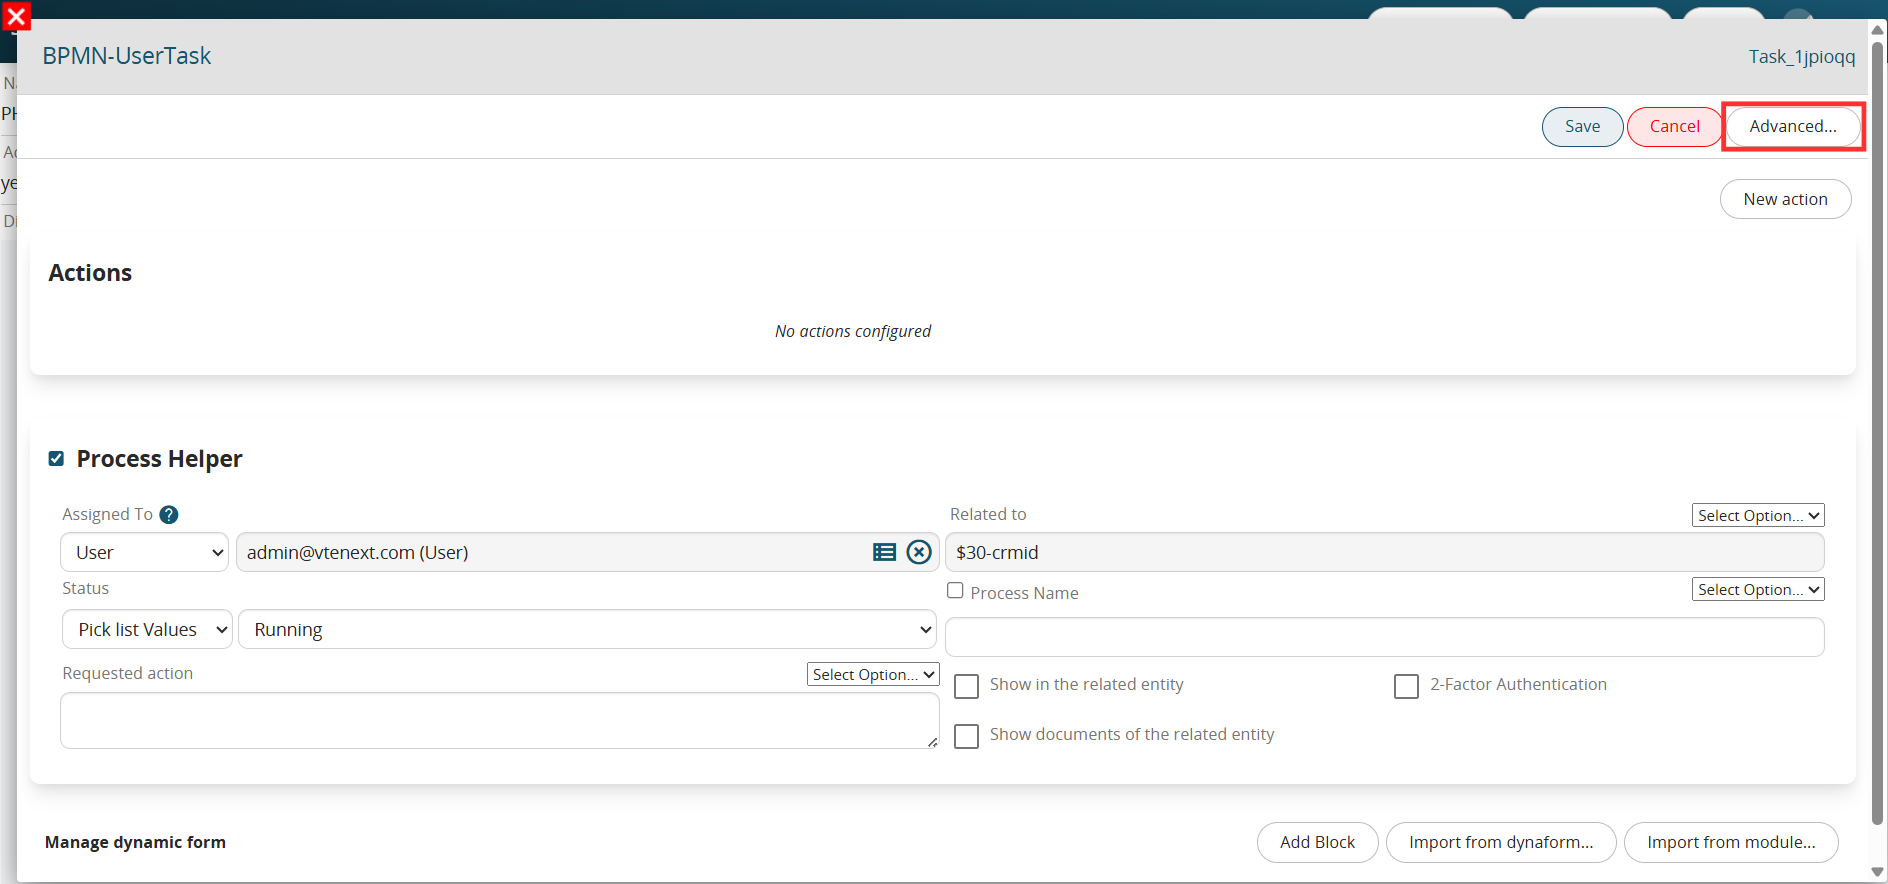](https://usermanual.vtenext.com/uploads/images/gallery/2025-06/Frzimage.png) Figure 1 **CONDITIONAL FIELDS (ON FORM)** Allows you to set up conditional field rules applicable to the instances of the forms involved in the process (Figure 2). These rules will be valid only during the duration of the process, in fact once it is finished they will be automatically deactivated. [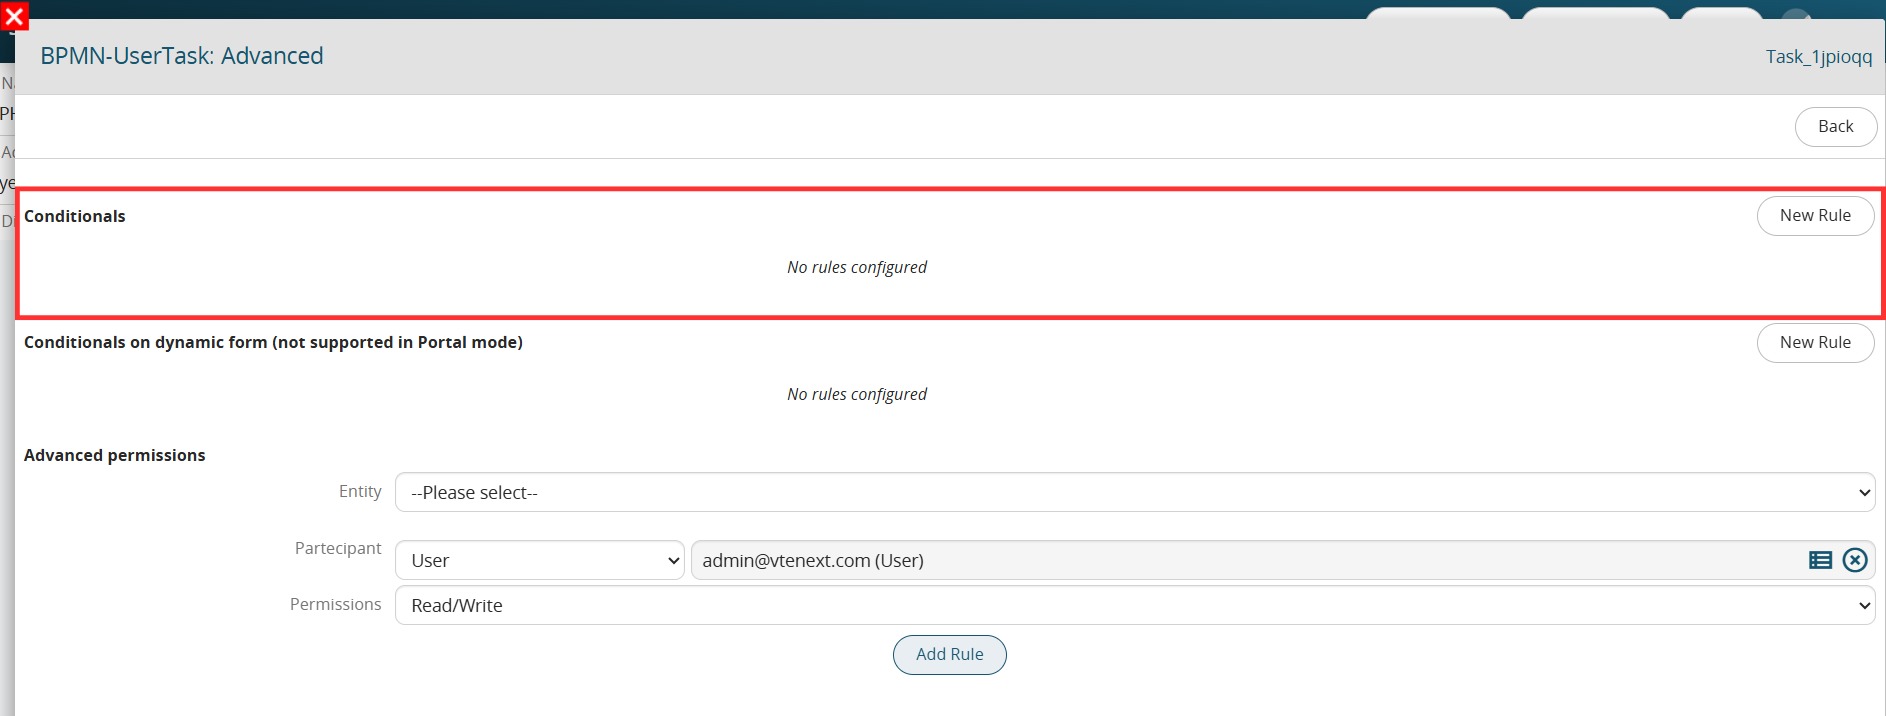](https://usermanual.vtenext.com/uploads/images/gallery/2025-06/p53image.png) Figure 2 To proceed with the creation of a rule, you will have to click the “New Rule” button. The system will ask you to enter a text description by filling in the “Rule” field. You will then have to select the instance involved in the process, indicate any Roles or Groups to which to limit the application of the rule, enter a condition (which must occur for the rule to be activated) and finally enter the permissions on the fields involved (Figure 3). For further information on the configuration of conditional fields, consult section 17.4 of the Vtenext general manual. [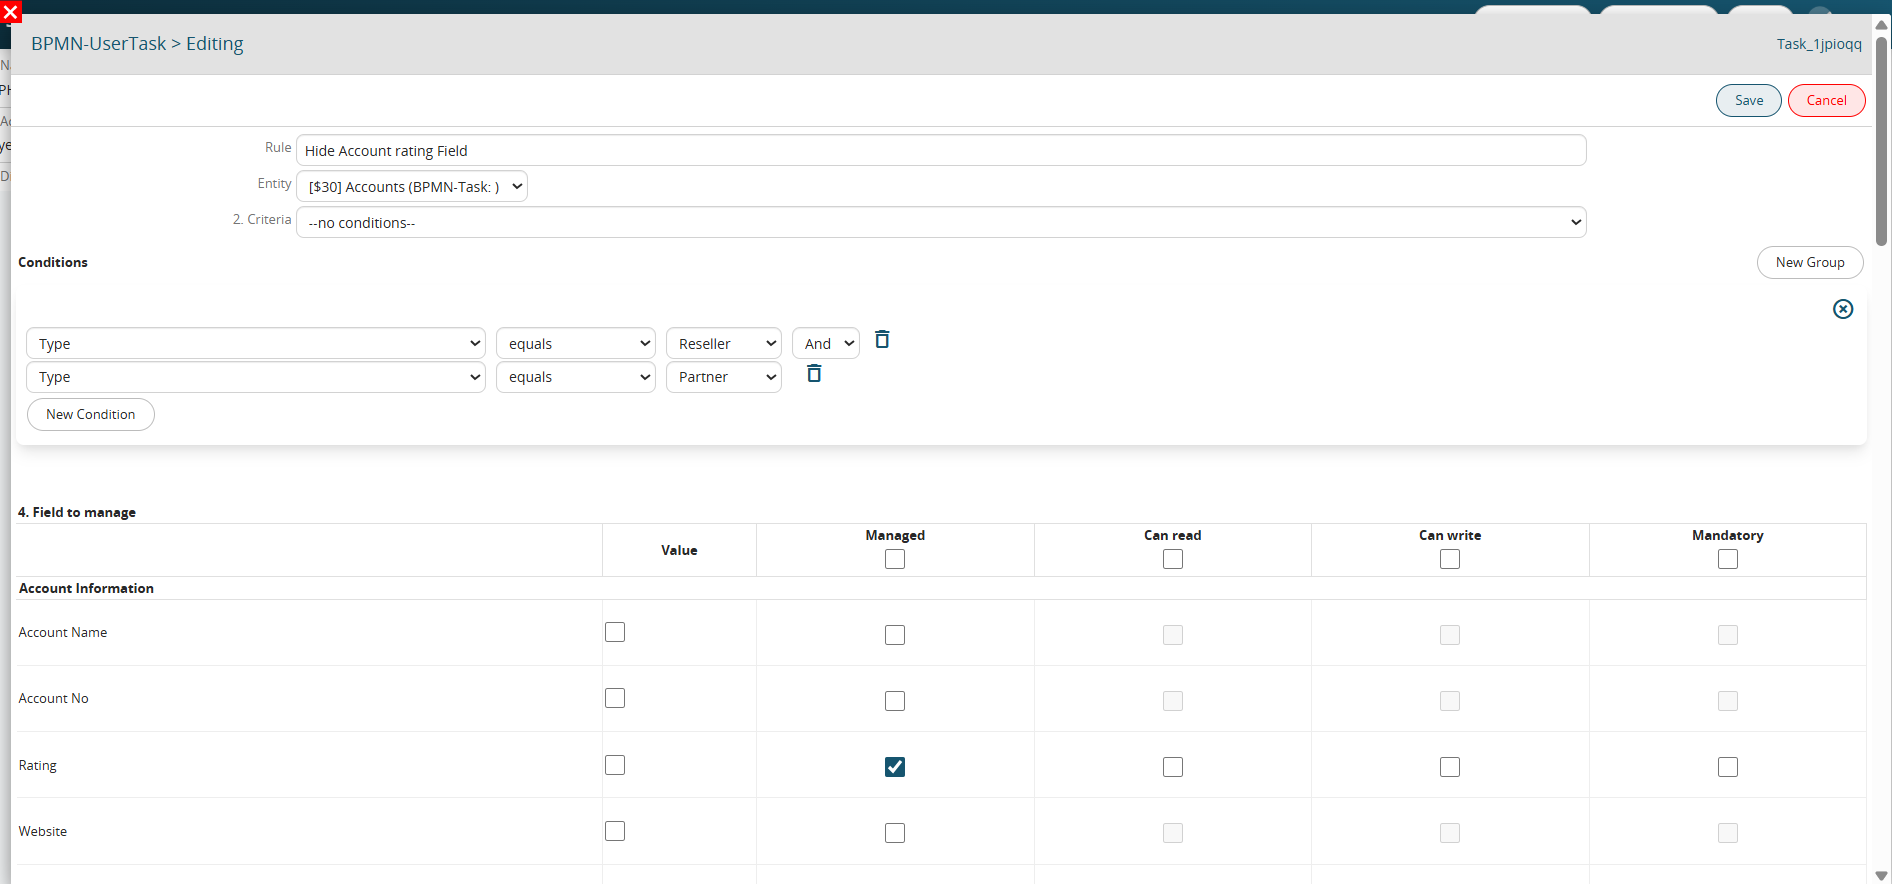](https://usermanual.vtenext.com/uploads/images/gallery/2025-06/emRimage.png) Figure 3 NOTE: compared to the standard conditional fields, an additional column called “Value” is available from the process, which allows you to force the insertion of static or dynamic data within the selected fields (Figure 4). [](https://usermanual.vtenext.com/uploads/images/gallery/2025-06/4a8image.png) Figure 4 **CONDITIONAL FIELDS ON DYNAMIC FORM (NOT SUPPORTED IN PORTAL MODE)** Allows you to set conditional field rules applicable to the fields of a specific dynamic form present within the process (Figure 5). These rules will be valid only during the duration of the process, in fact once it is finished they will be automatically deactivated. [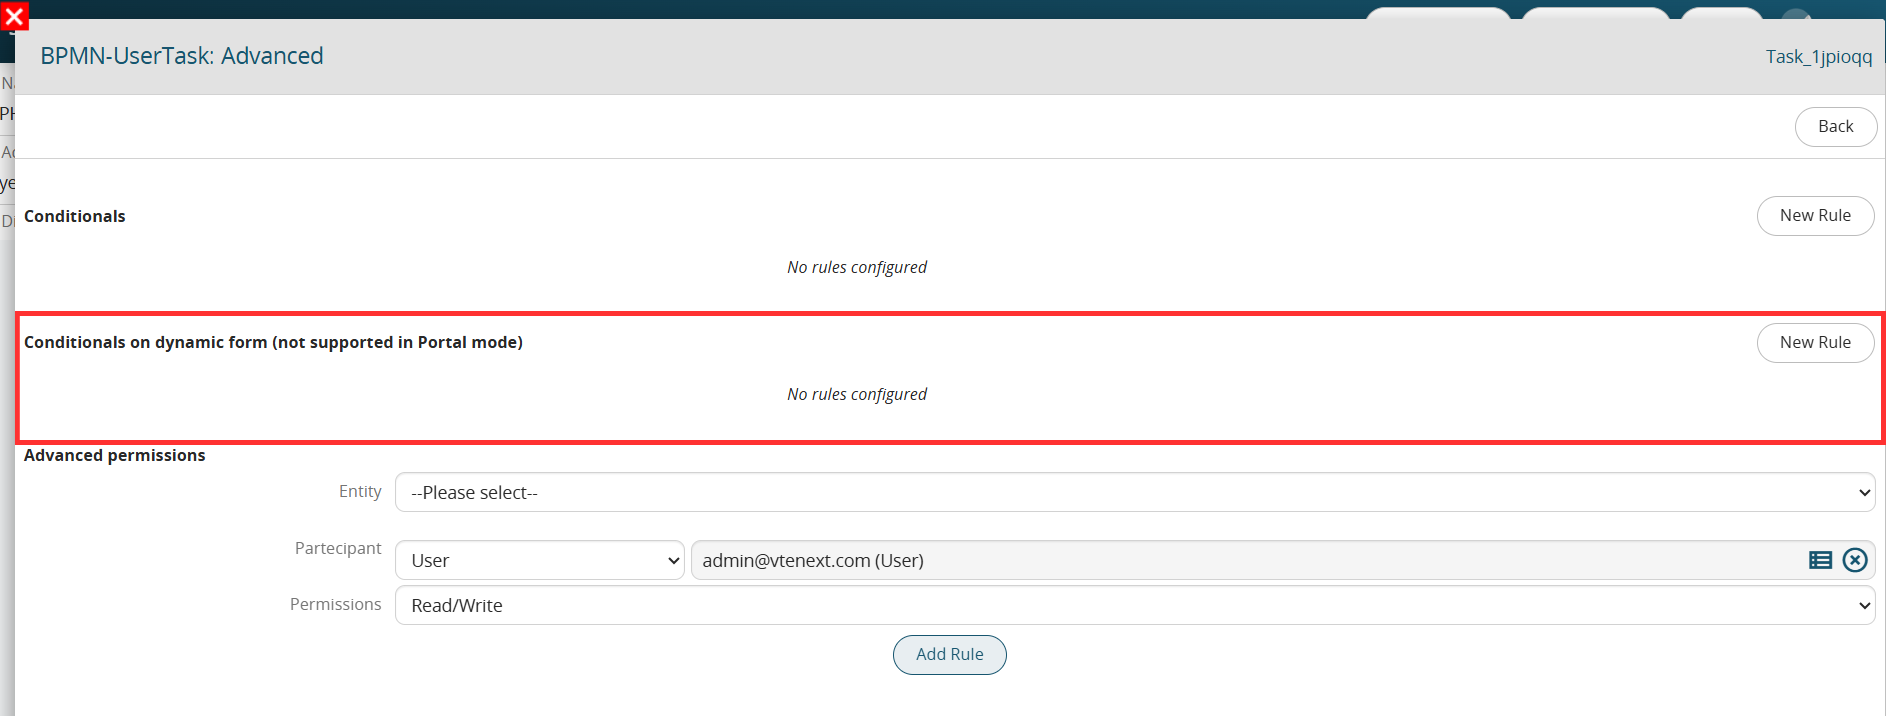](https://usermanual.vtenext.com/uploads/images/gallery/2025-06/FDNimage.png) Figure 5 To proceed with the creation of a rule, you will have to click the “New Rule” button. The system will ask you to enter a text description by filling in the “Rule” field. You will then have to indicate any Roles or Groups to which you want to limit the application of the rule, insert a condition (which must occur for the rule to be activated) and finally insert the permissions on the fields involved. For further information on the configuration of conditional fields, consult section 17.4 of the Vtenext general manual. To better understand how it works, below is an example of a Process Helper aimed at requesting the approval of an internal flow by filling in a single field called “Action” (Figure 6). [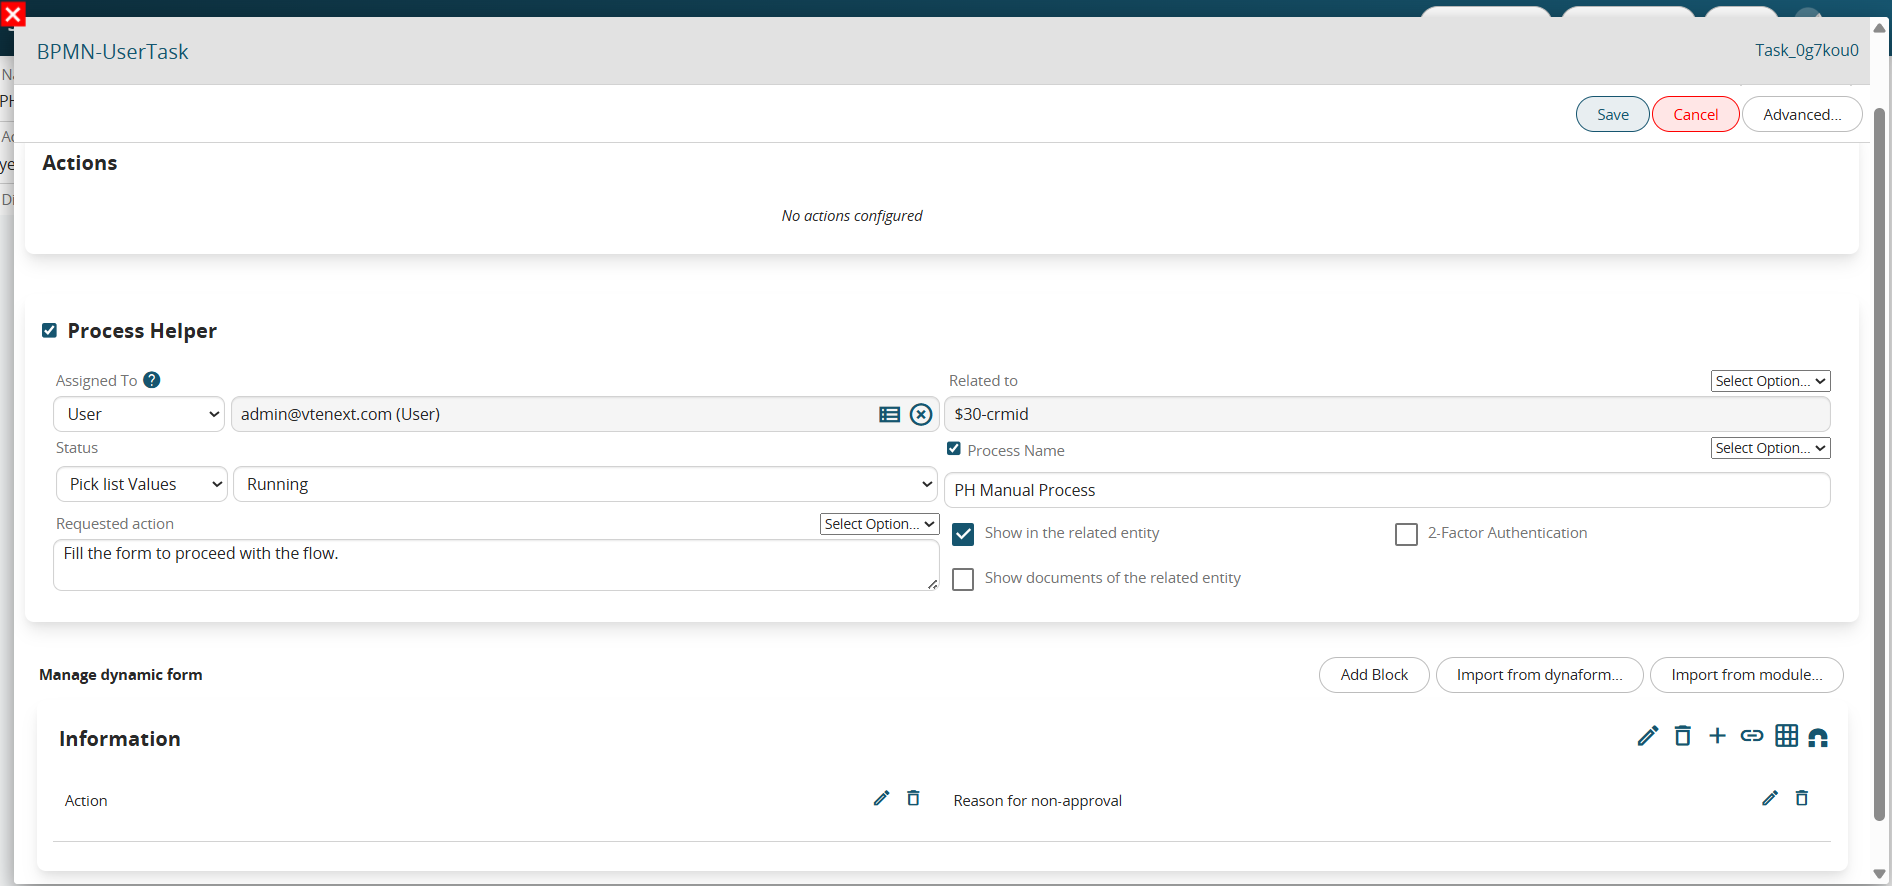](https://usermanual.vtenext.com/uploads/images/gallery/2025-06/IEQimage.png) Figure 6 This is a picklist type field with the following 3 static values: “empty”, “APPROVATE” and “DO NOT APPROVE” and with mandatory permissions as Default (Figure 7) [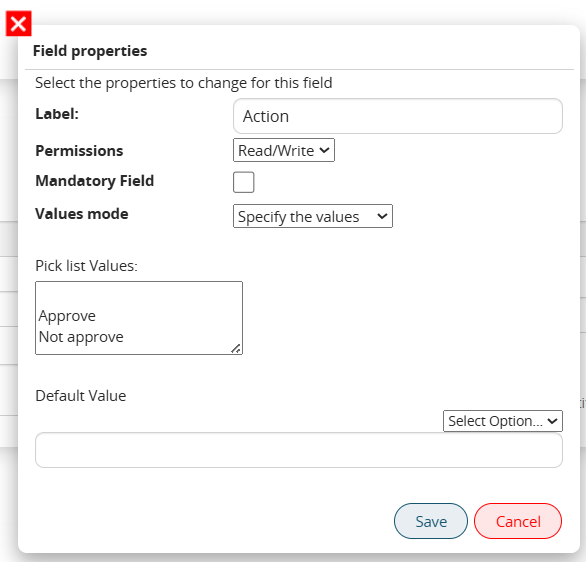](https://usermanual.vtenext.com/uploads/images/gallery/2025-06/YEnimage.png) Figure 7 There is an additional field called “Reason for non-approval” that should be shown and filled in only if the user chooses the “DO NOT APPROVE” option. For this reason, the following conditional field rule on dynamic form has been created that allows you to hide the aforementioned field if the “Action” field has a value other than “DO NOT APPROVE”. Therefore, in the “Advanced” → “Conditional fields on dynamic form” section, a rule called “If Action other than DO NOT APPROVE hide Reason for non-approval field” has been inserted (Figure 8). [](https://usermanual.vtenext.com/uploads/images/gallery/2025-06/SQwimage.png) Figure 8 In the “Condition” section, the “Action” condition other than “DO NOT APPROVE” has been inserted (Figure 9) [](https://usermanual.vtenext.com/uploads/images/gallery/2025-06/gweimage.png) Figure 9 In the “Fields to manage” section, only the “Managed” column was selected in the “Reason for non-approval” field (Figure 10) [](https://usermanual.vtenext.com/uploads/images/gallery/2025-06/Dh6image.png) Figure 10 **ADVANCED PERMISSIONS** Allows you to set complete visibility permissions on the instances of the modules involved in the process by specifying a user or a group (static or dynamic). N.B: They will be valid even after the end of the process. To proceed with the insertion of an advanced permission you will have to select an instance involved in the process, a user or group (static or dynamic) to apply it to and finally one of the available permissions (“Read/Write” and “Read Only”) (Figure 11). Once you click the “Add Rule” button, the advanced permission will be saved and confirmed. [](https://usermanual.vtenext.com/uploads/images/gallery/2025-06/ktMimage.png) Figure 11 # 6 Process Helper: Examples of Use # 6.1 Example of using Process Helper for internal user data requests – standard version As anticipated in the introductory chapter, one of the most common uses of the process helper concerns the creation of customized forms that can be presented to internal users of the CRM in order to request and save information. The blocks and fields that make up these forms are called "dynamic forms". PREMISE: In order for a user to be able to view and fill out a dynamic form, he/she must have enabled the appropriate permissions on the profile side (Figure 1) [](https://usermanual.vtenext.com/uploads/images/gallery/2025-06/2pOimage.png) Figure 1 In order to configure a process helper, you must first configure an Action Task (create a link with a dedicated section) following the dedicated procedure (Figure 1). NOTE: it is advisable to use the User Task symbol, as we are indicating an activity that will be charged to the user. [](https://usermanual.vtenext.com/uploads/images/gallery/2025-05/embedded-image-ffscqhqm.png) Figure 2 After the User Task, in this specific case it is essential to create a Task within which to perform some checks to allow the process to stop and present the dynamic form (Figure 2). [](https://usermanual.vtenext.com/uploads/images/gallery/2025-06/Ij5image.png) Figure 3 Once inside the User Task (in our example “Process Helper”) in configuration mode, we will find the section called “Process Helper” with all the related fields (Figure 3) [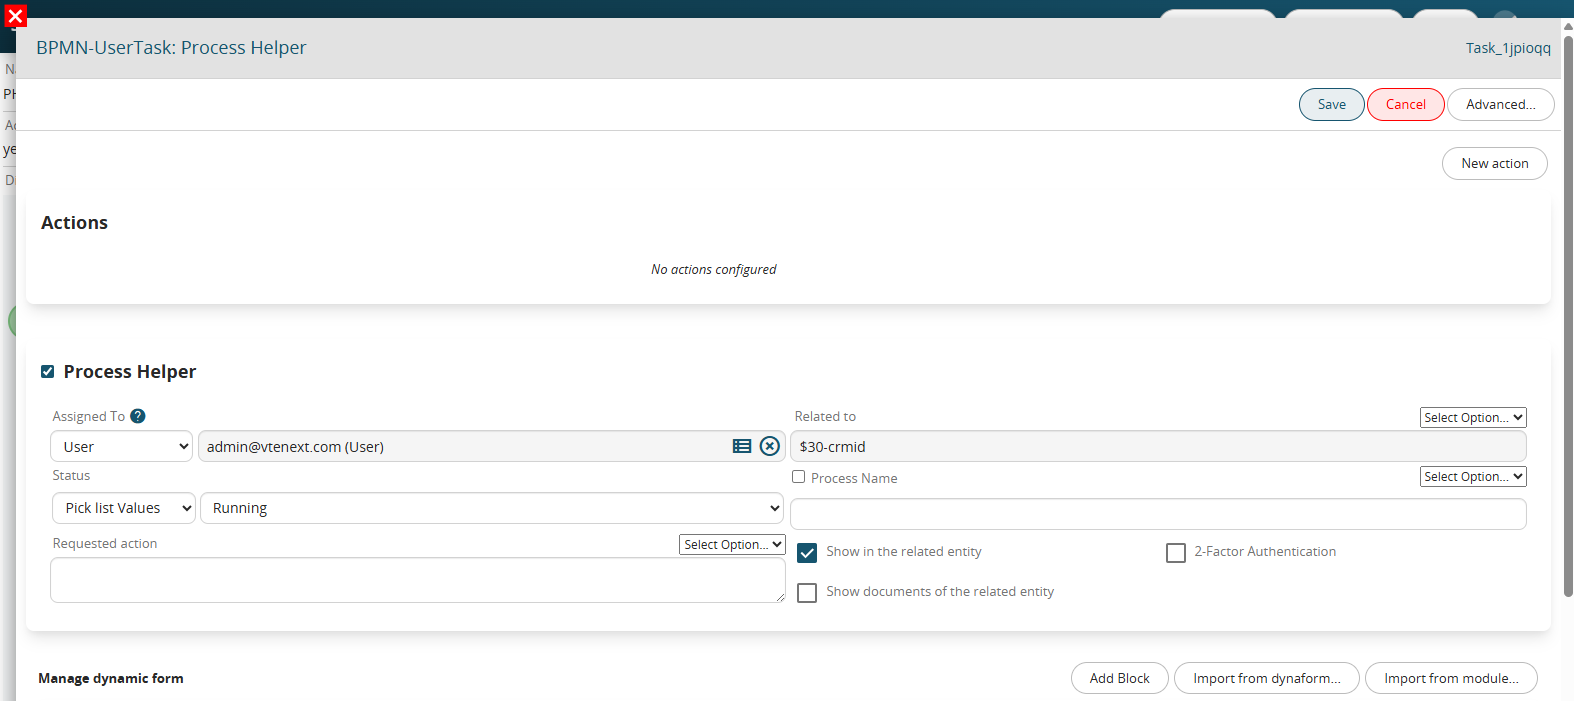](https://usermanual.vtenext.com/uploads/images/gallery/2025-06/6RPimage.png) Figure 4 Once the main fields have been configured (Assigned to, Linked to, Action requested) we will create the necessary blocks and fields in the dynamic form in order to save the information that will be entered by the user (for more information on their configuration, see the chapter ...). To better understand how it works, below is an example of a process helper aimed at requesting approval of an internal flow by filling in a single field called "Action" (Figure 4). [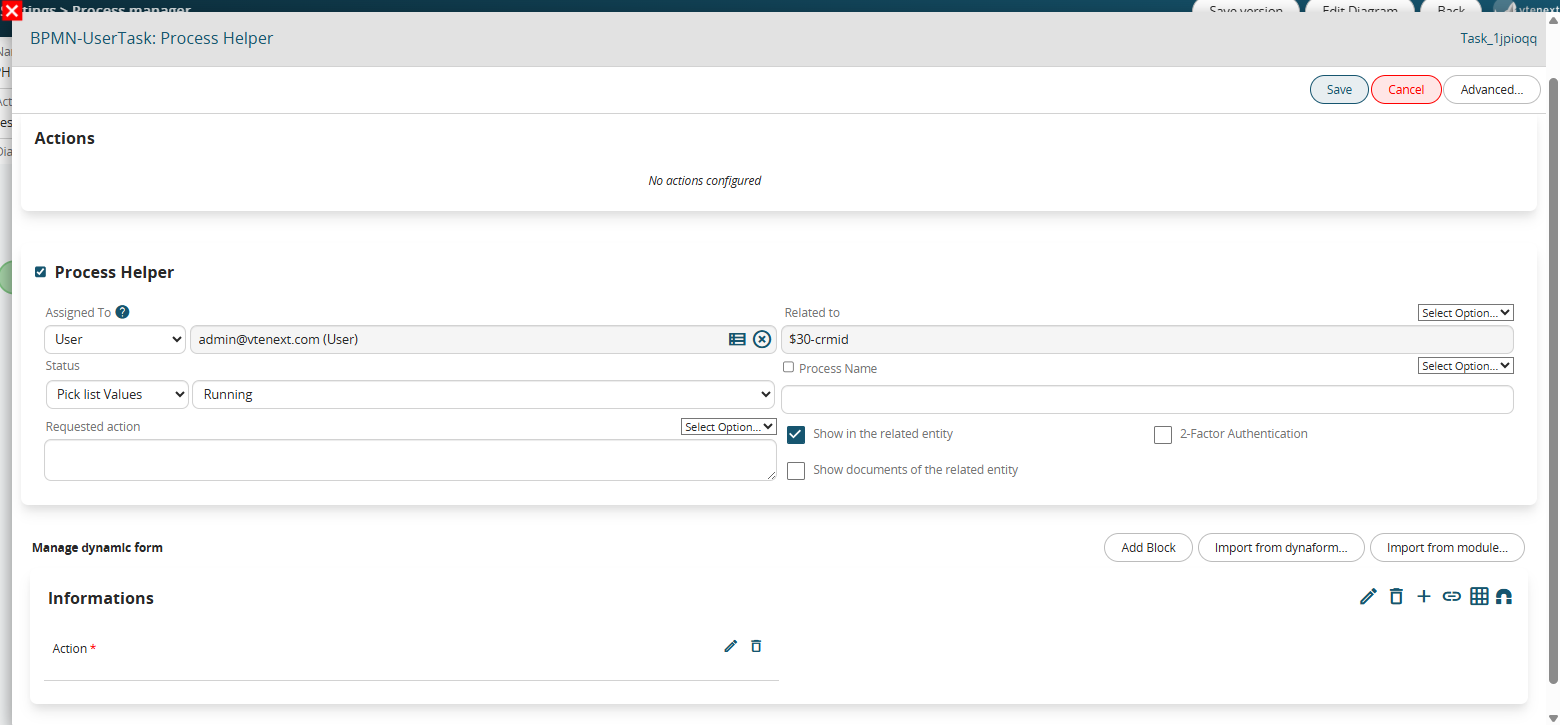](https://usermanual.vtenext.com/uploads/images/gallery/2025-06/qBpimage.png) Figure 5 This is a picklist type field with the following 3 static values: “empty”, “APPROVATE” and “DO NOT APPROVE” and with mandatory permissions as Default (Figure 5) [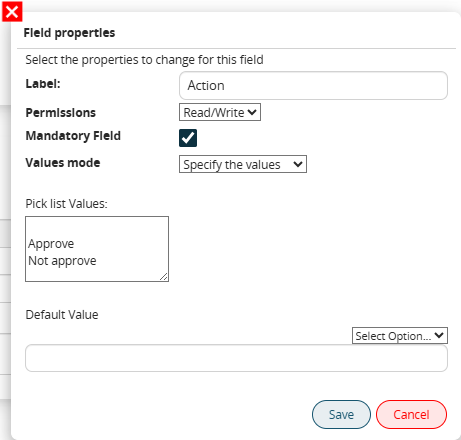](https://usermanual.vtenext.com/uploads/images/gallery/2025-06/v5himage.png) Figure 6 In the associated Control Task (called “Process Helper Control”) a condition is indicated that allows the process not to continue with its flow until a value other than blank has been entered (which instead represents the default value of the picklist) (Figure 6) [](https://usermanual.vtenext.com/uploads/images/gallery/2025-06/Czqimage.png) Figure 7 The two conditions inserted in separate groups allow the flow to be routed in two different paths based on the item selected by the user. On the operational side, the process helper presents itself with a preview mask as shown in Figure 7, this is because the “Show in the linked entity” flag has been activated. [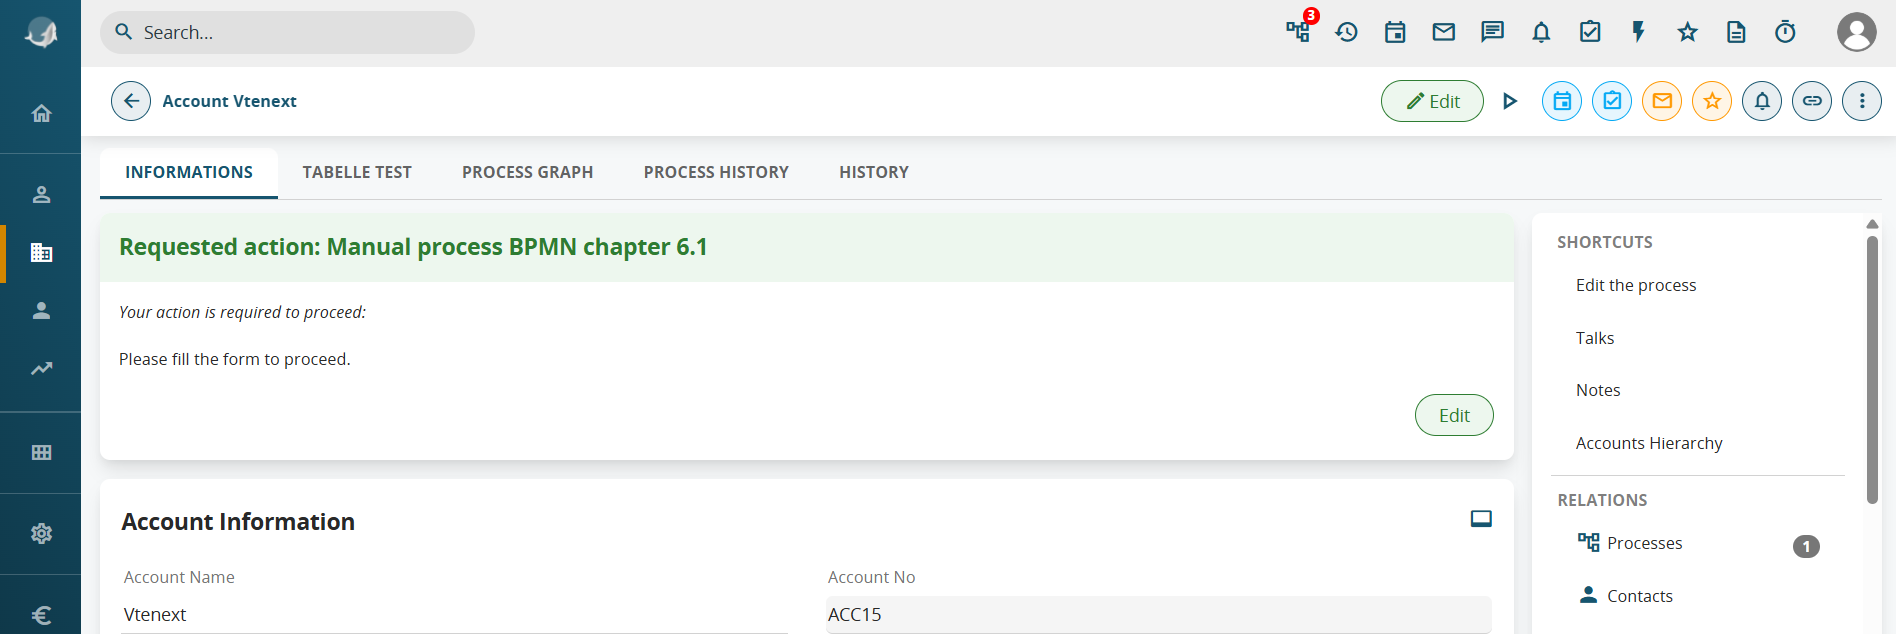](https://usermanual.vtenext.com/uploads/images/gallery/2026-07/Karimage.png) Figure 8 Alternatively, it will always remain visible and fillable in the section accessible via the dedicated button in the top-right menu (Figures 9 and 10). [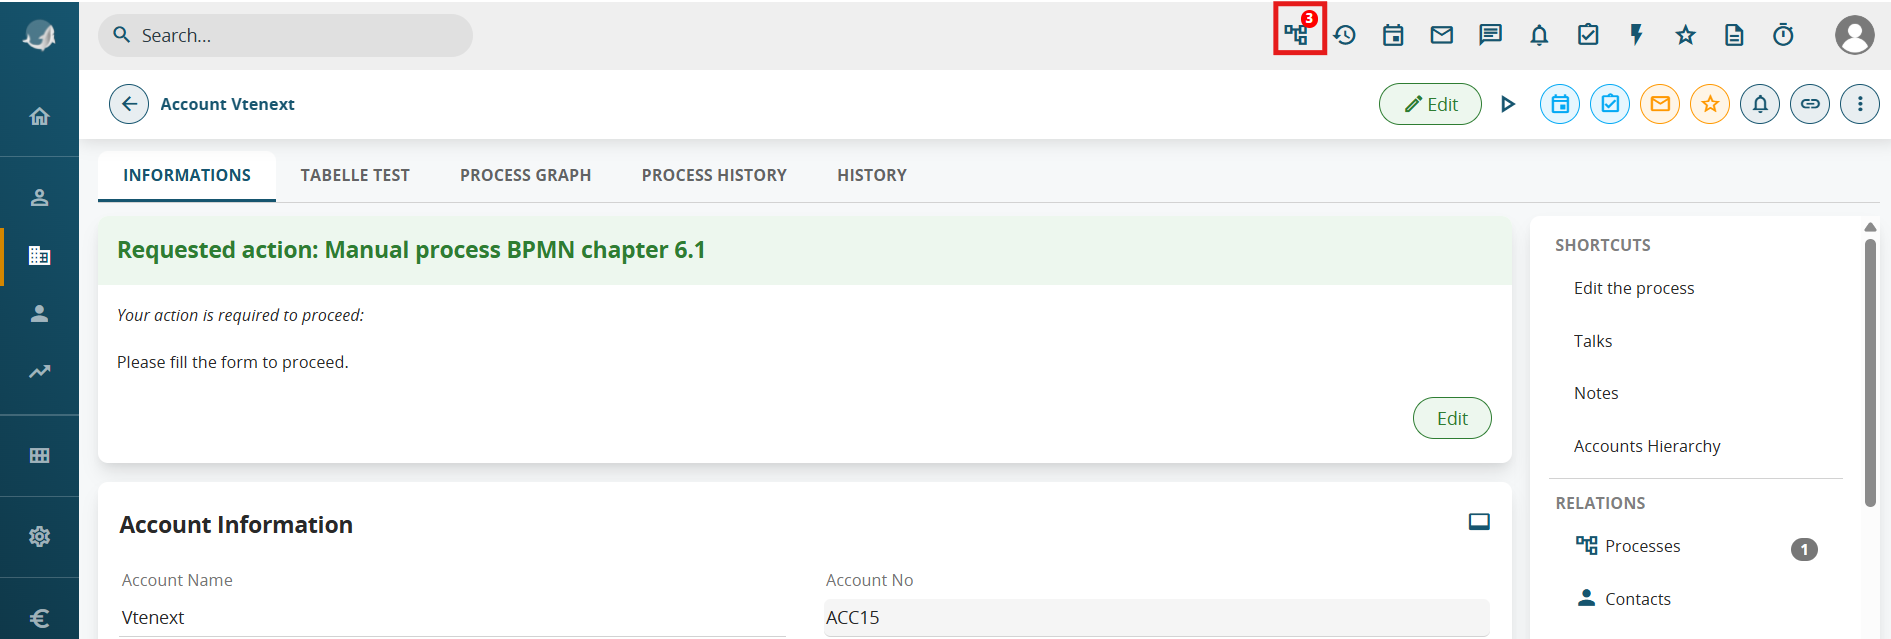](https://usermanual.vtenext.com/uploads/images/gallery/2026-07/tBDimage.png) Figure 9 [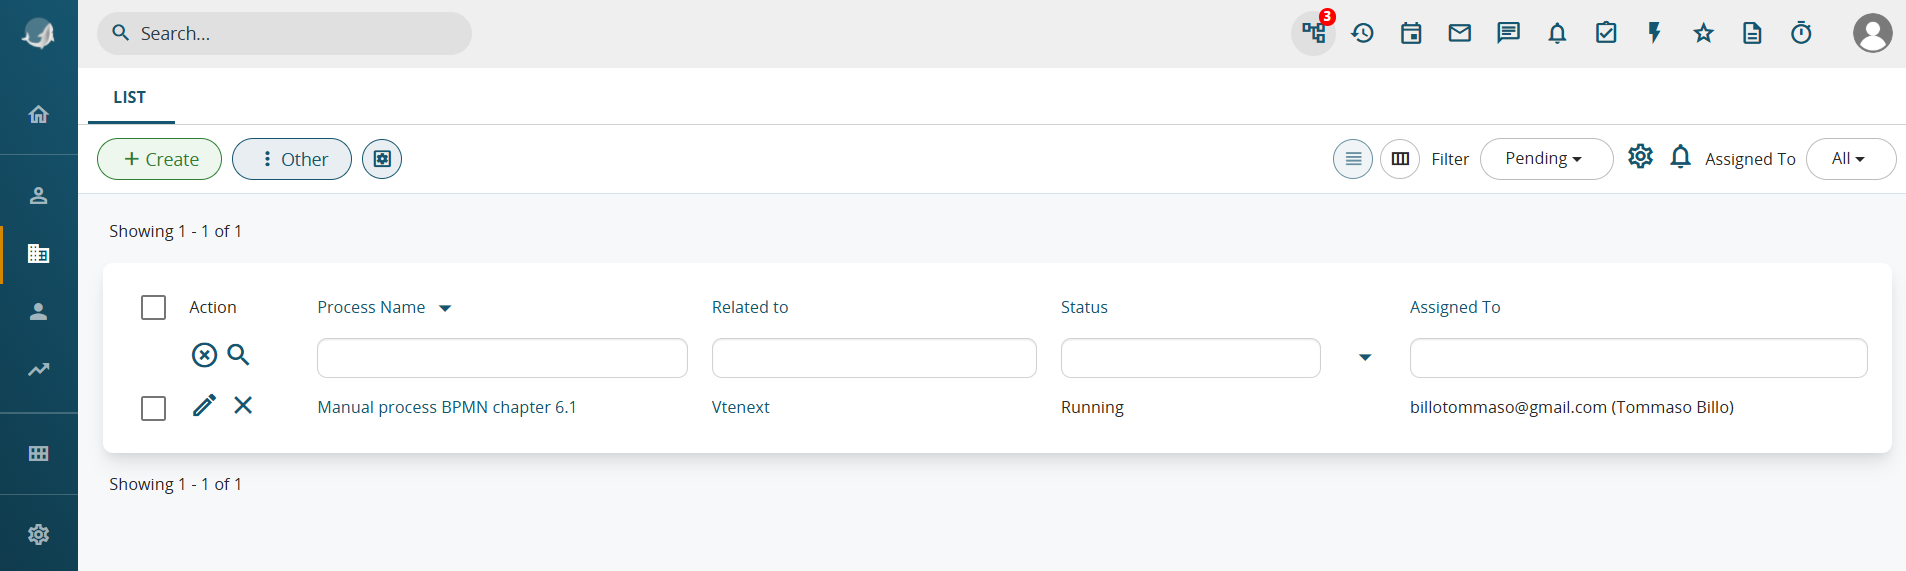](https://usermanual.vtenext.com/uploads/images/gallery/2026-07/f4Gimage.png) Figure 10 As of version 26.04, the preview display interface has been modified to correctly handle multiple dynamic forms active simultaneously on the same record. By default, they are displayed in "Slider" mode. (Figure 11) [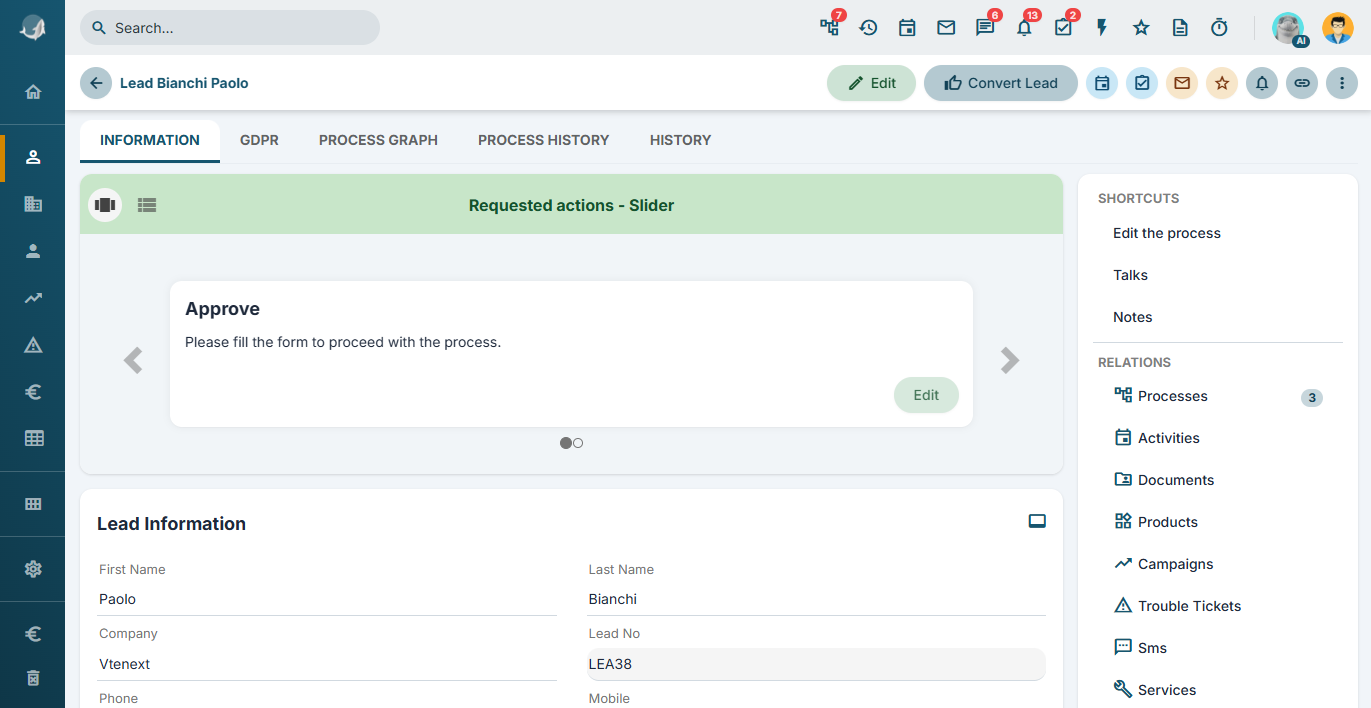](https://usermanual.vtenext.com/uploads/images/gallery/2026-07/mHcimage.png) Figure 11 By pressing the dedicated button, they can be viewed in "scroll" mode. (Figure 12) [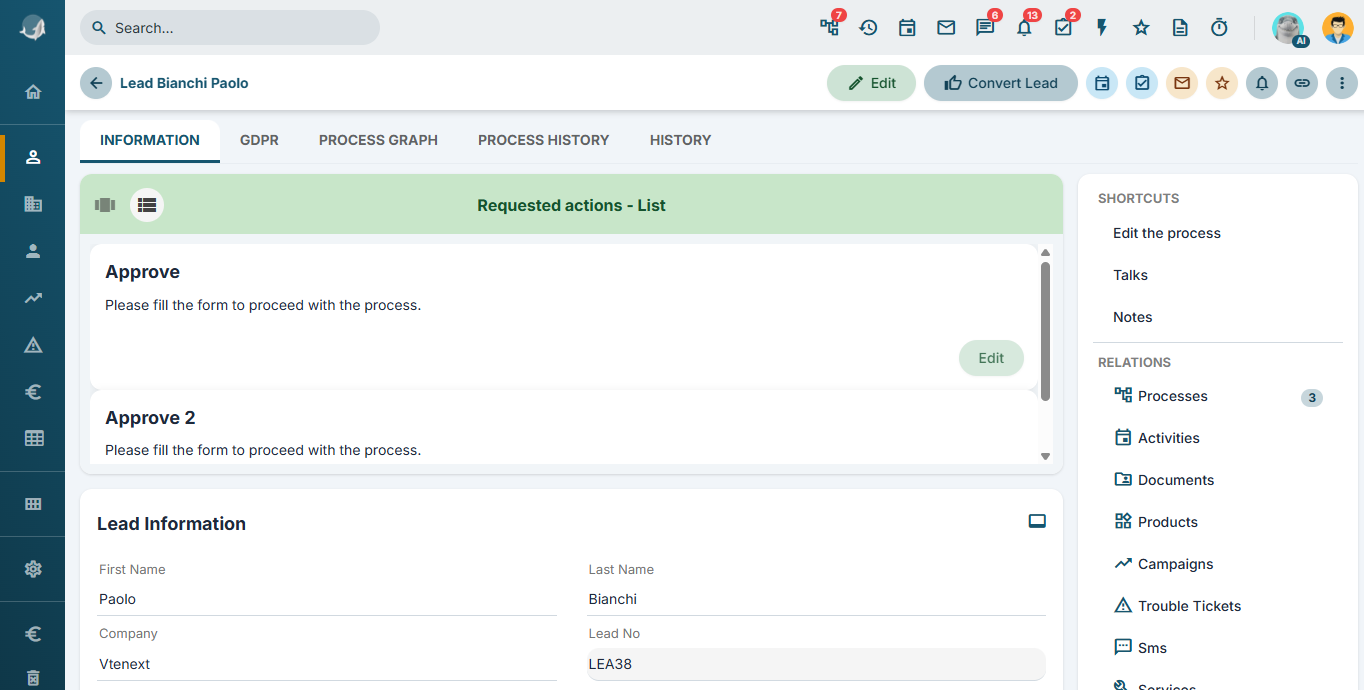](https://usermanual.vtenext.com/uploads/images/gallery/2026-07/NmLimage.png) Figure 12 The section accessible via the dedicated button in the top-right menu has also been modified, making it visually more striking and comprehensive. (Figure 13) [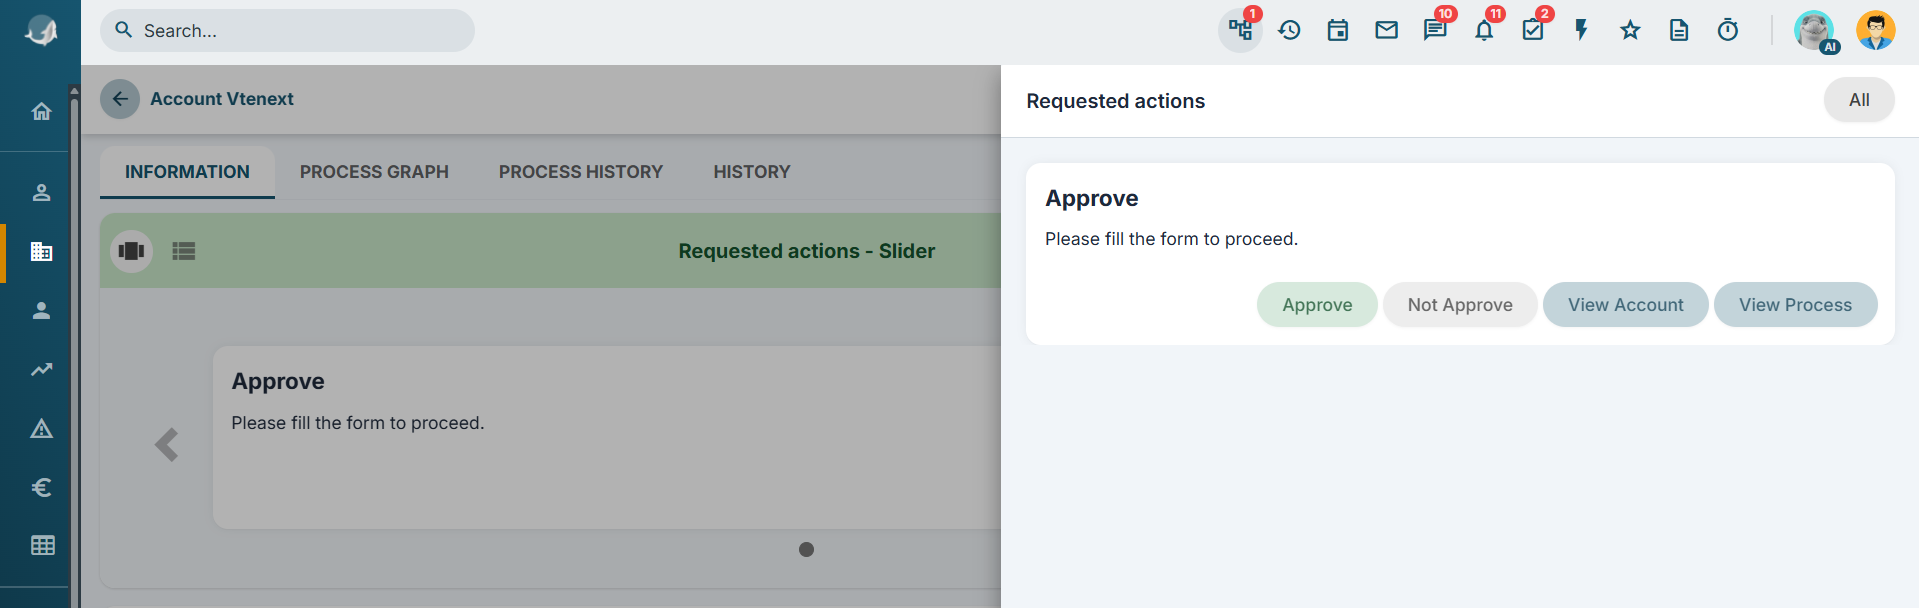](https://usermanual.vtenext.com/uploads/images/gallery/2026-07/n09image.png) Figure 13 Clicking the "All" button redirects the user to the legacy process screen, which has nevertheless been improved in terms of both graphics and functionality. Specifically, the following buttons have been added to the list: \- preview button: allows the content of the dynamic form to be viewed in the middle of the panel and enables the user to proceed with filling it out (Figure 14) \- direct fill button: allows the dynamic form to be opened directly as a pop-up (Figure 15) [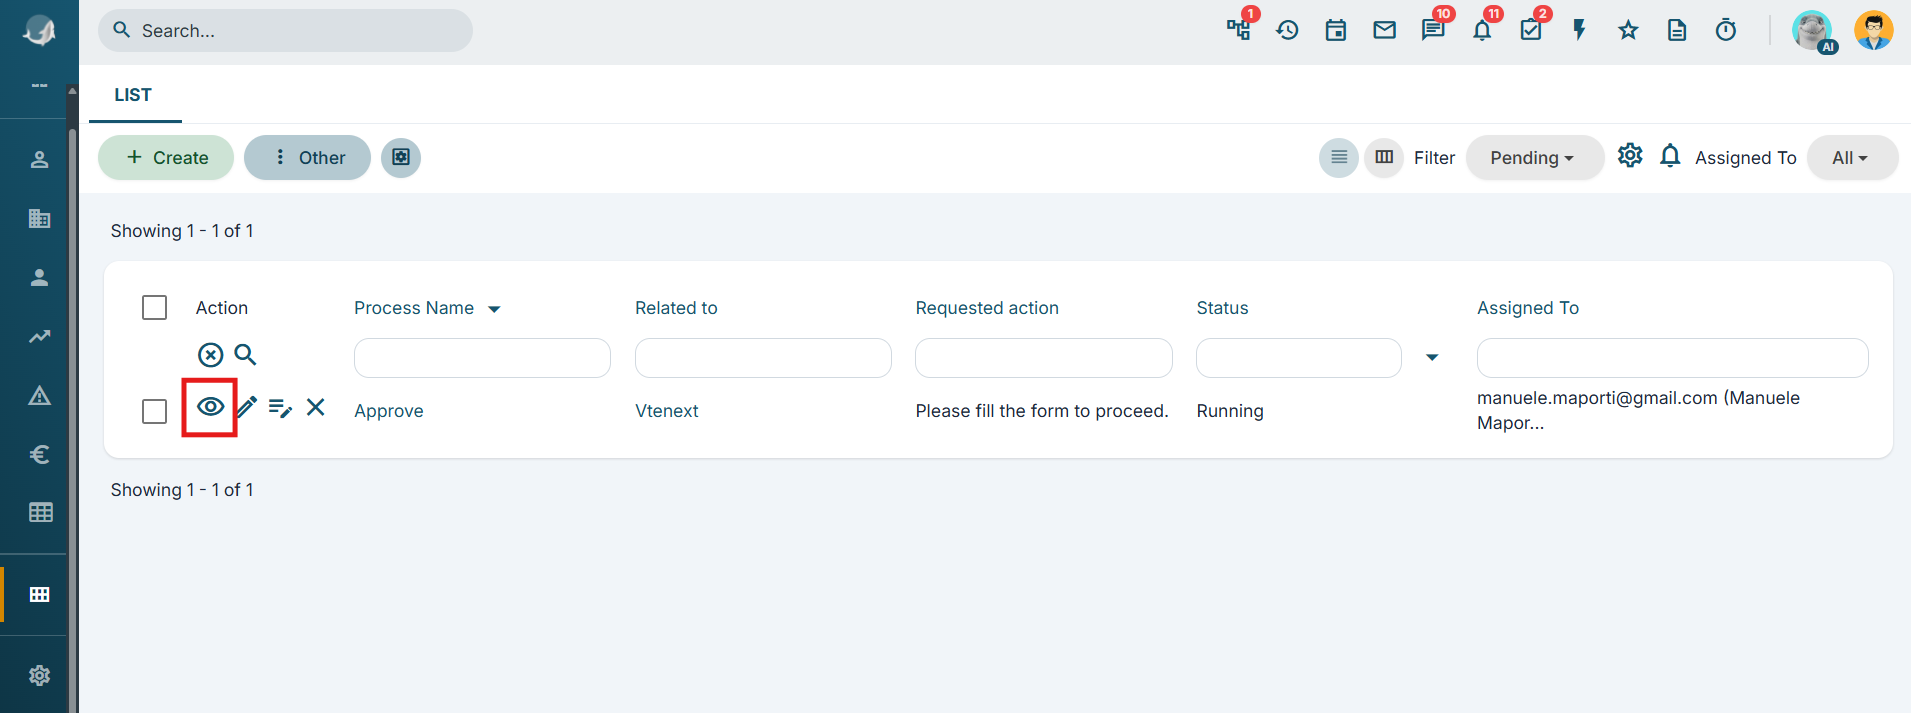](https://usermanual.vtenext.com/uploads/images/gallery/2026-07/RCWimage.png) Figure 14 [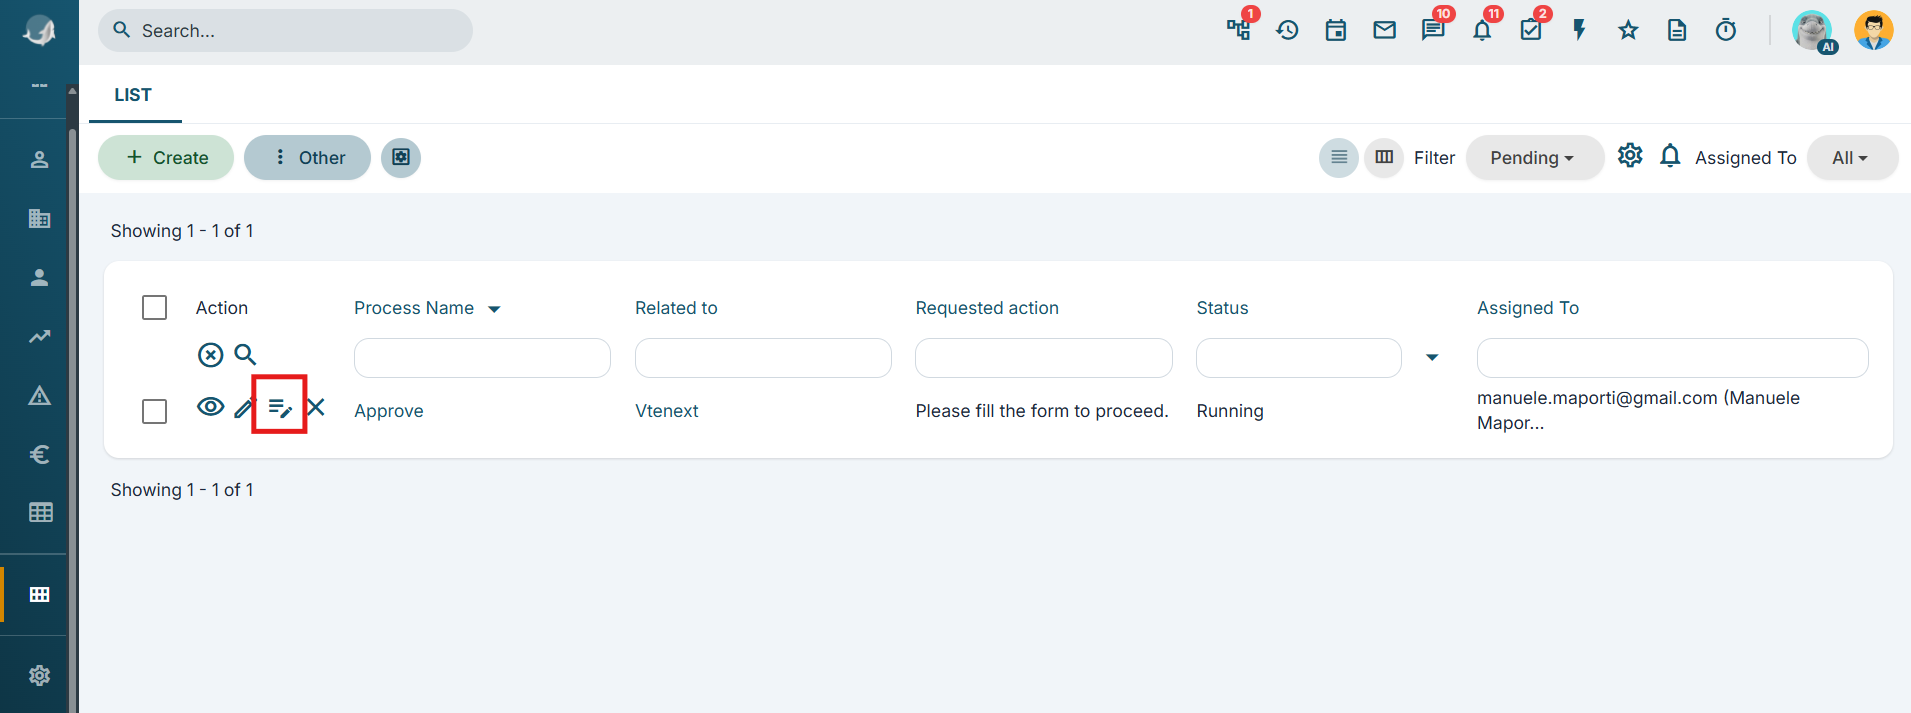](https://usermanual.vtenext.com/uploads/images/gallery/2026-07/c9jimage.png) Figure 15 Clicking the "Fill" button displays a pop-up containing the dynamic form. The user simply needs to fill in the "Action" field and then click the "Save" button (Figure 16). [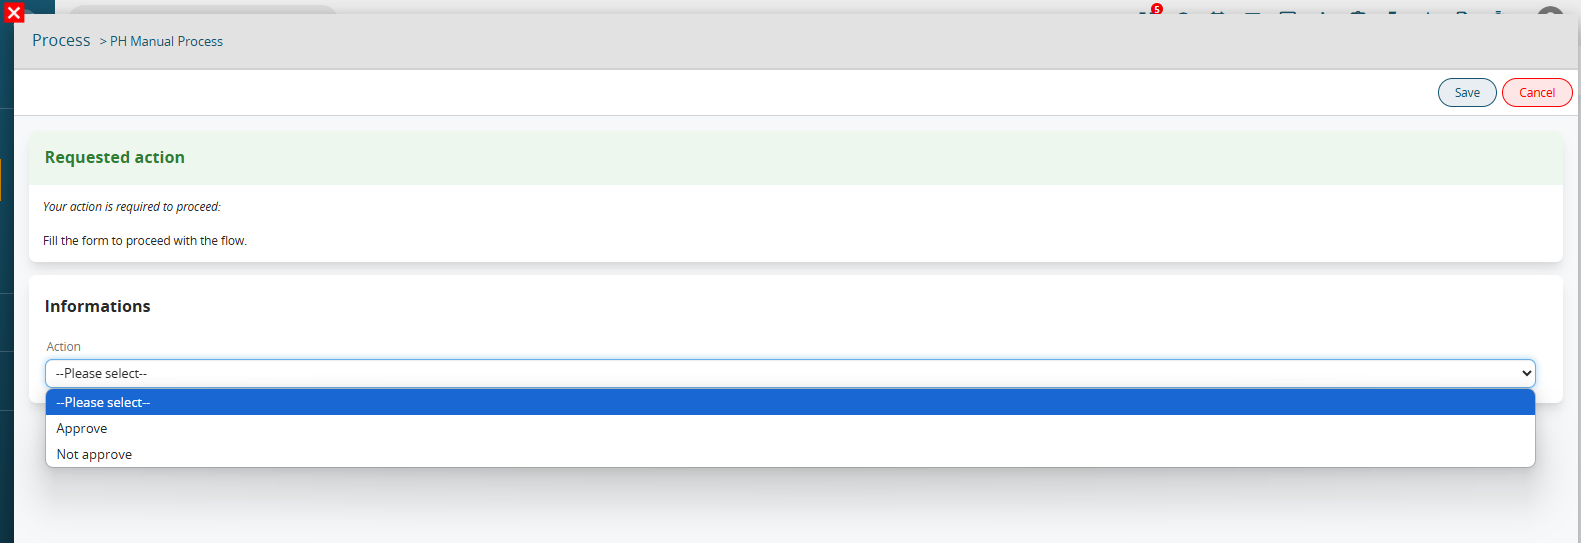](https://usermanual.vtenext.com/uploads/images/gallery/2025-06/xMNimage.png) Figure 16 # 6.2 Example of using Process Helper for internal user data requests – quick-button version As anticipated in the introductory chapter, one of the most common uses of the process helper concerns the creation of customized forms that can be presented to internal users of the CRM in order to request and save information. The blocks and fields that make up these forms are called "dynamic forms". PREMISE: In order for a user to be able to view and fill out a dynamic form, he/she must have enabled the appropriate permissions on the profile side (Figure 1) [](https://usermanual.vtenext.com/uploads/images/gallery/2025-06/2pOimage.png) Figure 1 In order to configure a process helper, you must first configure an Action Task (create a link with a dedicated section) following the dedicated procedure (Figure 1). NOTE: it is advisable to use the User Task symbol, as we are indicating an activity that will be charged to the user. [](https://usermanual.vtenext.com/uploads/images/gallery/2025-05/embedded-image-ffscqhqm.png) Figure 2 After the User Task, in this specific case it is essential to create a Task within which to perform some checks to allow the process to stop and present the dynamic form (Figure 2). [](https://usermanual.vtenext.com/uploads/images/gallery/2025-06/Ij5image.png) Figure 3 Once inside the User Task (in our example “Process Helper”) in configuration mode, we will find the section called “Process Helper” with all the related fields (Figure 3) [](https://usermanual.vtenext.com/uploads/images/gallery/2025-06/6RPimage.png) Figure 4 Once the main fields have been configured (Assigned to, Linked to, Action requested) we will create the necessary blocks and fields in the dynamic form in order to save the information that will be entered by the user (for more information on their configuration, see the chapter ...). To better understand how it works, below is an example of a process helper aimed at requesting approval of an internal flow by filling in a single field called "Action" (Figure 4). [](https://usermanual.vtenext.com/uploads/images/gallery/2025-06/qBpimage.png) Figure 5 This is a picklist type field with the following 3 static values: “empty”, “APPROVATE” and “DO NOT APPROVE” and with mandatory permissions as Default (Figure 5) [](https://usermanual.vtenext.com/uploads/images/gallery/2025-06/v5himage.png) Figure 6 In the associated Control Task (called “Process Helper Control”) a condition is indicated that allows the process not to continue with its flow until a value other than blank has been entered (which instead represents the default value of the picklist) (Figure 6) [](https://usermanual.vtenext.com/uploads/images/gallery/2025-06/Czqimage.png) Figure 7 The two conditions inserted in separate groups allow the flow to be routed in two different paths based on the item selected by the user. On the operational side, the process helper presents itself with a preview mask as shown in Figure 7, this is because the “Show in the linked entity” flag has been activated. [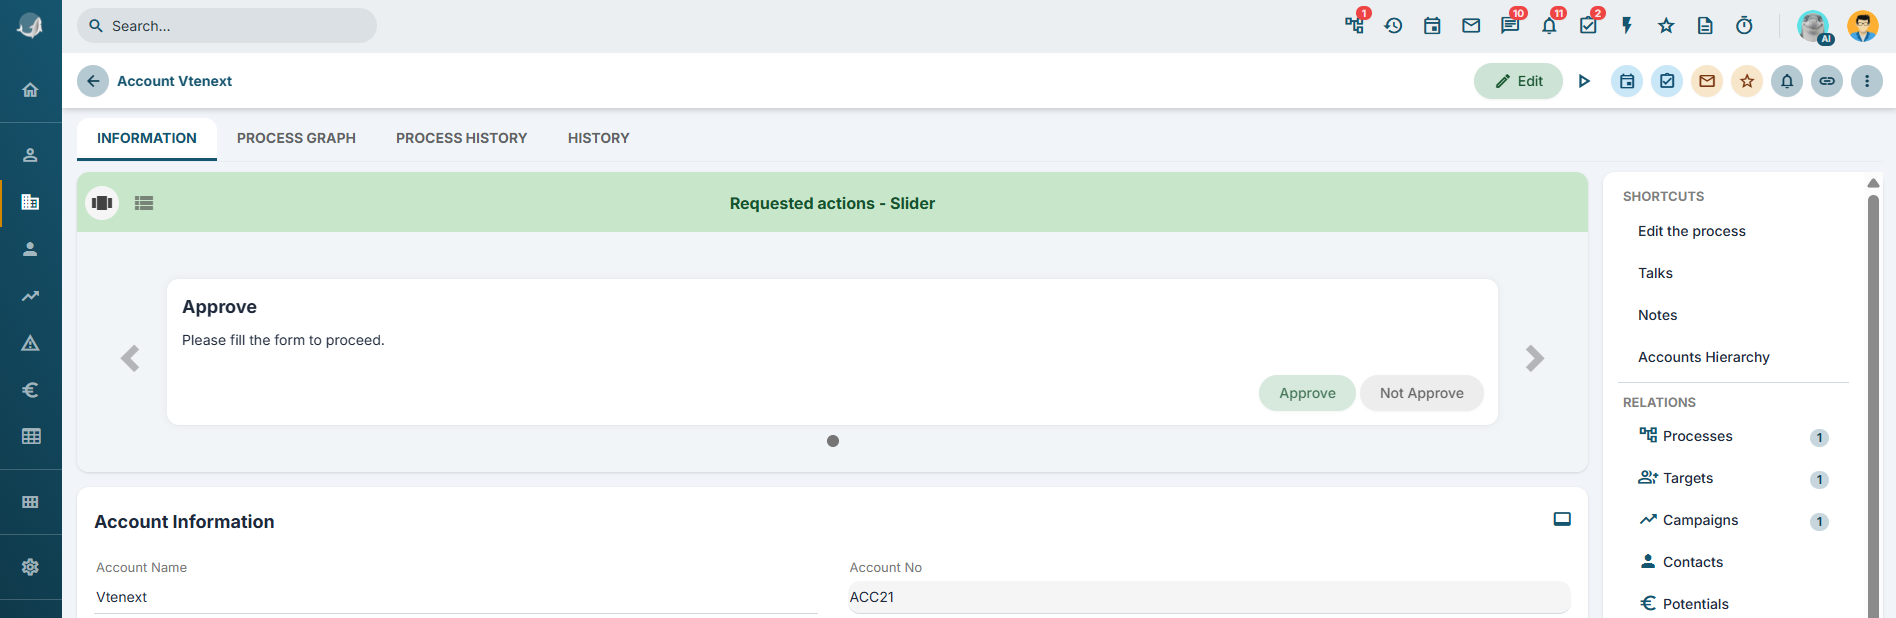](https://usermanual.vtenext.com/uploads/images/gallery/2026-07/Tooimage.png) Figure 8 Alternatively, it will always remain visible and fillable in the section accessible via the dedicated button in the top-right menu (Figures 9 and 10). [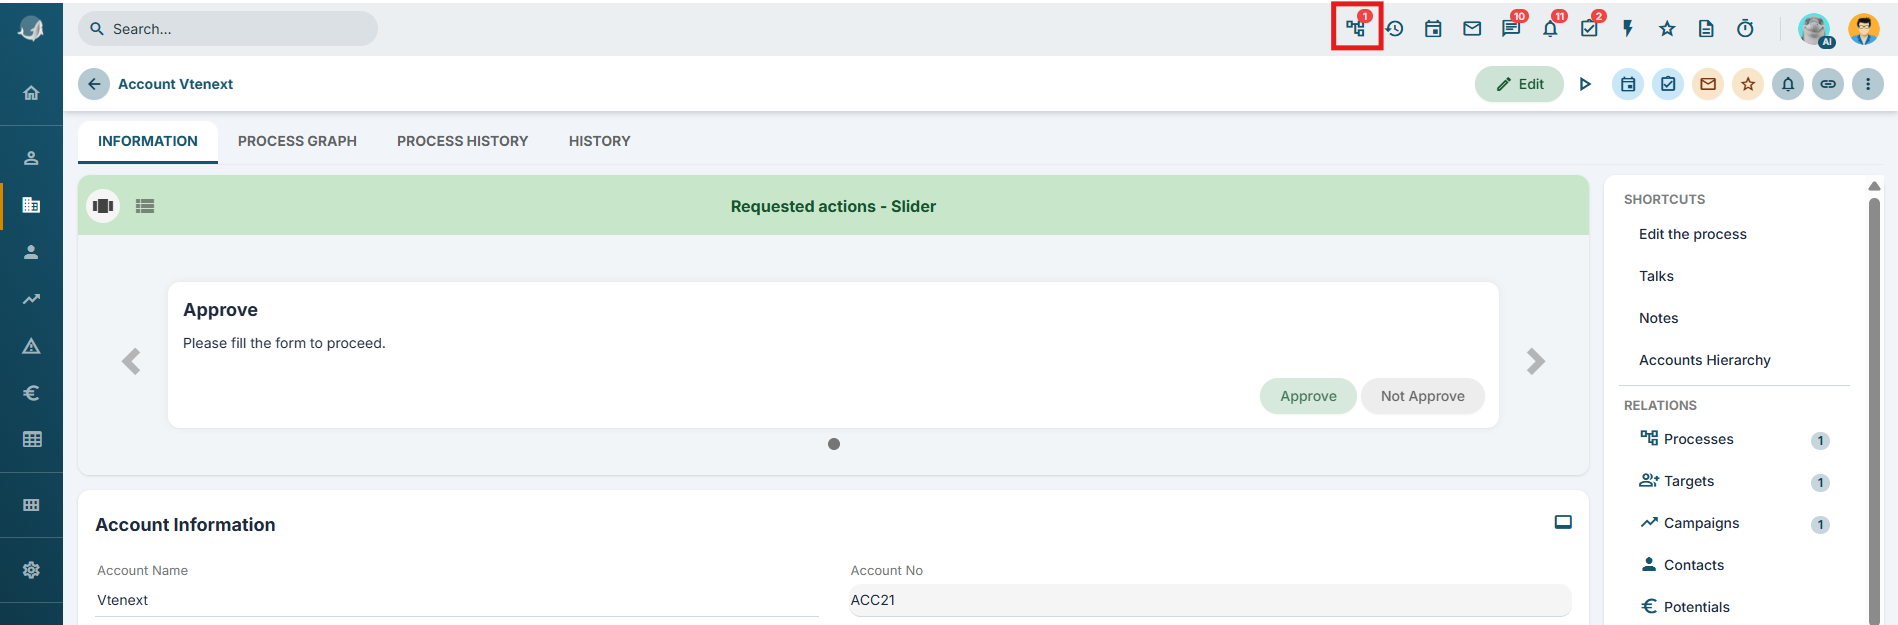](https://usermanual.vtenext.com/uploads/images/gallery/2026-07/au8image.png) Figure 9 [](https://usermanual.vtenext.com/uploads/images/gallery/2026-07/7Hwimage.png) Figure 10 # 6.3 Example of using Process Helper to request external user data As anticipated in the introductory chapter, one of the most common uses of the process helper concerns the creation of customized masks that can be presented to external users in order to request and save information. The blocks and fields that make up these masks are called “dynamic forms”. In order to configure a process helper, you must first configure an Action Task (create a link with a dedicated section) following the dedicated procedure (Figure 1). NOTE: it is advisable to use the User Task symbol, as we are indicating an activity that will be carried out by the user. [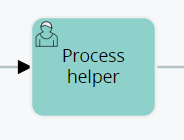](https://usermanual.vtenext.com/uploads/images/gallery/2025-05/embedded-image-tuhrfktx.png) Figure 1 After the User Task, in this specific case it is essential to create a Task within which to perform some checks to allow the process to stop and present the dynamic form (Figure 2). [](https://usermanual.vtenext.com/uploads/images/gallery/2025-06/rp3image.png) Figure 2 Once inside the User Task (in our example “Process Helper”) in configuration mode, we will find the section called “Process Helper” with all the related fields (see Figure 3) [](https://usermanual.vtenext.com/uploads/images/gallery/2025-06/K4Aimage.png) Figure 3 Once the main fields have been configured (Assigned to, Linked to, Action requested) we will create the necessary blocks and fields in the dynamic form in order to save the information that will be entered by the user. To better understand how it works, below is an example of a process helper aimed at requesting approval of a flow step by filling in a single field called “Action” (Figure 4). [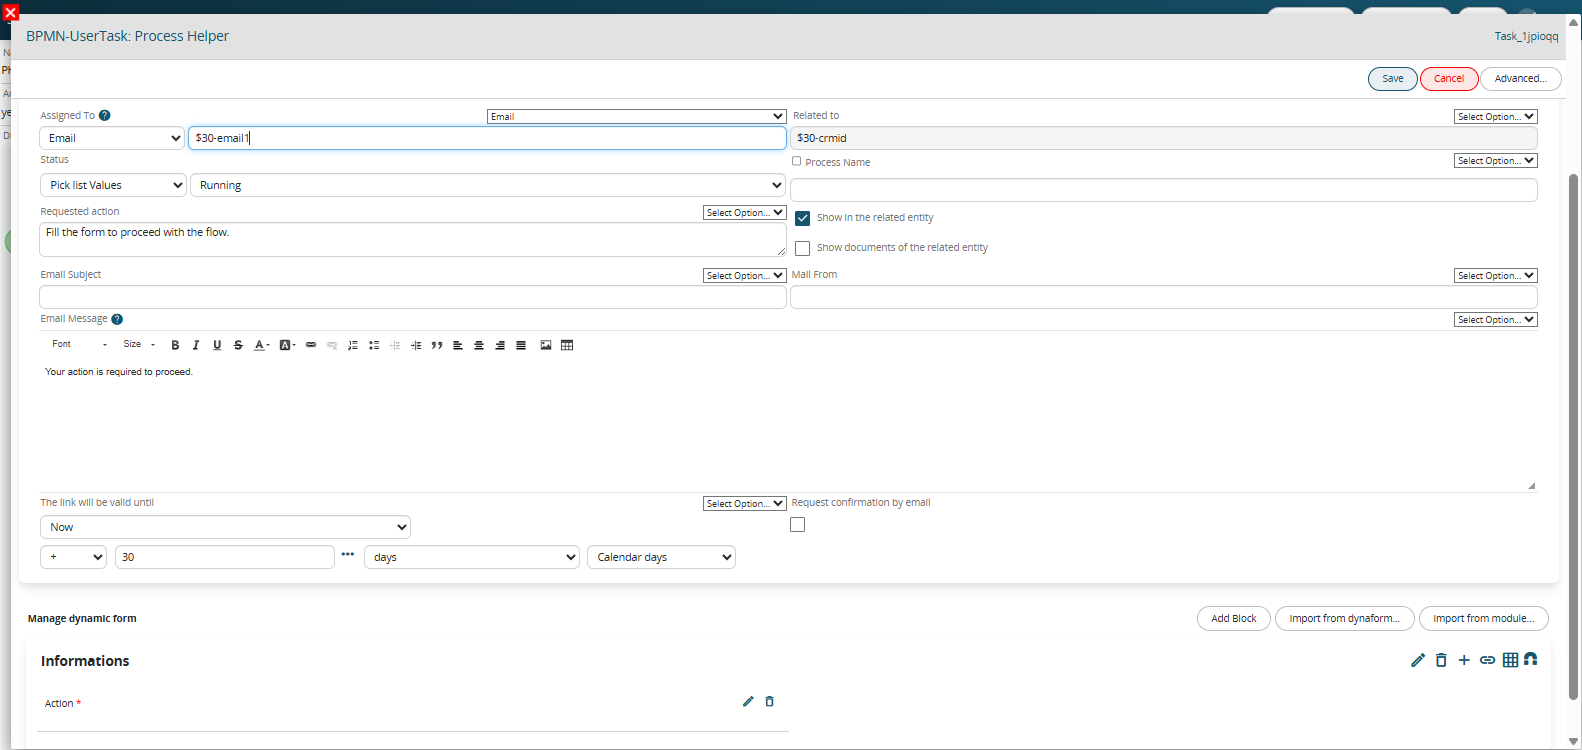](https://usermanual.vtenext.com/uploads/images/gallery/2025-06/FJbimage.png) Figure 4 This is a picklist type field with the following 3 static values: “empty”, “APPROVATE” and “DO NOT APPROVE” and with mandatory permissions as Default (Figure 5) [](https://usermanual.vtenext.com/uploads/images/gallery/2025-06/fbHimage.png) Figure 5 In the associated Control Task (called “Process Helper Control”) a condition is indicated that allows the process not to continue with its flow until a value other than blank has been entered (which instead represents the default value of the picklist) (Figure 6) [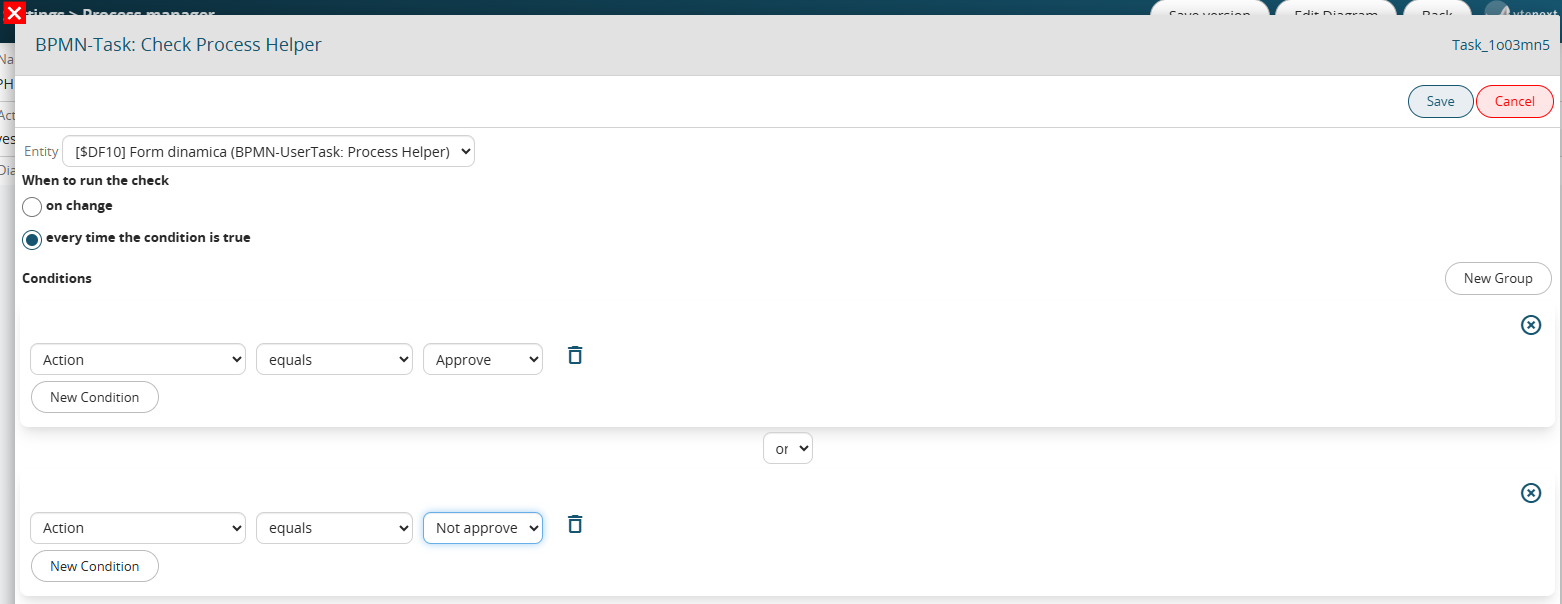](https://usermanual.vtenext.com/uploads/images/gallery/2025-06/Accimage.png) Figure 6 The two conditions inserted in separate groups allow the flow to be routed in two different paths based on the item selected by the user. On the operational side, an email is sent to the address entered in the “Assigned to” field that has a button called “CLICK HERE” (Figure 7) [](https://usermanual.vtenext.com/uploads/images/gallery/2025-06/Hv2image.png) Figure 7 Clicking the button opens a landing page with the content of the dynamic form. The user simply has to fill in the “Action” field and finally click on the “SEND” button (Figure 8) [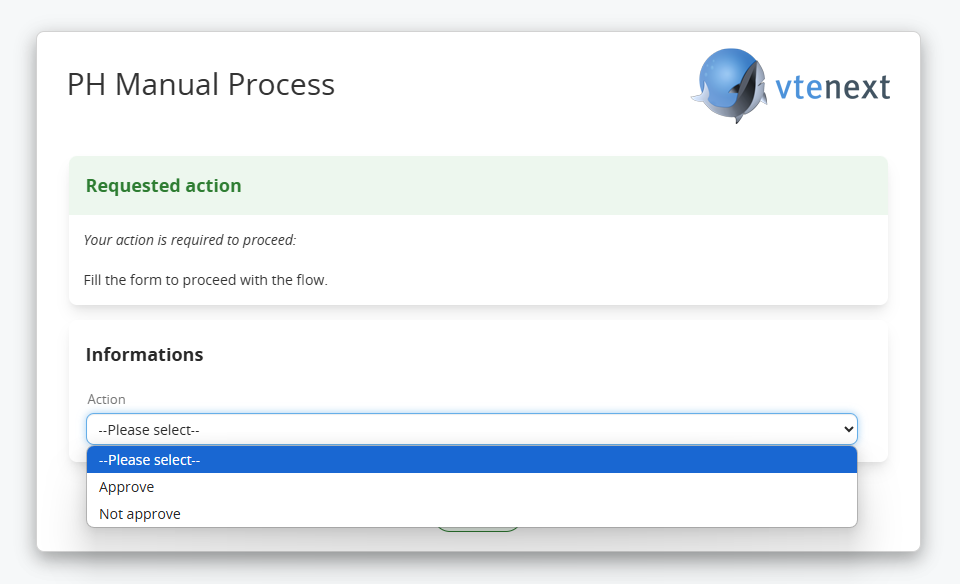](https://usermanual.vtenext.com/uploads/images/gallery/2025-06/Cy8image.png) Figure 8 Once saved, a warning message will be displayed on the landing page to indicate that the operation was performed correctly (Figure 9) [](https://usermanual.vtenext.com/uploads/images/gallery/2025-06/2kNimage.png) Figure 9 # 6.4 Example of using Process Helper to request Business Portal user data As anticipated in the introductory chapter, one of the most common uses of the process helper concerns the creation of customized forms that can be presented to Business Portal users in order to request and save information. For details on the conditions and requirements to be able to activate the management of processes on the Customer Portal side, we recommend consulting chapter 18.3 of the general Vtenext manual. The blocks and fields that make up these forms are called "dynamic forms". In order to configure a process helper, you must first configure an Action Task (create a link with a dedicated section) following the dedicated procedure (Figure 1). NOTE: it is advisable to use the User Task symbol, as we are indicating an activity that will be charged to the user. [](https://usermanual.vtenext.com/uploads/images/gallery/2025-05/embedded-image-igargp3j.png) Figure 1 After the User Task, in this specific case it is essential to create a Task within which to perform checks to allow the process to stop and present the dynamic form (Figure 2). [](https://usermanual.vtenext.com/uploads/images/gallery/2025-06/1GMimage.png) Figure 2 Once inside the User Task (in our example “Process Helper”) in configuration mode, we will find the section called “Process Helper” with all the related fields (see Figure 3) [](https://usermanual.vtenext.com/uploads/images/gallery/2025-06/PARimage.png) Figure 3 Once the main fields have been configured (Assigned to, Linked to, Action requested) we will create the necessary blocks and fields in the dynamic form in order to save the information that will be entered by the user. To better understand how it works, below is an example of a process helper aimed at requesting approval of a flow step by filling in a single field called “Action” (Figure 4). [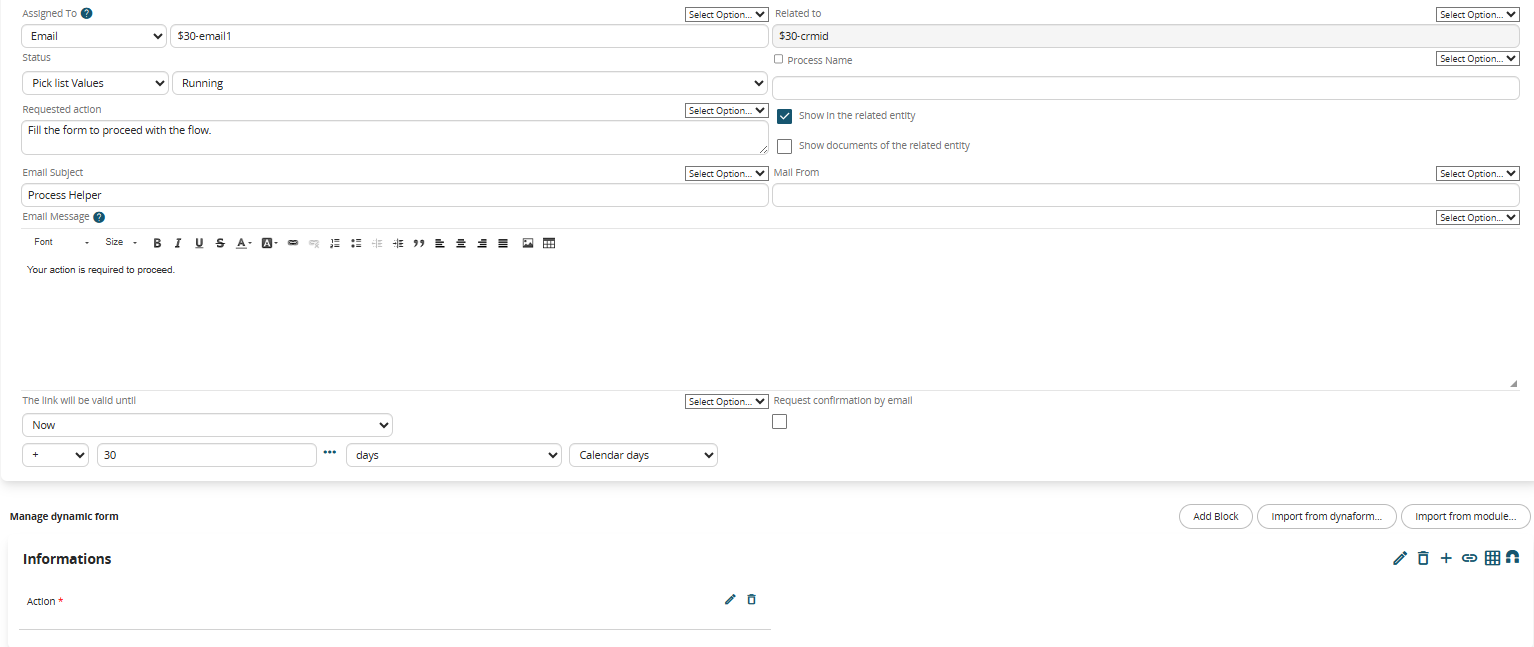](https://usermanual.vtenext.com/uploads/images/gallery/2025-06/jA1image.png) Figure 4 This is a picklist type field with the following 3 static values: “empty”, “APPROVATE” and “DO NOT APPROVE” and with mandatory permissions as Default (Figure 5) [](https://usermanual.vtenext.com/uploads/images/gallery/2025-06/GrNimage.png) Figure 5 In the associated Control Task (called “Process Helper Control”) a condition is indicated that allows the process not to continue with its flow until a value other than blank has been entered (which instead represents the default value of the picklist) (Figure 6) [](https://usermanual.vtenext.com/uploads/images/gallery/2025-06/wRgimage.png) Figure 6 The two conditions inserted in separate groups allow the flow to be routed in two different paths based on the item selected by the user. On the operational side, an email is sent to the address entered in the “Email” field of the Contact or Company entered in the “Assigned to” field of the Process helper that has a button called “CLICK HERE” (Figure 7) [](https://usermanual.vtenext.com/uploads/images/gallery/2025-06/W4Oimage.png) Figure 7 Clicking the button opens the Business Portal and displays the process completion interface in the "Required Actions" section (Figure 8). [](https://usermanual.vtenext.com/uploads/images/gallery/2025-06/YZoimage.png) Figure 8 The user will simply have to click on the “Fill” button (Figure 9), fill in the “Action” field and finally click on the “Save” button (Figure 10) [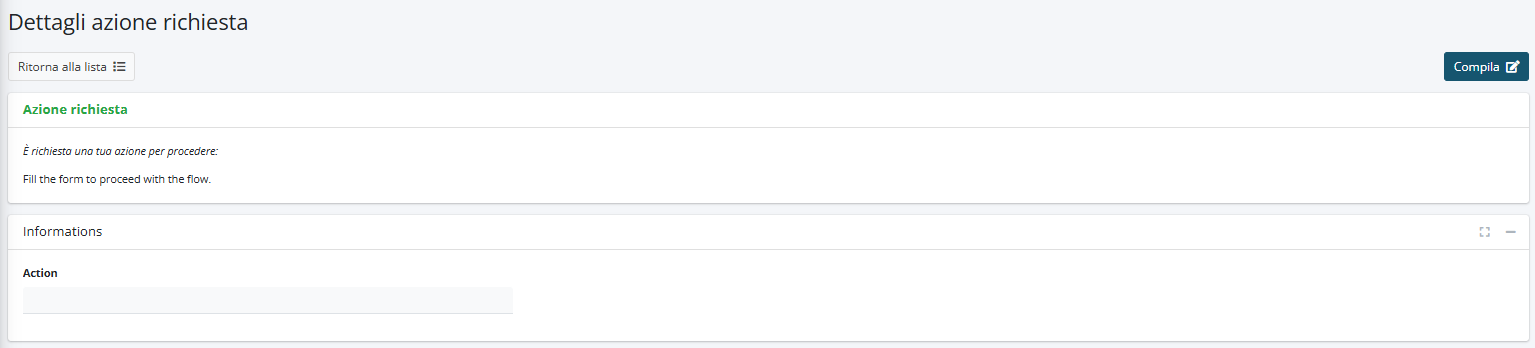](https://usermanual.vtenext.com/uploads/images/gallery/2025-06/ZnYimage.png) Figure 9 [](https://usermanual.vtenext.com/uploads/images/gallery/2025-06/AkFimage.png)Figure 10 # 6.5 Example of using Process Helper to activate Process Graph Configuring a process helper within a process allows you to activate the section called “Process Graph” available in the “PROCESS GRAPH” tab of the details of each individual record (Figure 1) [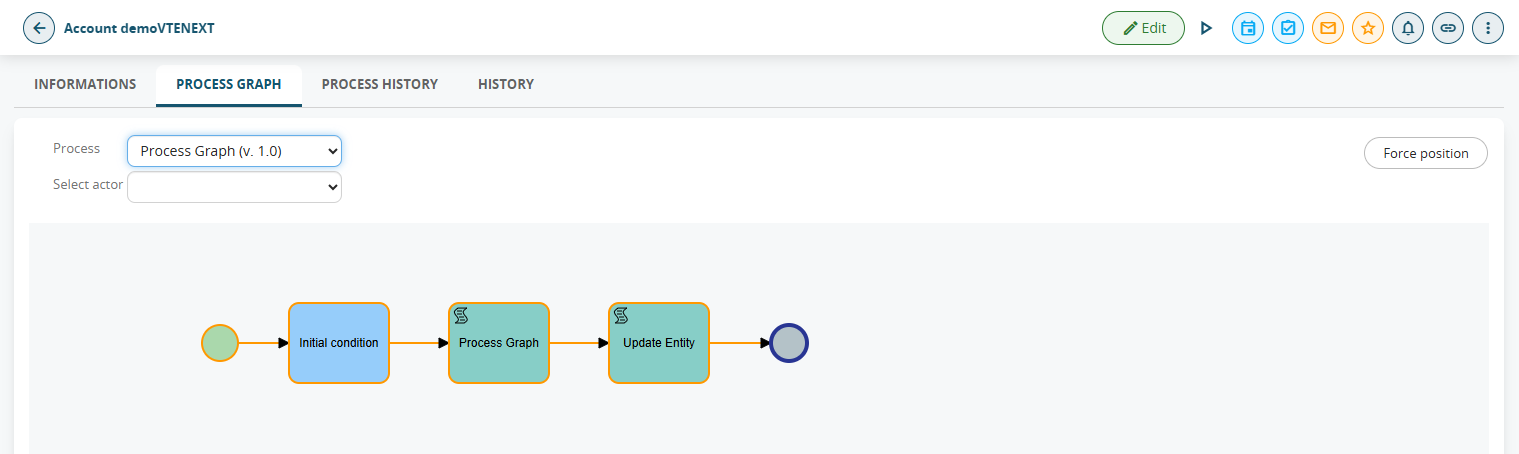](https://usermanual.vtenext.com/uploads/images/gallery/2025-06/3Ikimage.png) Figure 1 From this screen you can view the path taken from start to finish and the users (called “Participants”) involved in the various Tasks/Action Tasks of the process (Figure 2). [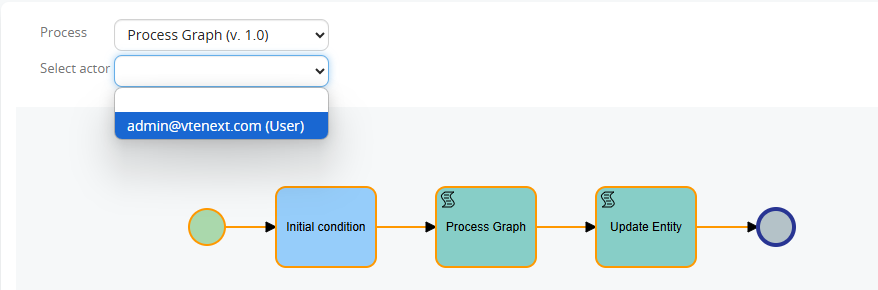](https://usermanual.vtenext.com/uploads/images/gallery/2025-06/i2Jimage.png) Figure 2 Also, since version 24.08, the individual Tasks/Action Tasks of the process that have already been executed are highlighted in yellow (Figure 3) [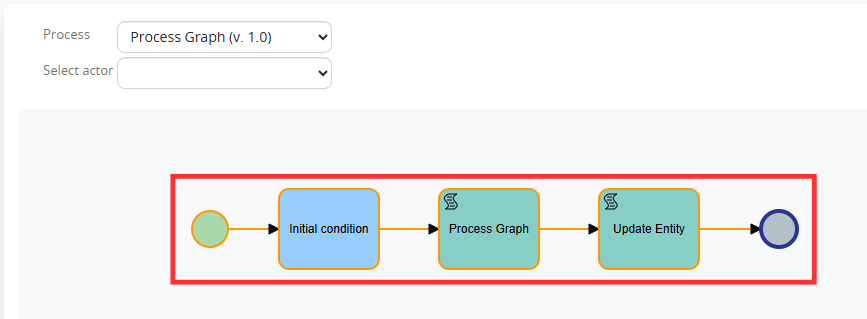](https://usermanual.vtenext.com/uploads/images/gallery/2025-06/RDPimage.png) Figure 3 Instead, the point where the process is located at that specific moment is highlighted in blue (Figure 4). [](https://usermanual.vtenext.com/uploads/images/gallery/2025-06/RVtimage.png) Figure 4 By clicking on each individual Task/Action Task it is possible to view the specific logs relating to those who performed the specific task and the relative time frame (Figure 5) [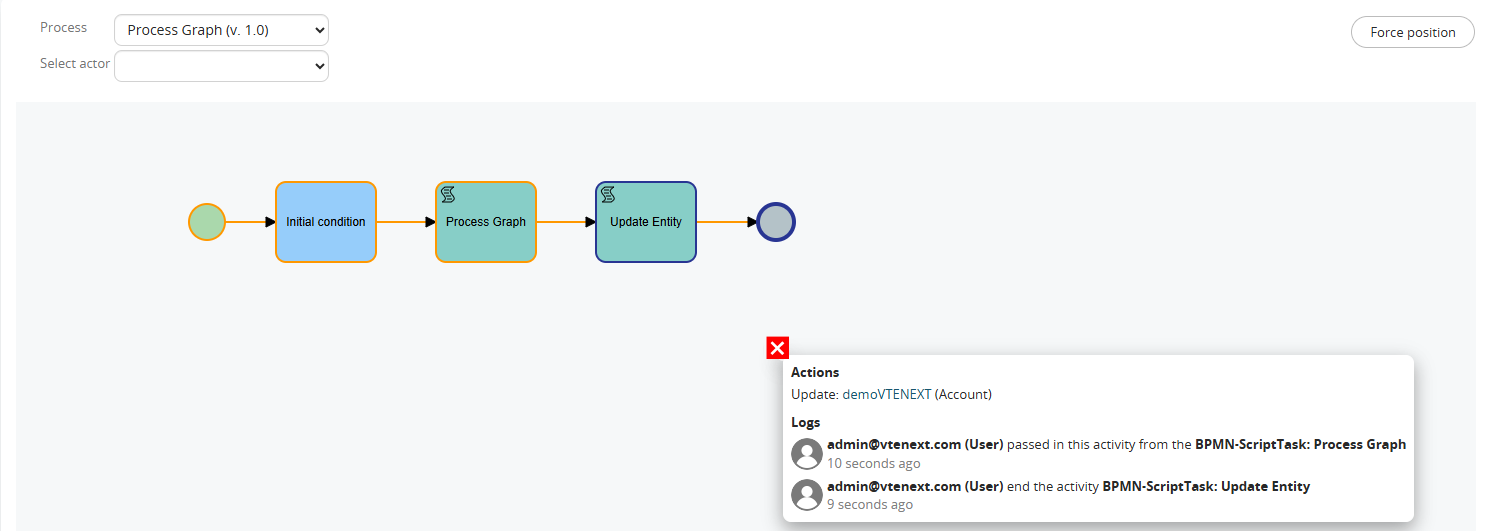](https://usermanual.vtenext.com/uploads/images/gallery/2025-06/0Rkimage.png) Figure 5 From version 24.08, if a dynamic Form is configured in a Process helper, clicking on the related Action Task and then on “Details” will allow you to view its content (Figure 6) [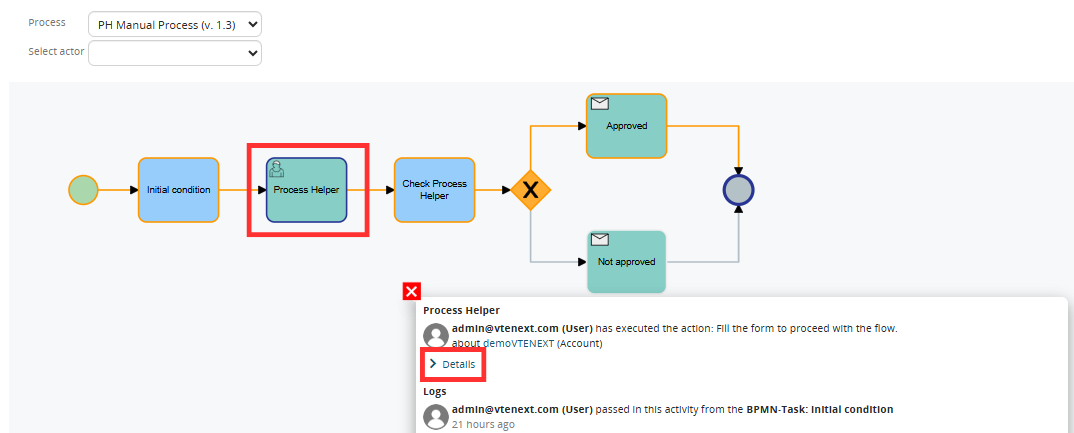](https://usermanual.vtenext.com/uploads/images/gallery/2025-06/goSimage.png) Figure 6 Starting with version 26.07, the log display interface has been improved by opening a dedicated panel on the right. (Figure 7) [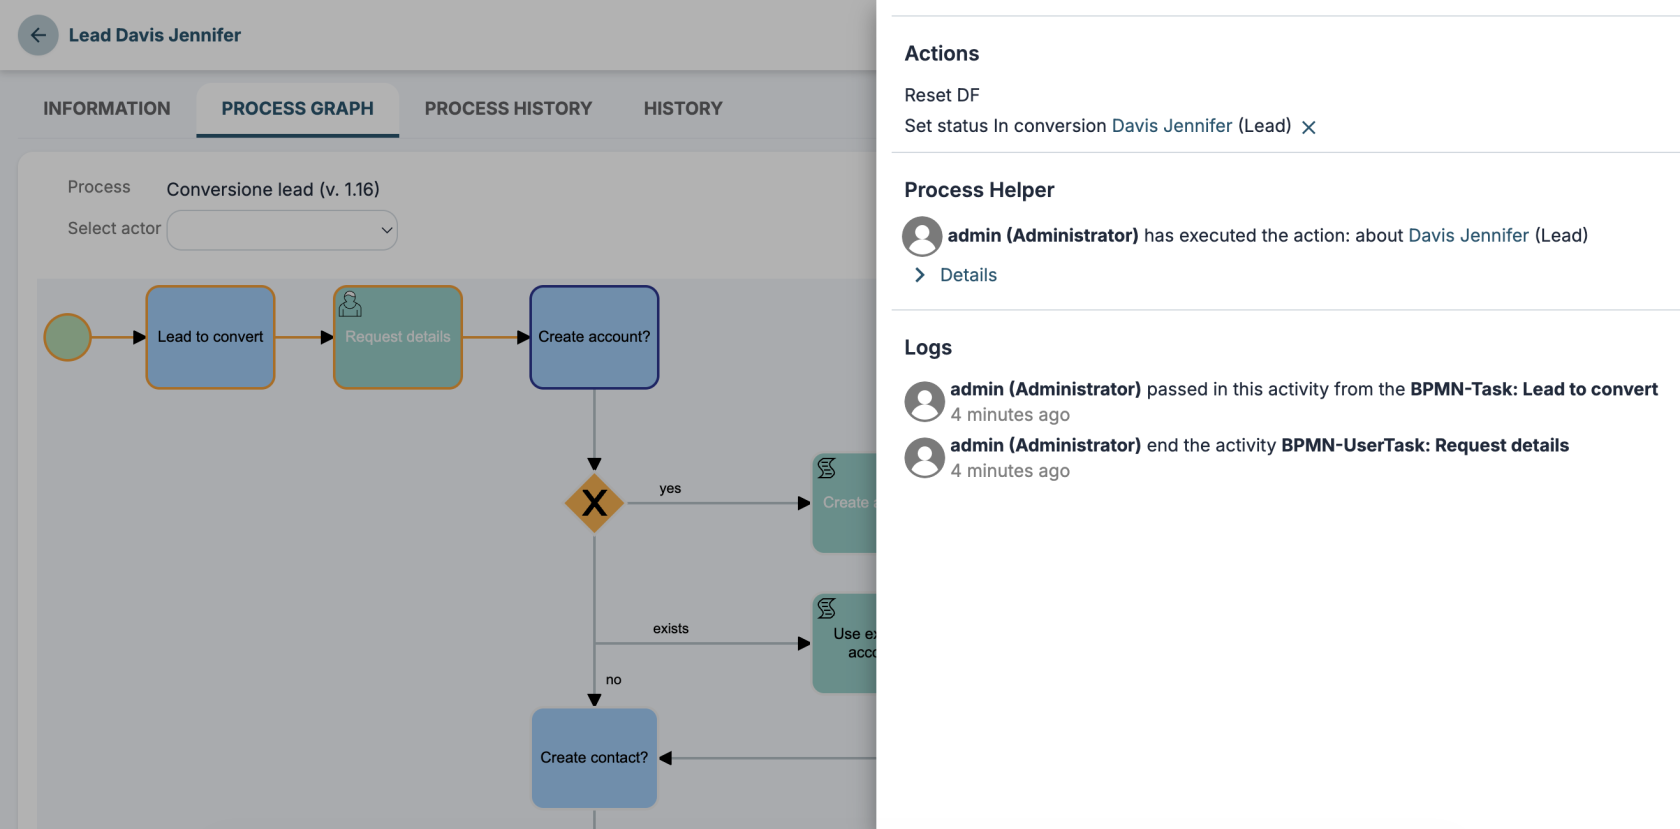](https://usermanual.vtenext.com/uploads/images/gallery/2026-07/iujimage.png) With a user with Administrator permissions, it is possible to perform direct maintenance on a single process instance by being able to move the point of execution of the flow forward (to avoid the execution of some Tasks/Action Tasks) or backward (to re-execute some Tasks/Action Tasks). To proceed with these operations, you must click on “Force position” (Figure 8), then on the Task/Action Task on which you want to position the process (Figure 9), then on “OK” in the confirmation popup (Figure 10), then on “Continue execution” (Figure 11) and finally on “OK” in the confirmation popup (Figure 12). [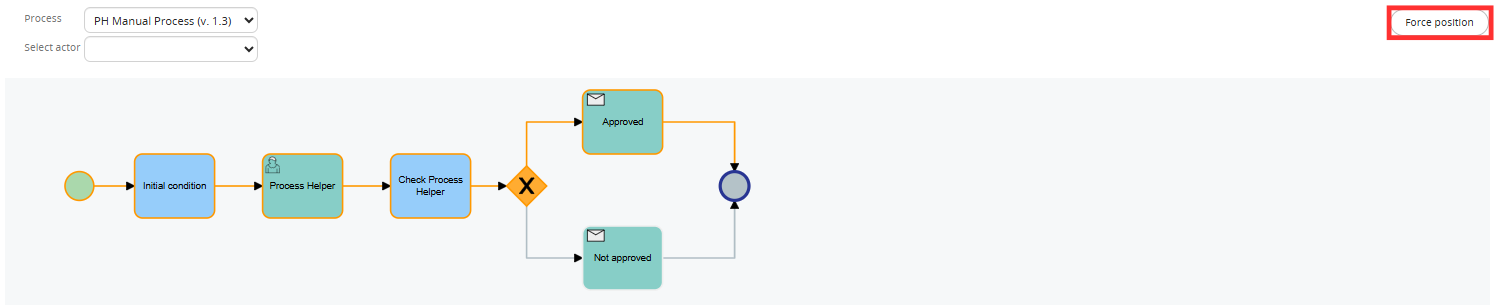](https://usermanual.vtenext.com/uploads/images/gallery/2025-06/OTnimage.png) Figure 8 [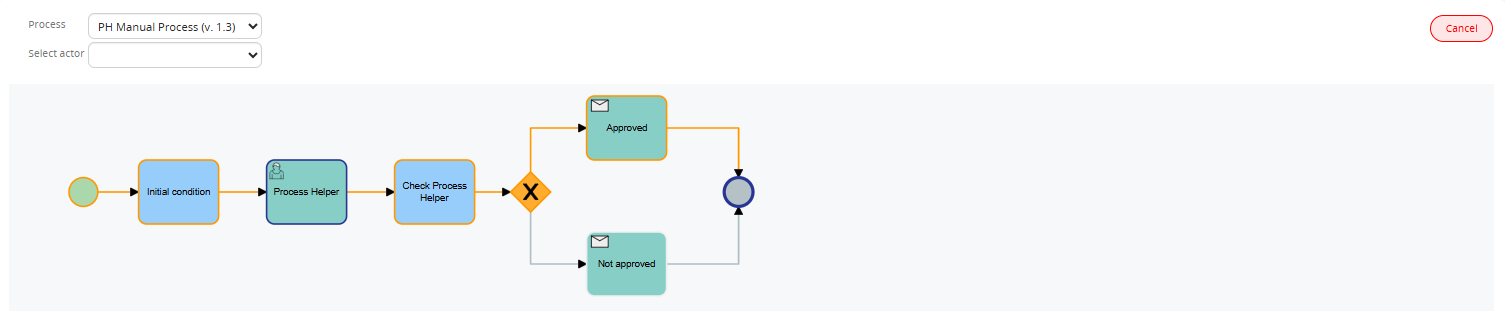](https://usermanual.vtenext.com/uploads/images/gallery/2025-06/Xmeimage.png) Figure 9 [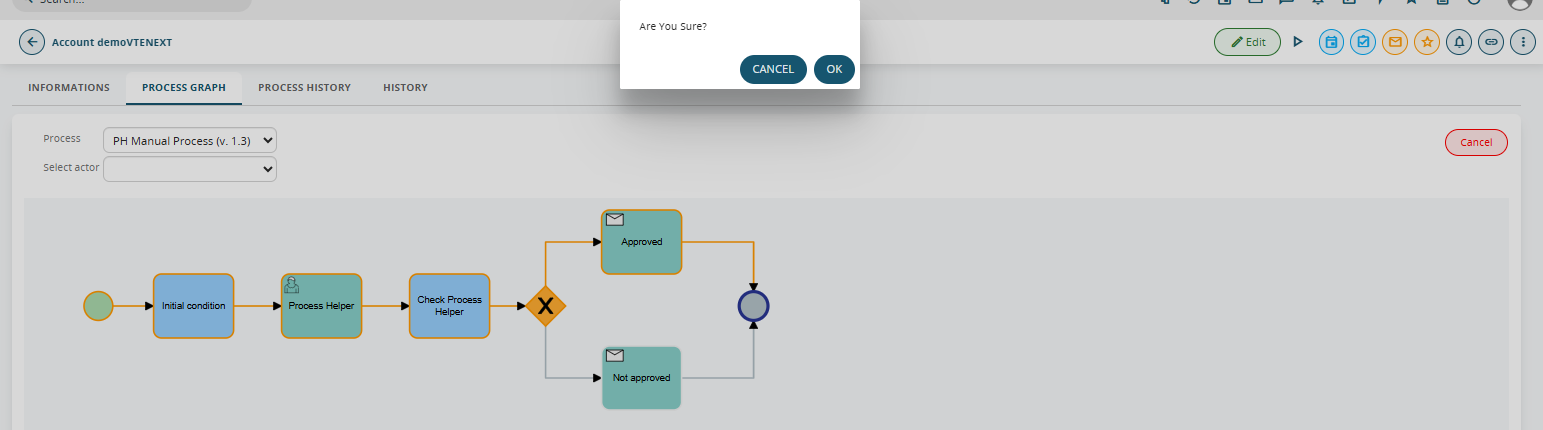](https://usermanual.vtenext.com/uploads/images/gallery/2025-06/oYCimage.png) Figure 10 [](https://usermanual.vtenext.com/uploads/images/gallery/2025-06/jYpimage.png) Figure 11 [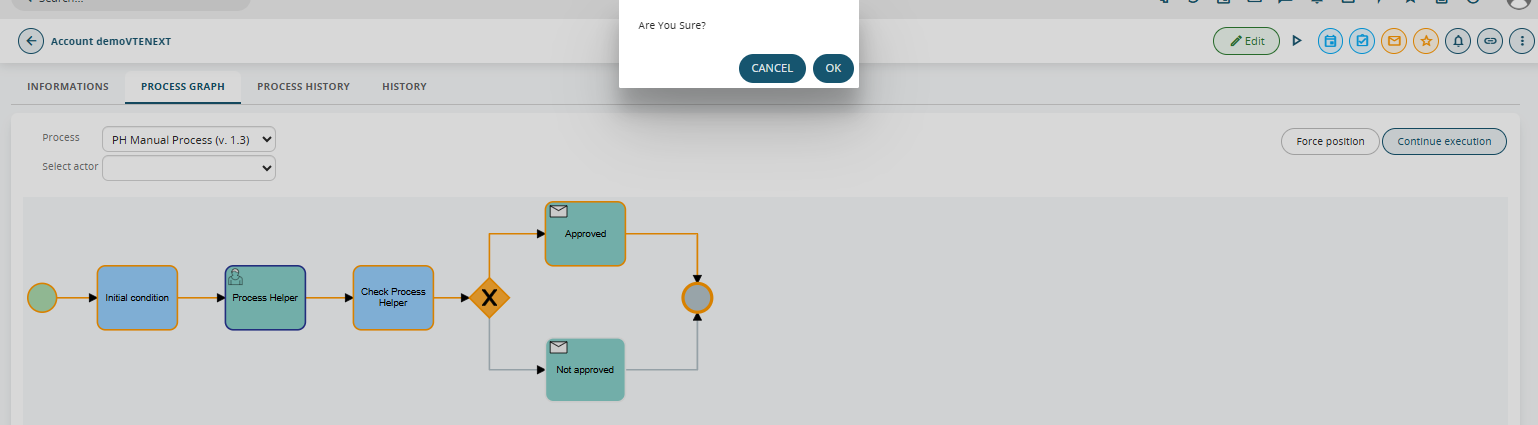](https://usermanual.vtenext.com/uploads/images/gallery/2025-06/NBKimage.png) Figure 12 In the re-executed Tasks/Action Tasks it is reported whether the execution was performed through a position force or not (Figure 13) [](https://usermanual.vtenext.com/uploads/images/gallery/2025-06/NgCimage.png) Figure 13 It is recommended to configure the aforementioned Process helper inside an Action Task inserted immediately after the Initial Condition Task to ensure that the graph is activated a few moments after the actual start of the process (Figure 14). [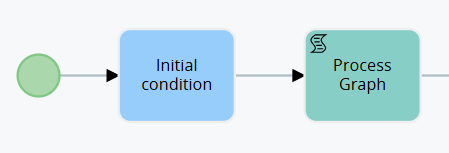](https://usermanual.vtenext.com/uploads/images/gallery/2025-06/NGoimage.png) Figure 14 To activate the Process helper, simply fill in the mandatory fields, namely the “Assigned to” and “Linked to” fields (Figure 15). [](https://usermanual.vtenext.com/uploads/images/gallery/2025-06/omsimage.png) Figure 15 NOTE: to avoid encountering errors, it is recommended to insert in the Linked to field the ID of the instance of the main module involved in the process, i.e. the record on which the process was triggered, otherwise you risk inserting the ID of an instance that does not exist at that specific point in the flow. # 6.6 Example of Process Helper usage for internal process use As anticipated in the introductory chapter, one of the uses of the process helper concerns the creation of virtual spaces in which to store data or carry out operations necessary exclusively within the process (and which therefore would be useless to historicize in the CRM modules). To proceed with the configuration of the process helper, you must first configure an Action Task (create link with dedicated section) following the dedicated procedure (Figure 1). [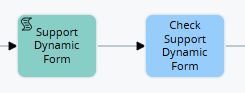](https://usermanual.vtenext.com/uploads/images/gallery/2025-06/8eCimage.png) Figure 1 NOTE: It is NOT mandatory to create a subsequent Task, since the checks that would be performed within it would not be aimed at stopping the process to present the dynamic form but rather to perform a simple check on the data present in the fields of the dynamic form (which we remind you were not entered directly by any user). Once inside the Action Task (in our example “Dynamic support form”) in configuration mode, we will find the section called “Process Helper” with all the related fields (Figure 3) [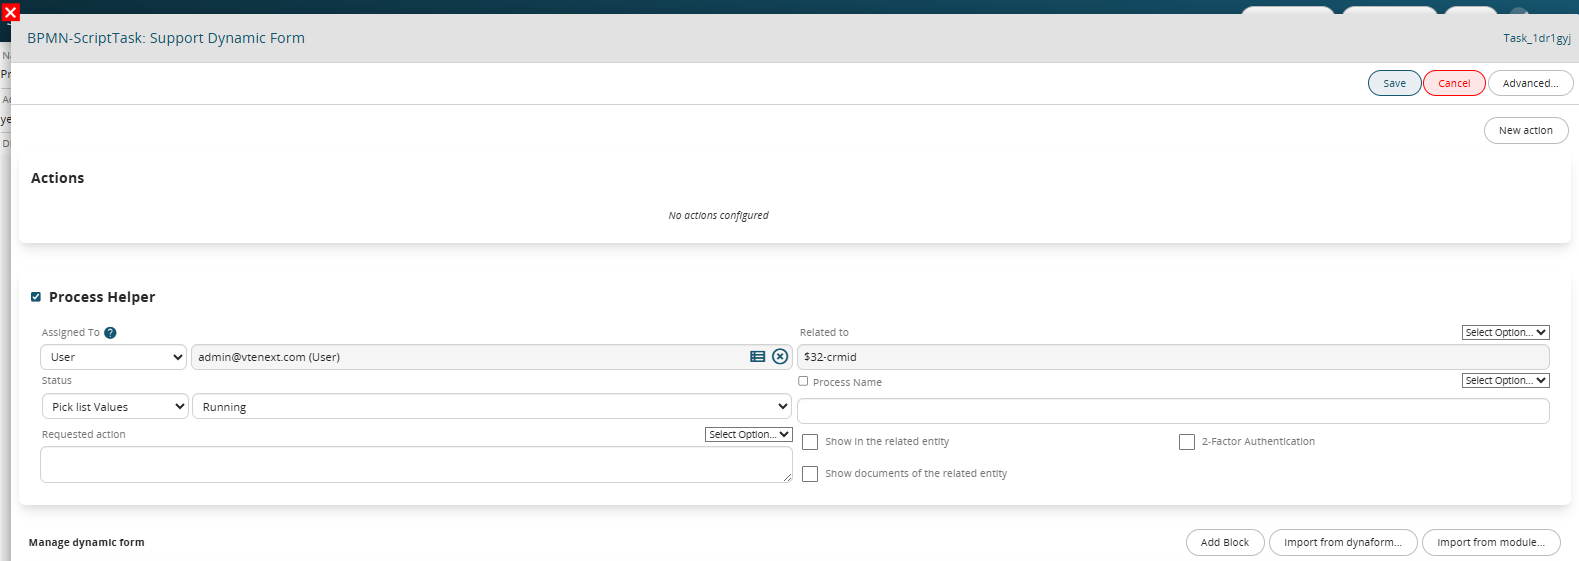](https://usermanual.vtenext.com/uploads/images/gallery/2025-06/SEnimage.png) Figure 3 Once the main fields have been configured (Assigned to, Linked to, Action requested) we will create the necessary blocks and fields in the dynamic form based on the data we want to use or the calculations we want to perform. To better understand how it works, below is an example of a process helper designed to calculate the difference in days between two dates and store the result in a field called "Calculation result", this to verify whether the two values taken into consideration are equal or different (and consequently perform different actions) (Figure 4). [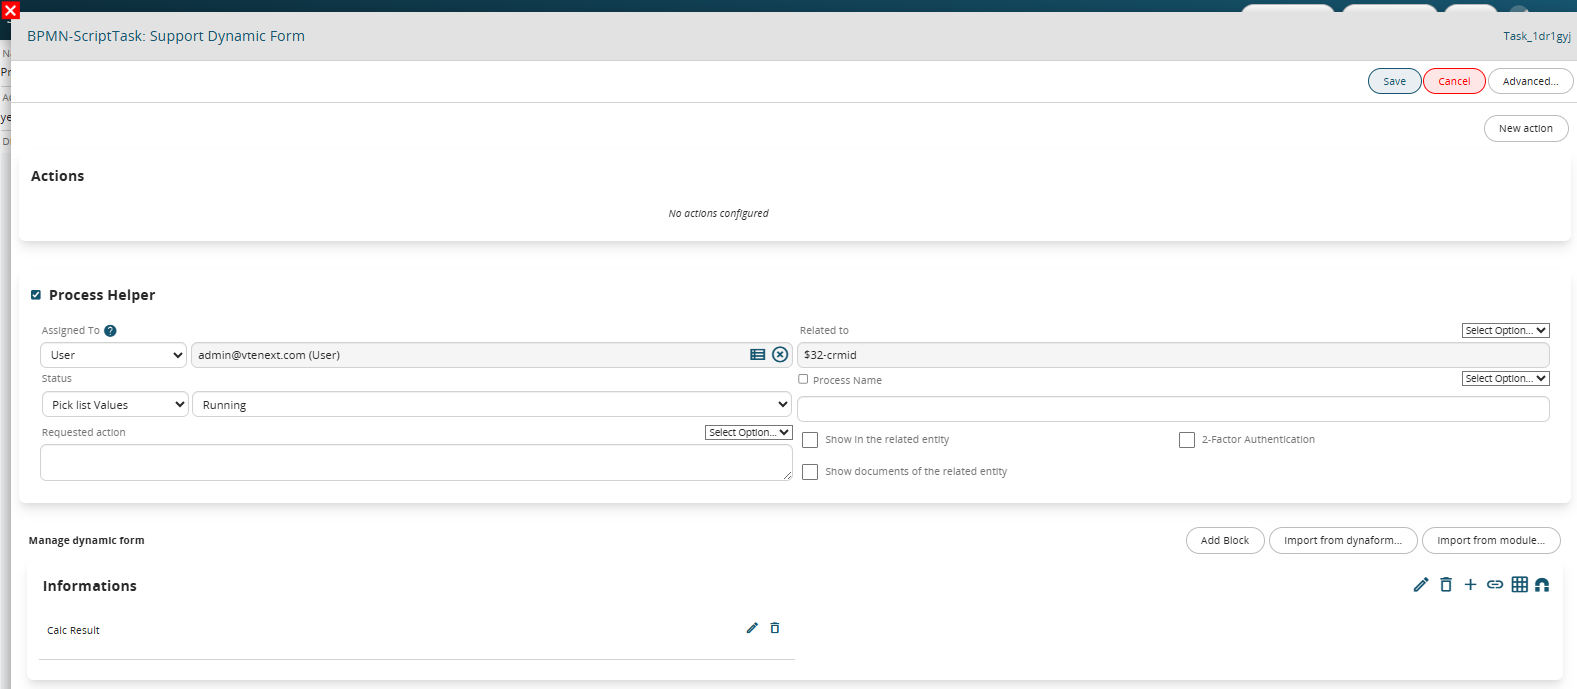](https://usermanual.vtenext.com/uploads/images/gallery/2025-06/kcPimage.png) Figure 4 This is a “Number” type field in which the SDK “Diff Date” function is inserted as a Default value, which allows you to perform the difference between two dates. NOTE: By default, the system returns the result in seconds, but if you want to obtain the result in days, you must pass the word “days” as the third parameter, as done in this example (Figure 5) [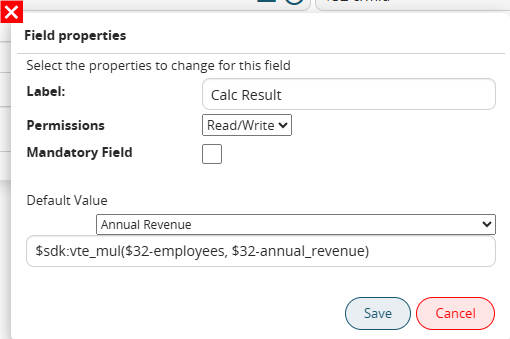](https://usermanual.vtenext.com/uploads/images/gallery/2025-06/N1Dimage.png) Figure 5 In the associated Control Task (called “Dynamic Support Form Control”) two different groups of conditions are indicated that allow the process to take different paths based on the calculation result (Figure 6). Specifically, it is checked whether the content of the “Calculation Result” field is equal to or different from 0, this is because if the two compared values are equal the calculated difference will be equal to 0, otherwise it will be different from 0. [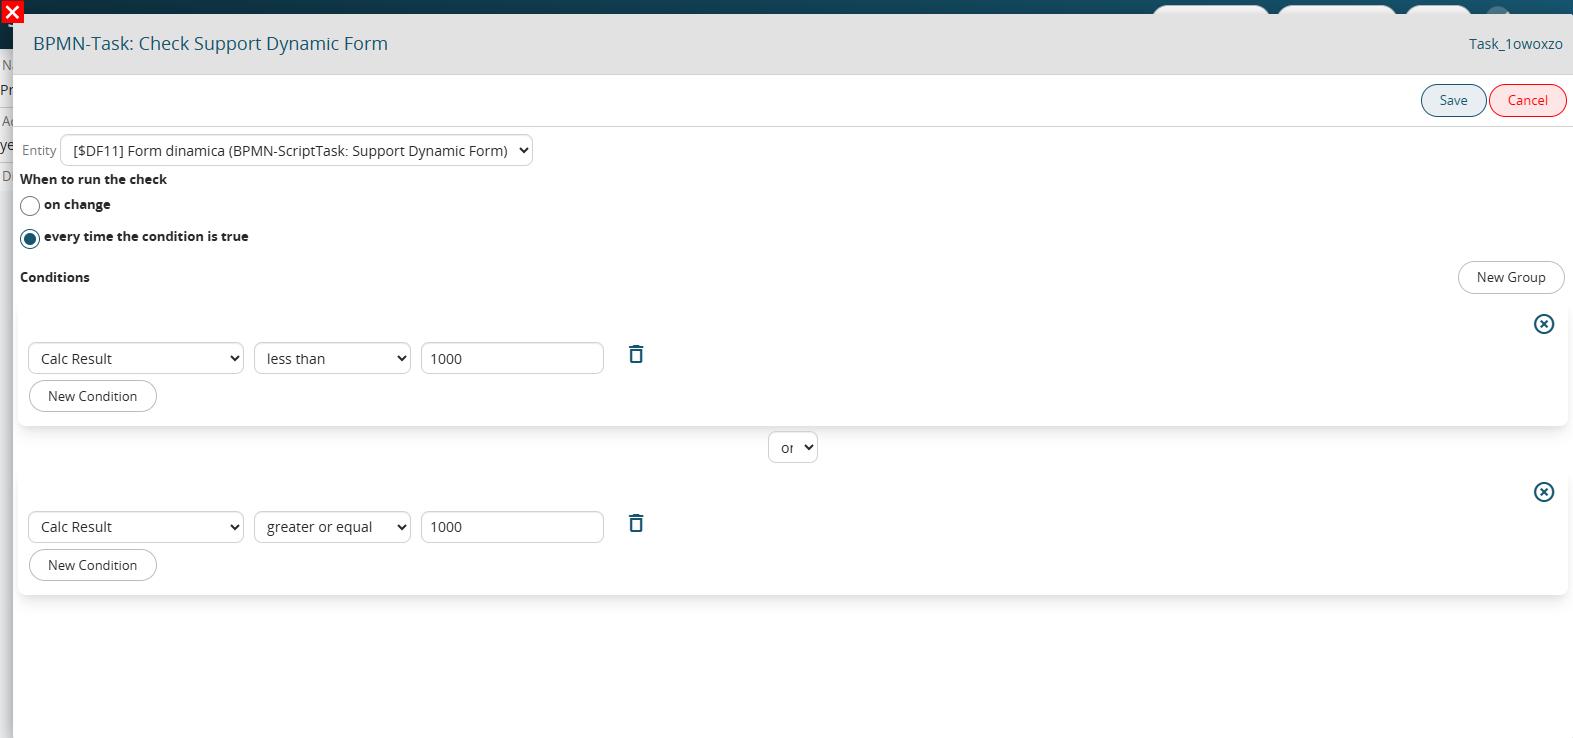](https://usermanual.vtenext.com/uploads/images/gallery/2025-06/VIuimage.png) Figure 6 # 7 Configuring a Basic Process # 7.1 Configuring a Basic Process - Quote Approval **FLOW DESCRIPTION** When creating a quote with Quote Stage = “Created”, the process will be triggered and will present the members of the “Management” group with a process helper in popup mode, requesting their completion. In case of confirmation, an internal notification will be sent to the assignee of the quote (which corresponds to the sales representative who is managing the quote). Instead, in case of rejection, a notification email will be sent to the assignee of the quote (which corresponds to the sales representative who is managing the quote) containing any internal notes/comments useful for reviewing the quote. If the popup is not completed by any user within two days, the system will send a reminder email to the members of the group. In the event of an SMTP error in sending the non-approval email, the system will notify the members of the “IT Department” group by sending an internal notification. **ELEMENTS REQUIRED IN THE PROCESS** To do this process we will need the elements listed below: -Condition Task -Action Task -Timer Boundary Event -Gateway -End Event If their operation is not clear we recommend first consulting chapter 2 of the process manual. **FLOW CHART CONFIGURATION** We use the elements mentioned above to set up a diagram like the one shown in Figure 1 [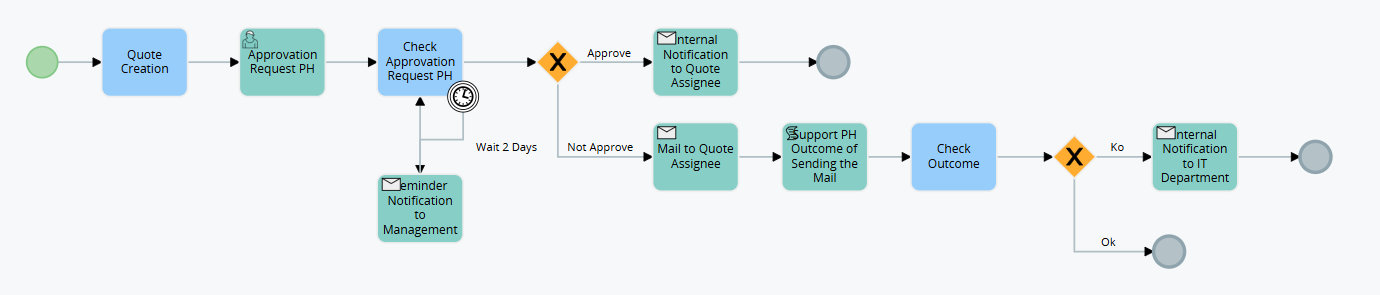](https://usermanual.vtenext.com/uploads/images/gallery/2025-06/1Rwimage.png) Figure 1 CONFIGURATION OF INDIVIDUAL ELEMENTS OF THE FLOW Let's proceed with the configuration of the individual elements that make up the process flow. Let's start with the Condition Task "Create estimate". In the "When to run the check" section, select the "At creation" option to start the process only when the estimate is created with Estimate Stage = "Created" (Figure 2). [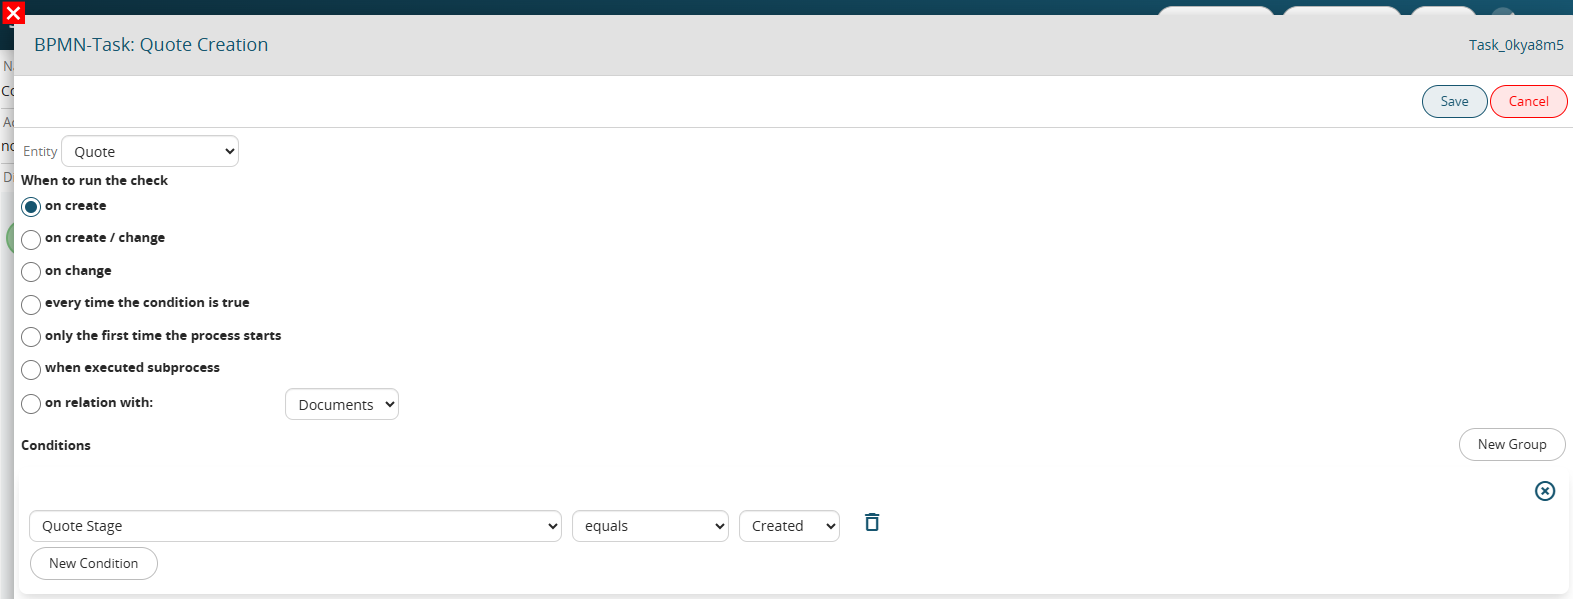](https://usermanual.vtenext.com/uploads/images/gallery/2025-06/cHcimage.png) Figure 2 In the UserTask “PH approval request” we configure a process helper in order to request the user for the information necessary for the approval of the estimate. **“Process Helper” block configuration:** -in the “Assigned to” field we statically insert the “Direction” group -in the “Linked to” field we insert the estimate ID -in the “Process Name” field we indicate the name that will be assigned to the process in this specific step, then we insert the static part “PH approval request” followed by the value of the “Estimate Number” variable -in the “Requested Action” field we insert a brief description of the activity to be performed -we check the “Show in the linked entity” checkbox to activate the process helper popup mode The result will be the one shown in Figure 3. [](https://usermanual.vtenext.com/uploads/images/gallery/2025-06/4Mvimage.png) Figure 3 Dynamic form configuration: In the dynamic form we create a single Block called “Quote Information” (see Figure 4) with the following fields: 1 “Action” (picklist field) with the following values: “empty”, “APPROVATE” and “DO NOT APPROVE” (see Figure 5) 2 “Internal Notes” (text area field) [](https://usermanual.vtenext.com/uploads/images/gallery/2025-06/eSeimage.png) Figure 4 [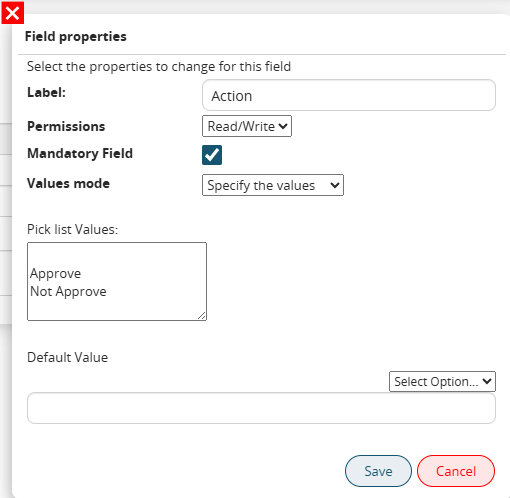](https://usermanual.vtenext.com/uploads/images/gallery/2025-06/j1Aimage.png) Figure 5 **Dynamic Form Reset Action Configuration** Let's create a "Dynamic Form Reset" action to reset the values of the fields in the form in the event that the process helper is forced to re-compile (see Figure 6). [](https://usermanual.vtenext.com/uploads/images/gallery/2025-06/07Limage.png) Figure 6 In the Condition Task “PH Control approval request” we are going to perform a check on the “Action” field of the process helper form to direct the process in the branch related to the value entered by the user (see Figure 7) [](https://usermanual.vtenext.com/uploads/images/gallery/2025-06/8whimage.png) Figure 7 In the lower right edge of the task we place a Timer Boundary Event (Figure 8) and proceed with its configuration by inserting a 2-day time interval (Figure 9) For further information, consult chapter 2.3 of the process manual. [](https://usermanual.vtenext.com/uploads/images/gallery/2025-06/Mcuimage.png) Figure 8 [](https://usermanual.vtenext.com/uploads/images/gallery/2025-06/qxJimage.png)Figure 9 We are going to connect the SendTask “Send reminder notification to Management” to the Timer Boundary Event in order to send an internal notification to the members of the “Management” group in the event that the process remains stuck on the Condition Task “PH control approval request” for more than 2 days (Figure 10) For further information, see section 3.4 of the process manual. [](https://usermanual.vtenext.com/uploads/images/gallery/2025-06/F75image.png) Figure 10 In the next gateway we associate each group of conditions (inserted in the Condition Task “PH Control approval request”) with the corresponding branch to follow (see Figure 11) [](https://usermanual.vtenext.com/uploads/images/gallery/2025-06/PSIimage.png) Figure 11 **Configuration of the elements following the “APPROVE” branch** In the SendTask “Send internal notification to quote assignee” we configure the sending of an internal notification to the quote assignee (which corresponds to the sales representative who is managing the quote) to notify him of the approval of the quote (Figure 12). For further information, see section 3.4 of the process manual. [](https://usermanual.vtenext.com/uploads/images/gallery/2025-06/UiKimage.png) Figure 12 The endEvent must also be configured, because we have involved a process helper in the process, so it is necessary to activate a process helper inside it to set the process status to “Terminated” (see Figure 13) [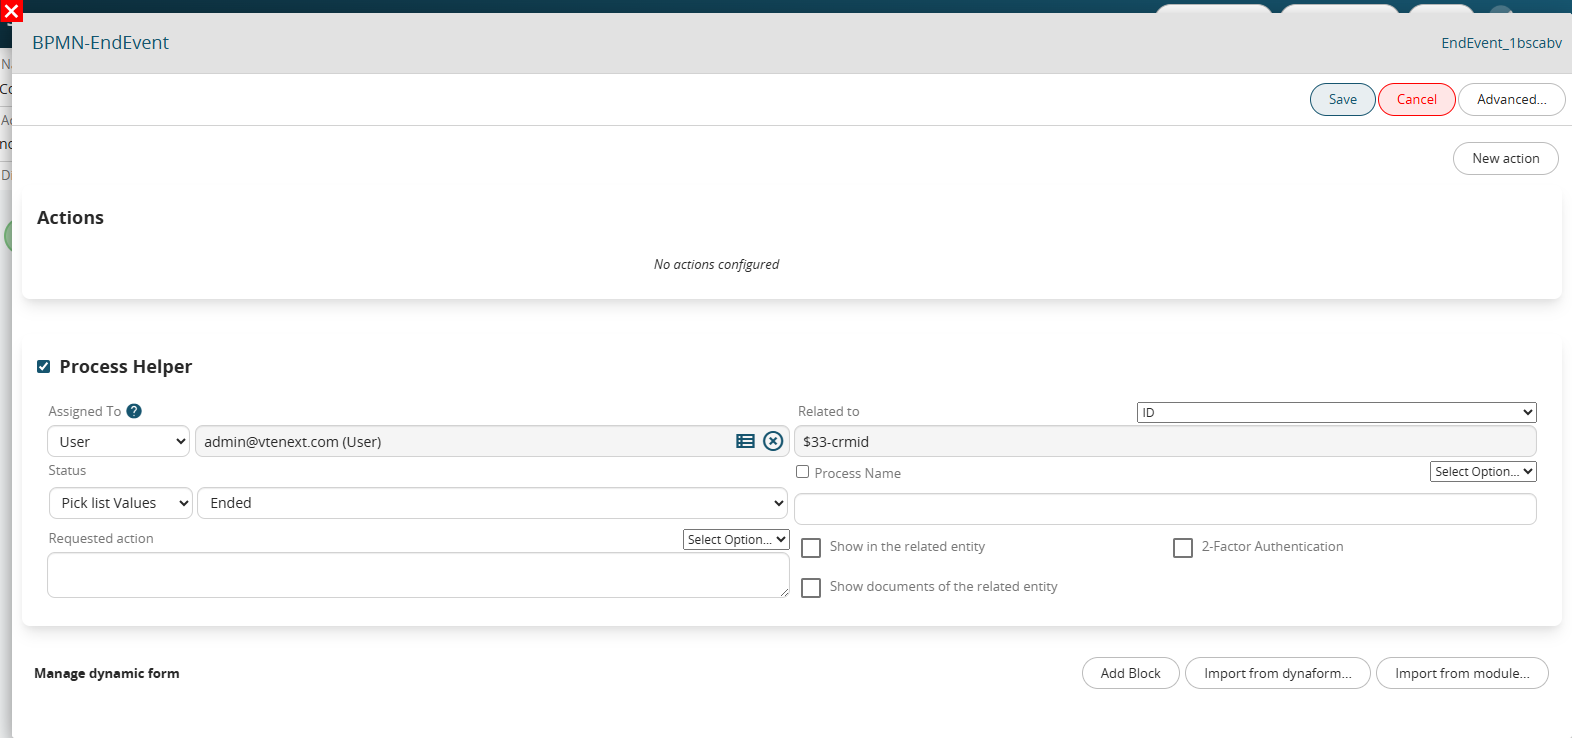](https://usermanual.vtenext.com/uploads/images/gallery/2025-06/50Iimage.png) Figure 13 **Configuration of the elements following the “DO NOT APPROVE” branch** In the SendTask “Send email to quote assignee” we configure the sending of an email to the quote assignee (which corresponds to the sales representative who is managing the quote) to notify him of the non-approval of the quote (Figure 14). For further information, see section 3.5 of the process manual. [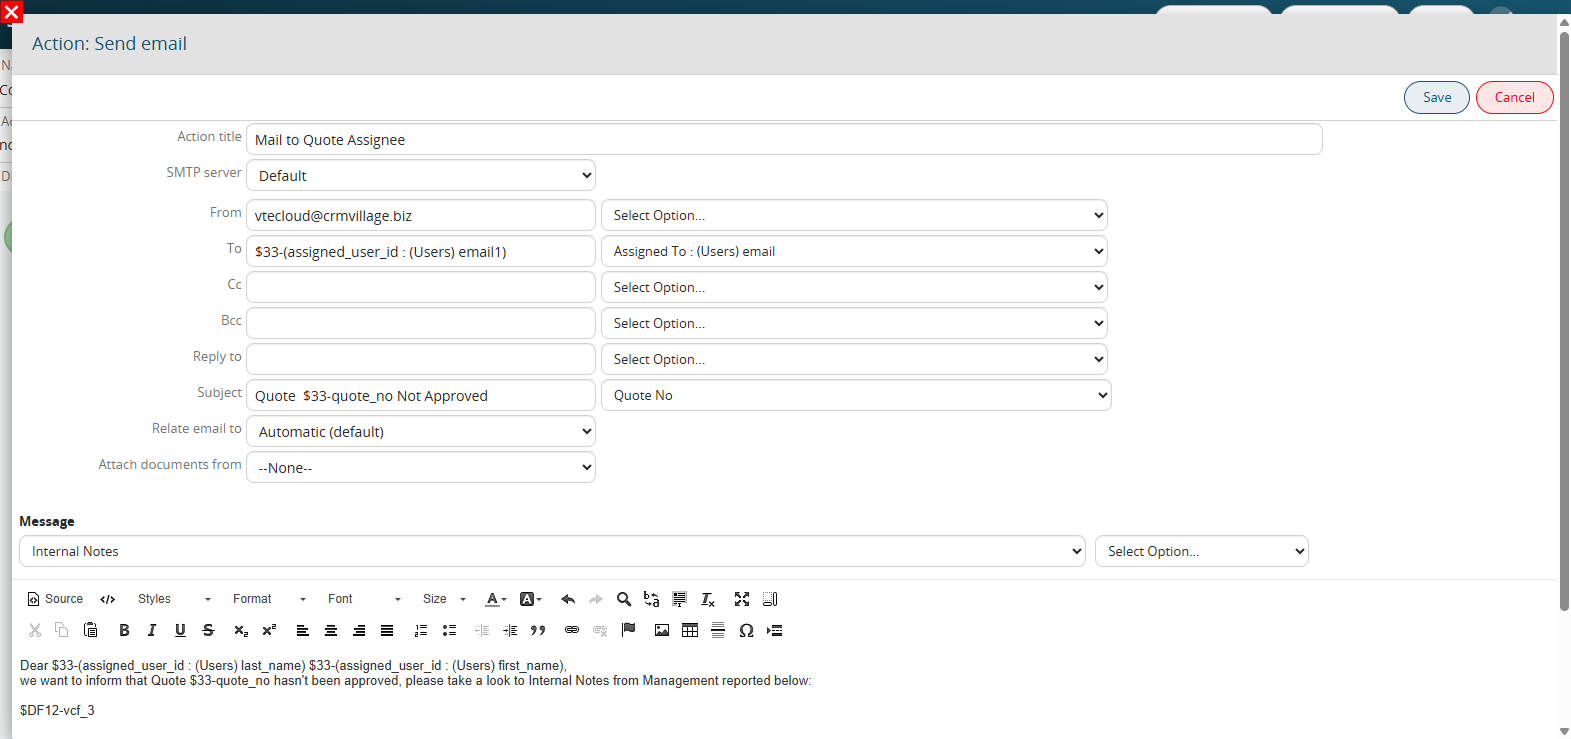](https://usermanual.vtenext.com/uploads/images/gallery/2025-06/874image.png) Figure 14 In the "Support PH for collecting email sending results" ScriptTask, we activate a process helper to use its dynamic form to log the email sending result (Figure 15). Specifically, for each "Send email" action configured within the process, the system provides the following two variables (Figures 16 and 17): \- "Successful outcome?" → 1 is returned if there is NO SMTP error; otherwise, 0 is returned. \- "Error message" → the description of the SMTP error encountered is returned. [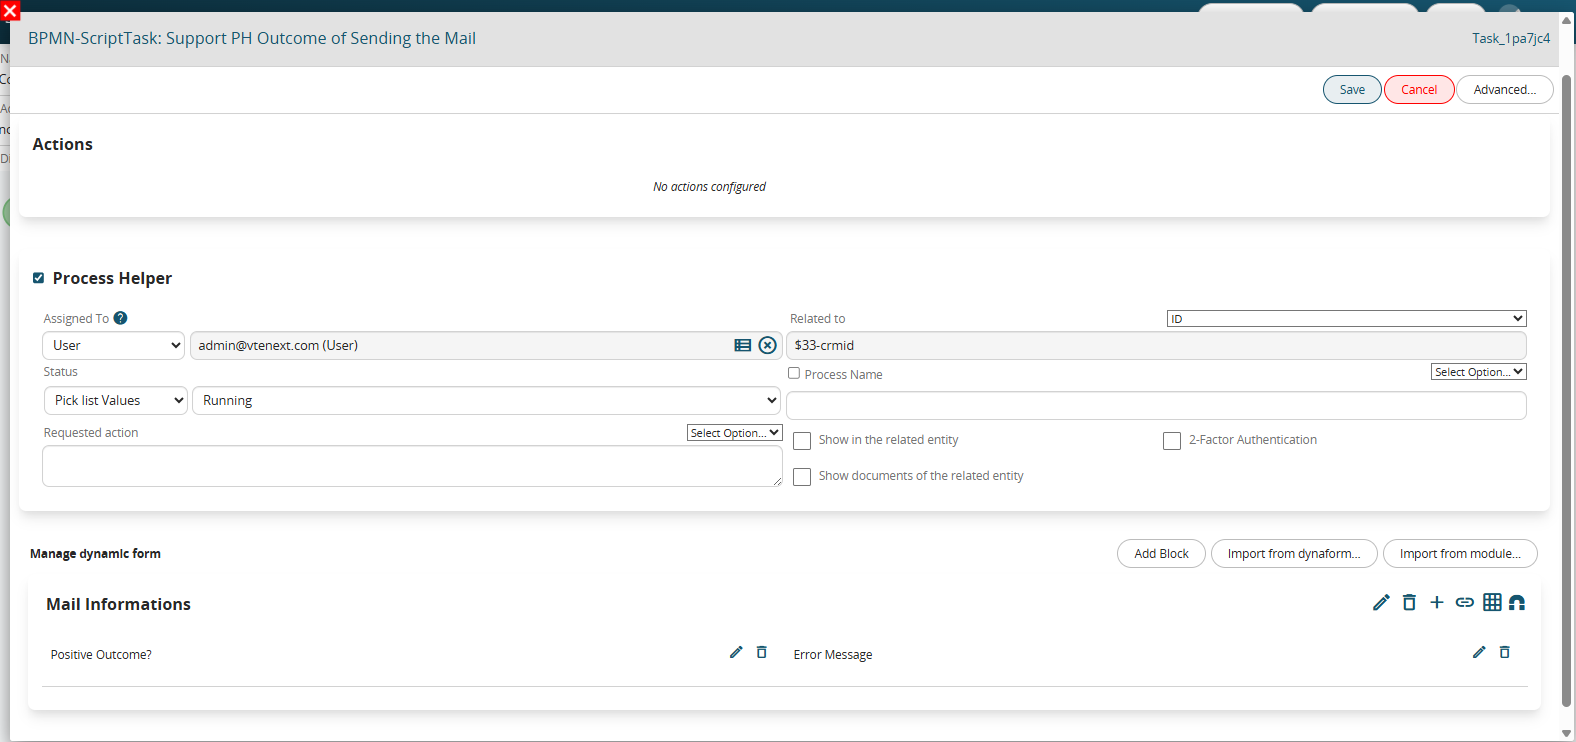](https://usermanual.vtenext.com/uploads/images/gallery/2025-06/ictimage.png) Figure 15 [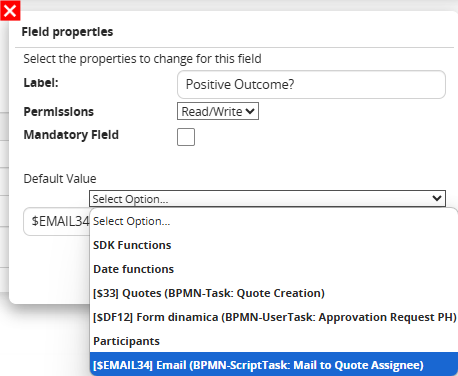](https://usermanual.vtenext.com/uploads/images/gallery/2025-06/3Ybimage.png) Figure 16 [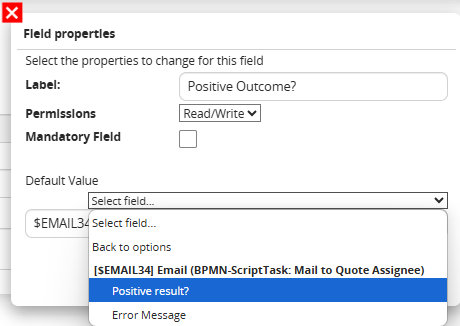](https://usermanual.vtenext.com/uploads/images/gallery/2025-06/WmRimage.png) Figure 17 In the Condition Task “Check email sending result” we are going to perform a check on the “Positive outcome?” field of the process helper form to direct the process in the branch related to the email sending result (see Figure 18) [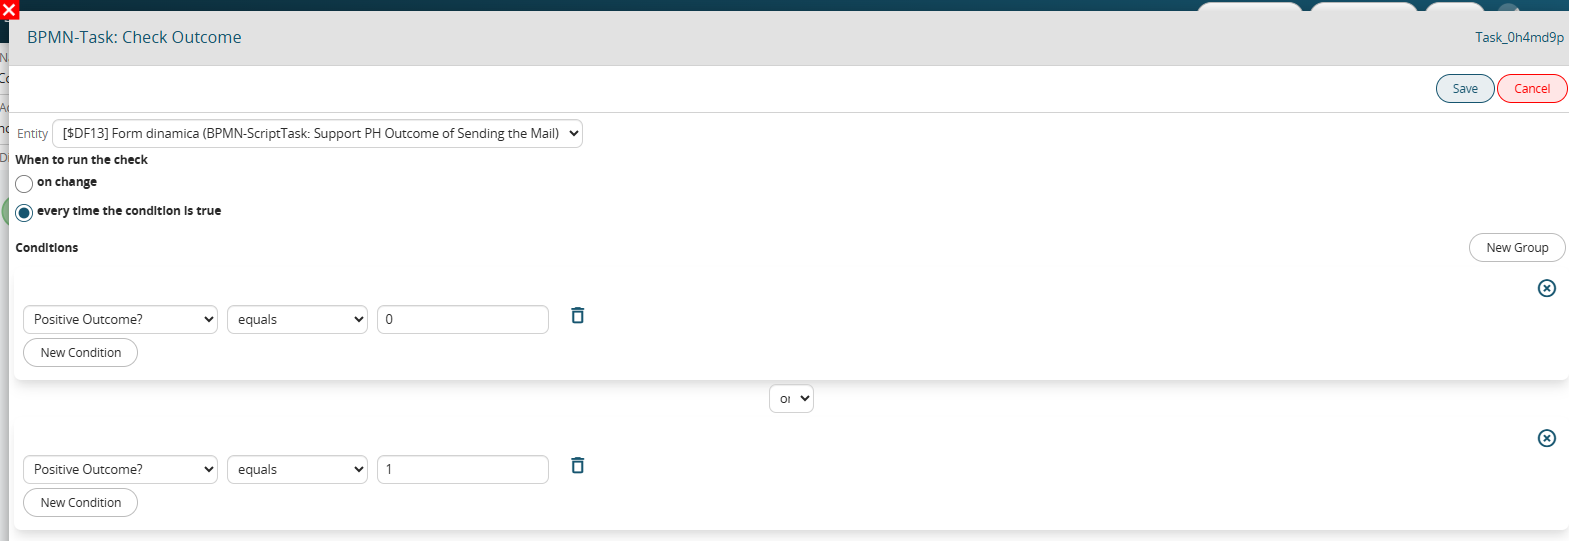](https://usermanual.vtenext.com/uploads/images/gallery/2025-06/IG1image.png) Figure 18 In the next gateway we associate each group of conditions (inserted in the Condition Task “Check email sending result”) with the corresponding branch to follow (see Figure 19) [](https://usermanual.vtenext.com/uploads/images/gallery/2025-06/uveimage.png) Figure 19 Configuration of the elements following the “Ok” branch The endEvent must also be configured, because we have involved a process helper in the process, so it is necessary to activate a process helper inside it to set the process status to “Terminated” (see Figure 20) [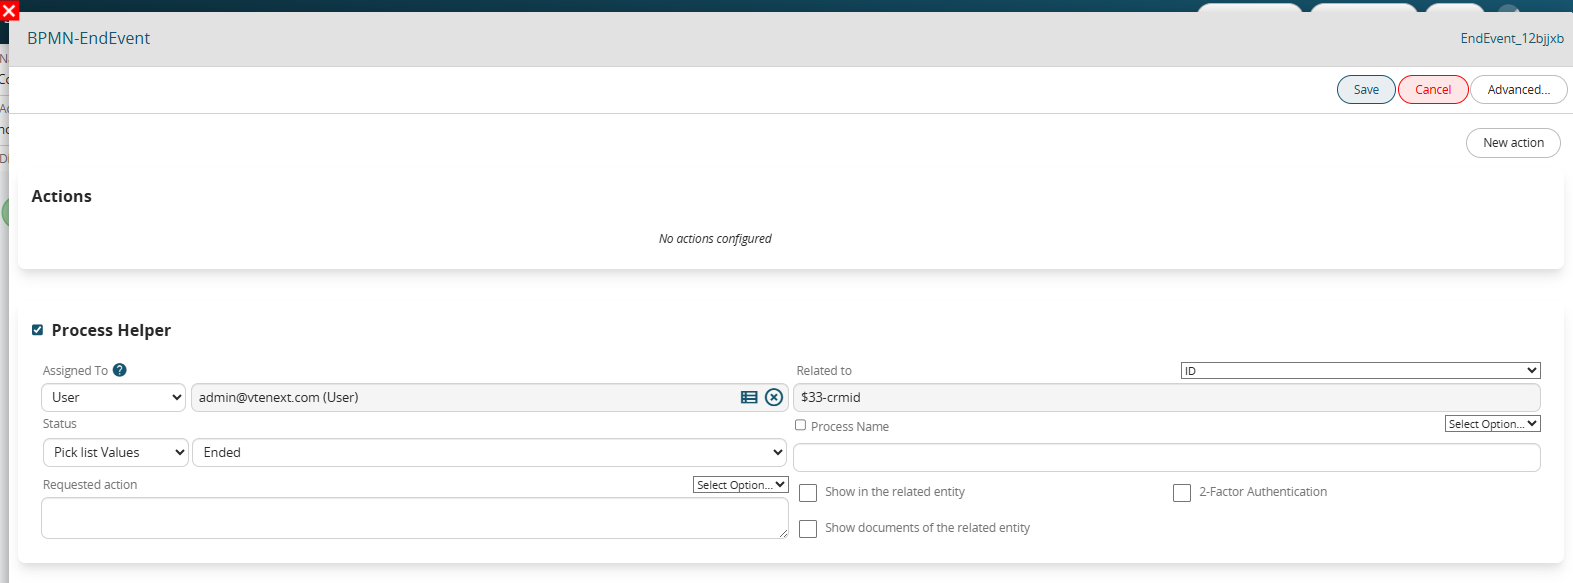](https://usermanual.vtenext.com/uploads/images/gallery/2025-06/UiPimage.png) Figure 20 Configuration of the elements following the “Ko” branch In the SendTask “Send internal notification to IT department” we configure the sending of an internal notification to the “IT Department” group to report the anomaly found in sending the email (Figure 21) For further information, see section 3.4 of the process manual. [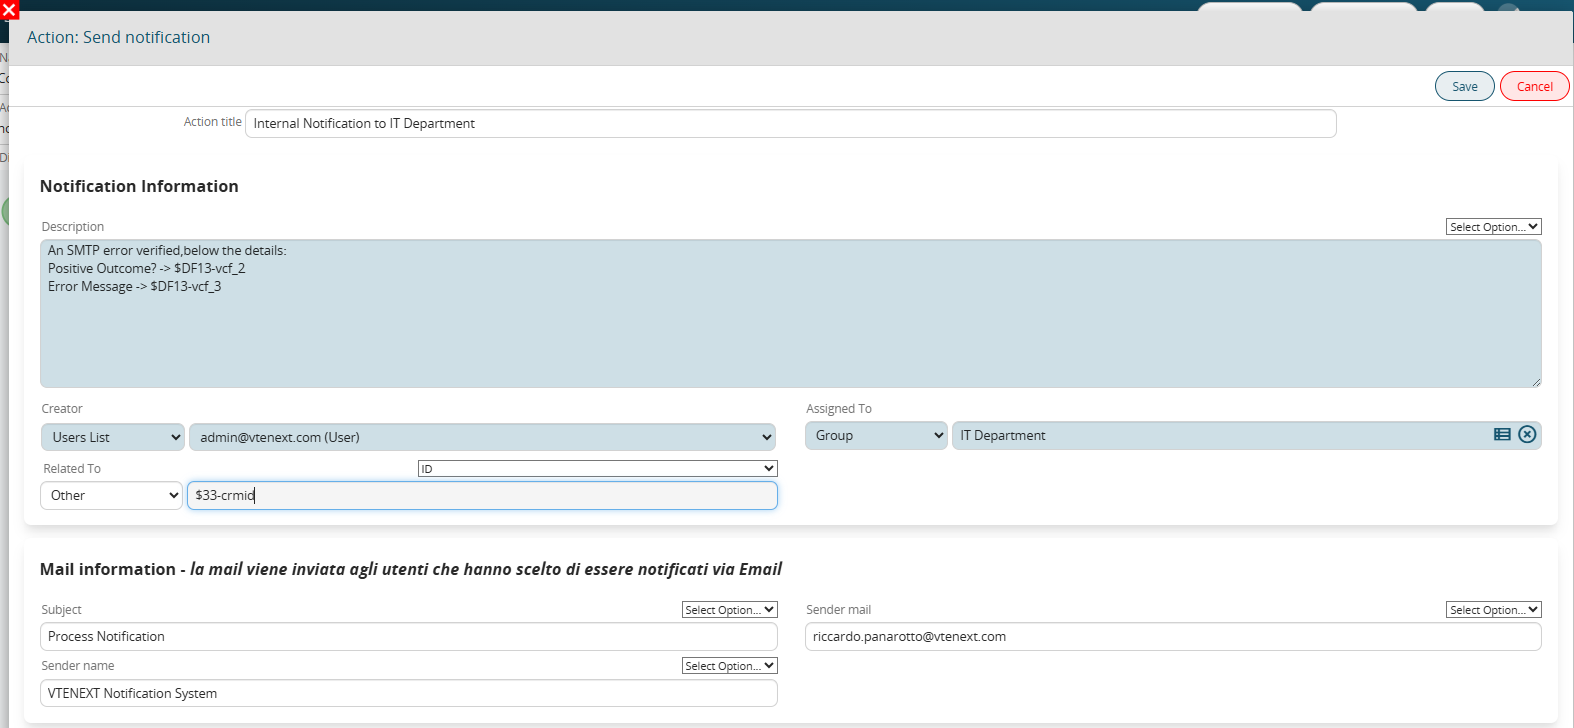](https://usermanual.vtenext.com/uploads/images/gallery/2025-06/jZqimage.png) Figure 21 The endEvent must also be configured, because we have involved a process helper in the process, so it is necessary to activate a process helper inside it to set the process status to “Terminated” (see Figure 22) [](https://usermanual.vtenext.com/uploads/images/gallery/2025-06/UiPimage.png) Figure 22 # 7.2 Activation of a Basic Process - Approval of Quotation Now let's proceed with the vision of the process in action. We then create a new quote by entering the requested information (Figure 1) [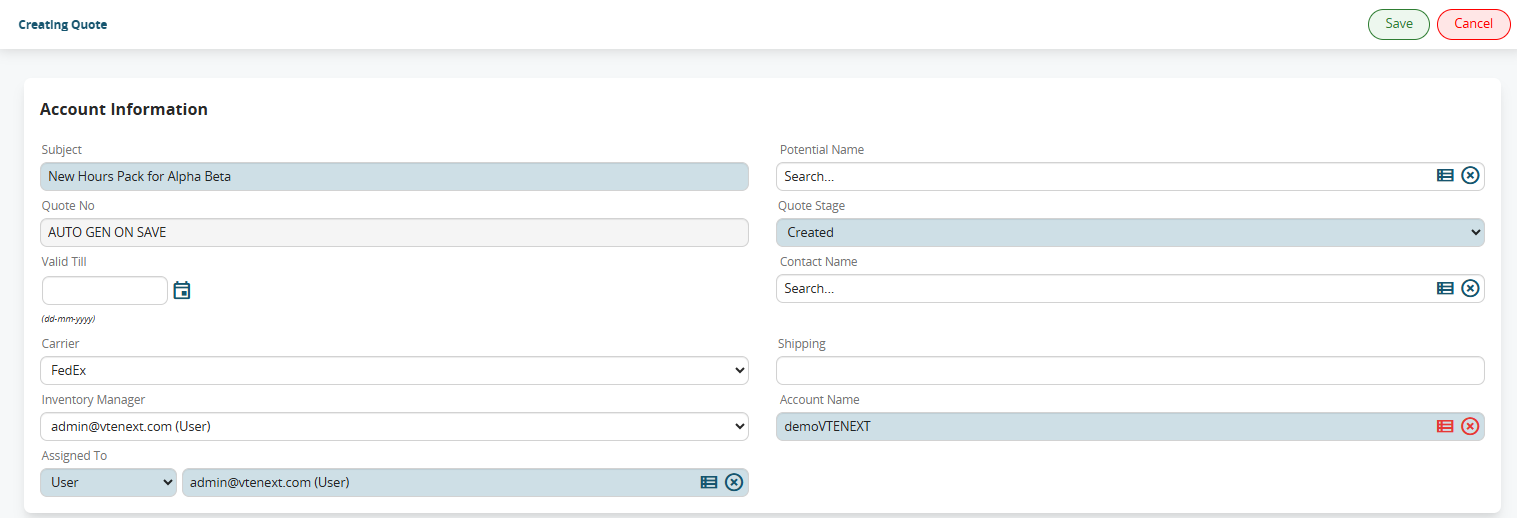](https://usermanual.vtenext.com/uploads/images/gallery/2025-06/eRlimage.png) Figure 1 After saving, the process will start by presenting a preview mask to each member of the “Direction” group (Figure 2). [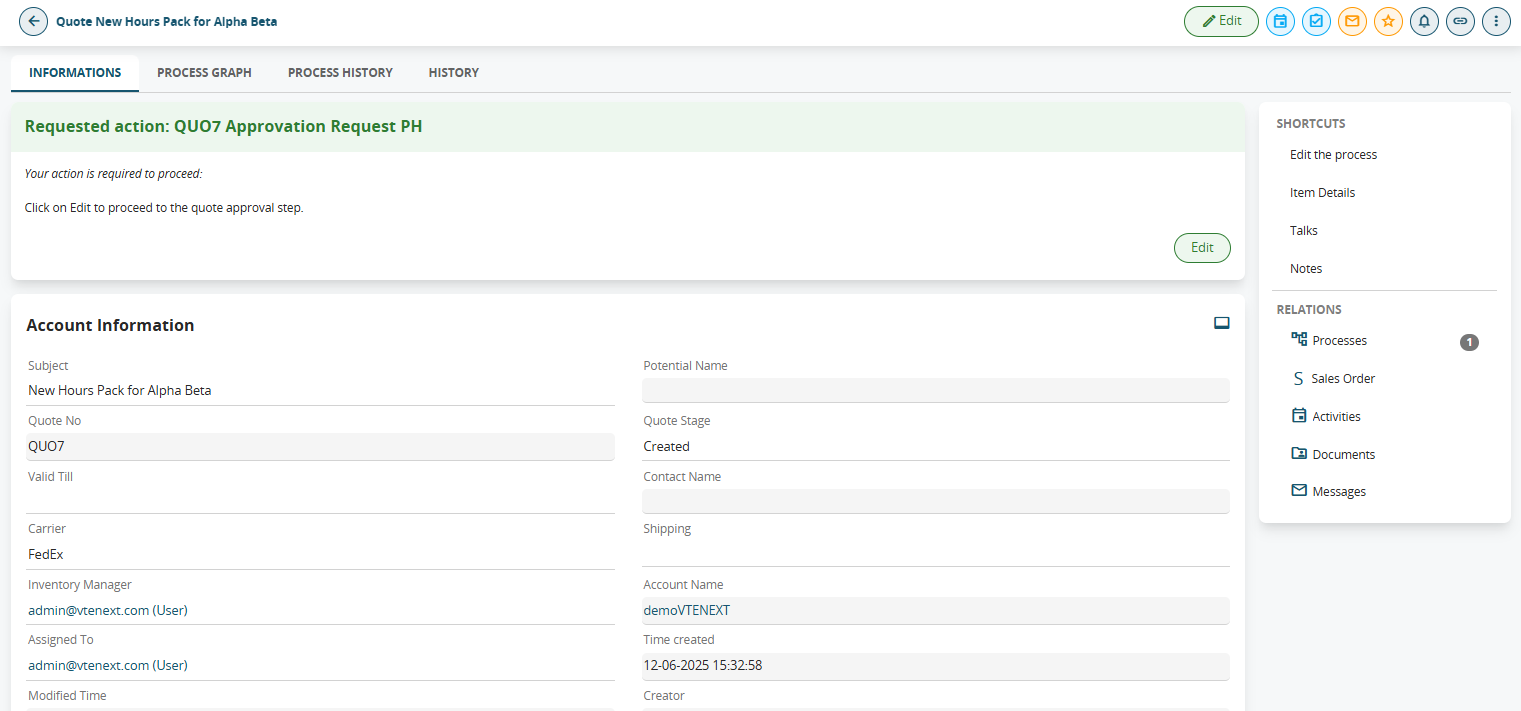](https://usermanual.vtenext.com/uploads/images/gallery/2025-06/hguimage.png) Figure 2 However, the task described above will only be visible by entering the estimate's details, so in this case it is possible to fill in the process helper through the "Processes" section accessible from the top right menu. (see Figure 3) [](https://usermanual.vtenext.com/uploads/images/gallery/2025-06/EJlimage.png) Figure 3 In fact, it contains all the pending processes assigned directly to the user or to any groups to which he or she belongs, so all you have to do is look for the line with the following information (see Figure 4): -process name: “PH approval request QUO94” -linked to: “New hour package for Alpha Beta” (i.e. the Subject of the estimate) [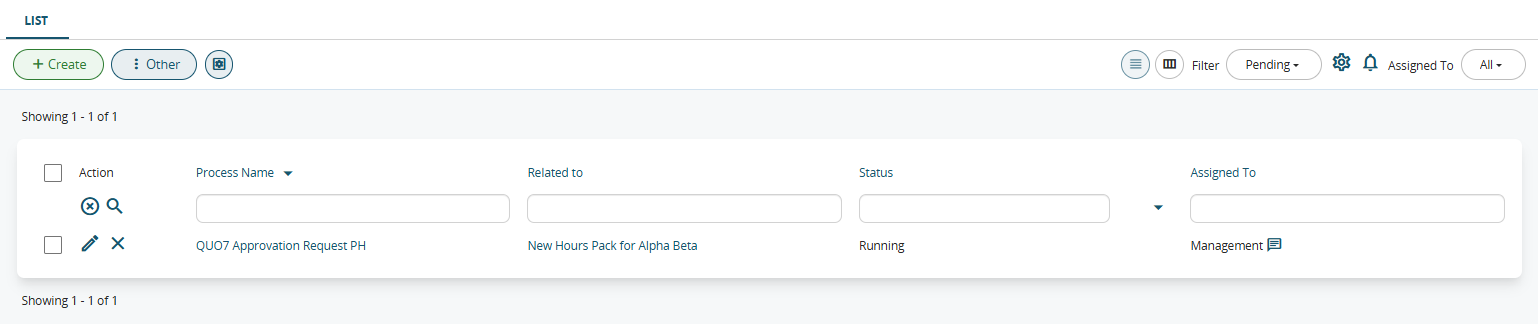](https://usermanual.vtenext.com/uploads/images/gallery/2025-06/o6Kimage.png) Figure 4 After that, simply click on the pencil to the left of the process name to be able to fill out the process helper (which will be displayed as if we were editing a module). Once on the process helper form, the user will find themselves in front of the screen shown in Figure 5. [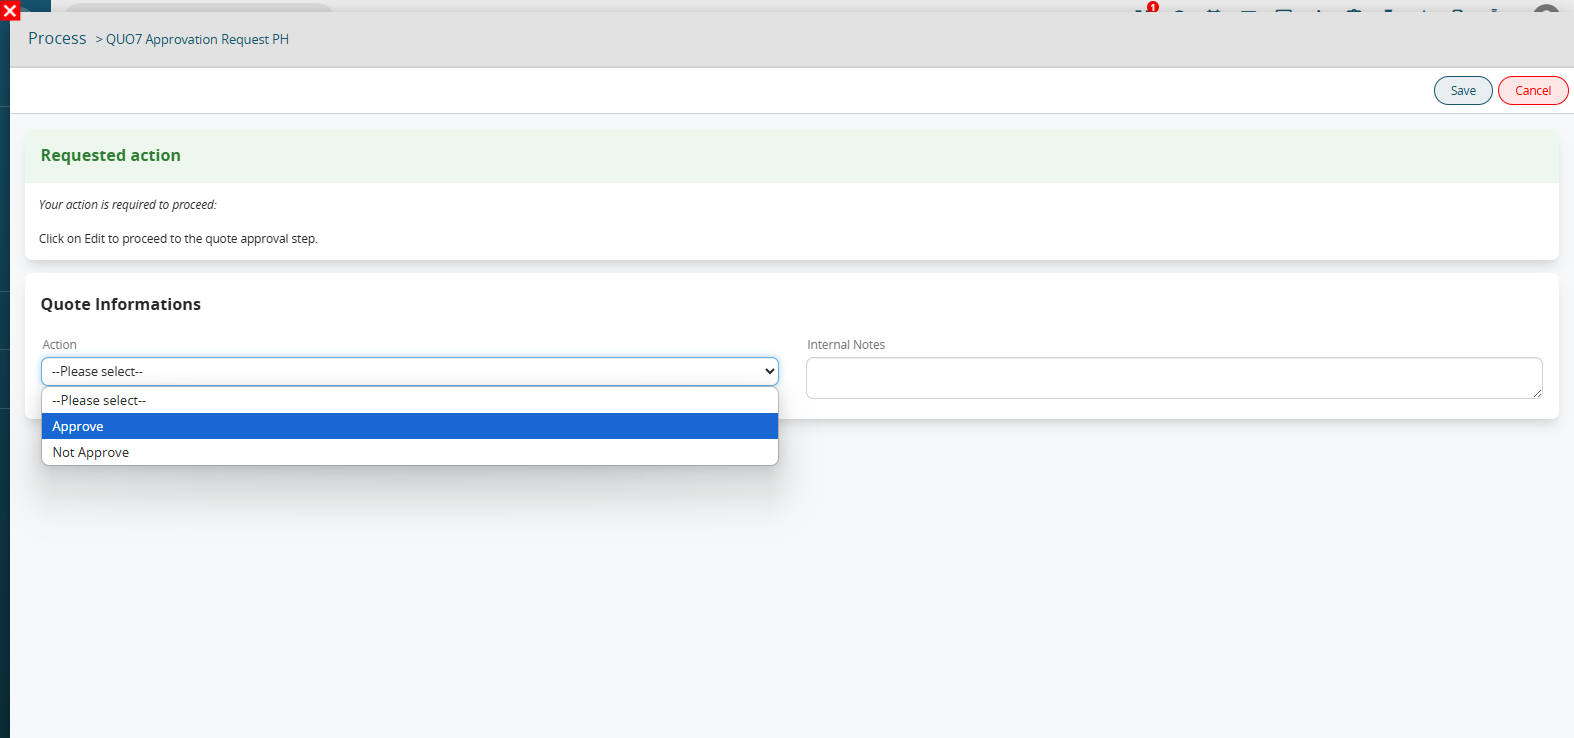](https://usermanual.vtenext.com/uploads/images/gallery/2025-06/jpsimage.png) Figure 5 If you want to simulate the approval of a quote, click on the value “APPROVARE” and save the process helper. The system will automatically send an internal notification to the quote assignee (Figure 6). [](https://usermanual.vtenext.com/uploads/images/gallery/2025-06/sruimage.png) Figure 6 If you want to simulate a lack of approval of the estimate, click on the value “NOT APPROVE” and save the process helper. The system will send an email to the assignee of the estimate (Figure 7). [](https://usermanual.vtenext.com/uploads/images/gallery/2025-06/gvnimage.png) Figura 7 # 8 Advanced Process Configuration # 8.1 Configuring an Advanced Process - Managing Installation Renewals **FLOW DESCRIPTION** When creating a new installation, the process will be triggered and will wait until the “Next renewal expiration date” is reached. Once the established time condition has been verified, the process will present a process helper in pop-up mode and will request its completion by the installation assignee. If the renewal is confirmed, a new renewal will be created, the “Next renewal expiration date” of the installation will be updated and finally the timer will return to wait until the “Next renewal expiration date” just entered is reached. Otherwise, the process will end after updating the installation with the renewal refusal reason entered by the user. **RENEWALS MODULE:** In order to better historicize all the renewals performed, we create a “Renewals” module with an N to 1 relationship with the “Installations” module and composed of the fields shown in Figure 1 [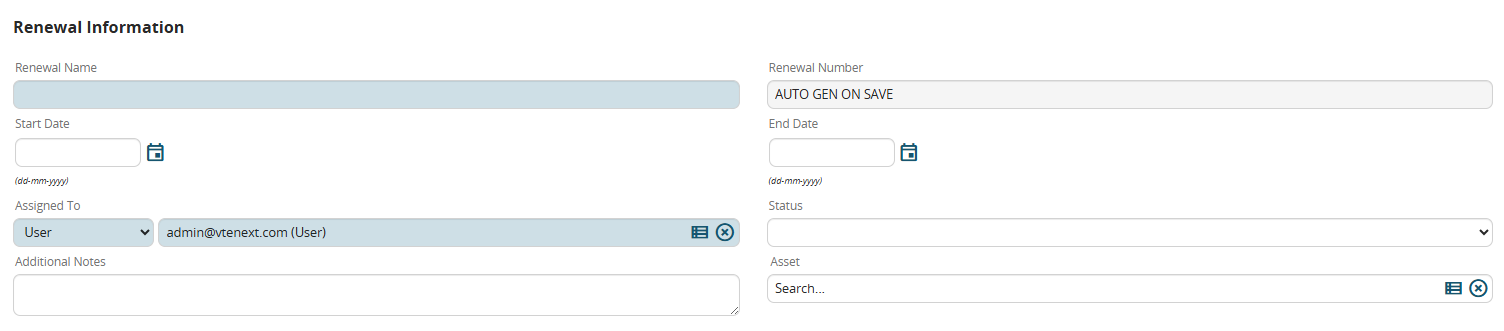](https://usermanual.vtenext.com/uploads/images/gallery/2025-06/oXEimage.png) Figure 1 **INSTALLATIONS MODULE REQUIREMENTS**: In the “Installations” module, we create the following fields: -”Next renewal expiration date” (date field) -”Reason for refusal of renewal” (text area field) **ELEMENTS REQUIRED IN THE PROCESS** To do this process, we will need the elements listed below: -Condition Task -Action Task -Timer Intermediate Catch Event -Gateway -End Event If their operation is not clear, we recommend first consulting chapter 2 of the process manual. **FLOW DIAGRAM CONFIGURATION** We use the elements mentioned above to set up a diagram like the one shown in Figure 2 [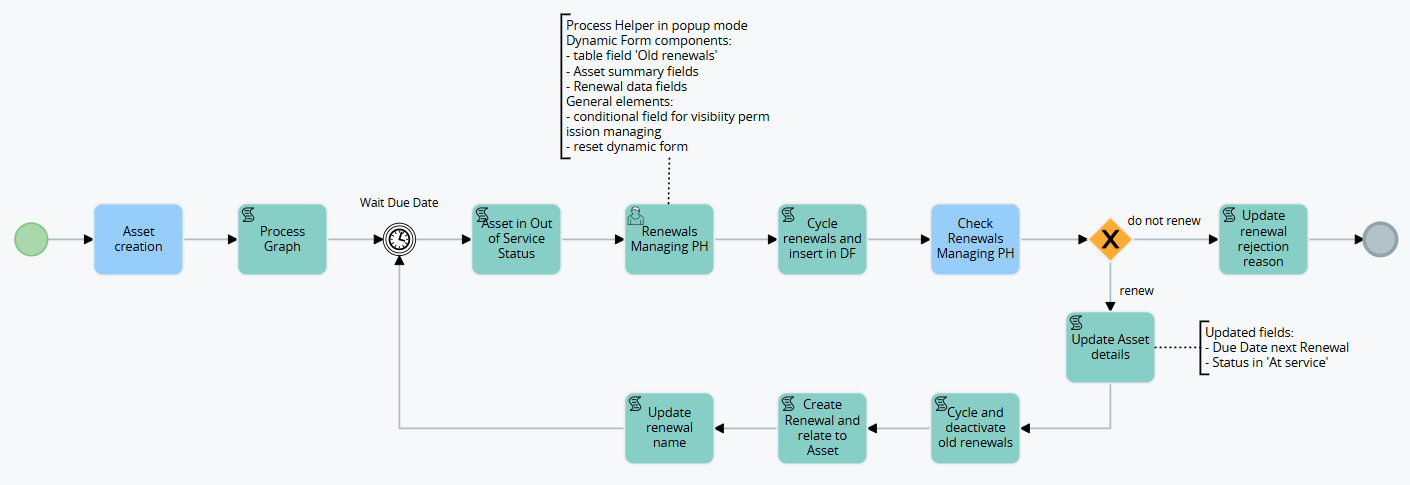](https://usermanual.vtenext.com/uploads/images/gallery/2025-06/IAoimage.png) Figure 2 **CONFIGURATION OF INDIVIDUAL ELEMENTS OF THE FLOW** Let's proceed with the configuration of the individual elements that make up the process flow. Let's start with the Condition Task "Create new installation". In the "When to run the check" section, select the "At creation" option to start the process only when the installation is created. [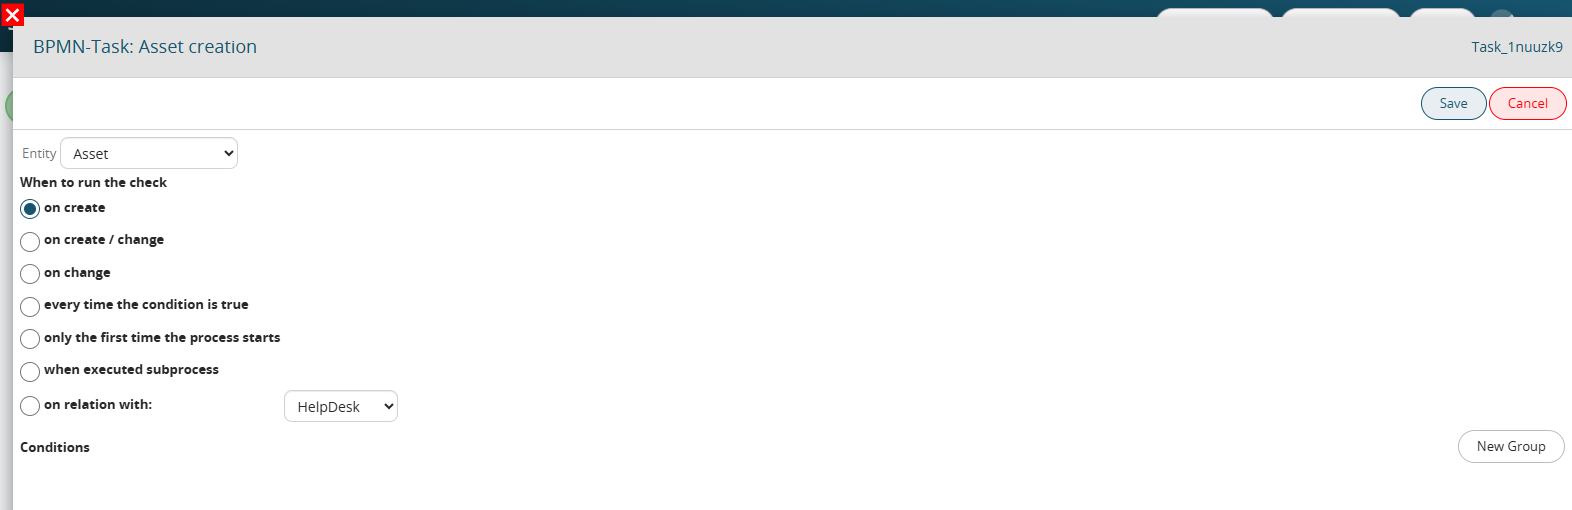](https://usermanual.vtenext.com/uploads/images/gallery/2025-07/image.png) Figure 3 In the “Process Graph” ScriptTask we configure a process helper that we will use to be able to display the process graph in the “Process Graph” tab of the connected entity (see Figure 4). [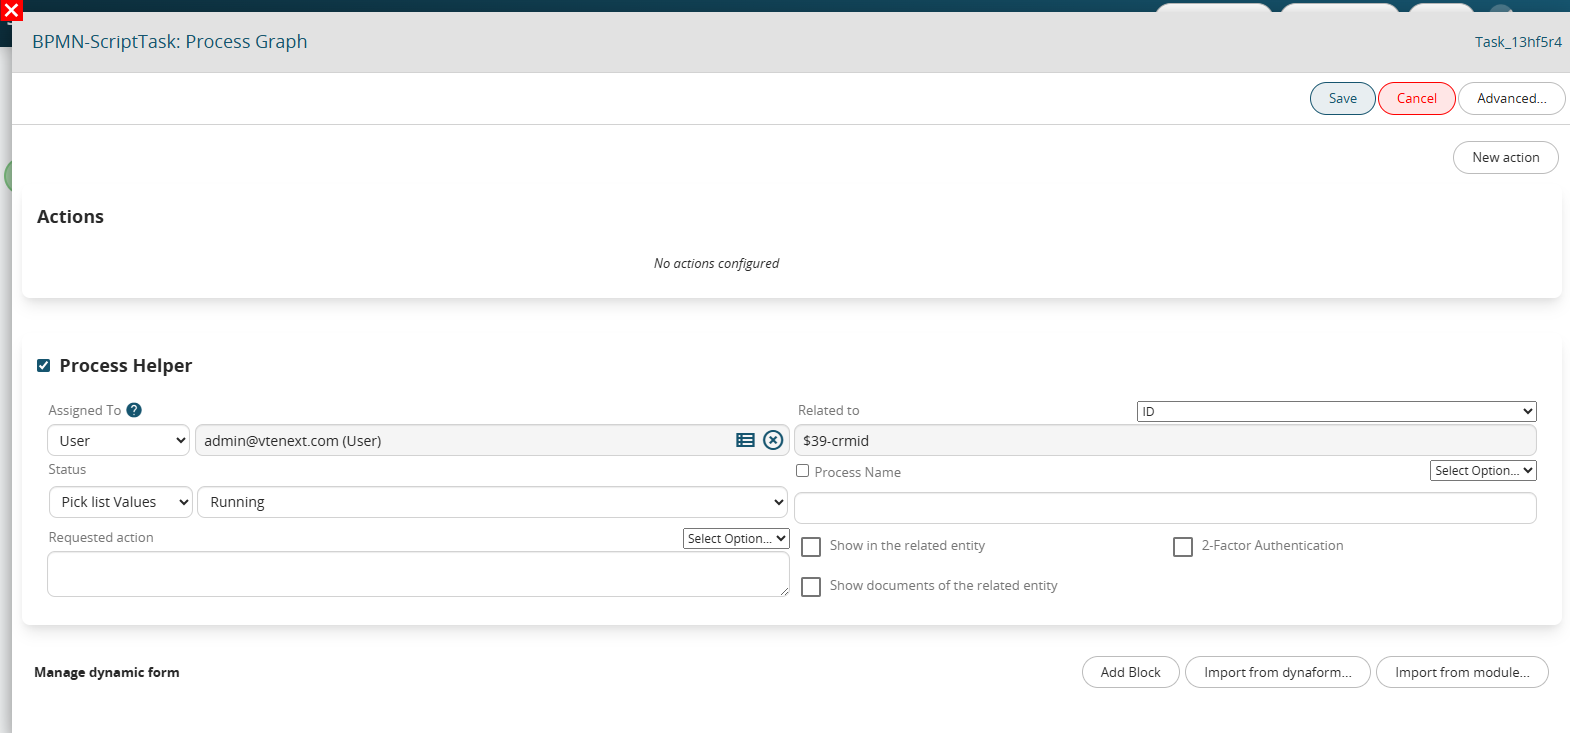](https://usermanual.vtenext.com/uploads/images/gallery/2025-07/ATEimage.png)Figure 4 In the Timer intermediate catch event we set the following configuration: Wait 0 “Before” “Other” → variable “Next installation renewal date” (see Figure 5). [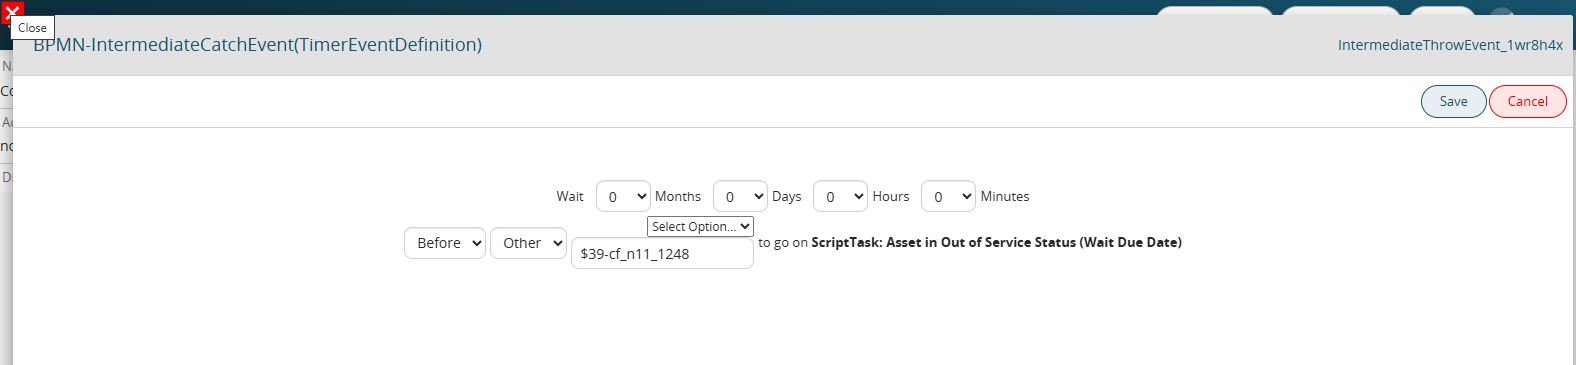](https://usermanual.vtenext.com/uploads/images/gallery/2025-07/YOSimage.png) Figure 5 In the ScriptTask “Update installation status to Out of Service” we configure an Update Entity action to set the installation status to “Out of Service” (see Figure 6) [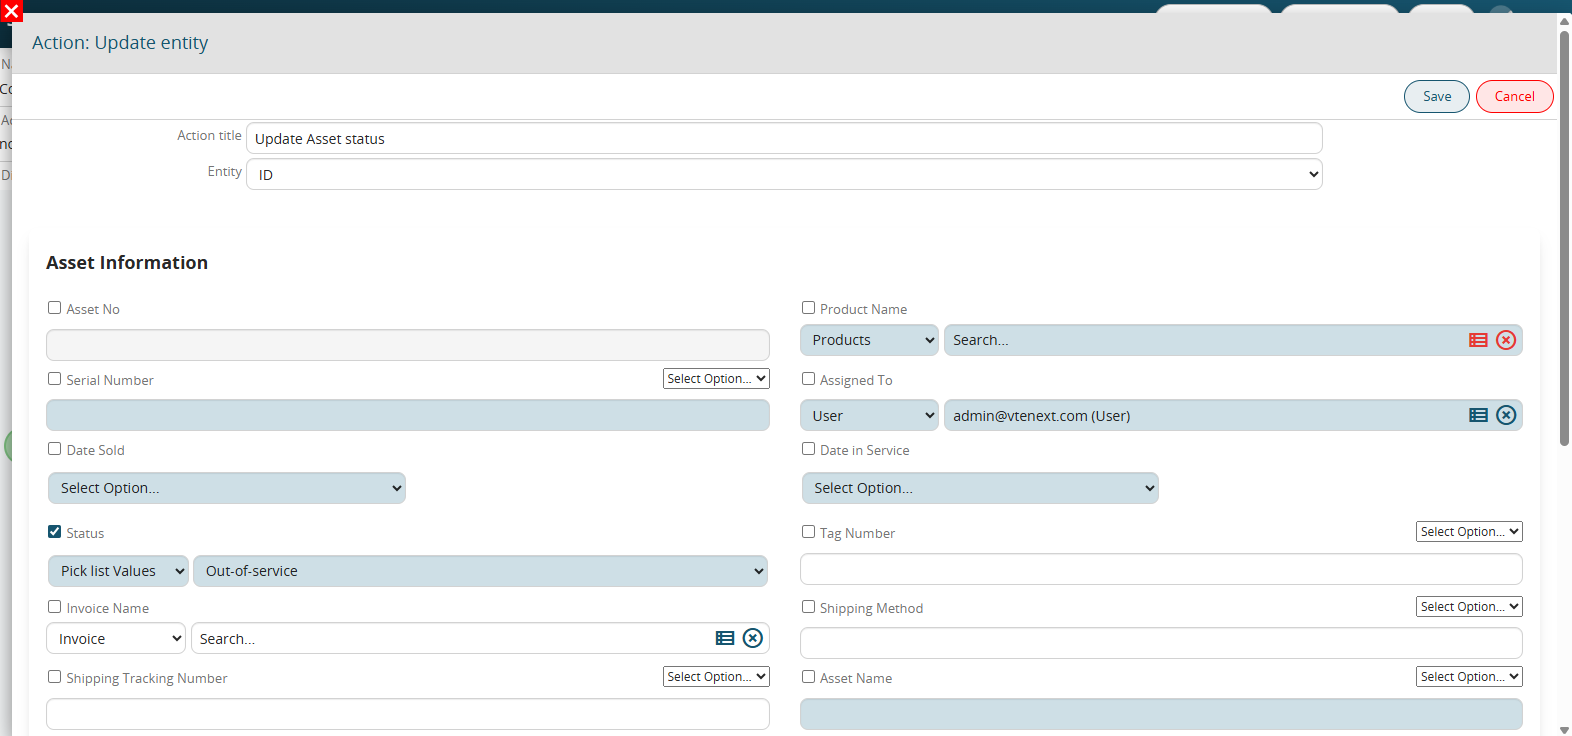](https://usermanual.vtenext.com/uploads/images/gallery/2025-07/P8Mimage.png) Figure 6 In the UserTask “PH renewal management” we configure a process helper in order to request the user for the information necessary for managing the renewal. **“Process Helper” block configuration:** -in the “Assigned to” field we insert the assignee of the installation -in the “Linked to” field we insert the installation ID -in the “Process Name” field we indicate the name that will be assigned to the process in this specific step, then we insert the static part “Renewal Management” followed by the value of the “Installation Name” variable -in the “Requested Action” field we insert a brief description of the activity to be performed -we check the “Show in the linked entity” checkbox to activate the process helper popup mode The result will be the one shown in Figure 7. [](https://usermanual.vtenext.com/uploads/images/gallery/2025-07/PTOimage.png) Figure 7 **Dynamic form configuration:** In the dynamic form we create the following blocks: A) “Installation Information” block (see Figure 8) with the following fields: 1 “Installation Name” (text field) 2 “Company” (picklist field) 3 “Date to service” (date field) 4 “Status” (picklist field) [](https://usermanual.vtenext.com/uploads/images/gallery/2025-07/Ymtimage.png) Figure 8 B) “Renewal Information” block (see Figure 9) with the following fields: 1 “Renewals” table field (see Figure 10) with the following columns: 1.1 “Renewal Name” (text field) 1.2 “Start Date” (date field) 1.3 “End Date” (date field) 1.4 “Additional Notes” (text area field) N.B: We set the read-only permissions in both the table field and the individual columns since only past renewals will be reported in it 2 “Action” (picklist field) with the following values: empty, “Renew” and “Do not renew” (see Figure 11)-“Number of Months for Renewal” (number field) 3 “Additional Notes” (text area field) 4 “Reason for Renewal Refusal” (text area field) [](https://usermanual.vtenext.com/uploads/images/gallery/2025-07/GSWimage.png) Figure 9 [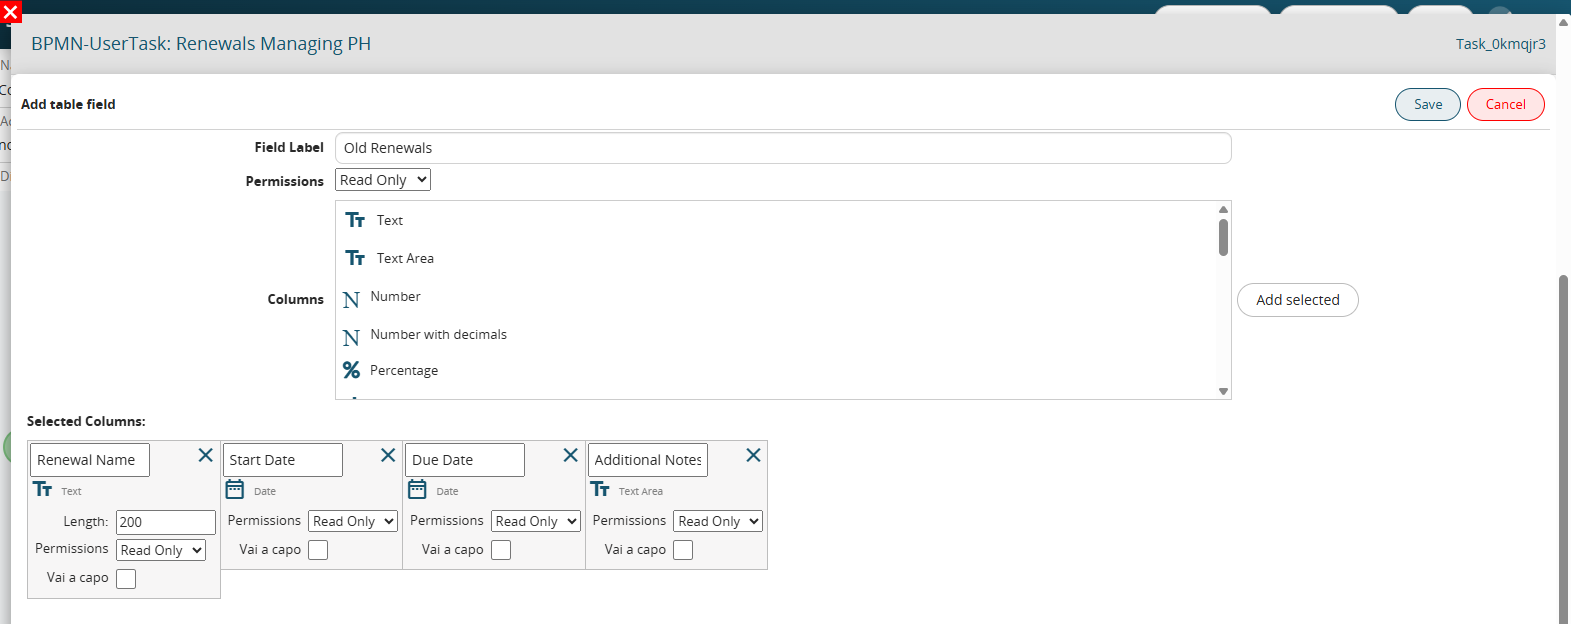](https://usermanual.vtenext.com/uploads/images/gallery/2025-07/2ofimage.png) Figure 10 [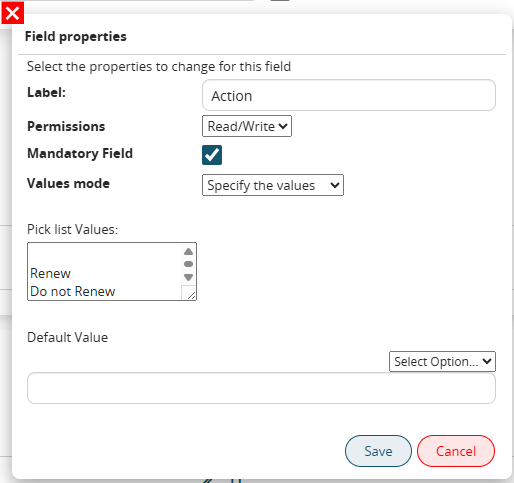](https://usermanual.vtenext.com/uploads/images/gallery/2025-07/3Pmimage.png) Figure 11 **Dynamic Form Reset Action Configuration** Let's create a "Dynamic Form Reset" action so that at the next renewal the process helper can be filled again as the values of the fields in the form will be reset (see Figure 12). [](https://usermanual.vtenext.com/uploads/images/gallery/2025-07/7Fwimage.png)Figure 12 Conditional fields configuration on dynamic form Let's set up a series of rules to manage the visibility permissions of the form fields in order to provide the user with a clearer and more efficient filling experience. So let's create the following rules: -if Action equals Do not renew hide Number of months Renewal, Additional notes and put mandatory Reason for refusal of renewal (see Figures 13 and 14) [](https://usermanual.vtenext.com/uploads/images/gallery/2025-07/jNmimage.png)Figure 13 [](https://usermanual.vtenext.com/uploads/images/gallery/2025-07/muyimage.png) Figure 14 -if Past Renewals table field has 0 rows hide it (see Figures 15 and 16) [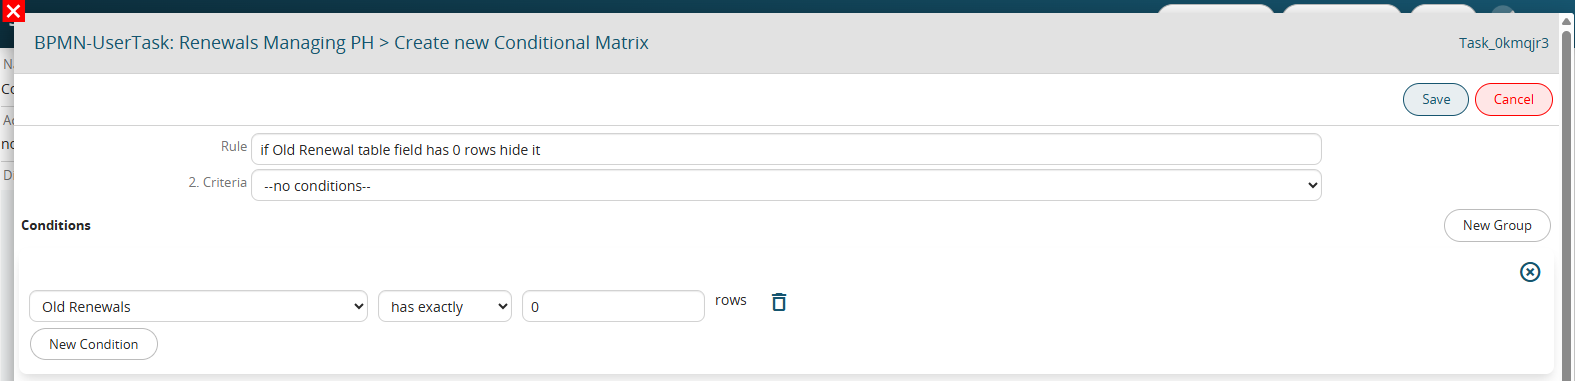](https://usermanual.vtenext.com/uploads/images/gallery/2025-07/ixSimage.png) Figure 15 [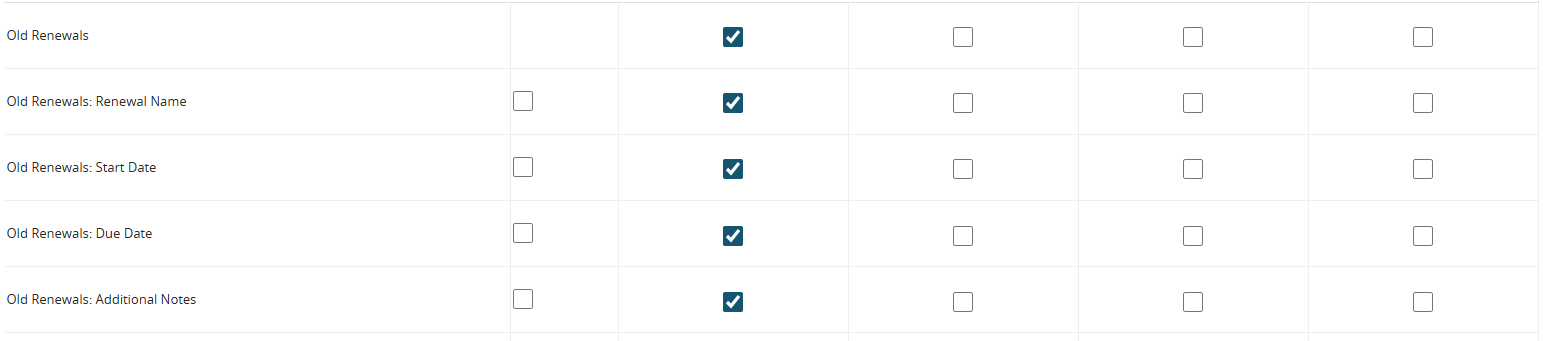](https://usermanual.vtenext.com/uploads/images/gallery/2025-07/1tzimage.png) Figure 16 -if Action equals Renew, set the Number of months of renewal as mandatory and hide the Reason for refusal of renewal (see Figures 17 and 18) [](https://usermanual.vtenext.com/uploads/images/gallery/2025-07/Obzimage.png) Figure 17 [](https://usermanual.vtenext.com/uploads/images/gallery/2025-07/NGMimage.png)Figure 18 -if Action equals empty hide Number of months Renewal, Additional Notes and Reason for Renewal Refusal (see Figures 19 and 20) [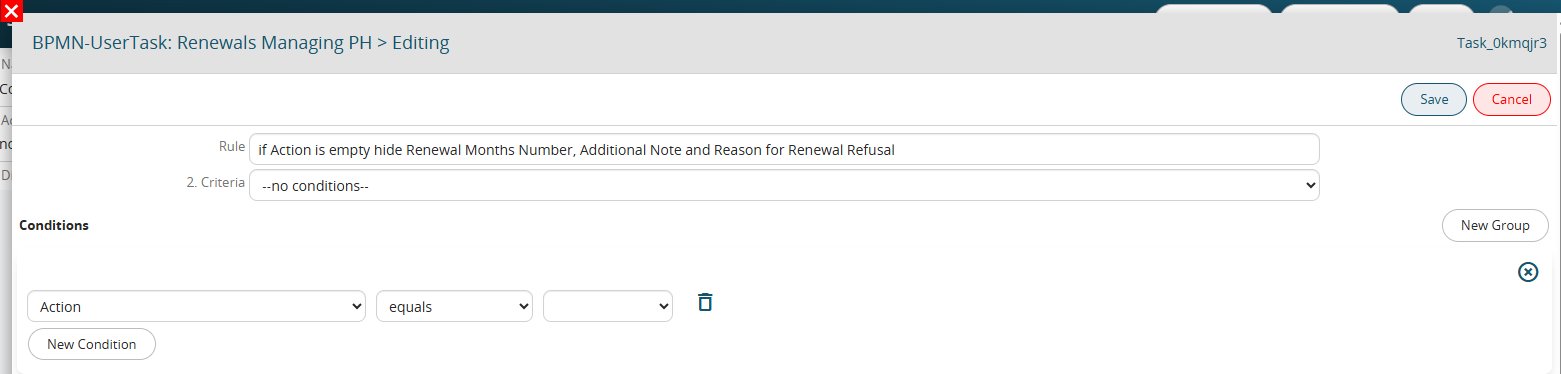](https://usermanual.vtenext.com/uploads/images/gallery/2025-07/OsXimage.png) Figure 19 [](https://usermanual.vtenext.com/uploads/images/gallery/2025-07/yxmimage.png) Figure 20 In the ScriptTask “Cycle renewals and insert into dynamic form” we configure an action to cycle related records and insert into the table field “Past Renewals” to give the user visibility of all past renewals (see Figure 21). Then in each column of the table field we insert the “current” value of the corresponding fields of the Renewals form (see Figure 22). [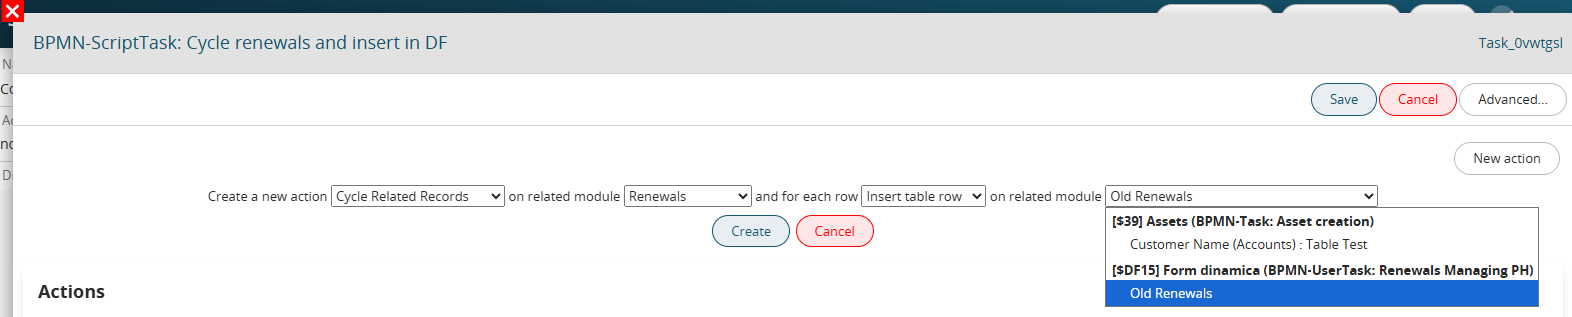](https://usermanual.vtenext.com/uploads/images/gallery/2025-07/xI1image.png) Figure 21 [](https://usermanual.vtenext.com/uploads/images/gallery/2025-07/XUTimage.png) Figure 22 In the Condition Task “PH renewal management control” we are going to perform a check on the “Action” field of the process helper form to direct the process in the branch related to the value entered by the user (see Figure 23) [](https://usermanual.vtenext.com/uploads/images/gallery/2025-07/CEPimage.png)Figure 23 In the next gateway we associate each group of conditions (inserted in the previous task) with the corresponding branch to follow (see Figure 24) [](https://usermanual.vtenext.com/uploads/images/gallery/2025-07/YFHimage.png) Figure 24 **Configuring the elements following the “Do not renew” branch** In the “Update renewal refusal reason” ScriptTask we configure an update entity action to update the “Renewal refusal reason” field of the installation with the content of the “Renewal refusal reason” field of the process helper form (see Figure 25). [](https://usermanual.vtenext.com/uploads/images/gallery/2025-07/8uZimage.png) Figure 25 The endEvent must also be configured, because we have involved a process helper in the process, so it is necessary to activate a process helper inside it to set the process status to “Terminated” (see Figure 26) [](https://usermanual.vtenext.com/uploads/images/gallery/2025-07/vtvimage.png) Figure 26 **Configuring the elements following the “Renew” branch** In the “Update installation data” ScriptTask we configure an update entity action to update the value of the following fields (see Figure 27): -“Next renewal expiration date”: Now + variable of the “Number of months Renewal” process helper form -”Status”: “In Service” [](https://usermanual.vtenext.com/uploads/images/gallery/2025-07/p9Aimage.png)Figure 27 In the ScriptTask “Cycle previous renewals and deactivate them” we configure an action “Cycle related records and update entities” to update all renewals linked to the installation by setting their status to “Inactive” (see Figures 28 and 29) [](https://usermanual.vtenext.com/uploads/images/gallery/2025-07/6iBimage.png)Figure 28 [](https://usermanual.vtenext.com/uploads/images/gallery/2025-07/vWgimage.png) Figure 29 In the “Create renewal and link it to the installation” ScriptTask we configure a create entity action to create a renewal form record and link it to the installation (see Figure 30). [](https://usermanual.vtenext.com/uploads/images/gallery/2025-07/cx6image.png)Figure 30 In the ScriptTask “Update renewal name” we configure an update entity action on the renewal to update the “Renewal Name” field by inserting the contents of the field itself and then the contents of the “Renewal Number” variable. In this way, each renewal that will be created will have a first part composed of the word “Renewal” and a second part composed of a progressive dynamic number (Renewal Name). (See Figure 31) [](https://usermanual.vtenext.com/uploads/images/gallery/2025-07/Kdbimage.png) Figure 31 # 8.2 Activating an Advanced Process - Managing Installation Renewals Now let's proceed with the vision of the process in action. We then create a new installation by entering the required information (see Figure 1). [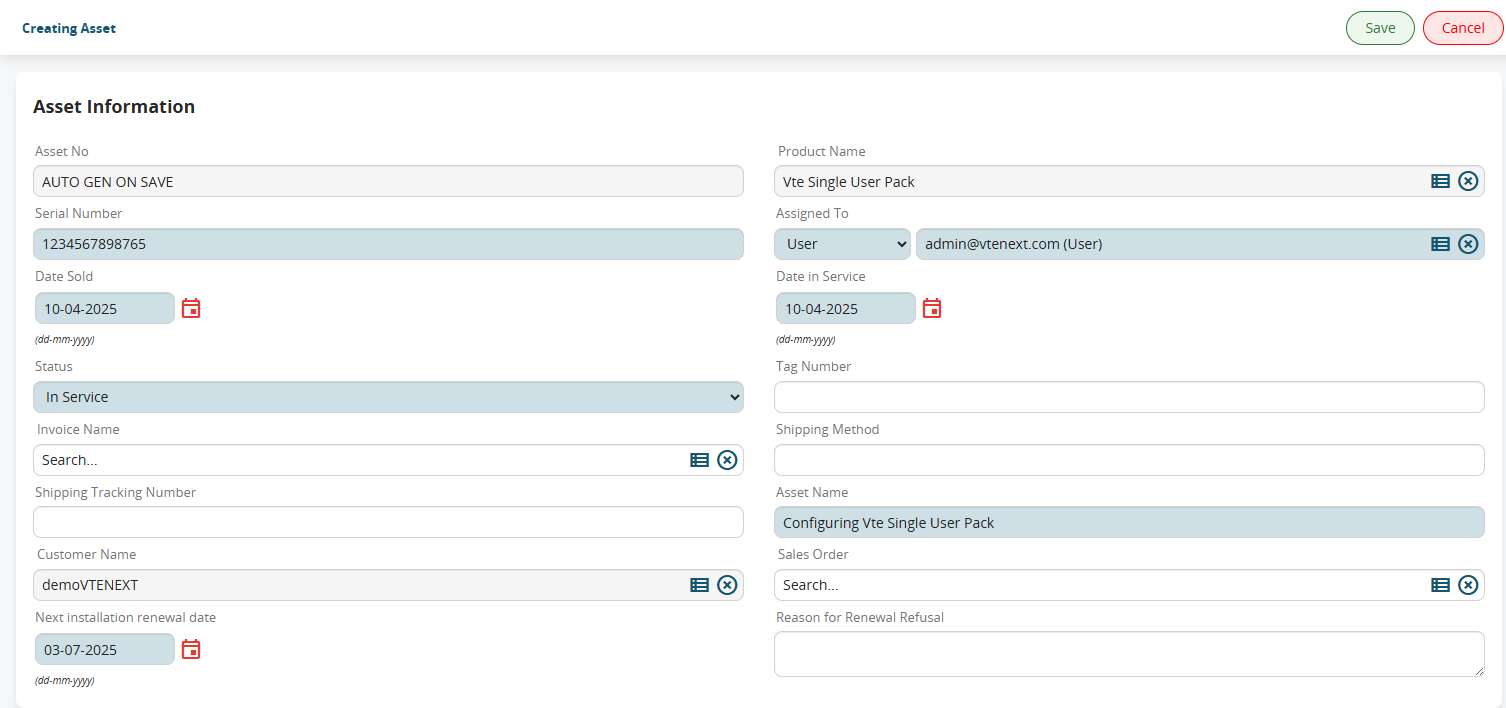](https://usermanual.vtenext.com/uploads/images/gallery/2025-07/KFKimage.png) Figure 1 After saving, the process will start by positioning itself on the timer to wait for the “Next renewal expiration date” to be reached (26-02-2022). In fact, by observing the process graph, we can see that the timer in the diagram is surrounded by a blue outline. (see Figure 2) [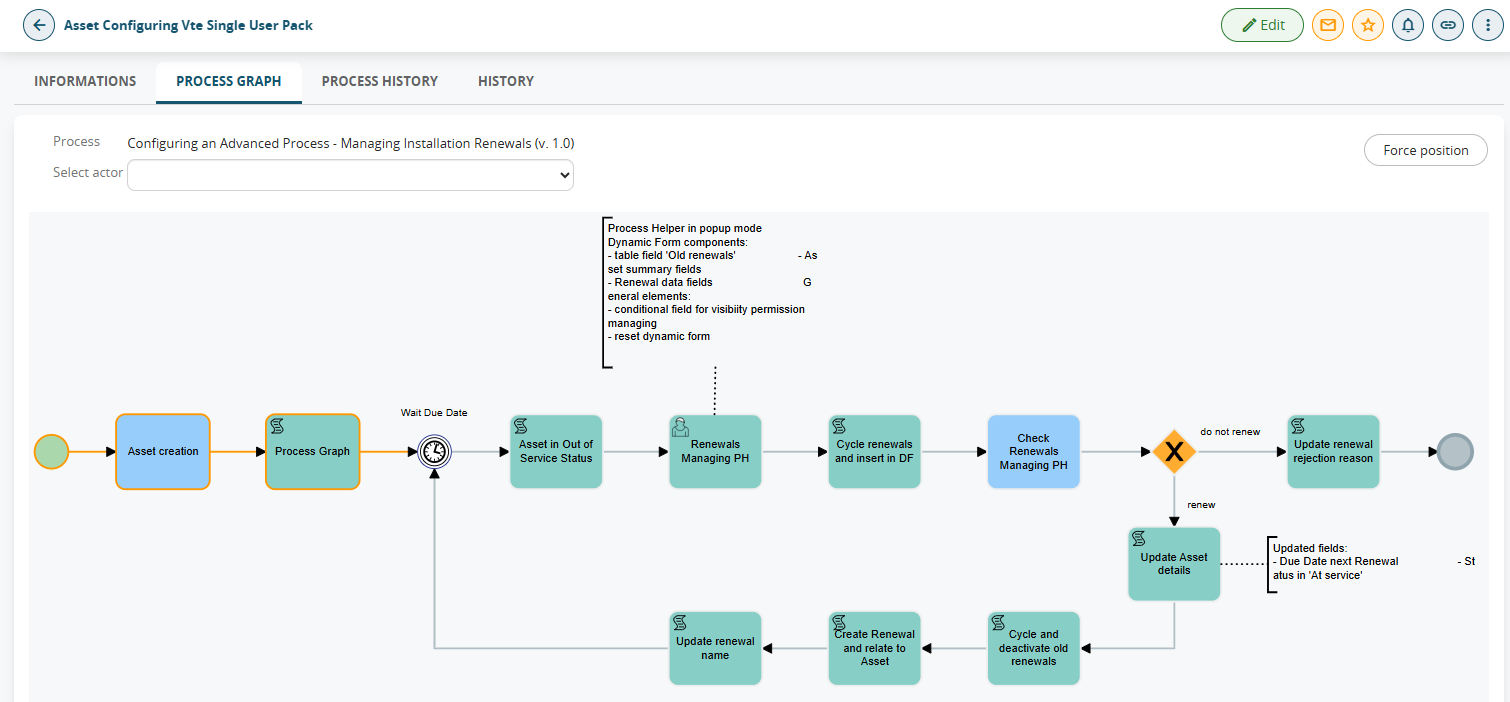](https://usermanual.vtenext.com/uploads/images/gallery/2025-07/Q10image.png) Figure 2 Once the expiration date is reached, the process will automatically set the status to “Out of Service” and present a task to the installation assignee to fill out the popup to manage the next renewal. The popup can then be filled out by clicking on the “Fill Out” button to the right of the task (see Figure 3) [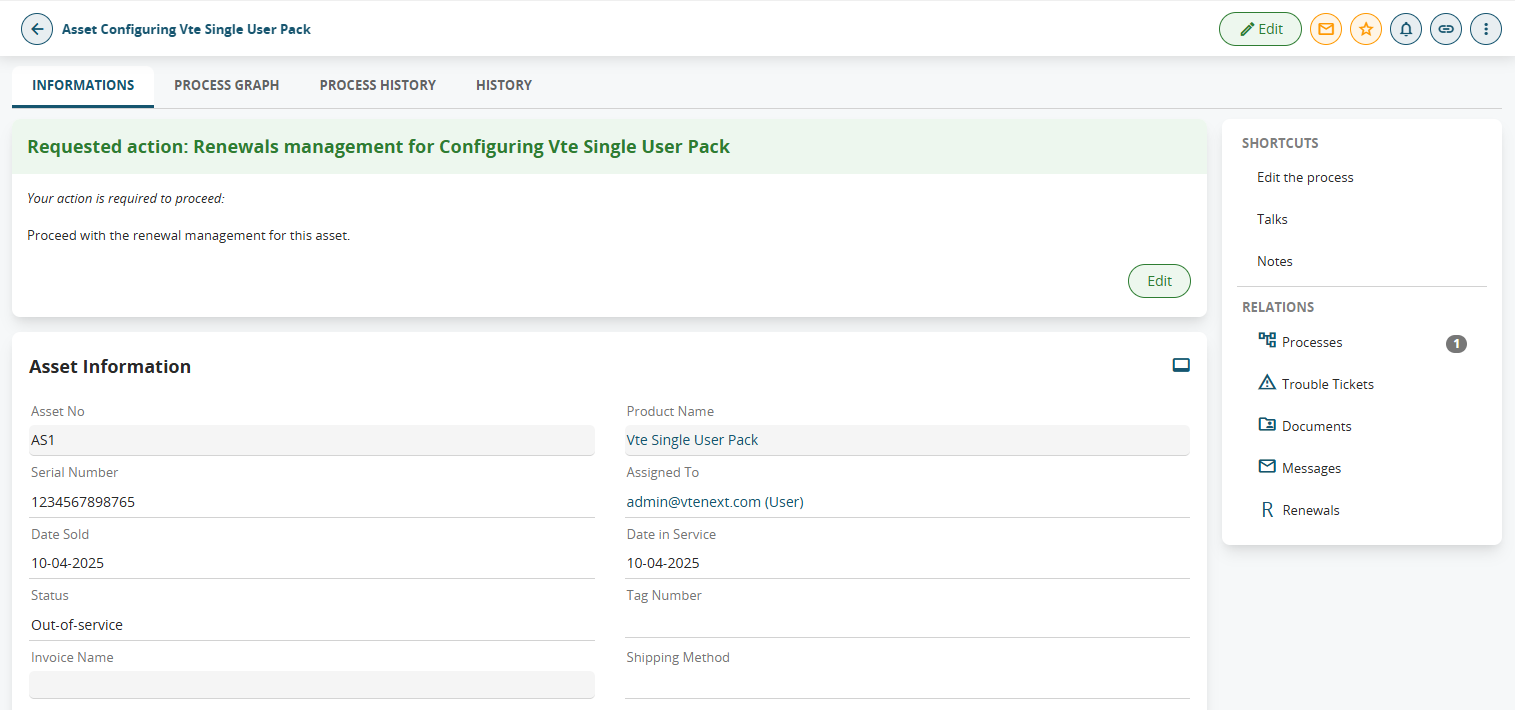](https://usermanual.vtenext.com/uploads/images/gallery/2025-07/x7Nimage.png) Figure 3 However, the task described above will only be visible by entering the installation registry, for this reason it is possible in this case to compile the process helper through the "Processes" section reachable from the menu at the top right. (see Figure 4) [](https://usermanual.vtenext.com/uploads/images/gallery/2025-07/YwXimage.png) Figure 4 In fact, it shows all the pending processes assigned directly to the user or to any groups to which he belongs, so just look for the line with the following information (see Figure 5): -process name: “Server Installation Renewal Management 1” -connected to: “Server Installation 1” After that, just click on the pencil to the left of the process name to be able to fill in the process helper that will be displayed as if we were editing a module. [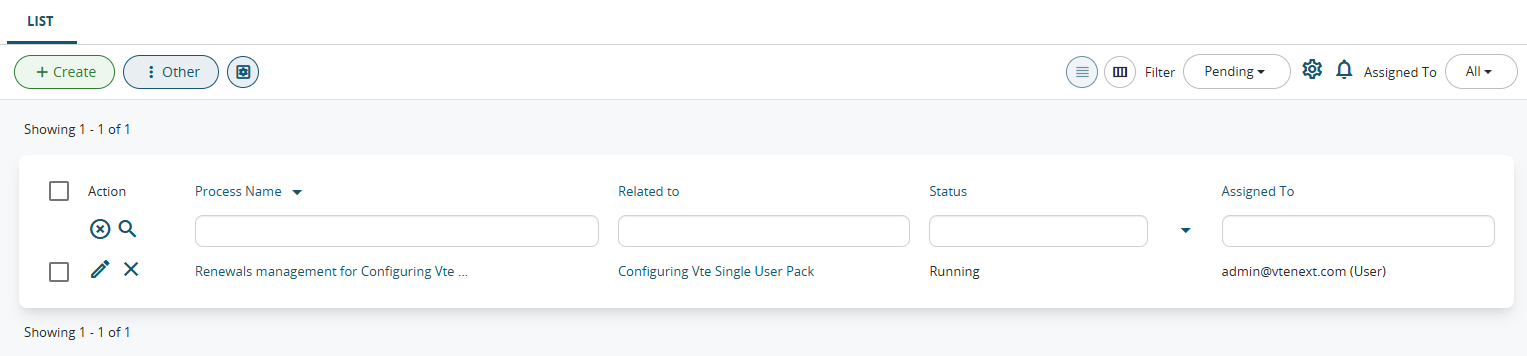](https://usermanual.vtenext.com/uploads/images/gallery/2025-07/Dkbimage.png) Figure 5 Once on the process helper form, the user will find themselves in front of the screen shown in Figure 6. Based on the value of the Action field, the previously created conditional fields will be activated, which will manage the permissions of the form fields involved in the rules. N.B: Since no renewals have been made yet, the Past Renewals table has always been hidden through the conditional fields. [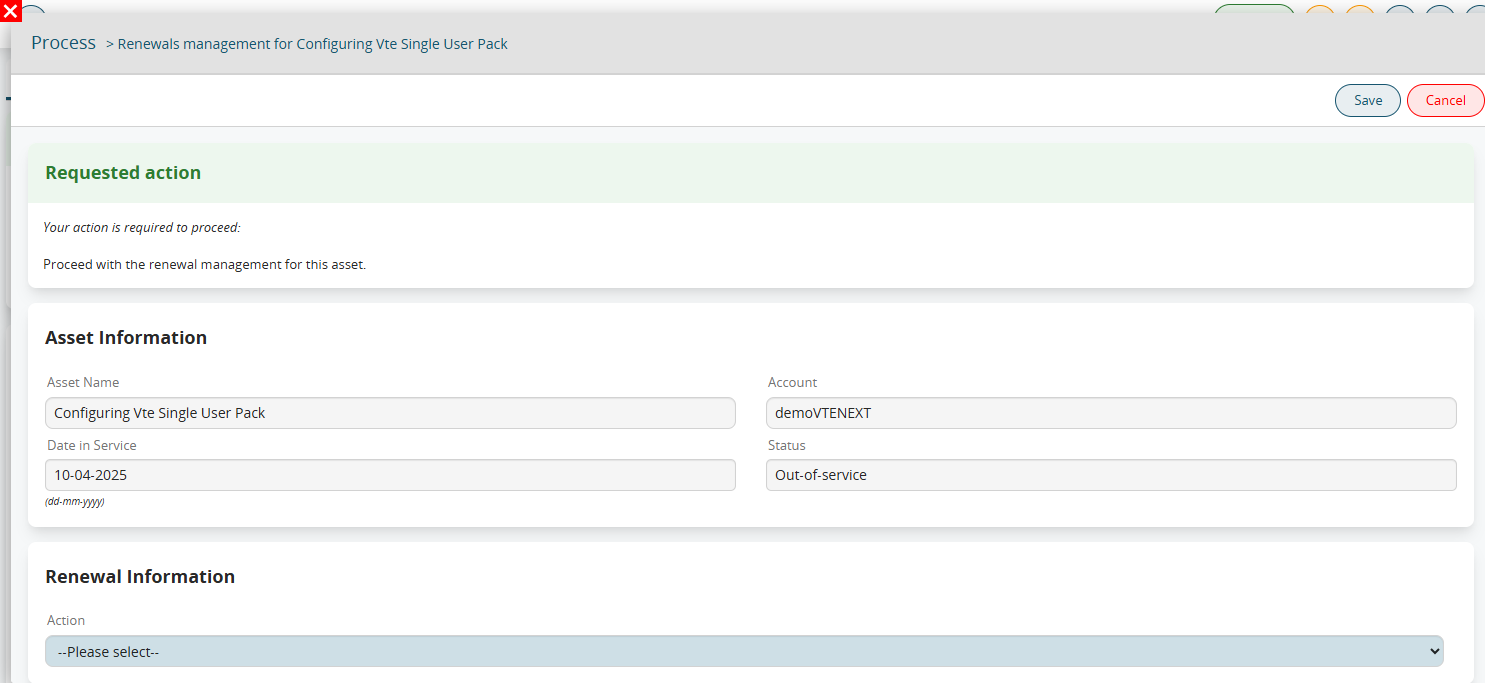](https://usermanual.vtenext.com/uploads/images/gallery/2025-07/mEpimage.png) Figure 6 If you want to simulate a renewal of the installation, click on the “Renew” value, in this way the system will show us the fields “Number of months Renewal” and “Additional notes” (see Figure 7). [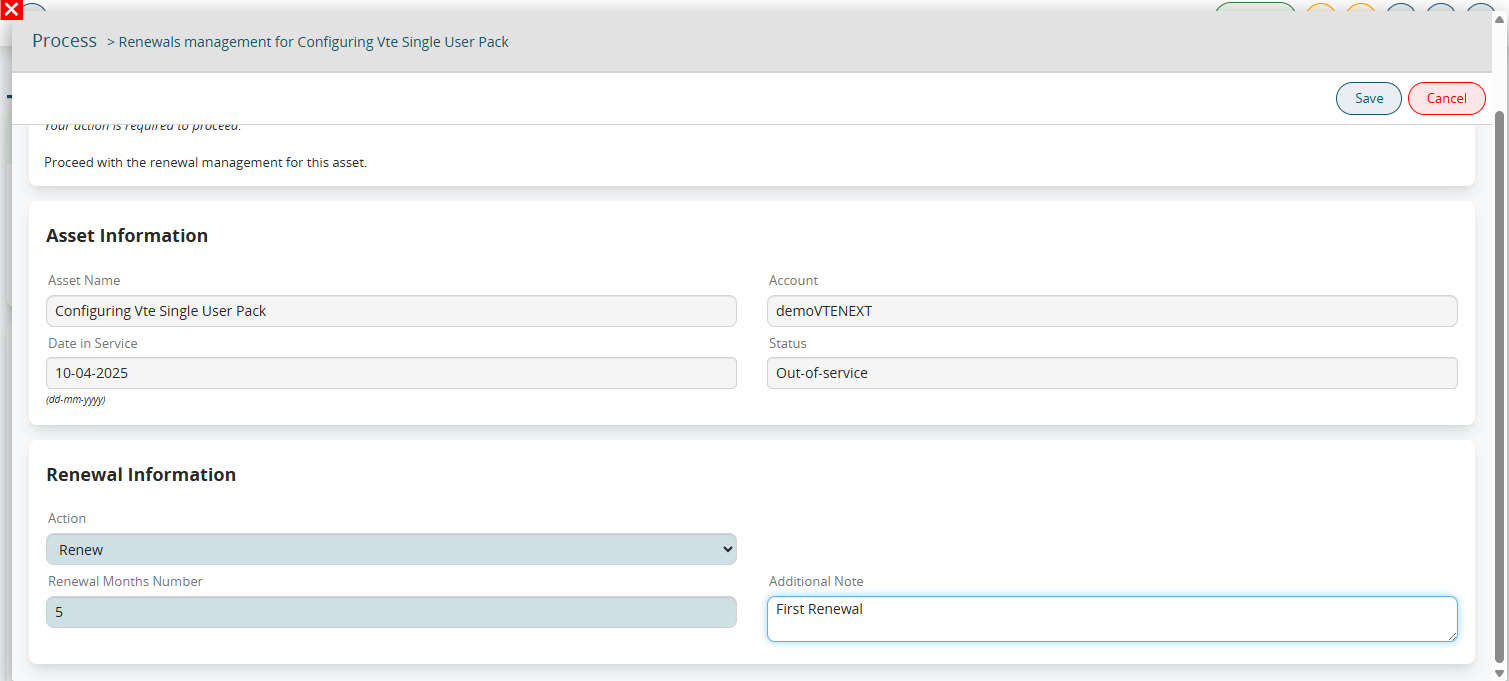](https://usermanual.vtenext.com/uploads/images/gallery/2025-07/AWXimage.png) Figure 7 Once the 2 fields mentioned above are filled in, we save and the process will generate a renewal that will be automatically related to the installation (see Figure 8). [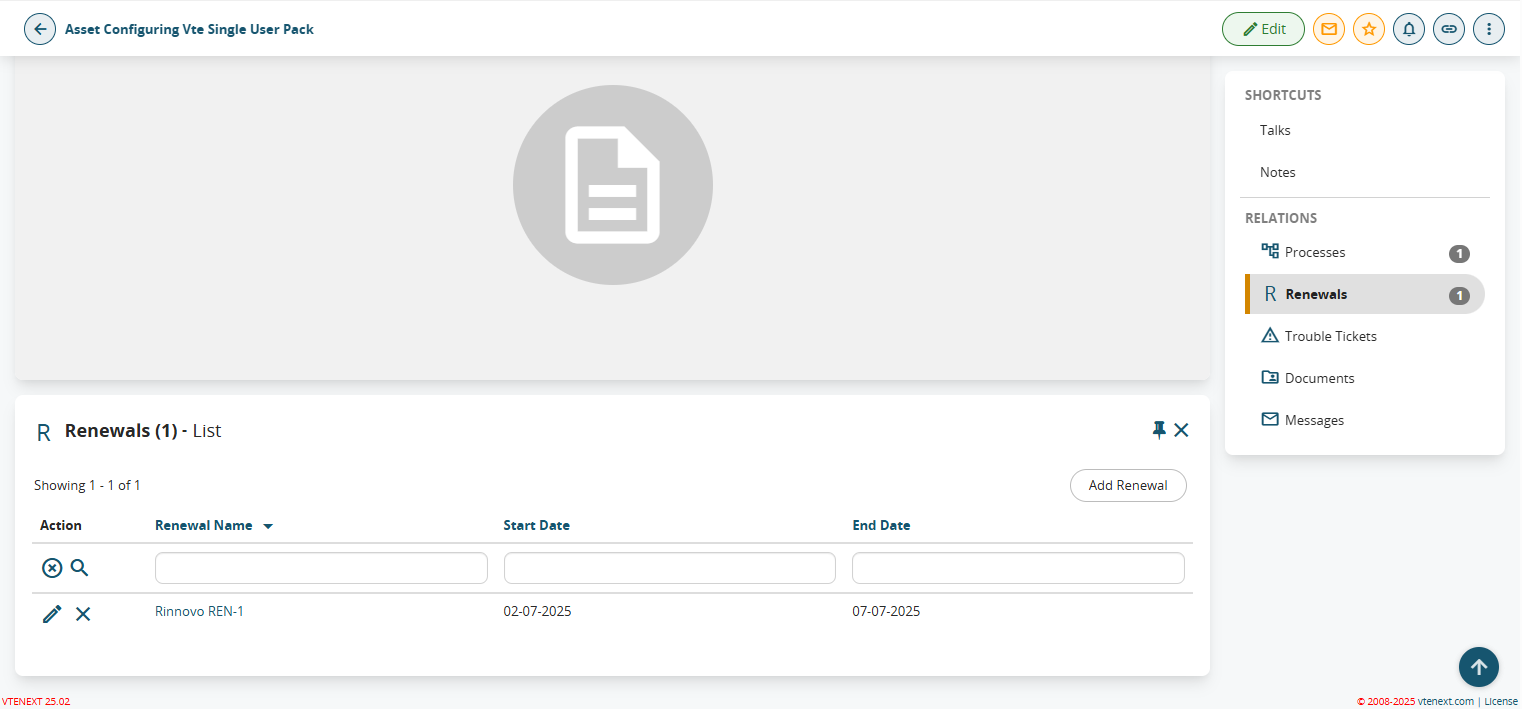](https://usermanual.vtenext.com/uploads/images/gallery/2025-07/fzAimage.png)Figure 8 From the first renewal onwards the process helper will display the Past Renewals table field as shown in Figure 9 [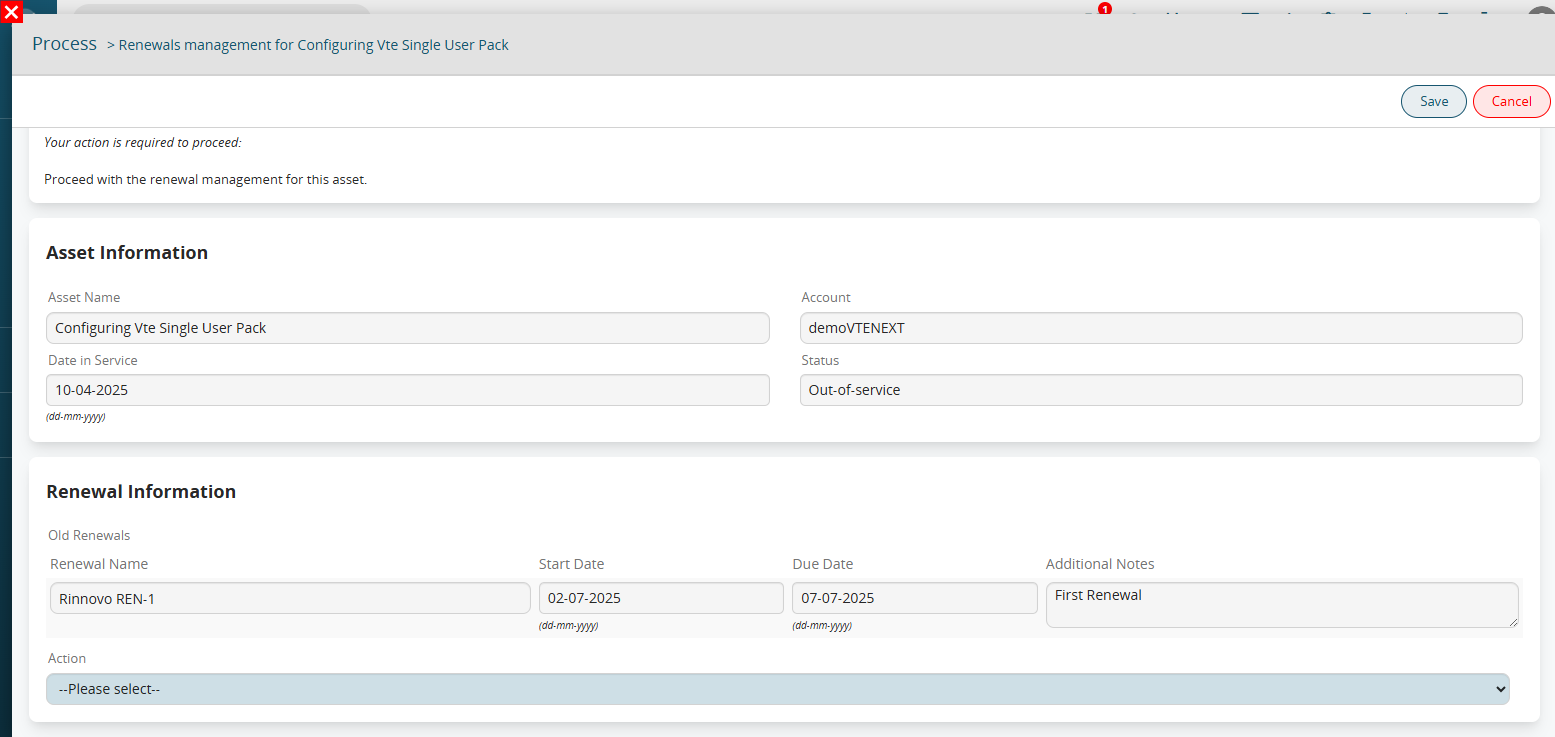](https://usermanual.vtenext.com/uploads/images/gallery/2025-07/0ogimage.png)Figure 9 Simulating instead of not wanting to renew, we click on the value "Do not renew", the system will ask us to enter a reason for refusing the renewal (see Figure 10). Upon saving, the "Reason for refusing renewal" field of the installation will be populated. [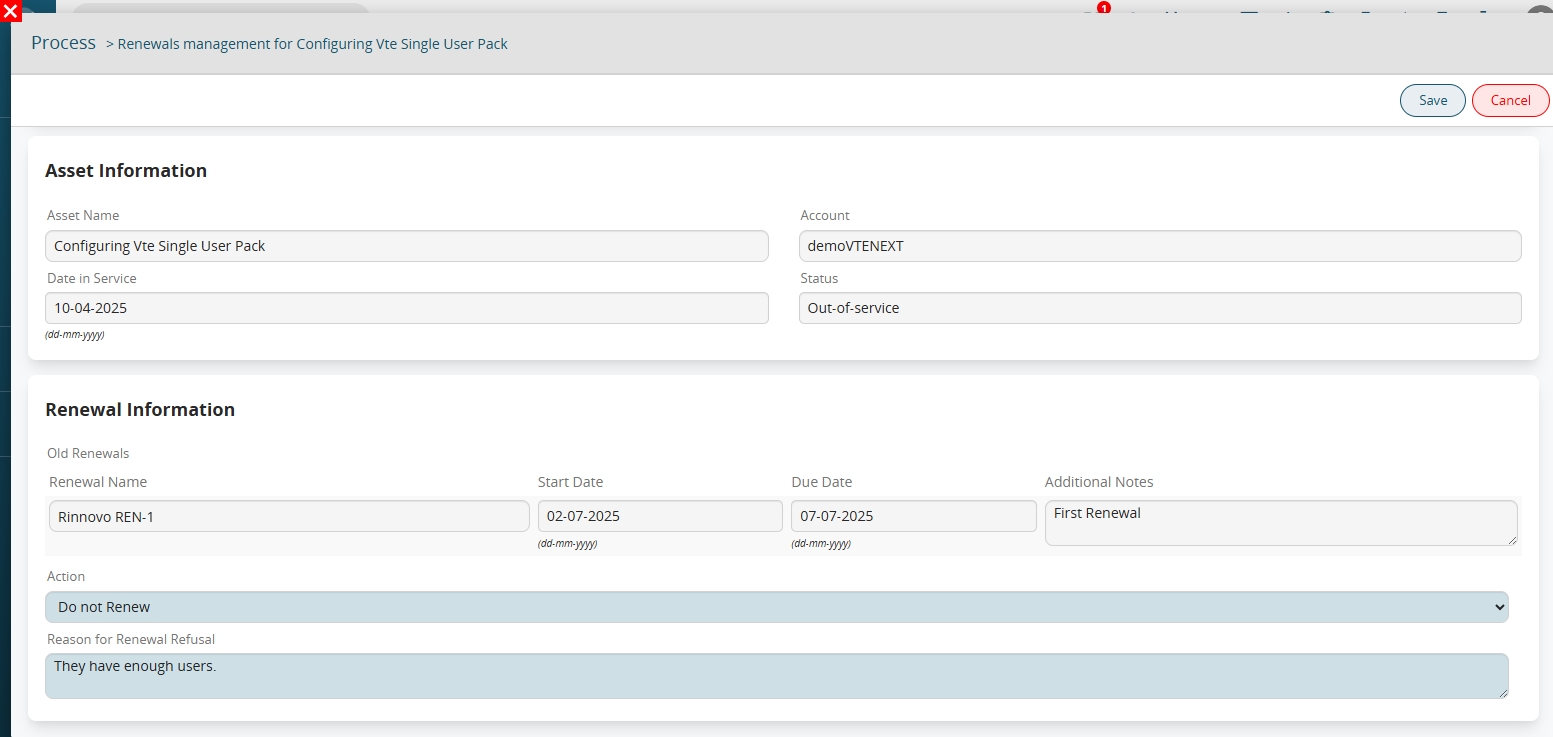](https://usermanual.vtenext.com/uploads/images/gallery/2025-07/SIuimage.png)Figure 10 # 9 Insights on Action Cycle Related Records in Processes # 9.1 Partial sum of related records involved in a cycle To perform the partial sum of the records of a specific module having a 1-N or N-N relationship with the starting module, it is not possible to use the "Sum" item, since the system will always take into account **ALL** related records. Therefore, to obtain the desired result, you will have to configure a related record cycle action and for each row "Update entity", in this way we will save the total within a field of the starting module or a dynamic form (from version 24.08 onwards). Once you have inserted the condition in the "Field conditions" section to involve only the interested records in the cycle, in the update entity action you will have to use the SDK fieldAction Standard function "vte\_sum()" (for further information see chapter 12.1) to add (at each cycle) the value of the current record to the content that is already present in the field in which you are saving the result. ATTENTION! -> in the event that a process is configured that is triggered recurringly, to obtain the correct result you must set an entity update action that empties the content of the field in which you want to save the result. EXAMPLE OF USE To better understand how it works, below is an example of a related record cycle action on the Installations module (starting from the Company module) with which we want to calculate the sum of the "Number of annual maintenance" field only of the installations having the value "In Service" in the "Status" column and save the result in the "Total maintenance on active installations" field of the company (Figure 1) [](https://usermanual.vtenext.com/uploads/images/gallery/2025-07/qORimage.png) Figure 1 Inside the process we configure an action to cycle related records (Installations) and for each row update entities of the "Companies" module (Figure 2 and 3) [](https://usermanual.vtenext.com/uploads/images/gallery/2025-07/aINimage.png)Figure 2 [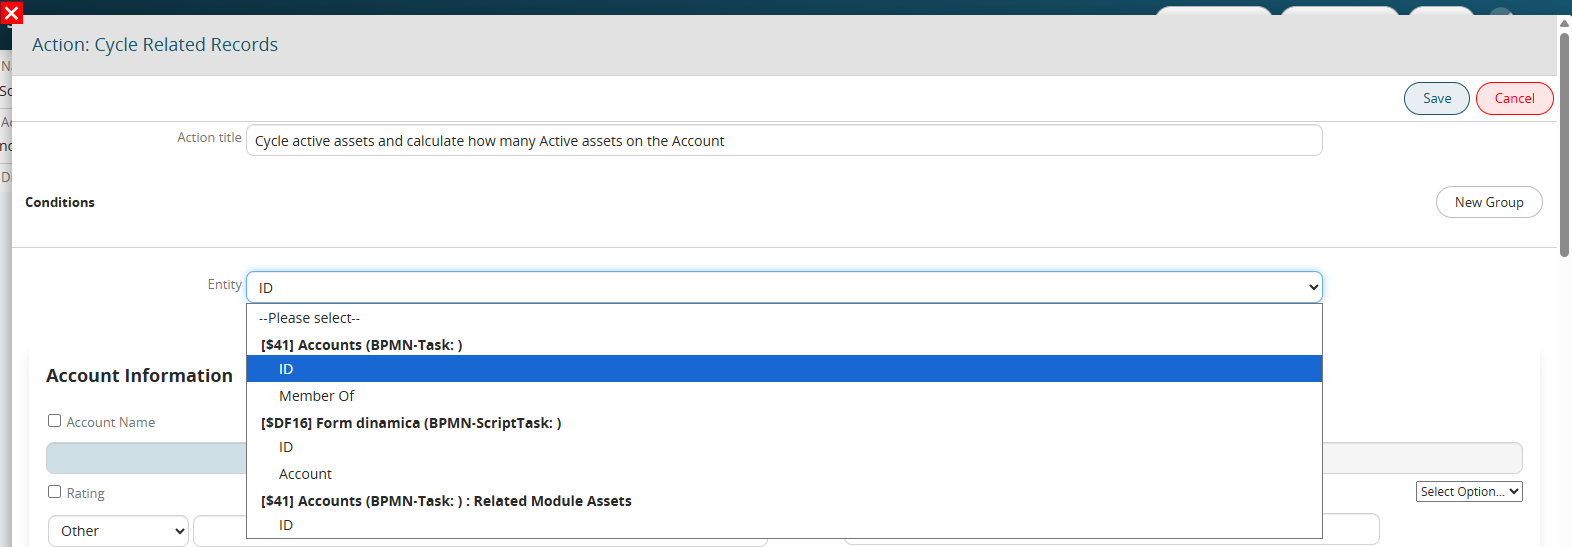](https://usermanual.vtenext.com/uploads/images/gallery/2025-07/l8Rimage.png) Figure 3 In the "Field Conditions" section, we enter "Status" = "In Service" (Figure 4) [](https://usermanual.vtenext.com/uploads/images/gallery/2025-07/iRnimage.png) Figure 4 Inside the "Tot maintenance on active installations" field we go to recall the interested SDK function through the "Option Selection" picklist and accessing the "SDK Functions" section (Figure 5) [](https://usermanual.vtenext.com/uploads/images/gallery/2025-07/vzlimage.png) Figure 5 As the first parameter we insert the variable that identifies the content of the field "Tot maintenance on active installations" (Figure 6) [](https://usermanual.vtenext.com/uploads/images/gallery/2025-07/XNiimage.png) Figure 6 As a second parameter we insert the variable that identifies the current value of the "Number of annual maintenance" field of the installations involved in the cycle (Figure 7) [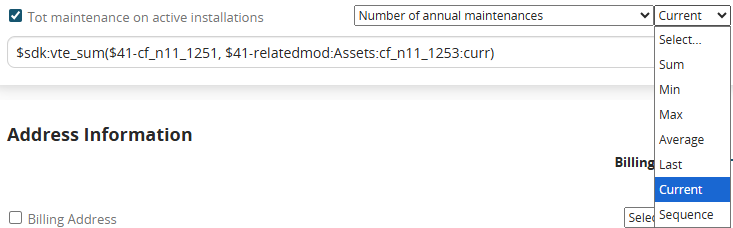](https://usermanual.vtenext.com/uploads/images/gallery/2025-07/XP5image.png) Figure 7 # 10 Insights into Using Table Fields in Processes # 10.1 Insights into Using Table Fields in Processes In order to be able to exploit its content within the processes, the system provides (in the "Select option" picklist) a dedicated section for each table field involved in the modules or dynamic forms associated with the process (Figure 1) [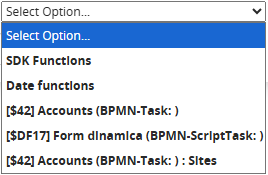](https://usermanual.vtenext.com/uploads/images/gallery/2025-07/VWtimage.png) Figure 1 By clicking on a specific section, the system allows you to quickly select one of the columns present in the table field being examined (Figure 2) [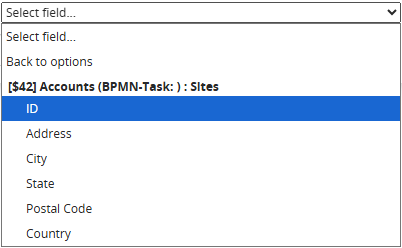](https://usermanual.vtenext.com/uploads/images/gallery/2025-07/wCgimage.png) Figure 2 NOTE: the system automatically performs a filter based on the starting field from which you are consulting the "Select options" picklist, consequently it will only show the columns of the table field whose typology can be accepted by the starting field. If, for example, inside the "Member of" field of the Company module you wanted to insert the content of the text type column "Address", the system will not make this column available, this is because it will only allow you to select the columns of the table field of the "Related to" type. If there are no columns of this type, the system will not make the entire section of the table field available (Figure 3)3 [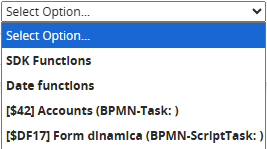](https://usermanual.vtenext.com/uploads/images/gallery/2025-07/tzBimage.png) Figure 3 Alternatively, you can access the table field columns by selecting the section for the form where the table field is located and scrolling through the various available fields (Figure 4 and 5) [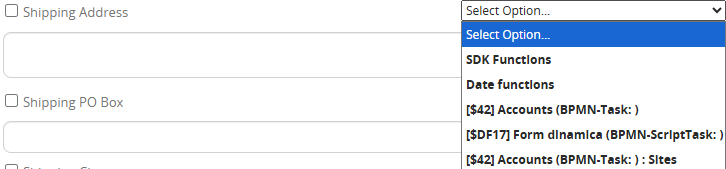](https://usermanual.vtenext.com/uploads/images/gallery/2025-07/xYMimage.png) Figure 4 [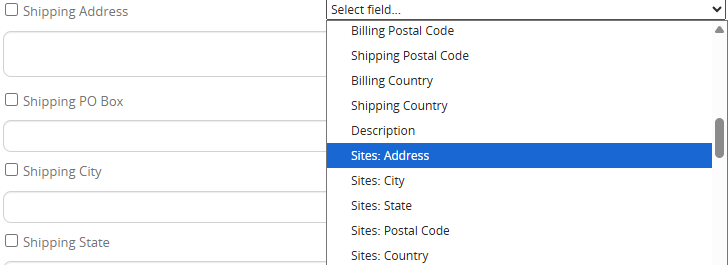](https://usermanual.vtenext.com/uploads/images/gallery/2025-07/Ro2image.png) Figure 5 Once the column of the table field of interest has been selected, an additional picklist will be presented to the right of the "Select options" field, from which it will be possible to select one of the available items (Figure 6) [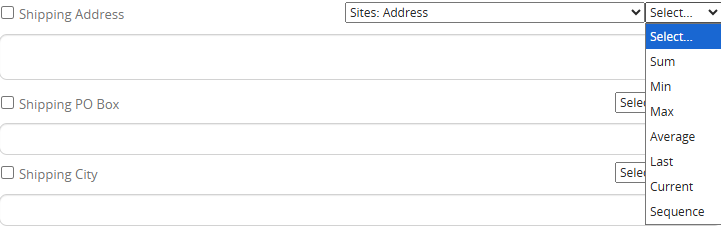](https://usermanual.vtenext.com/uploads/images/gallery/2025-07/4HIimage.png) Figure 6 \- "**Sum**"-> only for columns of the type Number, Currency and Percentage, allows you to obtain the sum of all the rows present in the table field concerned. NOTE: this item will still be available for the other types of columns but, logically, will not produce any results. \- "**Minimum**"-> only for columns of the type Number, Currency and Percentage, allows you to obtain the lowest value among all the rows present in the table field concerned. NOTE: this item will still be available for the other types of columns but, logically, will not produce any results. -"**Maximum**"-> only for columns of the Number, Currency and Percentage type, allows you to obtain the highest value among all the rows in the table field concerned. NOTE: this item will still be available for other column types but, logically, it will not produce any results. -"**Average**"-> only for columns of the Number, Currency and Percentage type, allows you to obtain the average value among all the rows in the table field concerned. NOTE: this item will still be available for other column types but, logically, it will not produce any results. -"**Last**"-> allows you to obtain the value of the last row in the table field concerned. -"**Sequence**"-> allows you to obtain the value of a specific row (if present) of the table field. To indicate the exact number of the row, you will have to fill in the field that will be presented on the right and finally click on the dedicated button (Figure 7) [](https://usermanual.vtenext.com/uploads/images/gallery/2025-07/tDeimage.png) Figure 7 In the case where we want to take into consideration only a part of the rows present in the table field, we will necessarily have to use a row cycle action (for more information on how it works, see chapter 10.2 of the process manual) This is because, if we do not perform a cycle on the table field, the system will always take into consideration **ALL** the rows present in the table field. In fact, within a row cycle action, it will be possible to indicate conditions that will allow only the rows that satisfy them to be involved. These conditions must be indicated in the "Field Conditions" section (Figure 8) [](https://usermanual.vtenext.com/uploads/images/gallery/2025-07/5XNimage.png) Figure 8 To use only the columns of the rows that are being cycled and that respect the conditions set, within the "Select" picklist available to the right of the "Select options" field it will be possible to select an additional item called "Current" (Figure 9) [](https://usermanual.vtenext.com/uploads/images/gallery/2025-07/NX2image.png) Figure 9 To better understand how it works, below is an example of a row cycling action on the "Locations" table field of the Company module (Figure 10) from which we want to create a record of the "Locations" custom module for each row having the value "IT" in the State column. [](https://usermanual.vtenext.com/uploads/images/gallery/2025-07/pqyimage.png) Figure 10 Inside the process we configure a cycle rows action and for each row it creates entities of the custom module "Locations" (Figure 11) [](https://usermanual.vtenext.com/uploads/images/gallery/2025-07/59wimage.png) Figure 11 In the "Field Conditions" section we enter State = "IT" while in the "Module" section we select the "Location" item (Figure 12) [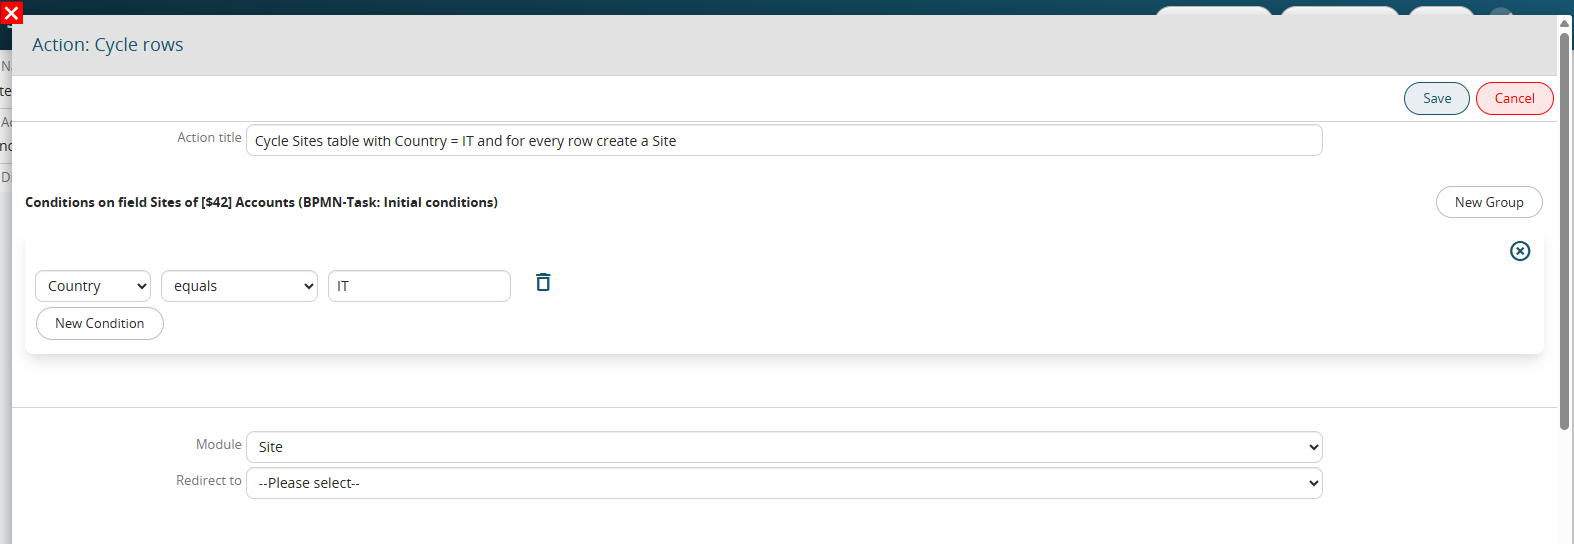](https://usermanual.vtenext.com/uploads/images/gallery/2025-07/2Kzimage.png) Figure 12 In the fields relating to the address of the Headquarters module, we insert the contents of the various columns, always selecting the "Current" item from the "Select" picklist available to the right of the "Select options" field (Figure 13) [](https://usermanual.vtenext.com/uploads/images/gallery/2025-07/d6mimage.png) Figure 13 Resuming Figure 10, as a final result we will obtain the creation of two total records of the Locations module, the first record corresponding to the first row and the second record corresponding to the third row. # 10.2 Partial sum of the rows of a table field involved in a loop As anticipated in chapter 10.1, to perform the partial sum of the rows of a table field involved in a cycle, it is not possible to use the "Sum" item, since the system will always take into account **ALL** the rows present within the table field. In fact, the "Sum" item is a variable available even if a cycle is not performed. Its existence is aimed at easily obtaining the sum of all the rows of a table field without necessarily having to configure a row cycle action. So, to get the desired result, you will have to configure a row cycle action and for each row "Update entity", in this way we will save the total inside a field of a module or a dynamic form (from version 24.08 onwards). Once you have inserted the condition in the "Field conditions" section to involve only the interested rows in the cycle, in the entity update action you will have to use the SDK fieldAction Standard function "vte\_sum()" (for more information see chapter 12.1) to add (at each cycle) the value of the current row to the content that is already present in the field in which you are saving the result. ATTENTION! -> in the case in which you configure a process that is triggered recurringly, to get the correct result you must set an entity update action that empties the content of the field in which you want to save the result. EXAMPLE OF USE To better understand how it works, below is an example of a row cycling action on the "Participants" table field (Figure 1) of the Leads module from which we want to calculate the sum of the "Number" column only of the rows having the value "Reseller" in the "Type" column and save the result in the "Total Resellers" field (Figure 2) [](https://usermanual.vtenext.com/uploads/images/gallery/2025-07/b3cimage.png) Figura 1 [](https://usermanual.vtenext.com/uploads/images/gallery/2025-07/FmRimage.png) Figure 2 Inside the process we configure a cycle action rows and for each row update entities of the "Leads" module (Figure 3 and 4) [](https://usermanual.vtenext.com/uploads/images/gallery/2025-07/Wj4image.png) Figure 3 [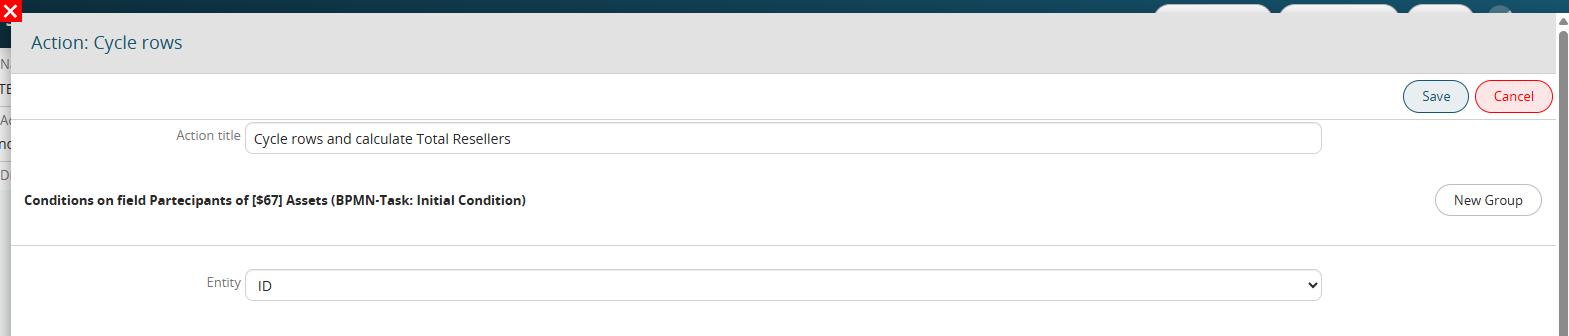](https://usermanual.vtenext.com/uploads/images/gallery/2025-07/D4Qimage.png) Figure 4 In the "Field Conditions" section, we enter "Type" = "Reseller" (Figure 5) [](https://usermanual.vtenext.com/uploads/images/gallery/2025-07/iUpimage.png) Figure 5 Inside the "Total Resellers" field we call up the interested SDK function through the "Option Selection" picklist and accessing the "SDK Functions" section (Figure 6) [](https://usermanual.vtenext.com/uploads/images/gallery/2025-07/D2Uimage.png) Figure 6 As the first parameter we insert the variable that identifies the content of the "Total Resellers" field (Figure 7) [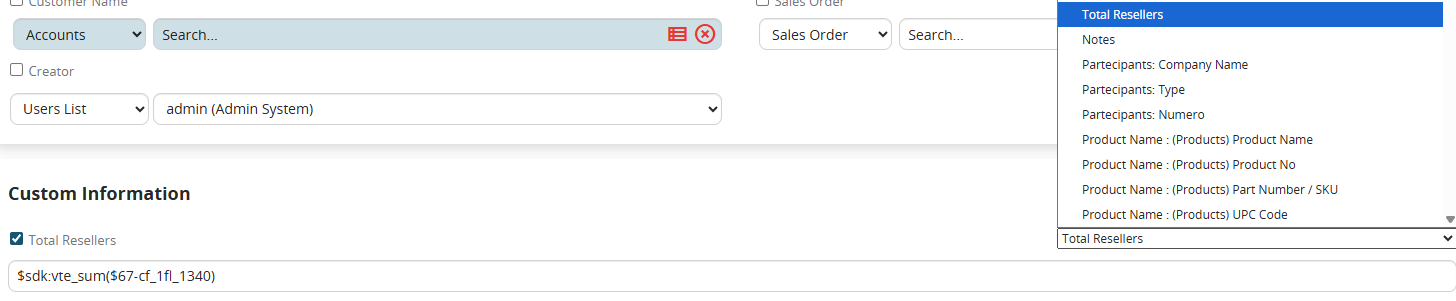](https://usermanual.vtenext.com/uploads/images/gallery/2025-07/zHnimage.png) Figure 7 As a second parameter we insert the variable that identifies the current value of the "Number" column of the rows of the table field involved in the cycle (Figure 8) [](https://usermanual.vtenext.com/uploads/images/gallery/2025-07/PBwimage.png) Figure 8 Resuming Figures 1 and 2, as a final result we will obtain the sum of the "Number" column of the first and third row of the table field, which in our case corresponds to the value 8 (Figure 9) [](https://usermanual.vtenext.com/uploads/images/gallery/2025-07/js9image.png) Figure 9 # 11 Process SDK: Installation and Configuration Within processes, it is possible to call PHP functions in order to perform operations or use data not available in the BPMN engine standard. In particular, there are 3 different types of functions that can be registered and called at different points in the configuration of a process: Field Action, Task Action and Task Condition. # 11.1 SDK Field Action This type of function is normally used to enhance the fields of a record, dynamic form, etc. with values calculated using the following method: ***SDK::setProcessMakerFieldAction($func, $src, $label, $parameters='');*** *$func : function name* *$src : file path containing the function* *$label : function label* *$parameters (optional) : static parameters (e.g. fixed field reference)* *To unregister the file use:* ***SDK::unsetProcessMakerFieldAction($func);*** *$func: function name* These functions can be called from the appropriate “SDK Functions” sections available in the “Option Selection” drop-down menu located at the top right of each individual field. N.B: All registered custom functions will always be inserted in the “SDK Functions” section, the “Date Functions” section is used exclusively to contain the php functions available as standard that concern the date fields. [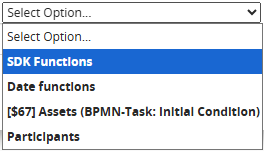](https://usermanual.vtenext.com/uploads/images/gallery/2025-07/Lciimage.png) [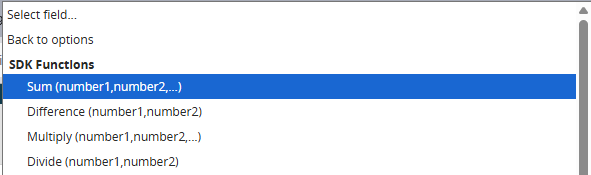](https://usermanual.vtenext.com/uploads/images/gallery/2025-07/FjXimage.png) A concrete example of an SDK function of this type is the “sum()” function that returns the sum of the parameters (static or dynamic) passed. It is possible to store the result in a field of a dynamic form of a Process helper by inserting the function as a default value, or insert it directly into a field of a form using the standard actions of create or update entity. [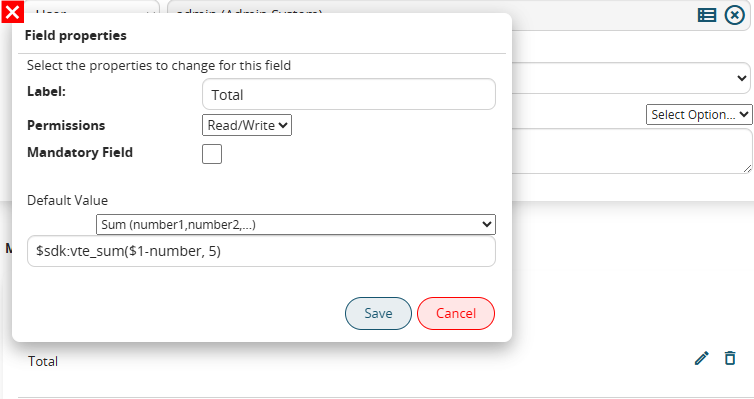](https://usermanual.vtenext.com/uploads/images/gallery/2025-07/mGCimage.png) [](https://usermanual.vtenext.com/uploads/images/gallery/2025-07/hWyimage.png) **Example** I am recording a function to calculate the percentage that will need the input parameters percentage and total. ```PHP SDK::setProcessMakerFieldAction('vte_calculate_percentage','modules/SDK/src/ProcessMaker/Utils.php','Calculate percentage (percentage,total)'); ``` In the implemented function I will then indicate the 2 parameters and return the result of the operation. ```php function vte_calculate_percentage($percentage, $total) { global $engine, $current_process_actionid; $value = ($percentage / 100) * $total; return $value; } ``` **N.B.** Inside the registered functions, the global variables $engine and $current\_process\_actionid are available. These respectively contain the object containing all the information relating to the process being executed and the id of the current action (e.g. Create entity, Update entity, ...) # 11.2 SDK Action It is a type of function that is used to create custom BPMN actions. You can register new actions with the following method: ***SDK::setProcessMakerAction($func, $src, $label);*** *$func : name of the function* *$src : path to the file containing the function* *$label : label of the function* To unregister the file use: ***SDK::unsetProcessMakerAction($func);*** *$func : name of the function* Once registered, it is available for use in the "Action" section where all the other BPMN actions are present. [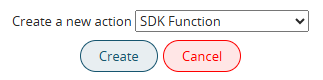](https://usermanual.vtenext.com/uploads/images/gallery/2025-07/a2wimage.png) Furthermore, once we have chosen the function to call, if we manage input parameters in the function we have the possibility of passing them directly from the interface: [](https://usermanual.vtenext.com/uploads/images/gallery/2025-07/RuGimage.png) **Example** In the following example I record a function to add a guest to an event. ```PHP SDK::setProcessMakerAction('vte_add_event_invitee', 'modules/SDK/src/ProcessMaker/Utils.php', 'Add invitee to event (event, user/contact)'); ``` This function requires two parameters: the event id and the invitee id, which can be a user or a contact. For clarity, I also indicate the parameters in the function label in the registration command. In the function that I will develop, the $event and $invitee parameters must be added, which will be populated with the values passed by the action configuration interface. The first two parameters are fixed and are: $engine, the object containing all the information relating to the process that is being performed $actionid, the id of the current action ```php function vte_add_event_invitee($engine, $actionid, $event, $invitee) { $engine->log('vte_add_event_invitee', "event:$event invitee:$invitee"); if (strpos($event,'x') !== false) list(,$event) = explode('x',$event); if (strpos($invitee,'x') !== false) list(,$invitee) = explode('x',$invitee); $parent_module = getSalesEntityType($invitee); if ($parent_module == 'Contacts') { $_REQUEST['inviteesid_con'] = $invitee; } else { $_REQUEST['inviteesid'] = $invitee; } $focus = CRMEntity::getInstance('Events'); $focus->retrieve_entity_info_no_html($event,'Events'); $focus->mode = 'edit'; $focus->save('Events'); } ``` If necessary, it will be possible to foresee within the function the return of a value that can then be recalled and saved within a field of a dynamic form or a module through the "Result" variable in the dedicated section available in the "Select option" picklist. [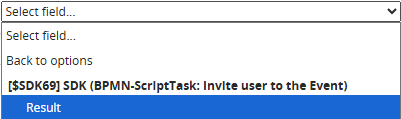](https://usermanual.vtenext.com/uploads/images/gallery/2025-07/JrZimage.png) # 11.3 SDK Task Condition It is a type of function that is used to perform custom checks in process control tasks (conditional tasks). To register them, use the method: ***SDK::setProcessMakerTaskCondition($func, $src, $label)*** *$func : name of the function* *$src : path to the file containing the function* *$label : label of the function* To unregister the file, use: ***SDK::unsetProcessMakerTaskCondition($func);*** *$func : name of the function* If you call on the “initial condition” task (task in which the process start rules are defined), it is possible to make the start of the process specific based on the returned result. [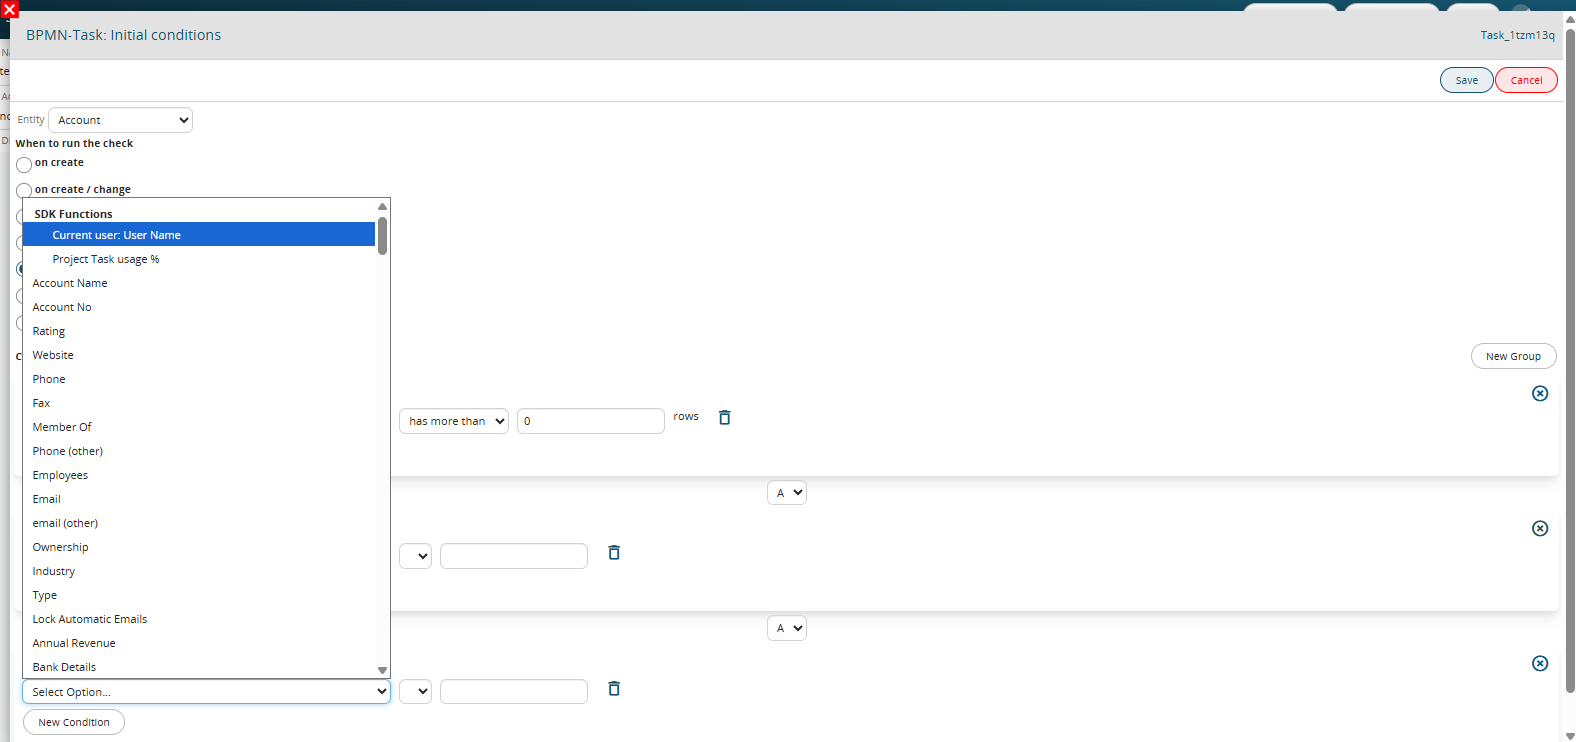](https://usermanual.vtenext.com/uploads/images/gallery/2025-07/UJximage.png)If you call instead simple control tasks they allow you to make the process take different paths based on the returned result. [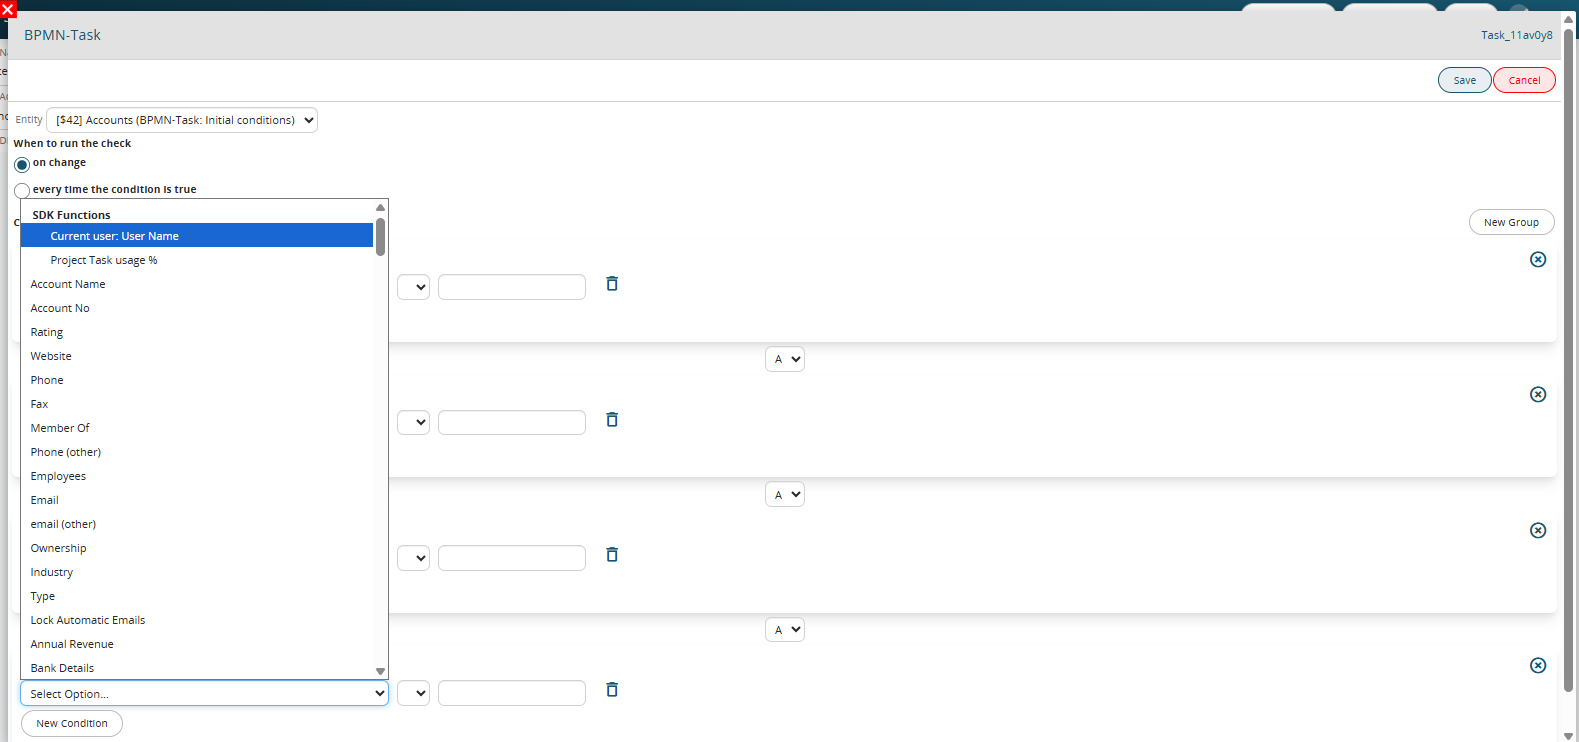](https://usermanual.vtenext.com/uploads/images/gallery/2025-07/4vEimage.png) Functions of this type will always be available in the form of variables that can be used to perform checks. A concrete example of an SDK function of this type is the “get\_running\_process\_current\_user” function that allows you to check whether the name of the current user is the same or different from the user defined in the condition. If used in the initial condition, it allows you to start the process only if the current user is the same as a specific user. [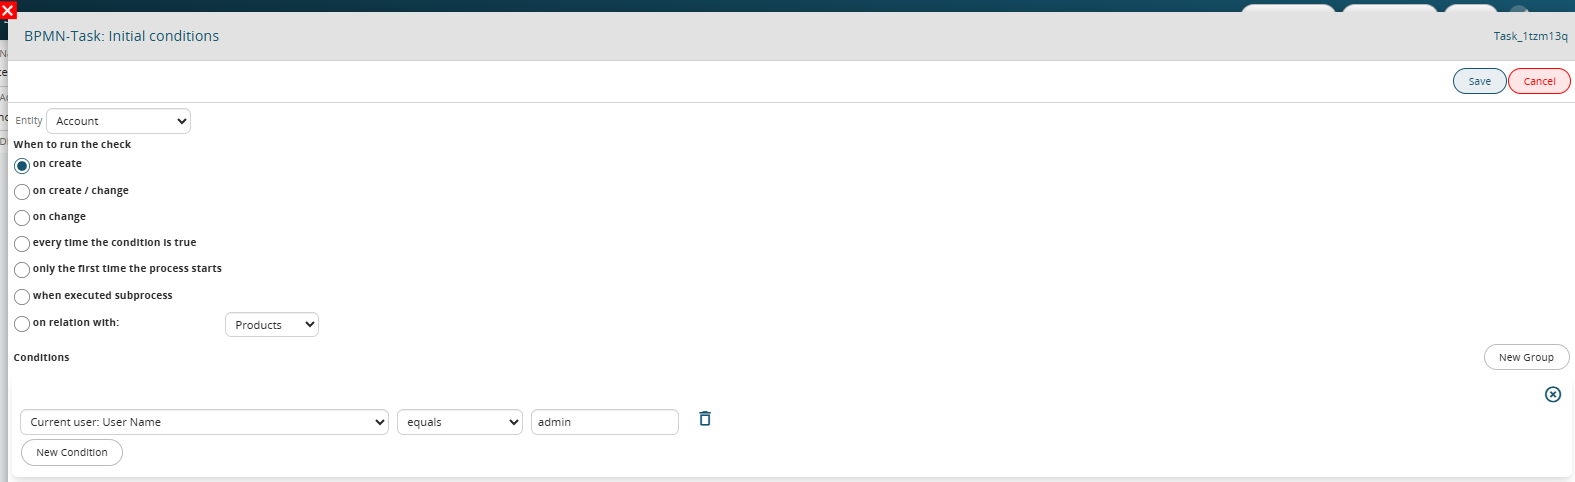](https://usermanual.vtenext.com/uploads/images/gallery/2025-07/qc9image.png) **Example** I register a function to check if the company's billing address is the same as the shipping address. ```php SDK::setProcessMakerTaskCondition('vte_compare_account_bill_ship_street', 'modules/SDK/src/ProcessMaker/Utils.php', 'Indirizzi di spedizione e fatturazione uguali [e/n]'); ``` The implemented function contains the following parameters. *$module: module of the entity on which the condition is executed* *$id: identifier of the entity in ws format (e.g. 3x55126)* *$data: array with the values of the fields of the record* The function must return a string to be used for the interface-side comparison. ```php function vte_compare_account_bill_ship_street($module, $id, $data) { list($wsModId,$id) = explode('x',$id); // do it every time if ($data['bill_street'] == $data['ship_street']) { return 'e'; } else { return 'n'; } } ``` At this point I can set up a process that starts when a company is created when the billing address is different from the shipping address. [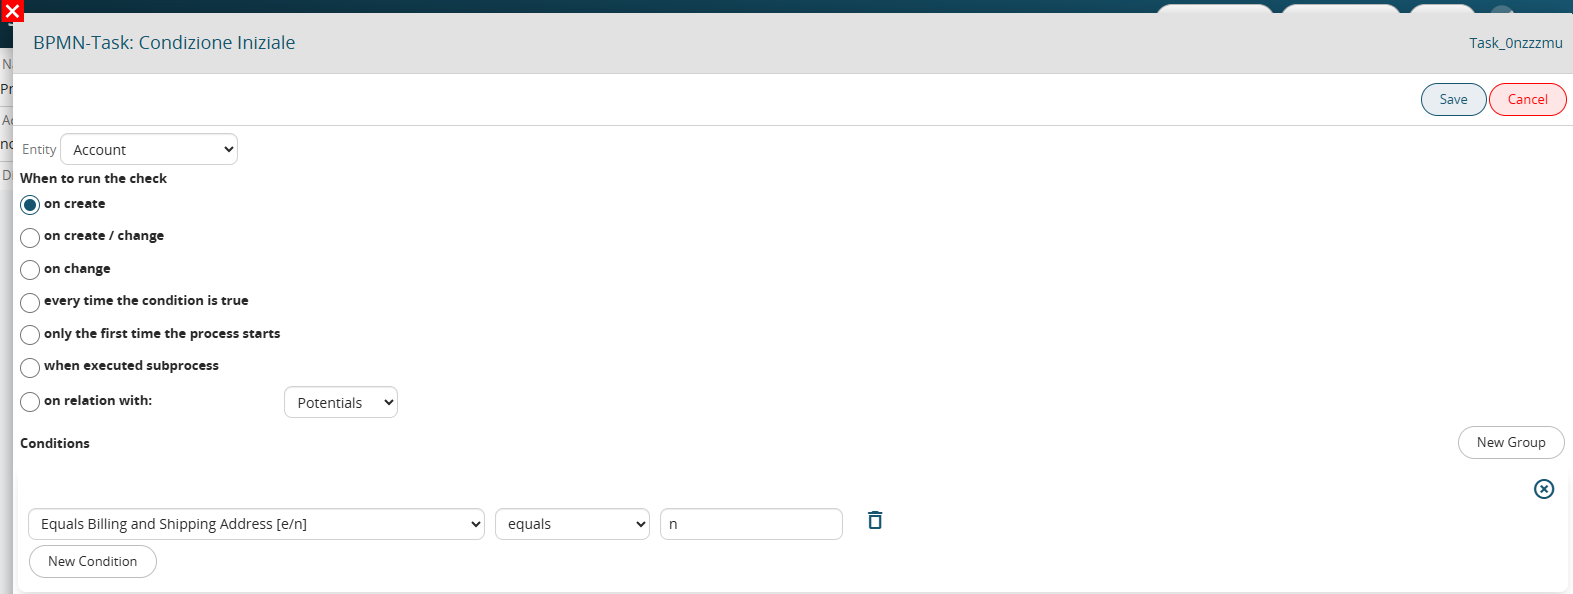](https://usermanual.vtenext.com/uploads/images/gallery/2025-07/fwtimage.png) # 11.4 Process SDK Registration Procedure The procedure described below is the same for the 3 types of process sdk functions. Suppose we need to create and register a “FIELD ACTION” type SDK function that allows you to perform the division between multiple values. Once written, **it must be inserted into the Utils.php file available in the modules/SDK/src/ProcessMaker path**. **It must then be registered through the following command to be inserted into the script.php file available in the plugins/script path**: SDK::setProcessMakerFieldAction('function name','path','function label'); 'function name' → name of the function 'path' → path where the function to be registered is located 'function label' → name with which the function will be displayed to the user in the processes section. We then insert the command in the script.php file and compile it with the data from the SDK: SDK::setProcessMakerFieldAction('division','modules/SDK/src/ProcessMaker/Utils.php','division(value1,value2,...)'); N.B: Each typology has its own dedicated command, so if we had to load an “ACTION” type SDK we should use the following command: SDK::setProcessMakerAction('function name','path','function label'); If instead we had to load an “TASK CONDITION” type SDK we should use the following command: SDK::setProcessMakerTaskCondition('function name','path','function label'); Once these steps are completed, just launch the script.php file and the function will be correctly registered. # 12 Standard Process SDK: Description and Usage # 12.1 SDK fieldAction: Sum This SDK function allows you to perform the sum between 2 or more values that must be passed as parameters. Being a fieldAction type function, it can be called within the individual fields of modules or dynamic forms. EXAMPLE OF USE To better understand how it works, below is an example of using the vte\_sum() function to perform the sum between the values of two fields called "Estimated Development Hours" and "Estimated Training Hours" and save the result in the "Total Estimated Hours" field (Figure 1) [](https://usermanual.vtenext.com/uploads/images/gallery/2025-07/1Animage.png) Figure 1 Within an Action Task we proceed with the configuration of an Update Entity action involving the "Total Estimated Hours" field. Specifically, we are going to call the interested SDK function through the "Option Selection" picklist and accessing the "SDK Functions" section (Figure 2) [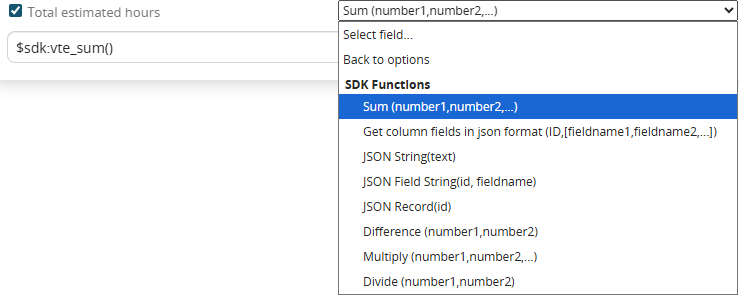](https://usermanual.vtenext.com/uploads/images/gallery/2025-07/ghPimage.png) Figure 2 Finally we pass as parameters (separated by commas) the contents of the two fields to be added (Figure 3) [](https://usermanual.vtenext.com/uploads/images/gallery/2025-07/t2gimage.png) Figure 3 # 12.2 SDK fieldAction: Difference This SDK function allows you to perform the difference between 2 or more values that must be passed as parameters. Being a fieldAction type function, it can be called within the individual fields of modules or dynamic forms. EXAMPLE OF USE To better understand how it works, below is an example of using the vte\_diff() function to perform the difference between the values of two fields called "Expected hours" and "Used hours" and save the result in the "Remaining hours" field (Figure 1) [](https://usermanual.vtenext.com/uploads/images/gallery/2025-07/plwimage.png) Figure 1 Within an Action Task we proceed with the configuration of an Update Entity action involving the "Remaining Hours" field. Specifically, we are going to call the interested SDK function through the "Option Selection" picklist and accessing the "SDK Functions" section (Figure 2) [](https://usermanual.vtenext.com/uploads/images/gallery/2025-07/xpLimage.png) Figure 2 Finally we pass as parameters (separated by commas) the contents of the two fields to be subtracted (Figure 3) [](https://usermanual.vtenext.com/uploads/images/gallery/2025-07/27simage.png) Figure 3 # 12.3 SDK fieldAction: Multiplication This SDK function allows you to perform the multiplication between 2 or more values that must be passed as parameters. Being a fieldAction type function, it can be called within the individual fields of modules or dynamic forms. EXAMPLE OF USE To better understand how it works, below is an example of using the vte\_mul() function to perform the multiplication between the contents of the two fields called "Fixed cost per km: (€)" and "Number of km traveled" and save the result in the "Total cost: (€)" field (Figure 1) [](https://usermanual.vtenext.com/uploads/images/gallery/2025-07/LB1image.png) Figure 1 Within an Action Task we proceed with the configuration of an Update Entity action involving the "Total Cost: (€)" field. Specifically, we are going to call the interested SDK function through the "Option Selection" picklist and accessing the "SDK Functions" section (Figure 2) [](https://usermanual.vtenext.com/uploads/images/gallery/2025-07/OO7image.png) Figure 2 Finally we pass as parameters (separated by commas) the two values to be multiplied (Figure 3) [](https://usermanual.vtenext.com/uploads/images/gallery/2025-07/GtJimage.png) Figure 3 # 12.4 SDK fieldAction: Division This SDK function allows you to perform the division between 2 or more values that must be passed as parameters. Being a fieldAction type function, it can be called within the individual fields of modules or dynamic forms. EXAMPLE OF USE To better understand how it works, below is an example of using the vte\_div() function to perform the division between the "Estimated Development Hours" field and a fixed value of 8 (which represents the working hours in a day) and save the result in the "Estimated Development Days" field (Figure 1) [](https://usermanual.vtenext.com/uploads/images/gallery/2025-07/XwQimage.png) Figure 1 Within an Action Task we proceed with the configuration of an Update Entity action involving the "Estimated Development Days" field. Specifically, we go to call the interested SDK function through the "Option Selection" picklist and accessing the "SDK Functions" section (Figure 2) [](https://usermanual.vtenext.com/uploads/images/gallery/2025-07/C4Simage.png) Figure 2 Finally we pass as parameters (separated by commas) the two values to divide (Figure 3) [](https://usermanual.vtenext.com/uploads/images/gallery/2025-07/bxOimage.png) Figure 3 # 12.5 SDK fieldAction: vte_json_column_fields This SDK function allows you to generate a JSON code containing the labels and values of the 2 or more fields passed as parameters. As the first parameter, you must pass the crmid of the record from which you want to extract the information, instead as subsequent parameters you must pass the "fieldname" of the fields to be included, or the names in which those fields are registered in the Database. NOTE: even if in the description of the function it is indicated to pass the parameters following the id by inserting square brackets, the latter must not be inserted. It is mainly used to format a subset of data in order to perform REST-type Web Service calls (always configurable by process through the dedicated standard action "Call External Web Service"). For more information on configuring API calls from the process, please refer to chapter 3.15 of the process manual. EXAMPLE OF USE To better understand how it works, below is an example of using the SDK function vte\_json\_column\_fields() to generate a JSON code containing the following fields and values of an instance of the Customer Service module involved in the process: Title Status Inside the dynamic form of a process helper, we proceed with the creation of a text area field called "Body JSON Format" in which the result of the function will be saved. Then we call the interested SDK function through the "Option Selection" picklist and access the "SDK Functions" section (Figure 1) [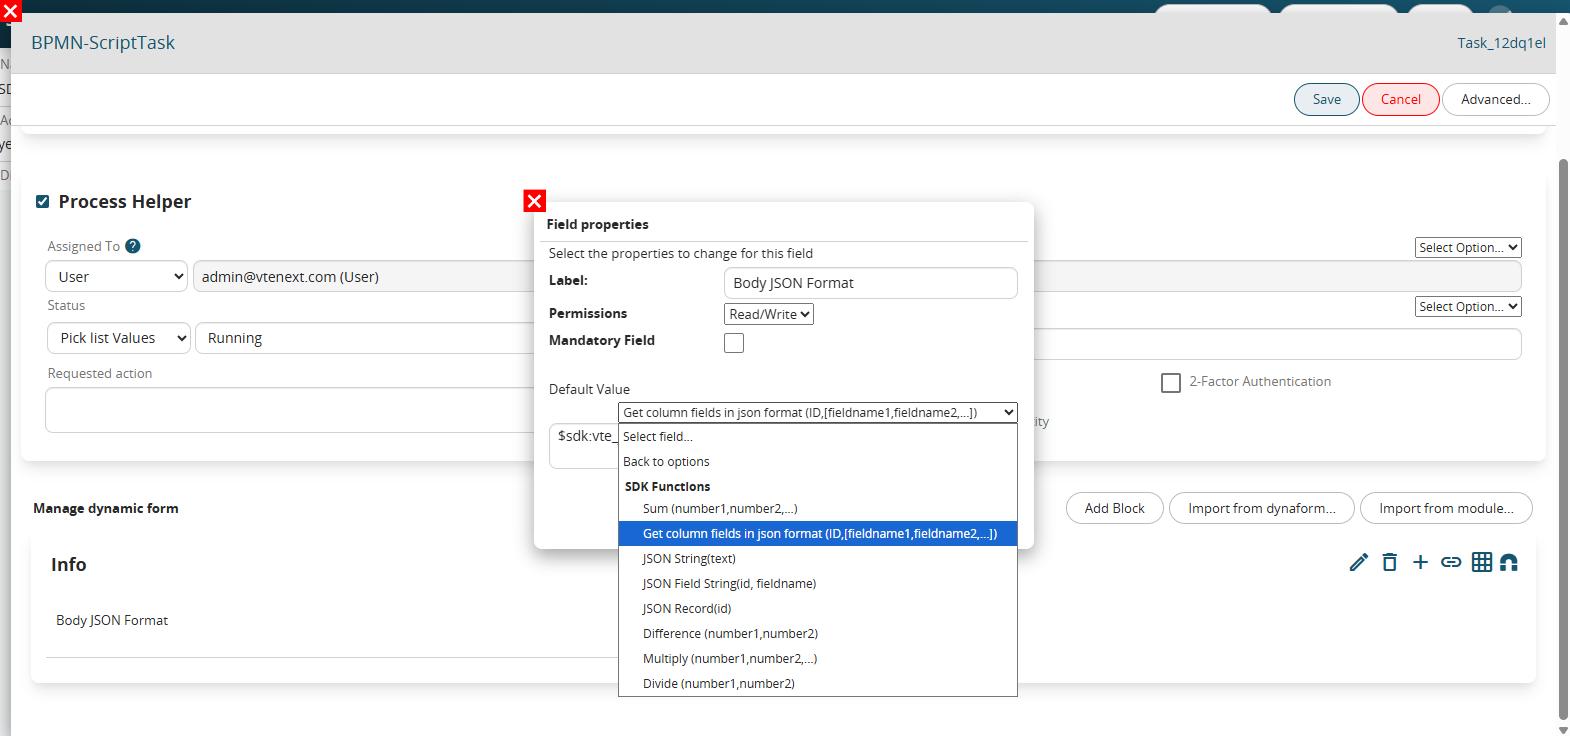](https://usermanual.vtenext.com/uploads/images/gallery/2025-07/bpYimage.png) Figure 1 Finally we pass the parameters required by the function, all separated by commas. Specifically, as the first parameter we insert the crmid of the record from which we want to extract the information, so in our case the ticket id. (Figure 2) [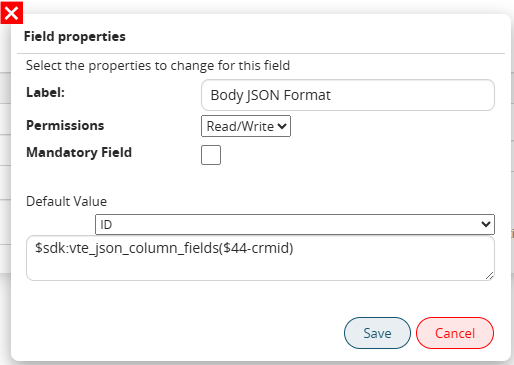](https://usermanual.vtenext.com/uploads/images/gallery/2025-07/1tgimage.png) Figure 2 Instead, as subsequent parameters, we insert the "fieldnames" of the fields to be involved, that is, the names with which those fields are registered in the Database. In our specific case, they will be "ticket\_title", "ticketstatus" and "ticketpriorities". (Figure 3) [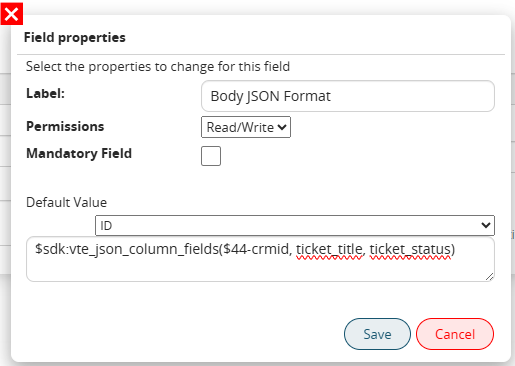](https://usermanual.vtenext.com/uploads/images/gallery/2025-07/SVbimage.png) Figure 3 To easily obtain them, simply select the relevant field from the "Option Selection" picklist and delete the reference to the instance involved in the process, i.e. the metaid (Figure 4). [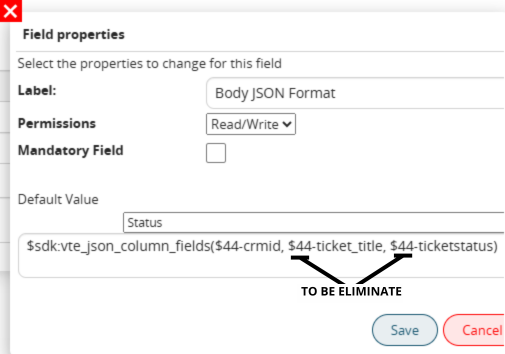](https://usermanual.vtenext.com/uploads/images/gallery/2025-07/SBUimage.png) Figure 4 The generated JSON code will be as shown in Figure 5 [](https://usermanual.vtenext.com/uploads/images/gallery/2024-09/q8Oimage.png) Figure 5 # 12.6 SDK fieldAction: vte_json_string This SDK function allows you to convert a string into JSON format by managing compatibility with special characters, so as to format them correctly and avoid conflicts with it. It is mainly used to format strings in order to perform REST Web Service calls (always configurable by process via the dedicated standard action "Call External Web Service") without encountering syntax errors on the JSON. Specifically, if the string contains special characters used in JSON syntax such as double quotes ("), slash (/) and backslash (\\), the function will automatically insert additional backslashes to prevent the JSON from generating an error. As the only parameter, therefore, we pass the content of any field (as long as it is a string) or a simple static value. EXAMPLE OF USE To better understand how it works, below is an example of using the SDK function vte\_json\_string() to format the "Description" field containing the following string: And \\ at that point / I told him: "Goodbye!" (Figure 1) [](https://usermanual.vtenext.com/uploads/images/gallery/2025-07/screenshot-2025-07-10-171621.png) Figure 1 Within an Action Task we proceed with the configuration of an Update Entity action involving the "Description" field. Specifically, we go to call the interested SDK function through the "Option Selection" picklist and accessing the "SDK Functions" section (Figure 2) [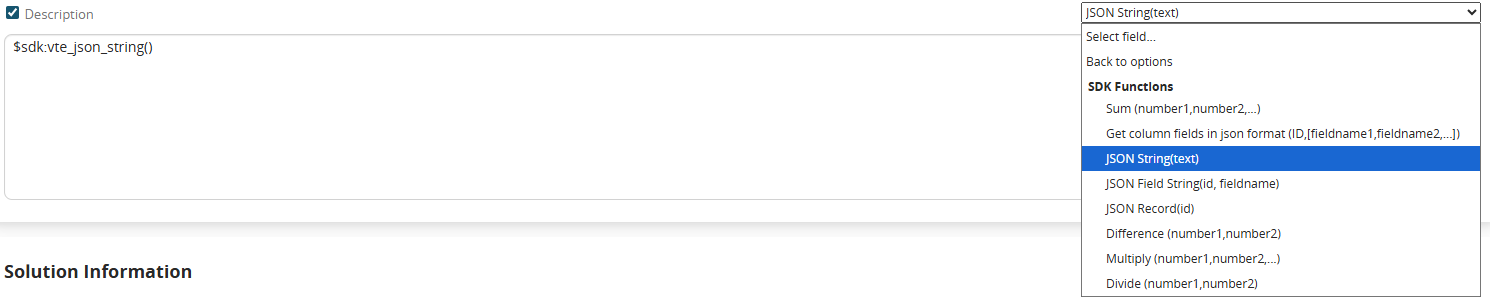](https://usermanual.vtenext.com/uploads/images/gallery/2025-07/rQvimage.png) Figure 2 (click on the image for a higher graphic resolution) Finally we pass as the only parameter the content of the field to be formatted (Figure 3) [](https://usermanual.vtenext.com/uploads/images/gallery/2025-07/6Knimage.png) Figure 3 The result generated by the function will be as shown in Figure 4 [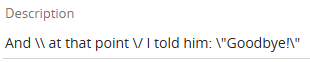](https://usermanual.vtenext.com/uploads/images/gallery/2025-07/DYpimage.png) Figure 4 # 12.7 SDK fieldAction: vte_json_field_string It is a function similar to vte\_json\_string(), in fact it allows you to convert a string in JSON format in the same way by managing compatibility with special characters, so as to format them correctly and avoid conflicts with it. It is also mainly used to format strings in order to perform REST type Web Service calls (always configurable by process via the dedicated standard action "Call External Web Service") without encountering syntax errors on the JSON. Specifically, if the string contains special characters used in JSON syntax such as double quotes ("), slash (/) and backslash (\\), the function will automatically insert additional backslashes to prevent the JSON from generating an error. For more information on configuring API calls from the process, please see chapter 3.15 of the process manual. The real difference lies in the parameters that can be entered in input. The first parameter is the crmid of the record from which you want to extract the information, while the second parameter is the "fieldname" of the field to be included, i.e. the name in which that field is registered in the database. EXAMPLE OF USE To better understand how it works, below is an example of using the SDK function vte\_json\_field\_string() to format the "City (Invoicing)" field of an instance of the Company module involved in the process containing the following string in JSON code: "Verona" (Figure 1) [](https://usermanual.vtenext.com/uploads/images/gallery/2025-07/Lapimage.png) Figure 1 The result will then be saved inside the "Description" field. Inside an Action Task we proceed with the configuration of an Update Entity action involving the "Description" field. Specifically, we are going to call the interested SDK function through the "Option Selection" picklist and accessing the "SDK Functions" section (Figure 2) [](https://usermanual.vtenext.com/uploads/images/gallery/2025-07/XQ1image.png) Figure 2 (click on the image for a higher graphic resolution) Finally we pass the parameters required by the function, all separated by commas. Specifically, as the first parameter we insert the crmid of the record from which we want to extract the information, so in our case the company id. (Figure 3) [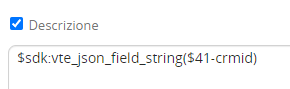](https://usermanual.vtenext.com/uploads/images/gallery/2024-10/CM0image.png) Figure 3 Instead, as a second parameter, we insert the "fieldname" of the field to be involved, or the name with which that field is registered in the Data Base. In our specific case it will be "bill\_city". (Figure 4) [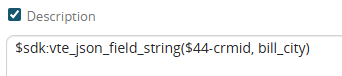](https://usermanual.vtenext.com/uploads/images/gallery/2025-07/ynMimage.png) Figure 4 To easily obtain it, simply select the relevant field from the "Option Selection" picklist and delete the reference to the instance involved in the process, i.e. the metaid (Figure 5). [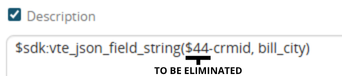](https://usermanual.vtenext.com/uploads/images/gallery/2025-07/Tgkimage.png) Figure 5 The result generated by the function will be as shown in Figure 6 [](https://usermanual.vtenext.com/uploads/images/gallery/2024-10/ysaimage.png) Figure 6 # 12.8 SDK fieldAction: vte_json_record This SDK function allows you to generate a JSON code containing the labels and values of all the fields of a module instance (record) passed as input. The only parameter to be passed is the crmid of the record from which you want to extract the information to be inserted into the JSON code. It is mainly used to easily generate a JSON code in order to perform REST type Web Service calls (always configurable from the process via the dedicated standard action "Call External Web Service"). For further information on configuring API calls from the process, please consult chapter 3.15 of the process manual. EXAMPLE OF USE To better understand how it works, below is an example of using the SDK function vte\_json\_record() to generate a JSON code containing all the fields and values of an instance of the Companies module involved in the process. Within an Action Task, we proceed with the configuration of an Update entity action involving the "Description" field. Specifically, we are going to call the interested SDK function through the "Option Selection" picklist and accessing the "SDK Functions" section (Figure 1) [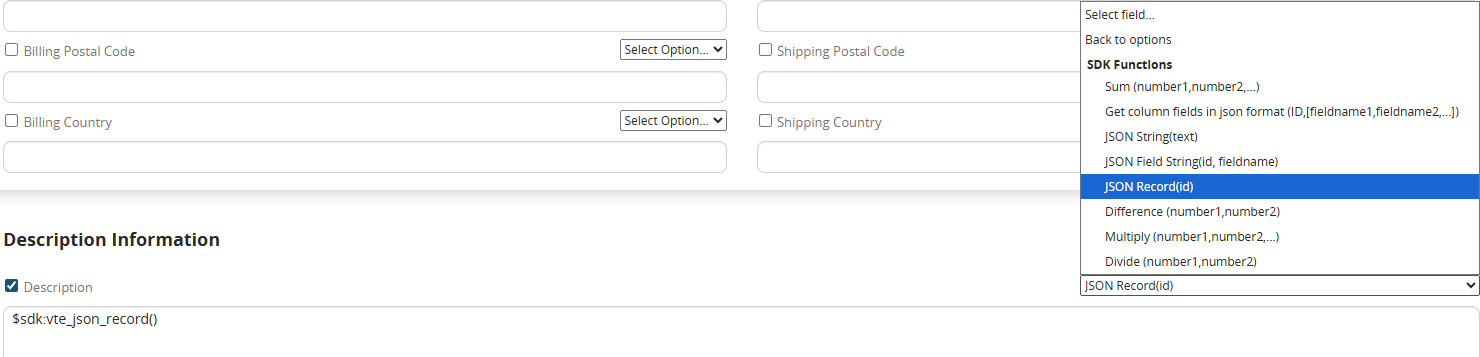](https://usermanual.vtenext.com/uploads/images/gallery/2025-07/ywZimage.png) Figure 1 (click on the image for a higher graphic resolution) Finally we pass as the only parameter the crmid of the record from which we want to extract the information, in this case of the Company (Figure 2) [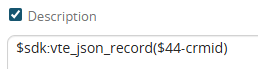](https://usermanual.vtenext.com/uploads/images/gallery/2025-07/U7timage.png) Figure 2 The result generated by the function will be as shown in Figure 3 [](https://usermanual.vtenext.com/uploads/images/gallery/2024-10/4lPimage.png) Figure 3 (click on the image for a higher graphic resolution) # 12.9 SDK fieldAction: Format Date This SDK function allows you to convert any date passed as input into a specific format. As the first parameter, you must pass the value of a field of a module or dynamic form containing the date you want to format, instead as the second parameter you must pass the format according to the following syntax: day / month / year (complete) -> d-m-Y Example: 25-10-2024 month / day / year (complete) -> m-d-Y Example: 10-25-2024 year (complete) / month / day -> Y-m-d Example: 2024-10-25 year (complete) / day / month -> Y-d-m Example: 2024-25-10 day / month / year (partial) -> d-m-y Example: 25-10-24 month / day / year(partial) -> m-d-y Example: 10-25-24 year(partial) / month / day -> y-m-d Example: 24-10-25 year(partial) / day / month -> y-d-m Example: 24-25-10 day / month / year(complete) hours / minutes / seconds -> d-m-Y H:i:s Example: 25-10-2024 16:32:20 month / day / year(complete) hours / minutes / seconds -> m-d-Y H:i:s Example: 10-25-2024 16:32:20 year(complete) / month / day hours / minutes / seconds -> Y-m-d H:i:s Example: 2024-10-25 16:32:20 year(full) / day / month hours / minutes / seconds -> Y-d-m H:i:s Example: 2024-25-10 16:32:20 hours / minutes / seconds -> H:i:s Example: 16:32:20 day only -> d Example: 25 month only -> m Example: 10 year(full) -> Y Example: 2024 year(partial) -> y Example: 24 hours only -> H Example: 16 minutes only -> i Example: 32 seconds only -> s Example: 20 N.B: a partial result will not be manageable within date or datetime fields, this is because they only accept values with at least one day, month and year. EXAMPLE OF USE To better understand how it works, below is an example of using the SDK function formatDate() to format the value of the "Creation Period" field of an instance of the Companies module and save it within a field of a process helper. Within the dynamic form we proceed with the creation of a date field called "Creation Date" in which the result of the function will be saved. Then we call the interested SDK function through the "Option Selection" picklist and access the "Date Functions" section (Figure 1) [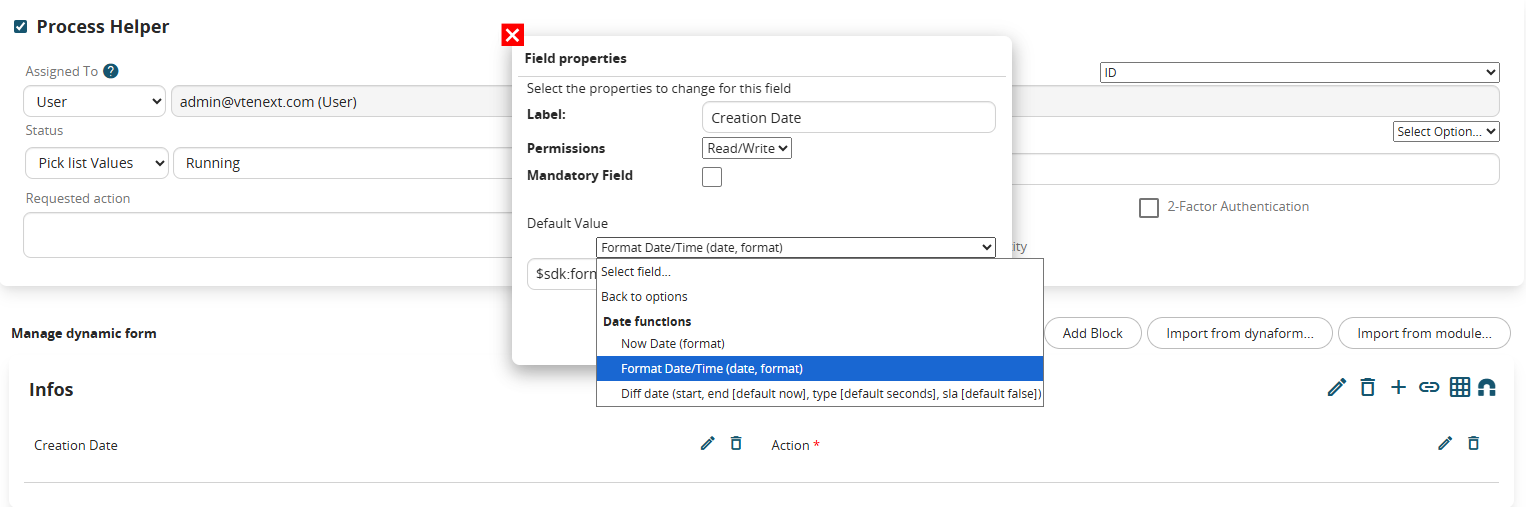](https://usermanual.vtenext.com/uploads/images/gallery/2025-07/BAximage.png) Figure 1 Finally we pass the parameters required by the function, all separated by commas. Specifically, as the first parameter we insert the value of the "Creation Period" field (Figure 2) [](https://usermanual.vtenext.com/uploads/images/gallery/2025-07/Y4limage.png) Figure 2 Instead, as a second parameter, we pass the format with which the function must return the date, so in our case d-m-Y (Figure 3) [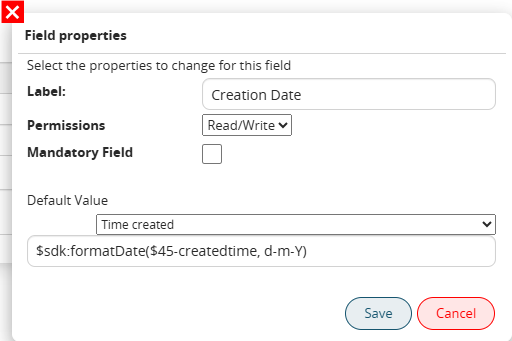](https://usermanual.vtenext.com/uploads/images/gallery/2025-07/MYQimage.png) Figure 3 The result will be as shown in figure 4 [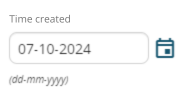](https://usermanual.vtenext.com/uploads/images/gallery/2025-07/Cdsimage.png) Figure 4 # 12.10 SDK fieldAction: Now Date This SDK function allows you to obtain and save today's date within any text, text area, date and datetime field. By default (so without passing any parameter), the result will always be returned in the "d-m-Y" format, to obtain the date in a different format, the format will be passed as the only parameter of the function, to view the syntax of each available case in detail, consult the chapter ... of the process manual. EXAMPLE OF USE To better understand how it works, below is an example of using the SDK function date\_now() to save today's date within a field of a process helper. Inside the dynamic form we proceed with the creation of a date field called "Today's date" in which the result of the function will be saved. Then we call the interested SDK function through the "Option Selection" picklist and access the "Date functions" section (Figure 1) [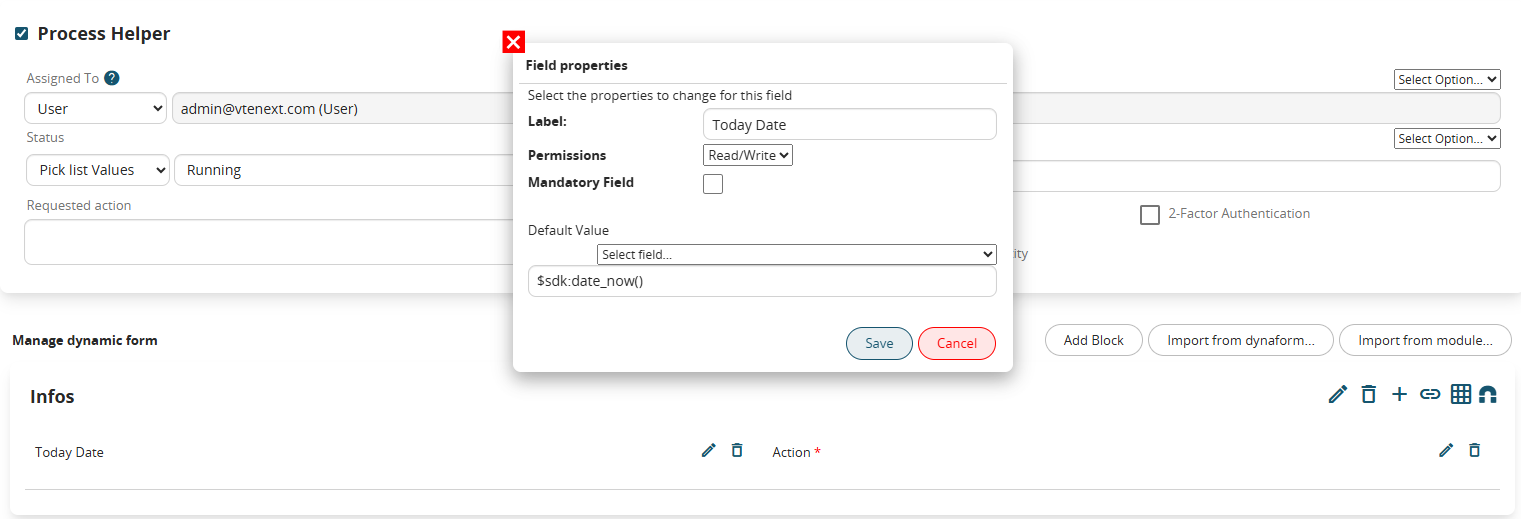](https://usermanual.vtenext.com/uploads/images/gallery/2025-07/NTMimage.png) Figure 1 Finally, if necessary, we pass the format with which the date must be returned (Figure 2) [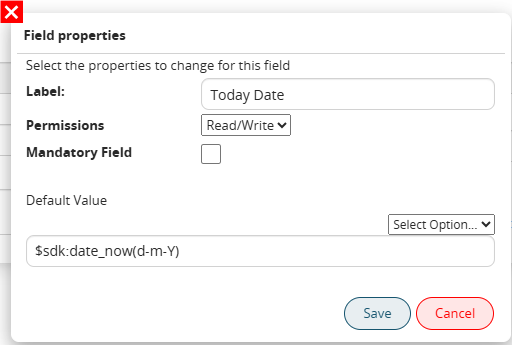](https://usermanual.vtenext.com/uploads/images/gallery/2025-07/o8kimage.png) Figure 2 The result will be as shown in figure 3 [](https://usermanual.vtenext.com/uploads/images/gallery/2025-07/c5eimage.png) Figure 3 # 12.11 SDK fieldAction: Diff Date This SDK function allows you to perform the difference between two dates passed as input parameters. As the first two parameters, separated by a comma, you will need to pass the values of the two date type fields to be involved in the difference, but keep in mind that the function performs the following calculation: parameter2 - parameter1 The second date parameter is not mandatory, so if you only pass a date value (parameter1), the calculation will be performed automatically taking today's date-time as the second parameter (parameter2). By default (so without passing a third parameter), the function will always return the result of the calculation in seconds. Instead, to obtain the result in days, you will need to pass the fixed string "days". ATTENTION! by default the function will always return only positive results, to enable the return of negative results you will need to apply a change to the php code. EXAMPLE To better understand how it works, here is an example of using the SDK function diffDate() to calculate the difference between the values of two fields called "Start Date" and "End Date" and save the result (in days) in the "Time Range" field (Figure 1) [](https://usermanual.vtenext.com/uploads/images/gallery/2024-10/T5Fimage.png) Figure 1 Within an Action Task we proceed with the configuration of an Update Entity action involving the "Time Range" field. Specifically, we are going to call the interested SDK function through the "Option Selection" picklist and accessing the "Date Functions" section (Figure 2) [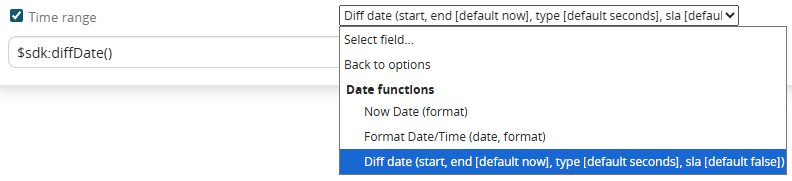](https://usermanual.vtenext.com/uploads/images/gallery/2025-07/Jb7image.png) Figure 2 (click on the image for a higher graphic resolution) N.B: in the label of the selectable function in the picklist "Select option.." the possibility of passing an additional parameter called "sla" is indicated, which by default is set to false, in fact it is only a typo, therefore it is an unmanageable parameter. As the first and second parameters (separated by commas) we pass the values of the "Start Date" and "End Date" fields in the order just mentioned (Figure 3) [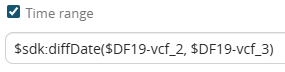](https://usermanual.vtenext.com/uploads/images/gallery/2025-07/PYDimage.png) Figure 3 Finally as a third parameter we pass the fixed string "days" (Figure 4) [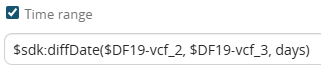](https://usermanual.vtenext.com/uploads/images/gallery/2025-07/N1vimage.png) Figure 4 The result will be as shown in figure 5 [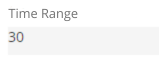](https://usermanual.vtenext.com/uploads/images/gallery/2025-07/pgcimage.png) Figure 5 # 12.12 SDK fieldAction: Set lead converted This SDK function allows the system to perform a series of automations that allow the correct and complete conversion of the lead. In fact, this function can be used exclusively within the standard lead conversion process available in the "Process manager" section with the wording "Lead conversion". (Figure 1) [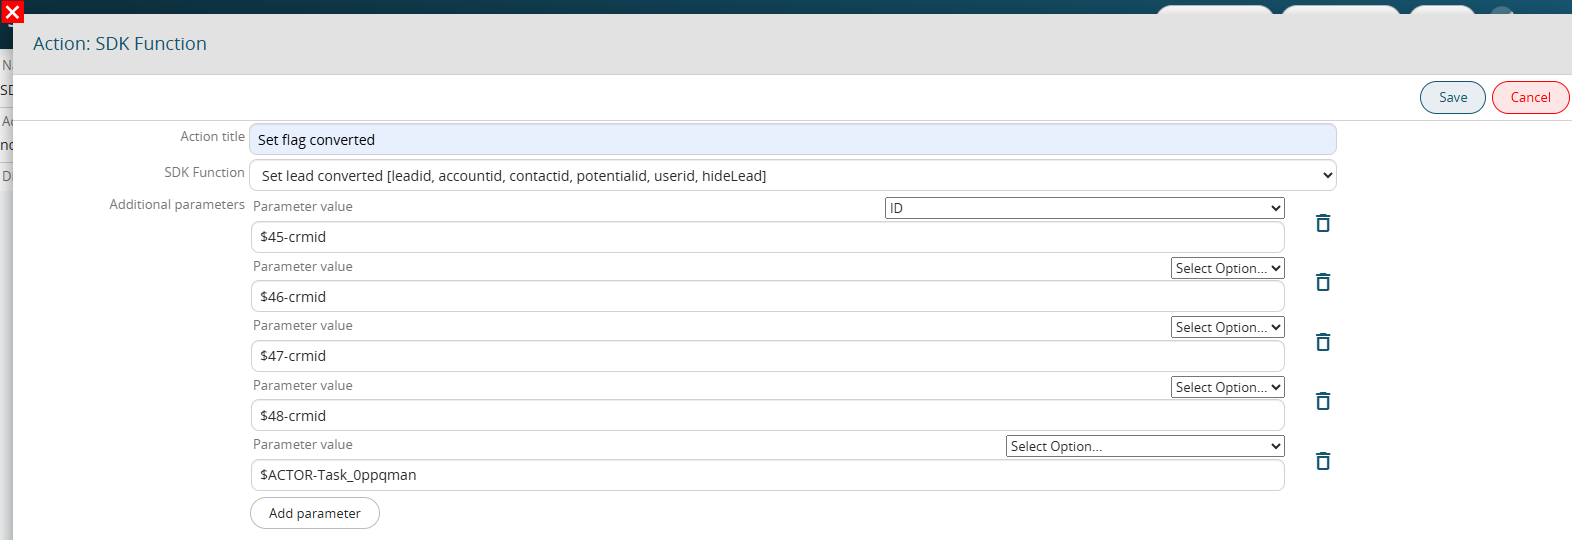](https://usermanual.vtenext.com/uploads/images/gallery/2025-07/8zbimage.png) Figure 1 (click on the image for a larger graphic resolution) The following operations are performed by the function: 1\) References to the lead in the vte\_email\_directory table are deleted 2\) If the lead is set among the favorites of some user, the function replaces it with the company or contact involved in the process depending on the value selected in the "Transfer elements linked to" field. N.B: if the "empty" value is selected, the lead will not be replaced. 3\) If the lead is present among the static newsletters of some campaign, the function replaces it with the company or contact involved in the process depending on the value selected in the "Transfer elements linked to" field. N.B: if the "empty" value is selected, the lead will not be replaced. 4\) The value of the "converted" column of the vte\_leaddetails table is set to "1". This allows you to completely hide the visibility of the lead on the interface side (as if it had been deleted). 5\) The vte\_leadconvrel table is populated to track the Conversion Date, lead crmid, company crmid, contact crmid and opportunity crmid. The first parameter is the crmid of the lead being converted. The second parameter is the crmid of the company (created or existing). The third parameter is the crmid of the contact (if created). The fourth parameter is the crmid of the opportunity (if created). The fifth parameter is the id of the user who triggered the process. To prevent the system from executing points 4) and 5) and therefore the lead from being hidden on the interface side, a sixth parameter must be added in which to insert the static value "false". (Figure 2) [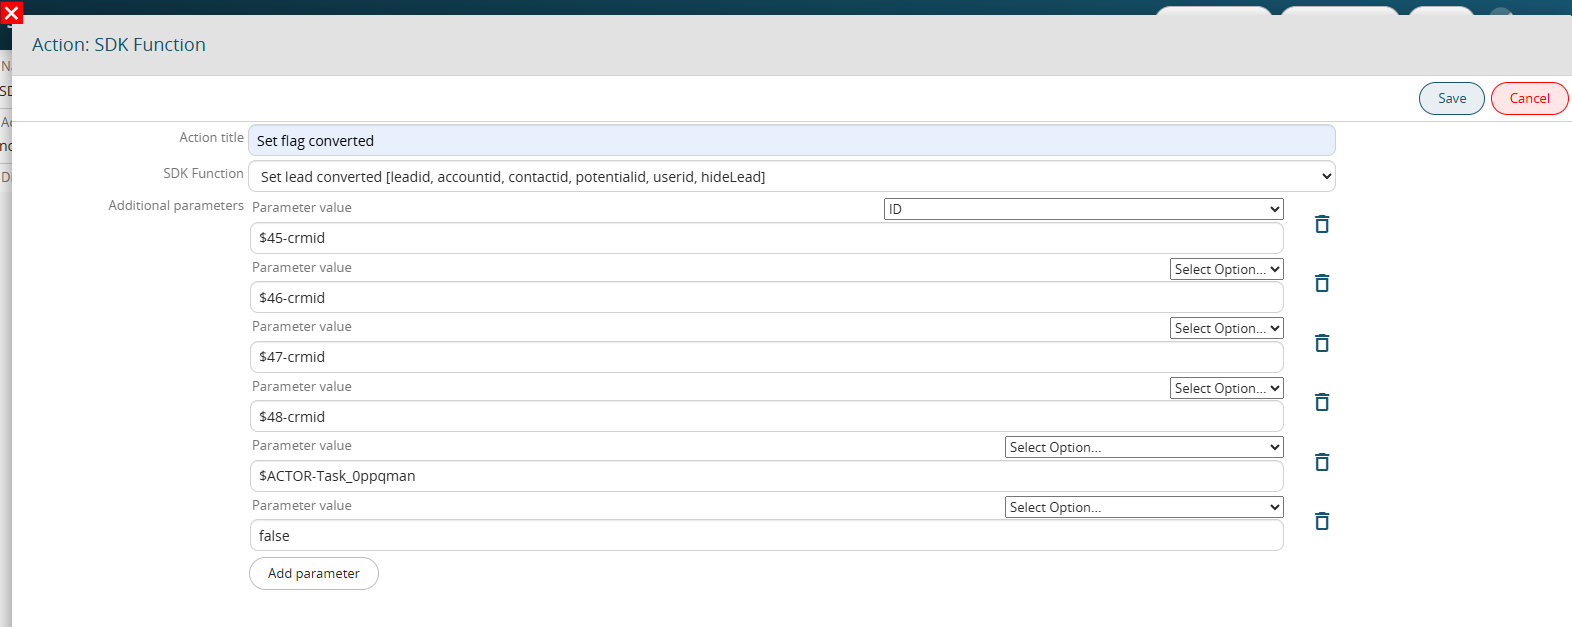](https://usermanual.vtenext.com/uploads/images/gallery/2025-07/cTZimage.png) Figure 2 (click on the image for a higher graphic resolution) # Nuova pagina12.13 SDK fieldAction: vte_formula This SDK function allows you to replicate the functionality of formula fields. Consequently, you can use all algebraic operators within the formulas: plus (+), minus (-), divided by (/), and multiplied by (\*). EXAMPLE 1 To better understand how it works, an example of using the `vte\_formula()` SDK function is provided below. This example calculates the content of the "Delta Budget Invoiced Open Order Value" field by applying the following formula: "Budget" - ( "Current Year Invoiced" + "Open Order Value" ) (Figure 1) [](https://usermanual.vtenext.com/uploads/images/gallery/2026-07/1s0image.png) Figure 1 Within an Action Task, we proceed to configure an "Update Entity" action involving the field "Delta Budget Invoiced Open Order Value." Specifically, we call the relevant SDK function via the "Option Selection" picklist by accessing the "Date Functions" section (Figure 2). [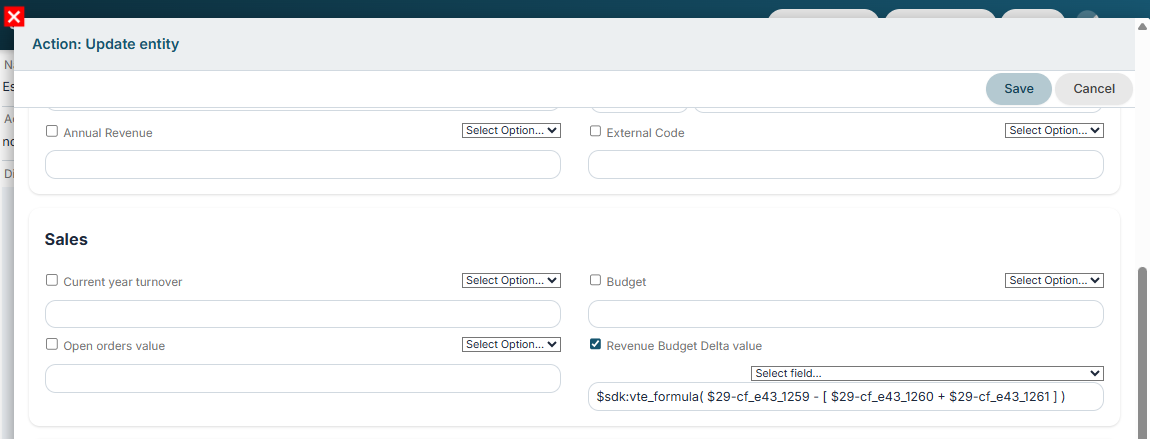](https://usermanual.vtenext.com/uploads/images/gallery/2026-07/DXJimage.png) Figure 2 The result will be like the one shown in Figure 3. [](https://usermanual.vtenext.com/uploads/images/gallery/2026-07/M0Wimage.png) Figure 3 It is also possible to configure If/Else controls using the following structure: **if** condition **then** true\_case **else** false\_case **end** (in this case, >, <, and == operators can be used; the != operator is not permitted). EXAMPLE 2 To better understand how it works, an example is provided below showing the use of the SDK function `vte\_formula()` to insert the value "Mr." into the "Salutation Formula" field if the "Gender" field is set to "Male," or the value "Ms." otherwise. (Figure 4) [](https://usermanual.vtenext.com/uploads/images/gallery/2026-07/kDgimage.png) Figure 4 Within an Action Task, we proceed to configure an "Update Entity" action involving the "Salutation Formula" field. Specifically, we select the relevant SDK function via the "Option Selection" picklist by accessing the "Date Functions" section (Figure 5). [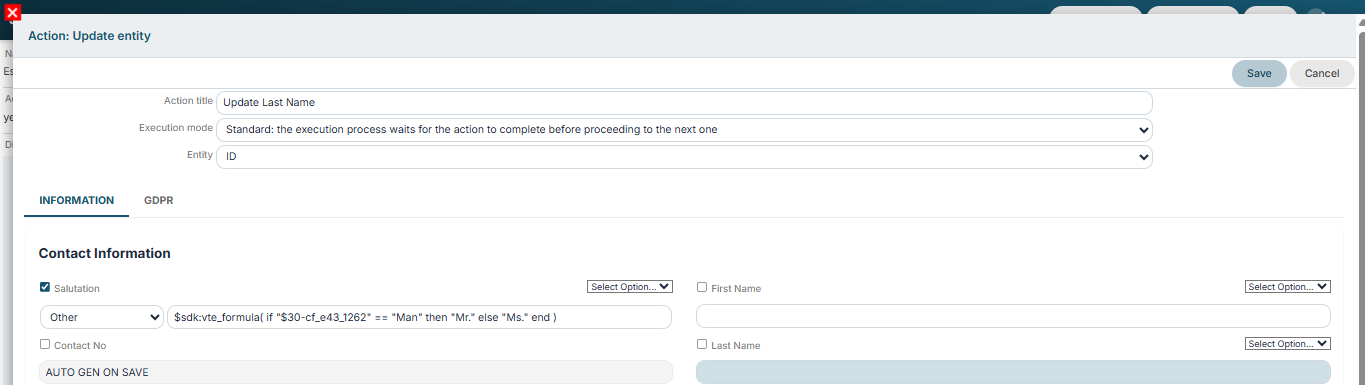](https://usermanual.vtenext.com/uploads/images/gallery/2026-07/pB2image.png)Figure 5 Selecting Gender = Male when adding a contact will result in the display shown in Figure 6. [](https://usermanual.vtenext.com/uploads/images/gallery/2026-07/01Qimage.png) Figure 6 It is also possible to perform operations using date-type fields; specifically, there are two operators: **time\_diffdays**: returns the difference in days between two dates **time\_diff**: returns the difference in seconds between two dates. **Note**: If only a single parameter is entered for the time\_diff and time\_diffdays functions, the value returned in the formula field is the difference between the current date and the date provided as the parameter. # 13 Standard Action Process SDK: Description and Usage # 13.1 SDK Action: Set entity reference This SDK function allows you to force a certain record within an entity (of the same module) involved in the process. It is mainly used to be able to perform any type of standard action even on records that have been inserted within "Related to" fields of a dynamic form. As the first parameter, the metaid (the id that uniquely identifies the instance of a module within a process) of the instance on which you want to force the record must be passed. Instead, as the second parameter, the crmid of the record to be forced must be passed. EXAMPLE OF USE To better understand how it works, below is an example of using the SDK function Set entity reference() to manage the existing company within the standard BPMN lead conversion process. In the dynamic form of the process helper (configured in the User Task "Request details"), the user is given the option to create a new company or select an existing one. Specifically, the existing company's CRMID is stored in a "Related to" field within the dynamic form (Figure 1) [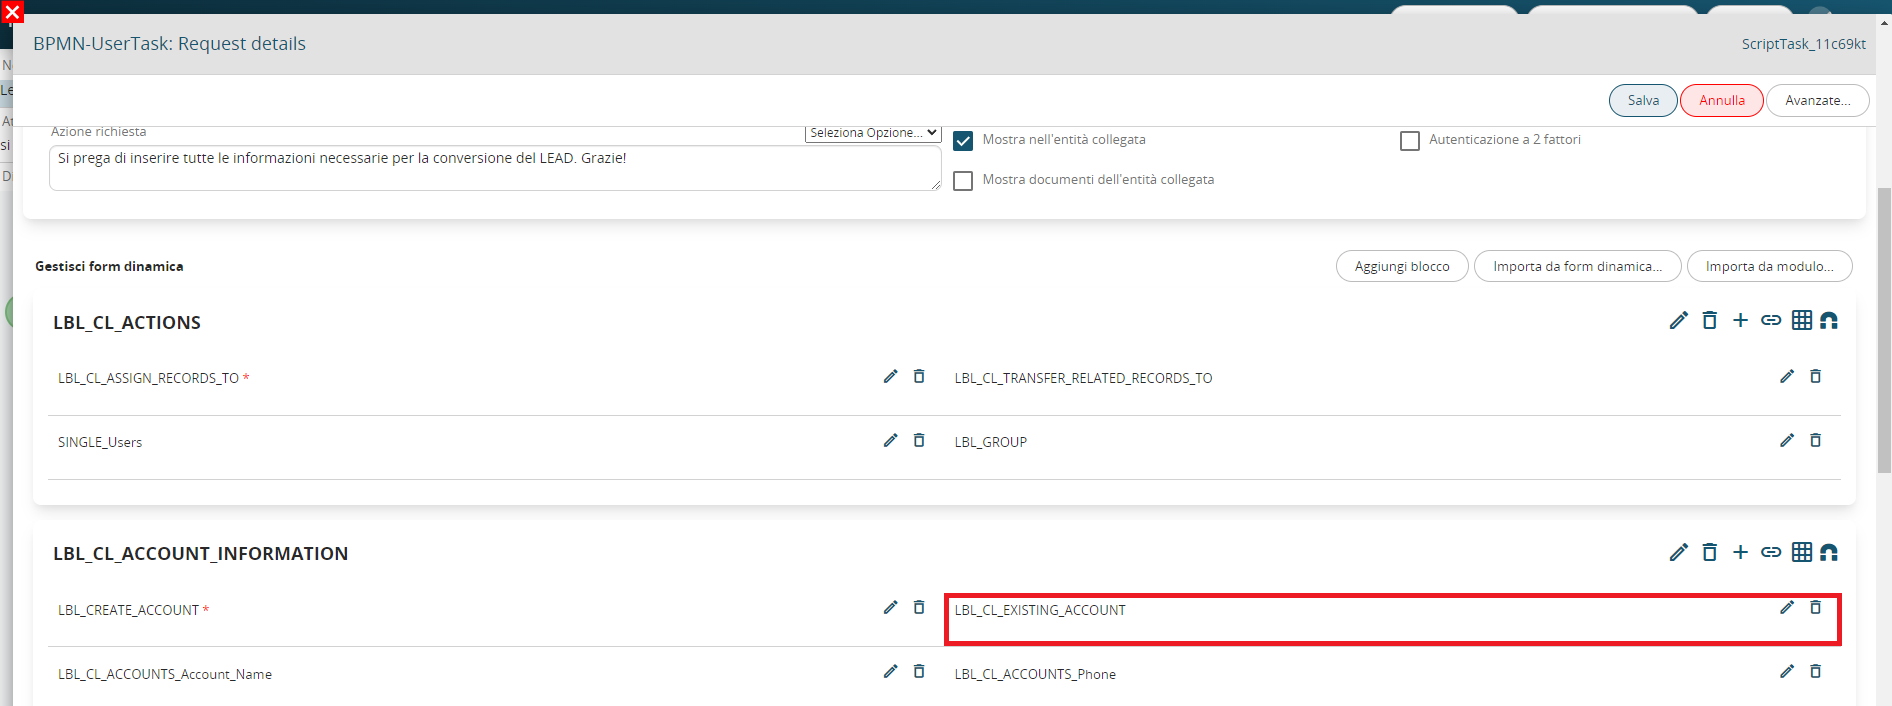](https://usermanual.vtenext.com/uploads/images/gallery/2024-10/screenshot-2024-10-16-121523.png) Figure 1 (click on the image for a larger graphic resolution) This type of field does not establish a real relationship, therefore it is not seen as a complete instance of the Companies module. In fact, it does not have any metaid (i.e. the id that uniquely identifies the instance of a module within a process). For this reason, the actions that can be performed on the record contained in the relationship field are limited. On the contrary, the entity instantiated by the Create entity action (configured in the Action Task "Create account") has its own metaid (i.e. 61), this is because it has been fully involved in the process (Figure 2) [](https://usermanual.vtenext.com/uploads/images/gallery/2025-07/account.png) Figure 2 In the case of the lead conversion process, it is not possible to involve the company contained within the relationship field within the standard action "Transfer relationships". To solve this problem, it is possible to use the SDK Set entity reference() function to force the existing company record (present in the relationship field) within the instance of the Company module involved through the Create entity action (therefore of the company created directly in the process). In this way, all the necessary actions can be performed without limitations. Therefore, within the Action Task "Use existing account", an action of type "SDK Functions" was configured in which the SDK Set entity reference() was called. The metaid of the created company instance was passed as the first parameter, i.e. 61 (Figure 3) [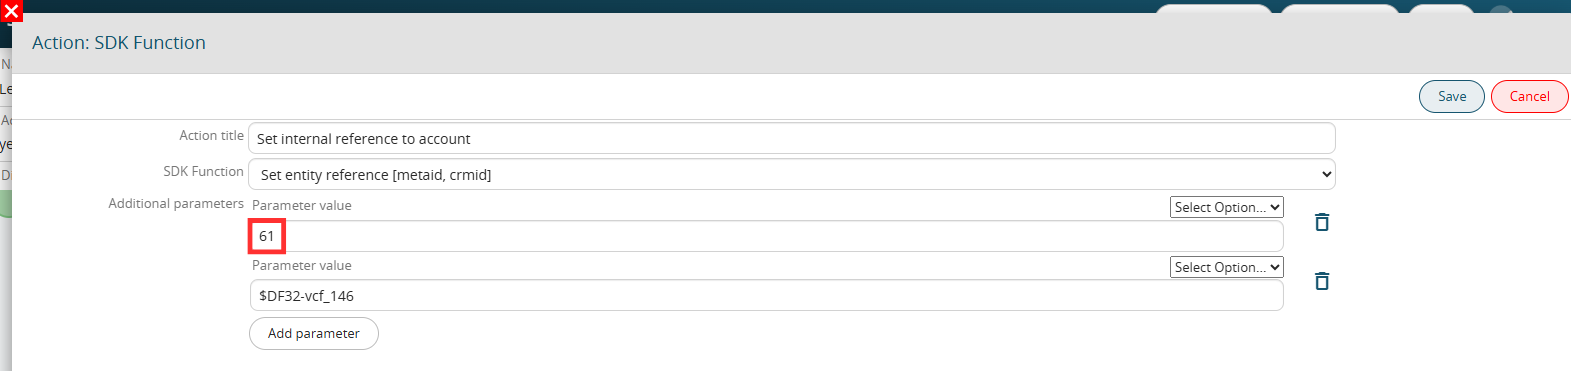](https://usermanual.vtenext.com/uploads/images/gallery/2025-07/90mimage.png) Figure 3 (click on the image for a higher graphic resolution) The second parameter was passed the content of the relation field containing the existing company (Figure 4) [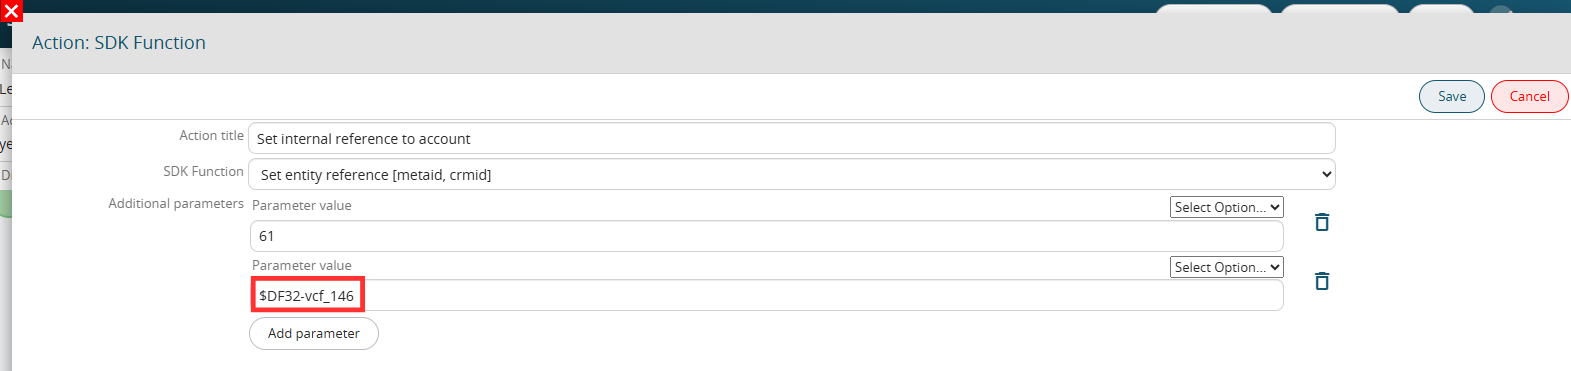](https://usermanual.vtenext.com/uploads/images/gallery/2025-07/jNiimage.png) Figure 4 (click on the image for a higher graphic resolution) In this way, for both cases (created or existing company), in the Action Task "Transfer relations to account" it was sufficient to configure a single Transfer relations action. (Figure 5) [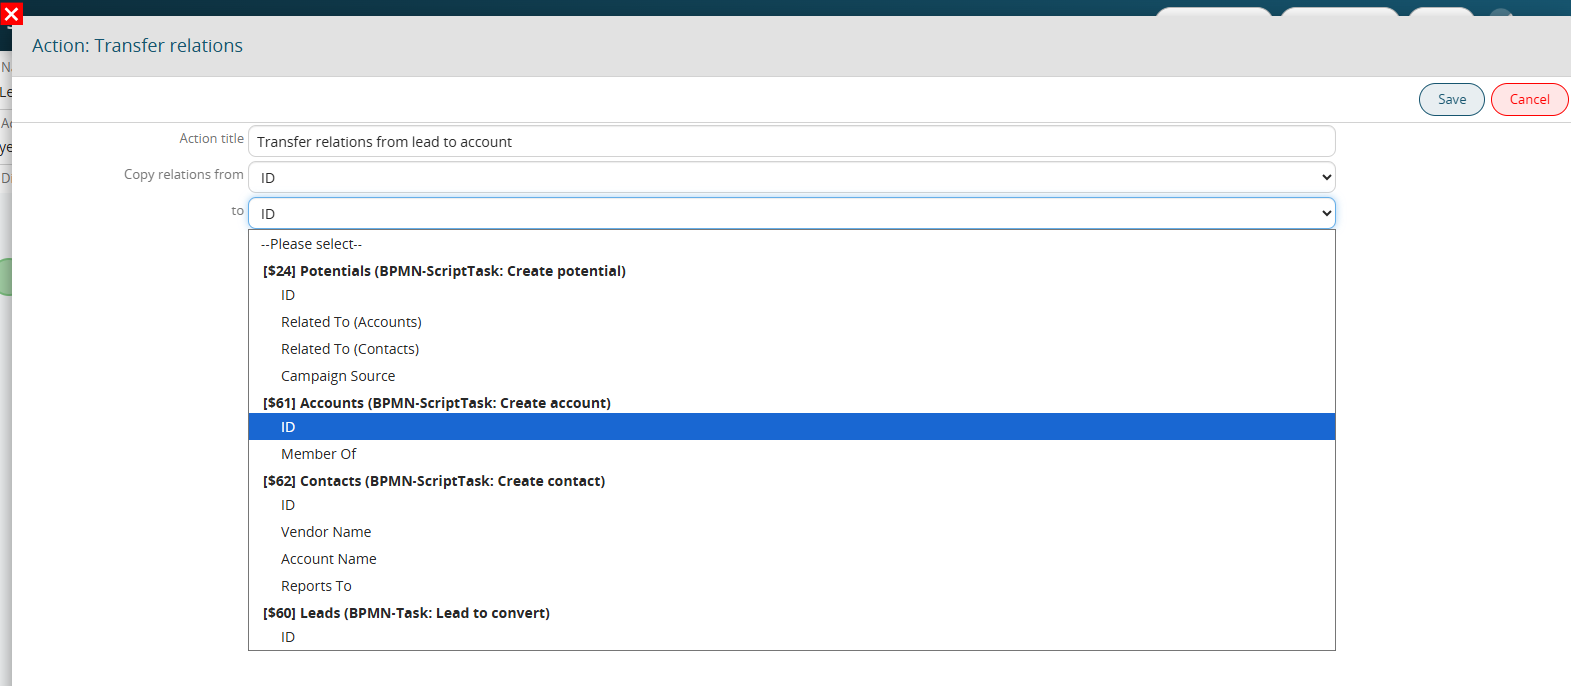](https://usermanual.vtenext.com/uploads/images/gallery/2025-07/HTwimage.png)Figure 5 (click on the image for a higher graphic resolution) # 13.2 SDK Action: Add comment to ticket This SDK function allows you to generate a comment that will be inserted in the "Comments" section of the Customer Support module. As the first parameter, you will need to pass the crmid of the ticket on which you want to add the comment. As the second parameter, you will need to pass the text of the comment to be inserted. As the third parameter, you will need to enter the id of the user or contact who will be the author of the comment. If, as the third parameter, you pass the id of a crm user, as the fourth parameter you will need to pass the fixed item "user". Instead, if, as the third parameter, you pass the id of a record of the Contacts module, as the fourth parameter you will need to pass the fixed item "customer". As the fifth parameter, the fixed value "true" must be passed if you also want to send the automatic notification email containing the comment text and a direct link to quickly access the ticket details (as already happens by default to portal users when a CRM user writes a comment). Otherwise, the fixed value "false" must be passed. EXAMPLE OF USE To better understand how it works, below is an example of using the SDK function Add comment to ticket() to automatically insert a comment containing the following text: "Dear customer, we will take charge of your request as soon as possible." Inside an Action Task we proceed with the configuration of an action of the "SDK Functions" type in which we call the SDK Add comment to ticket(). As the first parameter we pass the crmid of the ticket on which we want to add the comment, in our case $44-crmid (Figure 1) [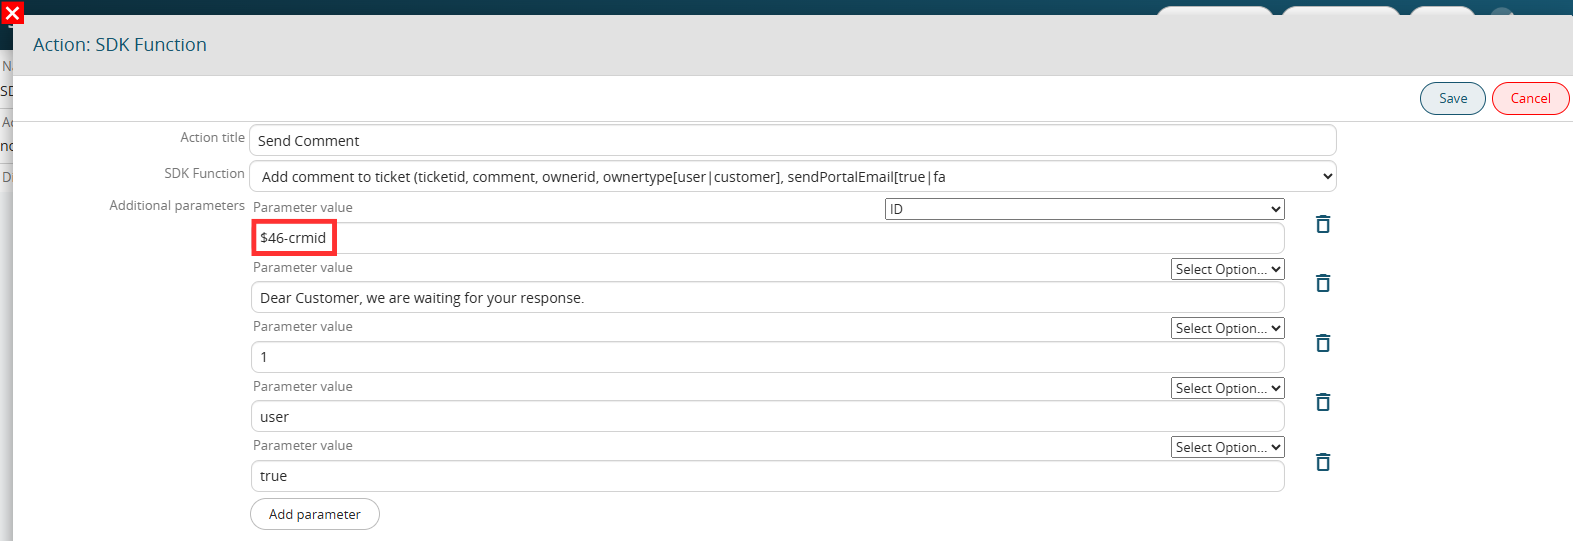](https://usermanual.vtenext.com/uploads/images/gallery/2025-07/xOBimage.png) Figure 1 (click on the image for a higher graphic resolution) As a second parameter we pass the text of the comment to be inserted, that is "Dear customer, we will take charge of your request as soon as possible." (Figure 2) [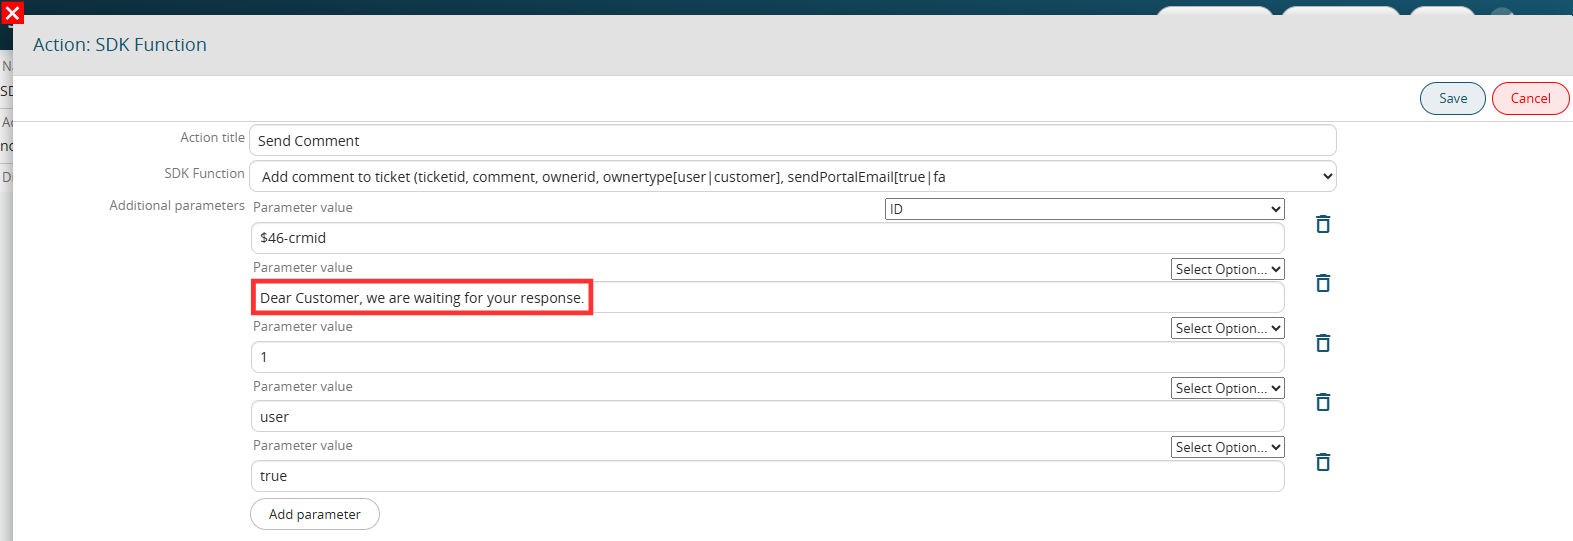](https://usermanual.vtenext.com/uploads/images/gallery/2025-07/KgHimage.png) Figure 2 (click on the image for a higher graphic resolution) As a third parameter we pass the fixed userid of the administrator user, in this way he will always appear as the author of the comment (Figure 3) [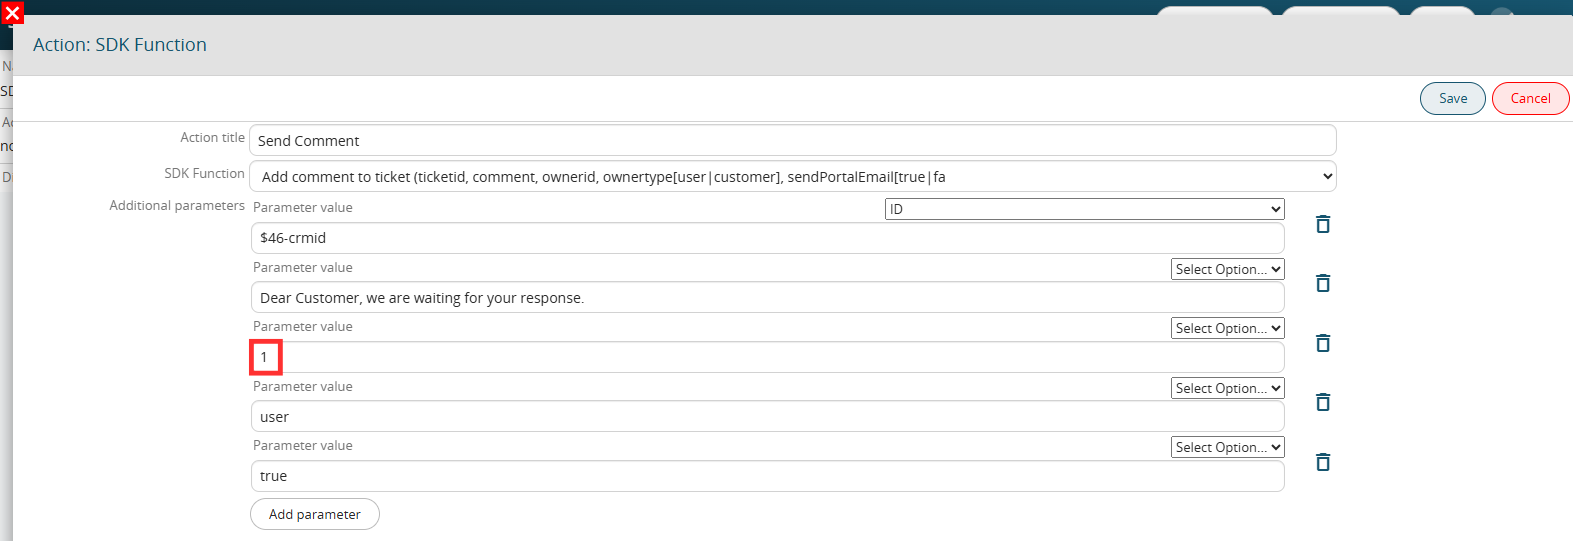](https://usermanual.vtenext.com/uploads/images/gallery/2025-07/pAzimage.png) Figure 3 (click on the image for a higher graphic resolution) As a fourth parameter we pass the fixed value "user" (Figure 4) [](https://usermanual.vtenext.com/uploads/images/gallery/2025-07/qCFimage.png) Figure 4 (click on the image for a higher graphic resolution) As a fifth parameter we pass the fixed value "true" to send the automatic alert email to the contact with active portal user connected to the ticket (Figure 5) [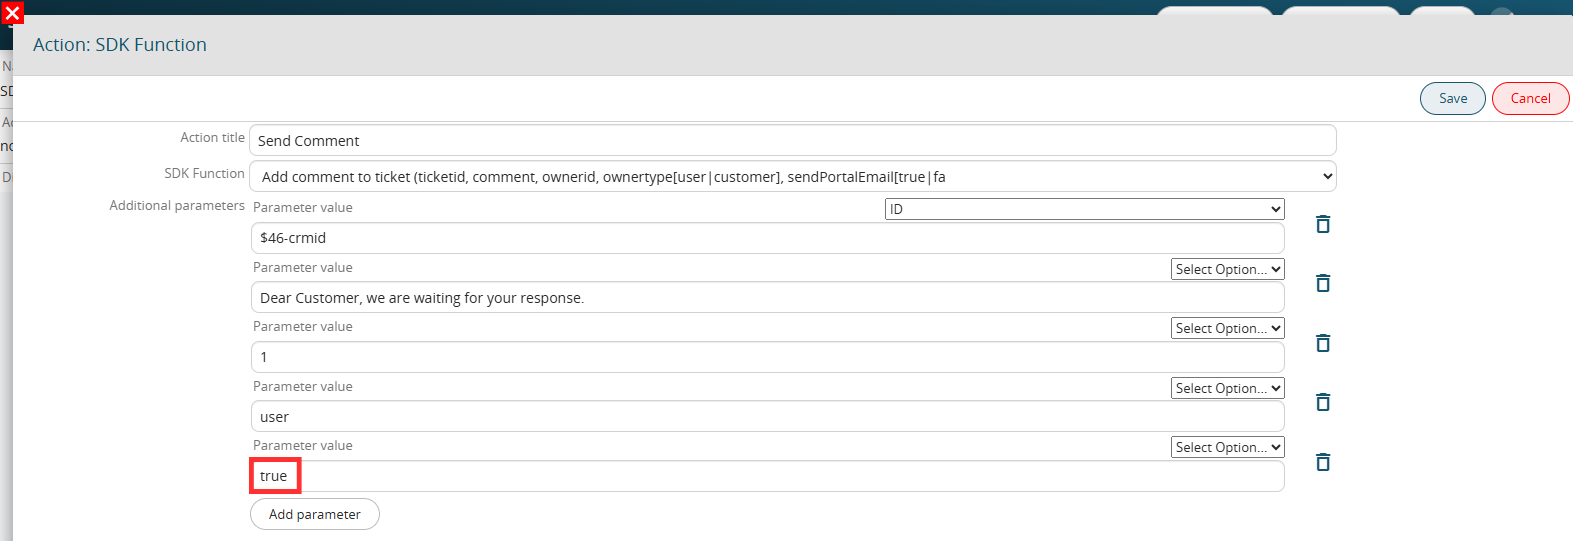](https://usermanual.vtenext.com/uploads/images/gallery/2025-07/f0eimage.png) Figure 5 (click on the image for a higher graphic resolution) The final result will be as shown in Figure 6 [](https://usermanual.vtenext.com/uploads/images/gallery/2025-07/m7Fimage.png) Figure 6 (click on the image for a higher graphic resolution) The automatic email sent to the contact with active portal user linked to the ticket will be as shown in Figure 7 [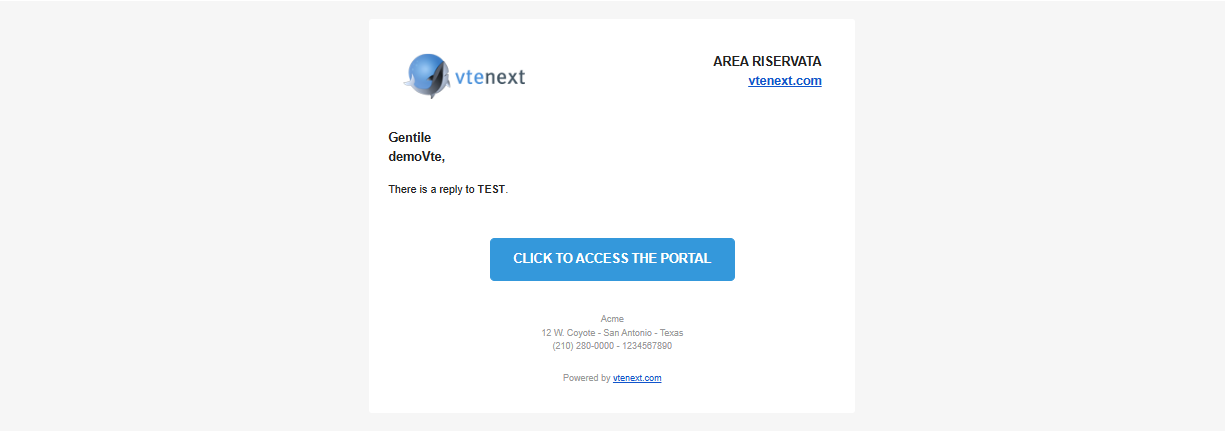](https://usermanual.vtenext.com/uploads/images/gallery/2025-07/Msmimage.png)Figure 7 (click on the image for a higher graphic resolution) # 13.3 SDK Action: Update ModLight row This SDK function allows you to perform an update of the existing rows of a table field present on a specific module. The row ID must be passed as the first parameter, i.e. the key parameter that allows you to uniquely identify a specific existing row in the table field. The second parameter must be passed as the Database name of the column of the table field that you want to update. The last parameter must be passed as the value that you want to insert into the column defined as the second parameter. EXAMPLE OF USE To better understand how it works, below is an example of using the SDK Update ModLight row() function to automatically update the value of the "Processed" column to "yes" for all existing rows of the "Operations" table field present in the Job Order module. (Figure 1) [](https://usermanual.vtenext.com/uploads/images/gallery/2025-07/kGOimage.png) Figure 1 Inside an Action Task we proceed with the configuration of a cycle rows type action on the "Operations" table field and for each "SDK Functions" row in which we call the SDK Update ModLight row(). (Figure 2) [](https://usermanual.vtenext.com/uploads/images/gallery/2025-07/Ioximage.png) Figure 2 As the first parameter we insert the current value of the "ID" variable of the "Operations" table field (on which we are executing the cycle), so in our case "$28-ml3::crmid:curr". (Figure 3) NOTE: this is a piece of data that is not present among the columns of the table but is automatically proposed as a variable within the process As the second parameter we insert the name of the Database of the "Processed" column, so in our case "f8". (Figure 3) As the last parameter we insert the value "si" which in this case, since the "Processed" column is of the checkbox type, in the Database corresponds to the value "1". (Figure 3) [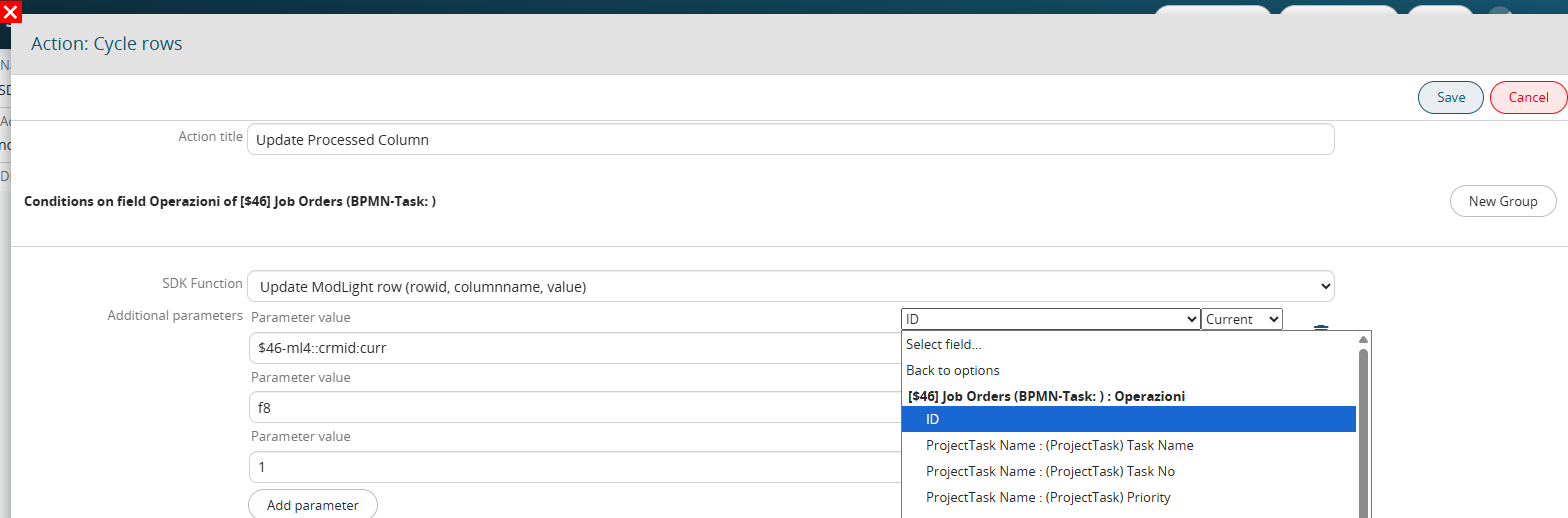](https://usermanual.vtenext.com/uploads/images/gallery/2025-07/NHmimage.png) Figure 3 # 13.4 SDK Action: Update DynaForm table row This SDK function allows you to update existing rows of a table field present on a dynamic form of a process helper. The metaid must be passed as the first parameter, i.e. the ID that uniquely identifies a specific dynamic form within the process. NOTE: the number must be passed without the DF prefix, so for example if the ID is DF9 you must enter only 9. The second parameter must be passed as the Database name of the table field present on the dynamic form of the process helper. The table sequence must be passed as the third parameter, i.e. the key parameter that is used to identify the rows to be updated. As the fourth parameter, the name of the column of the table field that you want to update must be passed to the Database. As the last parameter, the value that you want to insert into the column defined as the fourth parameter must be passed. EXAMPLE OF USE To better understand how it works, below is an example of using the SDK Update DynaForm table row() function to automatically update to "yes" the value of the "Processed" column for all rows of the "Operations" table field present on a dynamic form. (Figure 1) Figure 1 Within an Action Task, we proceed with the configuration of a row cycle type action on the "Operations" table field and for each "SDK Functions" row in which we call the SDK Update DynaForm table row(). (Figure 2) [](https://usermanual.vtenext.com/uploads/images/gallery/2025-07/UwHimage.png) Figure 2 As the first parameter we insert the metaid, that is the ID that uniquely identifies a specific dynamic form within the process without the DF prefix, so in our case 3. (Figure 3) As the second parameter we insert the Database name of the table field present on the dynamic form of the process helper, so in our case "vcf\_8". (Figure 3) As the third parameter we insert the current value of the "Sequence" variable, so in our case "$DF3-vcf\_8::index:curr". (Figure 3) As the fourth parameter we insert the Database name of the "Processed" column, so in our case "vcf\_10". (Figure 3) As the last parameter we insert the value "si" which in this case, since the "Processed" column is of the checkbox type, the Database corresponds to the value "1". (Figure 3) [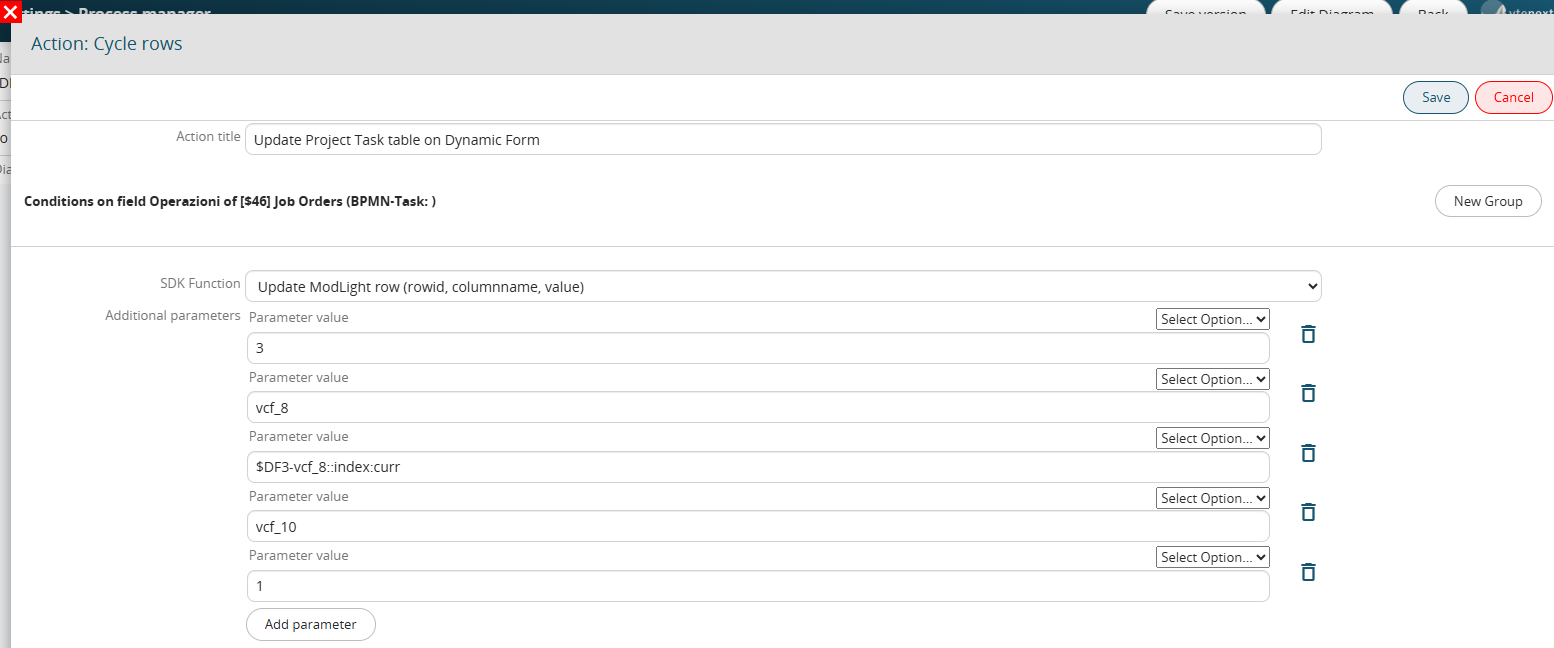](https://usermanual.vtenext.com/uploads/images/gallery/2025-07/8cLimage.png) Figure 3 # 13.5 SDK Action: Set Receiving Newsletter This SDK function allows you to enable or disable newsletter receipt for the email address associated with a Lead, Contact, or Company by controlling the "Receive Newsletter" checkbox field. The first parameter must be the `crmid` of the record for which you wish to update the "Receive Newsletter" field value. The second parameter must be the fixed value "lock" if you want to set the "Receive Newsletter" field to "no"; conversely, to set it to "yes," pass the fixed value "unlock." USAGE EXAMPLE To better understand how it works, the following is an example of using the "Set receiving newsletter" SDK function to disable newsletter receipt for a Lead. As the first parameter, we pass the `crmid` of the lead for which we want to update the "Receive Newsletter" field value—in our case, `$1-crmid` (Figure 1). As the second parameter, we pass the fixed value "lock" (Figure 1). [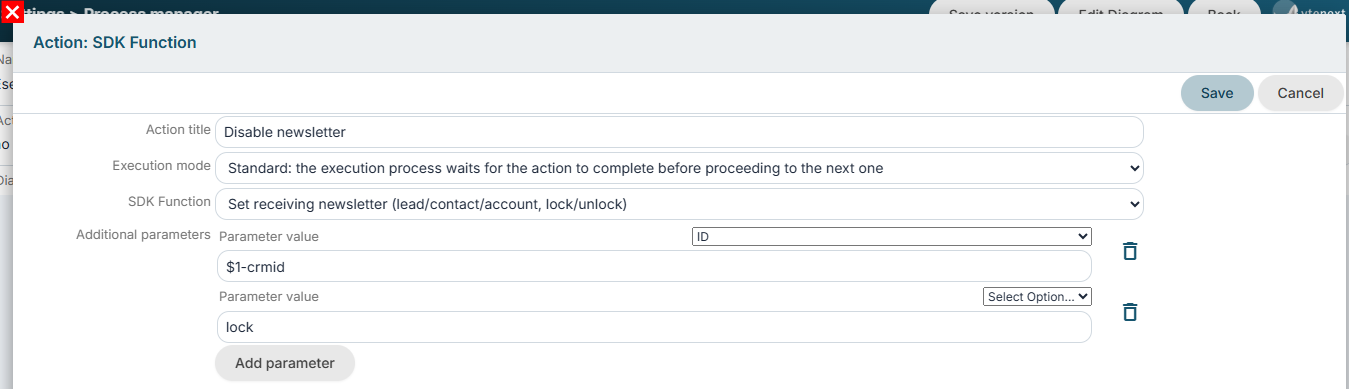](https://usermanual.vtenext.com/uploads/images/gallery/2026-07/fU1image.png) Figure 1 # 14 Standard Task Condition Process SDK: Description and Usage # 14.1 SDK Task Condition: Current User: User Name This SDK function allows you to perform a check on the user who triggered the process, i.e. the user who performed the save. Specifically, it allows you to check if this user corresponds to a statically specified user within the function (Figure 1) For more information on the operating logic of these types of SDKs, see chapter 11.3 of the processes manual. [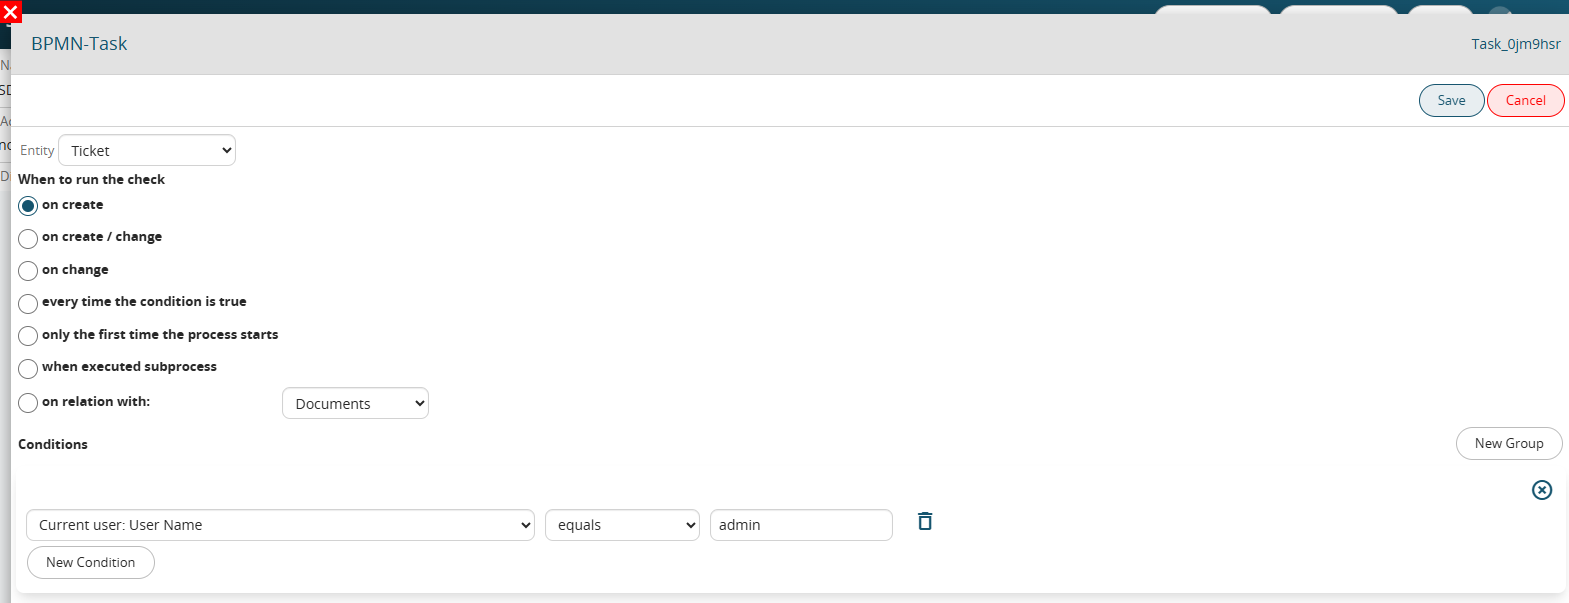](https://usermanual.vtenext.com/uploads/images/gallery/2025-07/Gnnimage.png) Figure 1 (click on the image for a higher graphic resolution) # 14.2 SDK Task Condition: Project Task usage % This SDK function allows you to perform a comparison between a static value (passed to the function) and a percentage value calculated based on the content of the "Service Delivery" field of the Operations module. If the "Package" item has been selected in the operation, the percentage value will be calculated based on the "Hours Used" and "Package Hours" fields. Instead, if the "Project" item has been selected in the operation, the percentage value will be calculated based on the "Hours Used" and "Forecasted Hours" fields. For more information on the operating logic of these types of SDKs, see chapter 11.3 of the process manual. To better understand how they work, Figure 1 shows the configuration of a process that is triggered when the percentage of hours used in an operation with "Service Delivery" = "Package" is greater than 70%. [](https://usermanual.vtenext.com/uploads/images/gallery/2025-07/vrhimage.png) Figure 1 (click on the image for a higher graphic resolution) # 15 Sub-processes # 15.1 Sub-processes: Configuration and Usage Modes Subprocesses are particular types of processes that can be called within other processes defined as “parent”. To proceed with their configuration, you must create a process by inserting the entry “when the subprocess is launched” in the initial condition (Figure 1) In the “Entity” field it will not be possible to select any module, as the instance defined in the “parent” process will be inherited. [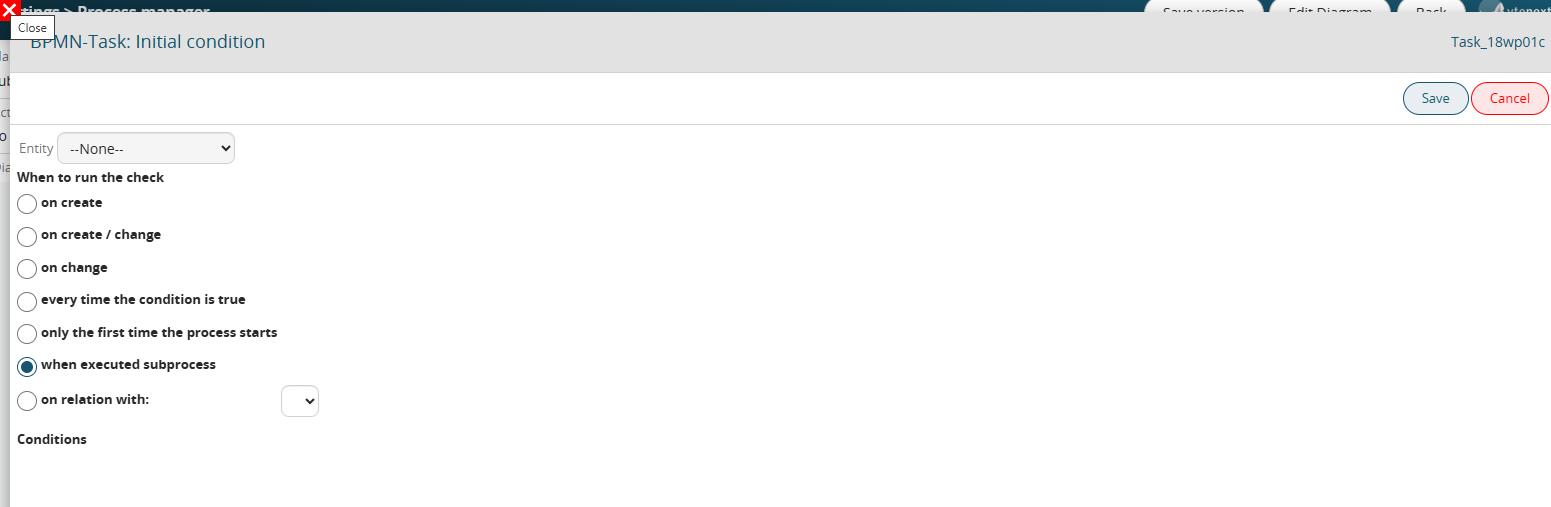](https://usermanual.vtenext.com/uploads/images/gallery/2025-07/qROimage.png) Figure 1 In order to configure the rest of the Tasks/Action Tasks defined in the flowchart (and therefore be able to use all the data of the "parent" process), you must first call the subprocess within the "parent" process using the following procedure: 1\) Define a Task within the flowchart of the parent process (Figure 2) [](https://usermanual.vtenext.com/uploads/images/gallery/2025-07/Qw5image.png) Figure 2 2\) Select the "Sub process (collapsed)" item from the available options by clicking on the wrench symbol (Figure 3 and 4) [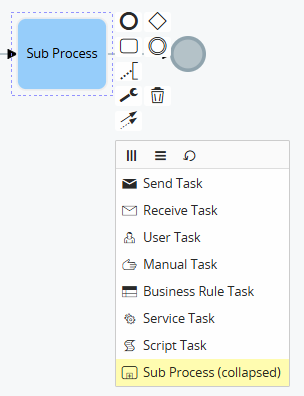](https://usermanual.vtenext.com/uploads/images/gallery/2025-07/twKimage.png) Figure 3 [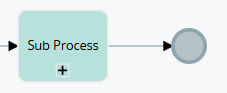](https://usermanual.vtenext.com/uploads/images/gallery/2025-07/oFeimage.png) Figure 4 NOTE: if you configure a subprocess in a version PREVIOUS to 24.08, after each "Sub process (collapsed)" Task configured in the "parent" process, you must insert a subsequent Task that allows the "parent" process to interrupt its flow until the called subprocess has finished its execution (Figure 5) Instead, from version 24.08 onwards the system will automatically manage the interruption and resumption of the flow of the "parent" process. [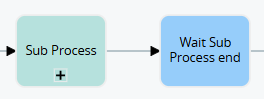](https://usermanual.vtenext.com/uploads/images/gallery/2025-07/ldZimage.png) Figure 5 3\) Access the Task in configuration mode and select the subprocess to involve (Figure 6) NOTE: even if in versions prior to 24.08 the "parent" processes will also be visible in this screen, if selected they will not produce any result, this is because only the subprocesses can be selected. [](https://usermanual.vtenext.com/uploads/images/gallery/2025-07/HIYimage.png) Figure 6 At this point, within the subprocess it will be possible to exploit all the data of the instances of the modules involved in the "parent" process (Figure 7) [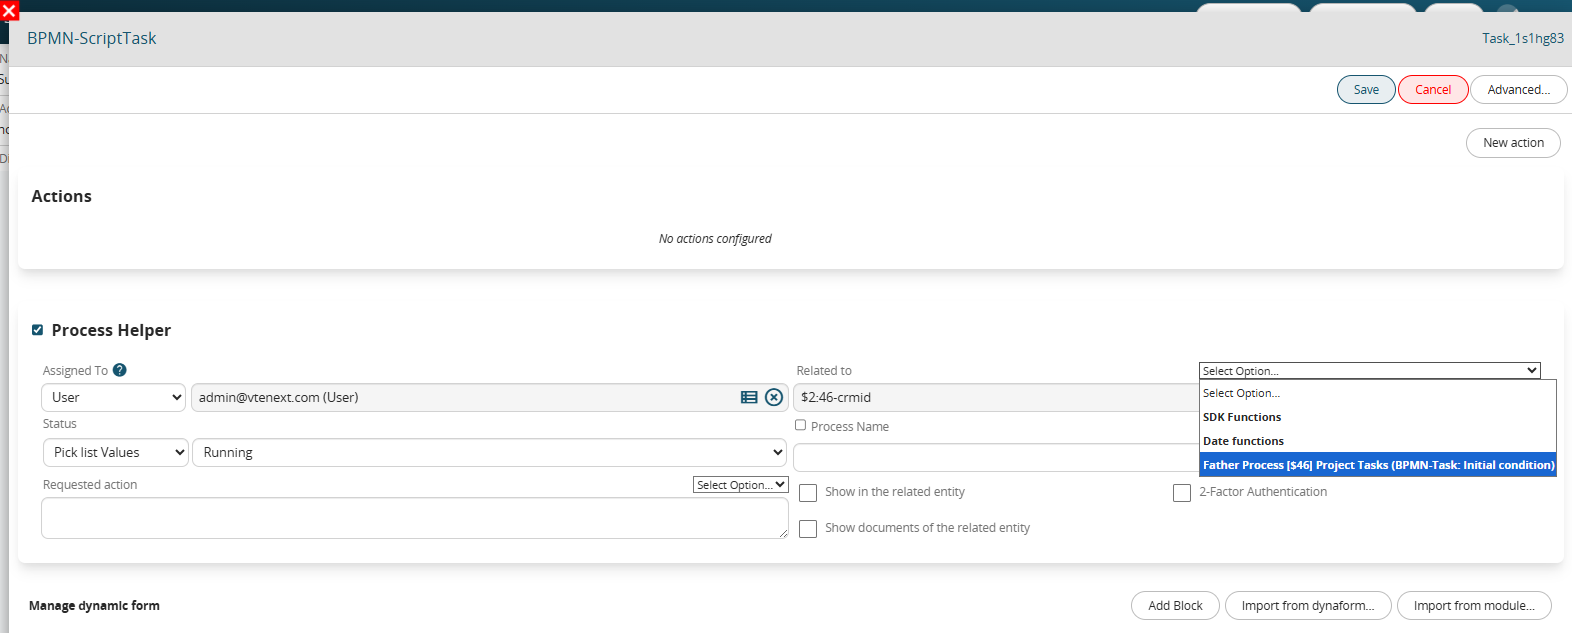](https://usermanual.vtenext.com/uploads/images/gallery/2025-07/yRnimage.png) Figure 7 Due to a structural technical limitation of the system, it is NOT possible to call the same subprocess multiple times within a "parent" process. However, it is possible to circumvent this limitation by composing a flowchart that allows the process to go back and re-execute the "Sub process (collapsed)" type Task in which the involved subprocess is called (Figure 8). [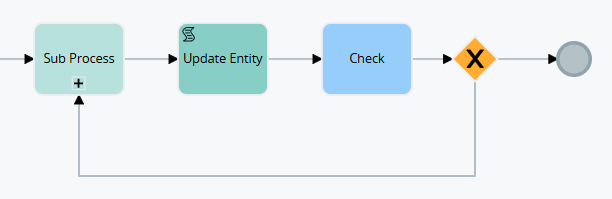](https://usermanual.vtenext.com/uploads/images/gallery/2025-07/ul0image.png) Figure 8 # 15.2 Example: Opportunity Management Process Configuration **Main Process: Opportunity Management Process** [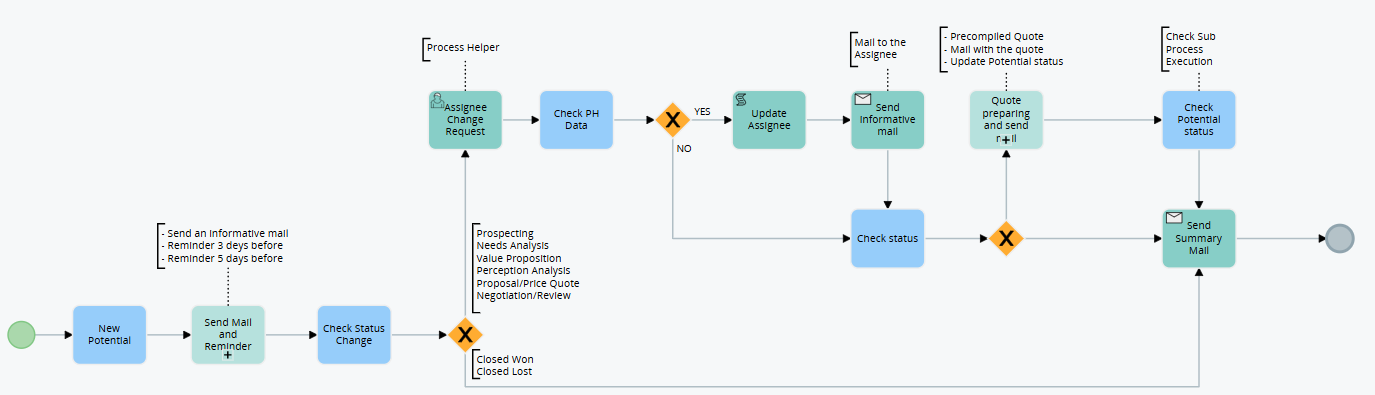](https://usermanual.vtenext.com/uploads/images/gallery/2025-07/aFuimage.png) The SubProcess task is used to call other processes (subprocesses) and therefore simplify the logic of the main process. In the case proposed below there are **2 SubProcesses**: **1st Send a summary email** to the assignee and create reminder events assigned to the same user. **2nd Create a pre-filled Quote** (only if the previous conditions are true) and send it via email also updating the status of the Opportunity.  **The screenshot shows the configured process.** [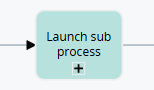](https://usermanual.vtenext.com/uploads/images/gallery/2025-07/fknimage.png)The following process is activated when a new Opportunity is created and follows the flow for a possible reassignment and sales stage update. To activate it, check the box “**active**” once the diagram and configuration are complete [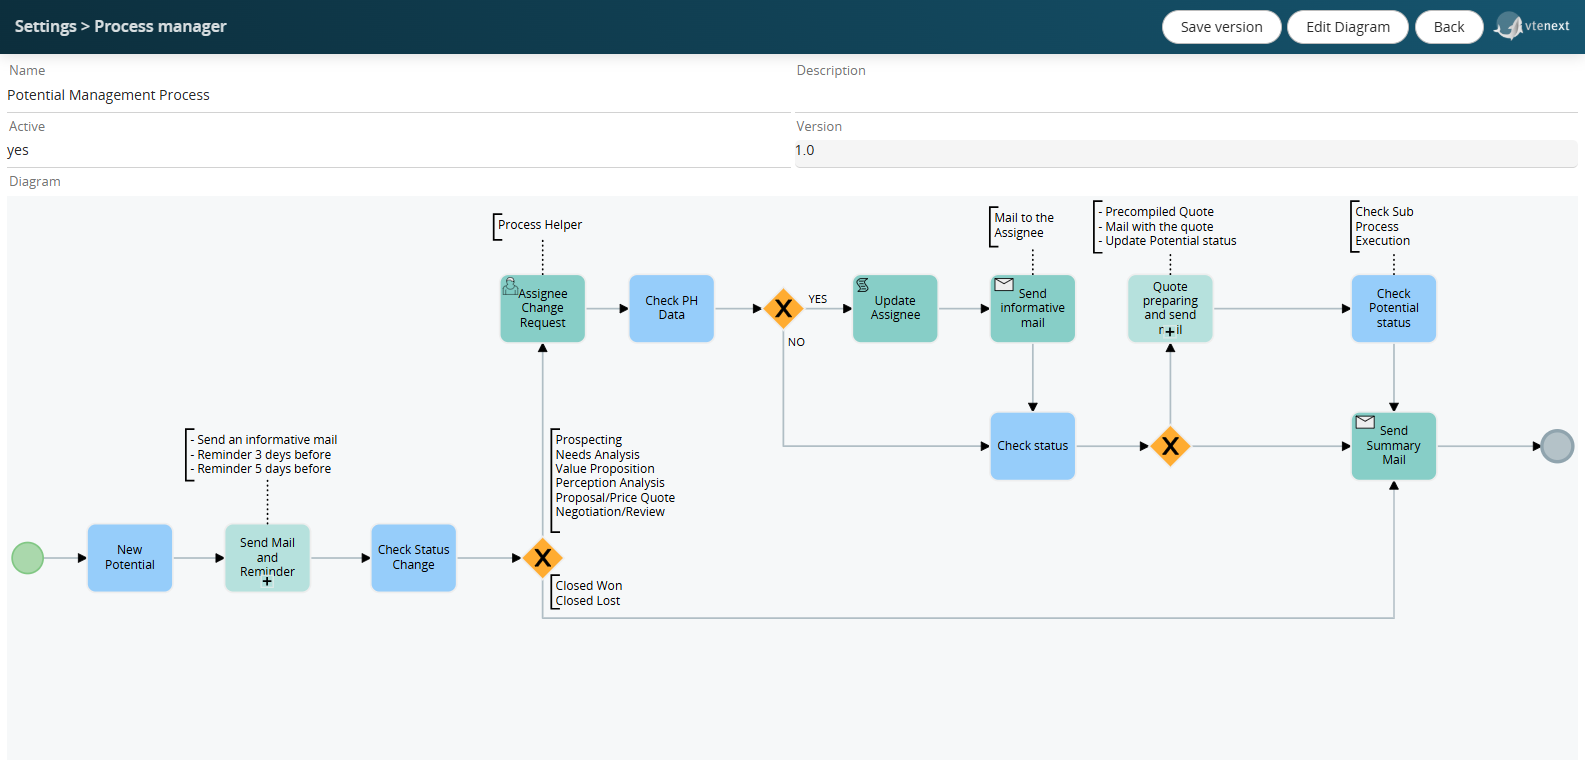](https://usermanual.vtenext.com/uploads/images/gallery/2025-07/Zo3image.png) [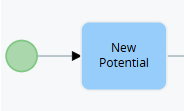](https://usermanual.vtenext.com/uploads/images/gallery/2025-07/Zq3image.png) Here on the side, the first task has been filled in, which represents the initial condition to start the process. Therefore, the linked entity “**Opportunity**” is selected and on When to run the check “at creation”. A Group of conditions is then specified to actually start the process, in this case that the Sales Stage is different from those indicated (“In Prospect”, “Qualification”, “In Estimate”) [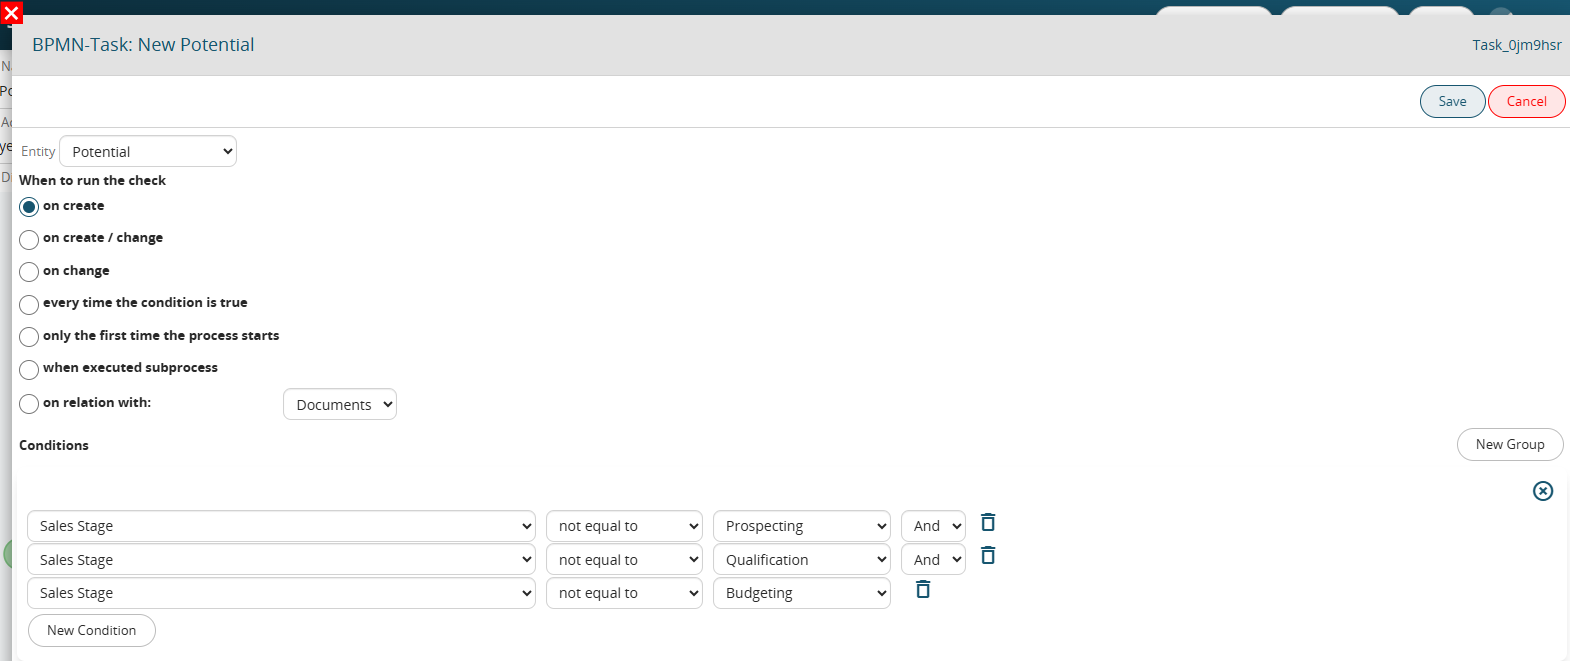](https://usermanual.vtenext.com/uploads/images/gallery/2025-07/oLwimage.png) [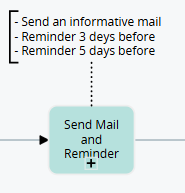](https://usermanual.vtenext.com/uploads/images/gallery/2025-07/W5Oimage.png) This task represents the call to another process (subprocess), which inside it executes its own execution flow. Therefore, it is necessary to choose which one to call from the proposed list. Inside it there will be a Task for sending emails to inform the opening of a new Opportunity and the creation of 2 reminders, one 5 days before the deadline, the other 3. [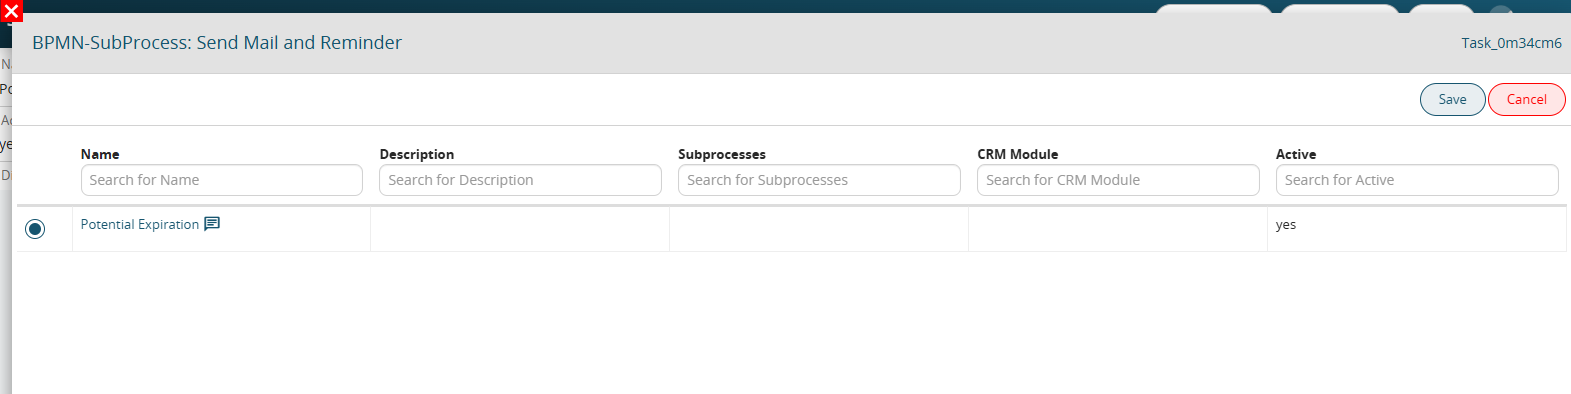](https://usermanual.vtenext.com/uploads/images/gallery/2025-07/qgMimage.png) [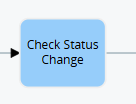](https://usermanual.vtenext.com/uploads/images/gallery/2025-07/Elkimage.png) This task represents a check on the status of the opportunity (Sales Stage). The possible cases of the values to be managed are therefore defined. In this case, it is verified whether the value of this field has changed in one of these: \- In Perspective \- To be Analyzed \- Perception Analysis \- Proposal / Price Estimate \- Negotiation / Review \- Proposed value \- Decision-making power OR \- Closed WON \- Closed LOST [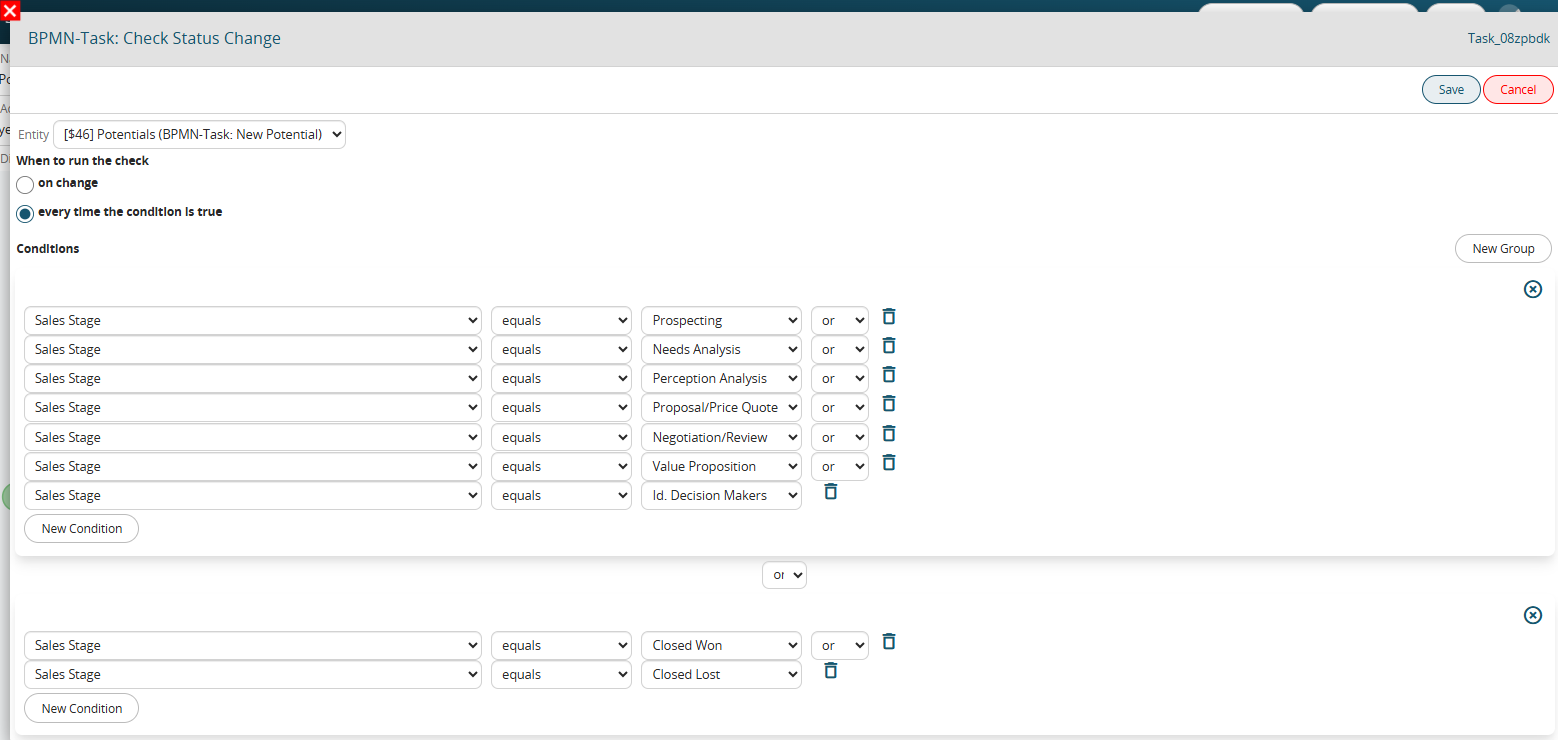](https://usermanual.vtenext.com/uploads/images/gallery/2025-07/9JMimage.png) [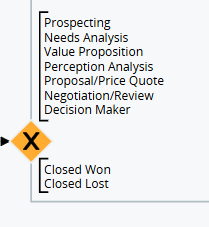](https://usermanual.vtenext.com/uploads/images/gallery/2025-07/ScHimage.png) This task represents an Exclusive Gateway, which defines the possible flows based on the previously set conditions. In this case, if the Sales Stage is one of those described previously (In Prospect, To be Analyzed, Perception Analysis, Price Proposal/Estimate, Negotiation/Revision, Value Proposed, Decision-making Power), it continues to the next task called “Request for change of assignee”. Otherwise, if it is equal to “**Closed WON**” or “**Closed LOST**”, the execution continues towards the “**Send Summary Email**” Task. [](https://usermanual.vtenext.com/uploads/images/gallery/2025-07/KqXimage.png) [](https://usermanual.vtenext.com/uploads/images/gallery/2025-07/A4simage.png) This task uses the so-called “**ProcessHelper**” which interfaces with the user and requires, as already defined, manual intervention. The “**Show popup in the linked entity**” box is flagged to make a window (dynamic form) appear with a set of read-only data as a summary and a user field from which it is possible to select the new assignee and a Button type field to change the value of the “**Confirm” picklist**. **You must then confirm to proceed** [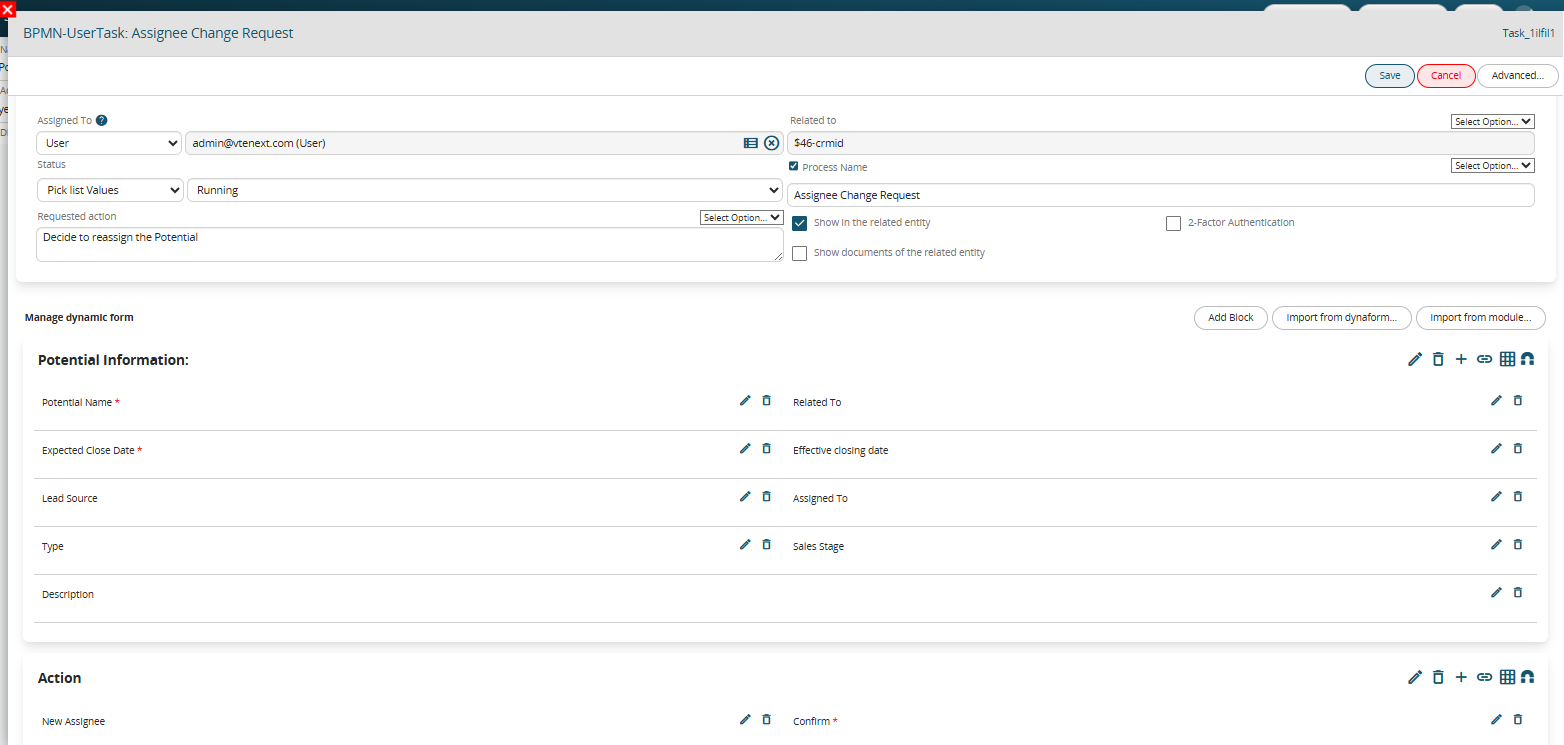](https://usermanual.vtenext.com/uploads/images/gallery/2025-07/2qLimage.png) [](https://usermanual.vtenext.com/uploads/images/gallery/2025-07/V4Himage.png) This Task verifies the ProcessHelper data. As already mentioned, a dynamic form displays summary fields and a confirmation picklist (YES/NO) for the new re-assignment. Therefore, the confirmation field of the Dynamic Form is checked to verify that it has been set to “**YES OR “NO**”. [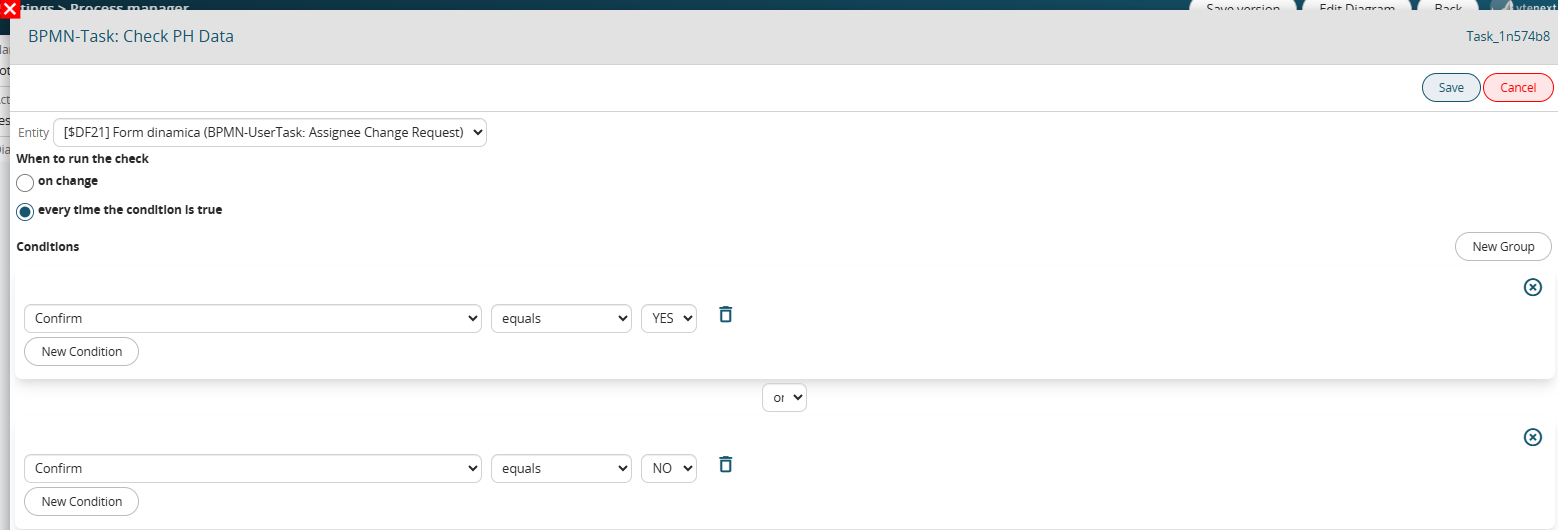](https://usermanual.vtenext.com/uploads/images/gallery/2025-07/g0iimage.png) [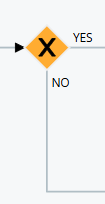](https://usermanual.vtenext.com/uploads/images/gallery/2025-07/M9qimage.png) At this point, Exclusive Gateway, we assign the previously configured roads based on the response given in the Dynamic Form. If the user has confirmed (YES) proceeds with the reassignment of the Opportunity, otherwise (NO) we proceed directly to the Status control of the latter (Sales Stage). [](https://usermanual.vtenext.com/uploads/images/gallery/2025-07/zwuimage.png) [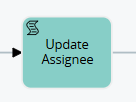](https://usermanual.vtenext.com/uploads/images/gallery/2025-07/IF9image.png) This task performs an update action. The previous user selected via the dynamic form is now set among the attributes of the opportunity in question. Therefore, a **NEW ACTION** is added - Update entity. Select the Opportunity entity and modify the Assigned to field by taking the reference of the field present in the Dynamic Form, in our case "**New Assignee**". [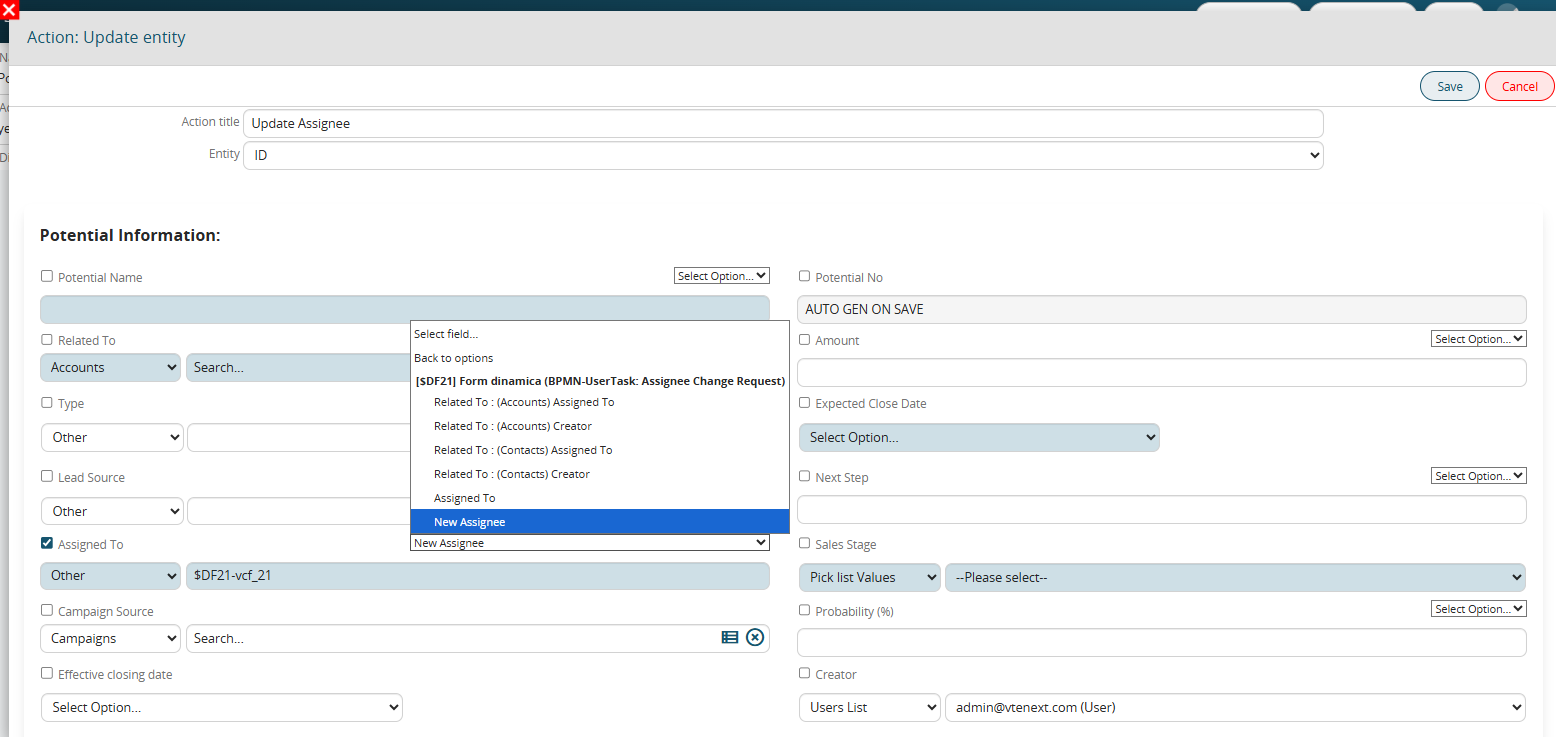](https://usermanual.vtenext.com/uploads/images/gallery/2025-07/jcEimage.png) [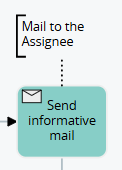](https://usermanual.vtenext.com/uploads/images/gallery/2025-07/QjXimage.png) This task represents the sending of an information email to the new assignee of the Opportunity. This will then receive a small summary of the data relating to the latter. The main fields sender, recipient, subject and body, necessary for sending the email, are then filled in. [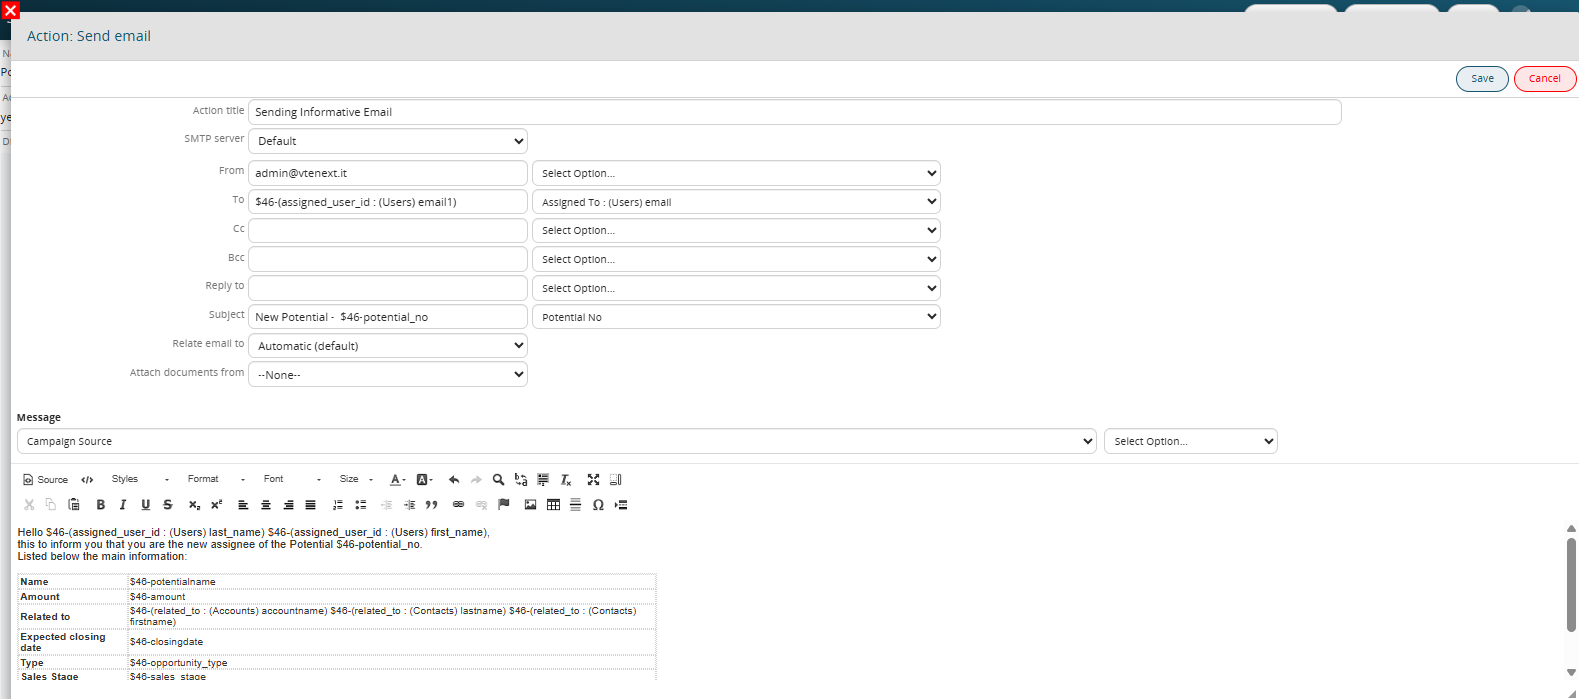](https://usermanual.vtenext.com/uploads/images/gallery/2025-07/Eykimage.png) [](https://usermanual.vtenext.com/uploads/images/gallery/2025-07/KX0image.png) This task represents a second check on the opportunity status (Sales Stage). The possible cases of the values to be managed are then defined. In this case, it is checked whether the sales stage is equal to “Proposal Quote/Price” or not. If equal to this, it continues with the call to the “Pre-filled Quote” Sub-Process, otherwise it continues directly to the “Send Summary Email” Task. [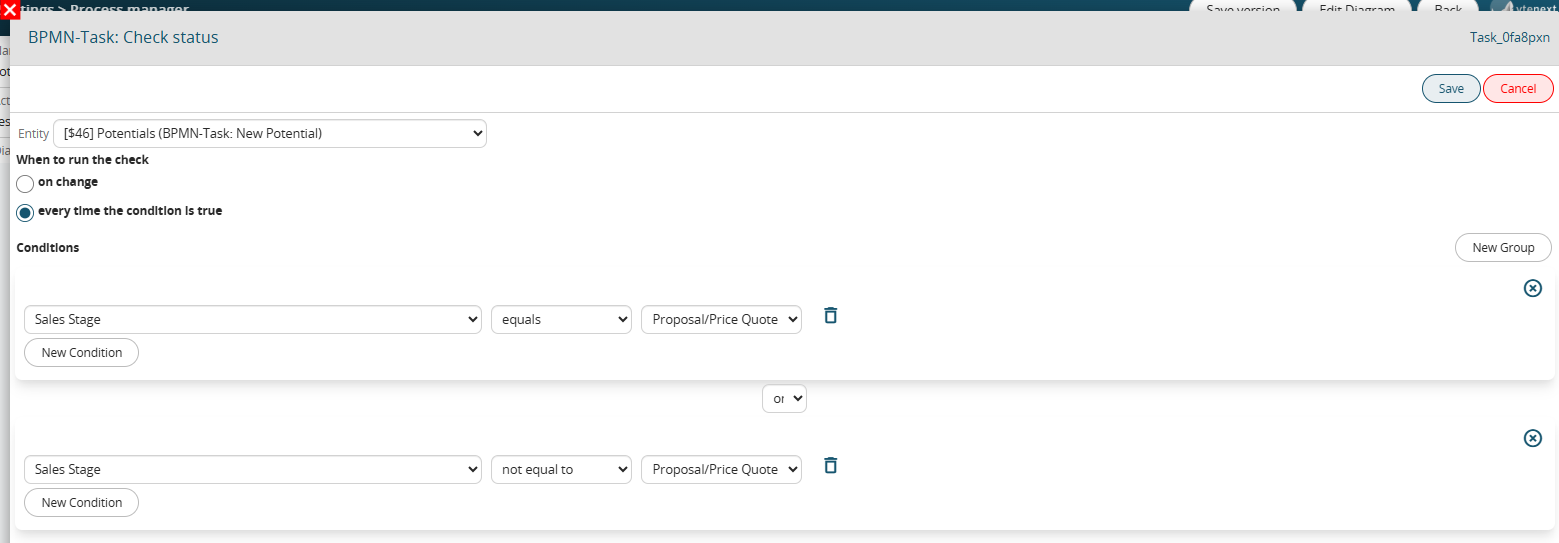](https://usermanual.vtenext.com/uploads/images/gallery/2025-07/F4Pimage.png) [](https://usermanual.vtenext.com/uploads/images/gallery/2025-07/E8Qimage.png) This task represents a further Exclusive Gateway, which defines the possible flows based on the previously set conditions. In this case, if the Sales Stage is “Estimate/Price Proposal”, it continues to the next task as mentioned, that is, to the call of the “Pre-filled Estimate” sub-process. Otherwise, it continues with sending emails. [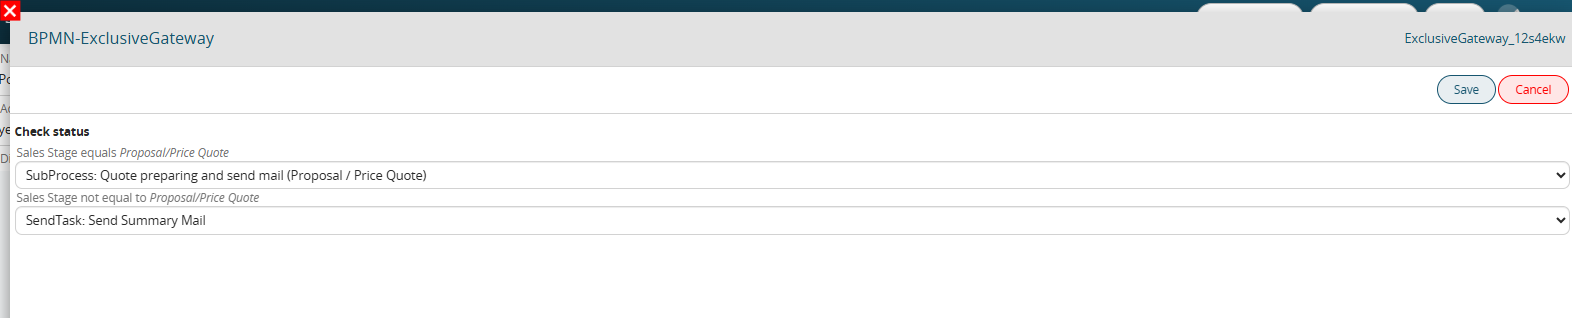](https://usermanual.vtenext.com/uploads/images/gallery/2025-07/VLIimage.png) [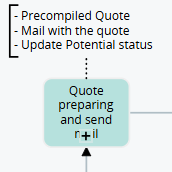](https://usermanual.vtenext.com/uploads/images/gallery/2025-07/pllimage.png) This task is a call to another sub-process, which will create a quote and when it is in the “Reviewed” state, will send the summary email and update the Sales Stage of the Opportunity. [](https://usermanual.vtenext.com/uploads/images/gallery/2025-07/gf0image.png) [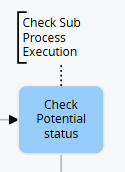](https://usermanual.vtenext.com/uploads/images/gallery/2025-07/V3limage.png) This task performs a control action on the Sales Stage of the Opportunity, to verify the complete and entire execution of the Sub-Process. If this is equal to “**Negotiation/Review**”, the flow continues with the next Task of sending the Final Summary email. [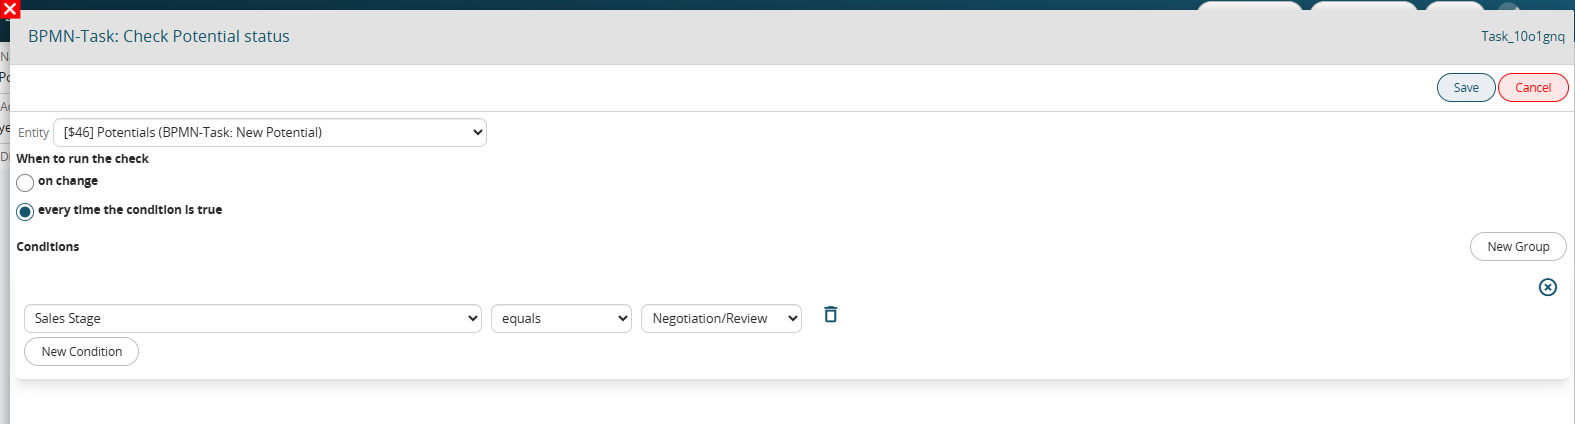](https://usermanual.vtenext.com/uploads/images/gallery/2025-07/aLFimage.png) [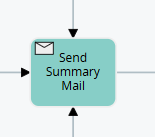](https://usermanual.vtenext.com/uploads/images/gallery/2025-07/Dsuimage.png) This task represents the last action, that is, a summary email to inform the assignee about the data relating to the Opportunity. Therefore, click on **NEW ACTION** - Email Sending and insert the necessary fields. After this Task, you reach the end of the process, therefore towards the End Event. [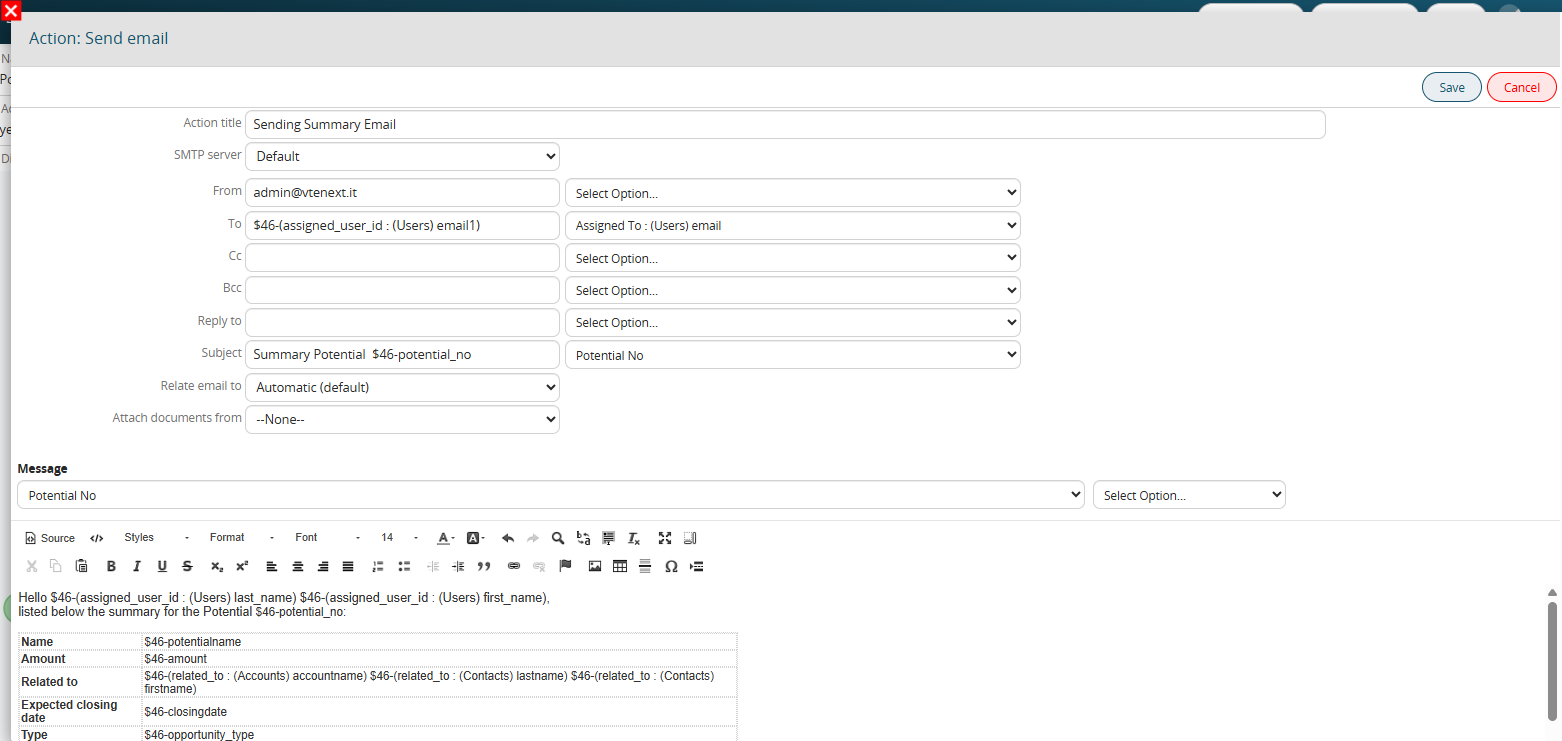](https://usermanual.vtenext.com/uploads/images/gallery/2025-07/YJmimage.png) [](https://usermanual.vtenext.com/uploads/images/gallery/2025-07/jsBimage.png) As mentioned, the process ends its execution at this node, i.e. the End Event. The “**Opportunity**” entity is connected and the status is set to “**Terminated**”. [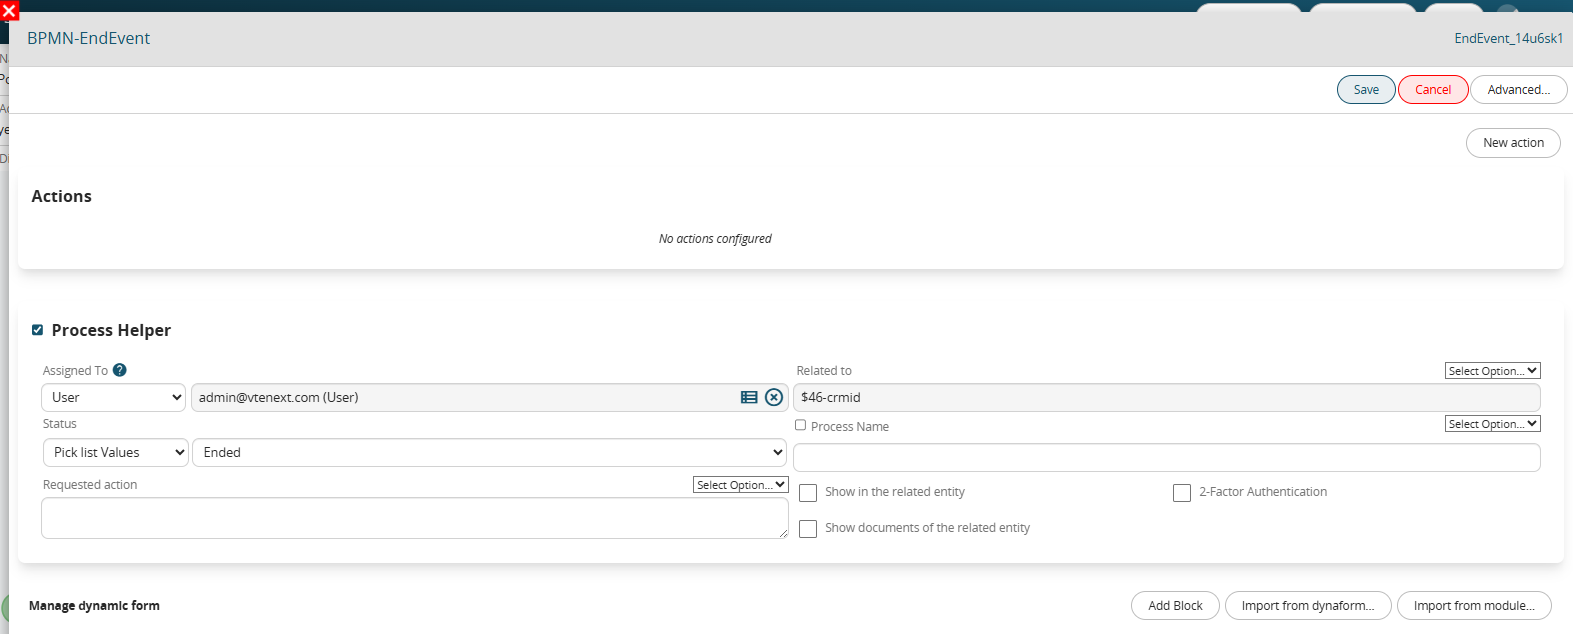](https://usermanual.vtenext.com/uploads/images/gallery/2025-07/hO4image.png) #### **Sub-Process:** **Opportunity Expiration** [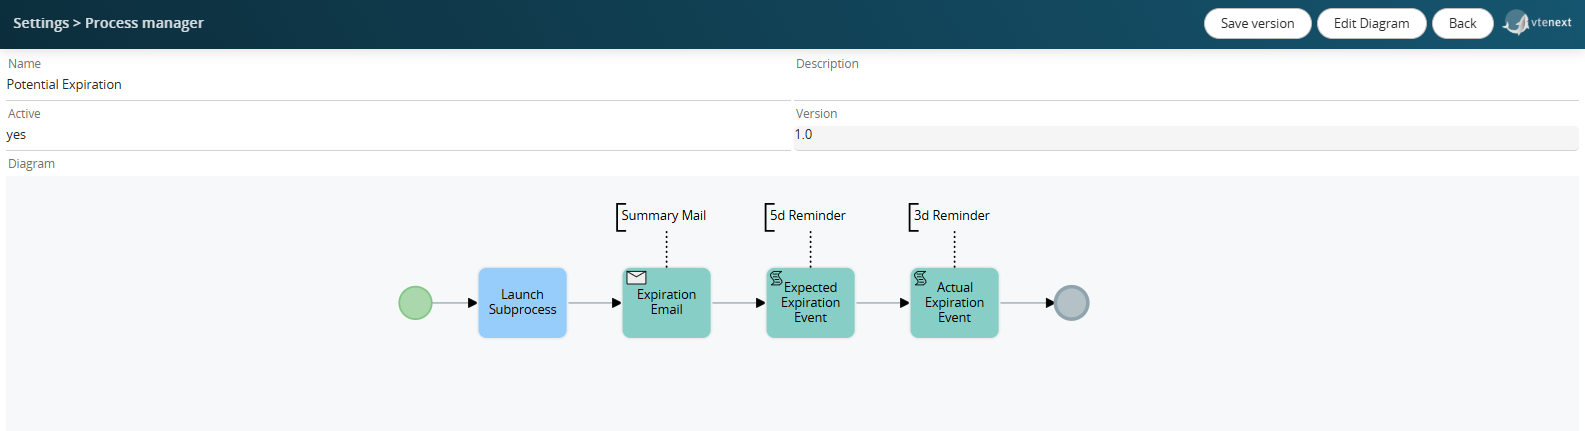](https://usermanual.vtenext.com/uploads/images/gallery/2025-07/BOTimage.png) [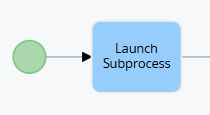](https://usermanual.vtenext.com/uploads/images/gallery/2025-07/gekimage.png) The Task represented is the initial Task for the launch of the Sub-Process. In fact, no entity is selected and in “**When to execute the check**” “**at the launch of the sub-process**” is selected. [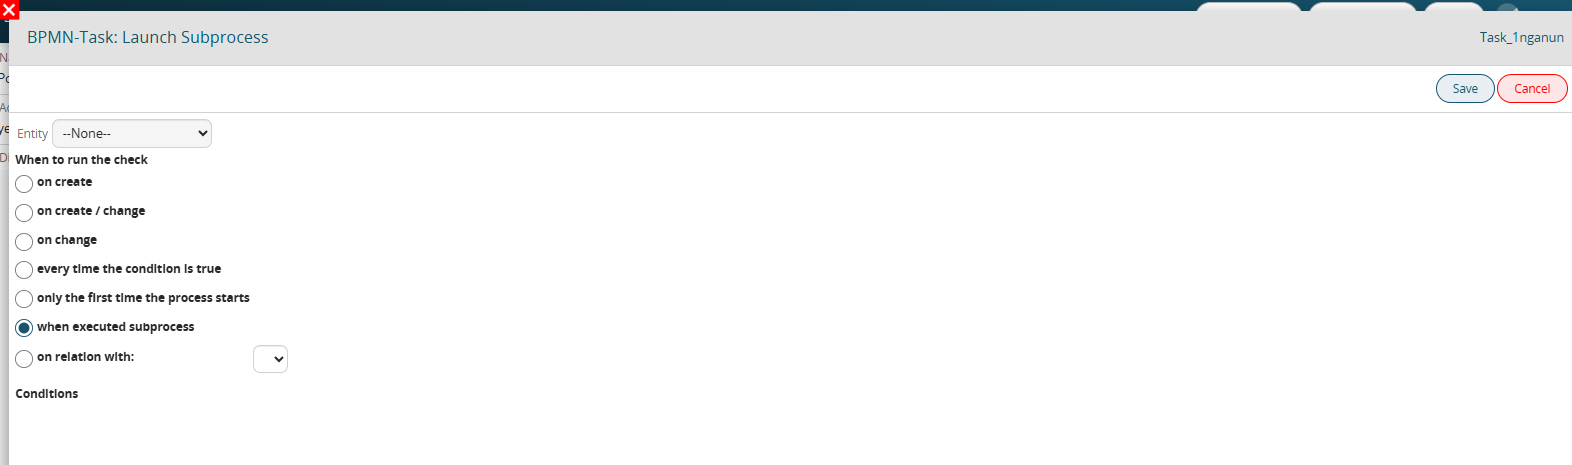](https://usermanual.vtenext.com/uploads/images/gallery/2025-07/2Drimage.png) [](https://usermanual.vtenext.com/uploads/images/gallery/2025-07/IUdimage.png) In this Task, the email sending is configured for the Opportunity assignee. **A NEW ACTION** is then configured - **Email sending**. The main information is entered (sender, recipient, subject, body, ...). [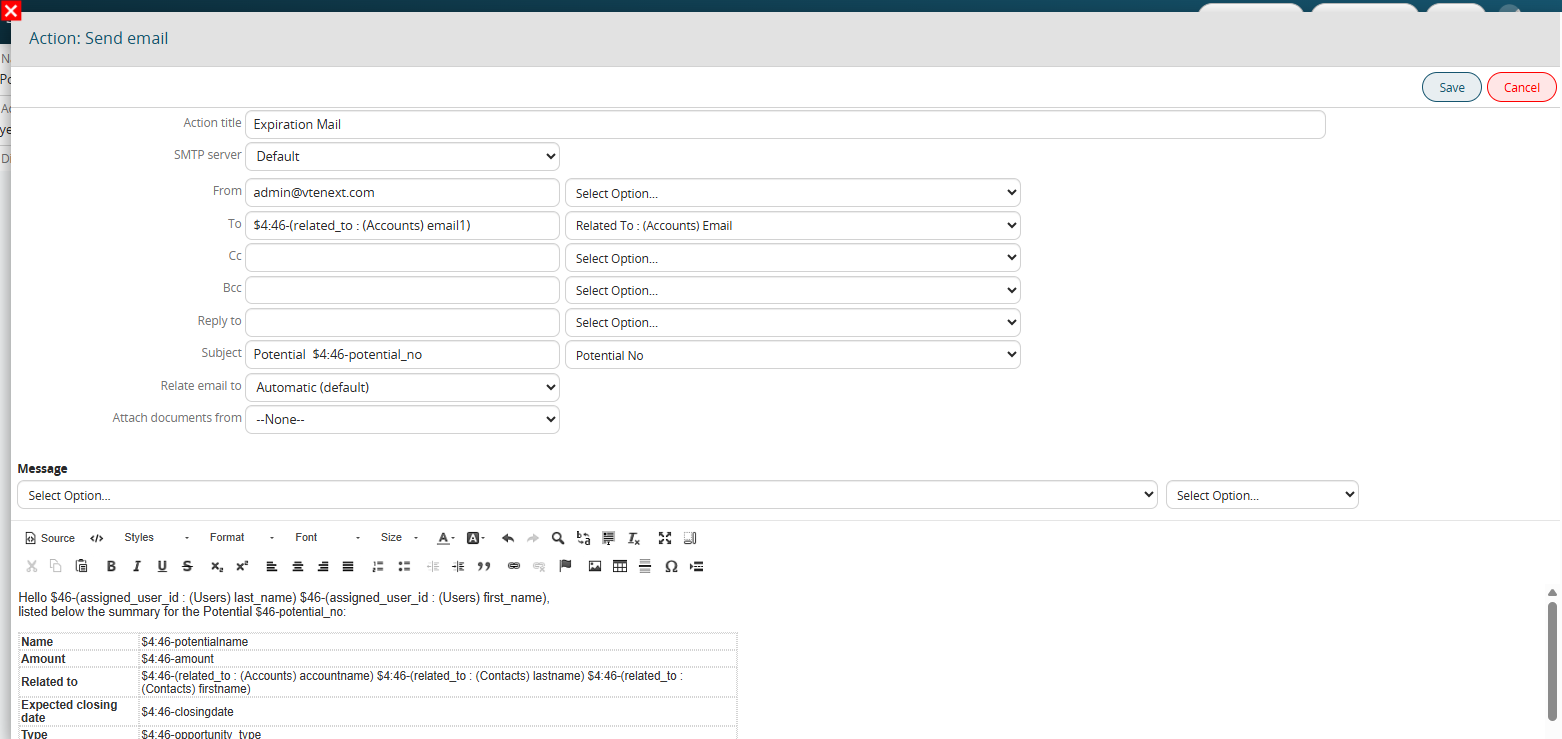](https://usermanual.vtenext.com/uploads/images/gallery/2025-07/EWTimage.png) [](https://usermanual.vtenext.com/uploads/images/gallery/2025-07/NKuimage.png) In the task described here on the side we see the creation of a reminder, or a calendar Event in view of the expected Deadline. In fact, this is planned 5 days from the “**Expected Closing Date**” entered in the Opportunity. Therefore, the various fields are filled in as desired and 5 days are subtracted from the indicated date. [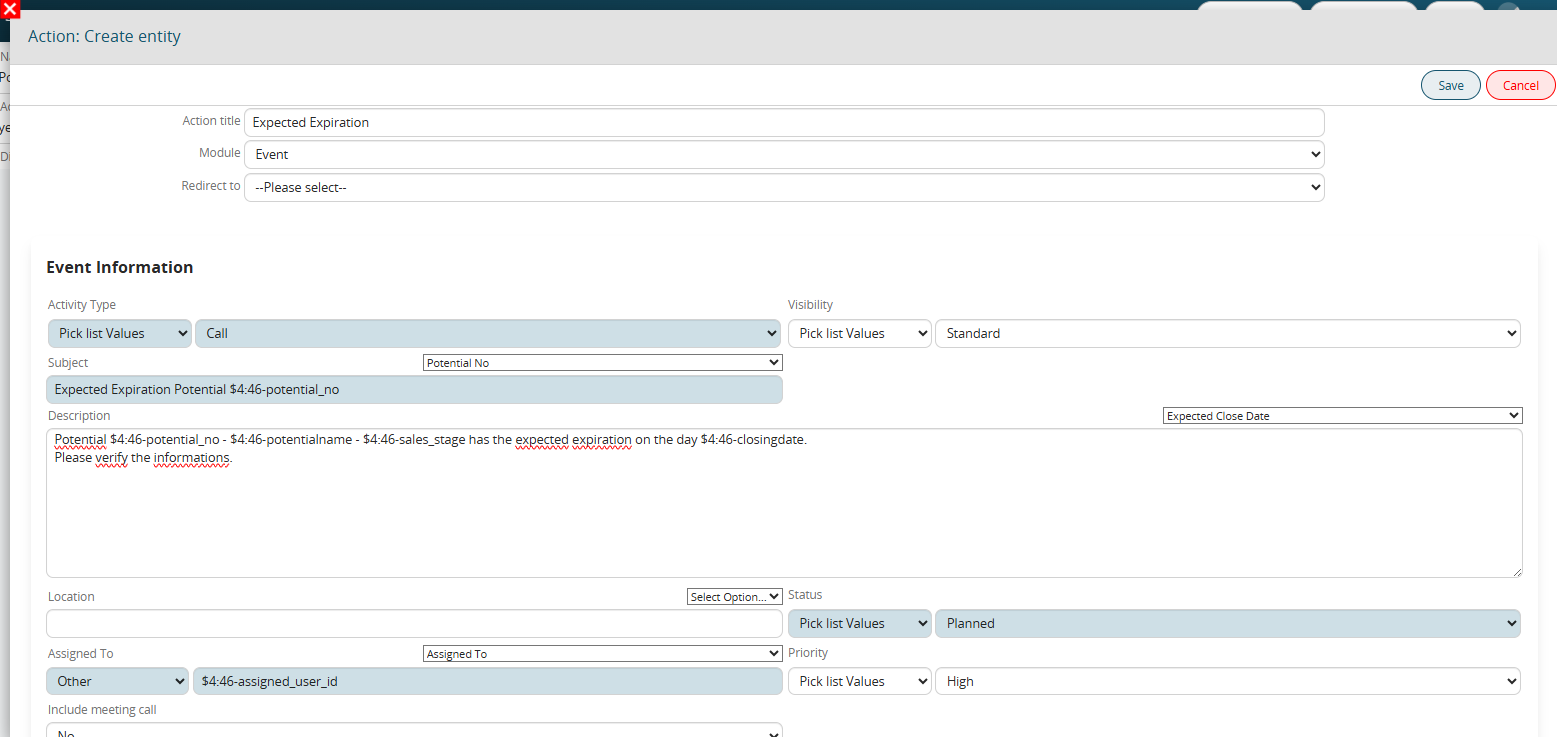](https://usermanual.vtenext.com/uploads/images/gallery/2025-07/8pQimage.png) [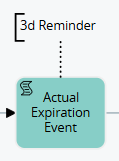](https://usermanual.vtenext.com/uploads/images/gallery/2025-07/dXBimage.png) In this task we have the creation of a second reminder, that is, a Calendar Event in view of the Actual Deadline. This, unlike the first, is planned 3 days from the “**Actual Closing Date**” entered in the Opportunity. Therefore, the various fields are filled in as desired and 3 days are subtracted from the indicated date. [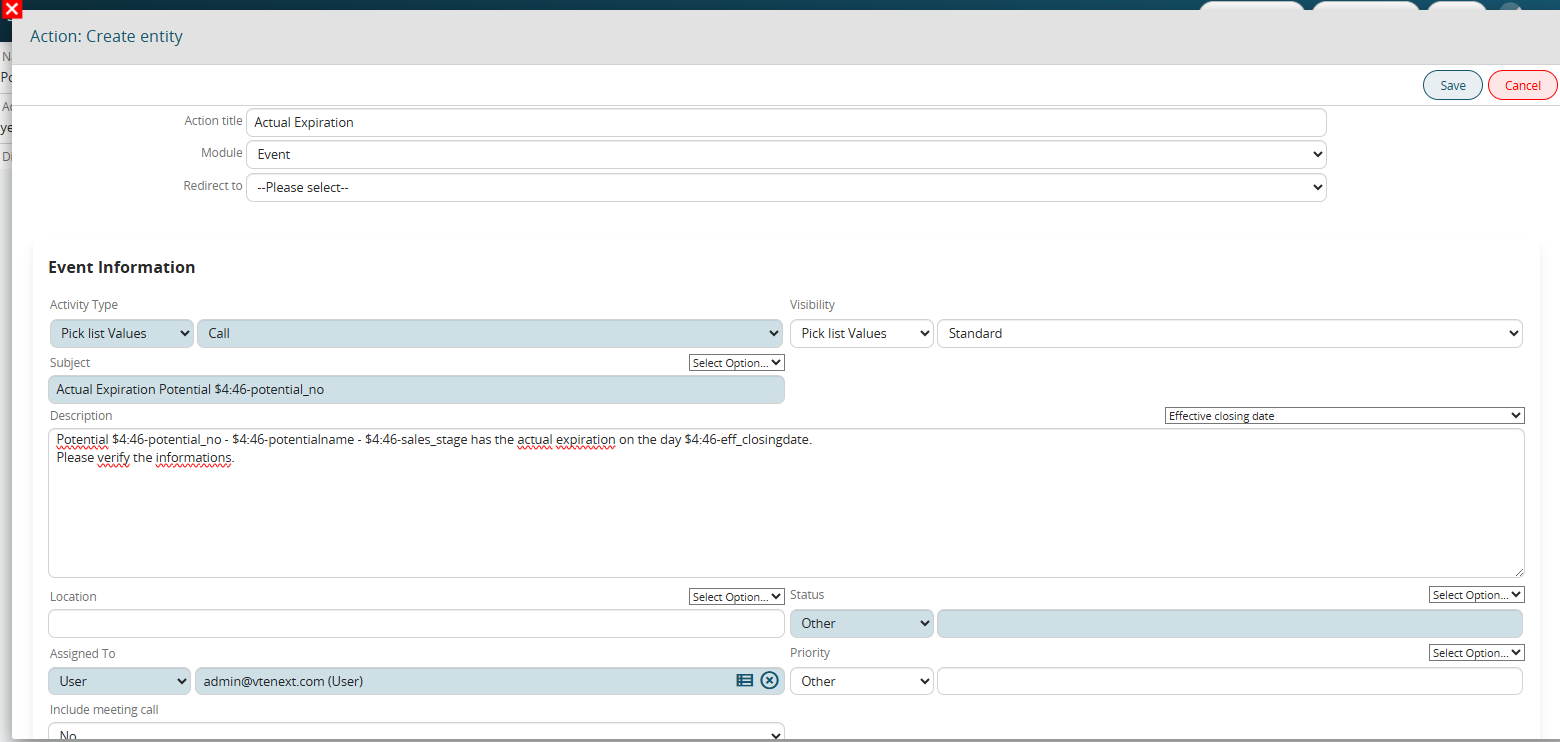](https://usermanual.vtenext.com/uploads/images/gallery/2025-07/x68image.png) #### **Sub-Process: Pre-filled Quote** [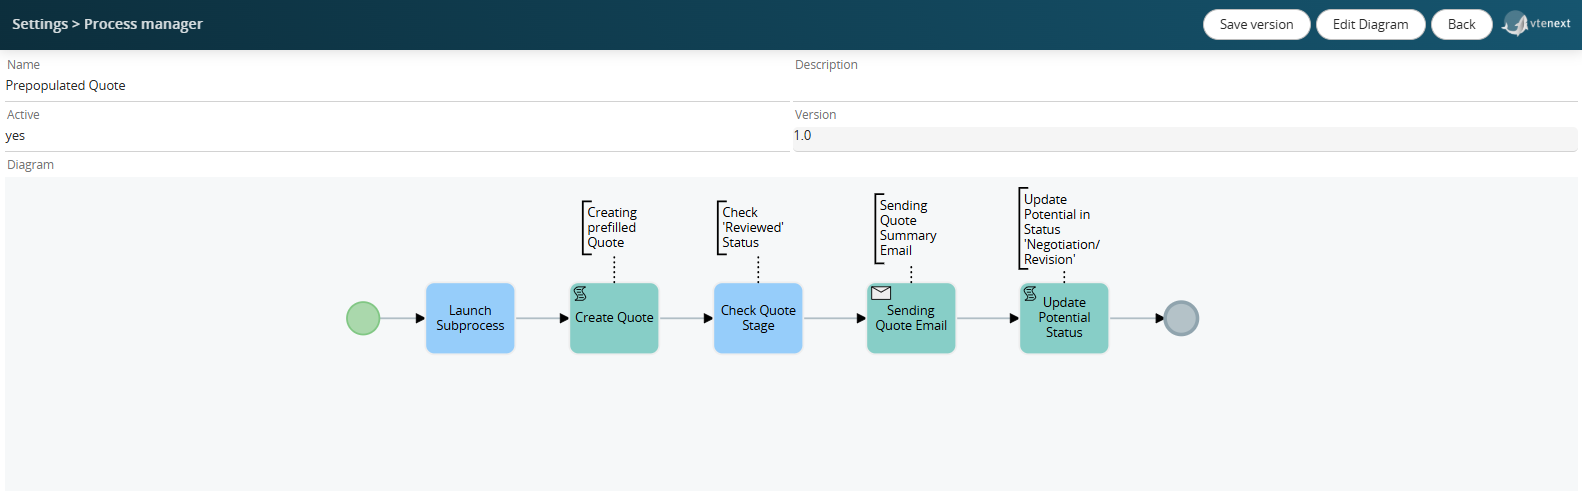](https://usermanual.vtenext.com/uploads/images/gallery/2025-07/LjEimage.png) [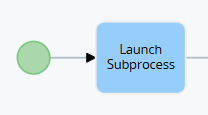](https://usermanual.vtenext.com/uploads/images/gallery/2025-07/Xf8image.png) As in the previous Subprocess, also in this case we find the initial Task for the start. In fact, no entity is selected and on “**When to execute the check**” we select “**at the start of the subprocess**”. [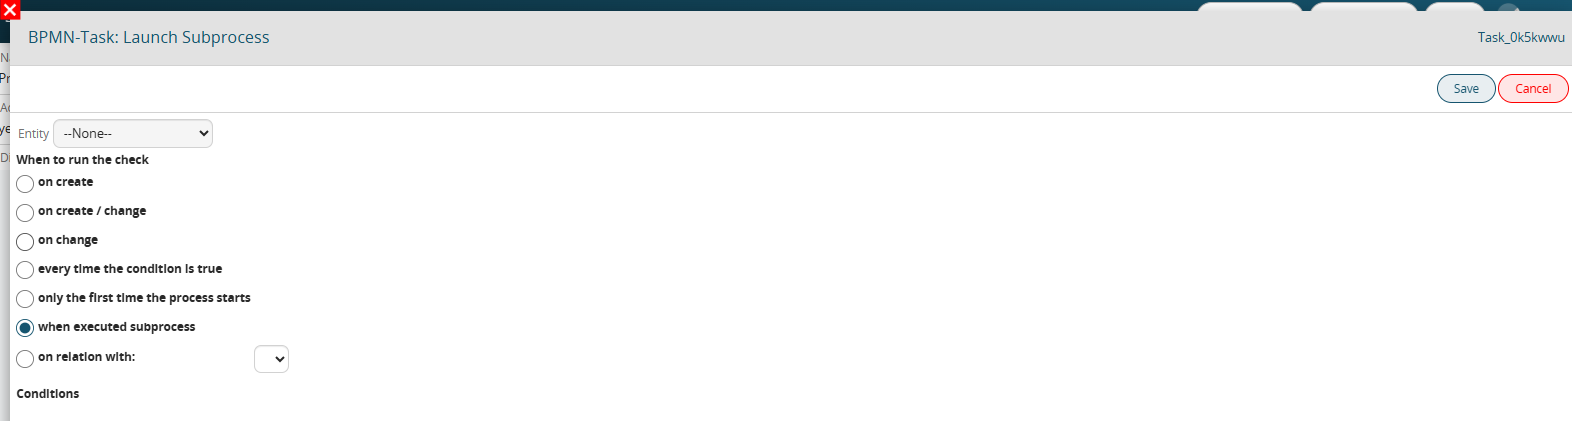](https://usermanual.vtenext.com/uploads/images/gallery/2025-07/isNimage.png) [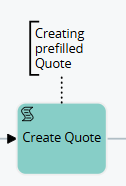](https://usermanual.vtenext.com/uploads/images/gallery/2025-07/B12image.png) In this Task, a **NEW ACTION - Create Entity** is configured, selecting the “**Quotes**” module, so as to create a pre-filled one. The title of the action is entered, the various fields also relating the Opportunity in question and setting the expiry date in 30 days. [](https://usermanual.vtenext.com/uploads/images/gallery/2025-07/HQjimage.png) [](https://usermanual.vtenext.com/uploads/images/gallery/2025-07/URximage.png) At this point the Subprocess blocks the execution flow on the Task described below. In fact, it waits for the Preventive Stage of the previously created entity (in the “created” state) to pass to “**Revised**”. Only when this condition is true will the process continue. [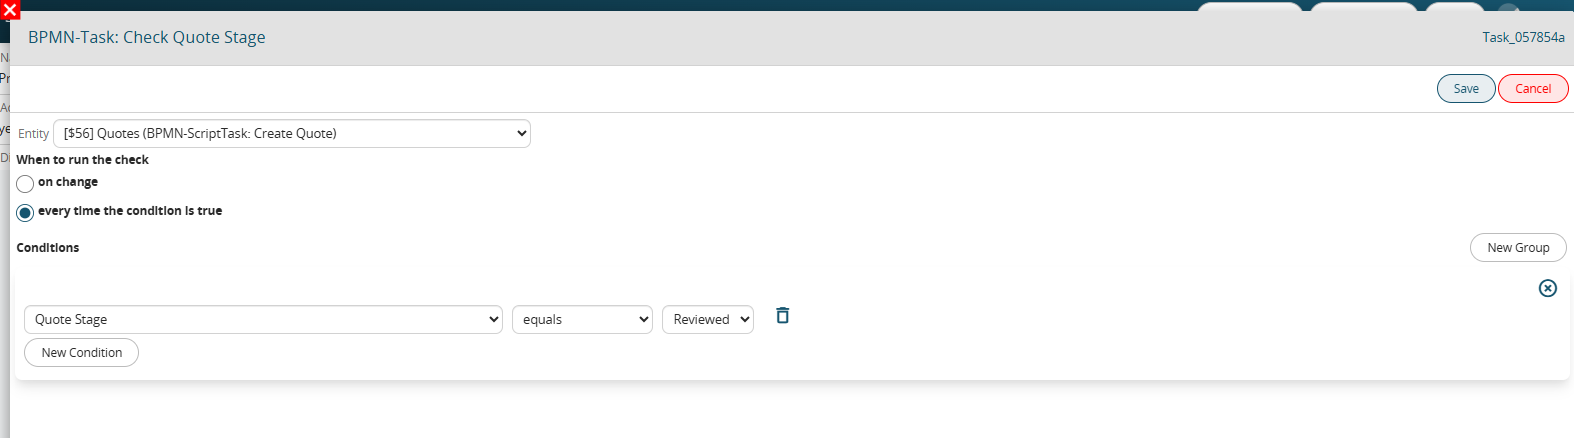](https://usermanual.vtenext.com/uploads/images/gallery/2025-07/HlDimage.png) [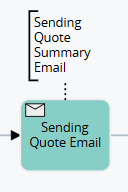](https://usermanual.vtenext.com/uploads/images/gallery/2025-07/8FGimage.png) Once the value “**Revised**” is set as the Preventive Stage, the process continues and sends the details of this via email to the address of the related entity (Company or Contact) and to the assignee in copy. [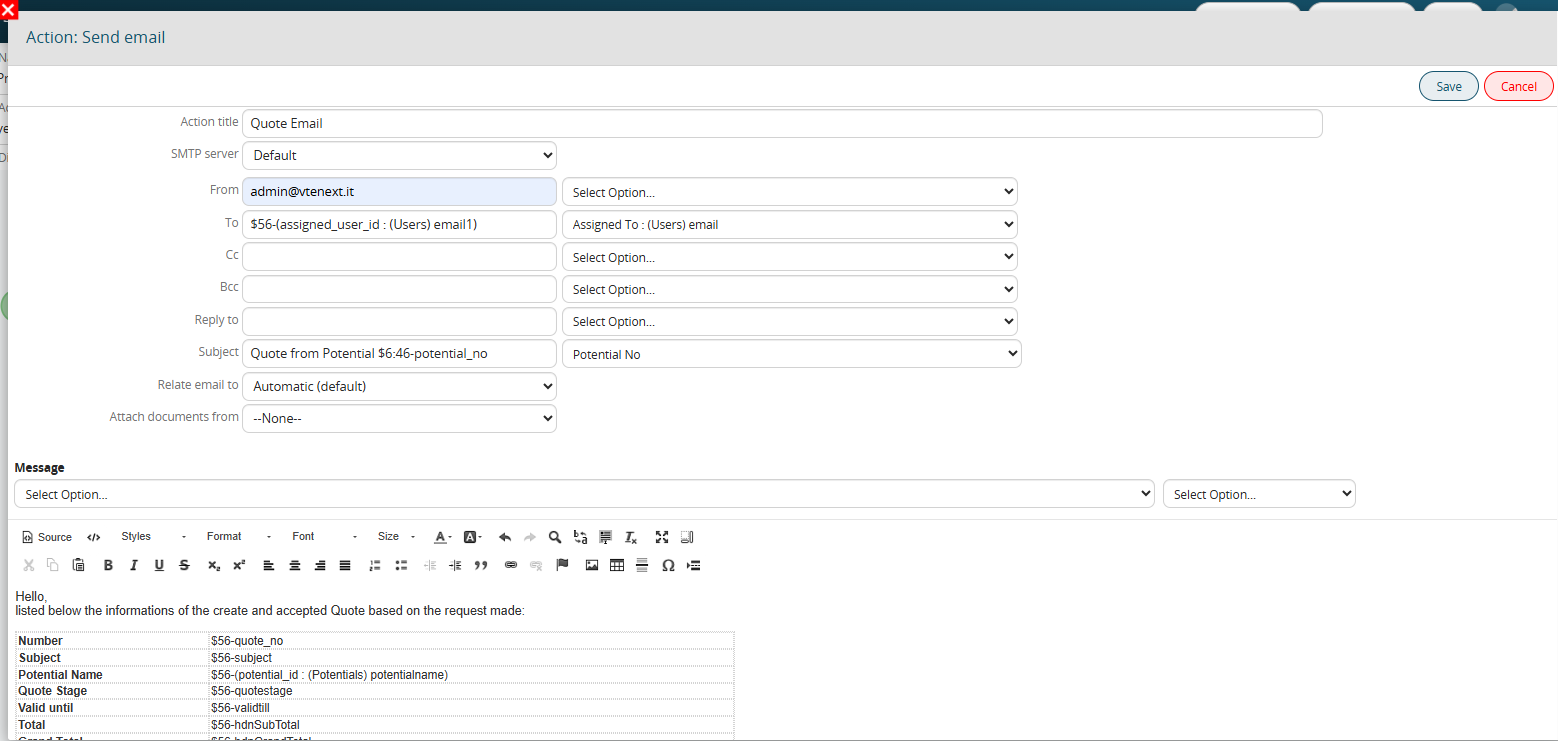](https://usermanual.vtenext.com/uploads/images/gallery/2025-07/wCrimage.png) [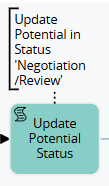](https://usermanual.vtenext.com/uploads/images/gallery/2025-07/iqEimage.png) Once the Quote has been created, checked that the Status has changed to “**Revised**” and the email has been sent, we update the Sales Stage of the Opportunity to “**Negotiation/Revision**”. **At this point the execution of the Sub-process ends.** [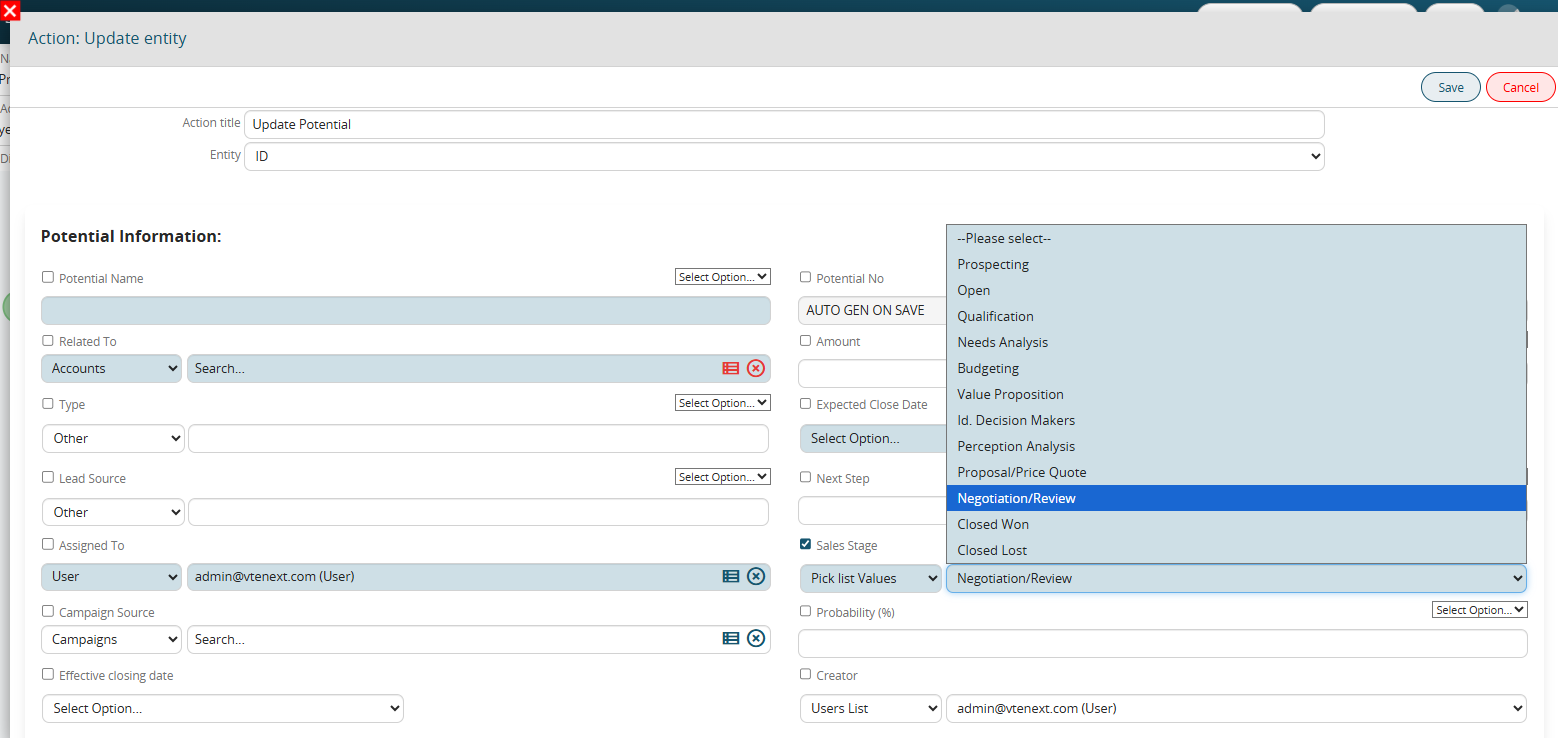](https://usermanual.vtenext.com/uploads/images/gallery/2025-07/4mBimage.png) # 15.3 Example: Potential Management Process Activation **PROCESS ACTIVATION** At this point we have finished configuring the process and its sub-processes. Therefore, let's proceed with checking that they are working correctly. **We then enter the creation of a New Opportunity**. In this case, we set the Sales Stage to "**Open**". [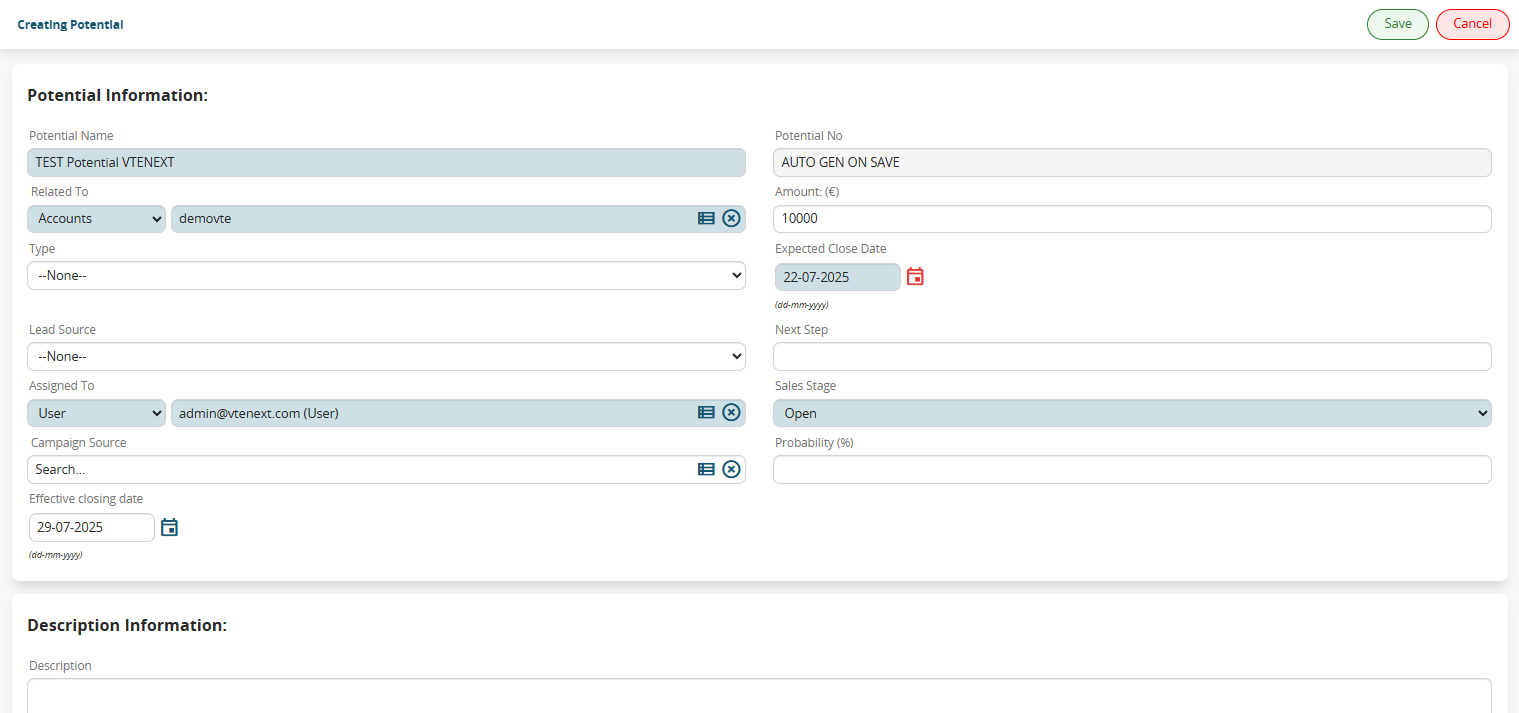](https://usermanual.vtenext.com/uploads/images/gallery/2025-07/zgiimage.png) Once the Opportunity is saved, the assignee will receive an email summarizing the data. In addition, there will already be 2 related events, namely the deadlines, one 5 days from the Expected Closing Date and the other 3 days from the Actual End Date. [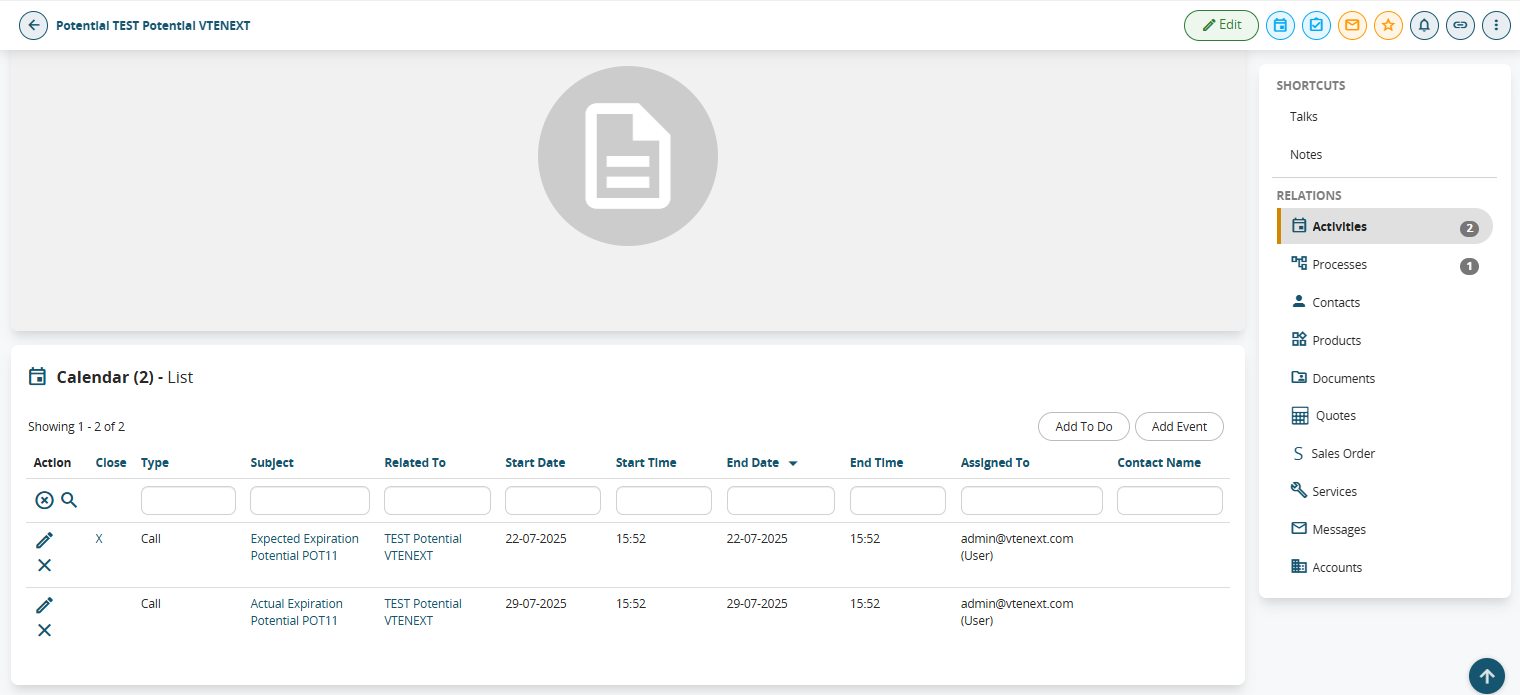](https://usermanual.vtenext.com/uploads/images/gallery/2025-07/PbEimage.png) At this point the process has stopped and waits for the Sales Stage to change value to one of those previously configured. In this case we set the value “**Quote Proposal/Price**”. [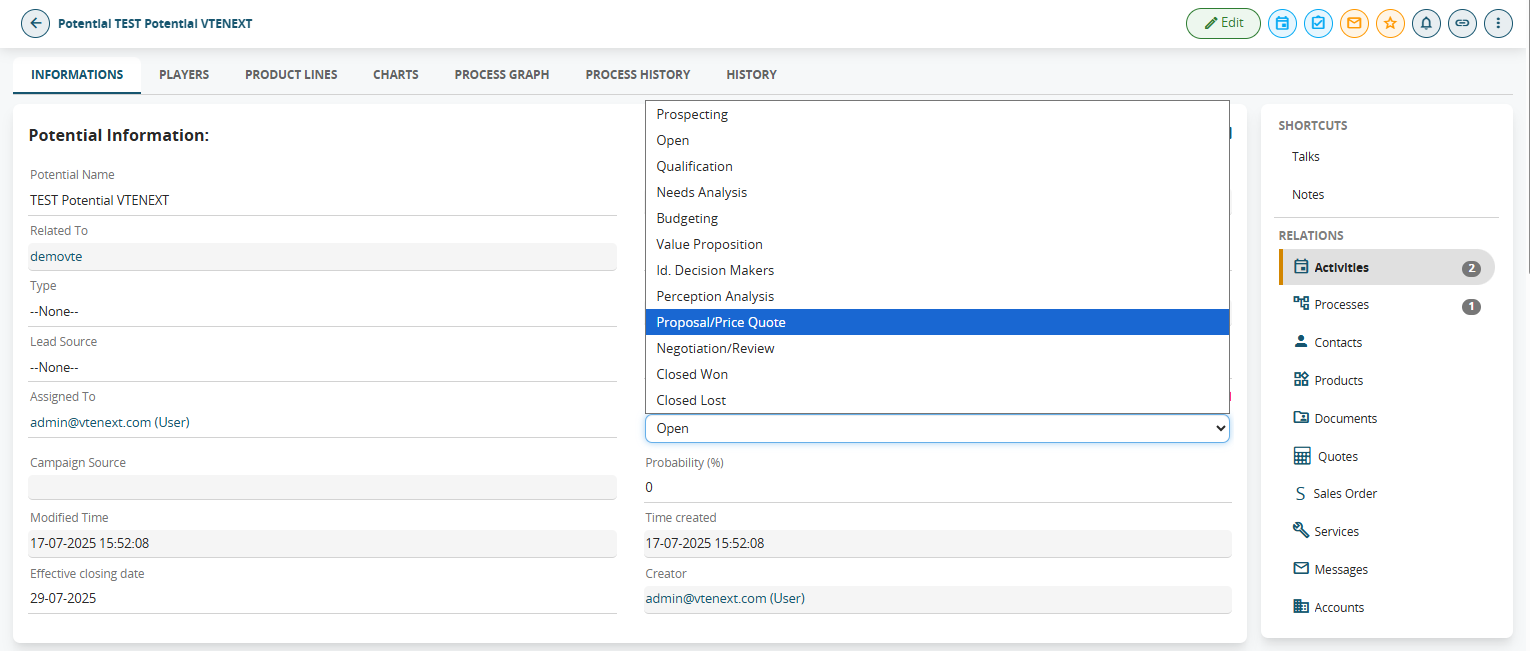](https://usermanual.vtenext.com/uploads/images/gallery/2025-07/98oimage.png) Once saved, a popup will appear to the assignee of the Opportunity with a summary of the read-only data and the possibility of reassigning it to another user. Once the desired user has been selected, select the value “**YES**” from the picklist (you can click the “**CONFIRM/CANCEL ASSIGNMENT**” button to change the value of the same picklist to YES/NO) and proceed by clicking on **SAVE**. [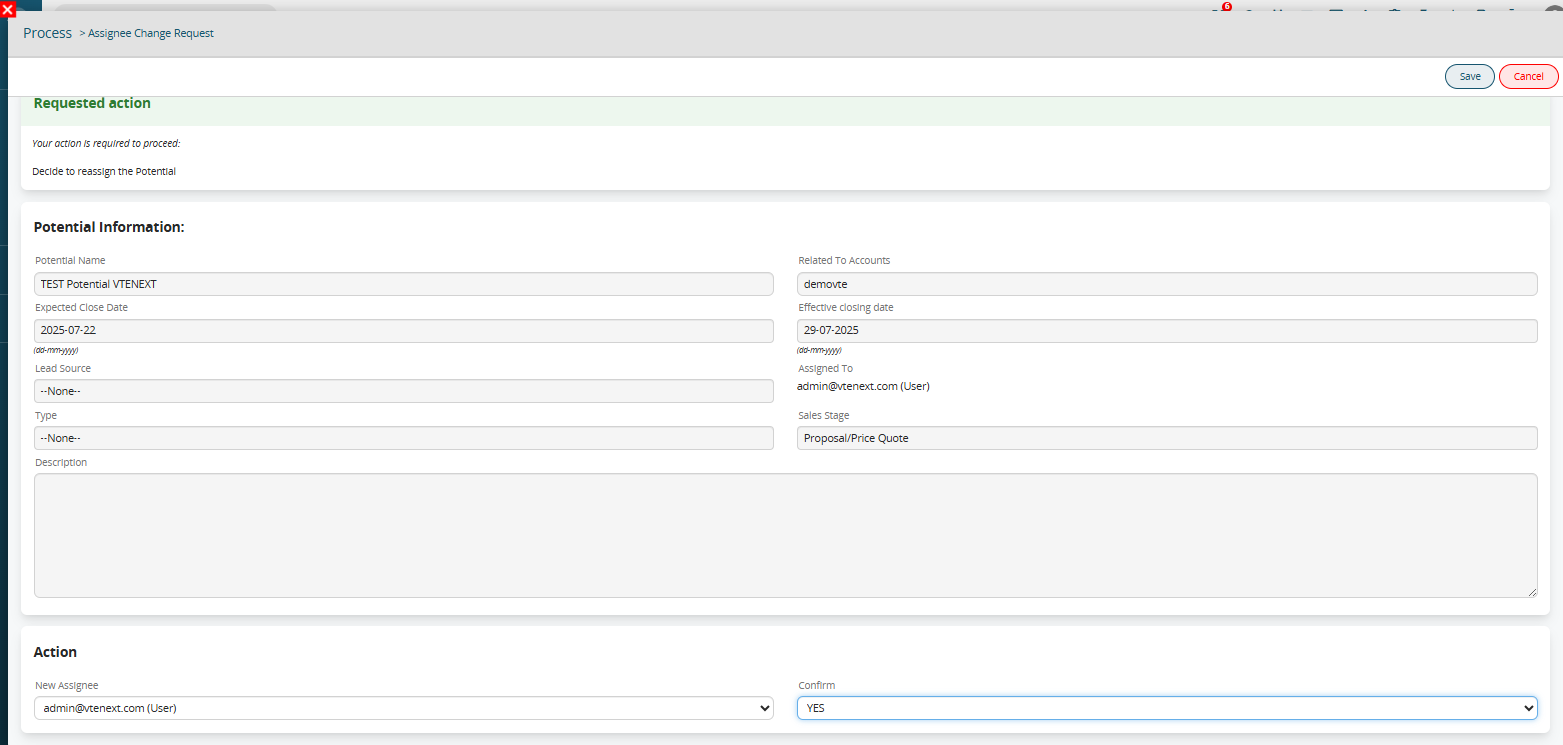](https://usermanual.vtenext.com/uploads/images/gallery/2025-07/cHhimage.png) Once confirmed (selected the value “**YES**” in the popup, the assignee of the Opportunity is updated and will receive an email with the data and confirmation of acceptance. [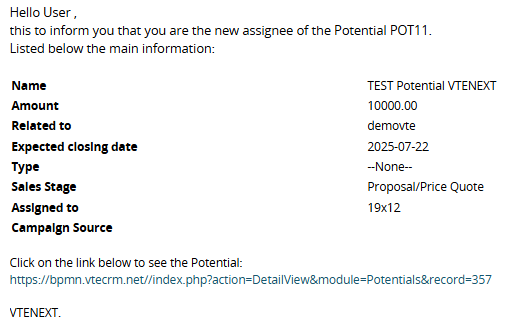](https://usermanual.vtenext.com/uploads/images/gallery/2025-07/ZAdimage.png) From the reports we can already see that the email has been related and the estimate has been created, as the Sales Stage was “Proposal/Estimate Price”. [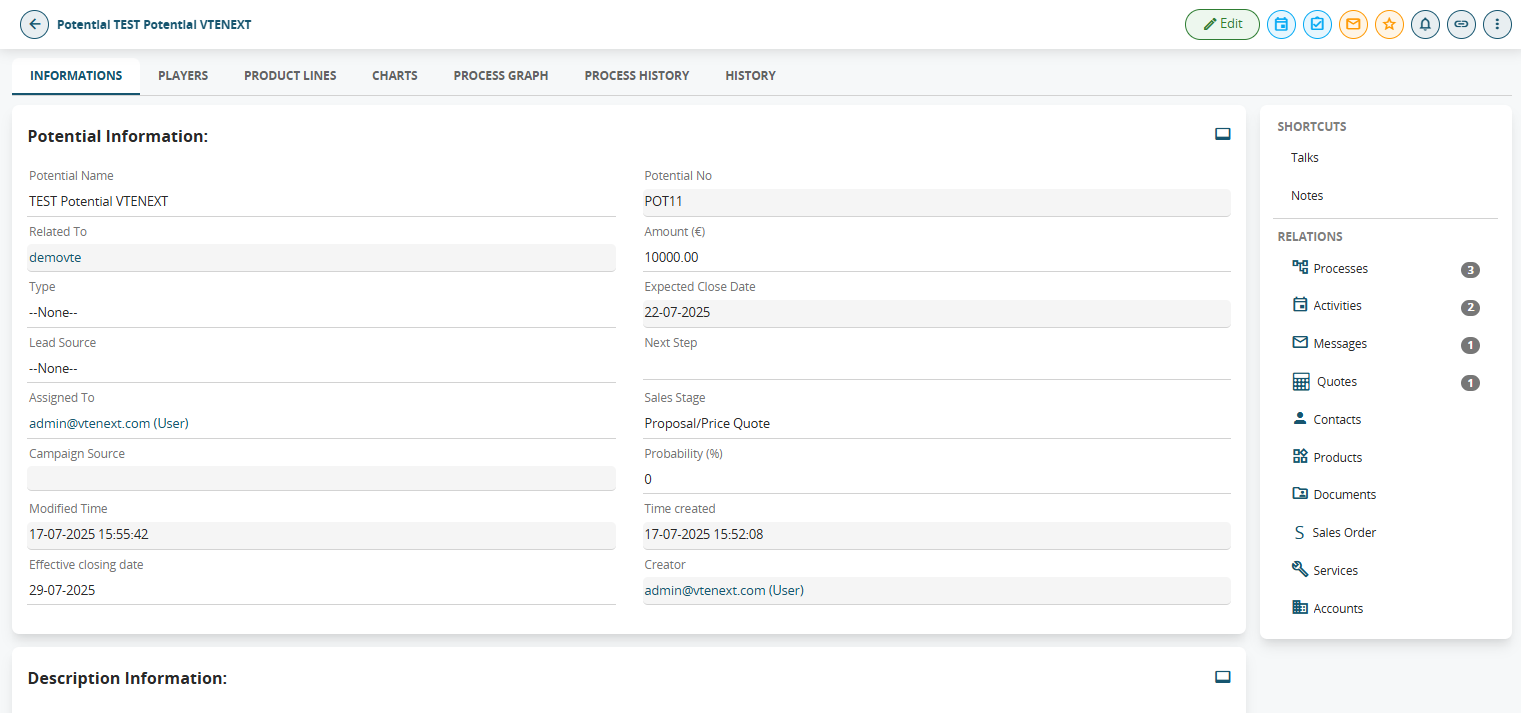](https://usermanual.vtenext.com/uploads/images/gallery/2025-07/rhFimage.png) By analyzing the report we can see the details of the created Estimate. At this point, we can go into detail, modify the data, insert products and change the Estimate stage to “**Revised**”. [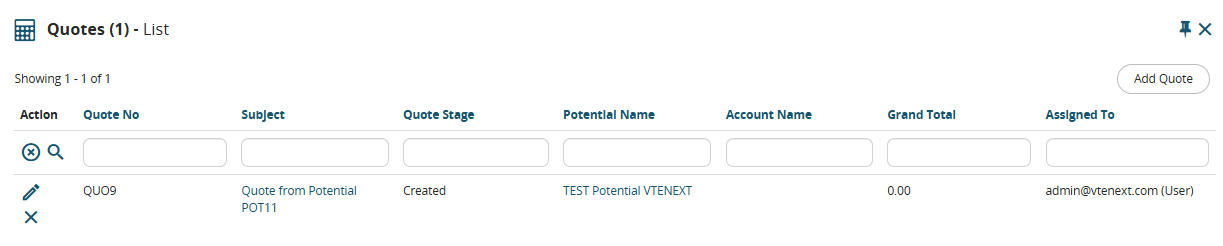](https://usermanual.vtenext.com/uploads/images/gallery/2025-07/ayFimage.png) [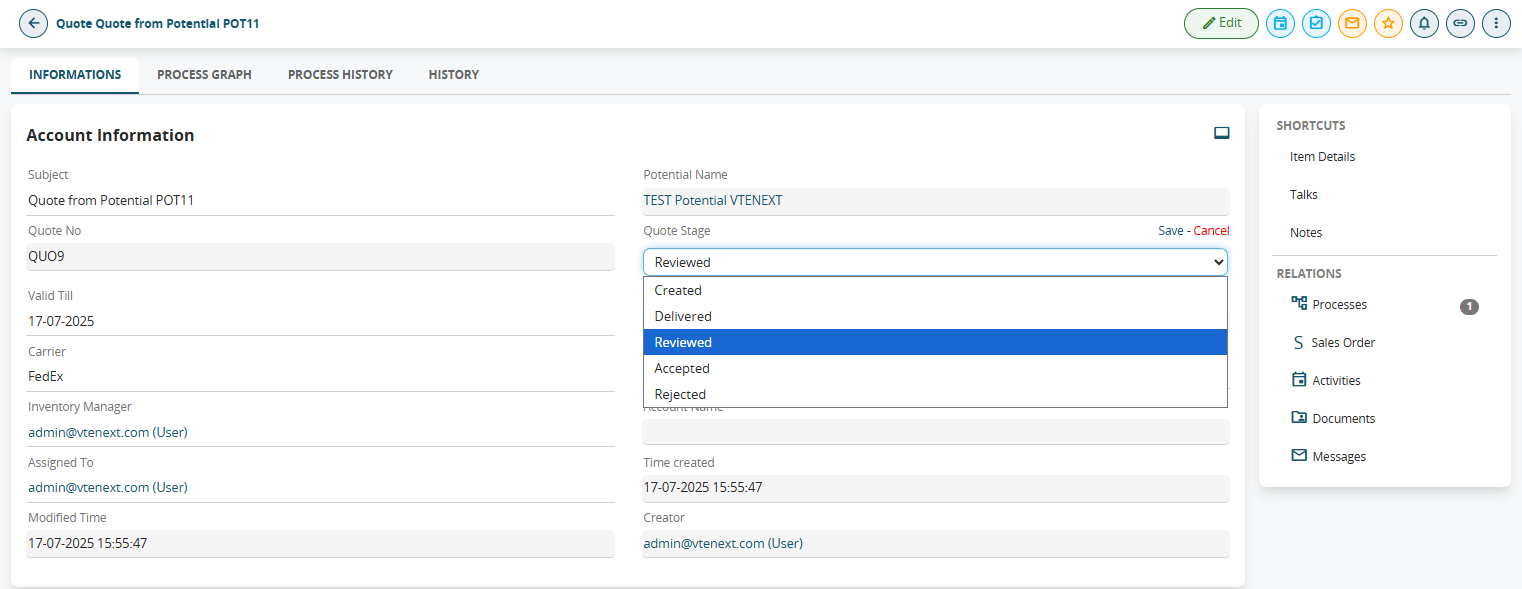](https://usermanual.vtenext.com/uploads/images/gallery/2025-07/c4Jimage.png) The process continues the flow and sends the email to the assignee containing the data of the Quote itself. In addition, the Sales Stage of the Opportunity is set to “**Negotiation/Review**”. [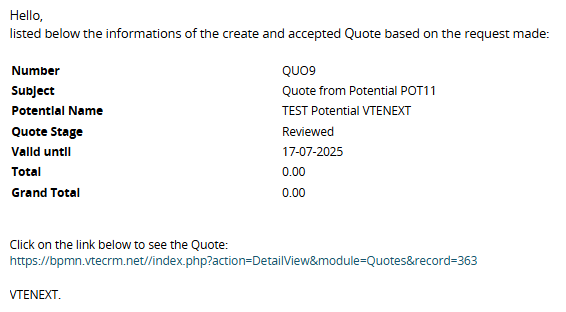](https://usermanual.vtenext.com/uploads/images/gallery/2025-07/ueBimage.png) [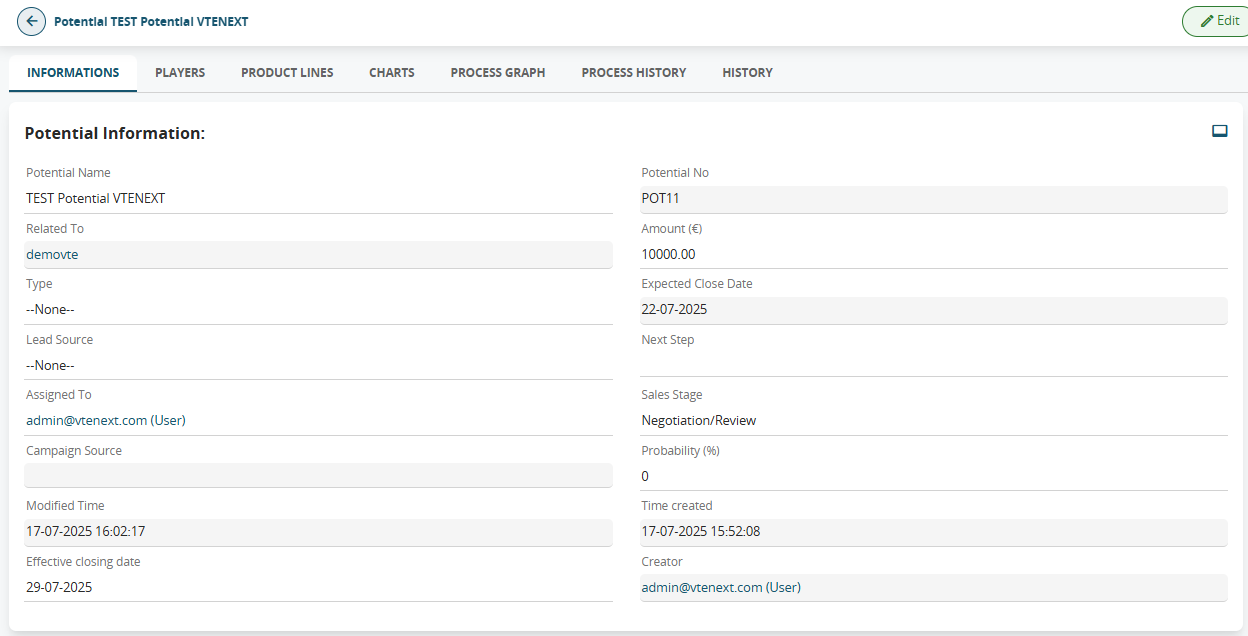](https://usermanual.vtenext.com/uploads/images/gallery/2025-07/DBVimage.png) At this point, the assignee receives a final summary email with all the data of the Opportunity. From the “**Process Graph**” tab we can see that the process has finished the execution flow. [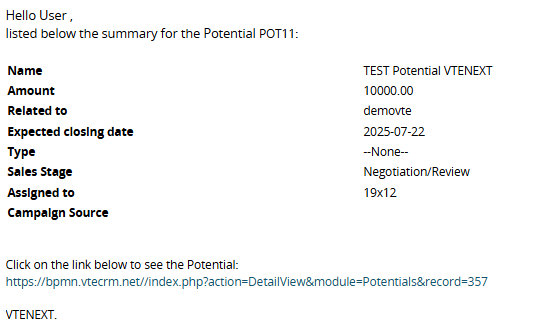](https://usermanual.vtenext.com/uploads/images/gallery/2025-07/Phnimage.png) [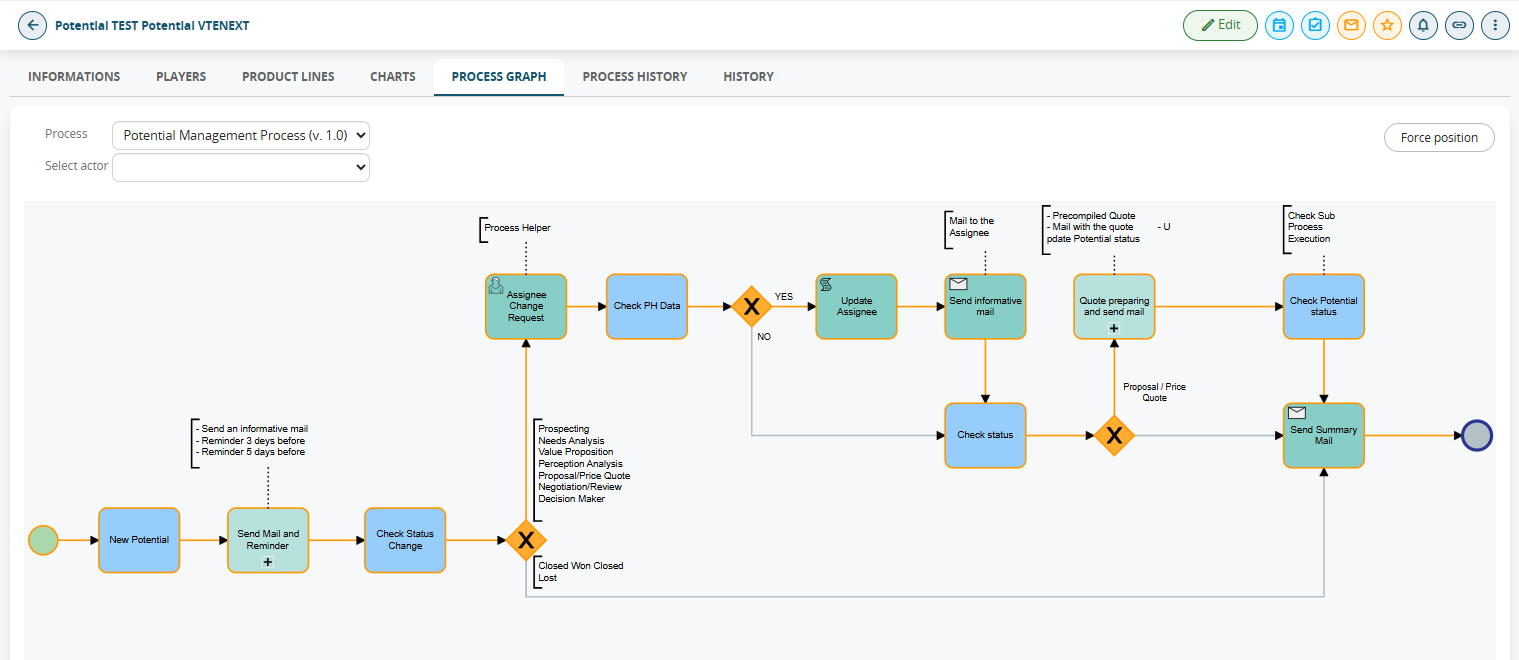](https://usermanual.vtenext.com/uploads/images/gallery/2025-07/h1Jimage.png) # 16 Tool Processes # 16.1 Tool Processes: Configuration and Usage Modes Starting with version 26.07, a new category of processes known as "Tool" processes has been introduced. These were implemented to replicate the programming advantages offered by functions, thereby eliminating the redundancy often encountered when using Standard processes. Specifically, this type of process can be invoked within multiple different Standard processes or multiple times within the same Standard process, effectively allowing for the reuse of existing process segments. Furthermore, a Tool process can be invoked within another Tool process without significant limitations. For technical and functional reasons, conditions linked to record creation or modification cannot be configured directly within a Tool process. However, if one wishes to use a Tool process as if it were a Standard process, one simply needs to configure a Standard process (defining the process's starting conditions) and then immediately invoke the relevant Tool process. To configure a Tool process, select the specific "Tool call" option within the first task of the flowchart. Upon selecting this option, the "Entity" picklist becomes read-only; if an entity was previously selected, the field is cleared. Additionally, a table appears below where you can define the parameters to be used as input when invoking the Tool process (Figure 1). [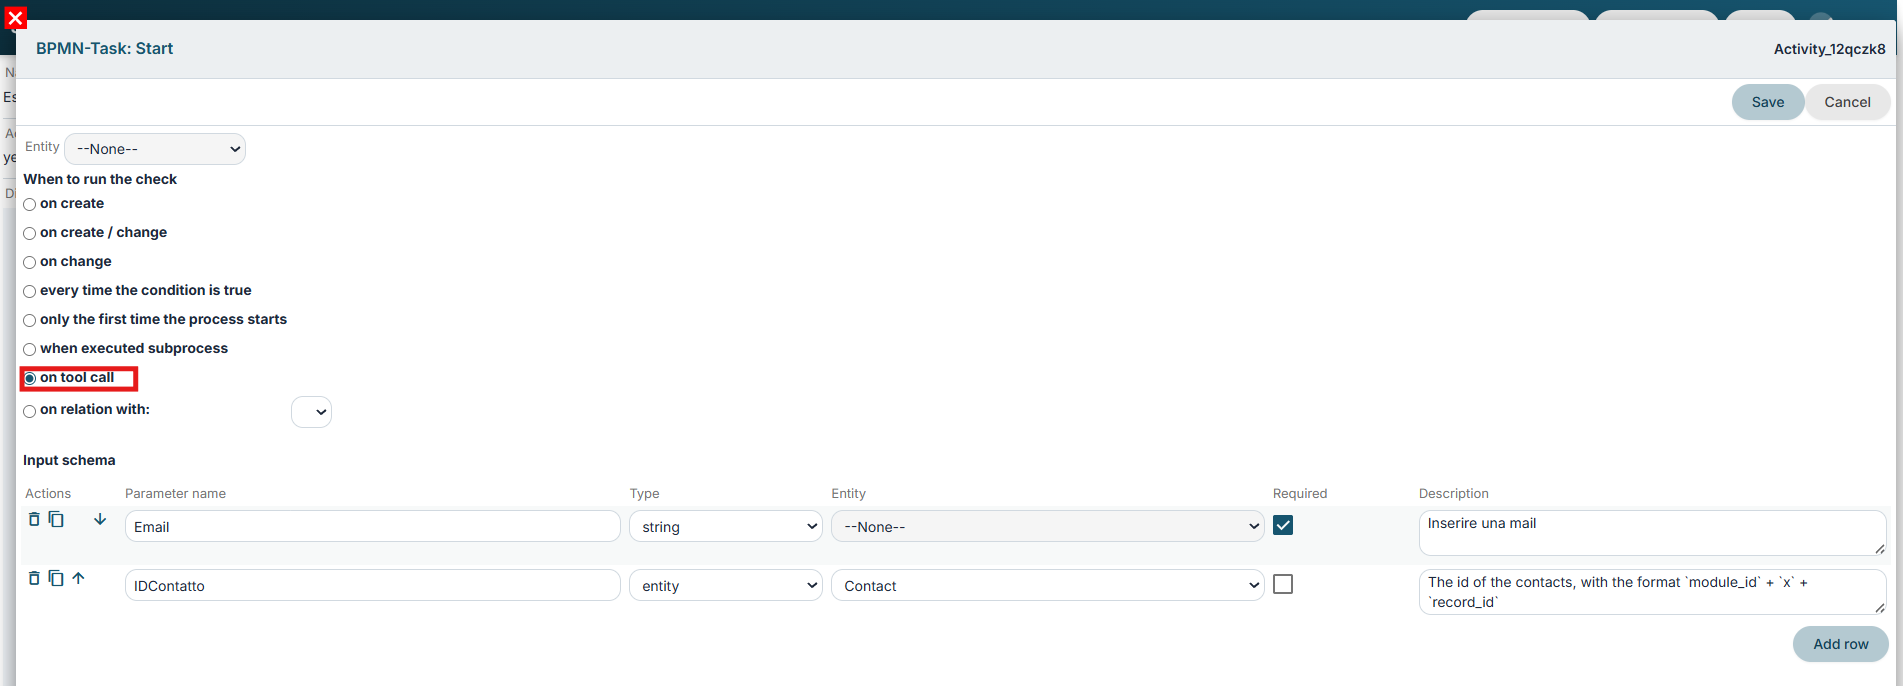](https://usermanual.vtenext.com/uploads/images/gallery/2026-07/haFimage.png) Figure 1 For each parameter (table row), the following fields must be completed: \- **Parameter Name** -> the name assigned to the parameter, which will be displayed within the Standard process \- **Type** -> the type of parameter the Tool process expects to receive; this can be one of two types: "string": if the parameter is a string "entity": if the parameter is an entity; in this case, the module it refers to must be specified in the next field \- **Entity** -> if Type = Entity, this field must be populated with the appropriate module \- **Mandatory** -> makes the parameter mandatory when the Tool process is called \- **Description** -> provides useful information for filling in the parameter when the Tool process is called Once activated, the Tool process can be selected within the dedicated BPMN action "Call Tool Process". (Figure 2) [](https://usermanual.vtenext.com/uploads/images/gallery/2026-07/qNyimage.png) Figure 2 ### MCP tool Once the process is activated, a new tool will automatically become available on the MCP servers. This allows the process to be launched just like an MCP server tool. To use it, the tool must be activated on the server; then, synchronization on the client must be awaited or forced, and—if applicable—it must be activated on the agents using the MCP client.