16.2 Example: Configuring a Customer Reminder Management Process
FLOW DESCRIPTION
When invoked within a Standard process or another Tool process, an automatic email will be composed and sent to the email address of the Organization or Contact associated with the Ticket involved, using the parameters provided as input.
If the email cannot be sent due to an SMTP error, the process will wait for 1 calendar day before attempting to send the email again. This will continue until the email is successfully sent.
ELEMENTS REQUIRED IN THE TOOL PROCESS
To create this process, we will need the following elements:
-Condition Task
-Action Task
-Timer Intermediate Catch Event
-Gateway
-End Event
If you are not familiar with how these elements work, we recommend consulting Chapter 2 of the Process Manual before proceeding.
FLOW DIAGRAM CONFIGURATION
Use the elements listed above to configure a flow diagram as shown in Figure 1.
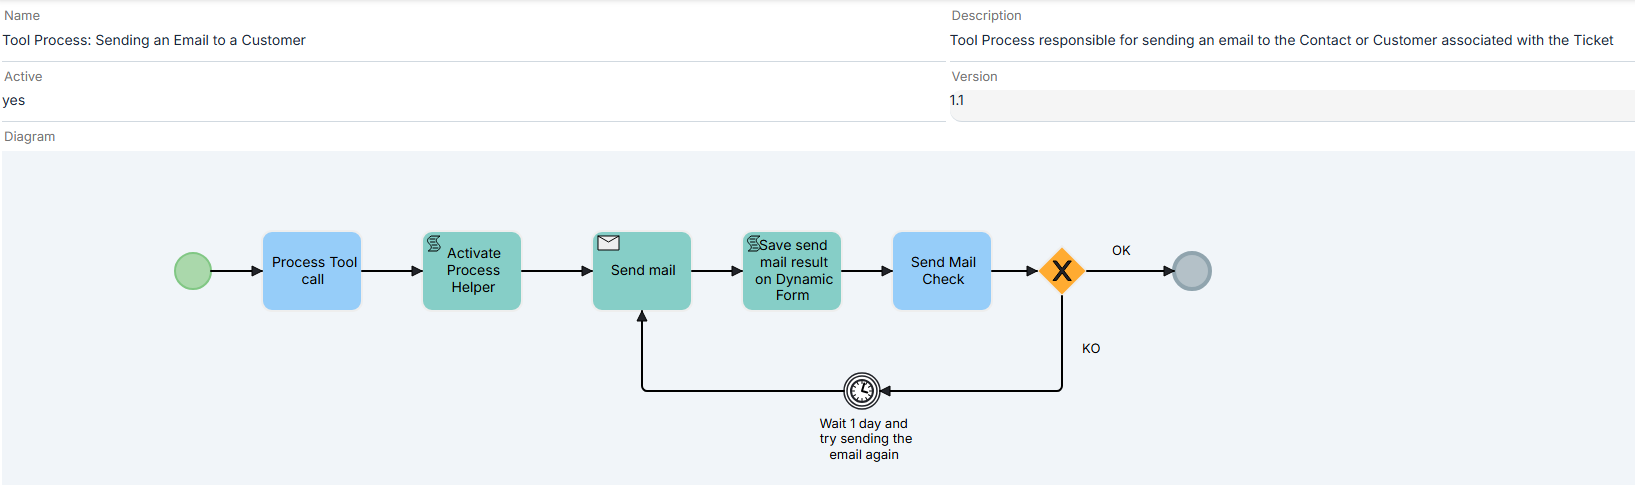
Figure 1
CONFIGURATION OF THE INDIVIDUAL FLOW ELEMENTS
Let's proceed with the configuration of the individual elements that make up the Tool Process flow.
We start with the "When the Tool Process is Called" Condition Task.
In the "When to execute the check" section, select the "When the Tool is called" option. In the "Conditions" section, enter the input parameters to be provided when the Tool Process is invoked from a Standard Process, namely:
- "Ticketid" parameter, with Type = "Entity" and Entity = "Ticket", configured as required (Figure 2).
"Recipient", "Subject", and "Body" parameters, with Type = "String", configured as required, together with the corresponding descriptions required by the system if the Tool Process is to be used as an MCP Tool (Figure 2).
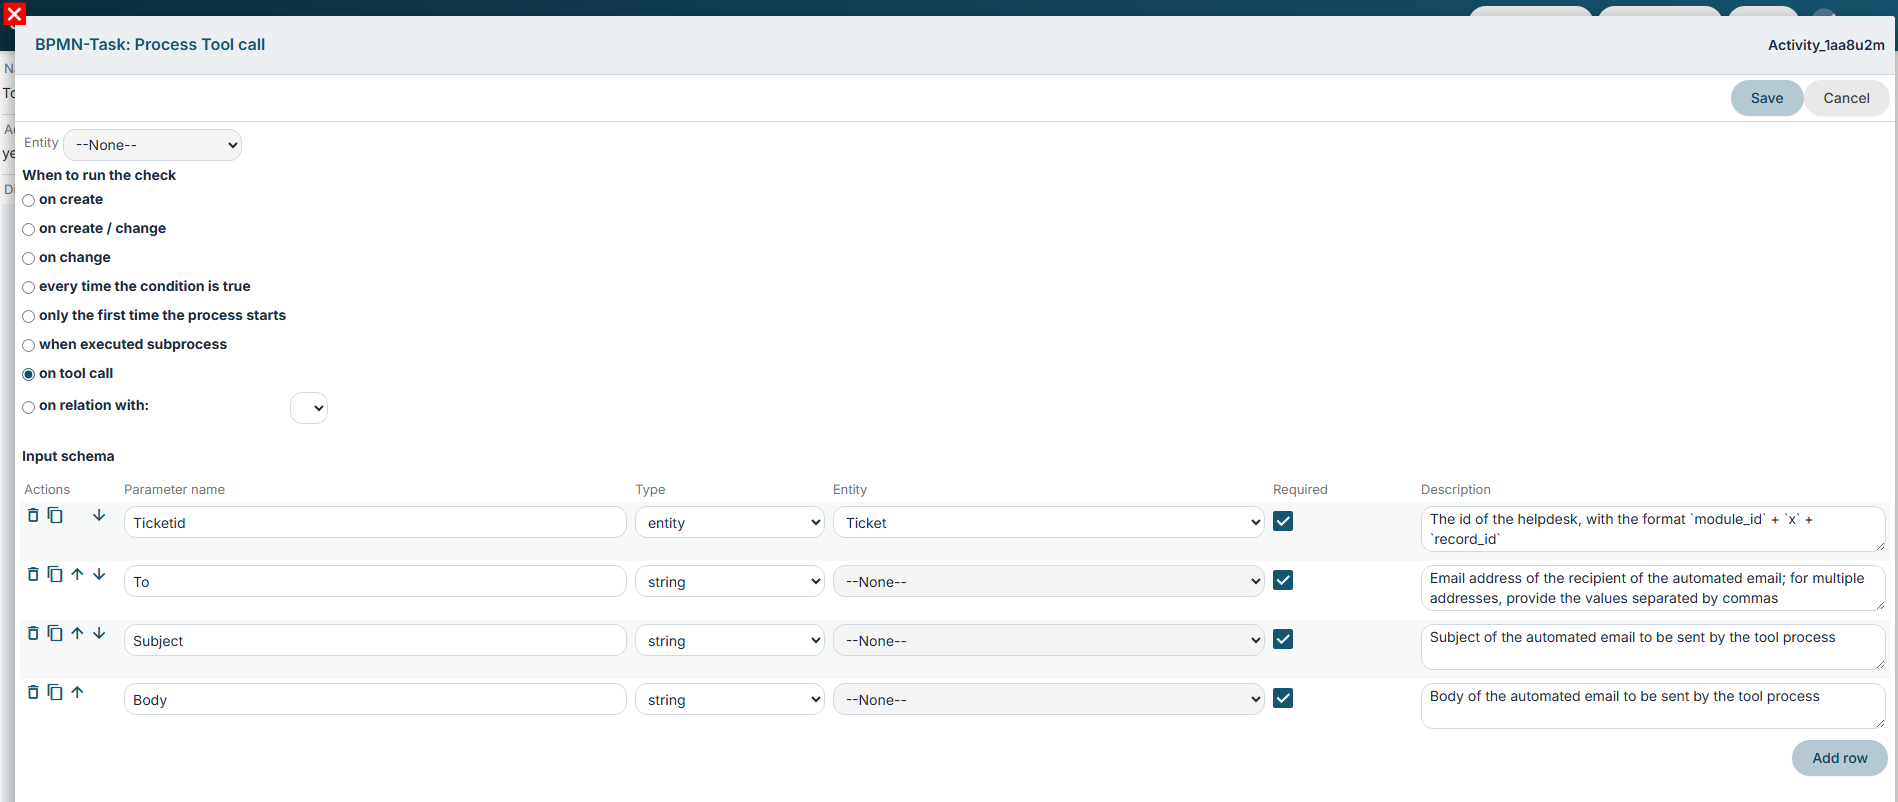
Figure 2
In the "Activate Process Helper" Script Task, we activate a Process Helper in order to display, when the process is triggered on the affected record, the path followed by the Tool Process and its related logs within the "Process Graph" tab.
For further details, refer to Chapter 6.5 (Figure 3).
-in the "Assigned To" field, leave the default value proposed by the system, i.e. the user configuring the Tool Process, as there is no Dynamic Form associated with it.
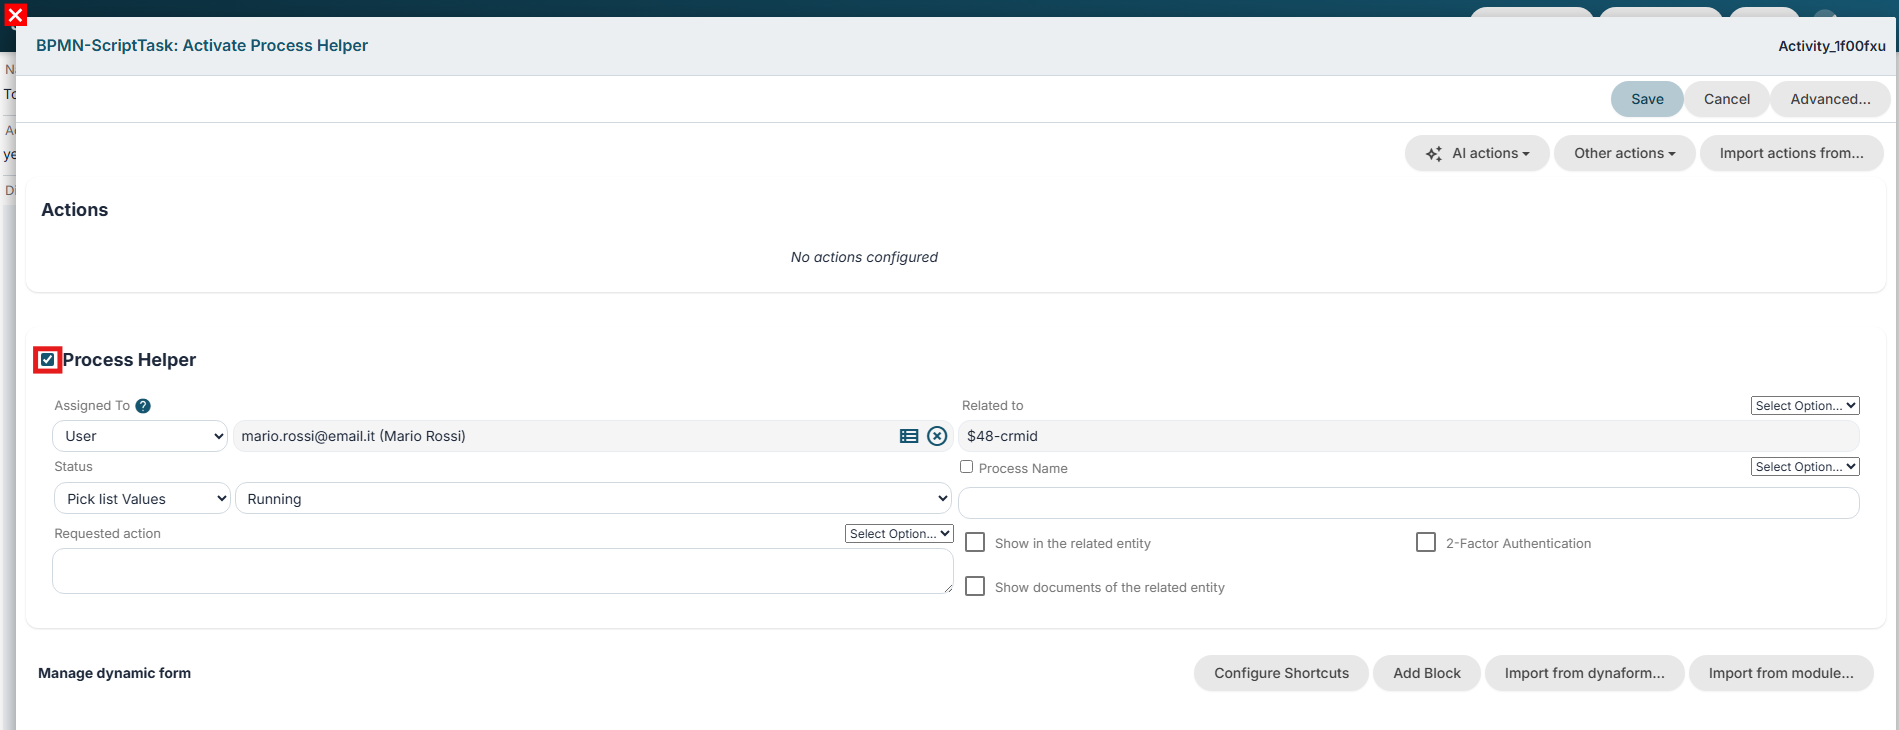
Figure 3
In the "Send Email" Send Task, configure an automatic email-sending action (Figure 4), entering the values contained in the Tool Process input parameters through the dedicated section available in the "Select Options..." picklist (Figures 5 and 6).
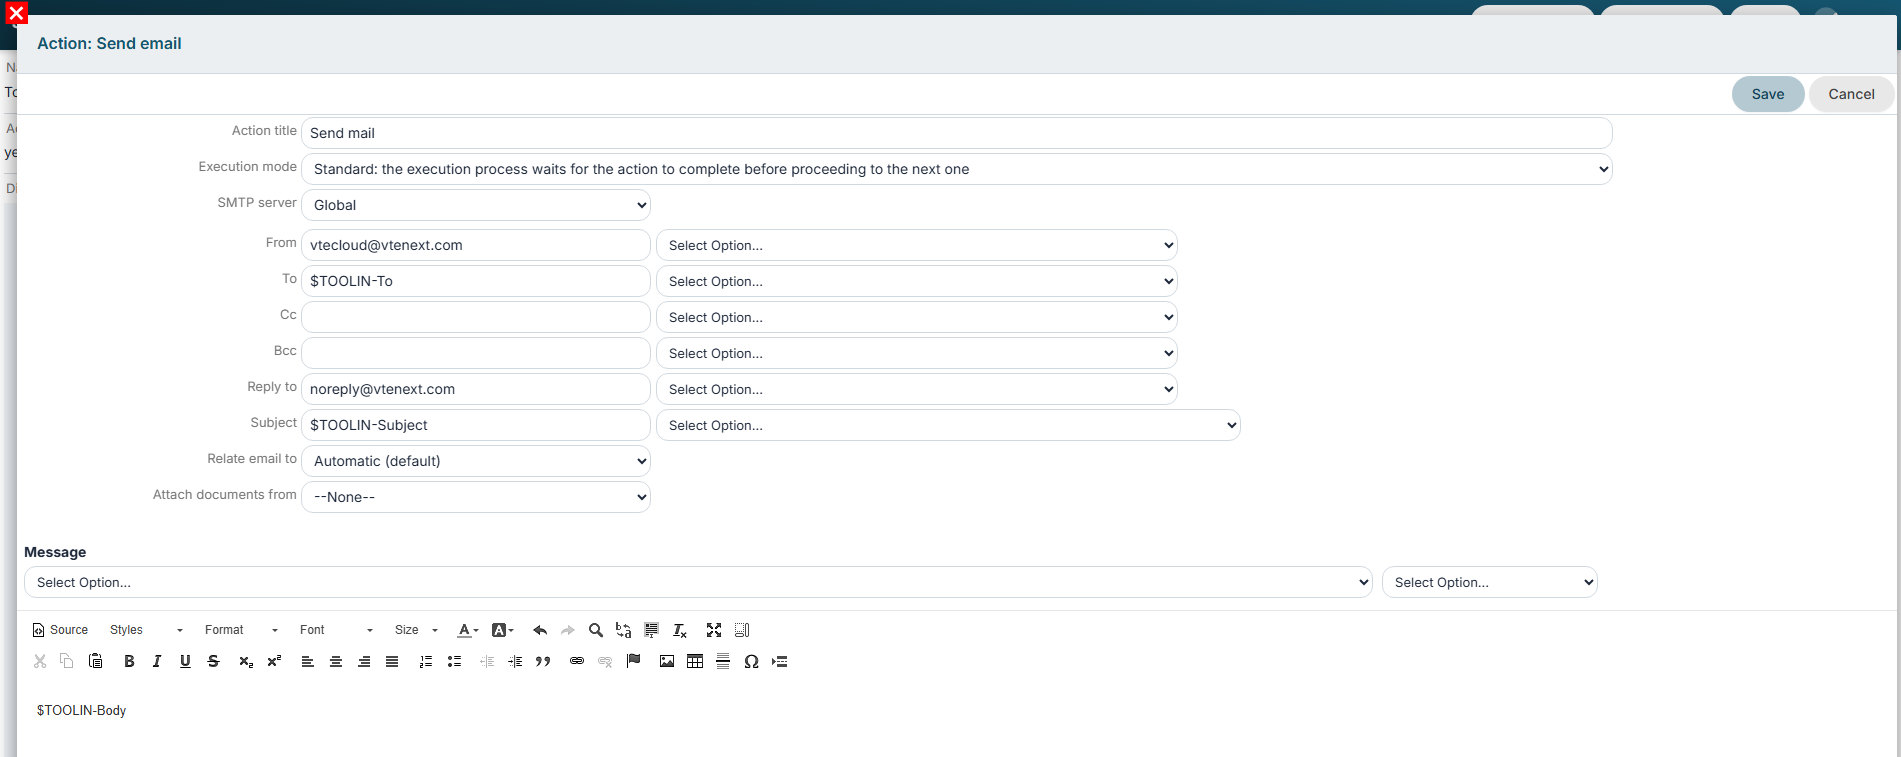
Figure 4
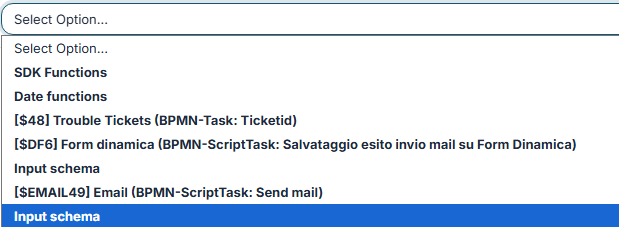
Figure 5
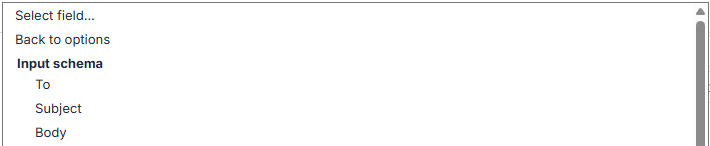
Figure 6
In the "Save Email Sending Result to Dynamic Form" Script Task, configure a Process Helper in order to use its Dynamic Form to store the result of the email sending operation.
"Process Helper" Block configuration:
-in the "Assigned To" field, leave the default value proposed by the system, i.e. the user configuring the Tool Process, as the associated Dynamic Form will not be displayed to any users involved in the process.
The result will be as shown in Figure 7.

Figure 7
Dynamic Form configuration:
In the Dynamic Form, create the "Save Email Sending Result to Dynamic Form" block.
For each "Send Email" action configured within the process, the system makes the following two variables available through the "Select Options..." picklist (Figures 8 and 9):
- "Successful?" → returns 1 if there is no SMTP error; otherwise, it returns 0
- "Error Message" → returns the description of the SMTP error encountered
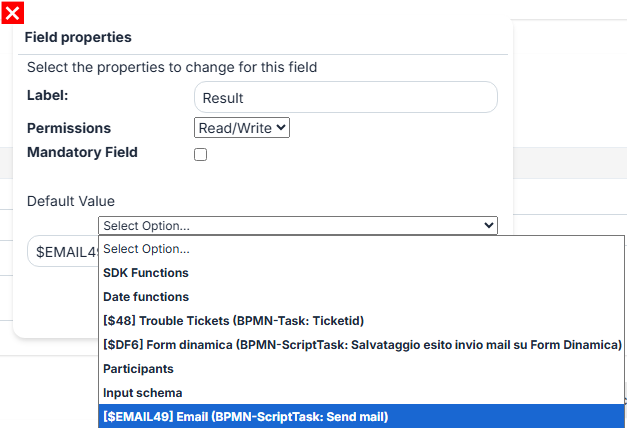
Figure 8
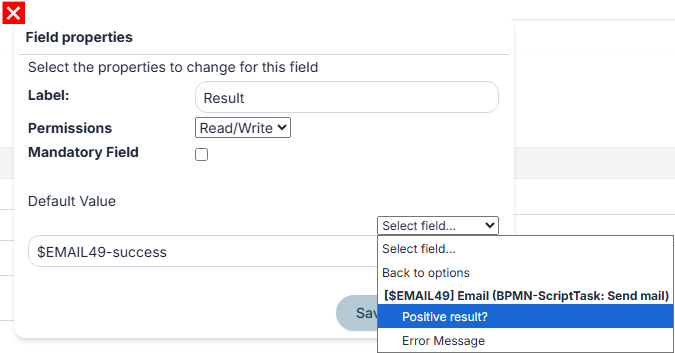
Figure 9
We then recreate equivalent fields within the Dynamic Form in order to store these values (Figure 10).

Figure 10
Reset Dynamic Form action configuration
Finally, create a "Reset Dynamic Form" action to ensure that the values in the form fields are reset if the Process Helper is forced to run again (see Figure 11).

Figure 11
In the "Email Send Check" Condition Task, perform a check on the "Result" field of the Process Helper form in order to direct the process to the appropriate branch based on the value contained in that field (see Figure 12).
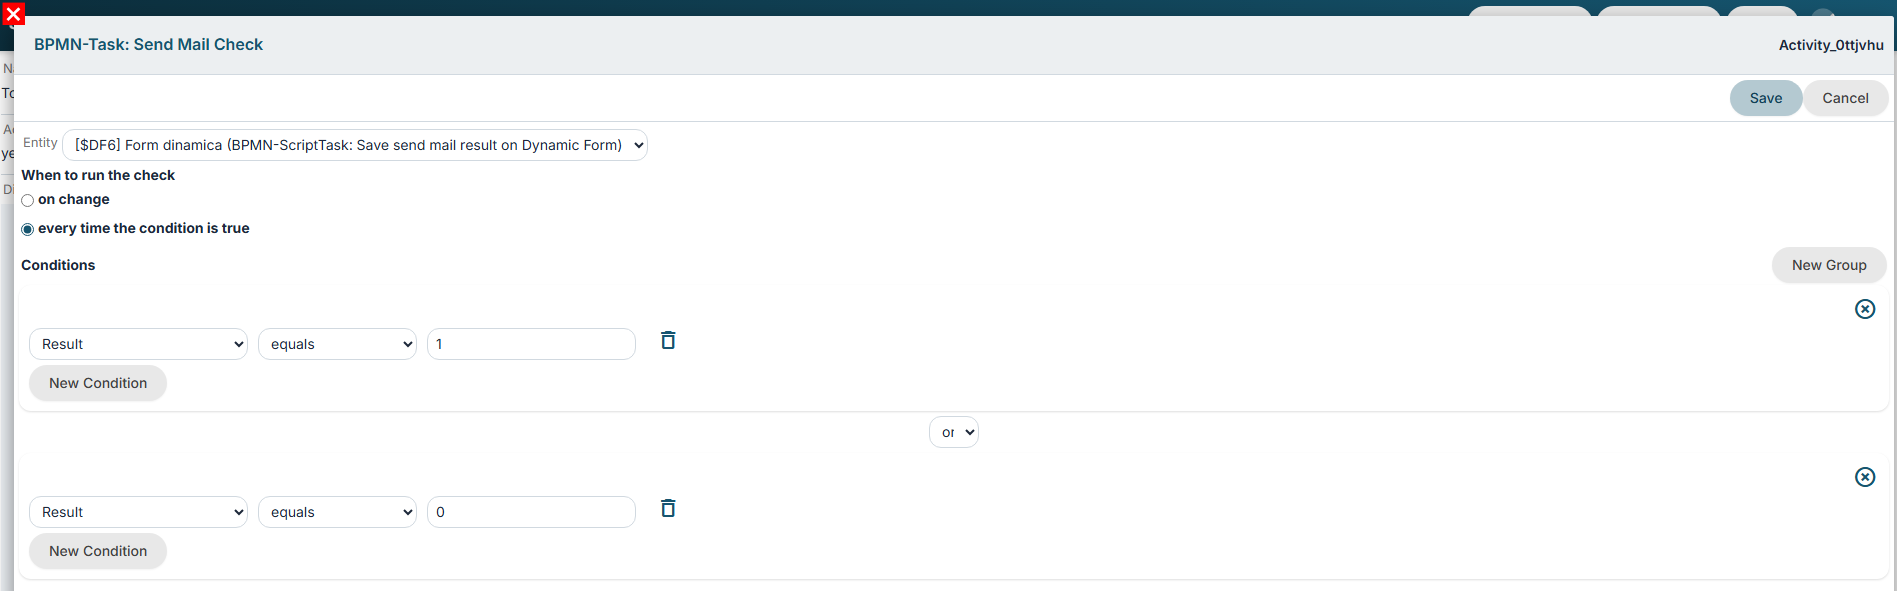
Figure 12
In the following Gateway, associate each group of conditions configured in the "Email Send Check" Condition Task with the corresponding branch to be followed (see Figure 13).

Figure 13
Configuration of the elements following the "OK" branch
Activate a Process Helper in the End Event. Since a Process Helper has been used within the process, it is necessary to activate a Process Helper within the End Event in order to set the process status to "Completed" (see Figure 14).
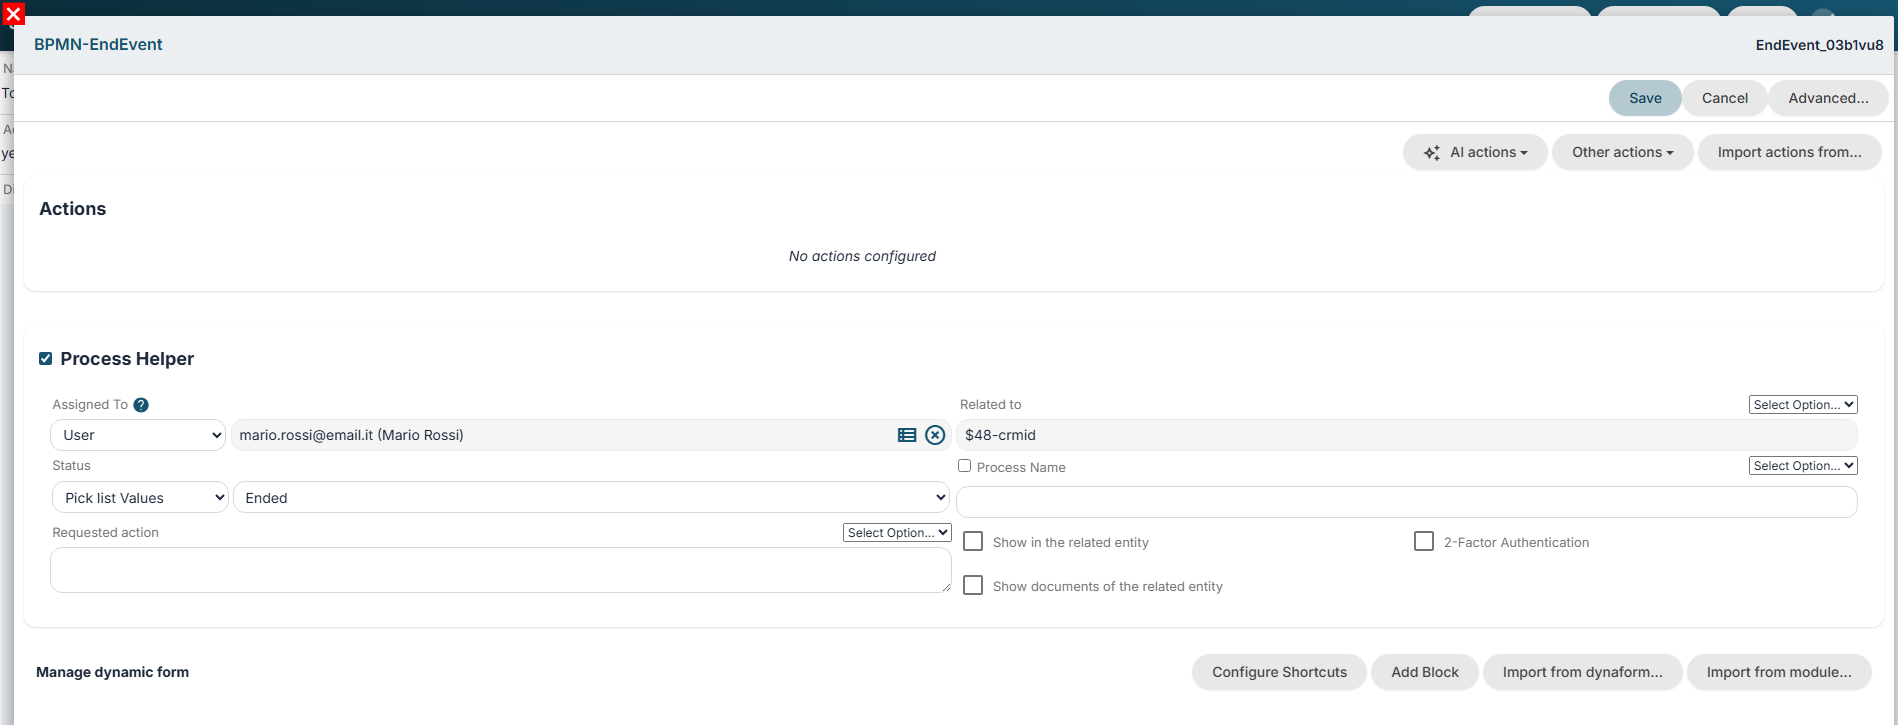
Figure 14
Configuration of the elements following the "KO" branch
In the "Wait 1 day and try sending the email again" timer of type "Intermediate Catch Event", configure it to "Wait 1 day after Now" (Figure 15).

Figure 15
Invocation from a Standard Process
A Tool Process such as the one just configured can be useful within a Standard Process that requires automatic emails to be sent with content that varies depending on the part of the flow involved, such as the one shown in Figure 16.
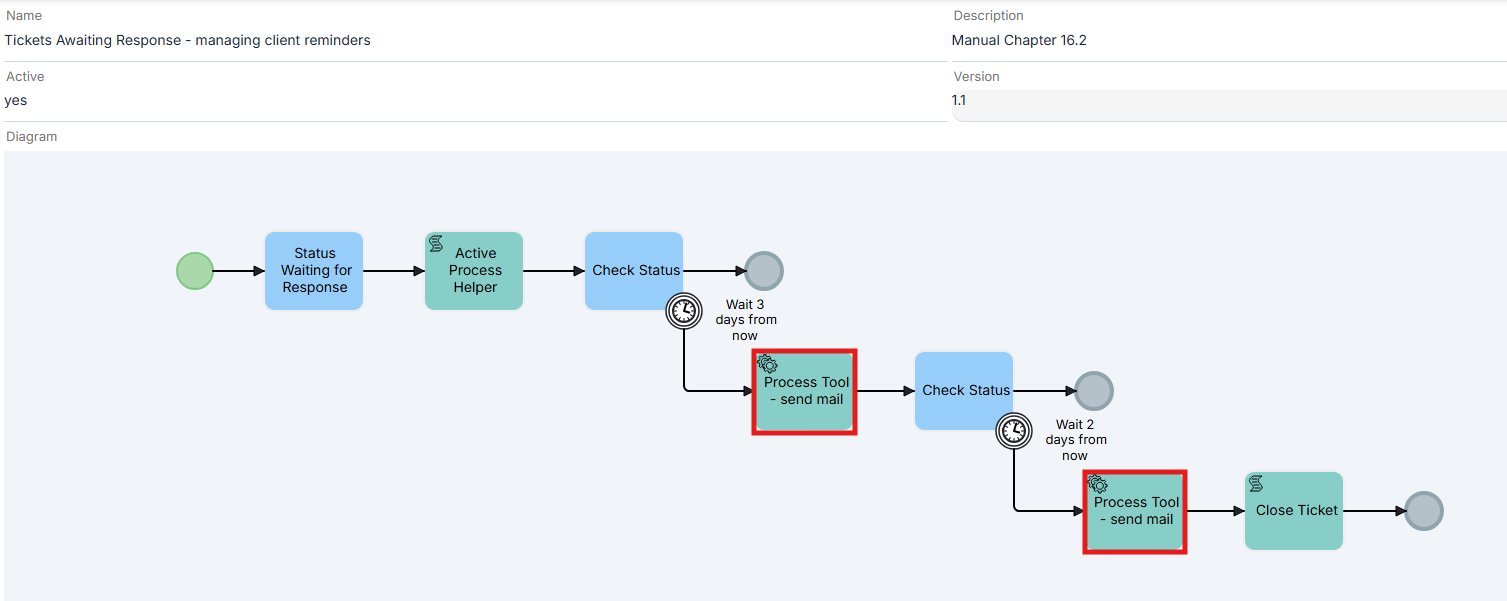
Figure 16
This Standard Process is triggered when the Ticket Status is changed to "Awaiting Reply" and waits for the status to change within 3 calendar days.
If the status does not change after 3 days, a first automatic email is sent by invoking the Tool Process through the configuration shown in Figures 17 and 18.
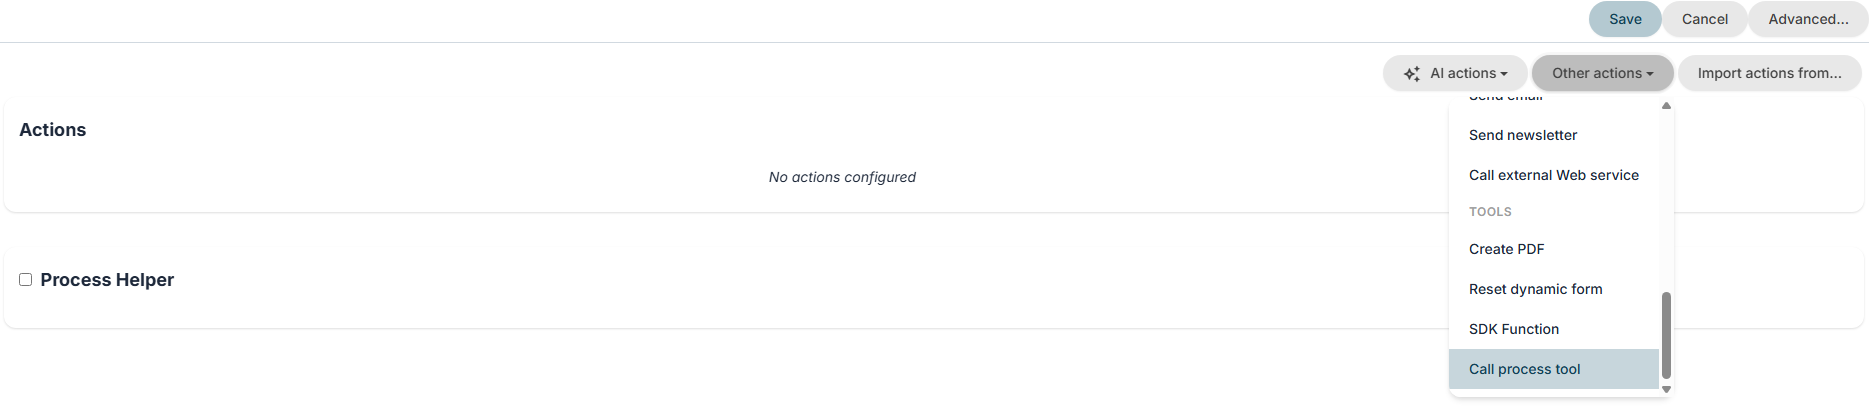
Figure 17
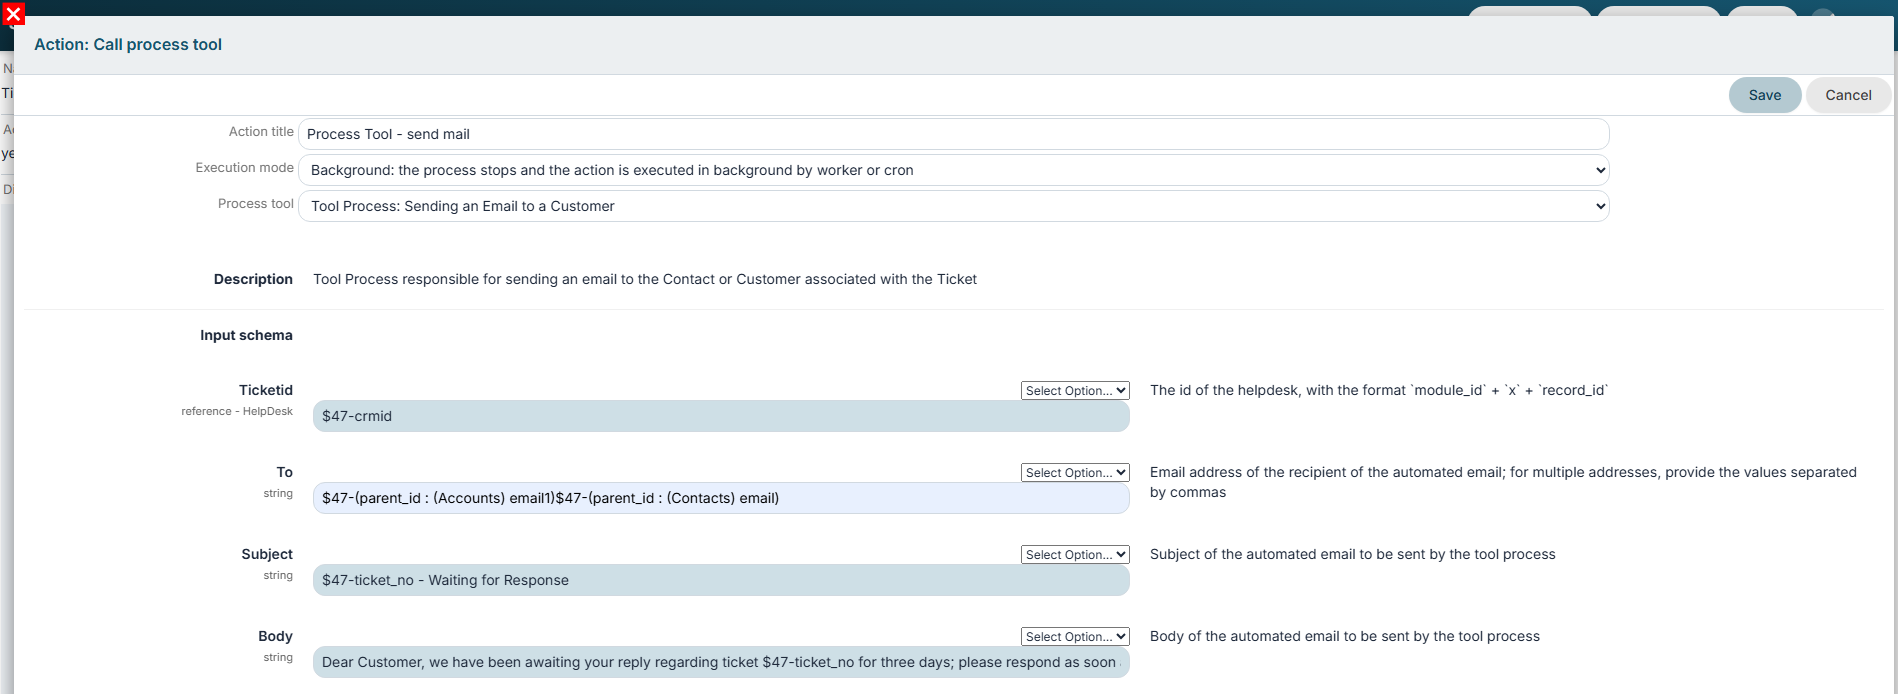
Figure 18
- "Ticketid" → the Ticket ID.
- "Recipient" → the value of the "Email" field of the Organization or Contact specified in the "Related To" field of the affected Ticket.
N.B: Without performing any dedicated checks beforehand, the values of both fields have been concatenated.
Since the "Related To" field can never contain both an Organization and a Contact at the same time, only one of the two variables will actually return a value.
- "Subject" → the internal Ticket number followed by the fixed string " - Waiting for Response".
- "Body" → the fixed string "Dear Customer, we have been awaiting your reply regarding ticket " + Internal Ticket number + " for three days; please respond as soon as possible so that we can resolve your issue."
After the email is sent, the process waits for another 2 days. If the Status has remained unchanged from its initial value, a second automatic email is sent by invoking the same Tool Process through the configuration shown in Figures 19 and 20. The Ticket is then closed by changing its Status to "Closed".
Figure 19
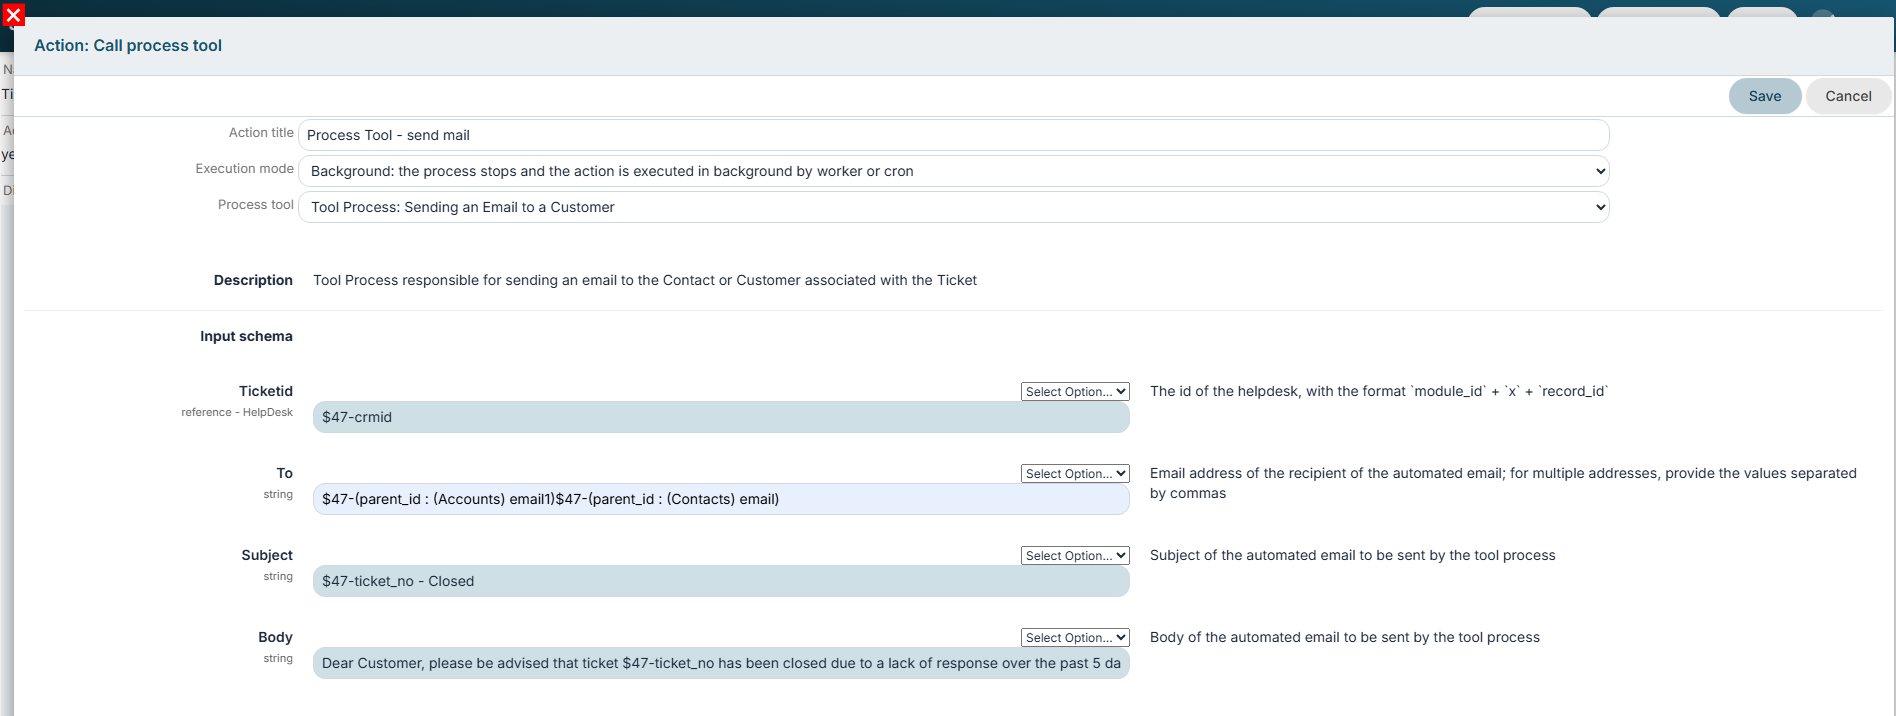
Figure 20
- "Ticketid" → the Ticket ID.
- "Recipient" → the value of the "Email" field of the Organization or Contact specified in the "Related To" field of the affected Ticket.
N:B: Without performing any dedicated checks beforehand, the values of both fields have been concatenated. Since the "Related To" field can never contain both an Organization and a Contact at the same time, only one of the two variables will actually return a value.
- "Subject" → the internal Ticket number followed by the fixed string "- Closed".
- "Body" → the fixed string "Dear Customer, please be advised that ticket " + Internal Ticket number + " has been closed due to a lack of response over the past 5 days; should you need further assistance, please open a new ticket."