# Zapier
Guide to create a new Zapier integration and examples
# Introduction
Zapier is a product that allows end-users to integrate web applications and automate workflows. It enables the connection of various web applications through "ZAPs," which can be customized based on user needs. Zapier functions as a bridge between different applications, allowing the automation of business processes and saving valuable time.
***The purpose of this tutorial is to configure the integration with vtenext in Zapier and aftwerwards 2 examples will be shown.***
# New integration
##### **Hot to create an integration with vtenext in Zapier**
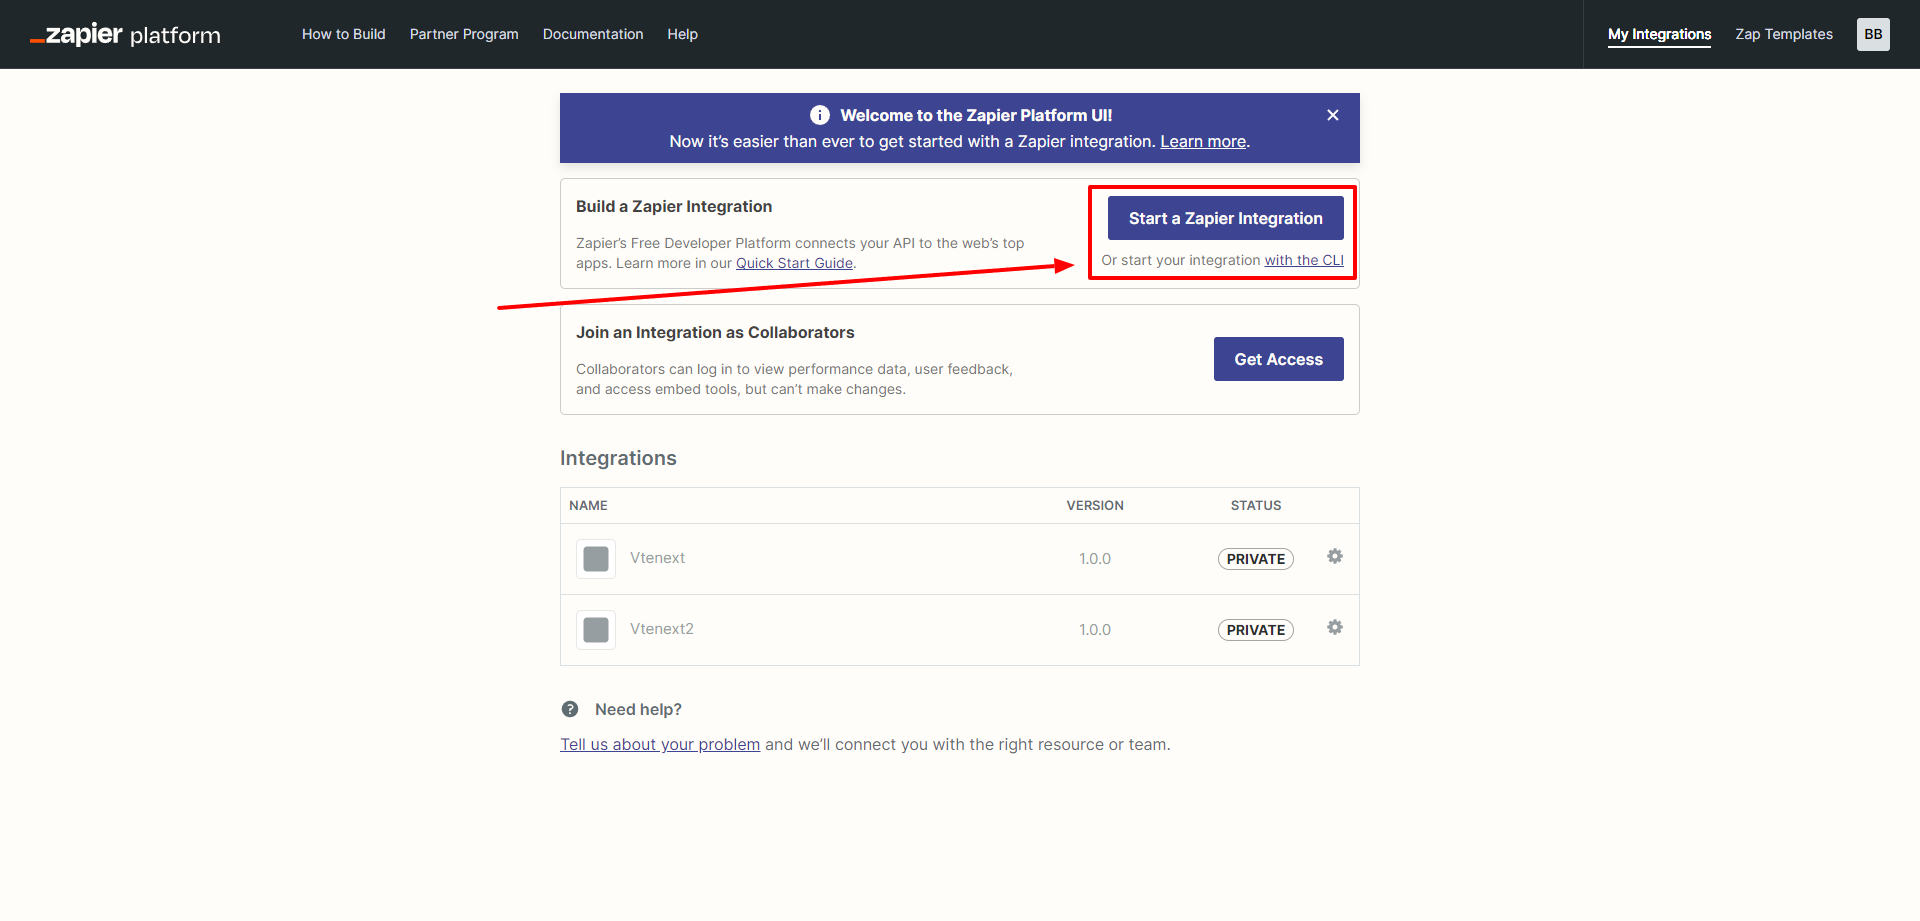
**1.** The first step is to go to [https://developer.zapier.com/](https://developer.zapier.com/), log in with your Zapier credentials, and click on "Start a Zapier Integration".
[](https://usermanual.vtenext.com/uploads/images/gallery/2023-07/image-1688997649695.png)
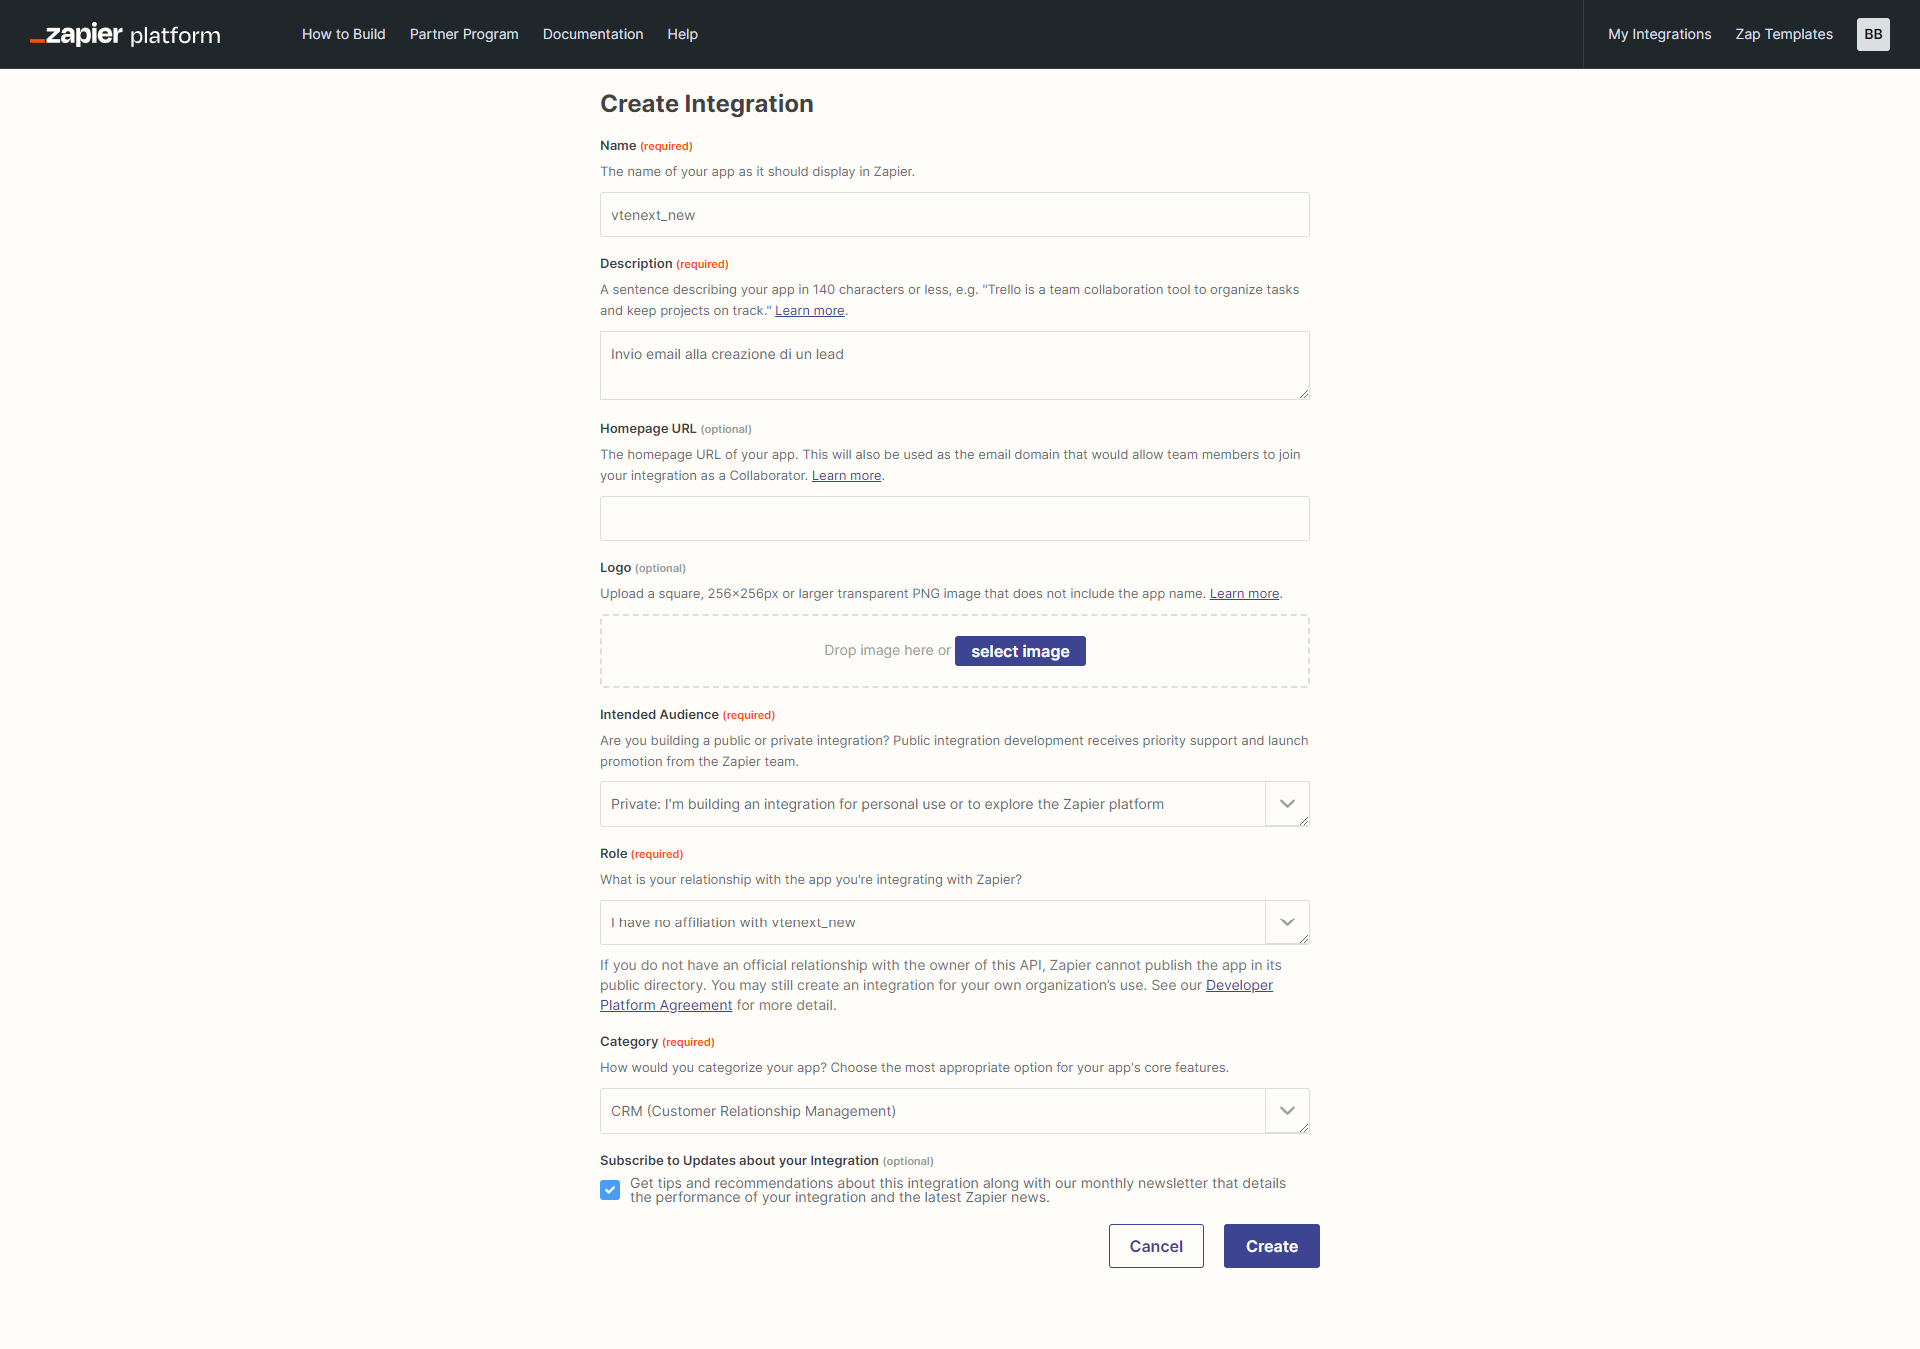
**2.** It is then necessary to fill in all the fields that the Zapier screen requests.
**Example**:
**Name**: vtenext
**Description**: Integrate vtenext with Zapier
**Audience**: Private
**Role**: I have no affiliation with...
**Category**: CRM
[](https://usermanual.vtenext.com/uploads/images/gallery/2023-07/image-1688998674505.png)
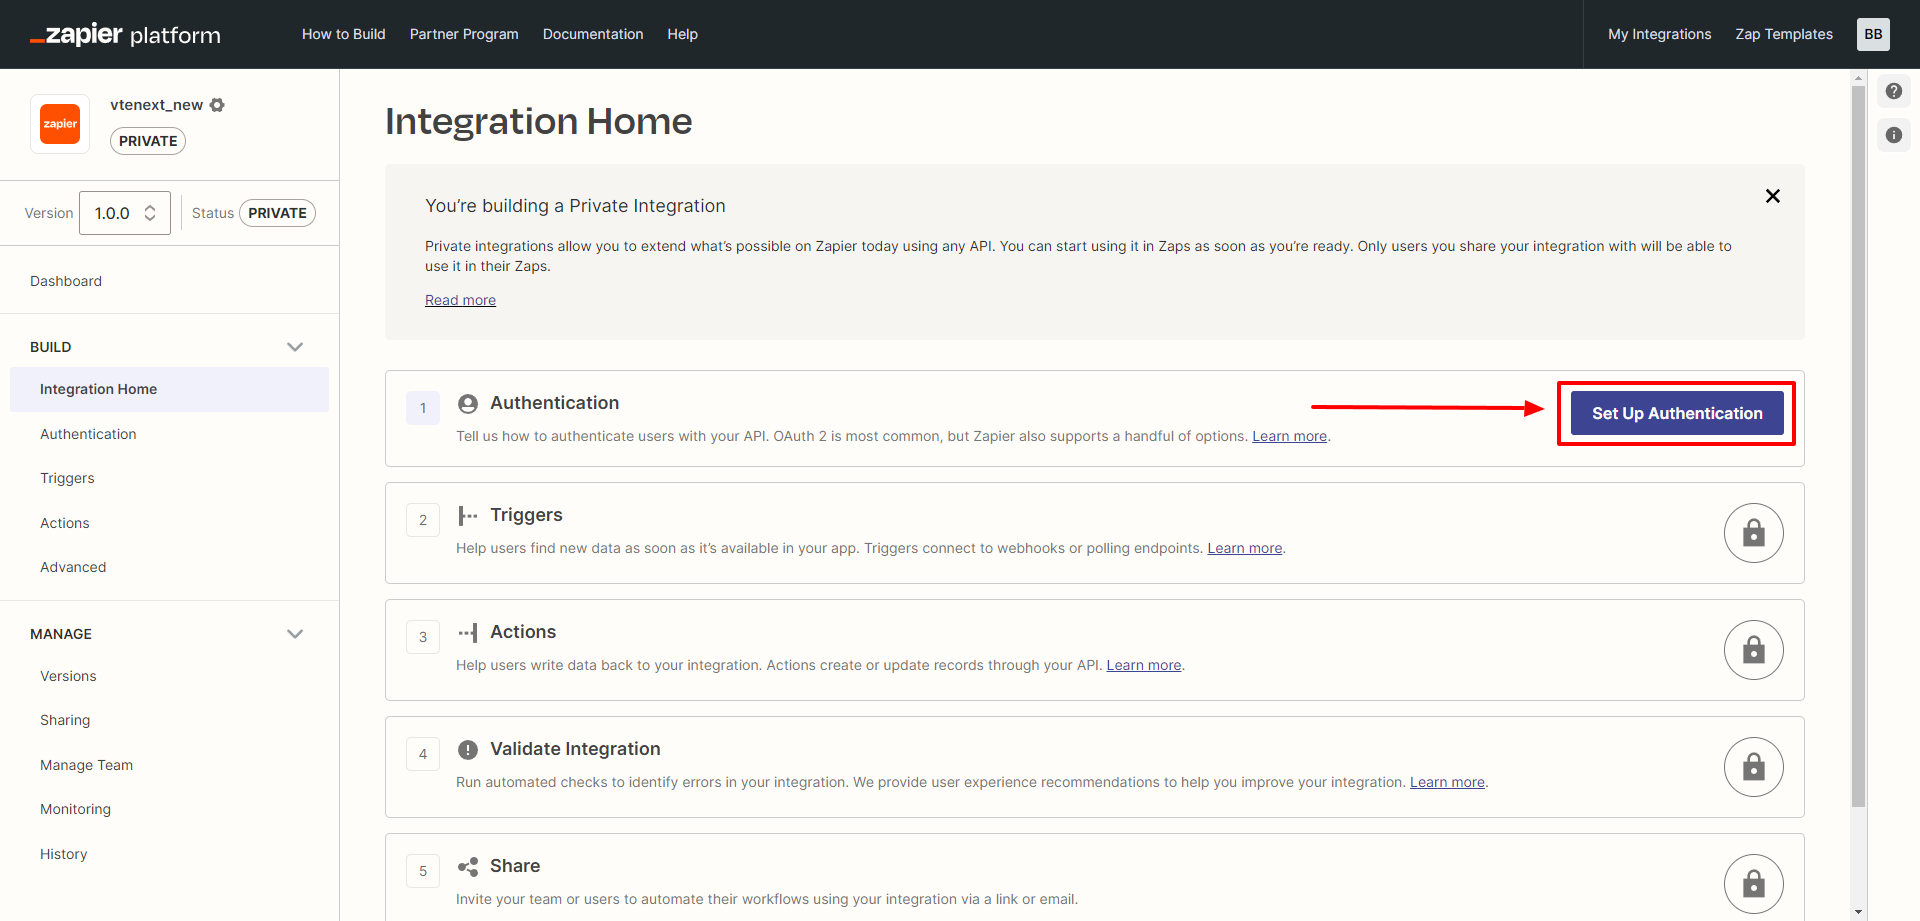
**3.** After a successful save message and successful creation, you will be able to configure the type of authentication.
[](https://usermanual.vtenext.com/uploads/images/gallery/2023-07/image-1688998892622.png)
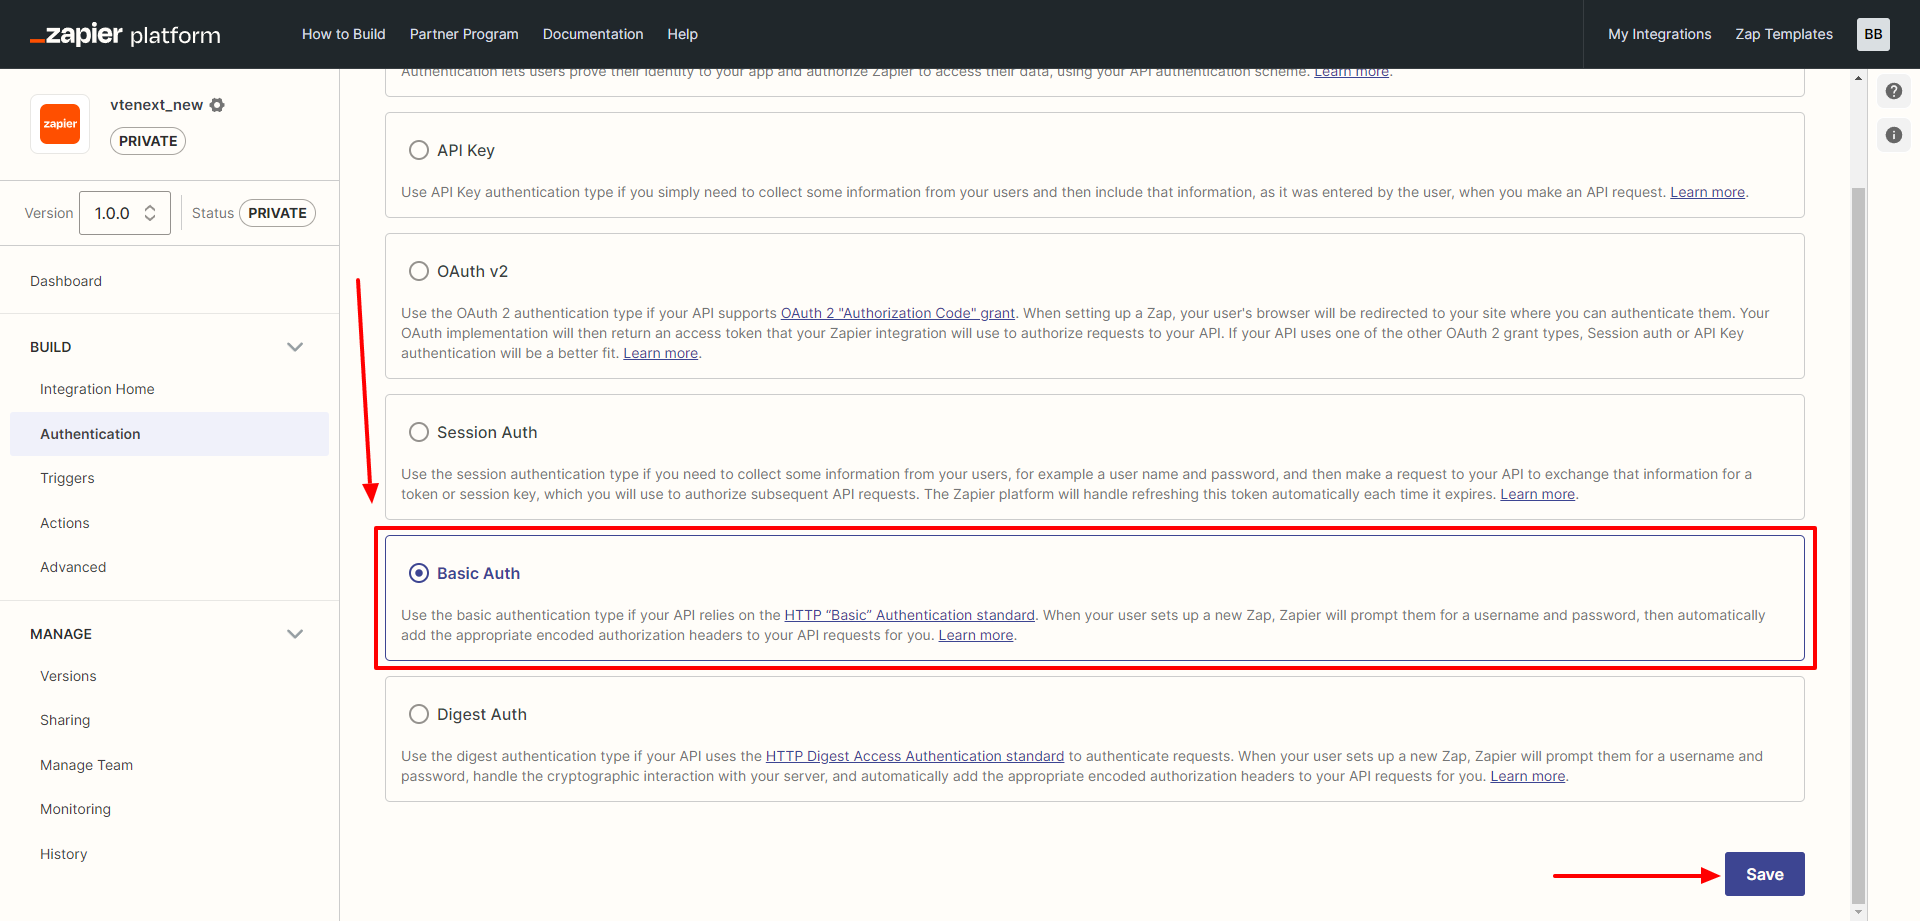
You should select BASIC AUTH and then click on SAVE accordingly.
[](https://usermanual.vtenext.com/uploads/images/gallery/2023-07/image-1688998997284.png)
**STEP 1:** Leave it blank and click on CONTINUE.
[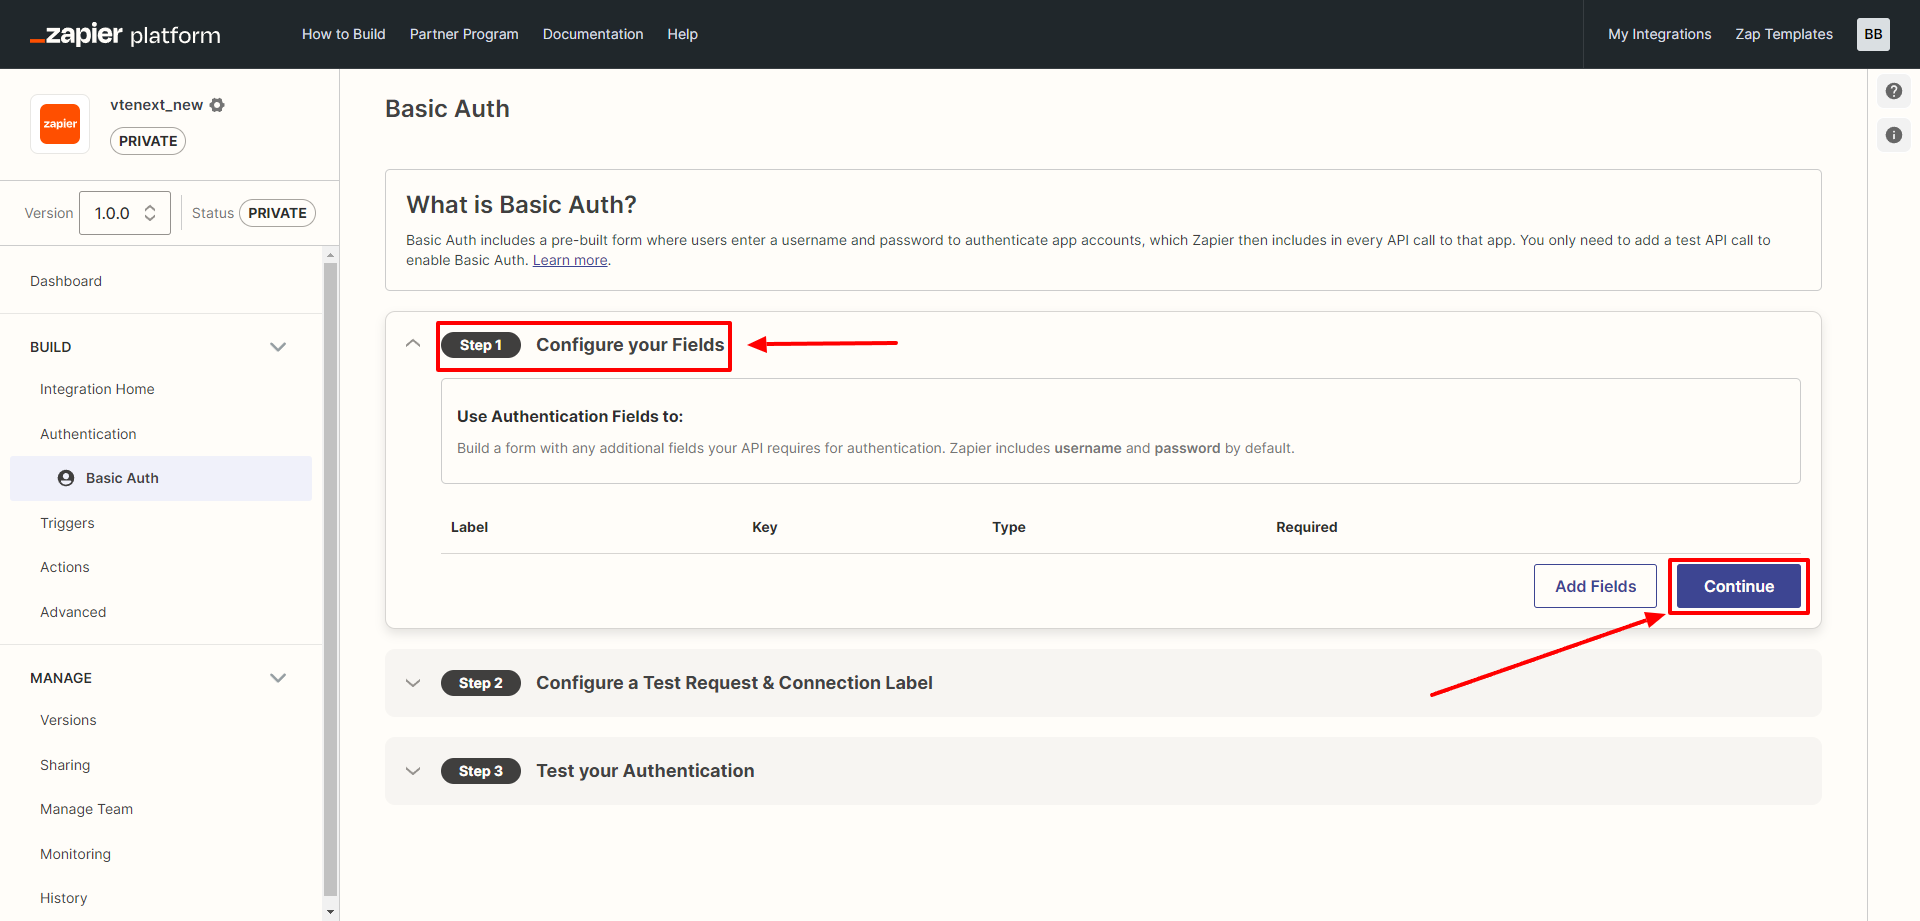](https://usermanual.vtenext.com/uploads/images/gallery/2023-07/image-1688999648720.png)
**STEP 2:** Enter in the test, the POST method, and configure the URL with the following string: [https://VTE-URL/restapi/v1/vtews/listtypes](https://vte-url/restapi/v1/vtews/listtypes) (where VTE-URL is the absolute address of your vtenext installation).
[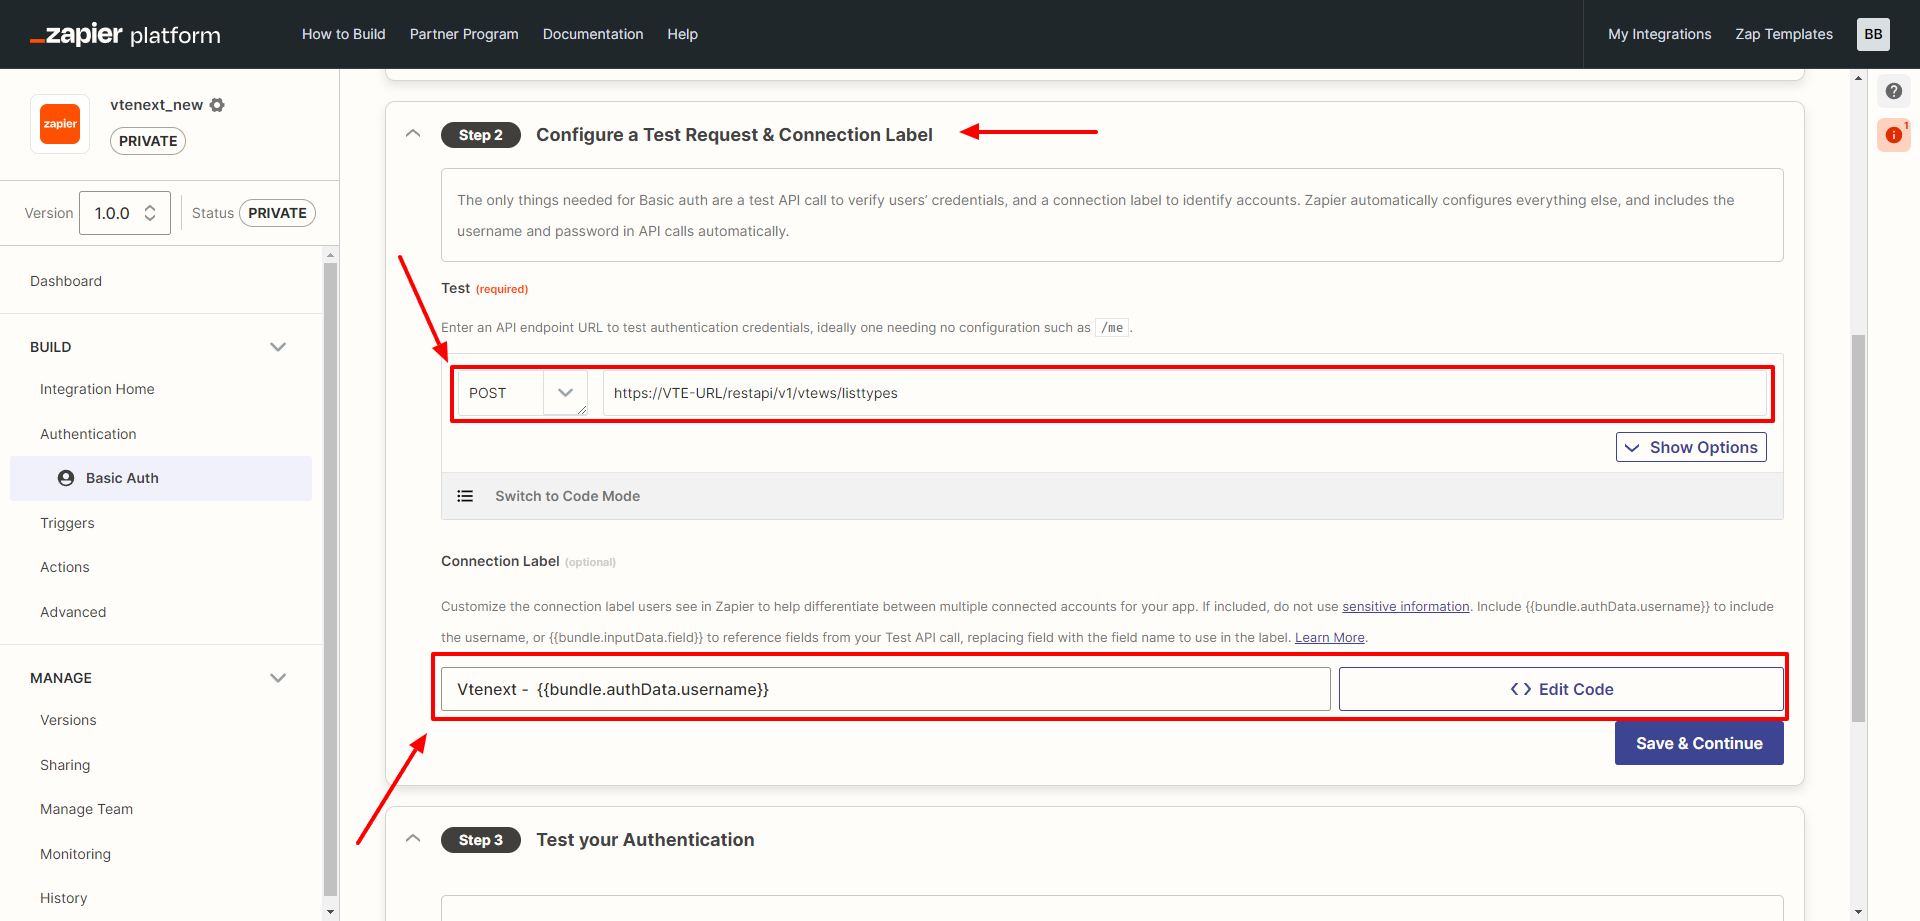](https://usermanual.vtenext.com/uploads/images/gallery/2023-07/image-1689002049644.png)
**STEP 3:** It's time to test the authentication by clicking on the blue "Sign In" button and finally clicking on **SAVE & FINISH.**
**CAUTION: The password to use is the access key of the vtenext user, which can be found in the user's preferences.**
[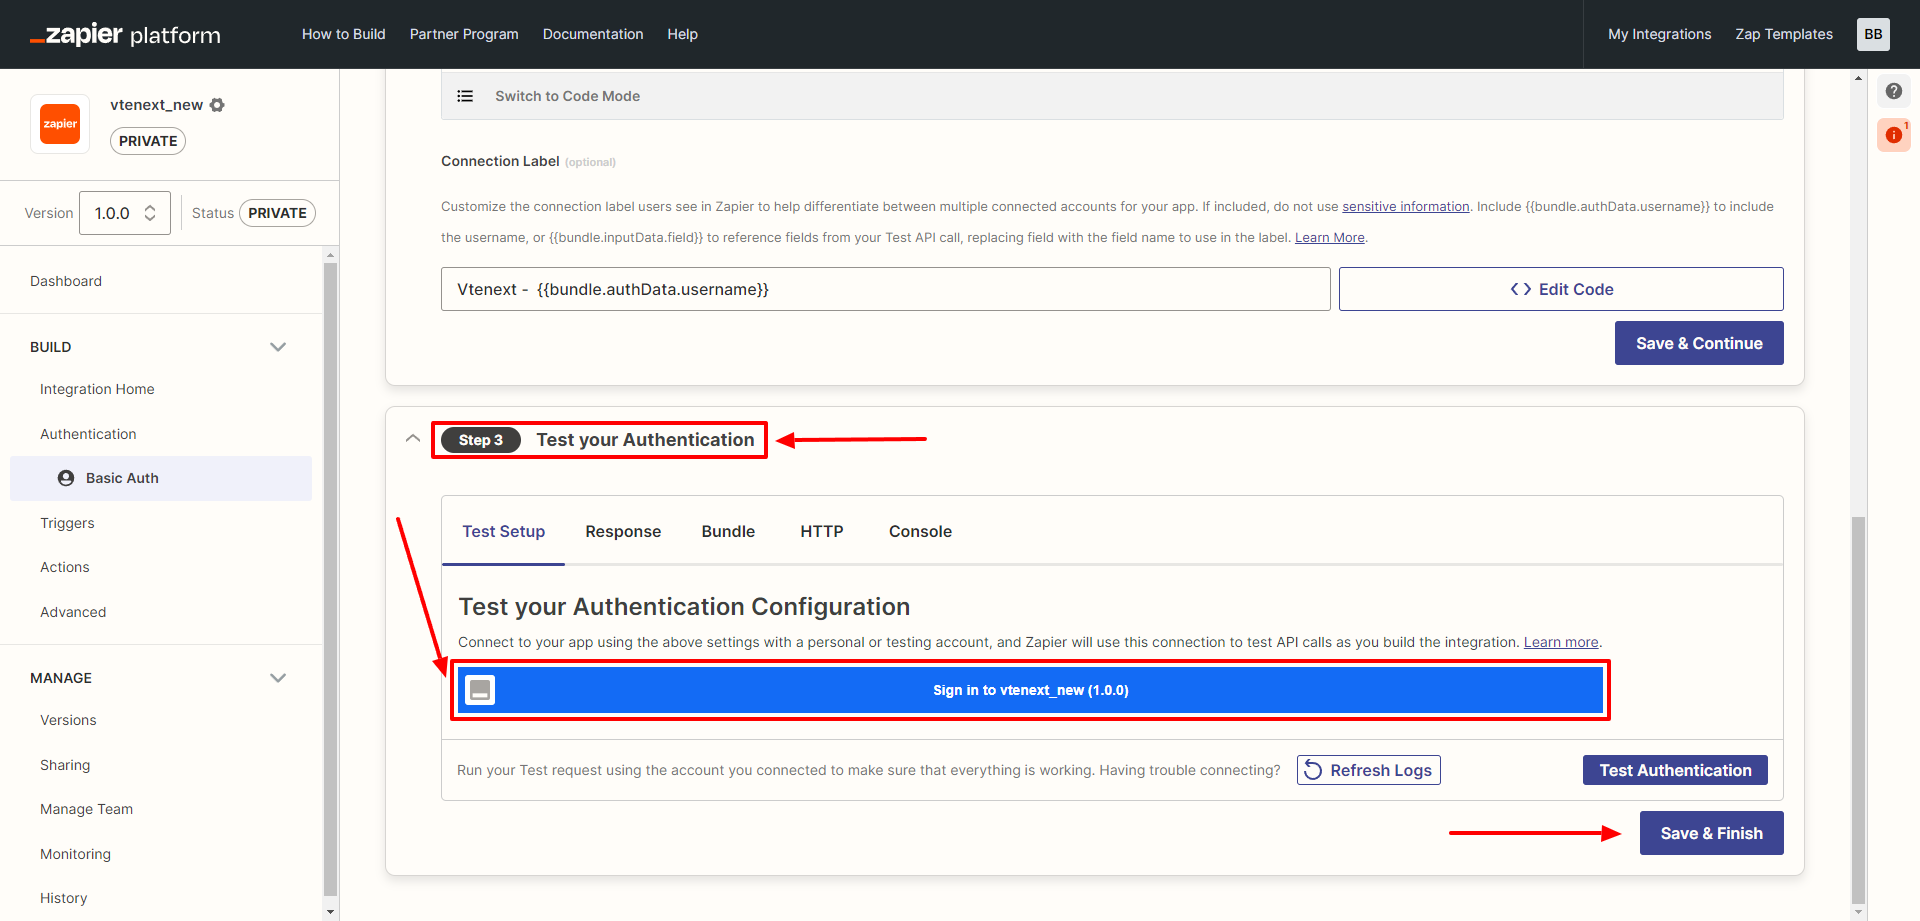](https://usermanual.vtenext.com/uploads/images/gallery/2023-07/image-1689003982494.png)
**4. Trigger creation**
This step is optional, it's necessary only if we want to execute Zapier actions when in vtenext some condition is met (for example, when a Lead is created, or when a condition of a process is satisfied).
Let's add a trigger as shown below:
[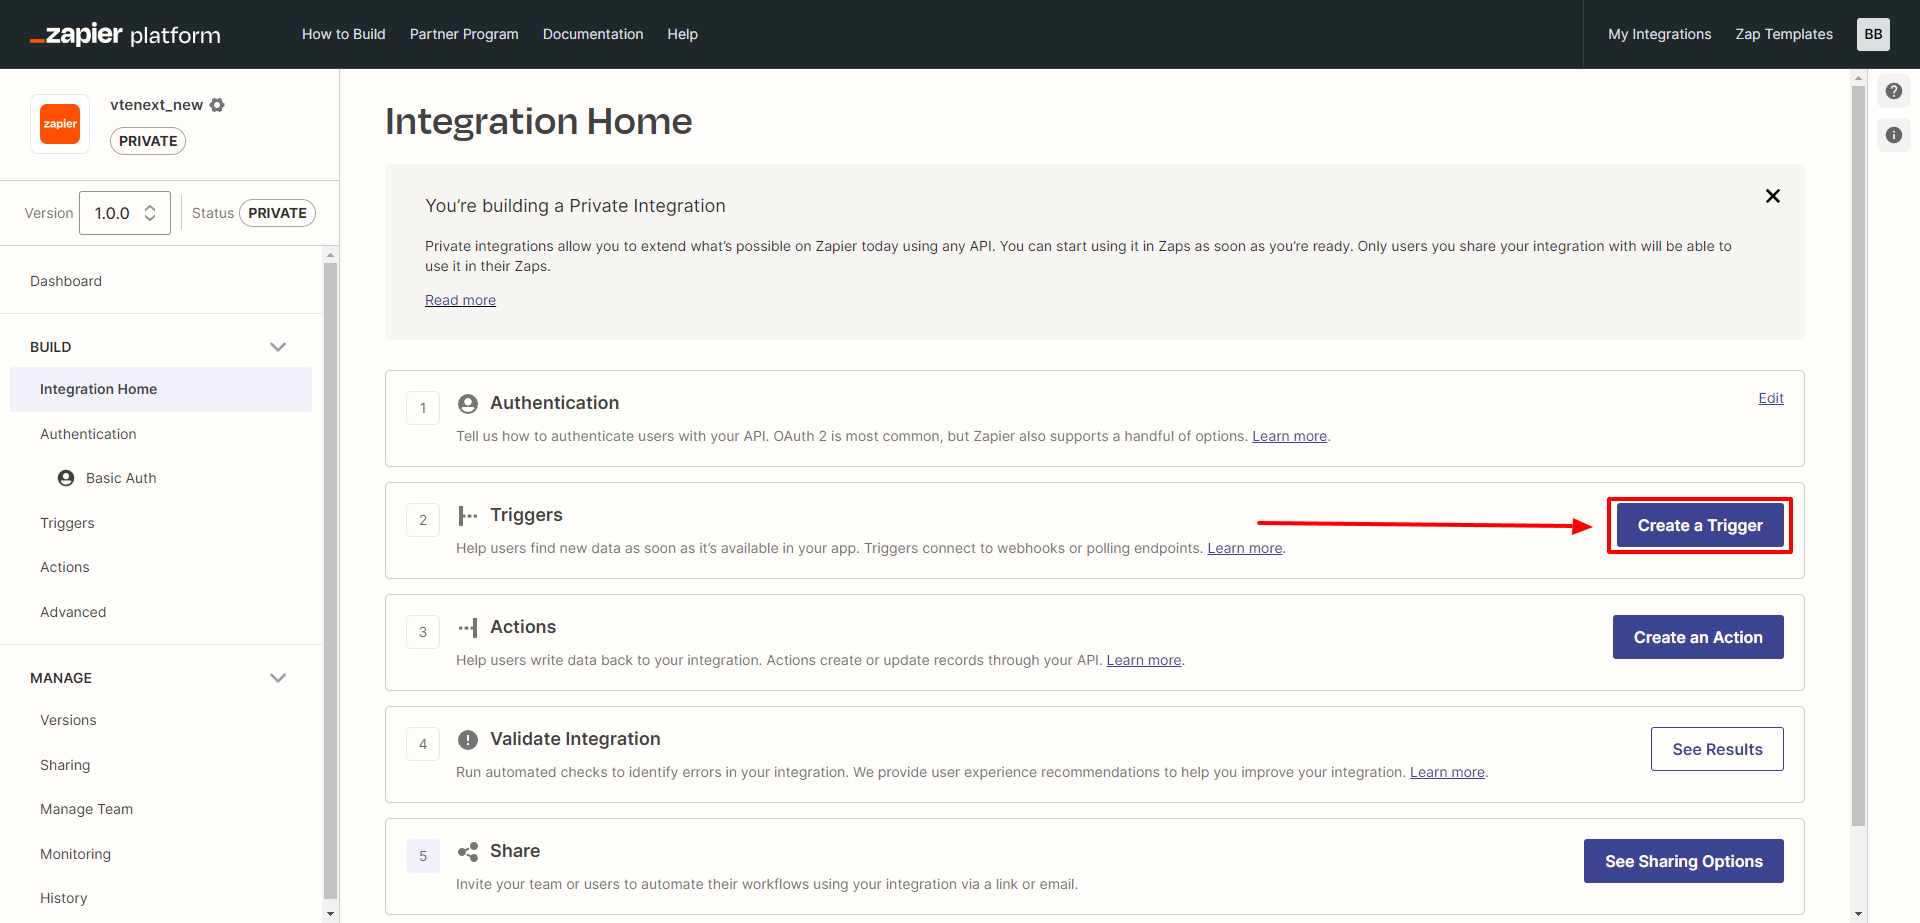](https://usermanual.vtenext.com/uploads/images/gallery/2023-08/image-1691677394684.png)
Clicking on the CREATE A TRIGGER button will present a screen with some fields to fill in. These fields should be managed based on what you want to achieve with the trigger itself (in the example, it involves intercepting the creation of a new Lead).
[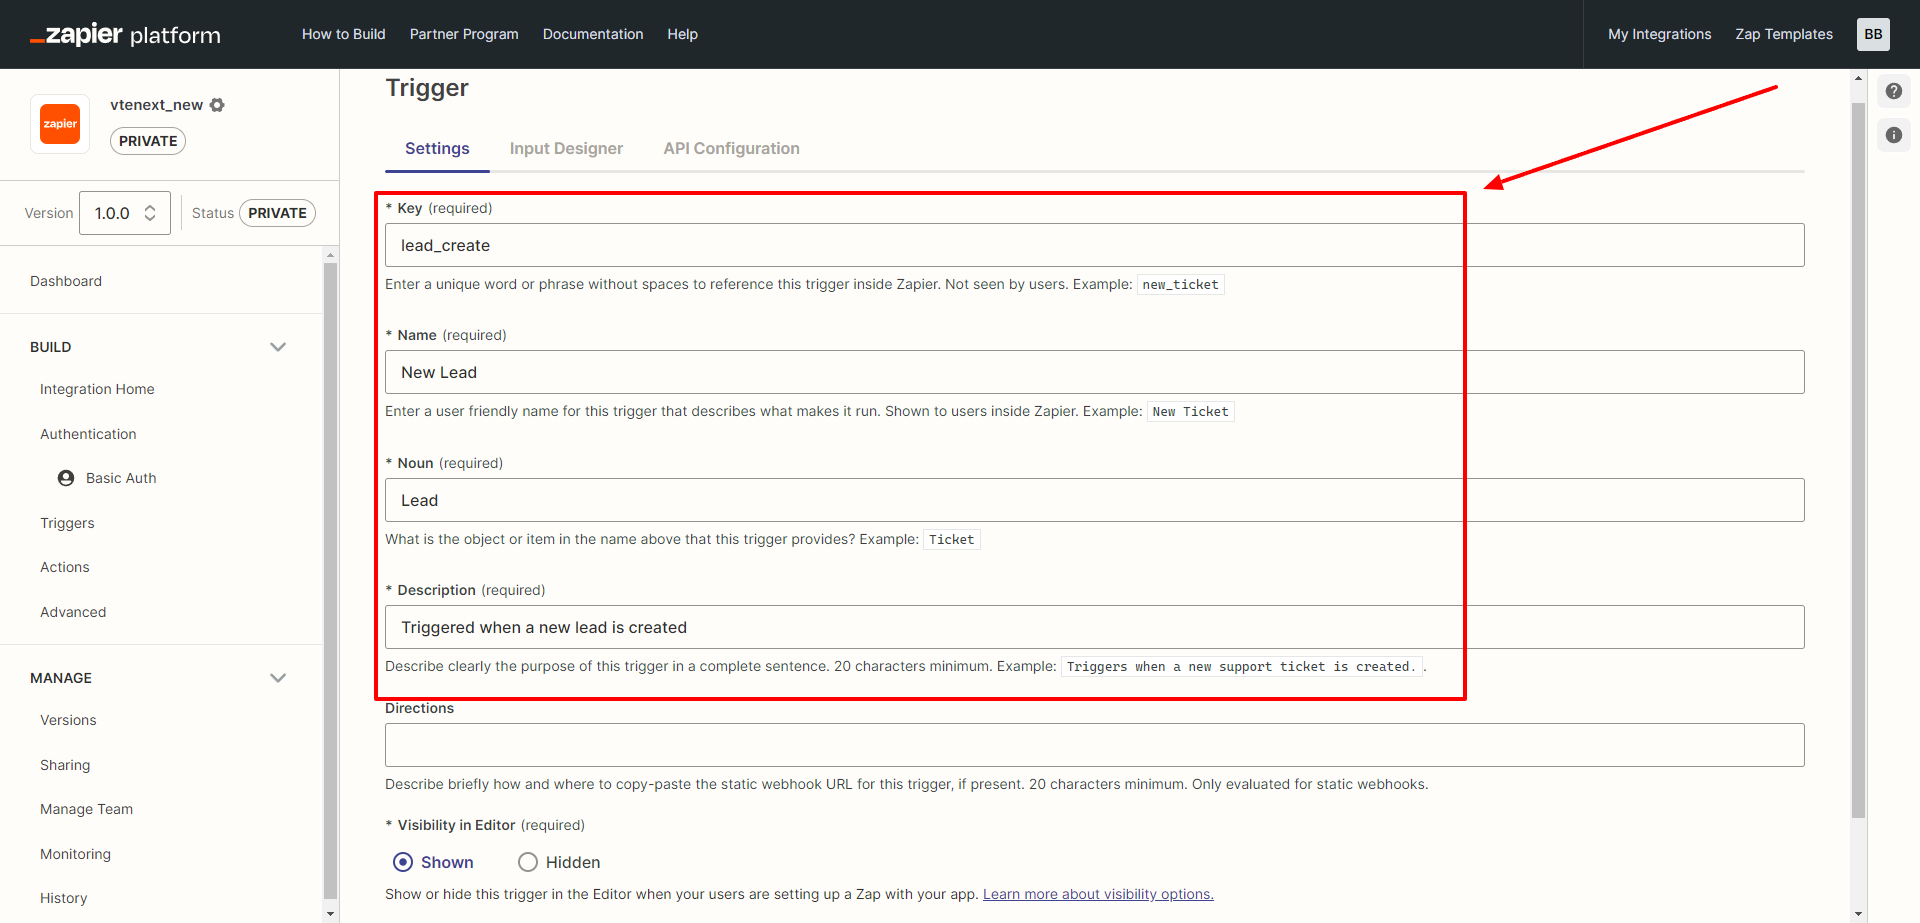](https://usermanual.vtenext.com/uploads/images/gallery/2023-08/image-1691677670950.png)
Once all the fields are filled in, click on **SAVE & CONTINUE** at the bottom of the page on the right.
Immediately after, the following page will appear, where you will need to click on **API CONFIGURATION** to create a webhook.
[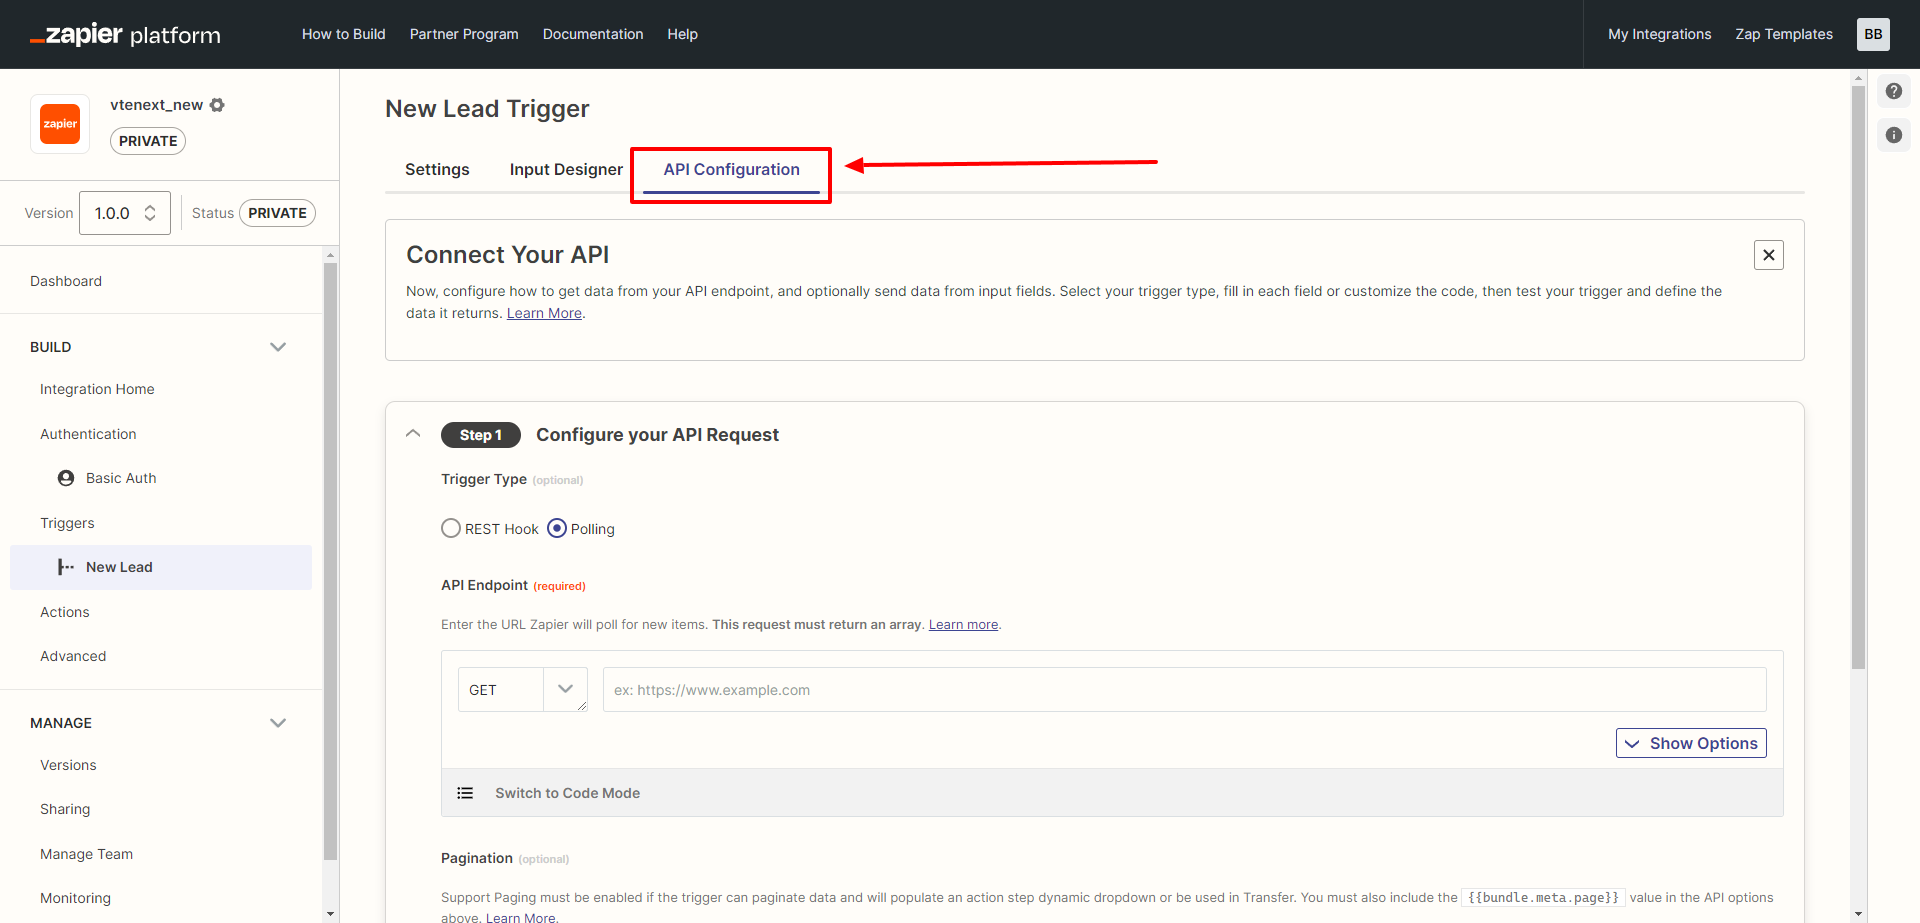](https://usermanual.vtenext.com/uploads/images/gallery/2023-08/image-1691677894652.png)
In **STEP 1,** choose the following parameters:
**SUBSCRIBE**
- REST Hook (select it)
- POST (select it from the dropdown menu, then enter the following webhook, replacing VTE-URL with the correct address of your CRM)
[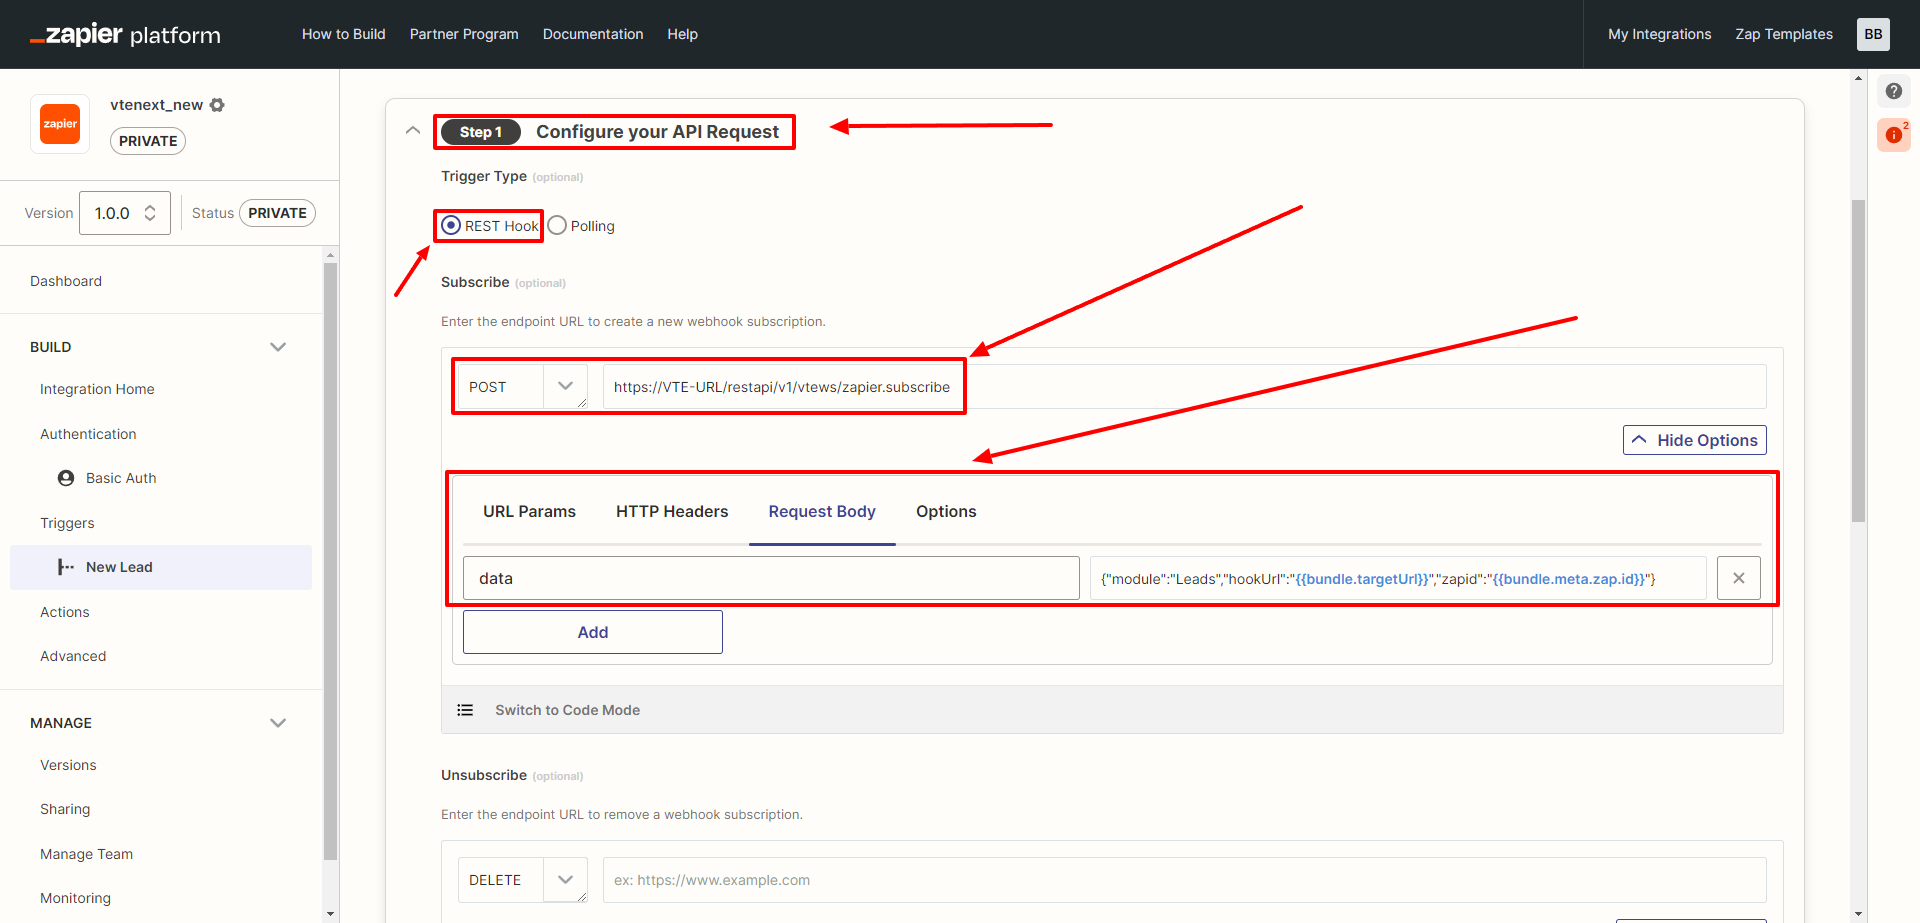](https://usermanual.vtenext.com/uploads/images/gallery/2023-08/image-1691680316892.png)
```
https://VTE-URL/restapi/v1/vtews/zapier.subscribe
{"module":"Leads","hookUrl":"{{bundle.targetUrl}}","zapid":"{{bundle.meta.zap.id}}"}
```
In this code, you can replace "Leads" with the module you want to configure.
Continuing the configuration, scrolling down the page, we find the **UNSUBSCRIBE** option, which should be configured with the following code.
[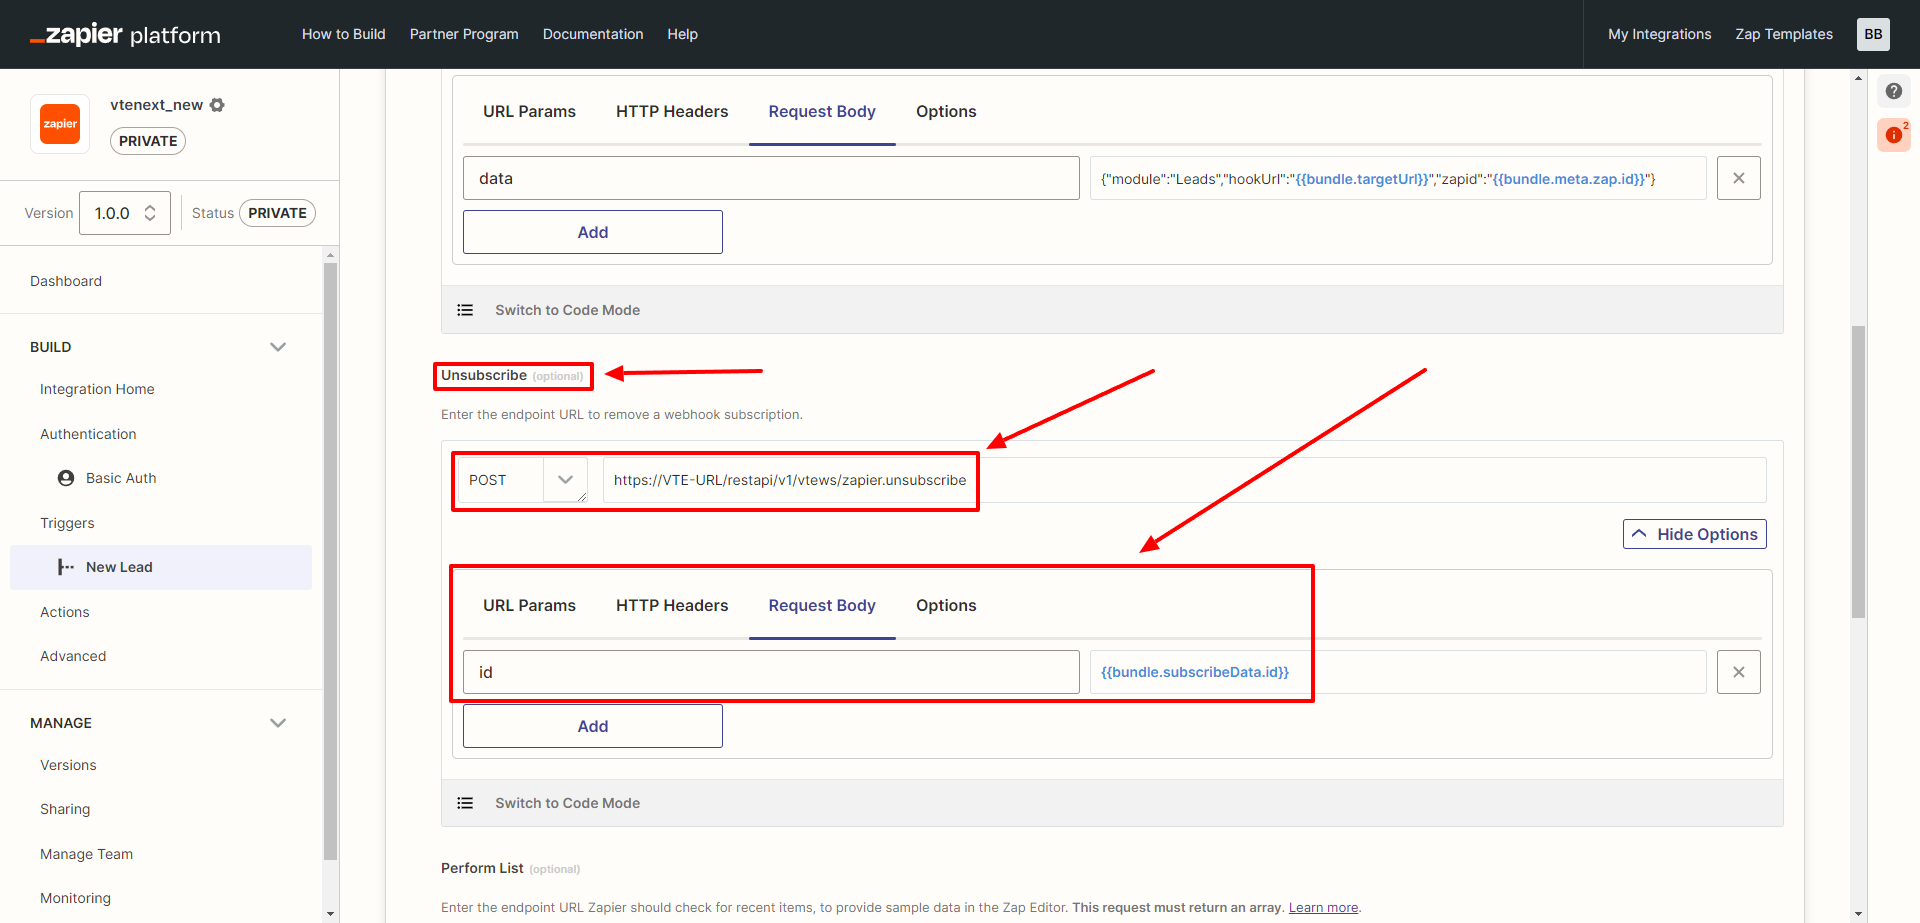](https://usermanual.vtenext.com/uploads/images/gallery/2023-08/image-1691680531292.png)
```
https://labs2.vtecrm.net:8443/restapi/v1/vtews/zapier.unsubscribe
{{bundle.subscribeData.id}}
```
Continuing with the **PERFORM LIST** parameter, you will need to configure the following code:
[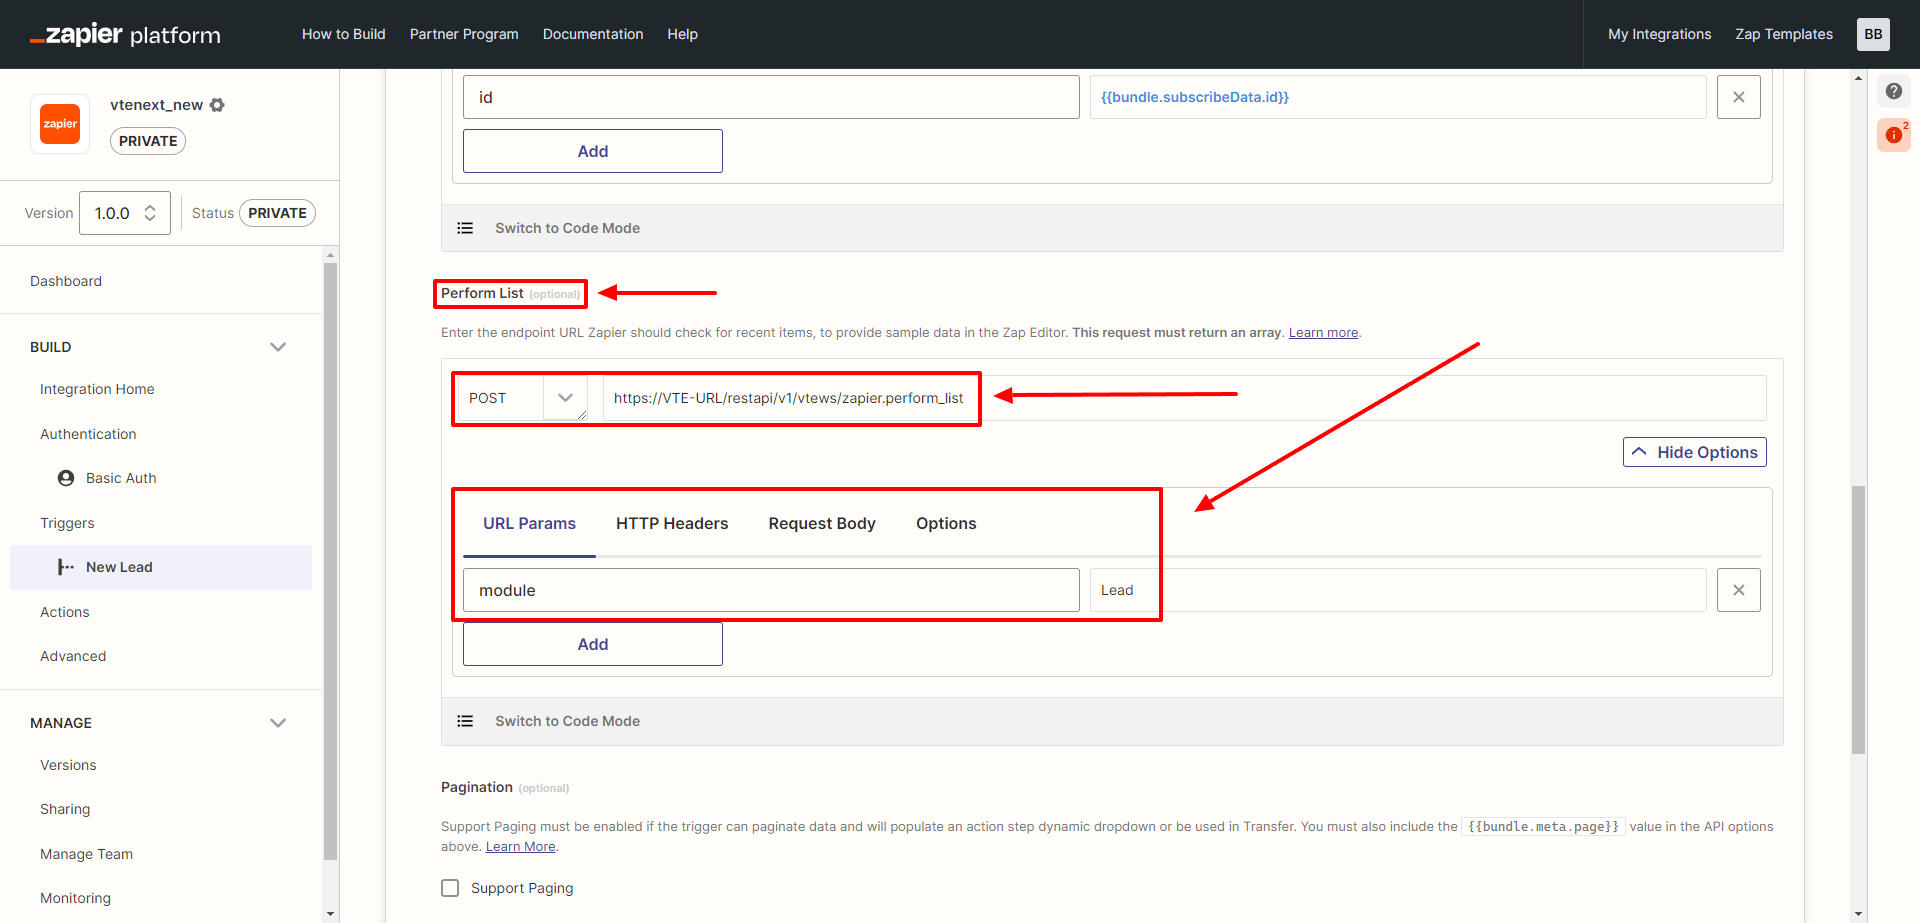](https://usermanual.vtenext.com/uploads/images/gallery/2023-08/image-1691681473958.png)
```
https://VTE-URL/restapi/v1/vtews/zapier.perform_list
Leads
```
Finally, for **PAGINATION**, there is nothing to configure, and you can click on **SAVE API Request & Continue.**
[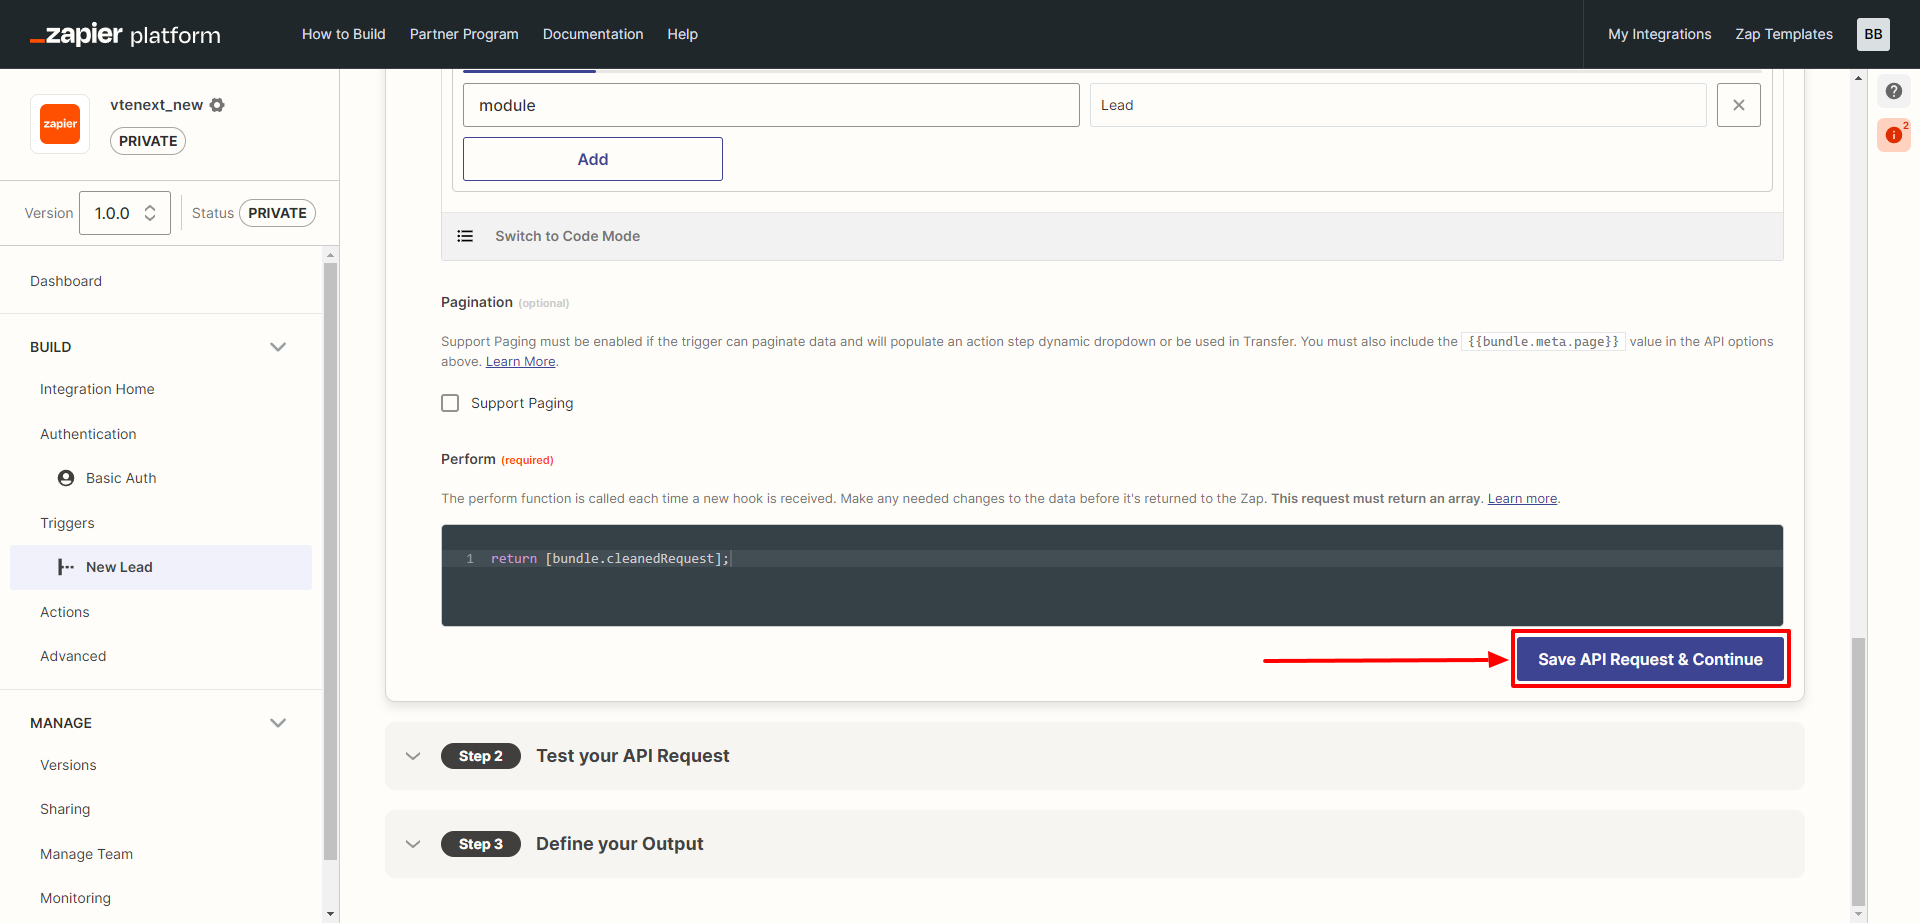](https://usermanual.vtenext.com/uploads/images/gallery/2023-08/image-1691681817484.png)
At **STEP** **2** of the Trigger configuration, nothing needs to be configured.
[](https://usermanual.vtenext.com/uploads/images/gallery/2023-08/image-1691682003664.png)
At **STEP 3** of the Trigger configuration, it is necessary to **leave** the field in that block empty.
[](https://usermanual.vtenext.com/uploads/images/gallery/2023-08/image-1691682110724.png)
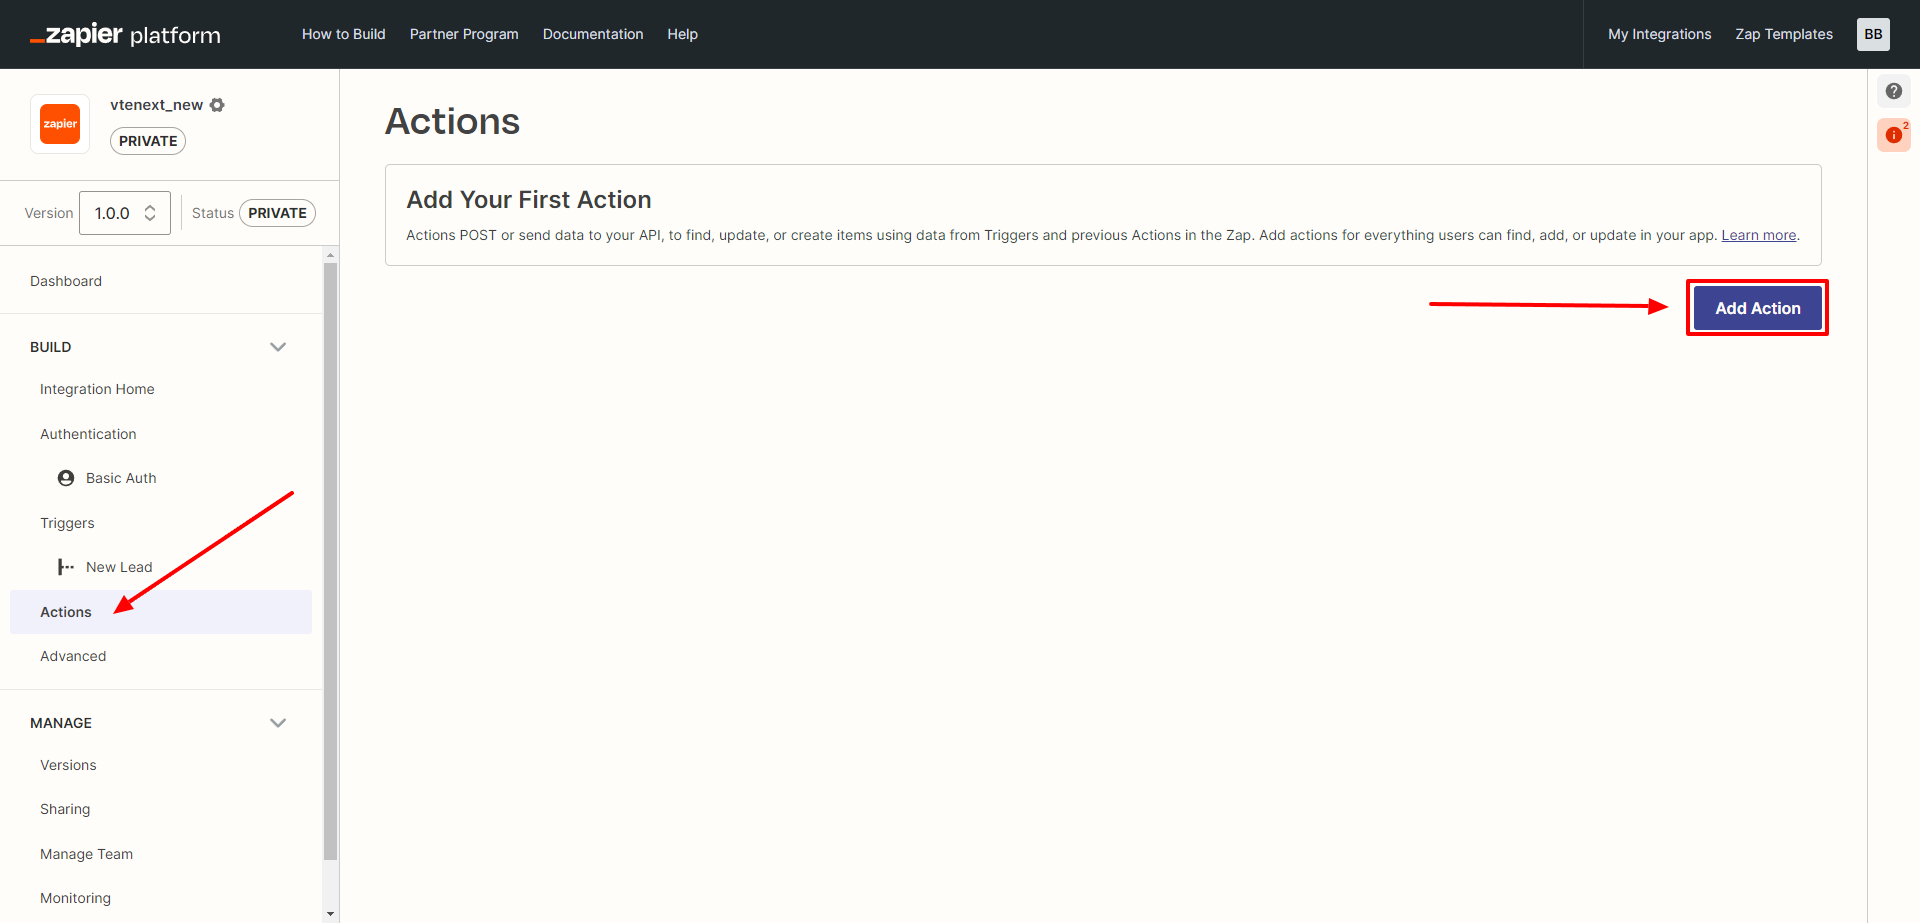
**5. Creating Actions**
Also in this case, this step is optional, it's necessary only if we want to execute actions in vtenext when the Zapier trigger satisfies its conditions. Actions available in vtenext are: search of a record, creation, update or deletion.
Moreover, it's possible to only create the actions required by your own integration.
**I. Search Action**
On the left-hand column, click on the **ACTION** item, and then on the right, click on the **CREATE** **ACTION** button.
[](https://usermanual.vtenext.com/uploads/images/gallery/2023-08/image-1691682308455.png)
It will open the following screen, which needs to be filled out as shown.
[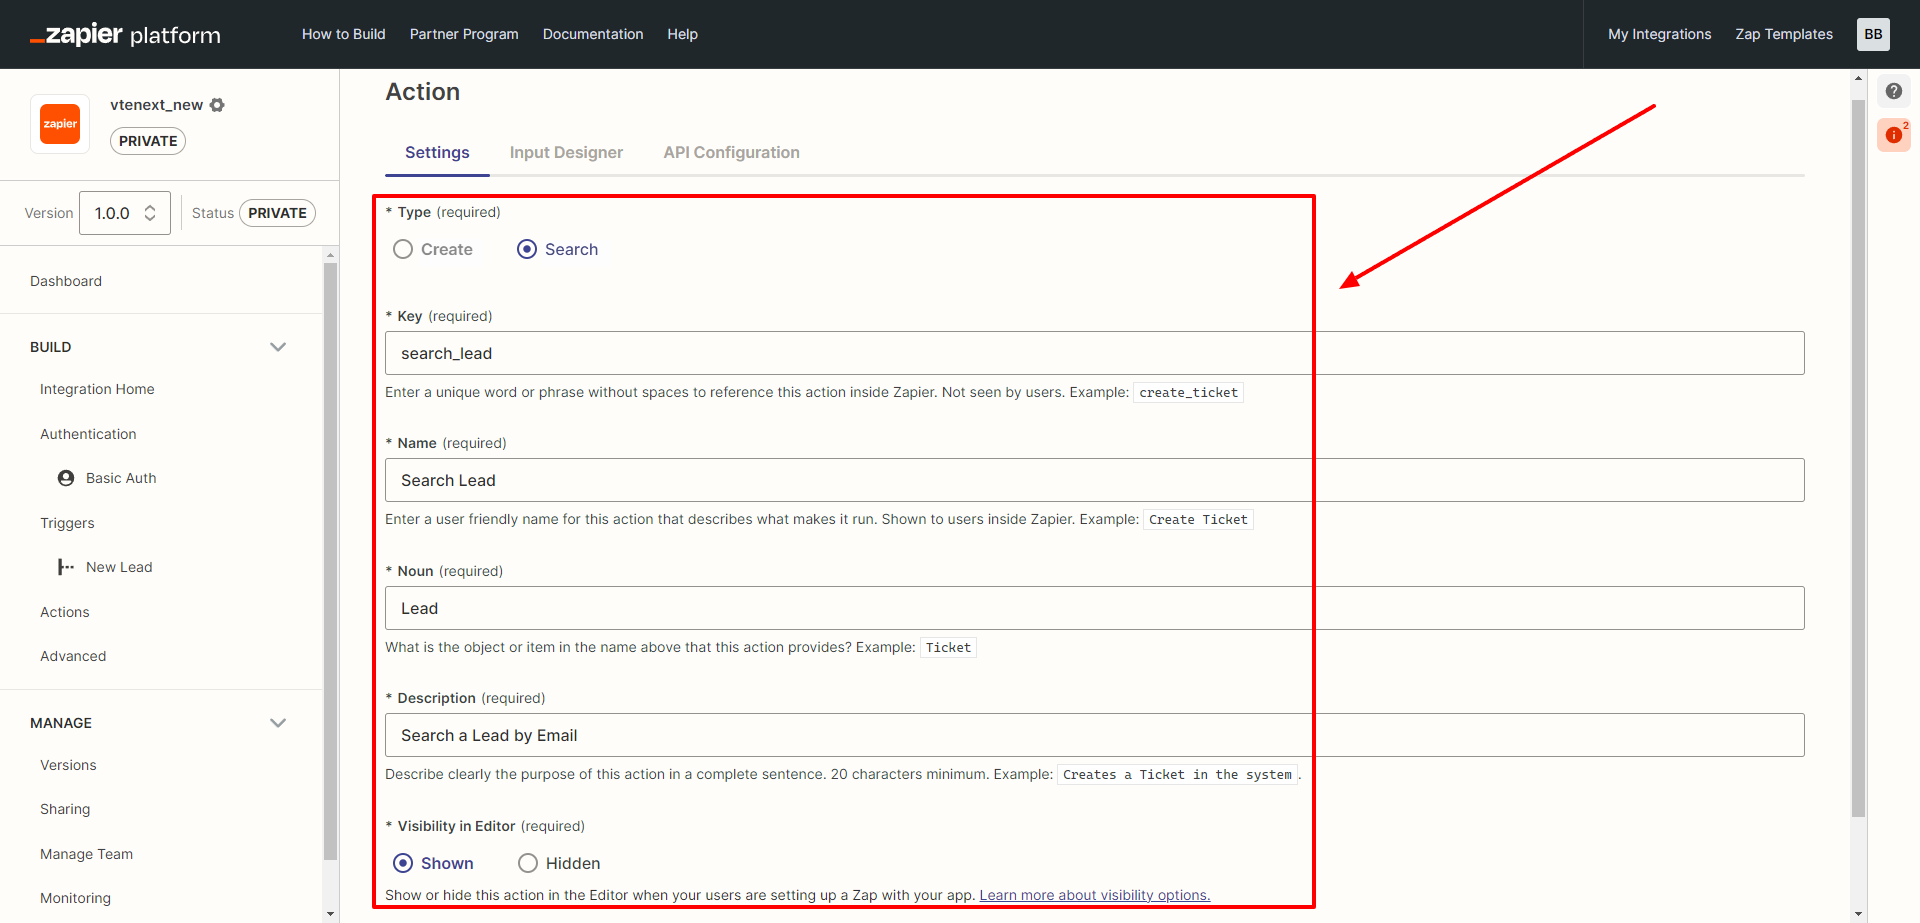](https://usermanual.vtenext.com/uploads/images/gallery/2023-08/image-1691682571573.png)
After completing the fields as shown in the previous image, you can click on **SAVE AND CONTINUE**. This will allow you to move to the next TAB to configure the **INPUT DESIGNER**.
[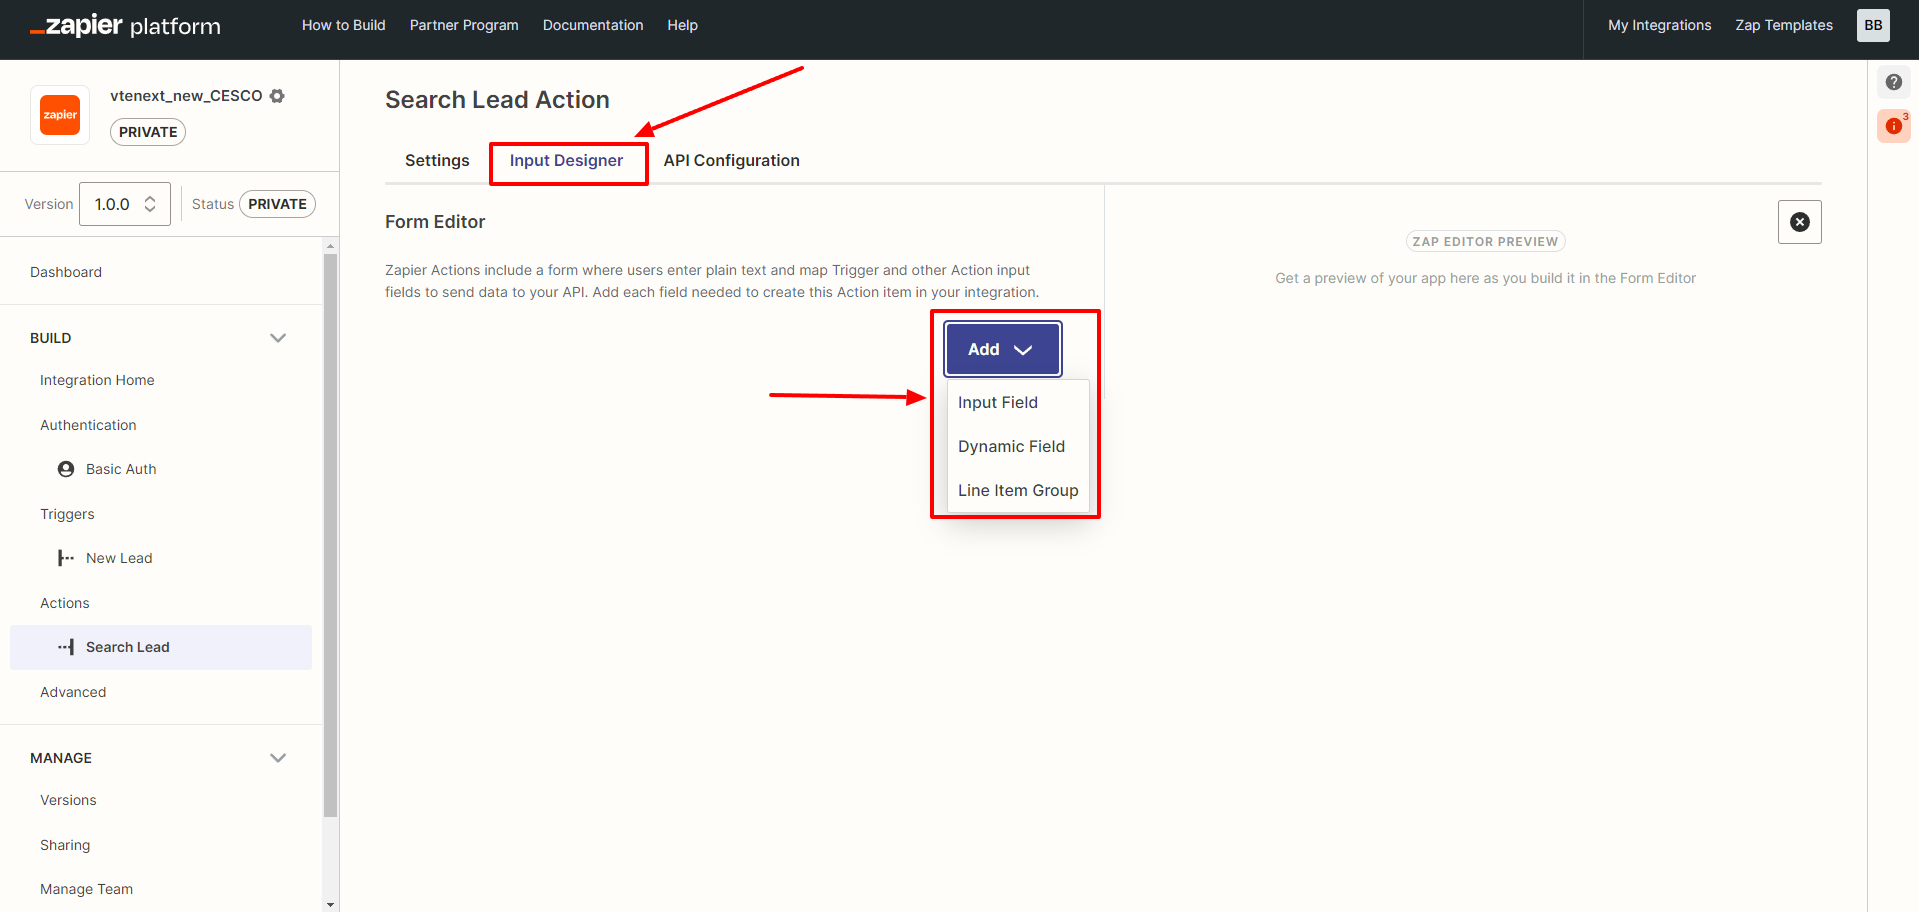](https://usermanual.vtenext.com/uploads/images/gallery/2023-08/image-1691760259231.png)
In this screen, click on **ADD**, choose **INPUT FIELD**, and the next configuration screen will appear.
[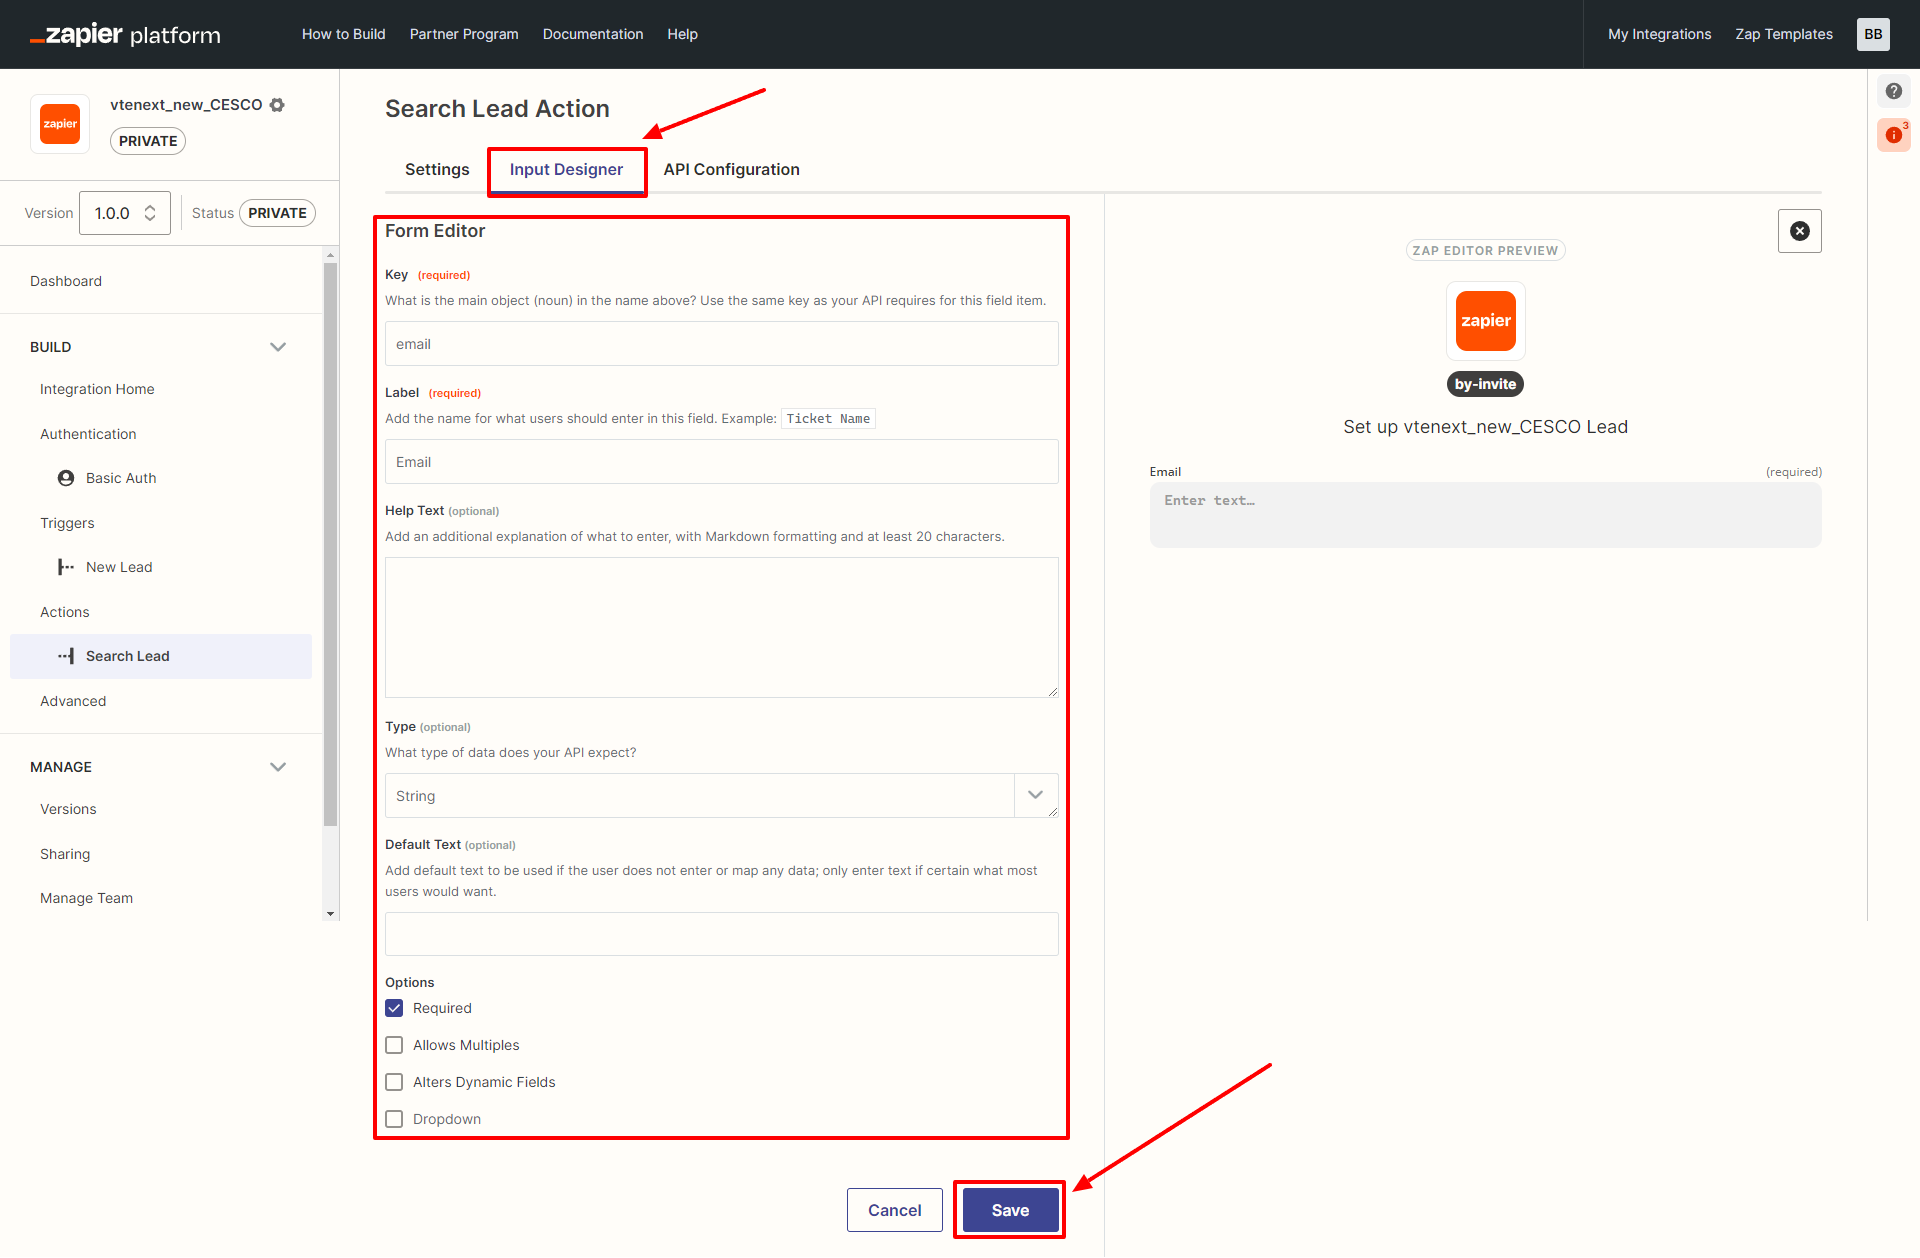](https://usermanual.vtenext.com/uploads/images/gallery/2023-08/image-1691760482484.png)
Enter the variables in the appropriate fields as indicated and then click on the **SAVE** button. This will move you to the **API CONFIGURATION** tab**.**
[](https://usermanual.vtenext.com/uploads/images/gallery/2024-07/image-1691761672586.png)
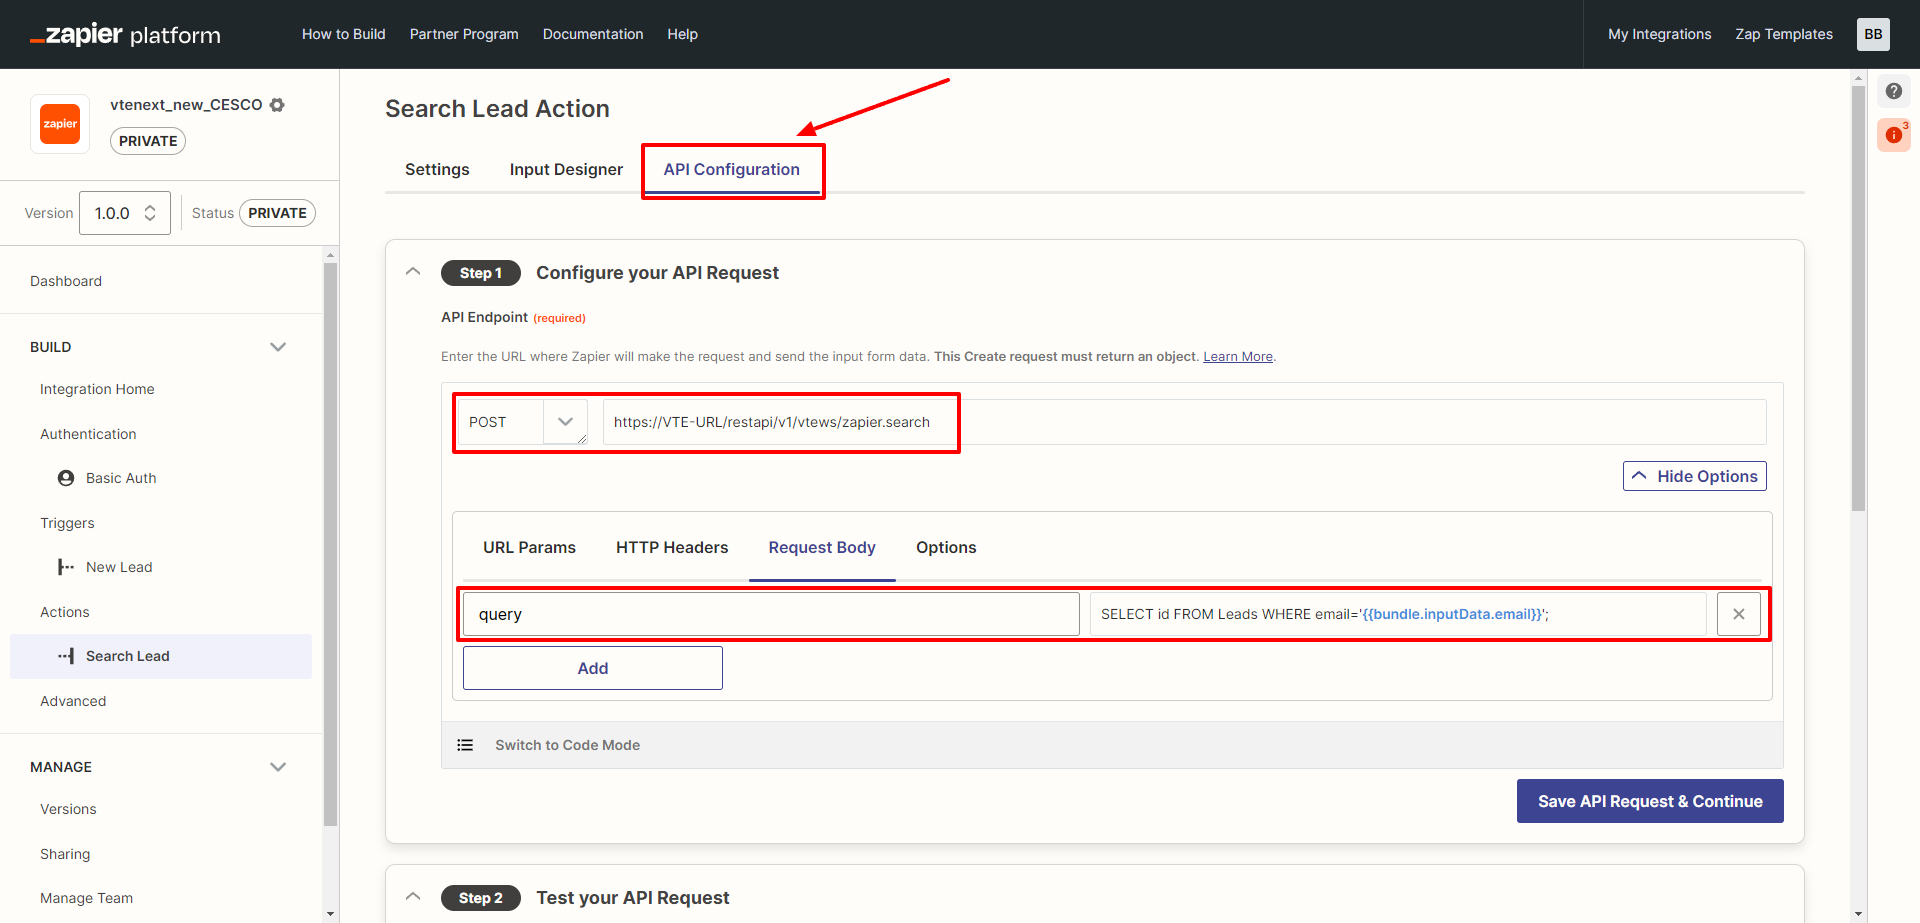
In this screen, enter the variables as shown. Replace "VTE-URL" with the full address of your vtenext installation. Finally, click on **SAVE API REQUEST & CONTINUE.**
```
https://VTE-URL/restapi/v1/vtews/zapier.search
SELECT id FROM Leads WHERE email='{{bundle.inputData.email}}';
```
In the TEST phase of STEP 2 on this page, enter a valid and existing email address for connection testing.
For the OUTPUT tab:
1. Use the response from the test data.
2. Generate output field definitions.
3. Set the appropriate type for each field.
Finally, click on **SAVE OUTPUT & FINISH** at the bottom right.
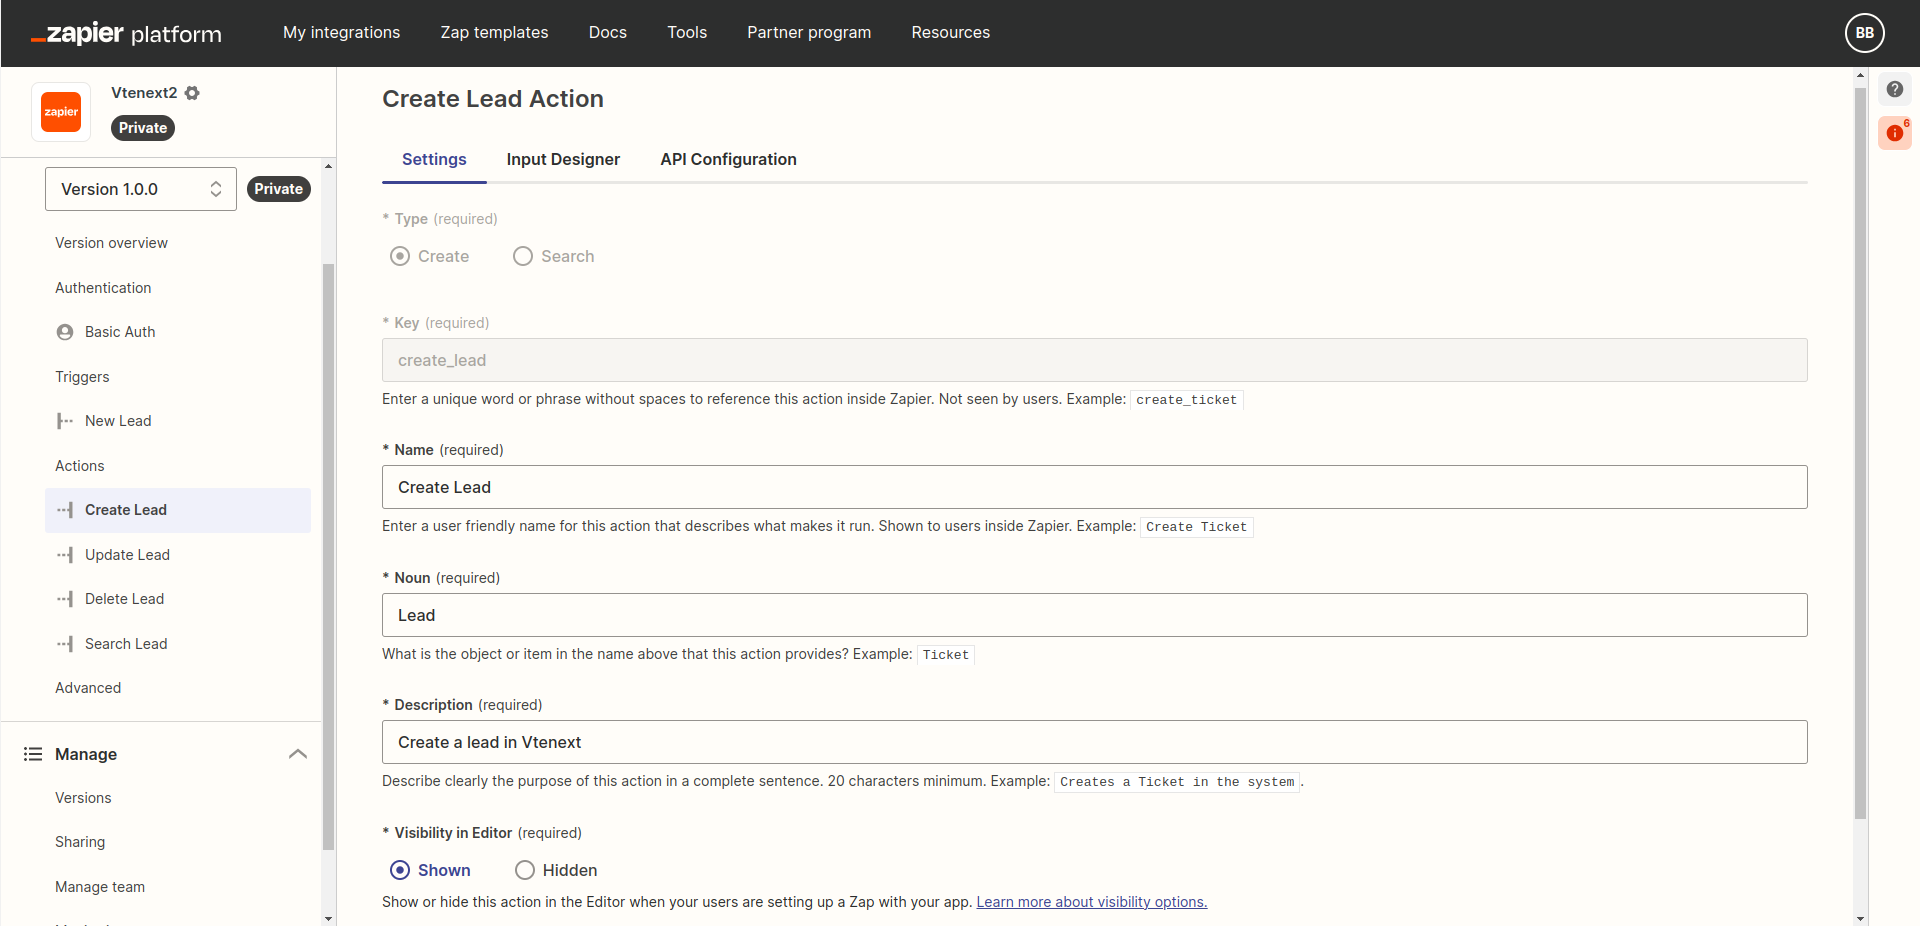
**II. Create Action**
Click on **ADD ACTION** to create a new action and fill the Settings tab as the following image:
**[](https://usermanual.vtenext.com/uploads/images/gallery/2024-04/screenshot-20240411-145655.png)**
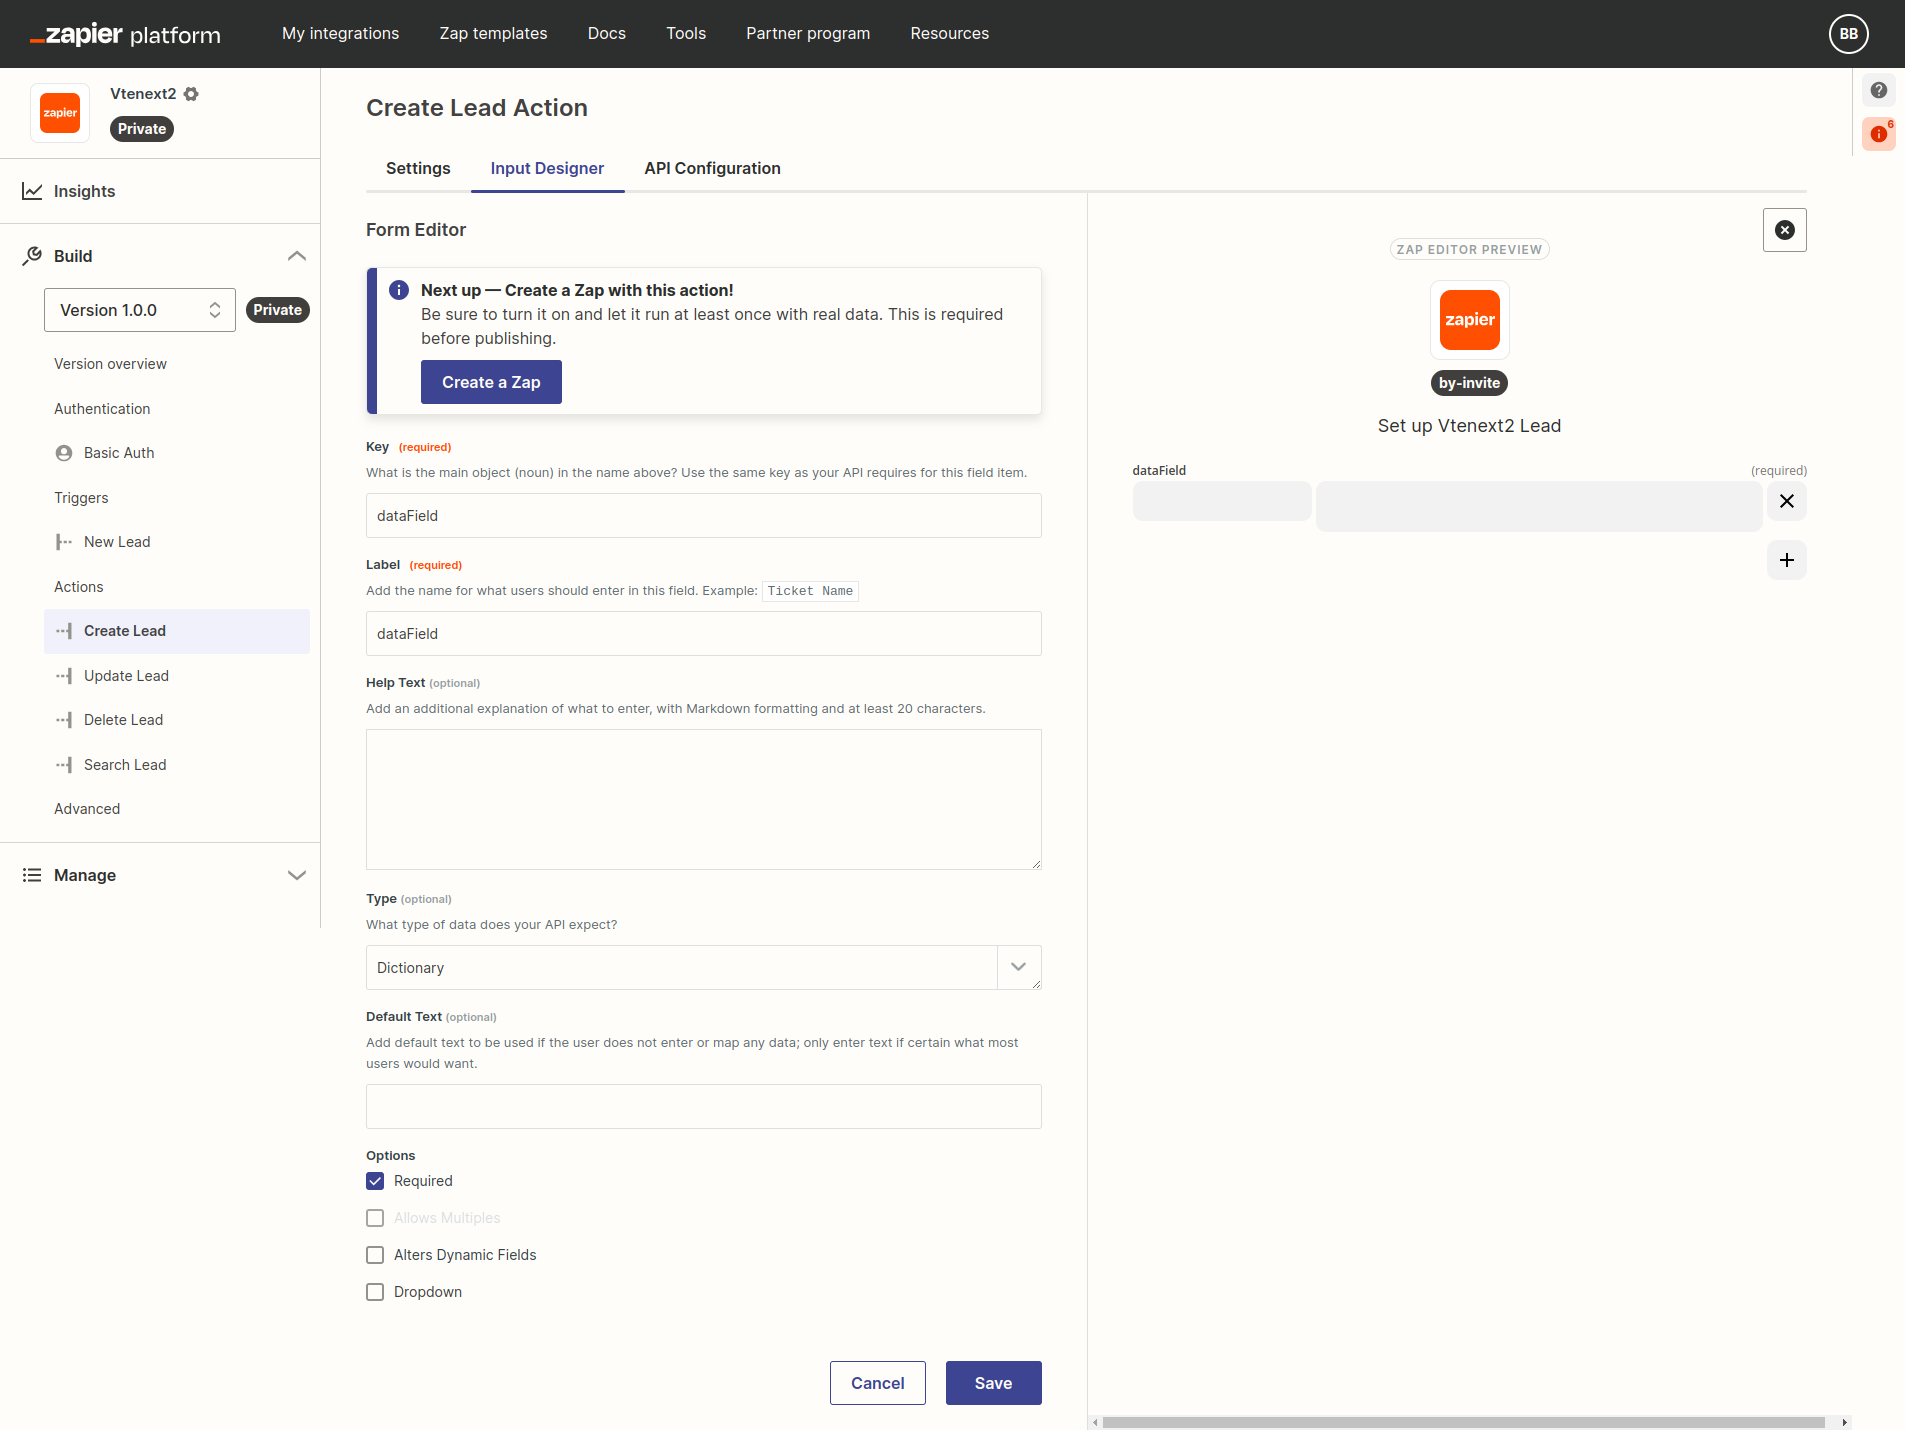
Click **SAVE AND CONTINUE** and move to the next TAB, to configure the **INPUT DESIGNER**, where a new **INPUT FIELD** should be added and configured in this way:
[](https://usermanual.vtenext.com/uploads/images/gallery/2024-04/2024-04-11-15-36-developer-zapier-com.png)
Click on **SAVE** and move to the tab **API Configuration** and configure parameters in the **STEP 1** like this**:**
[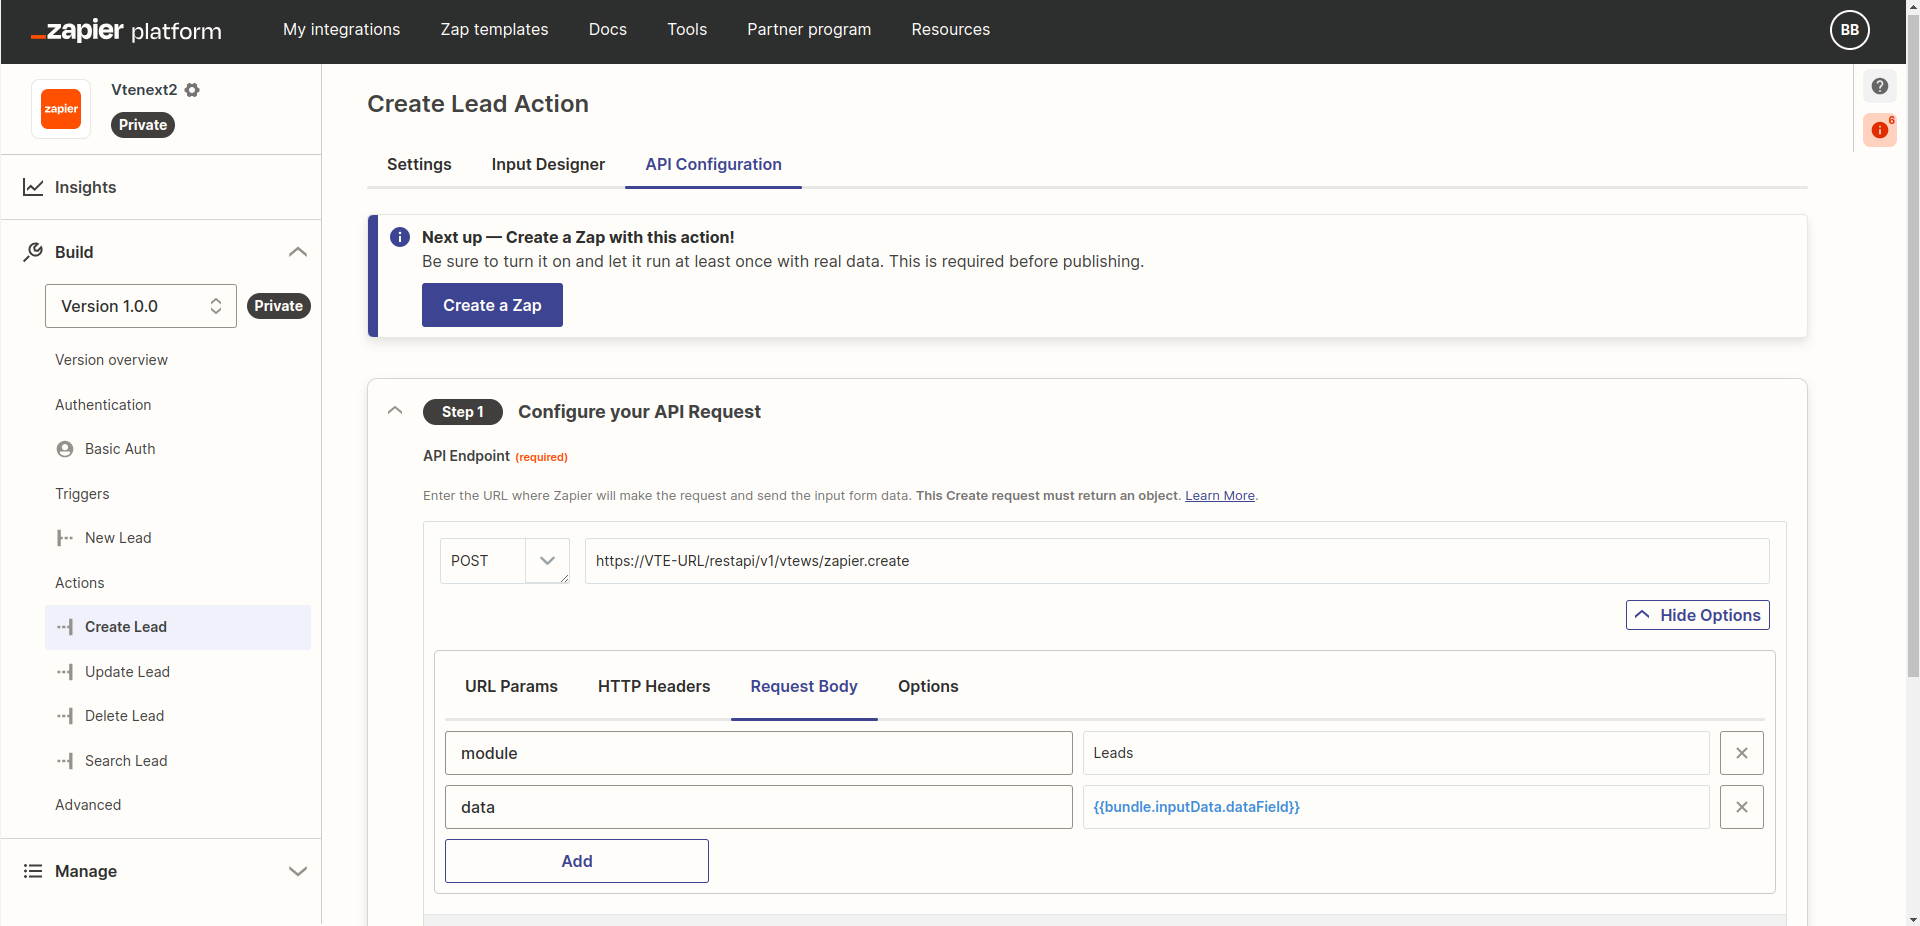](https://usermanual.vtenext.com/uploads/images/gallery/2024-04/screenshot-20240411-153934.png)
```
https://VTE-URL/restapi/v1/vtews/zapier.create
module = Leads
data = {{bundle.inputData.dataField}}
```
Clearly, VTE-URL should be replaced with the complete address of your vtenext installation, while the term "Leads" can be replaced with another module, in case you wish to create a different entity (for example Contacts or Accounts). Then click on **SAVE API REQUEST & CONTINUE**.
In **STEP 2**, to make a test choose "**Raw**" and replace all the code with the following:
```json
{
"inputData": {
"dataField": {
"firstname":"Test lead",
"lastname":"Zapier",
"phone":"123456789",
"company":"Test Company Zapier"
}
},
"authData": {},
"environment": {},
"subscribeData": {},
"cleanedRequest": {
"url": "https://example.com/hook-request-origin",
"method": "POST",
"body": {},
"headers": {
"Content-Type": "application/json"
}
}
}
```
and click on **Test Your Request**, which should result in the creation of a Lead with name "Test Lead" and surname "Zapier" in your vtenext instance. Then click **Finish Testing & Continue**.
In **STEP 3** click on **Use Response from Test Data** and then **Generate Output Field Definitions** to automatically map the returned fields. Finally, click on **Save Output & Finish.**
**III. Update Action**
Click on **ADD ACTION** to create a new action and fill the Settings tab as the following image:
**[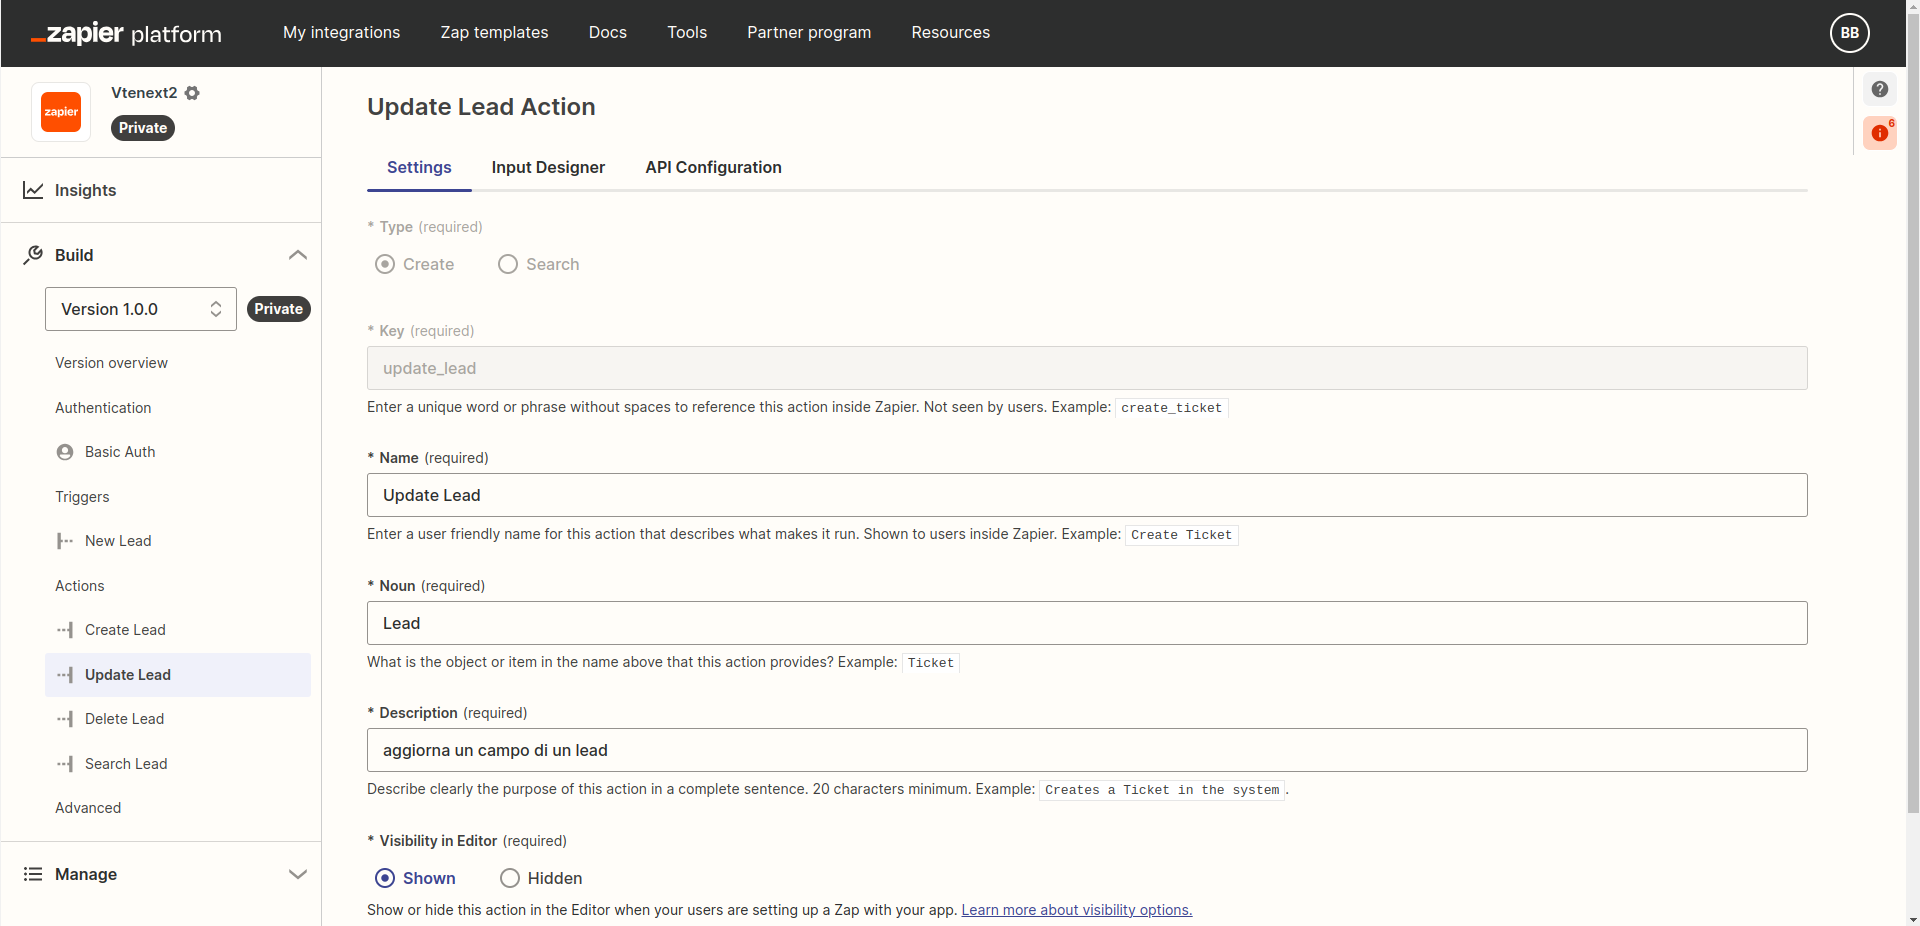](https://usermanual.vtenext.com/uploads/images/gallery/2024-04/screenshot-20240411-155651.png)**
In the **INPUT DESIGNER** tab, create 2 fields of type **Input Field**, with the followinf characteristics:
1. Key = id, Label = ID, Type = String, Required = yes
2. Key = dataField, Label = dataField, Type = Dictionary, Required = no
Once created, we should have the following situation:
[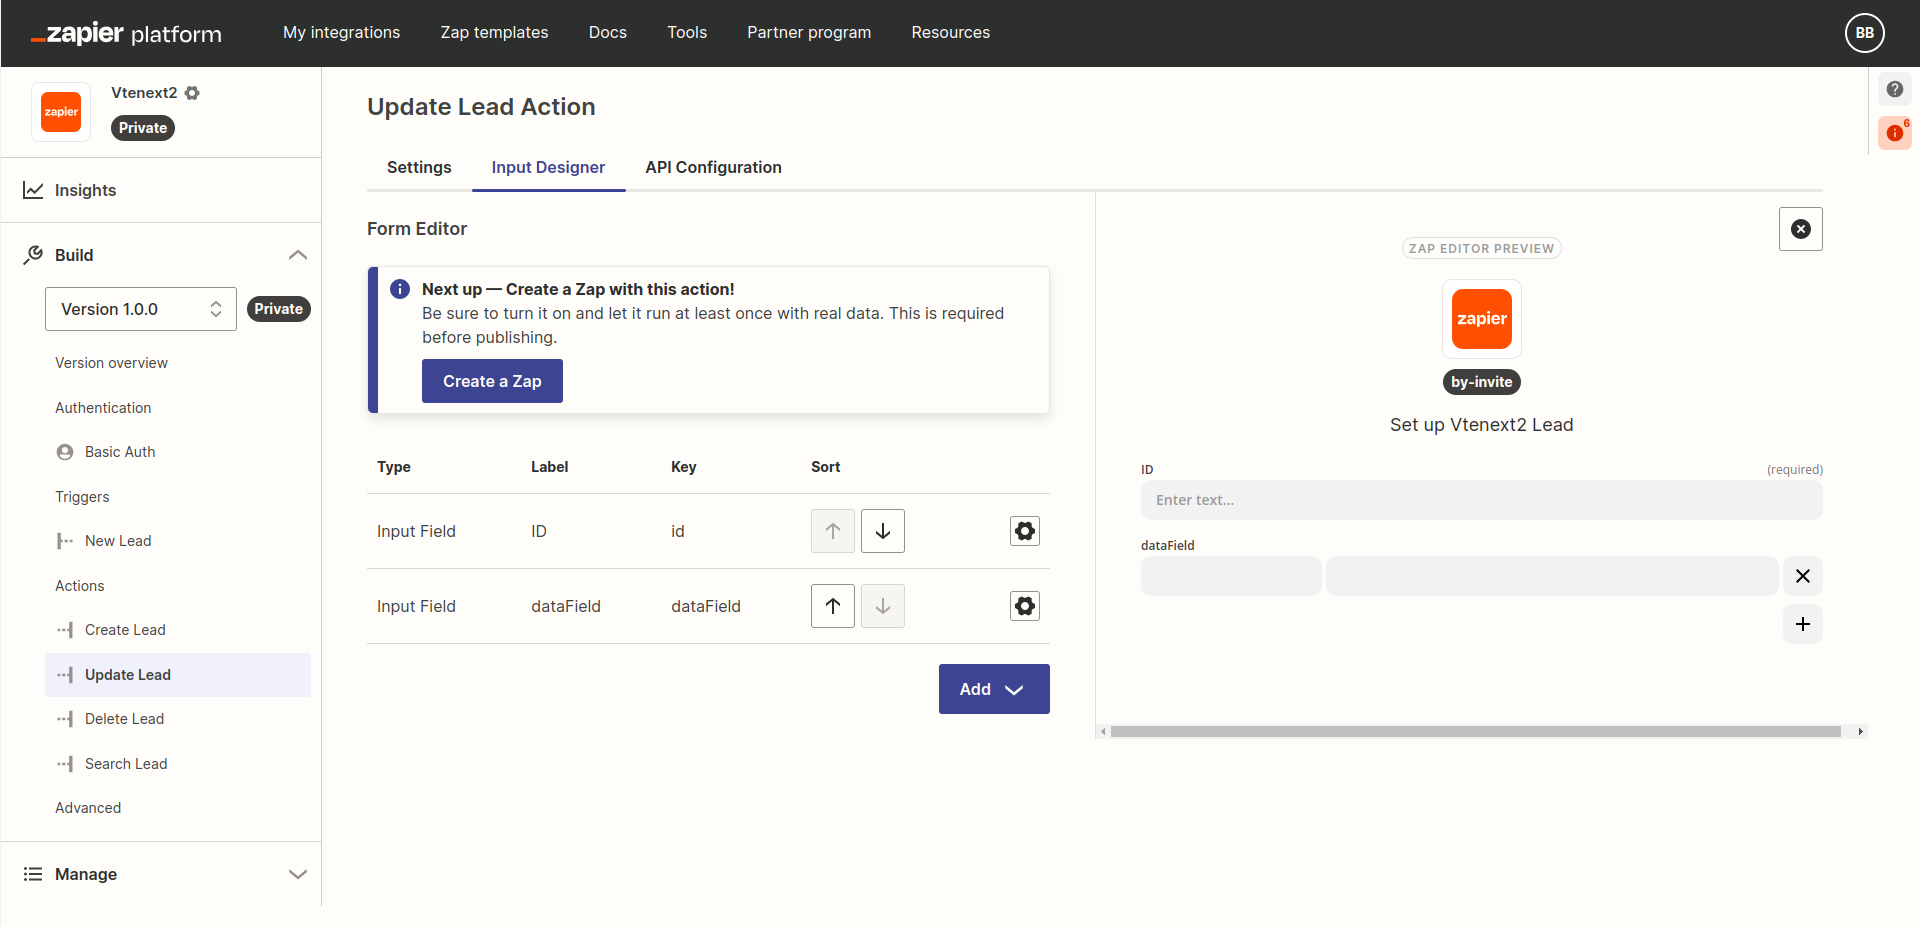](https://usermanual.vtenext.com/uploads/images/gallery/2024-04/screenshot-20240411-155841.png)
Move to the tab **API Configuration** and configure parameters in **STEP 1** like this:
[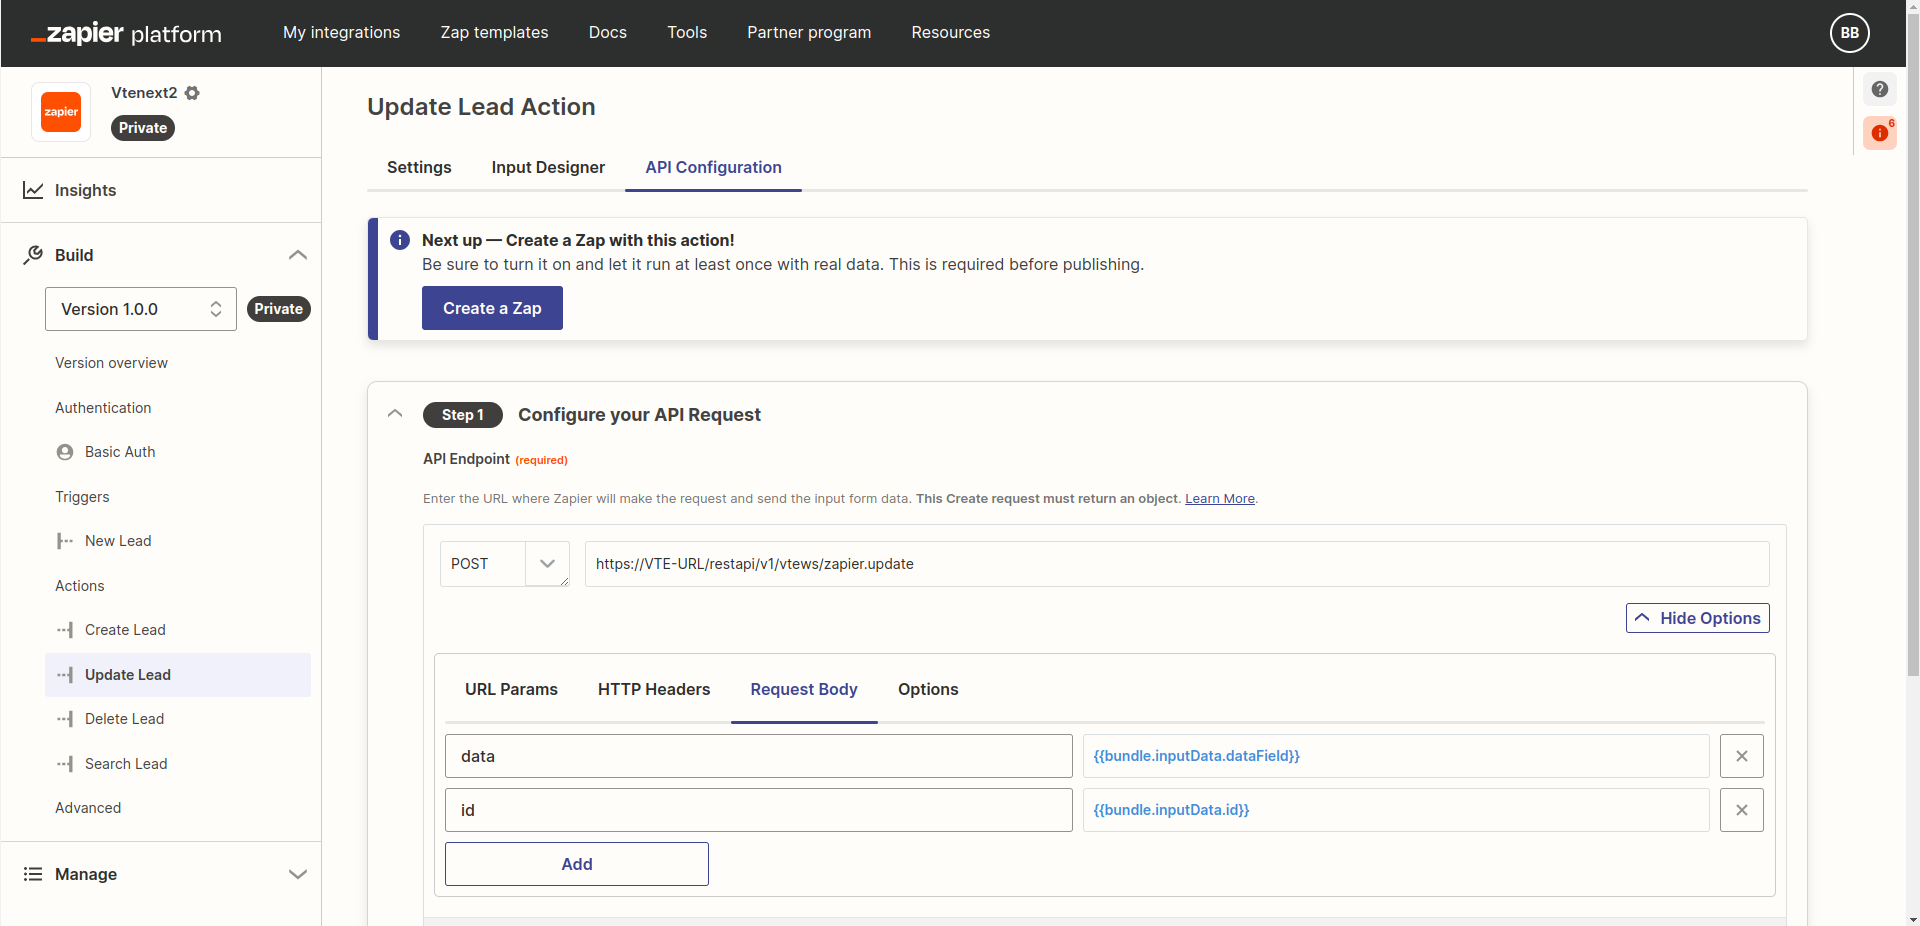](https://usermanual.vtenext.com/uploads/images/gallery/2024-04/screenshot-20240411-160149.png)
```
https://VTE-URL/restapi/v1/vtews/zapier.update
id = {{bundle.inputData.id}}
data = {{bundle.inputData.dataField}}
```
Replacing VTE-URL with the full address of your vtenext installation. Then click on **SAVE API REQUEST & CONTINUE**.
In **STEP 2**, to make a test choose "**Raw**" and replace all the code with the following:
```json
{
"inputData": {
"id": "2x53",
"dataField": {
"phone":"556677"
}
},
"authData": {},
"environment": {},
"subscribeData": {},
"cleanedRequest": {
"url": "https://example.com/hook-request-origin",
"method": "POST",
"body": {},
"headers": {
"Content-Type": "application/json"
}
}
}
```
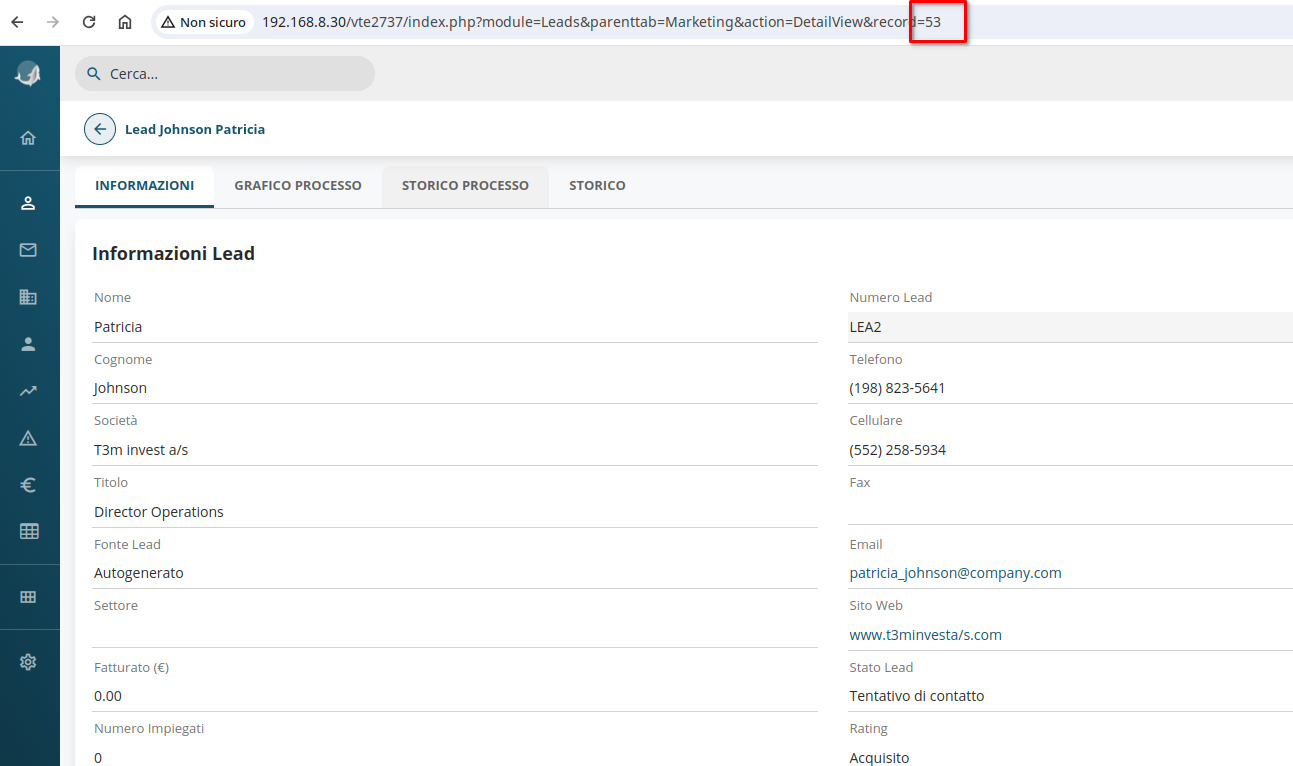
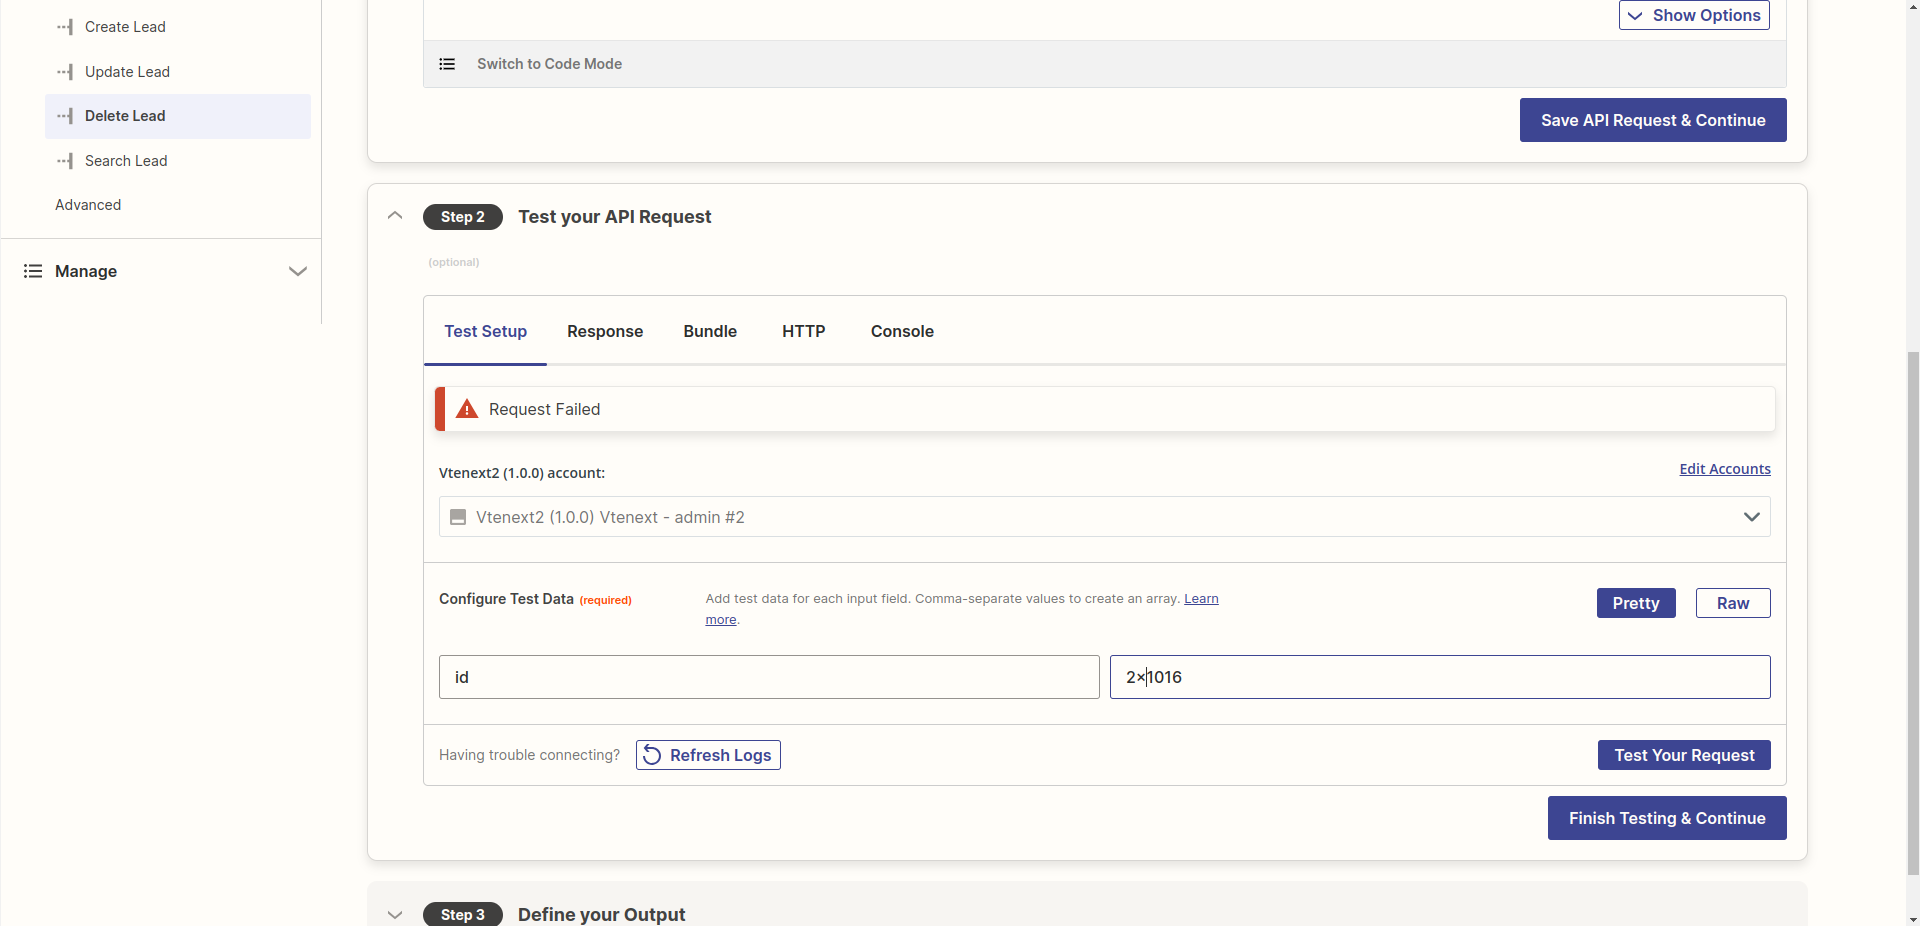
but replacing the "53" at line 3 with the ID of a lead in your installation:
[](https://usermanual.vtenext.com/uploads/images/gallery/2024-04/screenshot-20240411-160633.png)
[](https://usermanual.vtenext.com/uploads/images/gallery/2024-04/screenshot-20240411-160758.png)
By clicking on **Test Your Request** you should get a result like the following:
[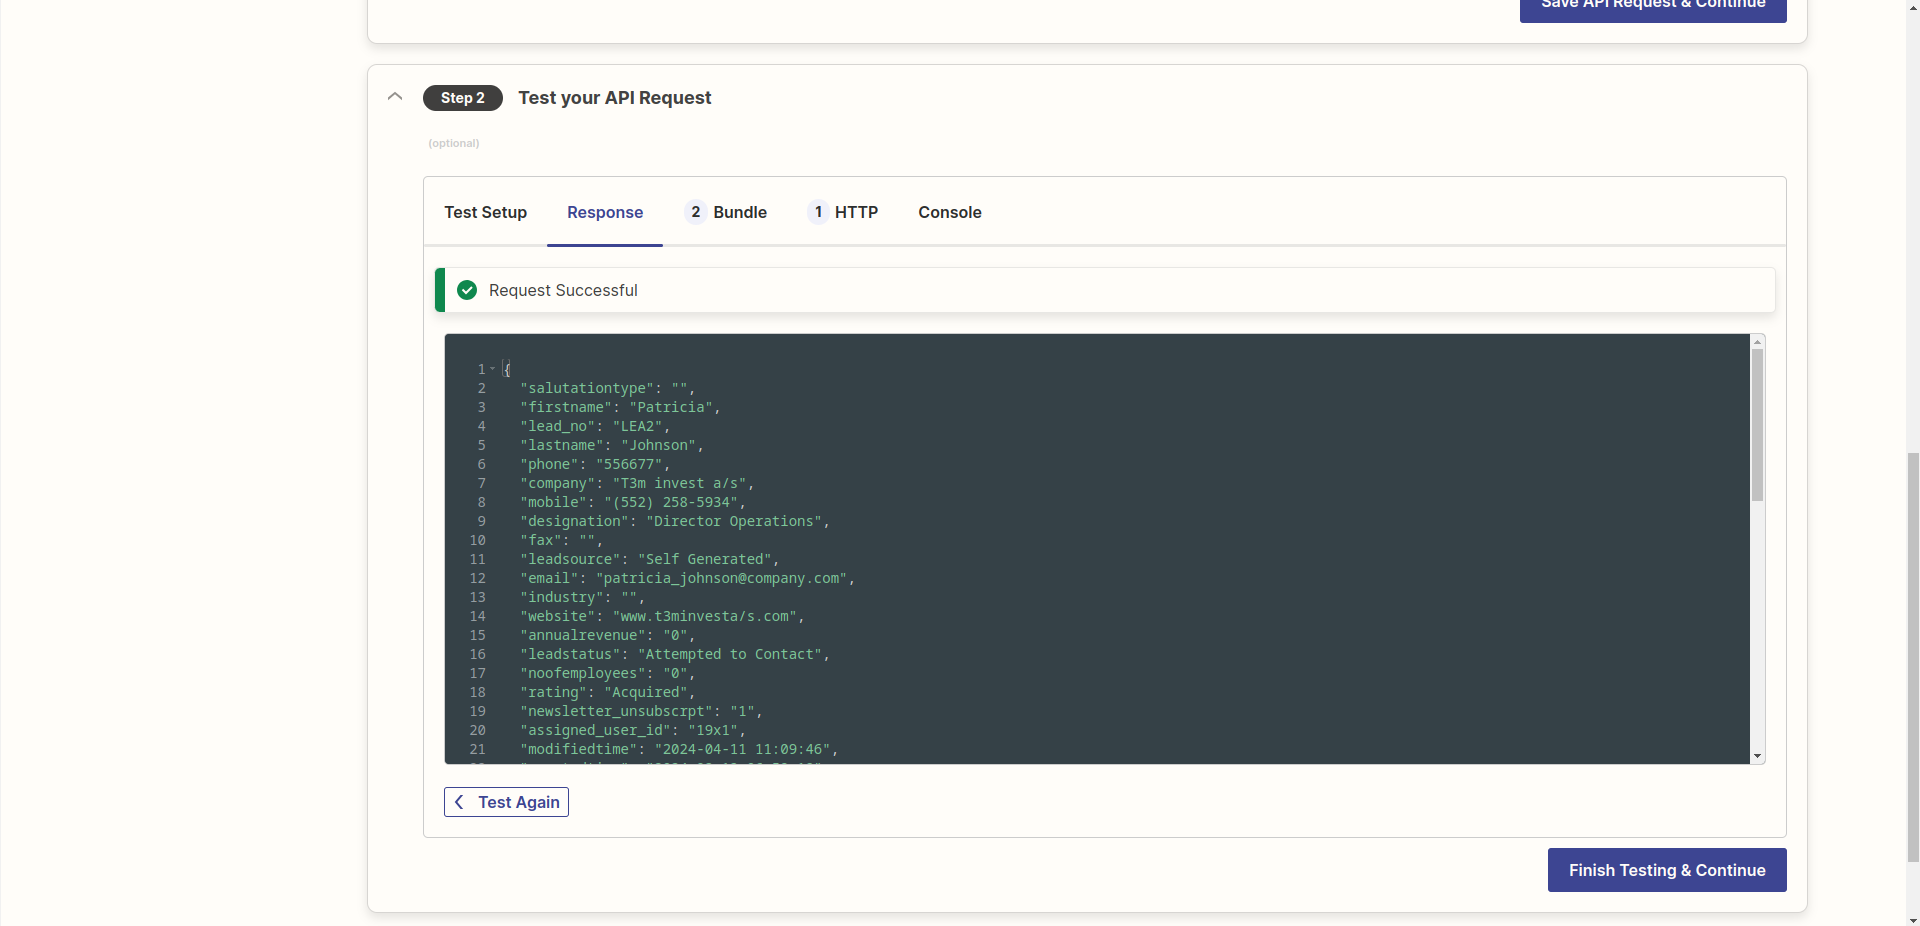](https://usermanual.vtenext.com/uploads/images/gallery/2024-04/screenshot-20240411-161033.png)
Finally, in **STEP 3** click on **Use Response from Test Data** and then **Generate Output Field Definitions** to automatically map the returned fields. Click then on **Save Output & Finish.**
**IV. Delete Action**
Click on **ADD ACTION** to create a new action and fill the Settings tab as the following image:
[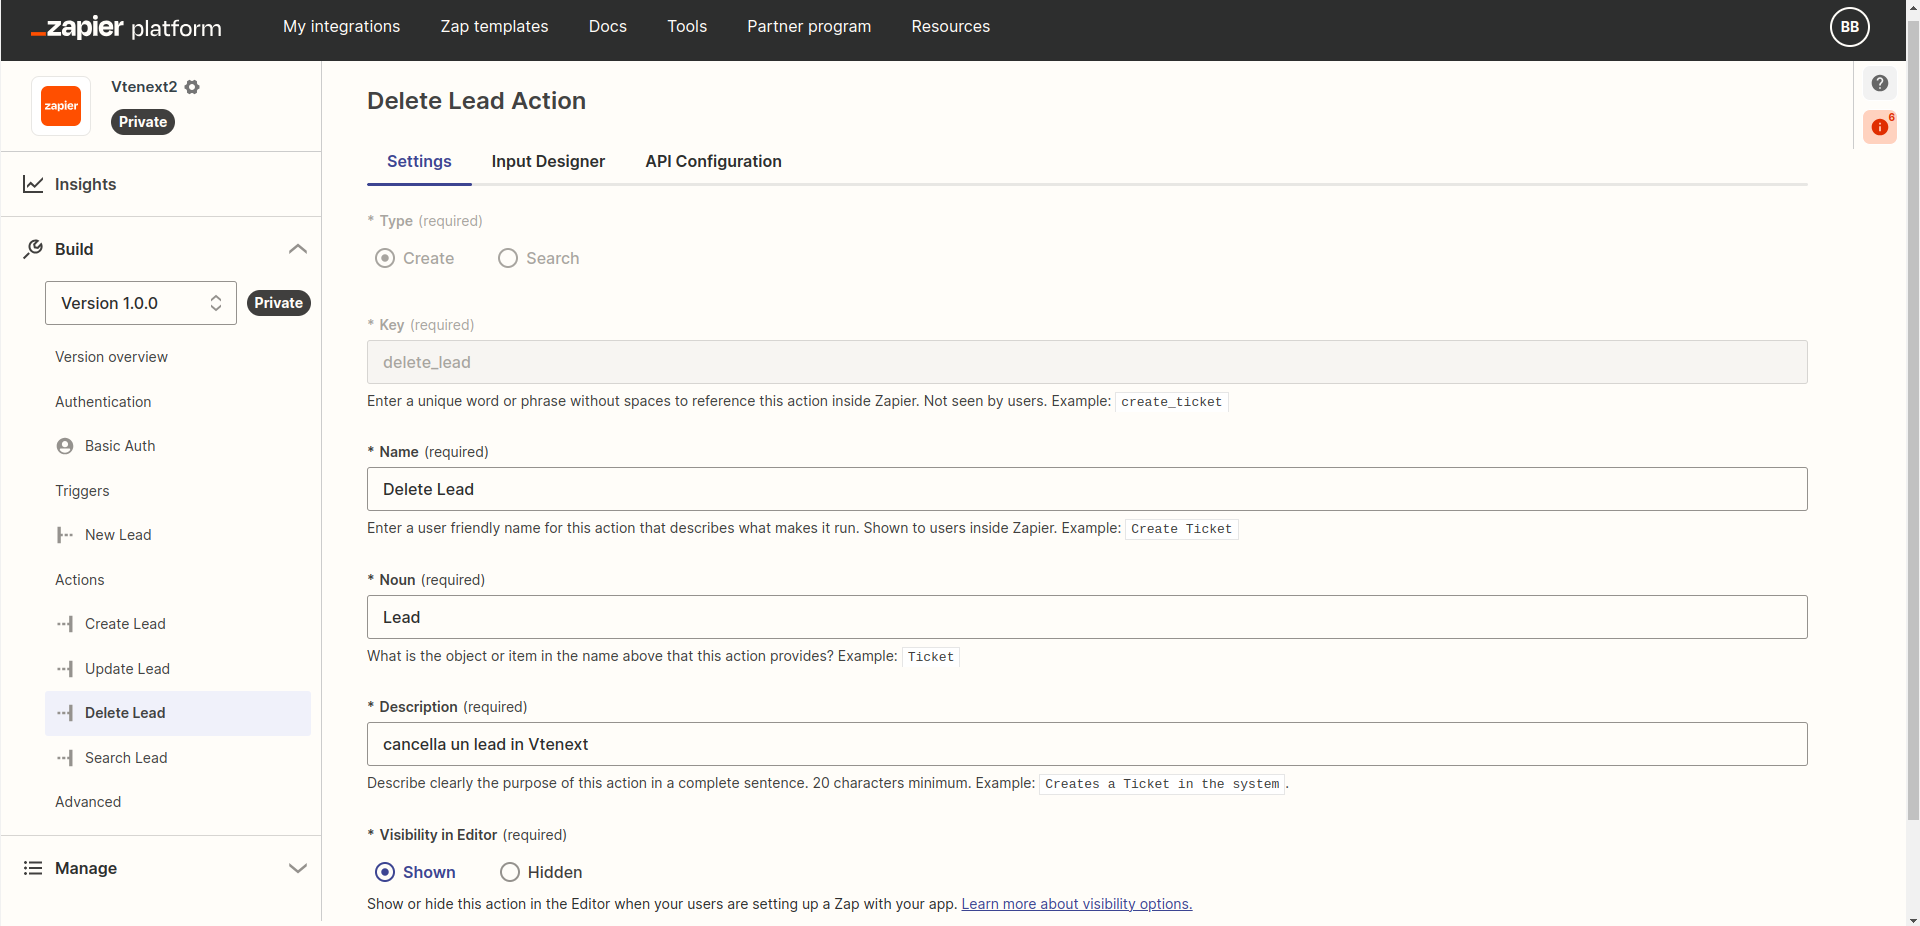](https://usermanual.vtenext.com/uploads/images/gallery/2024-04/screenshot-20240411-162620.png)
In the **INPUT DESIGNER** tab, create a field of type Input Field, with the following characteristics:
[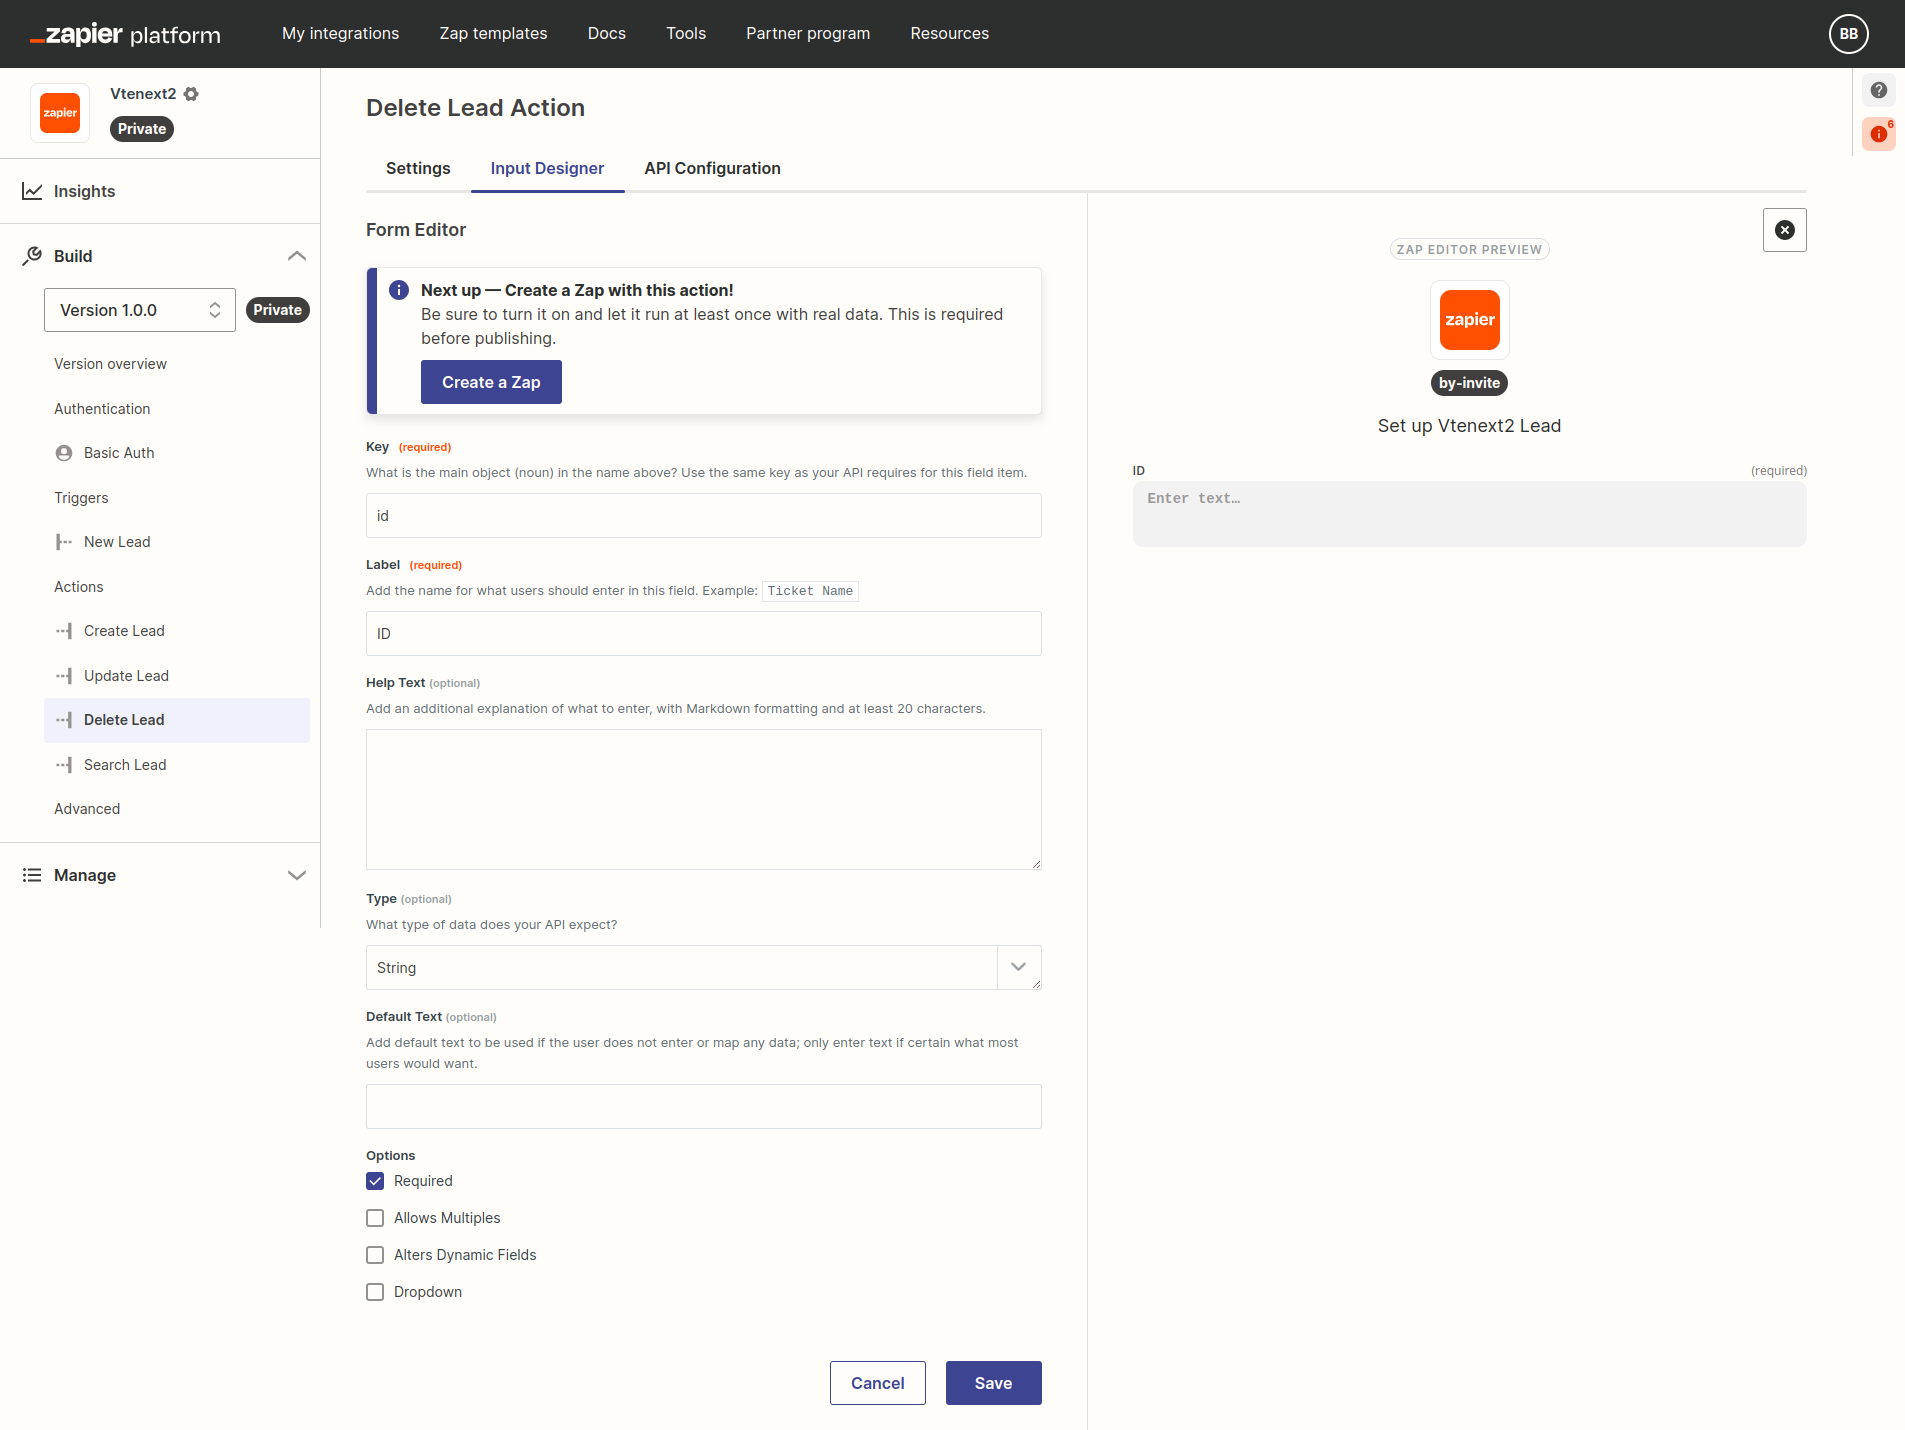](https://usermanual.vtenext.com/uploads/images/gallery/2024-04/2024-04-11-16-27-developer-zapier-com.png)
Move to the tab **API Configuration** and configure parameters in **STEP 1** like this:
[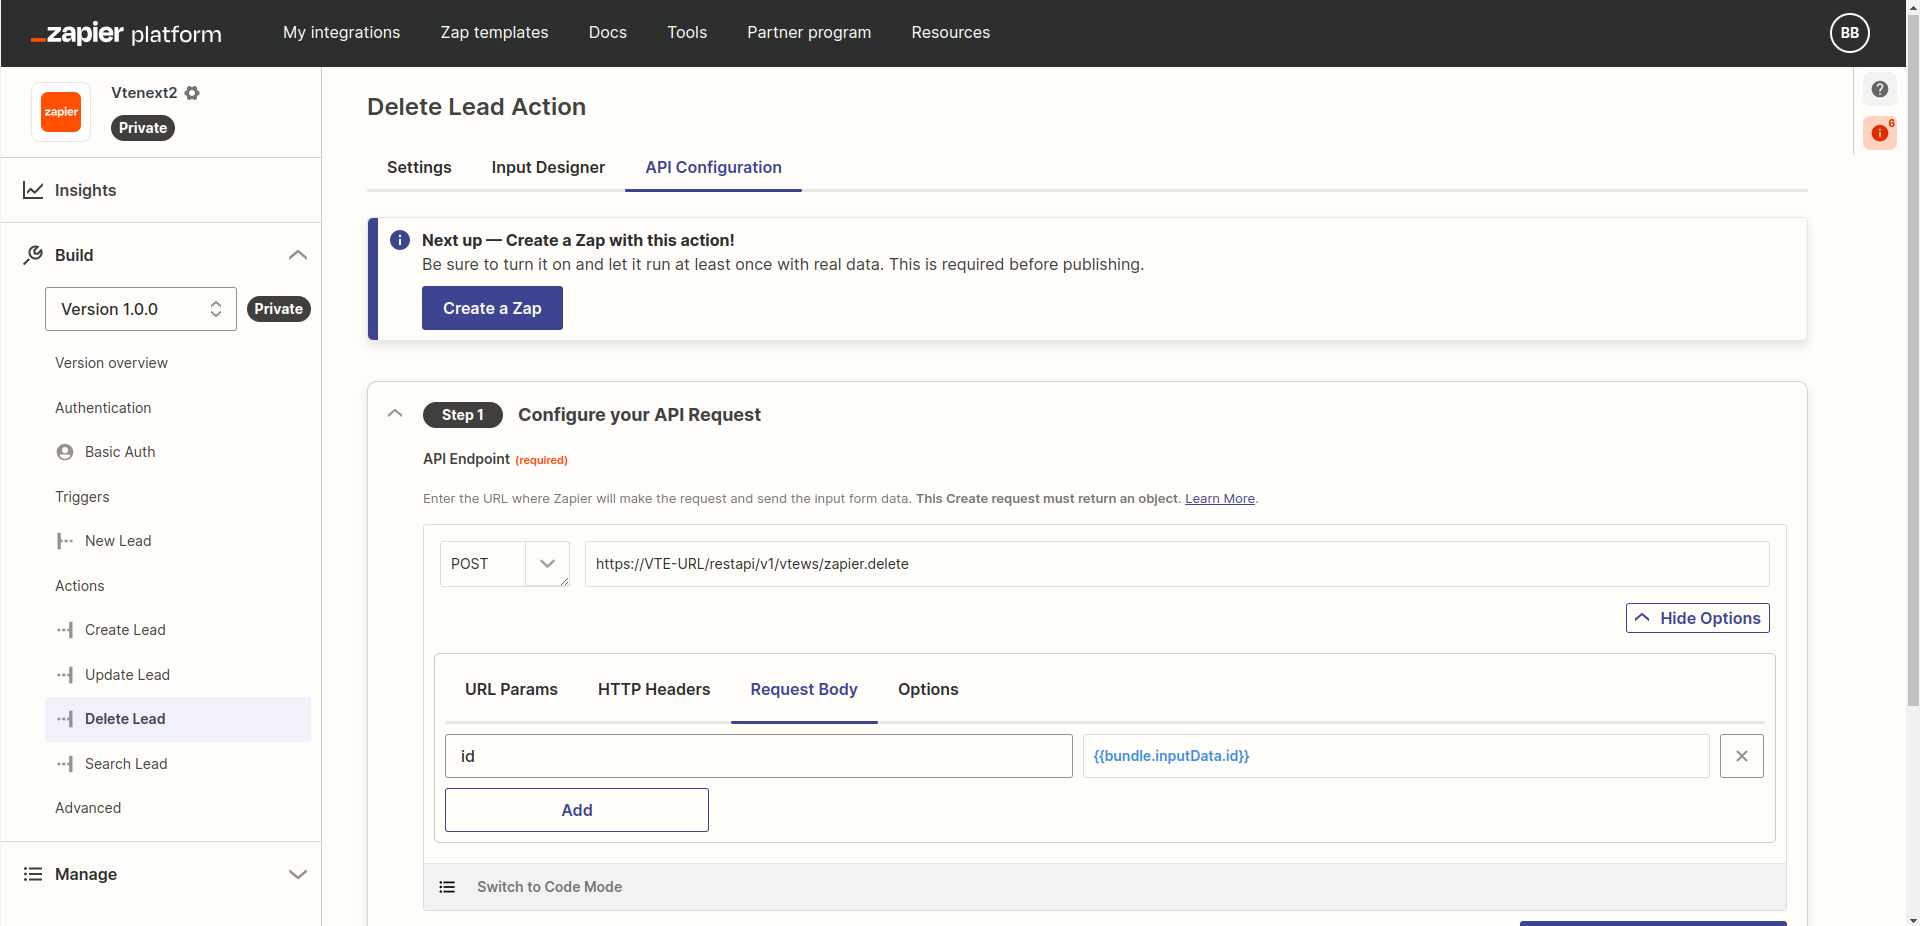](https://usermanual.vtenext.com/uploads/images/gallery/2024-04/screenshot-20240411-162822.png)
```
https://VTE-URL/restapi/v1/vtews/zapier.delete
id = {{bundle.inputData.id}}
```
Replacing VTE-URL with the full address of your vtenext installation. Then click on **SAVE API REQUEST & CONTINUE**.
In **STEP 2** insert as test value the ID of the Lead you wish to delete, in webservice format, so like "2xCRMID", for example:
[](https://usermanual.vtenext.com/uploads/images/gallery/2024-04/screenshot-20240411-163208.png)
In this action it's not necessary to configure **STEP 3** about the output fields.
**Congratulations! The creation of the integration is complete!**
You can now configure specifics ZAP to integrate different services with vtenext.
# Zap creation
##### **Examples: How to create ZAP**
**Example 1 - Trigger from vtenext with action in Zapier**in this example we send an email when a Lead is created in vtenext:
1. Go to [https://zapier.com/app/dashboard](https://zapier.com/app/dashboard)
2. Click on **Create**
3. Trigger: vtenext, event = new lead, account = use a valid account
4. Test it, you should get a Lead, click on **Continue with selected record**
5. Add an action, for example **Email by Zapier** -> **Send Outbound Email**
6. In this action, configure the fields:
- To: email address which will receive the email
- Subject: Lead Created + variables from the email
- Body: Text of the email with variables[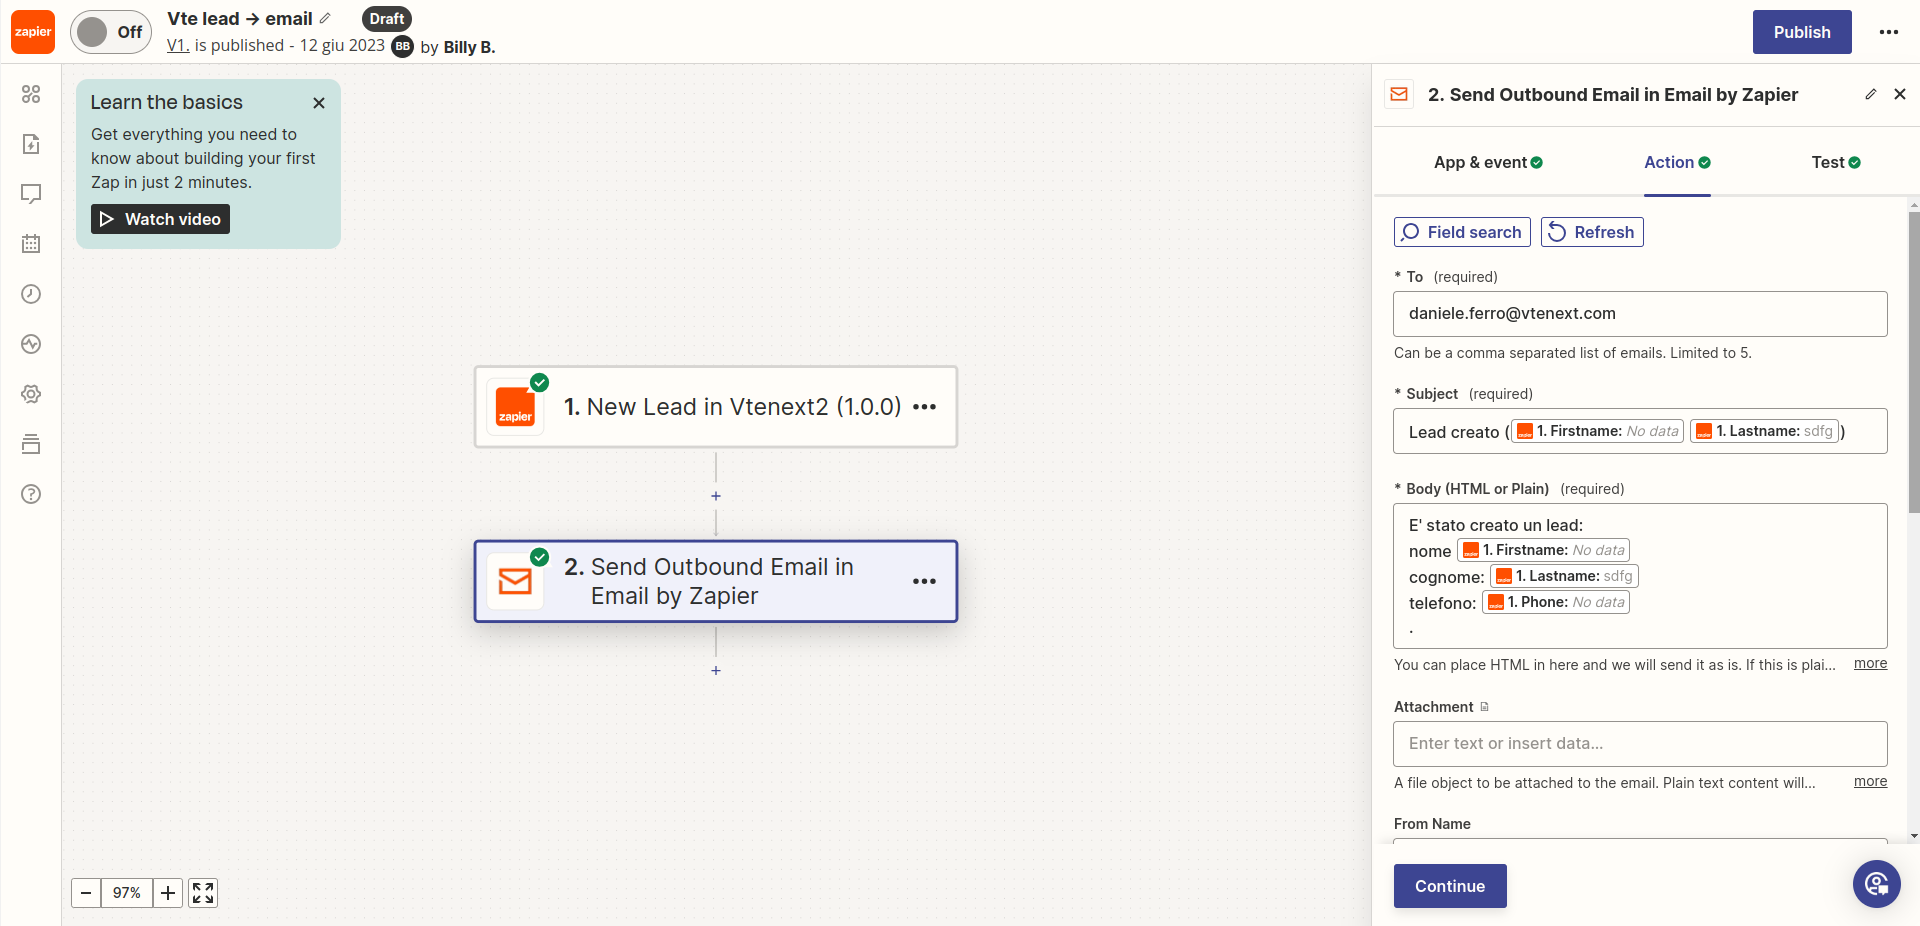](https://usermanual.vtenext.com/uploads/images/gallery/2024-04/screenshot-20240411-164935.png)Click on **Continue** and check if you received the email. Click then on **PUBLISH** and verify that the Zap is active.Now, to set off the trigger from vtenext a process containing the call to Zapier must be created.In the simplest case, the process can have this flow:
[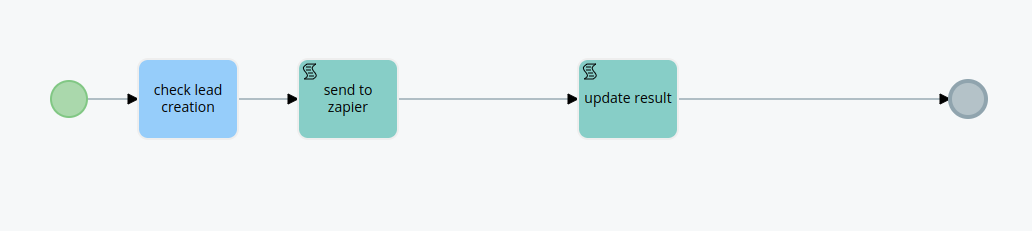](https://usermanual.vtenext.com/uploads/images/gallery/2024-02/pJAimage.png)
And one of the actions should be of type "Call External Webservice", using the webservice that was automatically created when the Zap was actrivated. The action should be configured as follows:
[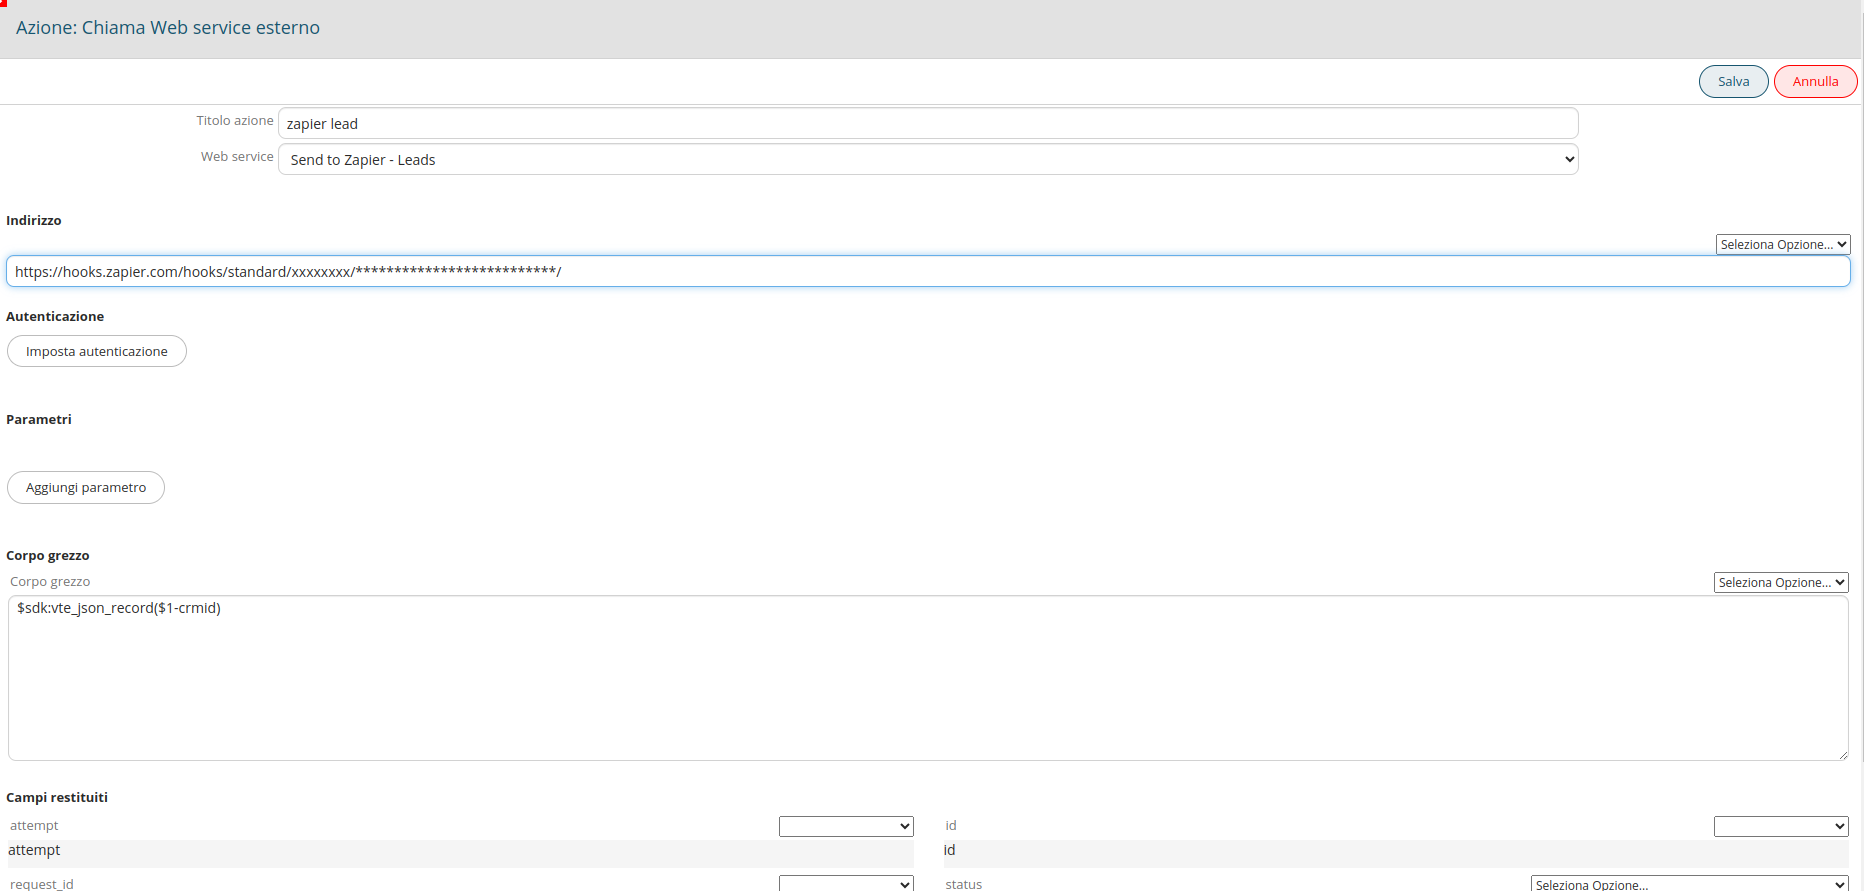](https://usermanual.vtenext.com/uploads/images/gallery/2024-02/image.png)
In the **Raw body** the string to use is
```
$sdk:vte_json_record($1-crmid)
```
where $1-crmid is the record handled by the process, that we want to send to Zapier
*or*
```
$sdk:vte_json_field_string($1-crmid, firstname, lastname, phone, ...)
```
To send only some fields. You can choose the ones that interest you the most.Once the process is active, when the action is executed, Zapier will receive the record and on it the action configured in the Zap will be executed.
**NOTE: If the zap is deactivated and recreated, the process must be modified to use the new webservice.**
---
**Example 2 - Trigger from Zapier and action in vtenext**
In this example, we will try to create a lead in vtenext when an email is sent to a Zapier address:
1. Go to [https://zapier.com/app/dashboard](https://zapier.com/app/dashboard)
2. Clock on **Create**
3. Trigger: **Email by Zapier** ->**New Inbound Email**
4. Configure a prefix for the mailbox, for example:
5. Send an email to that address and verify that Zapier receives it
6. Create a new action: **Vtenext** -> **Create Lead**
7. Use the proper account and configure the fields to send to vtenext, remembering to map all mandatory fields (otherwise the Lead cannot be created), for example:
[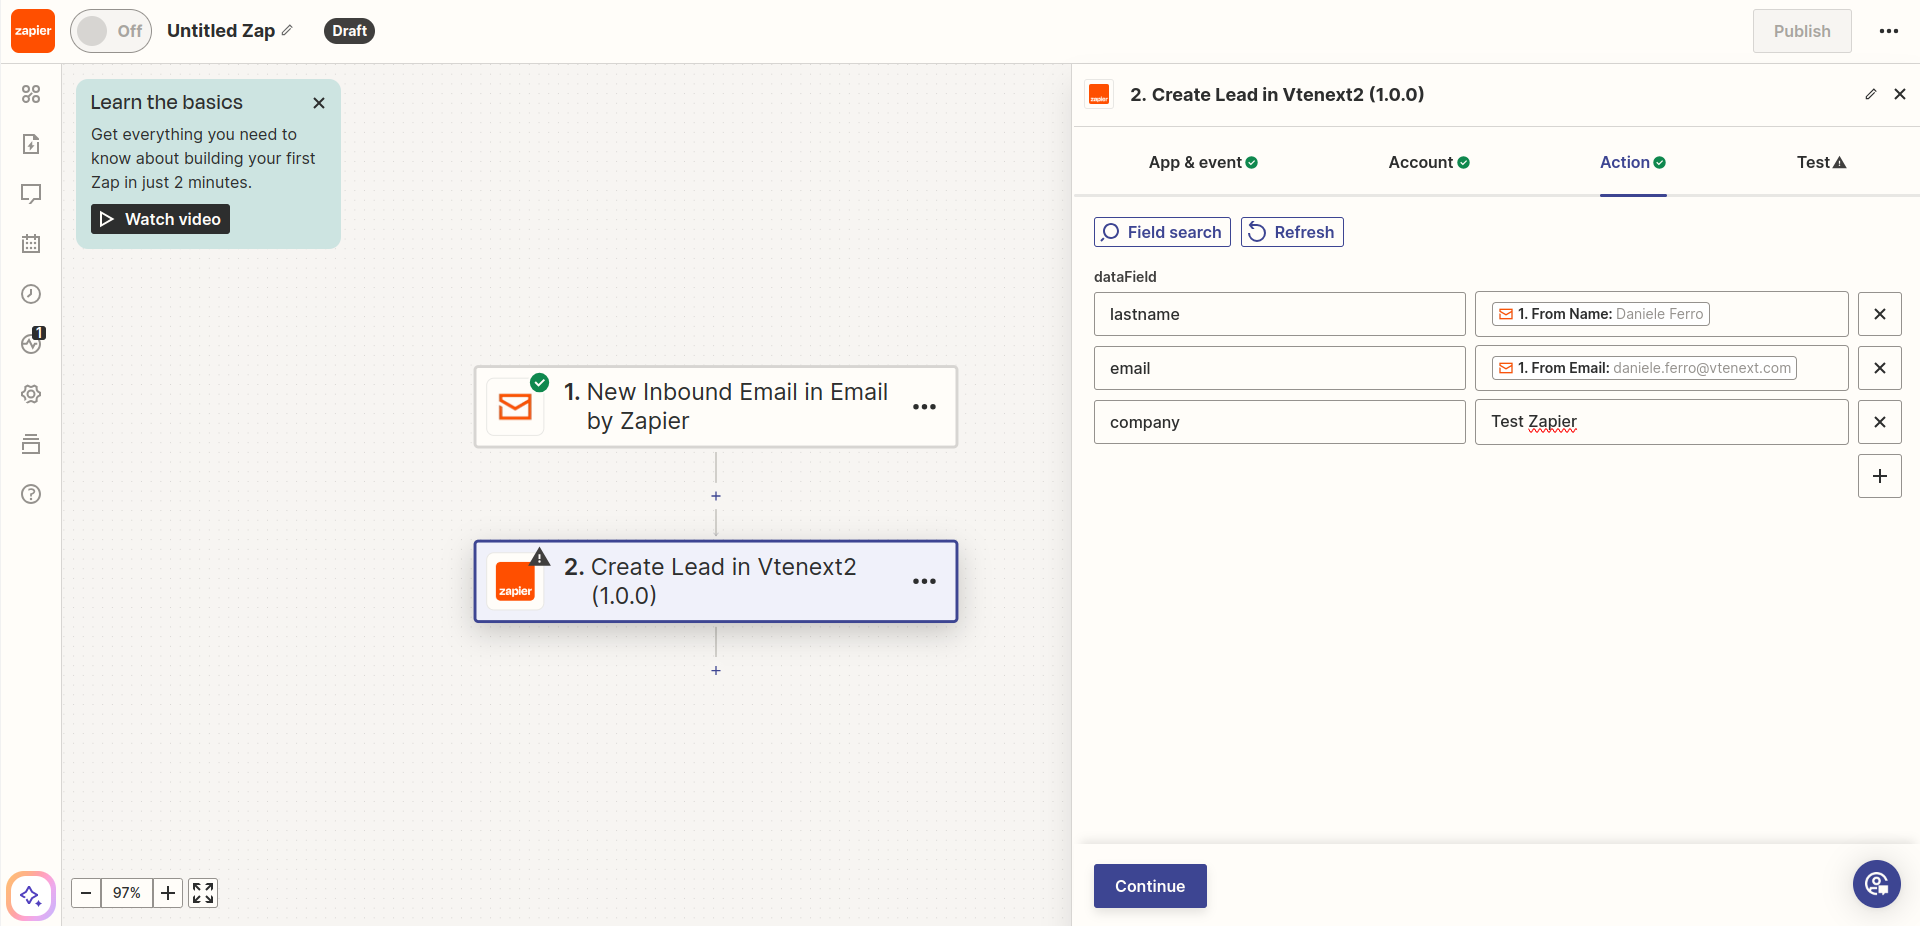](https://usermanual.vtenext.com/uploads/images/gallery/2024-04/screenshot-20240411-170647.png)
8. Make a test to verify the proper creation of the lead.
Finally, click on **PUBLISH**.
At this point, by sending emails to that configured Zapier address, leads are created in vtenext.
These are just a few examples of what the integration with Zapier can do. You can try and come up with all the triggers you want! Just think that, using Zapier paths, it is possible to create or update records by searching directly in the attributes of incoming emails. But it's just an example that helps you understand the power of the tool.