3 Customers records and basic data management
- 3 Customers records and basic data management
- 3.1 Leads
- 3.1.1 Lead creation
- 3.1.2 Lead conversion
- 3.2 Accounts
- 3.3 Contacts
- 3.4 Vendors
- 3.5 How to import and export records
- 3.5.1 Imports
- 3.5.2 How to format the CSV file
- 3.5.3 Export
- 3.5.4 Checking duplicates in a module
- 3.5.5 Save Mapping
- 3.6 Mass Edit
3 Customers records and basic data management
vtenext identifies 4 types of customer records:
- Leads: potential customers;
- Accounts: acquired customers or customers in negotiations, defined by name (including ex-customers, partners, distributors…);
- Contacts: people with whom you have commercial relations (company handlers, private customers, partners…);
- Vendors: companies that supply goods and services.
This chapter illustrates the customer list modules, which are of central importance for all the other activities managed by vtenext, the basic data management functions available in the majority of the modules (mass edit, duplicate, import/export), and geolocation.
 |
 |
 |
 |
3.1 Leads
A lead is a potential customer whose interest in the products or services offered by your company is to be investigated. To aid understanding of the concept of lead, imagine a business card you picked up during a marketing campaign. The lead in question will then attract a series of sales activities that will likely culminate in the opening of commercial negotiations.
What kind of data can you save for each lead?
Just like a conventional business card, you can write the data of the physical reference person and the company for which they work or that they represent.
Where do leads come from?
You can collect leads from marketing activities such as exhibitions, sales campaigns, fairs, advertising, presentations, from your own website via webforms (see specific chapter), acquired lists, etc.
It’s important to know where each lead comes from in order to perform continual assessments and answer questions.
Example:
- which channel generates the most leads?
- which channels produce profitable leads (meaning leads that graduate to become sales opportunities)?
- what is the ROI of a given trade event?
- how many leads have you collected and how many of them are sufficiently interesting to open an opportunity?
- on which channels is it worth making investments to boost your business?

3.1.1 Lead creation
Creating a new lead: to create a new record, access the LEADS module and click on the button 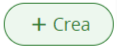
The lead creation window will appear:

Example of key record fields:
|
Name/Surname |
Name and surname of the contact person. |
| Company |
Company name in which person is employed or that he/she represents. |
| Title |
Role of the contact person (Proprietor, Sales Manager, CEO). |
|
Lead source |
Channel through which the lead was obtained. |
|
Assigned to |
User or group of users assigned to the lead management; the new lead is first assigned to the user who created it, but a different user can be chosen if required. |
The fields highlighted in light blue are required. The CRM admin user can change the obligatory attributes (except for some fundamental fields such as Surname), create new fields, change drop-down menu values (such as Lead Source) and more besides. For more on this topic refer to chapter 16.7 concerning the Layout Editor.
Once the lead has been saved and the detail view opened, you can start managing the related marketing activities:
- emails sent or linked to the lead file;
- calendar activities (events and/or to-dos);
- newsletter campaigns (the lead will be part of the target involved in the campaign) or telemarketing campaigns (saleable separately);
- documents.
ANONYMIZE: in the new release, clicking on the “Other” button provides access to the “Anonymize” option. This feature has been created to manage leads according to GDPR rules. Anonymized Leads and Contacts cannot be restored.
3.1.2 Lead conversion
A show of interest from the lead in relation to your proposal corresponds to the opening of a commercial negotiation. Before the offer is generated, the lead must be converted into:
- a Contact with the data of the physical person (name, surname, email, mobile phone…)
- an Account containing the company name (VAT number, registered office, sector…) [optional]
- a sale Opportunity, i.e. the negotiation (amount, closing date…) [optional]
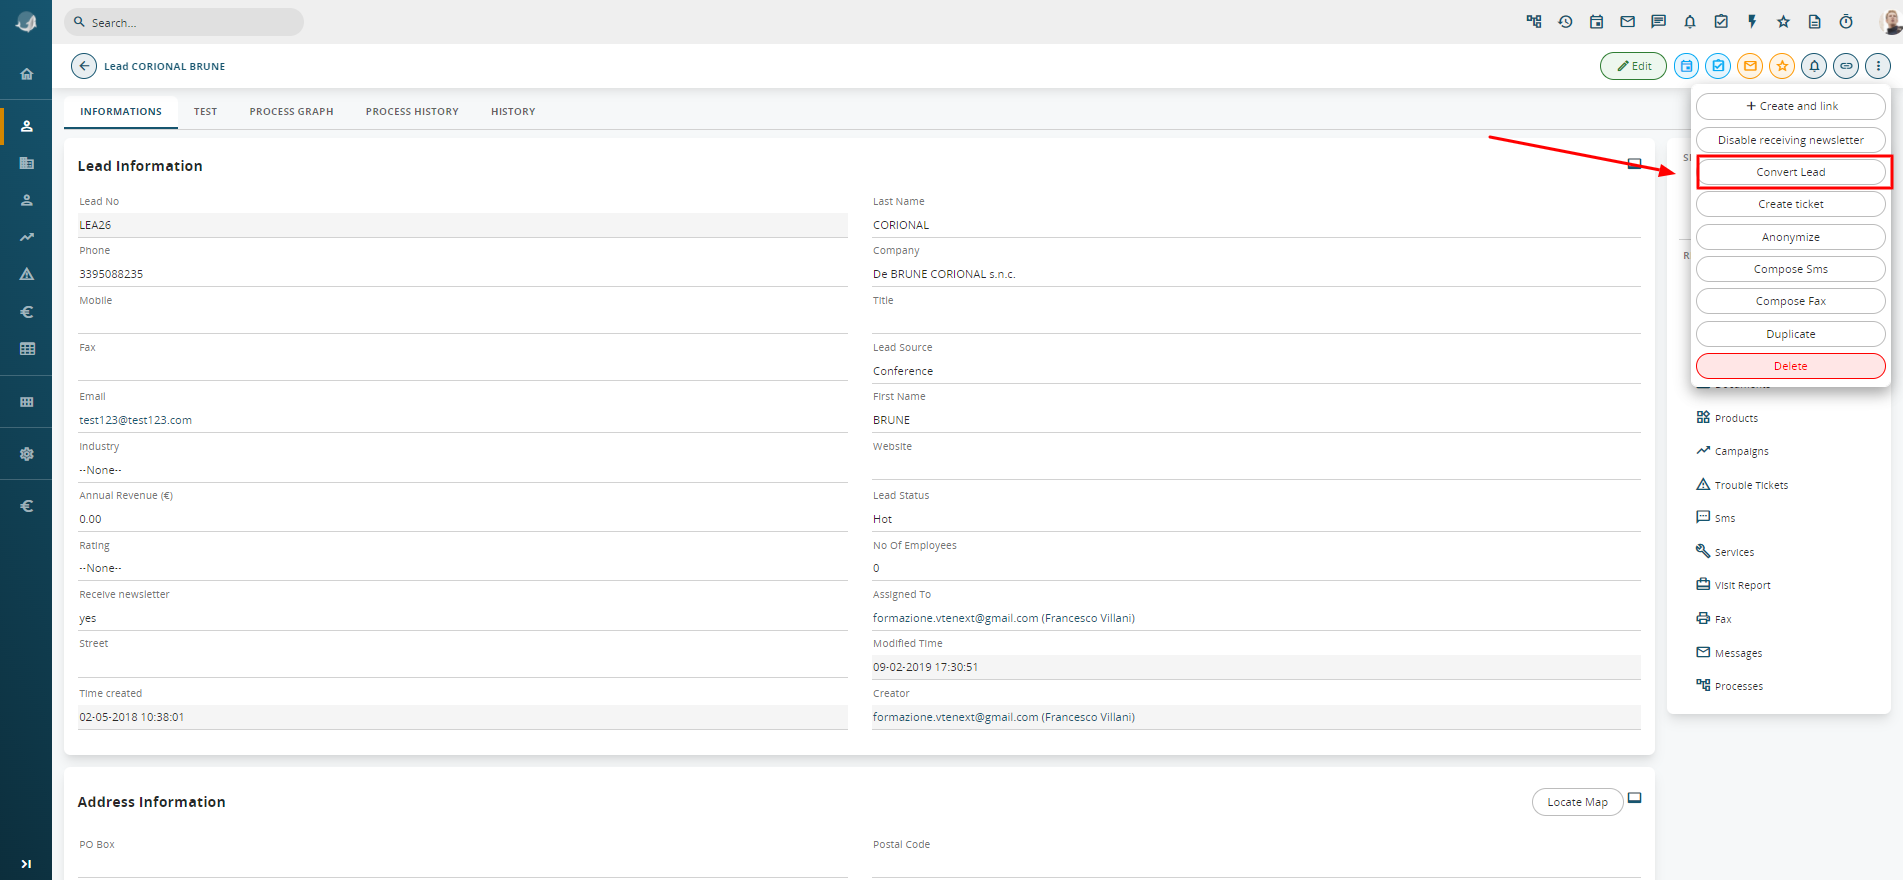
All information previously collected for the Lead will be available, after conversion, in the Contacts, Accounts, and/or Potential Modules, based on their contents and the mapping defined during the configuration phase. (Please view chapter 17.7.2 Custom fields mapping for Leads conversion)
N.B.: table fields are not supported in Lead conversion and therefore cannot be mapped
To convert a lead, just click on Convert Lead in the Other button. The conversion panel allows you decide whether to:
- create the account, the contact and/or the potential, by activating or deactivating the corresponding flag;
- enter the commercial negotiation data in the potential: Potential Name, Expected Closing Date, Sale status, Amount;
- the elements initially related to the lead will be transferred to the account or to the contact.
When you save the data, an account, a contact related to the account and a potential will be created, depending on the options selected.
N.B.: The original lead will be deleted in order to avoid duplicates.
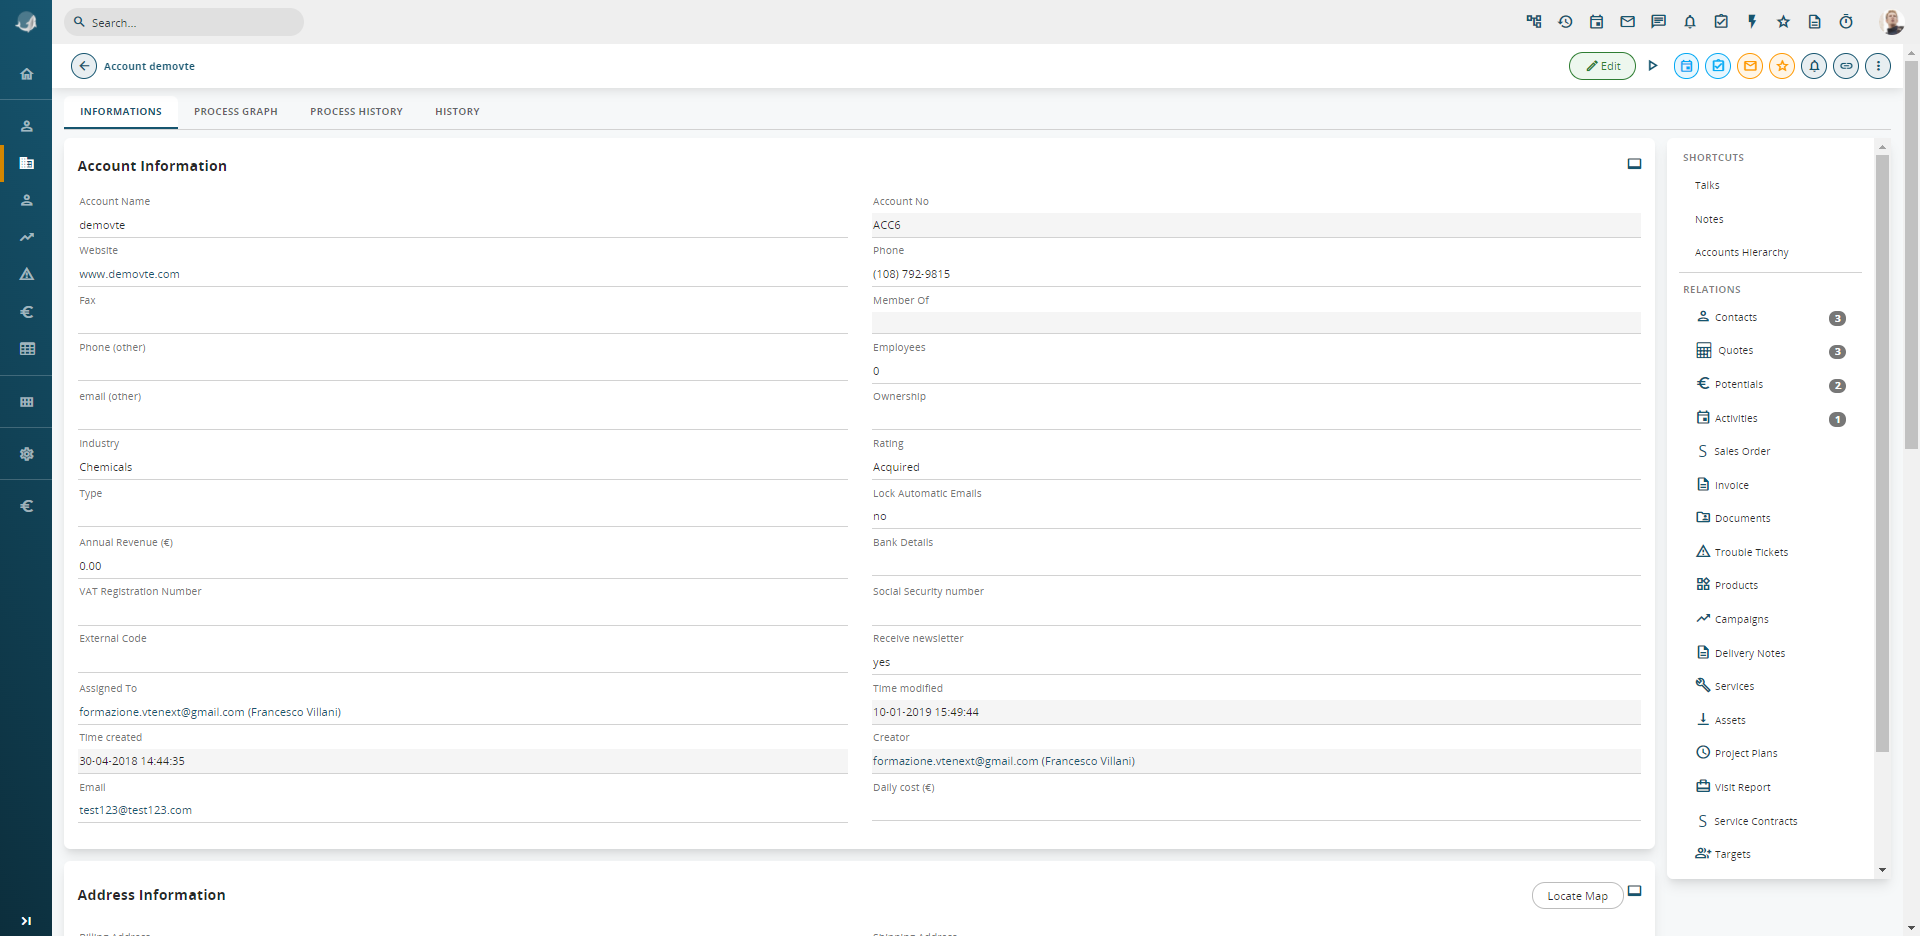
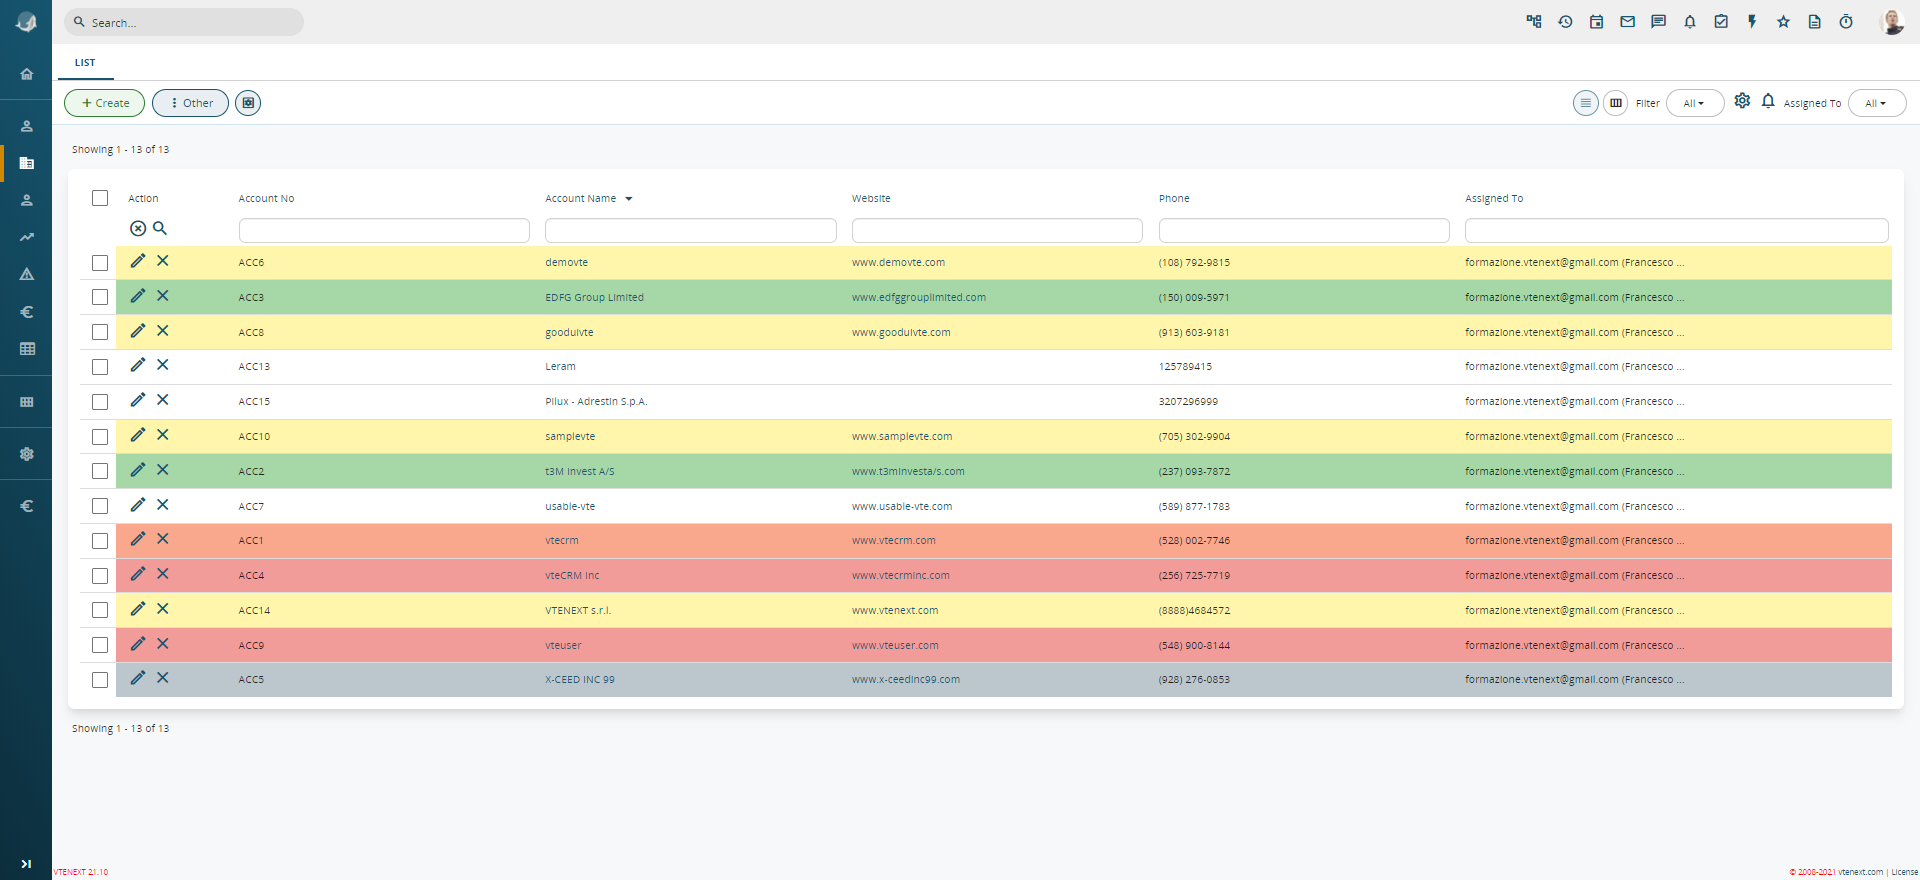
3.2 Accounts
The accounts module contains the records concerning the corporate titles of:
- Customers;
- Potential customers with a potential and a quote already created and related;
- Others: partners, resellers, distributors, partners, other sites, etc.
It is preferable to create a new company from a lead as described above; however it may sometimes be necessary to add a new account directly. In this case, always click on the  button.
The fields logic is as described for the Leads module. A selection of the main fields in Accounts is shown below:
|
Account Name |
Business name. |
|
Member of |
Manages a hierarchy between companies by interrelating the account being created with another account present in the CRM. |
|
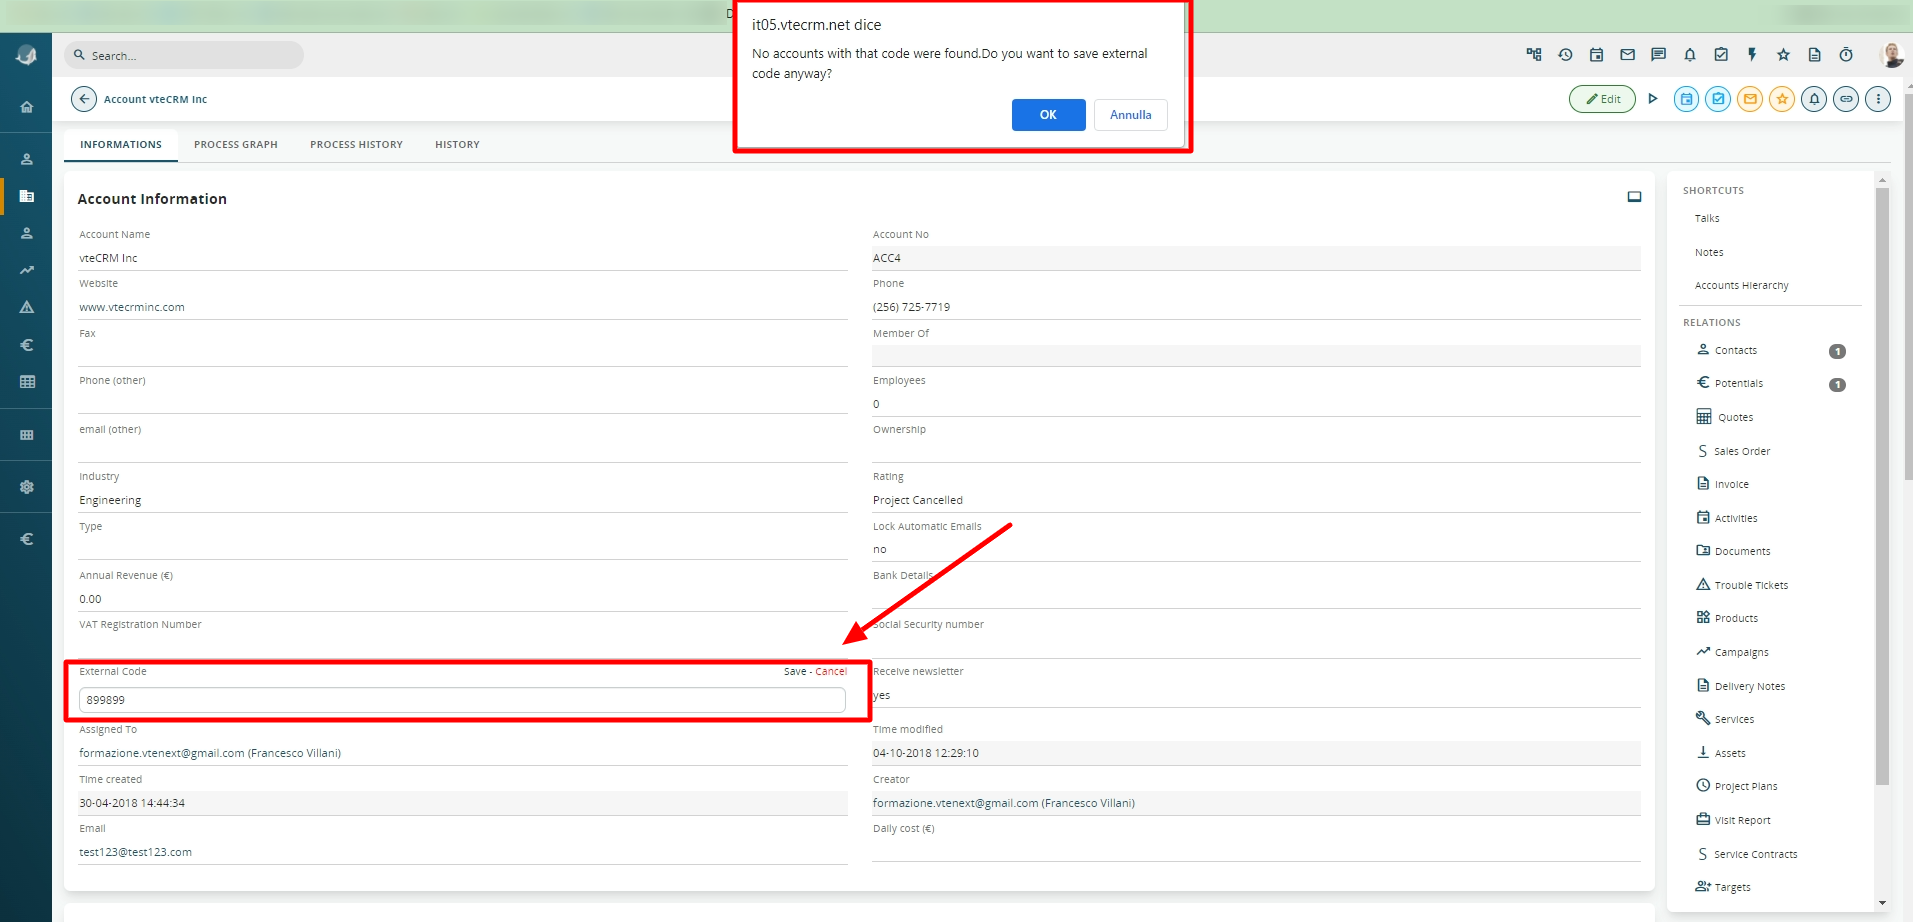
External Code |
Indicates the customer code of the company on another system (e.g. generated by an ERP application). This field is subject to a uniqueness check. |
|
Assigned to |
User or group of users that manage the account. |
The Member of field makes it possible to create hierarchical relationships among account records in the event that:
- there is a group of accounts with a parent company and N subordinate accounts;
- there is an account with a registered office and N operating sites;
- the invoicing customer is related to the target customer.
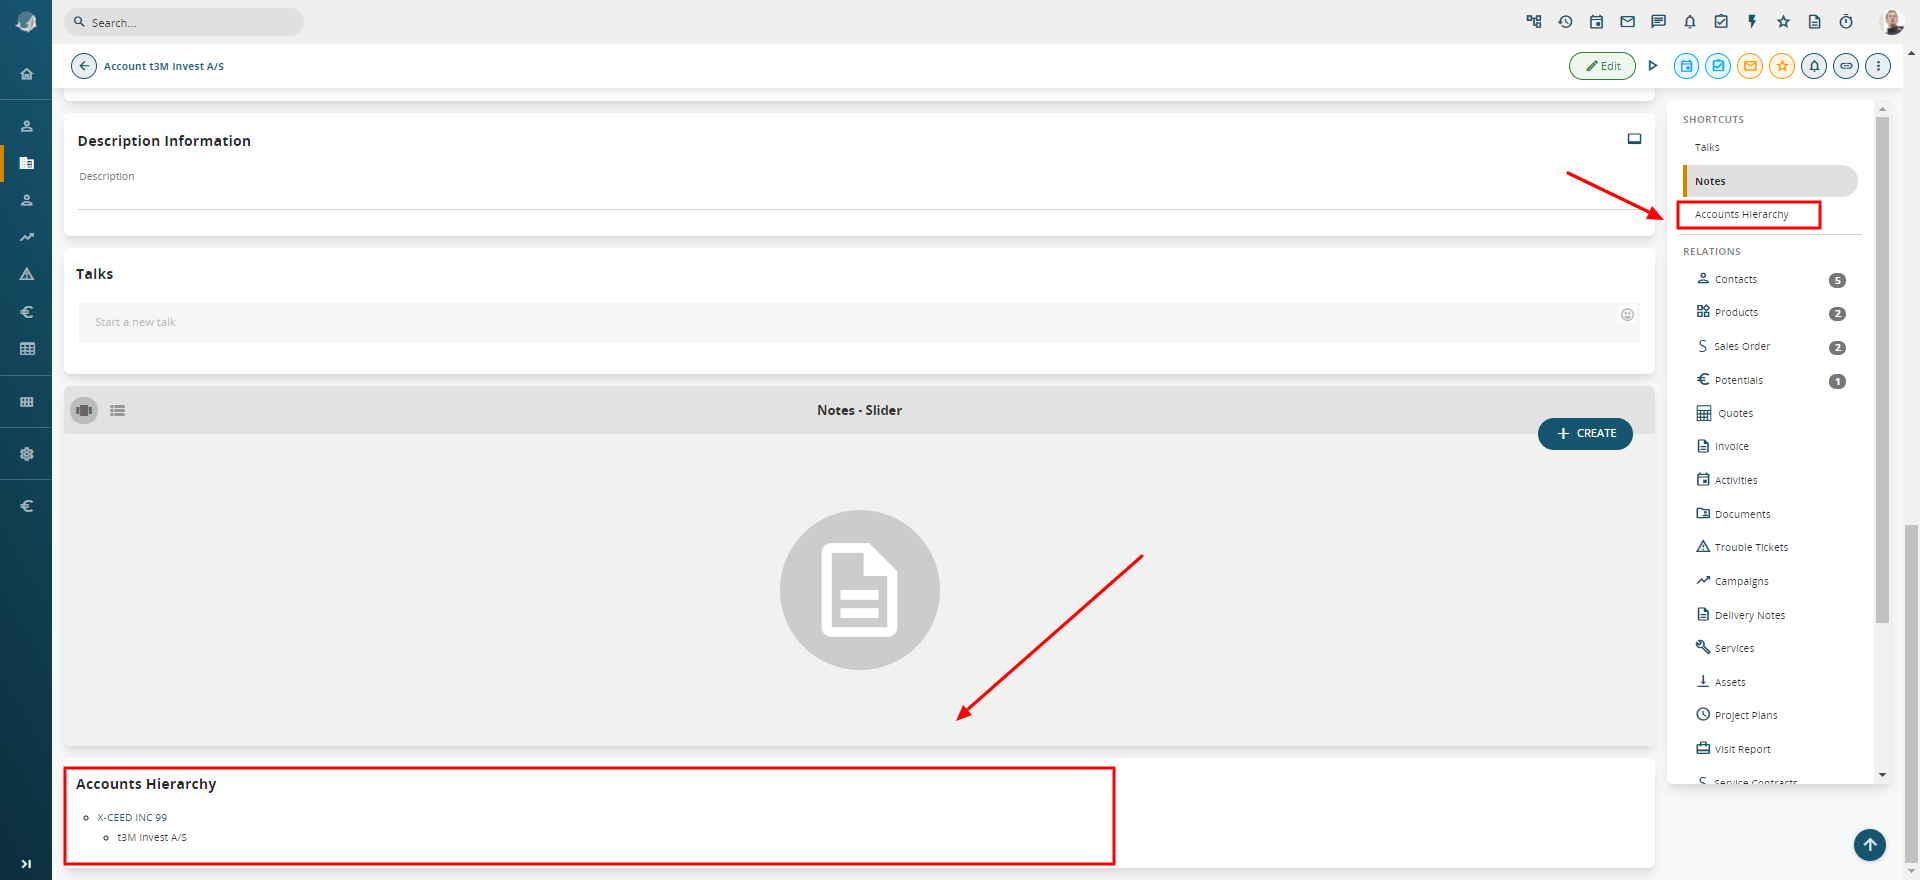
In this case, the hierarchy of companies is represented by means of a simple diagram at the bottom of the record. In the example shown in the diagram, ARCA S.S.D.A.R.L. is part of the 3Mb S:R:L: Mec Store group. By means of the links, you can open the records of the various accounts.
The External Code field typically contains the code associated with the account imported from the management system connected to the crm. Its behaviour is determined in two stages.
When the code is not present in the crm, a popup notification saying “No accounts with that external code were found. Do you want to save the external code anyway?” appears.
If at this point you decide to save, in case of “Account creation”, the Client entity will be created, while in case of “existing Account modification”, only the External Code field will be updated.
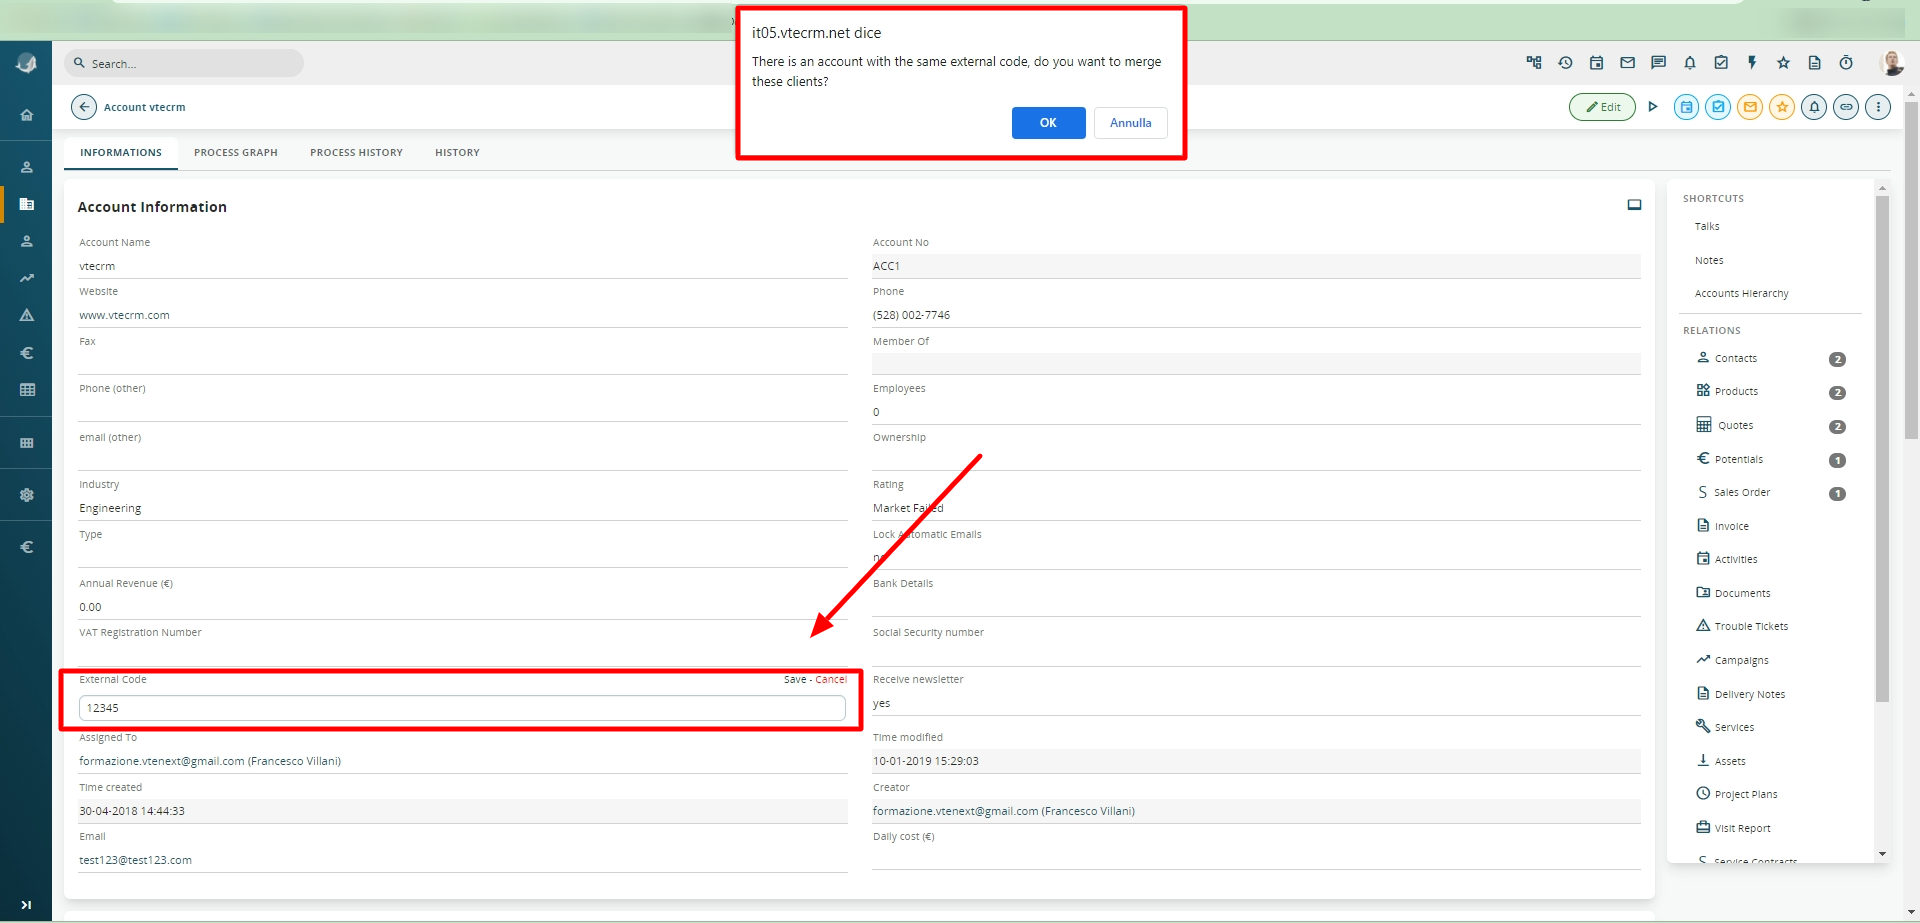
When instead the code is present in the crm, a different popup saying “There is already an account with the same code assigned to other users. So you can’t merge it” appears. In this case, there is no possibility to create or to modify an Account in order to avoid doubles coming either from data imported by the connected management system, or incorrect typing.
3.3 Contacts
Contacts contains the lists of the physical persons with whom relations have been established:
- account contact persons (customers, partners, or other type);
- private customers (or potentials) who generally come from a lead conversion;
- vendor contact persons.
![3.3 [1].png](https://usermanual.vtenext.com/uploads/images/gallery/2022-06/3-3-1.png)
It is preferable to create a new contact from a lead as described above; however it may sometimes be necessary to add a new contact directly. In this case, always click on the  button
![3.3 [2].png](https://usermanual.vtenext.com/uploads/images/gallery/2022-06/3-3-2.png)
Below some relevant fields in Contacts:
|
Report to |
Link to another contact, e.g. superior in the company. |
|
Do Not Call |
Tick the flag if you want the contact to not be called; this is for simple information purposes and is not linked to automatic functions or blocks. |
|
User Portal |
Enables the contact to access the vtenext Customer Portal (see dedicated chapter): when the contact is saved, the system will send an email with the credentials. |
|
Support Start and End Date |
Defines the vtenext Customer Portal access expiry date. |
vtenext is equipped with a parallel customer service tool called Customer Portal.

Provides contacts with limited access to Trouble Ticket functions: opening of new Tickets, sharing documents, etc.
To change the template of the email used to send the credentials, go to Settings > Email template > Registration and access data.
ANONYMIZE: in the new release, clicking on the “Other” button provides access to the “Anonymize” option. This feature has been created to manage leads according to GDPR rules. Anonymized Leads and Contacts cannot be restored.
3.4 Vendors
The Vendors module contains the business name records that correspond to companies that supply goods and services.
![3.4 [1].png](https://usermanual.vtenext.com/uploads/images/gallery/2022-06/3-4-1.png)
You can add a new vendor with the  button.
![3.4 [2].png](https://usermanual.vtenext.com/uploads/images/gallery/2022-06/3-4-2.png)
Here are some relevant fields for Vendors:
|
Vendor name |
Business name. |
|
GL Account |
Allows classification of vendors by macro-sectors according to the GL account code used by the departments. |
Vendors module is related to Contacts module, just like the Accounts module (1 to N).
3.5 How to import and export records
If authorised by admin, you will find two specific buttons for data Import/Export in the vtenext Leads, Contacts, Accounts and Vendors modules.
- Import data;
- How format CSV file before upload;
- Export data;
- Manage duplicate record within a module;
- Save import data Mapping.

3.5.1 Imports
In all modules that involve master data, is possible to import data from CSV files, clicking on the button Other and then the button Import. The import is available in list view of the module.

Before uploading new data through the importation procedure, always:
- Check the match between column names in the csv files and the ones in vtenext;
- Perform a duplicates check according to the data already in vtenext.
Warning! It is advisable to import files of up to 950 lines. If your databases has more lines, divide it into different files. This is a safety measure to avoid server overloads.
How to import:
STEP 1: Select the previously set csv file;
STEP 2: Specify the file type, the character encoding, the delimiter and whether it contains the column header in the first line. (We recommend maintaining the proposed settings).;
STEP 3: Select the mode for managing possible duplicate records between csv and vtenext from among the following modes present in the screen;
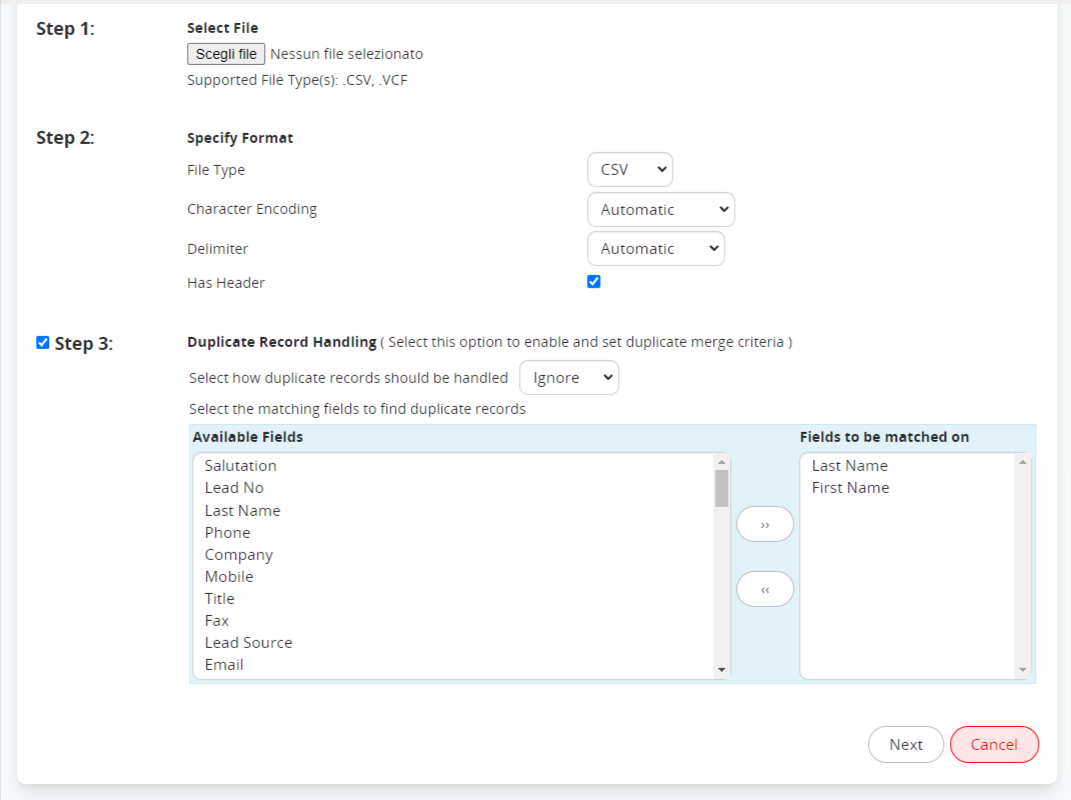
Ignore: the records present in vtenext will be maintained and the csv file data will not be imported;
Replace: the records present in vtenext will be deleted and new records will be created corresponding to those of the csv file.
Update: updates the records as follows: if the target field in the CRM is empty, it will be updated as indicated in the csv file; if the field is already filled in the CRM, the values indicated in the csv will be disregarded.
Next, define the fields that will constitute the duplicates recognition key. A practical example is given below.
vtenext contains the following leads:
|
Name |
Surname |
Account |
|
Creation Date |
Relations |
|
Giorgio |
Rossi |
Rossi SPA |
grossi@rossispa.it |
01.01.2018 |
1 calendar activity |
|
Giorgio |
Rossi |
Rossi SPA |
grossi@rossispa.it |
02.12.2018 |
1 Email |
A data import from a csv file containing the following record is carried out 03-12-2018, mapping the name, surname and company.
|
Name |
Surname |
Account |
|
Phone |
|
Giorgio |
Rossi |
Rossi SPA |
grossi@rossispa.it |
3331234567 |
Option 1: management of duplicates by means of the Skip (Ignore) option.
The situation remains unchanged:
|
Nome |
Surname |
Account |
|
Creation Date |
Relations |
|
Giorgio |
Rossi |
Rossi SPA |
grossi@rossispa.it |
01.12.2018 |
1 calendar activity |
|
Giorgio |
Rossi |
Rossi SPA |
grossi@rossispa.it |
02.12.2018 |
1 Email |
Option 2: duplicates management by means of the Replace option.
The records in vtenext are deleted and the csv file data remain valid:
|
Name |
Surname |
Account |
|
Phone |
Creation Date |
Relations |
|
Giorgio |
Rossi |
Rossi SPA |
grossi@rossispa.it |
3331234567 |
03.12.2018 |
Option 3: duplicates management by means of the Update option.
Among duplicated records in vtenext the most recent record is kept and merged with the csv file record:
|
Name |
Surname |
Account |
|
Phone |
Creation Date |
Relations |
|
Giorgio |
Rossi |
Rossi SPA |
grossi@rossispa.it |
3331234567 |
03.01.2018 |
1 Email |
Proceeding with the NEXT button, you must now map your data according to the vtenext fields (whether standard fields or customised fields).

|
CRM field |
Proposes the standard and customised fields in the module in which you are working. |
|
Default Value |
You can define the default value to set if the cell is empty in the csv file. |
Note. To carry out multiple imports, you can save the mappings for a future use by flagging “Save as Customised mapping” and assigning a name. In future imports the Mapping will be available in the upper right in the popup menu.
Once you have finished mapping, click on Import to transfer your data to vtenext. In the last step the result of the importation will be shown.
Order to be respected in importing data related to other modules.
In case we have to import data that has relations with other modules, for examples accounts and contacts, we will import firstly the data of the module with the relation 1-N ( an account has N contacts) and then the data with the relation N -1 ( N contacts for each account) during the importing process we will associate contacts and accounts.
3.5.2 How to format the CSV file
Data must be in ASCII format with values separated by commas or semi-colons. The csv format is frequently used to exchange data between the various applications.
If you wish to import data, they must be formatted in accordance with the following rules:
- All comma separated fields must be between quotation marks;
- You must include all required fields in the CRM (e.g. Surname and Company in the case of Leads); Fields with dashes, file extensions or justification spaces are not allowed;
- Numerical fields must not contain thousands separators (e.g. 3800 rather than 3.800). The decimal separator is a full stop;
- Fields containing quotation marks cause problems. If you wish to use them they must be enclosed between round brackets;
- To import date type fields you can choose the format;
- To import values into standard picklist, just enter the value in the cell and it will be imported. If this value is not present in the crm picklist, it will be added automatically, while if it is written in the same way both in the crm and in the CSV file, it will be connected normally;
- To import values in multi-selection picklists use the format: value1 [##] value2 [##] value3. (spaces and brackets included);
- The field headers must be in the first line of the csv file;
- When related fields are imported (e.g. the Contact who is connected to his Company), the CSV file must be formatted in a particular way, with a string to be able to connect said Contacts (or other module), with your Company (or other module whose main name must be written in the same way as it was entered in vtenext):
| Name | Surname | Account Name |
| Lynda | Carter | Accounts::::Wonder LTD |
Below we will list all the names to correctly set the related fields on the CSV file:
| Modulo Name | Prefix Name | Modulo Name | Prefix Name |
| Accounts | Accounts:::: | Assets | Assets:::: |
| Calendar | Calendar:::: | Campaigns | Campaigns:::: |
| Contacts | Contacts:::: | DDT | Ddt:::: |
| Documents | Documents:::: | Employees | Employees:::: |
| FAQ | Faq:::: | Trouble tickets | HelpDesk:::: |
| Invoice | Invoice:::: | Job Orders | JobOrder:::: |
| Leads | Leads:::: | Potentials | Potentials:::: |
| Product lines | ProductLines:::: | Products | Products:::: |
| Project Milestones | ProjectMilestone:::: | Projects | ProjectPlan:::: |
| Project Tasks | ProjectTask:::: | Quotes | Quotes:::: |
| Purchase Order | PurchaseOrder:::: | ||
| Sales Order | SalesOrder:::: | Service Contracts | ServiceContracts:::: |
| Services | Services:::: | Timecards | Timecards:::: |
| Vendors | Vendors:::: | Visit Report | Visitreport:::: |
The figure shows an example of a file for importing a lead. Each line represents a data set.


If you want to import contact data from your office application, ensure they are correctly formatted. Whenever you use MS Outlook proceed as explained below:
1. Check data format
In most cases the data must be checked and manually edited before importation. This is an important operation to ensure all the information is correctly formatted.
Now proceed as follows:
- Export the contacts from Outlook in Excel format; Launch Excel and open the file;
- Check all special characters such as comas, dots, semicolons, and quotation marks and replace any that give rise to problems, e.g. with a blank space;
- Check columns containing the compulsory fields, making sure that every single value is present in the different lines;
- Remove the initial column, if present, and all other columns that are not needed in vtenext, in order to streamline the importation process;
- Make sure the information you intend to use is present, because subsequent removal of mistakes in vtenext may require additional work.
2. Save the file in CSV format (DELIMITED BY THE LIST SEPARATOR)
From your Excel program (or similar), is possible to export (File + Save with name) in CSV format (comma separeted values) and save with this configuration. The file will be ready to be imported in the crm.
3.5.3 Export
The export process allows the records to be saved in a csv file. Click on the icon to open a menu in which the export criteria can be selected.
![3.5.3 [1].png](https://usermanual.vtenext.com/uploads/images/gallery/2022-06/3-5-3-1.png)
|
Export with search records |
Export only records returned in search results |
|
Export without search records |
Export all records irrespective of search results |
|
Export all data |
Export all records |
|
Export data in current page |
Export records shown in current page |
|
Export selected records |
Export only flagged records |
When you click on “Export” the browser will prompt you to save the data on your computer.
3.5.4 Checking duplicates in a module
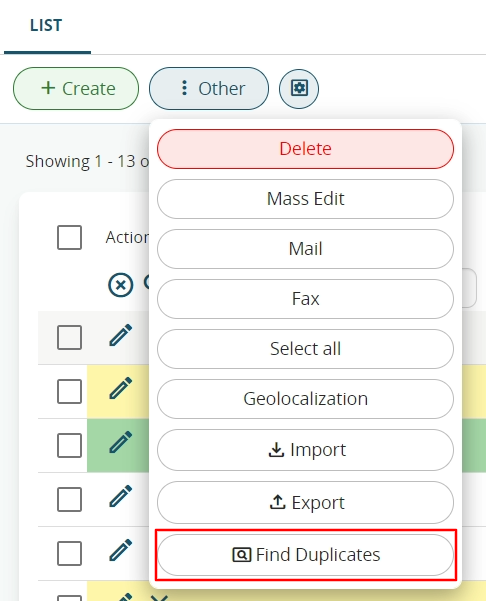
You can check for the presence of duplicates in a module by means of a wizard.
To launch the duplicates check click on Other and Find duplicates in the module in question, then enter the key fields to find the duplicates (including customised fields).
Start the duplicates search procedure by clicking OTHER > FIND DUPLICATES button.

Duplicate records can be merged using the Merge button. You can merge up to three duplicate records at a time.
See the screenshot below for details on how to validate and merge duplicate records by selecting the required values field by field.
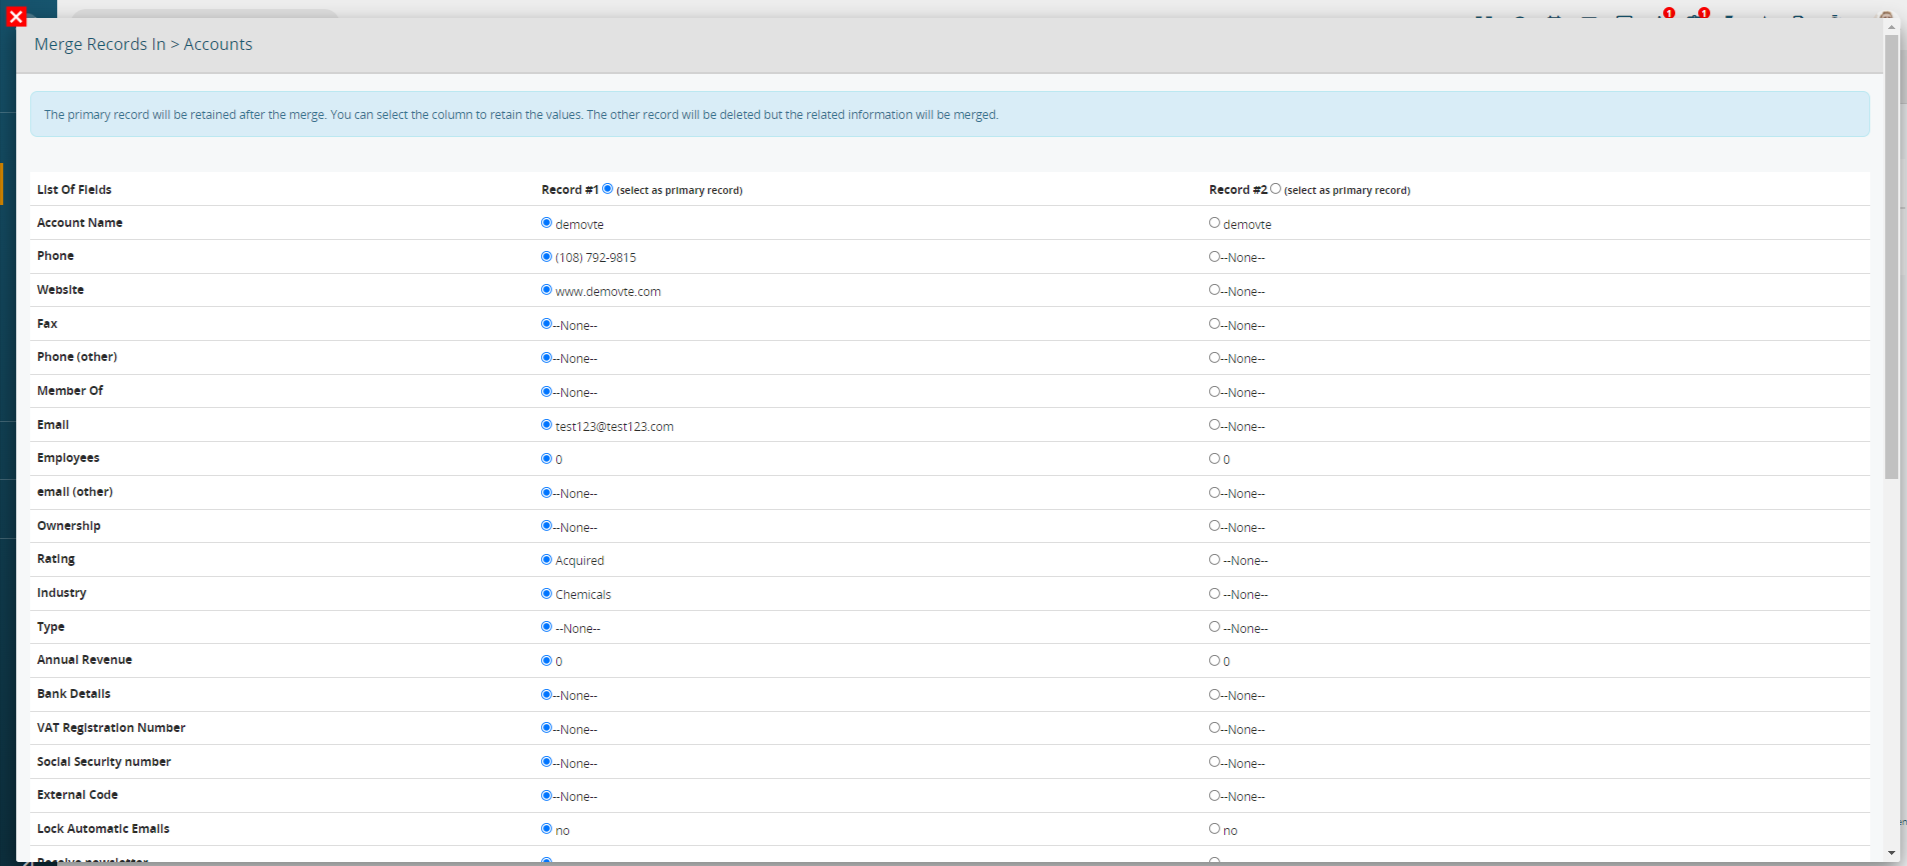
Note:
- the selected record will be the file that is saved following the merge;
- following the merge, the saved record will contain the merged relations;
- the records merge operation can be enabled or disabled in User profiles.
See the next paragraph, relating to the SAVE FIELD MAPPING button which allows you to check the data during insertion to avoid entering existing personal data.
3.5.5 Save Mapping
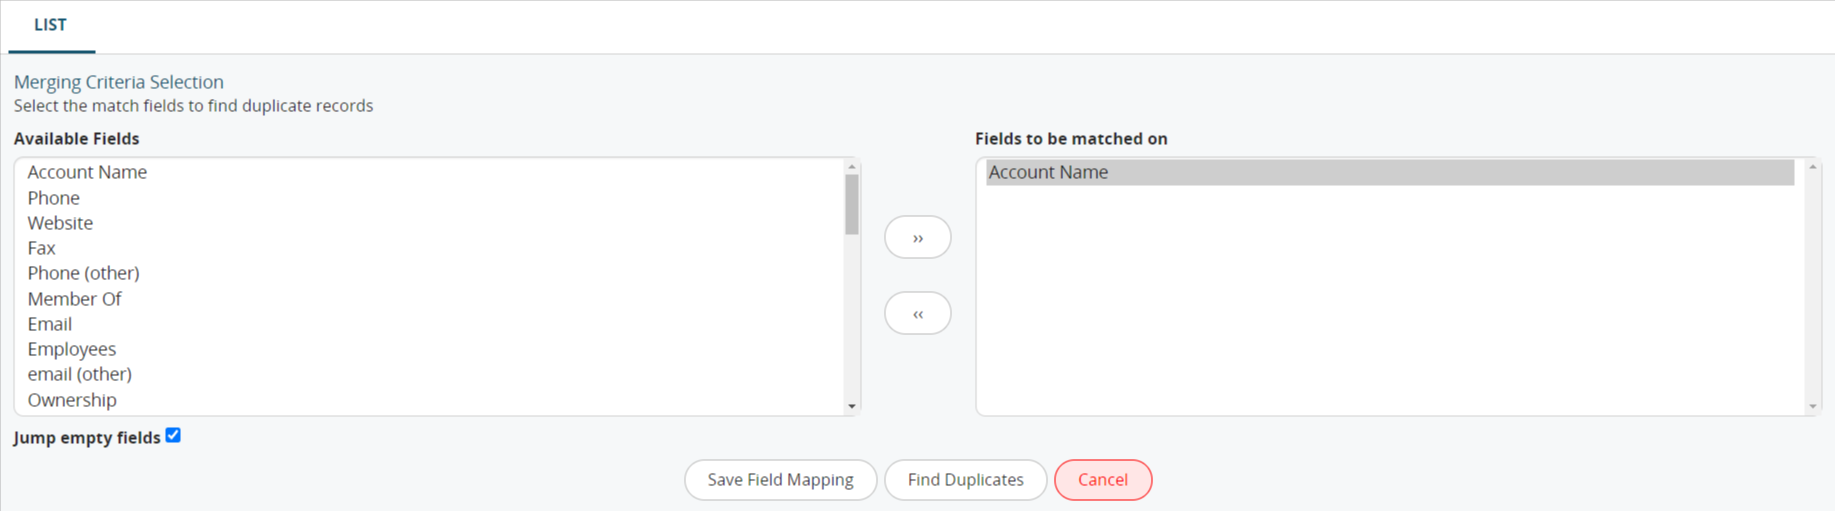
All users can perform a uniqueness check on each module by means of the "Find Duplicates” button when creating new records.
Define the set of fields to be matched and then click on Save Mapping.
At this point, whenever you attempt to edit an existing record or create a new one, the system will check for the existence of a record with the same combination of fields, alerting you to the presence of duplicates. For example, if the Email field is selected for matching, the warning shown in the following screenshot will be displayed.

3.6 Mass Edit
The Mass Edit function is useful for rapid updating of fields in one or more selected records.
For example, if you create a customised field in Leads and you want to edit it across multiple names, this can be done without having to update the individual records.
The screenshot shows an update of several records selected in the Leads module.
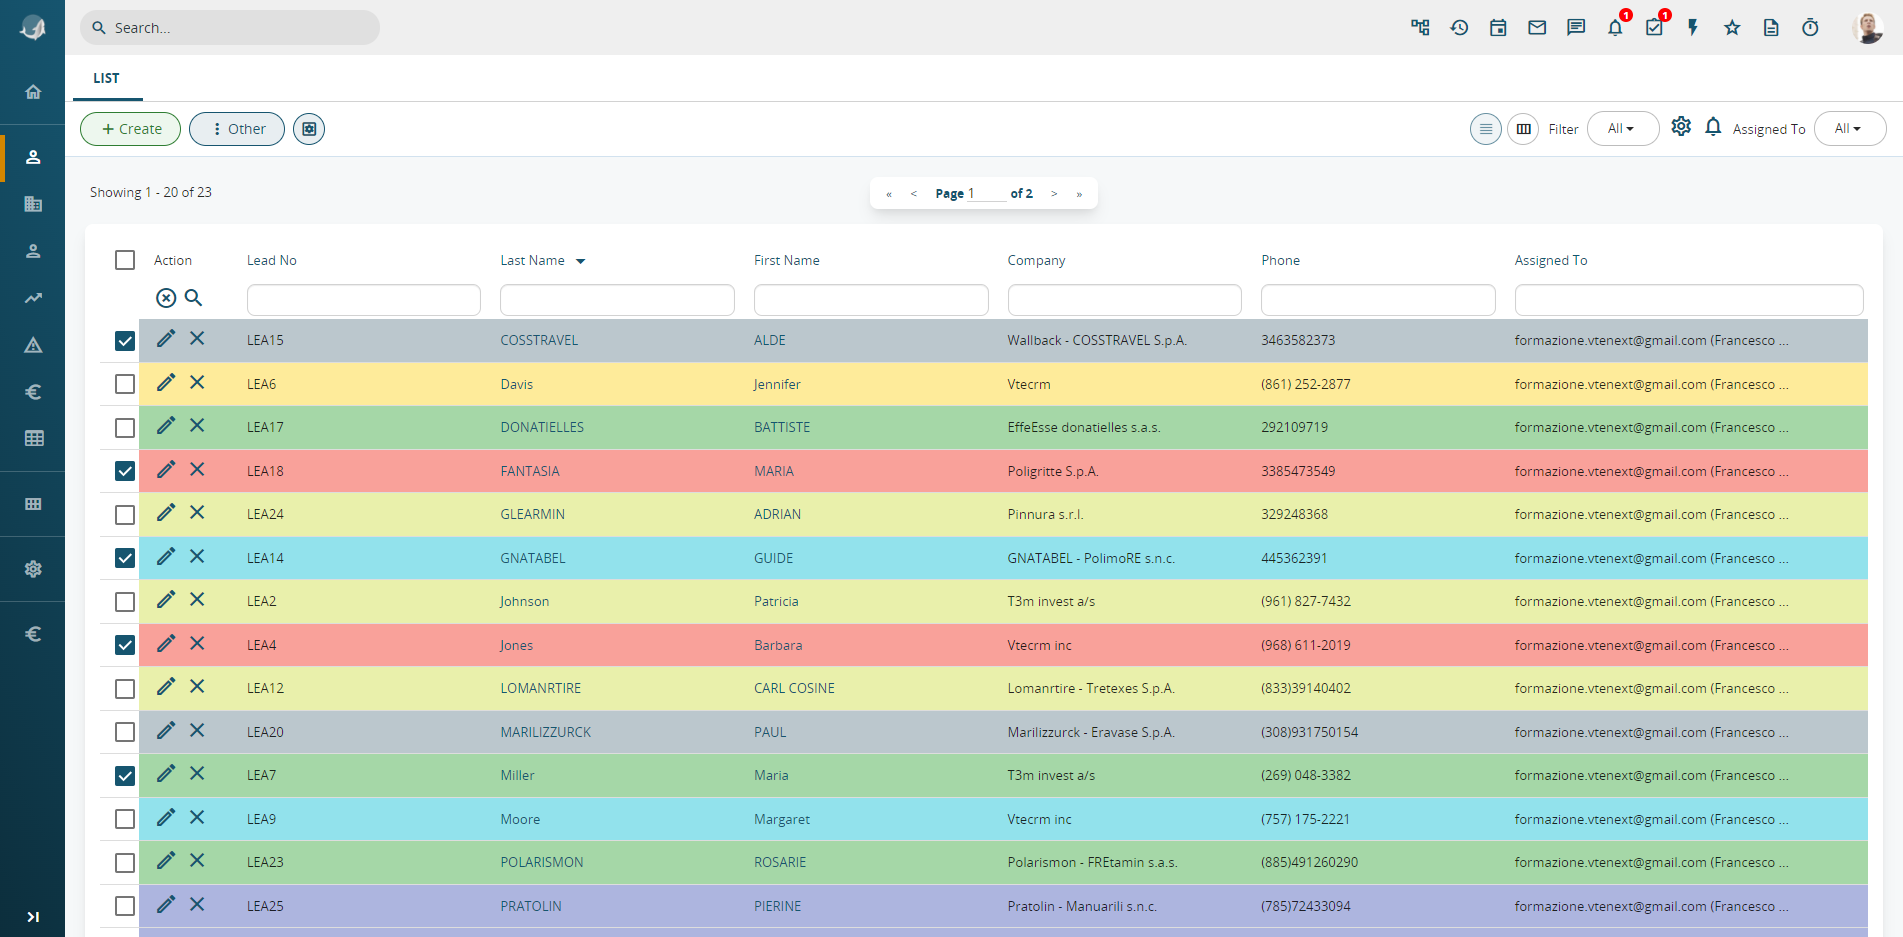
Click on OTHER > MASS EDIT
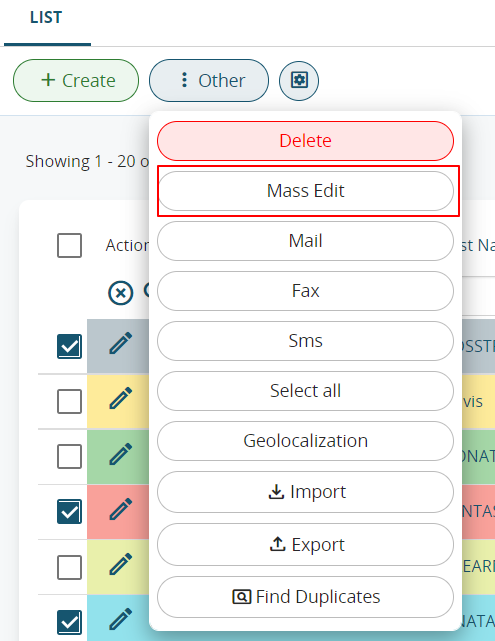
Then choose the field/fields for massive editing.
 Mass Edit is available in all vtenext modules under the Other button. The mass edit function is not however applicable to all fields. Among the editable fields, the CRM admin user can enable/disable the availability of effectively editable fields in the mass editing panel using the Layout Editor (see dedicated chapter).
