18 Other vtenext Settings
- 18 Other vtenext Settings
- 18.1 Template email
- 18.2 Webforms
- 18.2.1 Webform with GDPR fields
- 18.3 Customer Portal
- 18.3.1 Enabling the customer portal for a user
- 18.3.2 Customer Portal Interface
- 18.3.3 GDPR module settings
- 18.4 Account Details
- 18.4.1 Logos and Backgrounds
- 18.5 Server SoftPhone Settings
- 18.6 LDAP
- 18.7 Currencies
- 18.8 Tax Calculation
- 18.9 Proxy Server
- 18.10 Internal REST Webservice Methods
18 Other vtenext Settings
You can define further settings within vtenext:
- Template email
- Webforms
- Webform with GDPR fields
- Customer Portal
- How to enable the Customer portal
- Customer Portal interface
- GDPR module settings
- Account Details
- Server SoftPhone Settings
- Requirements and configurations
- LDAP
- Currencies
- Taxes Calculation
- Proxy Server
18.1 Template email
As for the newsletter module, the admin user will be able to access to the email template editor. An email template can be used for messages or for newsletter and can be saved in a public or private folder. Within the template the variables can be added.
18.2 Webforms
Through the vtenext Webforms tool, you can create a web form to be inserted within your site, for example the classic "contact us" form. The data entered in the webform will be automatically sent to the CRM in the Leads modules.
To create a new webform, from Settings > Webforms, click on the button 
![18.2 [1].png](https://usermanual.vtenext.com/uploads/images/gallery/2022-06/4tp18-2-1.png)
- Assigned to --> vtenext user that will manage the lead
- Return URL --> By clicking on the confirm of the webform, the user will be redirected to the address here indicated
Once you have created the form by selecting all the desired fields and determining which ones are mandatory, you can click on VIEW FORM at the top right to access a window that reveals the HTML code to copy and paste onto the desired website page (or landing page). This HTML code is not formatted and will need to be managed with CSS files by your webmaster.
ATTENTION: Any changes made to the web form fields in the CRM require that the HTML code be re-uploaded to the site.
HOW TO RECEIVE NOTIFICATIONS UPON RECEIVING NEW LEADS.
During the form creation process, it is necessary to choose the LEAD SOURCE field and determine the desired default source (e.g., WebSite). This field should be set as hidden. This way, you can create a filter in the lead module that filters leads coming from the WebSite source and set up the notification bell on that filter.
At this point, every time someone fills out the form on the site, a new lead will be automatically created and the CRM will notify you with a notification.
18.2.1 Webform with GDPR fields
GDPR fields have been enabled inside the webforms from version 18.12 onwards. For example, you can request Marketing Consent, Third-Party Consent, Profiling Consent, etc., and save the choice made with IP and date-time in the lead data sheet.
Here are the configuration details:
The GDPR fields are grouped in blocks of three (view, date-time, IP).
It is therefore necessary to set the information view fields as mandatory, to display the field in the webform as a picklist (YES/NO) and then force the user to make a choice. The date and IP fields must be hidden fields (so set the hidden flag to yes in the webform configuration).
The following must be entered as default value in the date field:
“$(general : (__VteMeta__) date_Y_m_d) $(general : (__VteMeta__) time”
The following must be entered as default value in the IP field
“$(general : (__VteMeta__) clientip”.
By doing so, the setting of the consent + date-time and IP of the request is obtained in the GDPR block.
![18.2.1 [1].PNG](https://usermanual.vtenext.com/uploads/images/gallery/2022-06/RBt18-2-1-1.PNG)
|
Assigned to |
Lead Recipient |
|
Return Url |
When the webform confirmation button is pressed, the user will be redirected to the address indicated here (for example, the thank you page) |
Once the webform has been created, click on the "Show Form" button to display the HTML code to be included inside your web page.
18.3 Customer Portal
It's possible to configure the functions of your customer portal through the 'Customer Portal' section within the settings.
In updated versions of vtenext (i.e., when transitioning from an old release to the current one), you will be able to choose via a dropdown menu which version of the portal to make available for your customers.
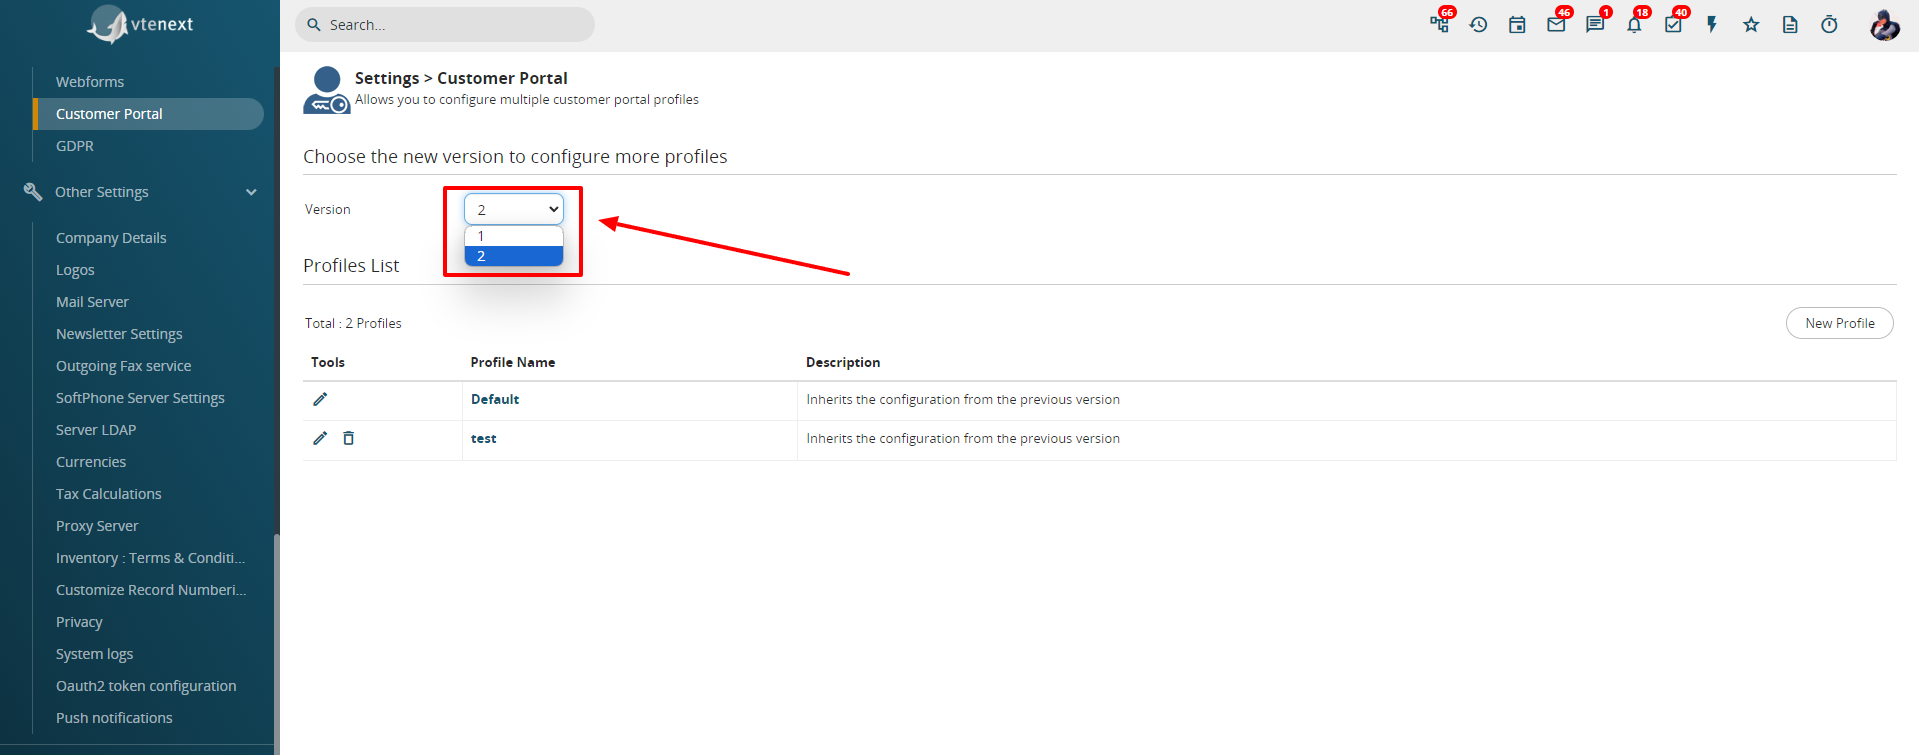
However, for new installations there won't be a choice, and you can only use the new Portal (Version 2).
CUSTOMER PORTAL VERSION 1
In Basic Settings, you can:
1. choose which items (modules) should be active on the portal side;
2. define the order of the items;
In Advanced Settings, you can further define:
the visibility of data through the option to View all records.
![18.3 [1].png](https://usermanual.vtenext.com/uploads/images/gallery/2022-06/50R18-3-1.png)
- Yes: the customer displays both the data related to their contact details (tickets, documents, etc.) and the data related to the company registry to which they are linked
- No: the customer displays only the data related to their contact details and not those related to the company to which they are linked.
Through the Select user option (a disabled user can also be chosen), it is possible to select a CRM user, also disabled, with a specific configuration of entries for the standard fields. The portal will display precisely those items in the available drop-down menus. When a Ticket is created by the Client Portal, it is assigned to this user. It is possible, however, to assign the Ticket to another CRM user. The assignee will receive an immediate email notification. This function is very useful for the management of active Tickets.
![18.3 [2].png](https://usermanual.vtenext.com/uploads/images/gallery/2022-06/icN18-3-2.png)
Through the Select the email template option you can decide which email template the system should use to communicate portal access information.
CUSTOMER PORTAL VERSION 2 (some functions are paid)
The new version of the Customer Portal provides an entirely new experience for the accessing customer. It allows configuring interface views through the creation of dedicated Profiles, directly assigning them to individual Contacts from the CUSTOMER PORTAL INFORMATION section.
Now let's see how from the Customer Portal Settings, it's possible to create new Profiles (this feature requires a fee). By selecting Version 2 of the Portal (where this option is applicable), the new profiles configuration or management page will appear.
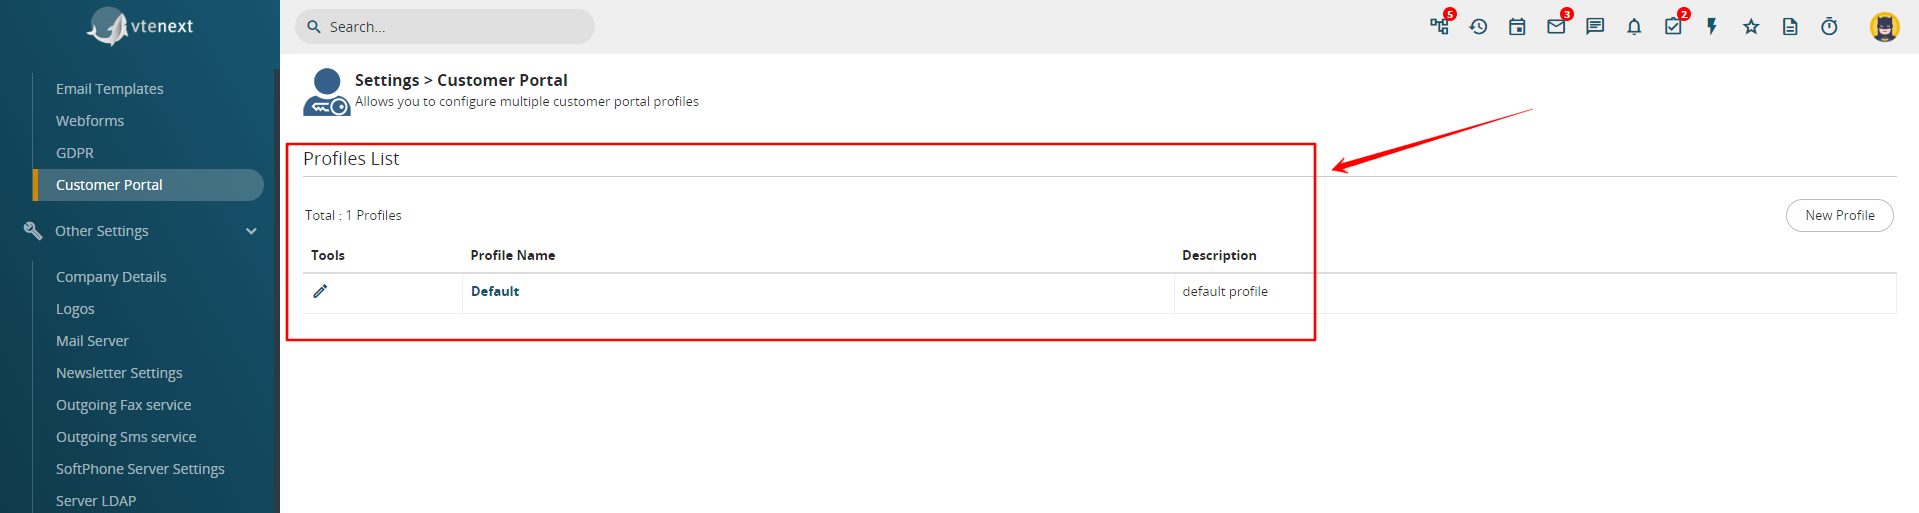
As standard, we have only the profile named DEFAULT, which allows starting with a basic configuration. But let's see how to create a new custom profile.
By clicking on NEW PROFILE on the right side, you will access the creation page as shown in the following image:
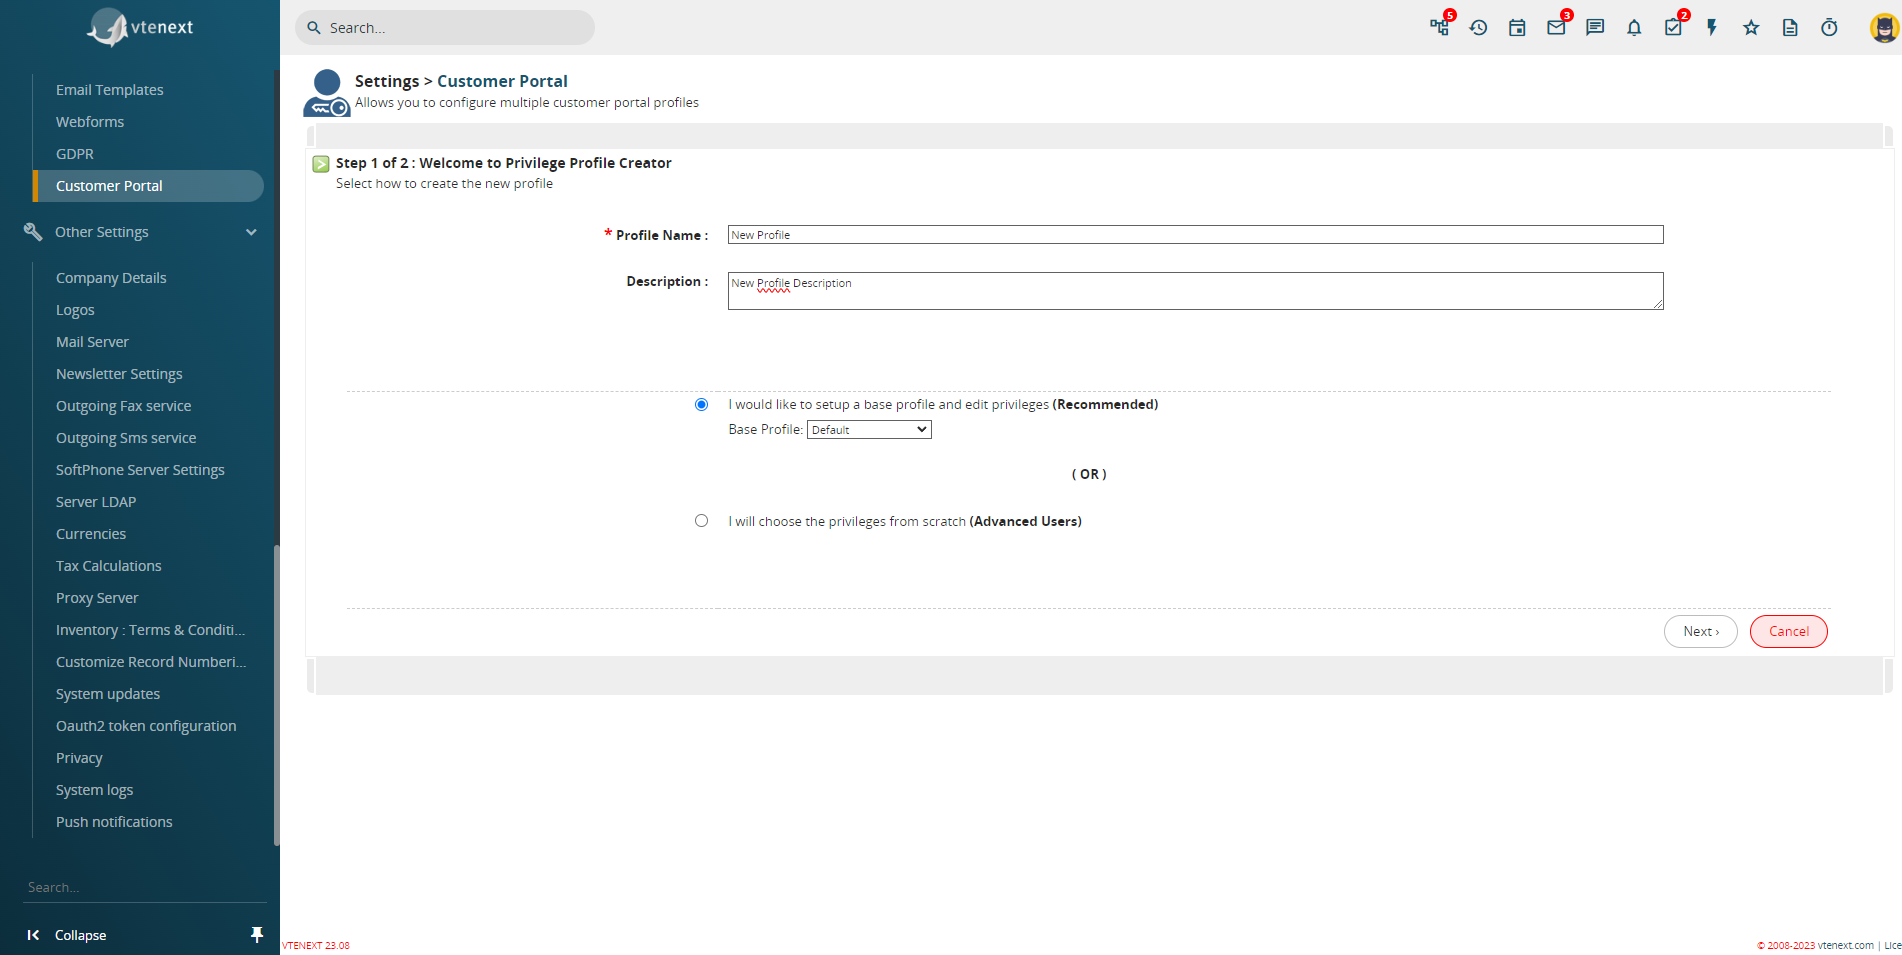
The page resembles the one for creating standard user profiles, so you should essentially follow the same process – choose a name, a description, and select which profile to start from for the new configuration. Finally, click on NEXT at the bottom right.
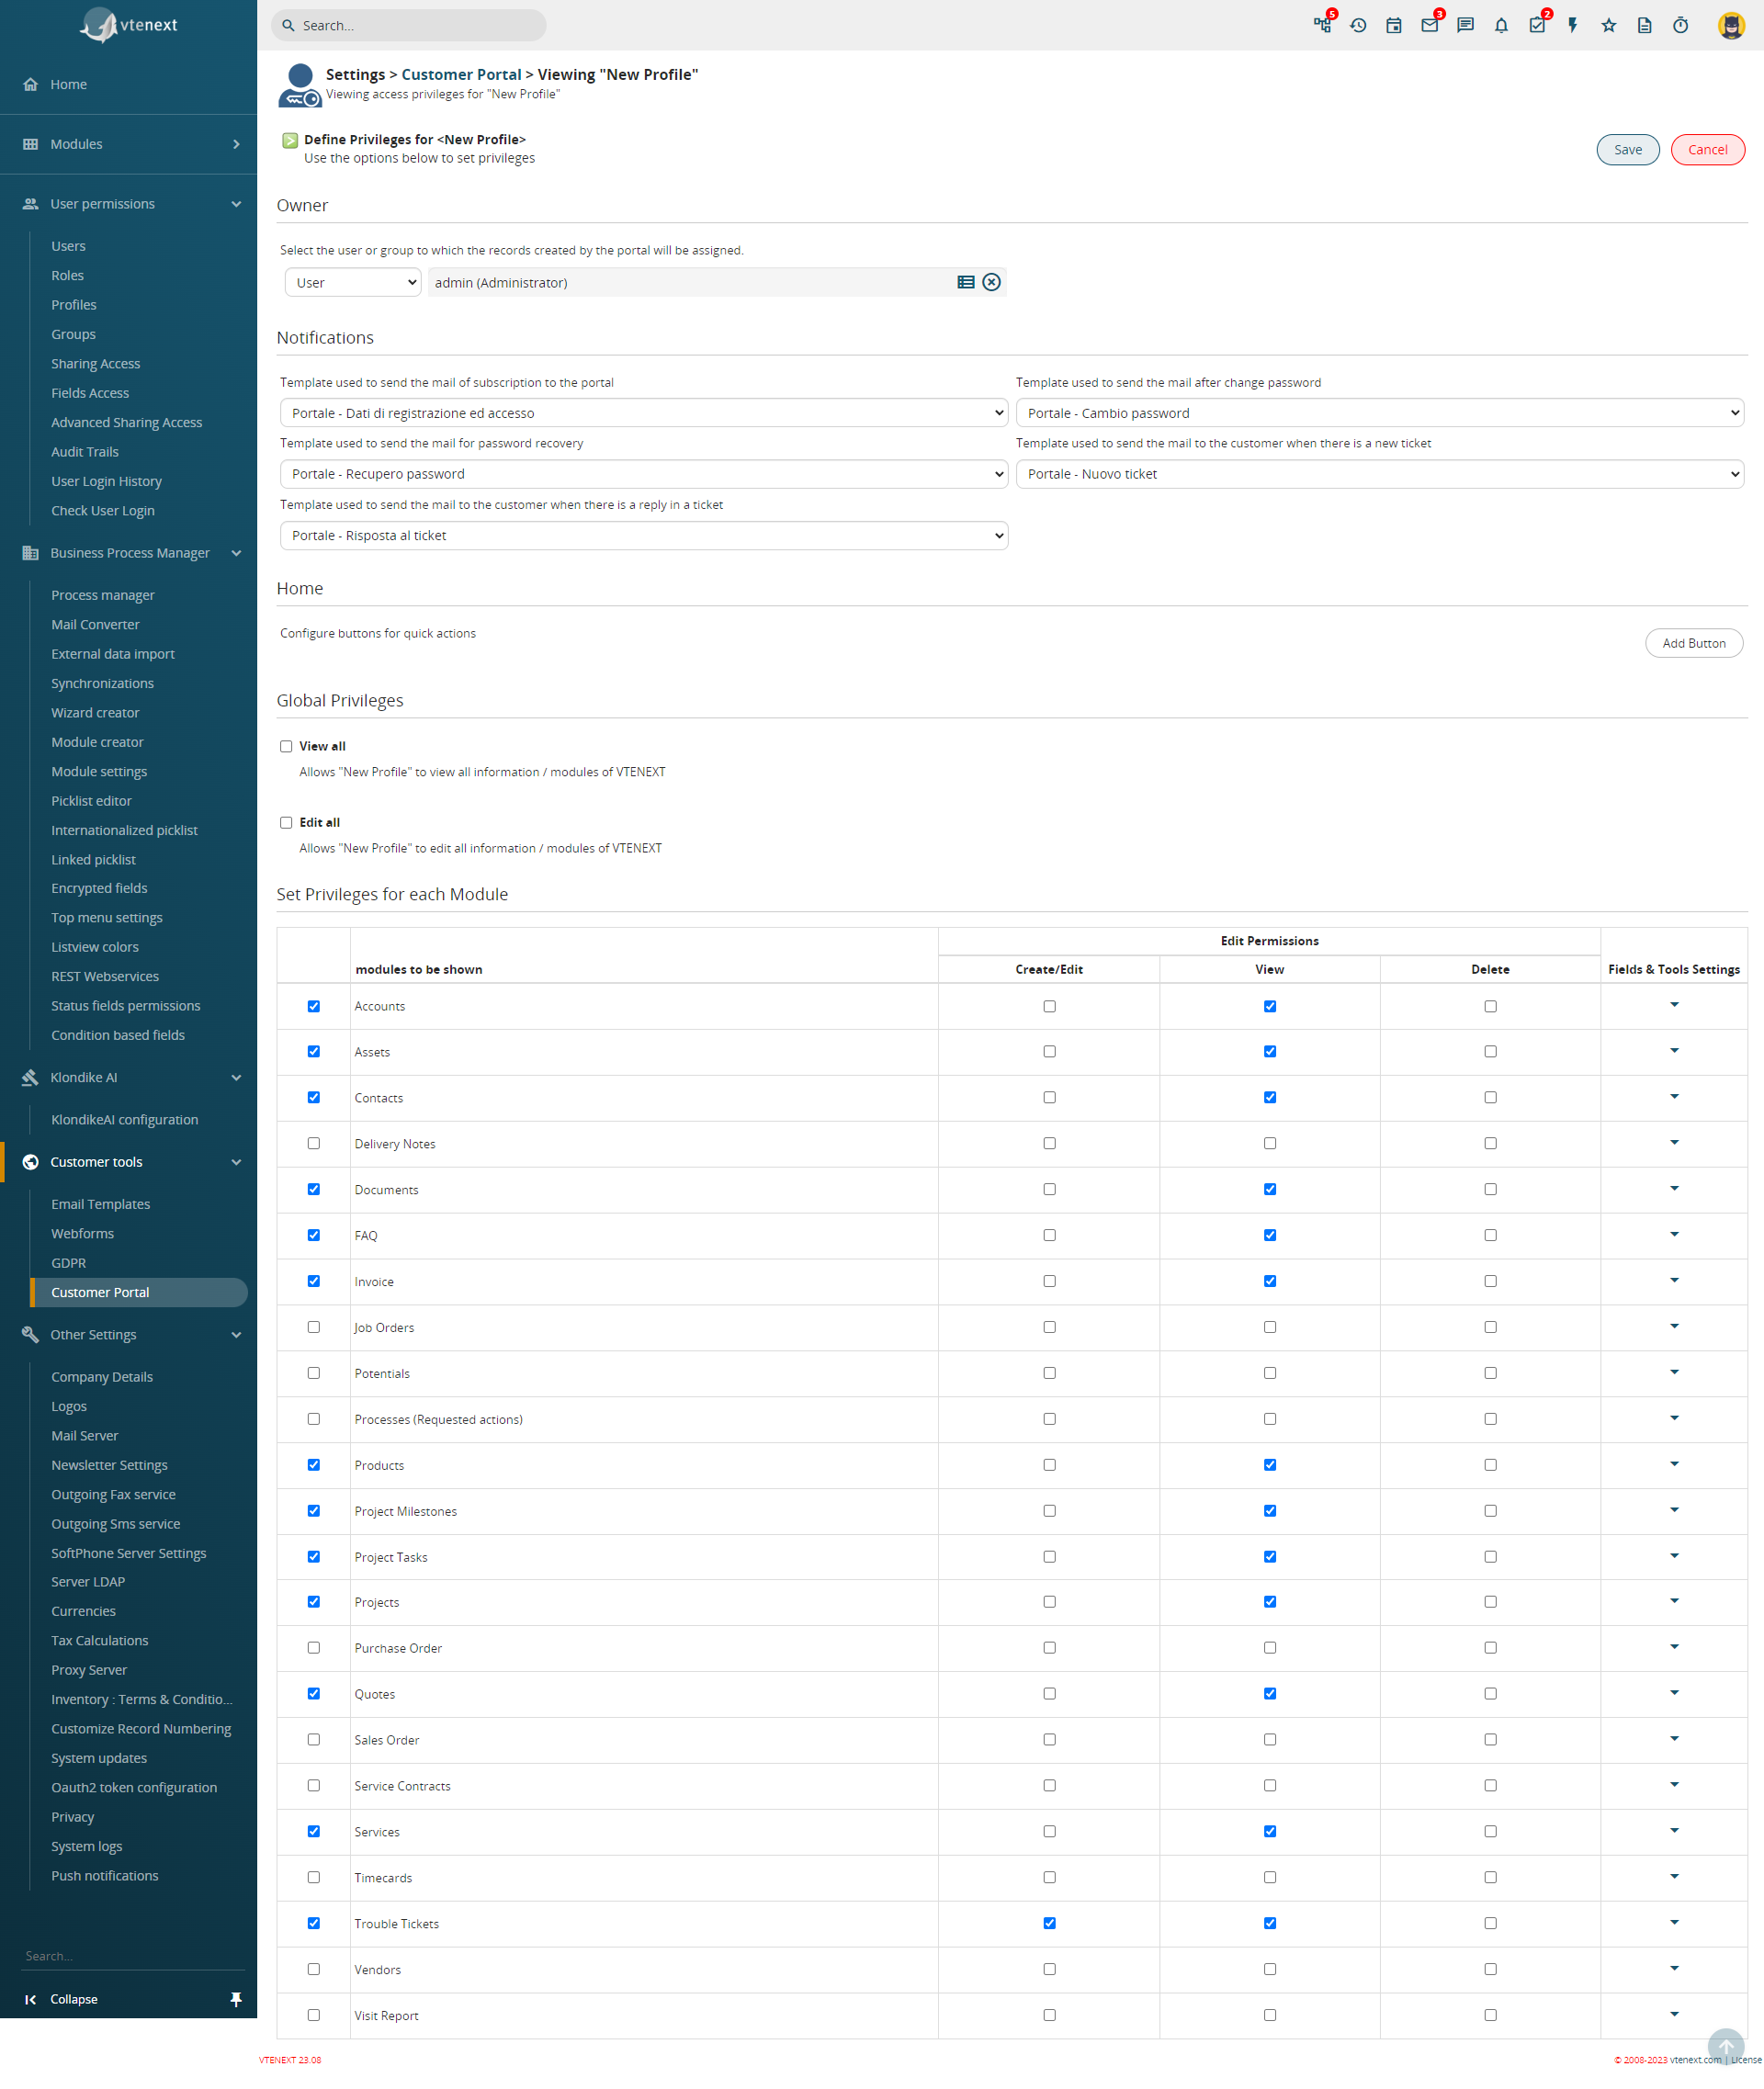
On this page, you can configure several functions, which we'll summarize in the following table:
|
Assignee |
You can select the CRM user to whom all records created from the portal will be directly assigned; |
|
Notifications |
It offers the possibility to select email templates, which can be customized through creation or modification using the dedicated EMAIL TEMPLATE section in SETTINGS, for exchanging information with the portal user. The options are:
|
|
Home |
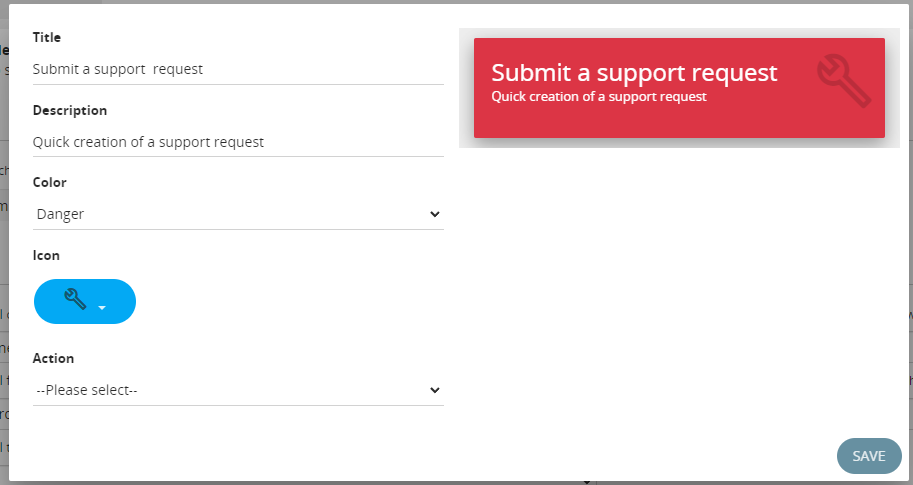
It allows configuring buttons for quick actions on the portal home page. By clicking on ADD BUTTON on the right, you can enable a window from which to set:
Button Creation Screen
Button List Viewing Screen
The order of the buttons can be changed through drag-and-drop. |
|
Global Privileges |
It offers the possibility to configure all privileges for each individual user profile, determining what they can or cannot do or see through the customer portal. You can apply these settings to all modules of vtenext. |

18.3.1 Enabling the customer portal for a user
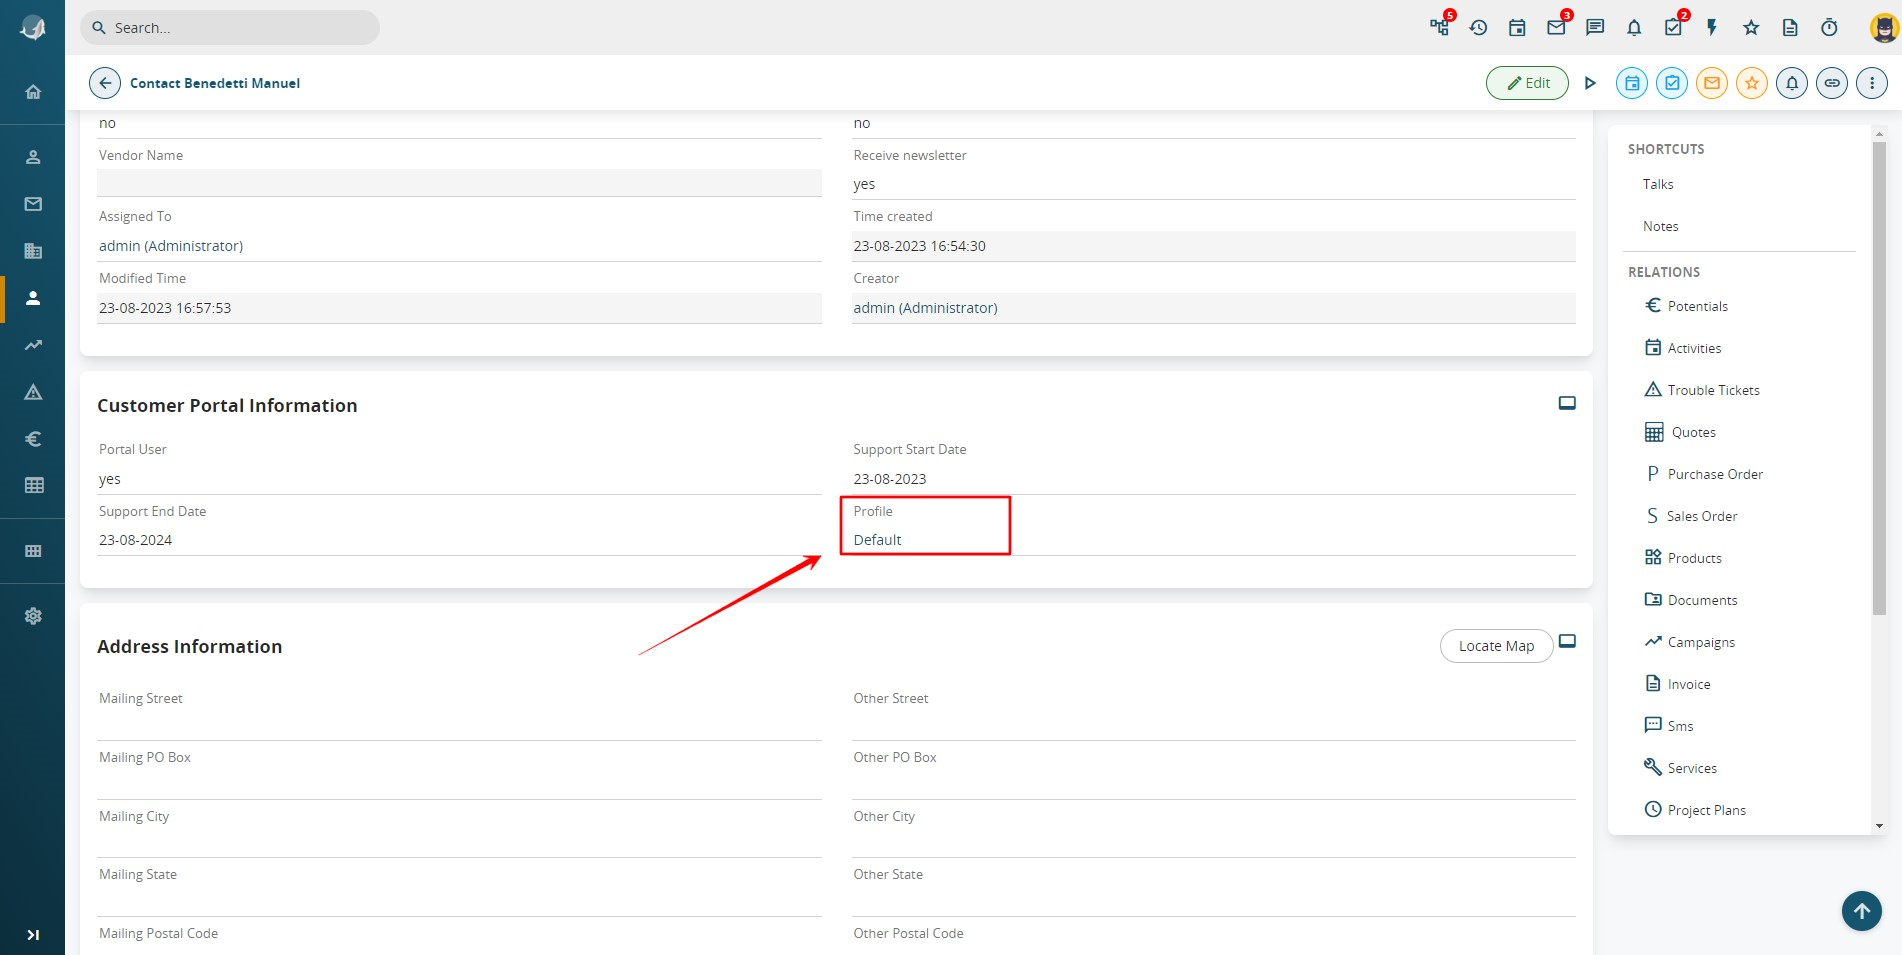
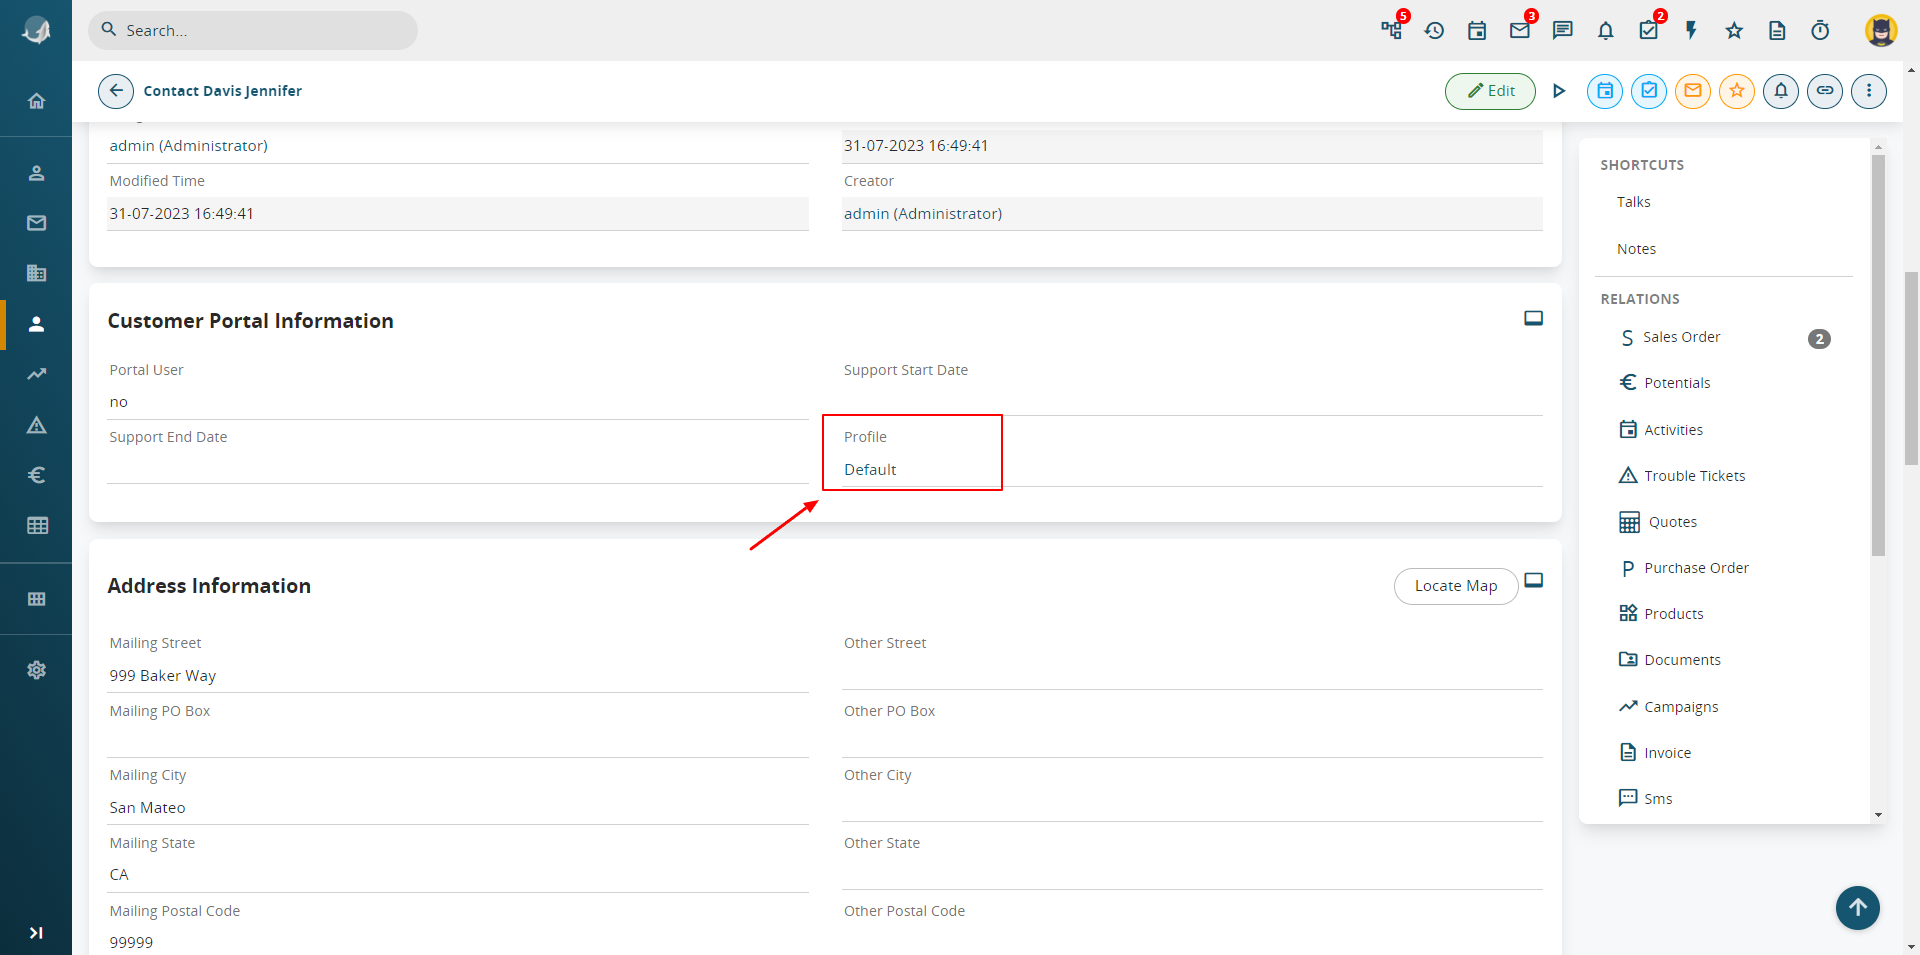
Only contacts present in vtenext can be enabled for the Customer Portal. Within the individual contact record, it's necessary to check the checkbox in the PORTAL USER section and input a start support date and an end date.
Upon enabling the checkbox, the system autonomously sends a message to the email address provided in the contact's email field, containing the credentials to access the Customer Portal. The specified dates determine the actual access period.
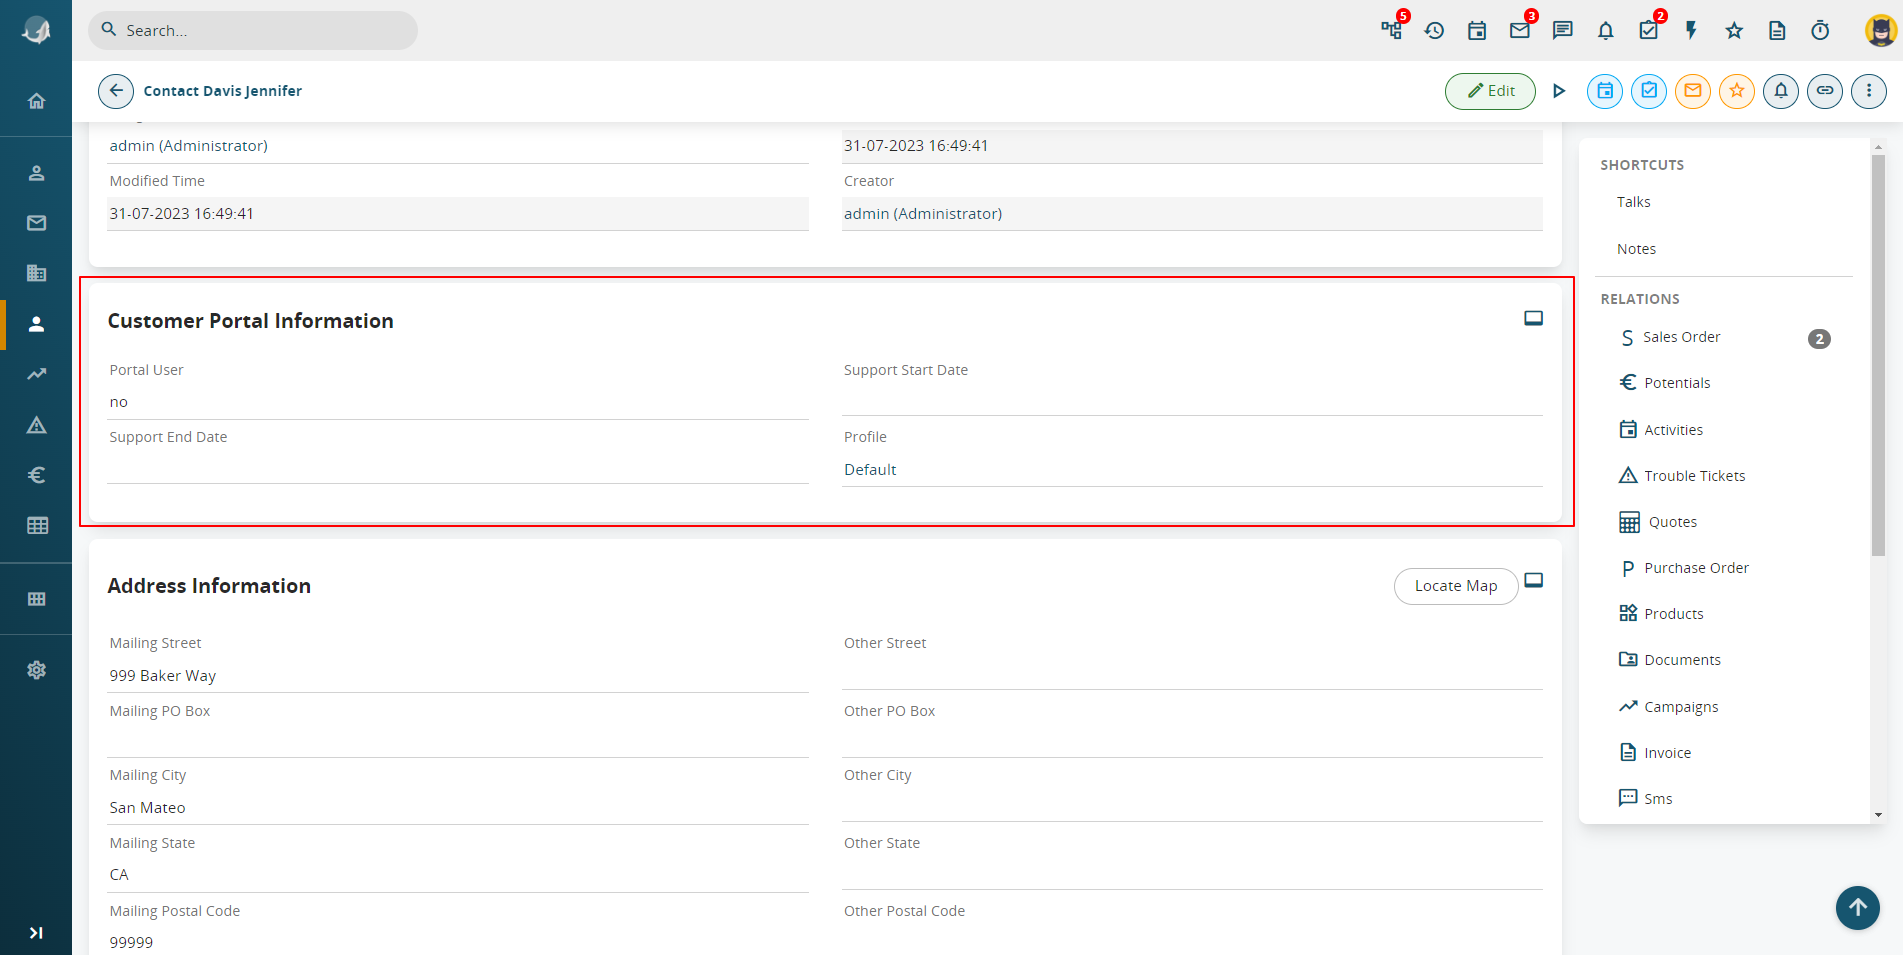
Additionally, it will be necessary to choose the Profile that the specific Portal User will have for their usage and viewing. The Profile determines how each portal user sees their data and how they can interact with the available modules.
18.3.2 Customer Portal Interface
INTERFACE VERSION 1
Once they have entered their login details, your customer can first enter a new request for assistance and then access the entities that you have related to his contact card (only enabled modules) from the menu items on the left. Support requests by default provide for an email to be sent to the contact's email address, with the summary and ID of the ticket. Any subsequent comments will always be notified by email. Once you have dealt with the contact request, you can close the ticket (if satisfied with the result).


INTERFACE VERSION 2
Based on the configurations made in Chapter 18.3 and 18.3.1, the Customer Portal can appear differently for each user who uses it. This is determined by the profile assigned to that specific user:
ATTENTION: the v2 portal is responsive.
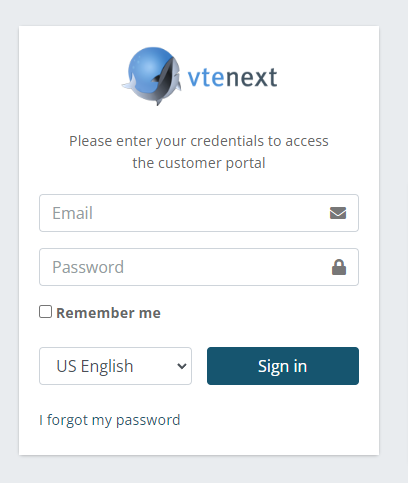
This image represents the Login page for the Customer Portal.

Upon the first access, the Customer Portal prompts you to change the password, so you can immediately set a different one from the system-generated default password.
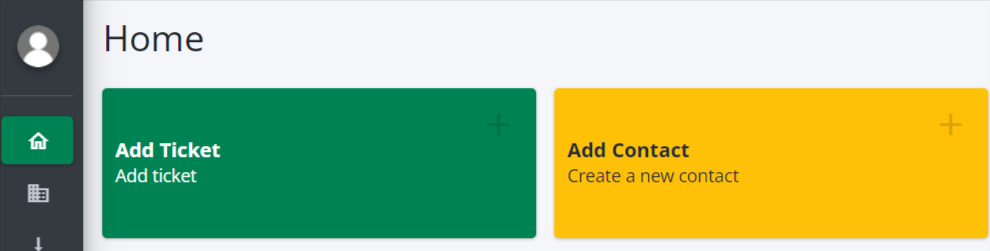
Here's how the portal interface looks once you've logged in:
- On the left, you will find all the modules that the user's profile allows them to access. For each module, the portal user can search among their records, create new records, and consult existing records;
- In the center, there are all the buttons that have been configured in the settings. These buttons facilitate a more user-friendly experience of the Portal;
- On the right, in addition to the LOGOUT button that allows quick logout from the platform, there is also a small button that activates full-screen mode;
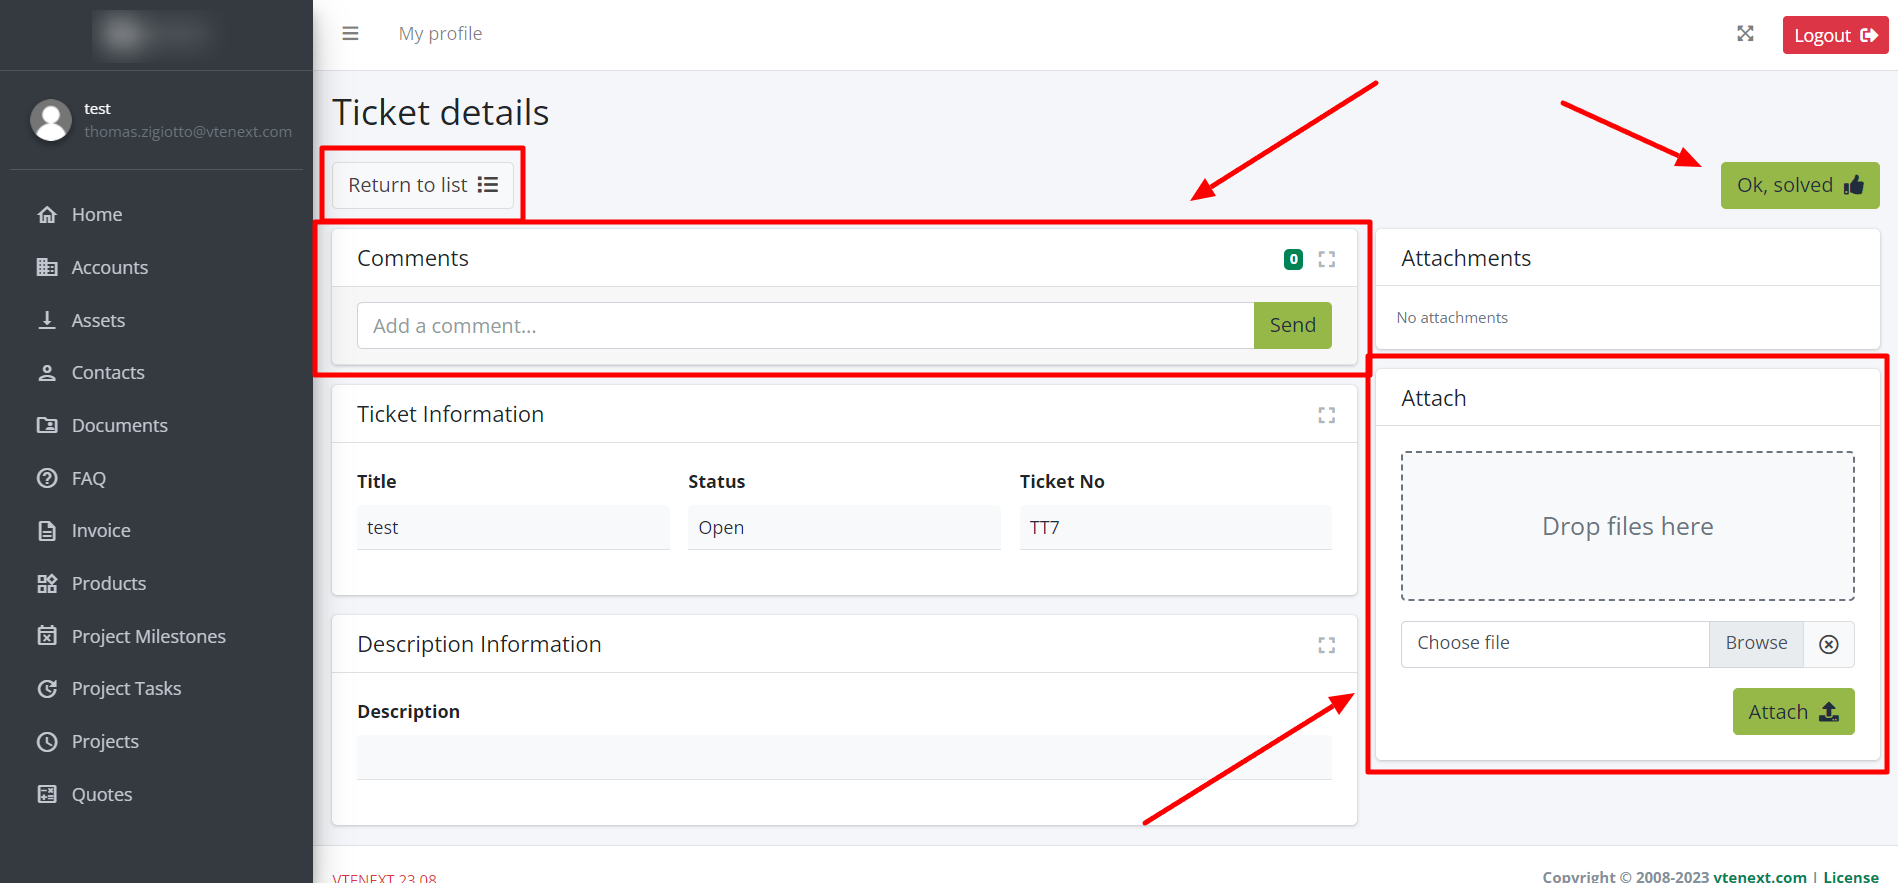
Here's the interface for viewing an existing ticket. Notice the 'RETURN TO LIST' button on the left, which allows you to go back to the list view of all the customer's reports. The comments section has been placed at the top for easy access, while the area for uploading new Documents is located on the right, with the option to drag and drop them. Using the 'OK RESOLVED' button, the portal user can autonomously close the ticket. This type of display is repeated for other modules as well, with different field types
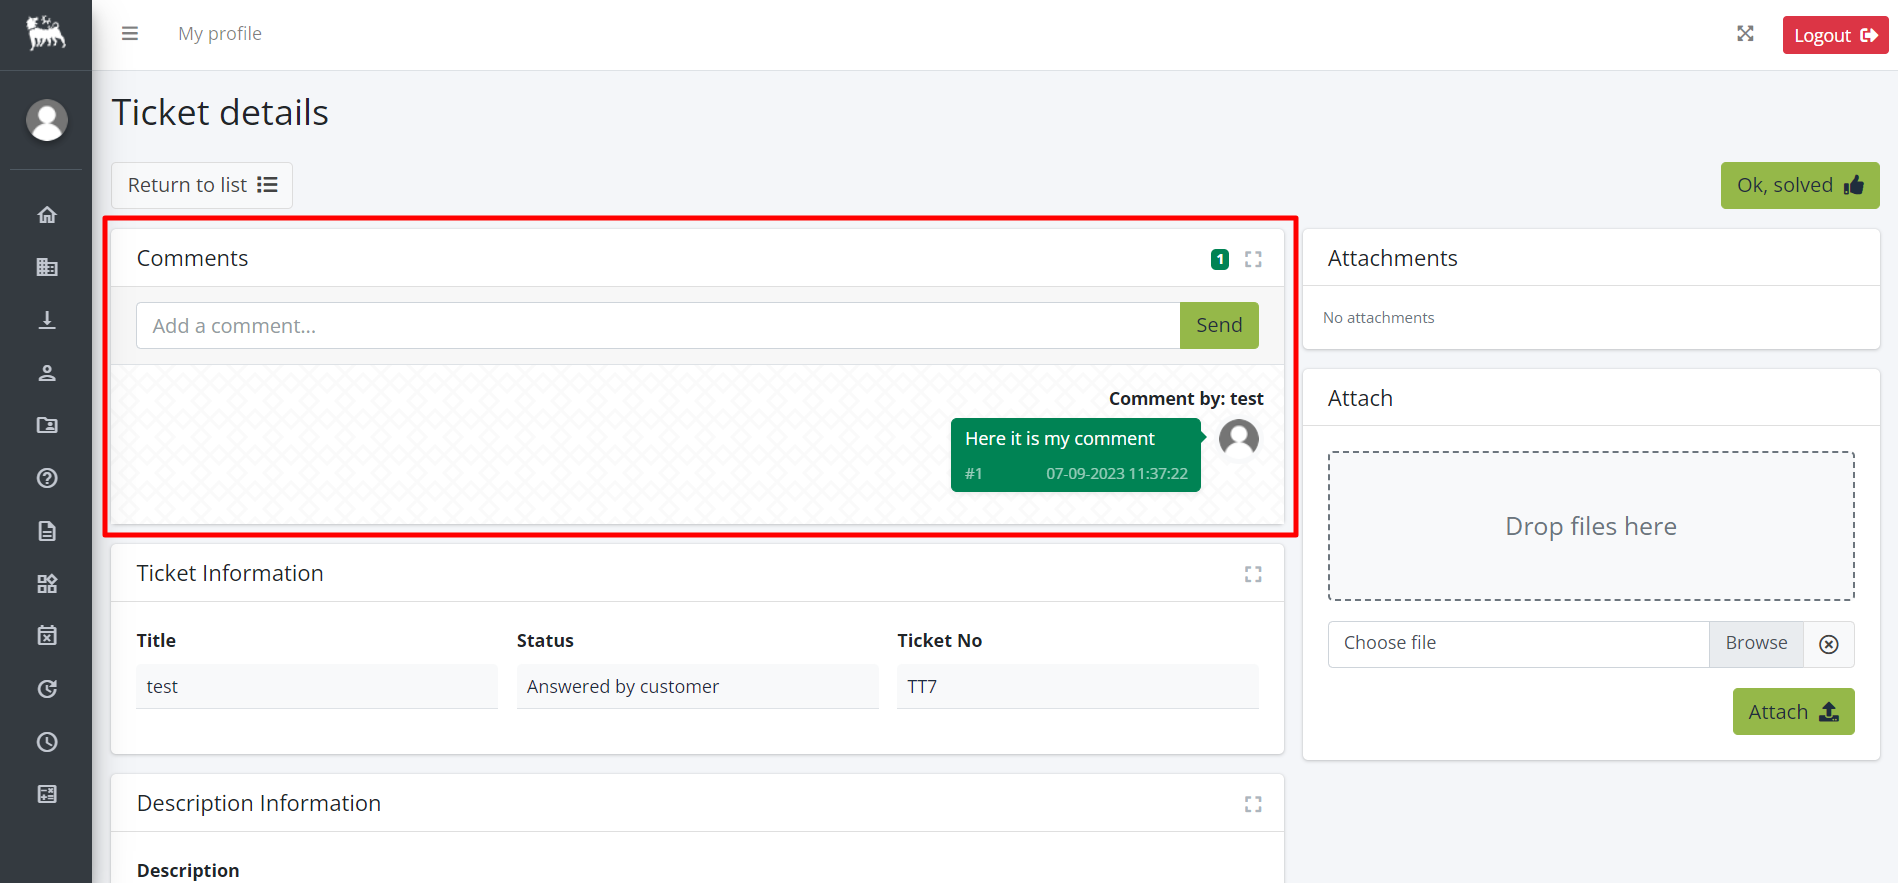
Here's how the Comments section looks. In the center, you have the back-and-forth communication between the Portal User and Customer Support. In the top-right corner, the small blue background number (3) represents the number of Comments
In this screen, you can see the list of all the tickets in the Portal. With this view, you can search based on any of the displayed fields, matching multiple columns together, or perform a general search using the box in the top-right corner. This display pattern is repeated for other modules, with field types changing accordingly
18.3.3 GDPR module settings
For privacy management, you can customise certain configurations, the templates proposed for communication through GDPR campaigns and the privacy policy of your company through the different features of the GDPR module.
![18.3.3 [1].png](https://usermanual.vtenext.com/uploads/images/gallery/2022-06/OZB18-3-3-1.png)
![18.3.3 [2].png](https://usermanual.vtenext.com/uploads/images/gallery/2022-06/MJp18-3-3-2.png)
18.4 Account Details
In Company Details you can specify the details of your company.
![18.4 [1].png](https://usermanual.vtenext.com/uploads/images/gallery/2022-06/LEg18-4-1.png)
This information can then be retrieved within the PDF Maker templates or Email or Newsletter for invoices, quotes, orders, etc. Make sure that the size of your company logo fits in the space available for it.
N.B.: The recommended size is 150x60 pixels. The logo must be uploaded in .png or .jpg format.
18.4.1 Logos and Backgrounds
In Settings, you will also find the section for 'Logos,' which allows us to change both the logos for the Access and Login pages, including their backgrounds, as well as the logo within the CRM, located at the top left.
As soon as you access this area, you will be able to:
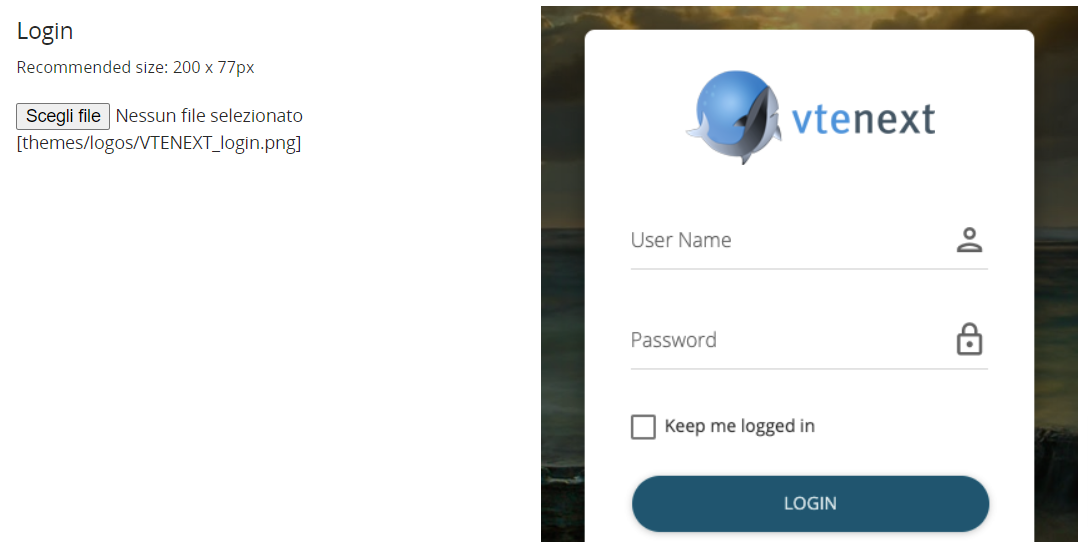
Change the Login Page Logo, recommended dimensions are 200 x 77 pixels.
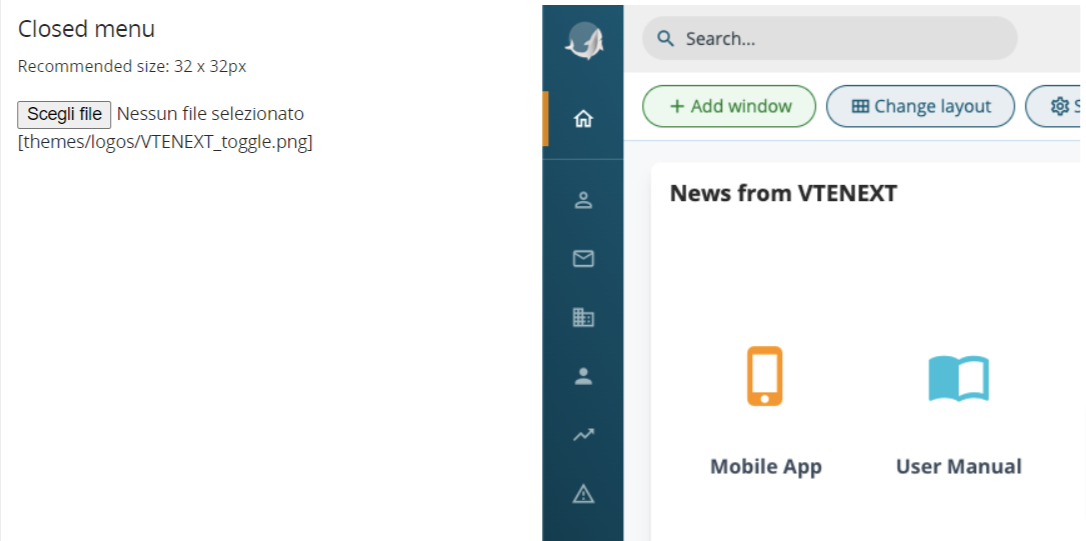
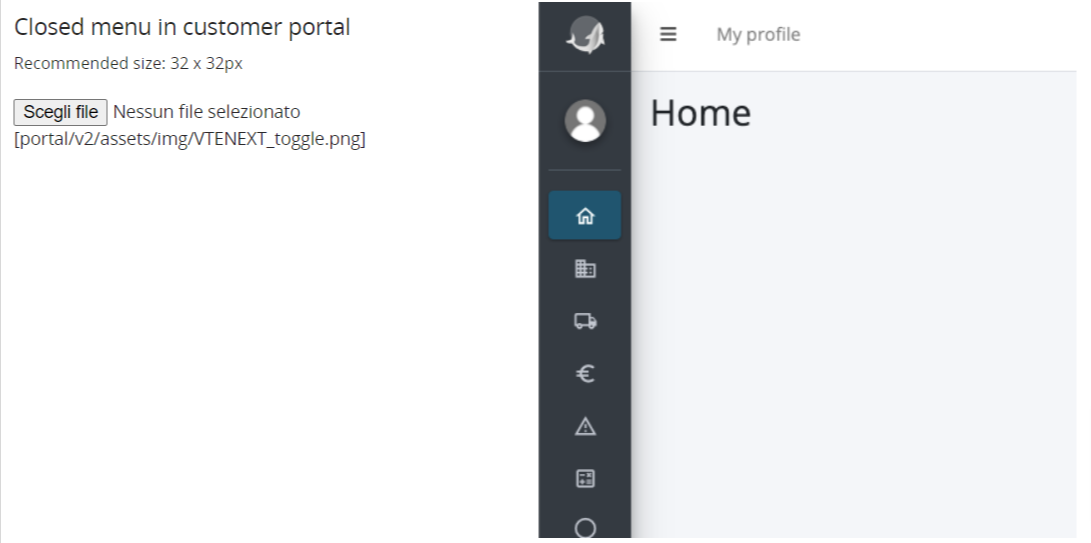
Change the Logo (LIGHT THEME) within the CRM when the left menu is in collapsed mode, recommended dimensions are 32 x 32 pixels.
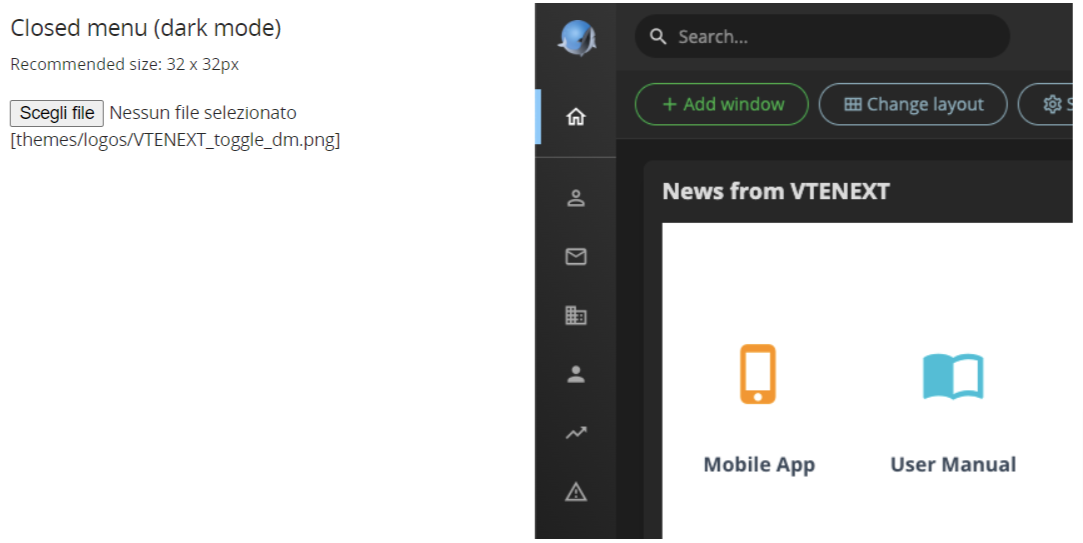
Change the Logo (DARK THEME) within the CRM when the left menu is in collapsed mode, recommended dimensions are 32 x 32 pixels.
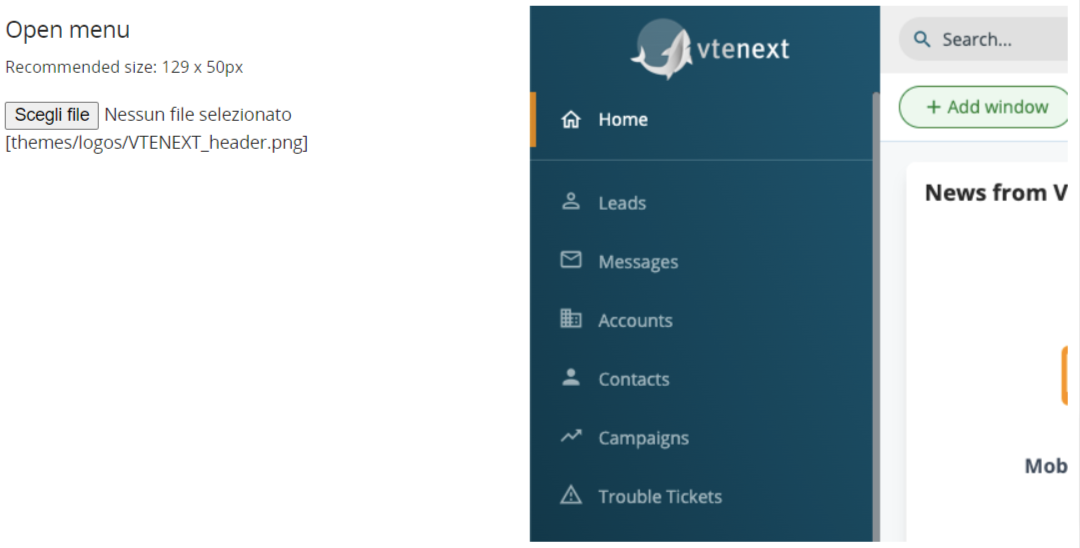
Change the Logo (LIGHT THEME) within the CRM when the left menu is in expanded mode, recommended dimensions are 129 x 50 pixels.

Change the Login Page Logo for the Customer Portal, recommended dimensions are 200 x 77 pixels.
Change the Logo within the Customer Portal, when the left menu is in collapsed mode, recommended dimensions are
32 x 32 pixels.
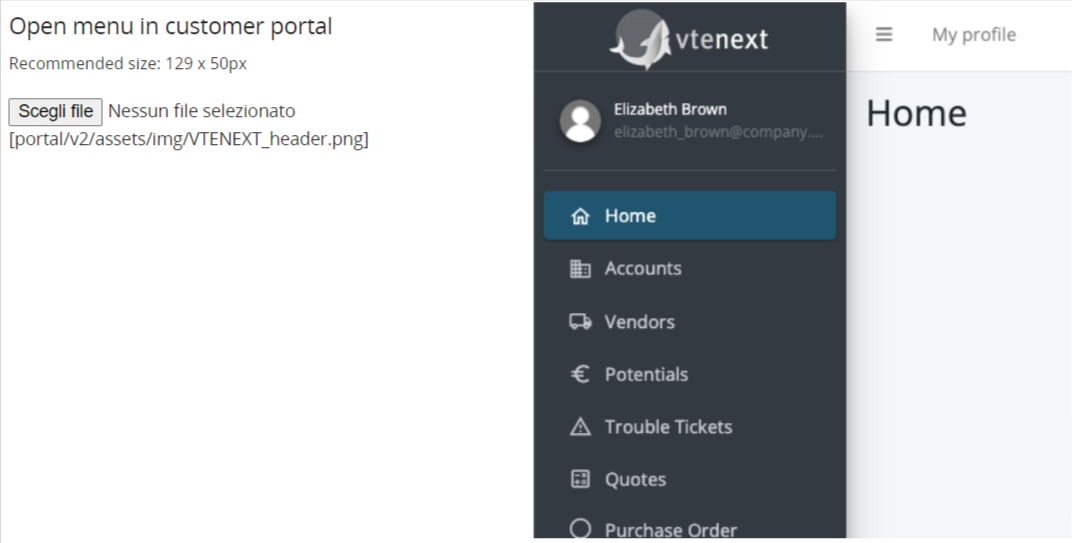
Change the Logo within the Customer Portal, when the left menu is in expanded mode, recommended dimensions are
129 x 50 pixels.

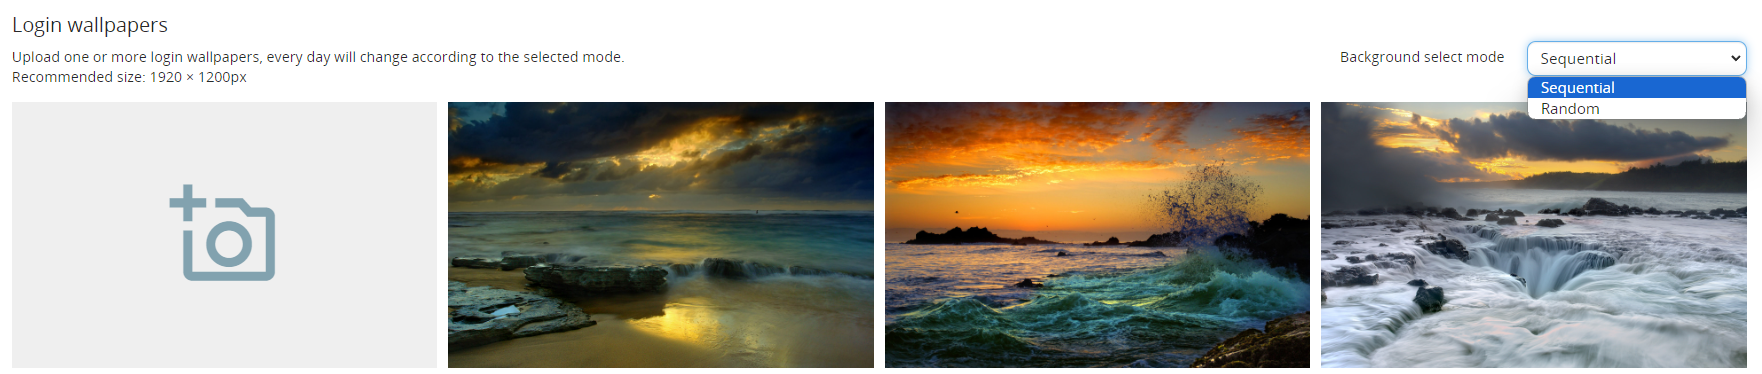
Furthermore, you can choose a background image for the Login Page, either from the system-provided options or uploaded directly by the admin user. Recommended size is 1920 x 1200 pixels. Changing the order of the image sequence can be done simply by dragging and dropping.
For the Login Page backgrounds, you can choose the background selection mode, which can be:
- Sequential: displays the images in the same order as they were uploaded.
- Random: displays the uploaded images in a completely random order within this area.
18.5 Server SoftPhone Settings
vtenext can be integrated with Asterisk, an open source telephone PBX application that allows you to route phone calls. Asterisk is a free implementation of PBX software that offers the same features as other proprietary systems at a much lower cost and with greater flexibility.
Today it is a benchmark within the sector; the full range of its contents and its reliability make it an ideal platform for a wide range of applications: it is used as a supporting element to create RTG/IP switchboards (PBXs able to use both traditional telephone lines and IP channels), Centrex systems (Virtual and centralised PBXs), Call Centre management applications and more.
Features and objectives:
- Make phone calls by clicking on phone numbers directly from vtenext.
- Receive notifications within vtenext with caller information when a call comes to the user. Notifications appear in the lower right corner of the screen.
- View call history in the PBX Manager Module (Call Manager Module)
- Associate the phone calls with the Contact/Account/Lead in the Activity History.
- Set user extensions through the User Preferences data sheet.
- Phone numbers format: you can save the number in vtenext in any format, with or without prefixes and also with SIP and PSTN if you use the character, to separate this prefix from the number itself.
Note: We do not recommend using special characters or hyphens in the phone/cell phone field.
Requirements and configuration:
- vtenext installed on the system
- Asterisk installed on the system.
- The server containing Asterisk and the one containing vtenext must be able to see each other online.
- You must have a valid Asterisk user extension and a VoIP phone configured with that extension.
When the Asterisk server is configured to function with vtenext, you must configure the vtenext settings to connect to Asterisk.
To enter Asterisk server settings, choose SoftPhone Server Settings:
![18.5 [1].png](https://usermanual.vtenext.com/uploads/images/gallery/2022-06/wgq18-5-1.png) Within User Preferences, point 6. Asterisk Configuration, you can associate the extension (internal) for the user:
Within User Preferences, point 6. Asterisk Configuration, you can associate the extension (internal) for the user:
![18.5 [2].png](https://usermanual.vtenext.com/uploads/images/gallery/2022-06/wGy18-5-2.png)
Receive Incoming Calls enables caller recognition for incoming calls. Once the incoming call has been answered, this option makes it possible to display a pop-up on the CRM screen, which appears at the bottom right with the caller's name and the link to access the details.
If the caller's number is not present in vtenext, the popup proposes the creation of a lead, a contact or an account.
Warning! SoftPhone Server Settings is only available in “on-premise” vtenext solutions.
Warning! In order for caller recognition to be active, it is also necessary to activate the relevant CRON on the vtenext installation server. See CRONJOB – Processes to be planned chapter.
18.6 LDAP
You can configure the LDAP server data in vtenext to synchronise user passwords.
For configuration from Settings, choose LDAP Server. Then fill in the LDAP server information as shown in the figure:
![18.6 [1].png](https://usermanual.vtenext.com/uploads/images/gallery/2022-06/PLL18-6-1.png)
When creating a user, you can search for the user once you have configured the LDAP server data:
The connection with LDAP allows:
![18.6 [2].png](https://usermanual.vtenext.com/uploads/images/gallery/2022-06/18-6-2.png)
- the pre-compilation of some user information (name, surname, email)
- the synchronisation of user access passwords
18.7 Currencies
It is possible to manage different types of currencies in the event there are users who have to draw up offers in a currency different from the one proposed by default by the system (Euro).
From Settings > Currencies you can view the currencies configured in the system and add new ones.
![18.7 [1].png](https://usermanual.vtenext.com/uploads/images/gallery/2022-06/SFW18-7-1.png)
The following information is required to create a new currency:
|
Currency Name |
The name of the currency you want to manage, for example "USA, Dollars (USD)" |
|
Conversion Rate |
The conversion rate must always be linked to the base currency of vtenext |
|
Status |
Active/Inactive |
![18.7 [2].png](https://usermanual.vtenext.com/uploads/images/gallery/2022-06/ZQy18-7-2.png)
Once you have configured the currency, you can:
- create quotes, sales orders, invoices, DDT, and purchase orders with the new currencies.
- associate the default currency to each user through the Preferences data sheet. This setting will allow the user to view all currency type fields (e.g., the Invoiced field in the Account registry) in the currency chosen by default, according to the conversion rate indicated in the settings.
18.8 Tax Calculation
You can set the tax items to be used on Quotes, Orders, Invoices and Delivery Notes.
![18.8 [1].png](https://usermanual.vtenext.com/uploads/images/gallery/2022-06/Cb218-8-1.png)
Negative tax values can also be managed, for example for the management of ENASARCO or withholding tax.
The calculation of taxes in Quotes, Orders, Invoices and Delivery Notes can be calculated per line or per group, depending on the setting chosen by the user when creating the document:
![18.8 [2].PNG](https://usermanual.vtenext.com/uploads/images/gallery/2022-06/UG418-8-2.PNG)
18.9 Proxy Server
If your company is using a proxy server to access the Internet, you can use the Proxy Server Settings menu, as shown in the figure.
![18.9 [1].png](https://usermanual.vtenext.com/uploads/images/gallery/2022-06/6f918-9-1.png)
18.10 Internal REST Webservice Methods
These Web services allow you to do HTTP requests to the specified endpoints (VTE_URL/restapi/v1/vtews/METHOD_NAME).
The requests need POST method, basic authentication (you must set ‘Authentication basic’ into the header which is calculated through a function based on username* and password*) and their relative parameters.
Each one method will give a JSON response with a status and the data or in case of error an error code and its relative message.
Notes:
• The “id” parameter is always specified as ‘moduleid* x recordid’ (ex: 2x313) moduleid*: You can get the the moduleid from webservice ‘describe’ method (idPrefix)
Requirements for Apache2:
• Activate apache rewrite module
• Set AllowOverride All into the virtualhost file to the vte path folder.
Example:
<Directory /var/www/html/VTE_FOLDER>
Options -Indexes +FollowSymLinks +MultiViews
AllowOverride All
Require all granted
</Directory>Requirements for Nginx + PHP FPM
As Nginx does not handle htaccess file, some special rewrites are needed in order to handle WS requests.
Below an example of nginx conf file:
server {
listen 80;
root /var/www/vtenext/;
autoindex off;
index index.php index.html index.htm;
# Make site accessible from http://localhost/
server_name localhost;
location / {
# First attempt to serve request as file, then
# as directory, then fall back to index.html
try_files $uri $uri/ index.html;
}
# pass the PHP scripts to FastCGI server listening on 127.0.0.1:9000
location ~ [^/]\.php(/|$) {
include snippets/fastcgi-php.conf;
# With php cgi alone:
#fastcgi_pass 127.0.0.1:9000;
# With php fpm:
fastcgi_pass unix:/var/run/php/php7.0-fpm.sock;
fastcgi_param SCRIPT_FILENAME $document_root$fastcgi_script_name;
}
# deny access to .htaccess files, if Apache's document root
# concurs with nginx's one
location ~ /\.ht {
deny all;
}
# special folder handling, since .htaccess files are not supported
# REST API
location /restapi/v1 {
rewrite ^(.+)/vtews/(.*)$ /restapi/v1/index.php/vtews/$2;
}
# Business Portal
location /portal/v2 {
rewrite ^\/portal\/v2\/(?!public)(.*)$ /portal/v2/public/$1;
}
# STORAGE
location /storage {
deny all;
location /storage/uploads_emails_ {
allow all;
}
location /storage/images_uploaded/ {
allow all;
}
location ~* /storage/logo/.+\.(jpg|jpeg|png|gif)$ {
allow all;
}
rewrite ^/storage/(.*)$ /getStorage.php?file=$1;
}
# PROTECTED FOLDERS
location /logs {
deny all;
}
location /plugins/dataimporter {
deny all;
}
location /cache/sys {
deny all;
}
location /cache/pdfmaker {
deny all;
}
location /cache/import {
deny all;
}
location /cache/session {
deny all;
}
location /cache/pdf {
deny all;
}
location /dataimport {
deny all;
}
location /modules/VteSync/VteSyncLib/storage {
deny all;
}
location /modules/Messages/src/attachment_tnef/plugins/attachment_tnef/class/ {
deny all;
}
# SMARTOPTIMIZER
# disabled by default, enable it if needed
#location ~* \.(gif|jpe?g|png|swf|css|js|html?|xml|txt|ico)$ {
# rewrite ^(.*)$ /smartoptimizer/?$1;
#}
}
Web Service Methods:
| Name | Description | Parameters | Response |
| create | Create a record of the specified module | elementType (String)element (Encoded) | Return all fields and values of the created record |
| Ex:Url: VTE_URL/restapi/v1/vtews/createParameters: {"elementType":"Accounts", "element":"{\"accountname\":\"account1\", \"assigned_user_id\":\"19x1\"}"} |
|||
| update | Update the specified record | id (String)columns (Encoded) | Return all fields and values of the updated record |
| Ex:Url: VTE_URL/restapi/v1/vtews/updateParameters: {"id":"3x310", "columns":"{\"accountname\":\"test fede postman\"}"} |
|||
| revise | Update the specified record. It’s different only for parameters, the result is the same | element (Encoded) | Return all fields and updated values |
| Ex:Url: VTE_URL//restapi/v1/vtews/reviseParameters: {"element":"{\"id\":\"3x27\",\"employees\":\"5\",\"industry\":\"Banking\"}"} | |||
| retrieve | Illustrate the fields of the specified record and their relative values | id (String) | Return all fields and values of the specified record |
| Ex:Url: VTE_URL/restapi/v1/vtews/retrieveParameters: {"id":"3x310"} |
|||
| retrieveinventory | Illustrate the fields of the specified inventory record, their relative values and the product block’s information | id (String) | Return all fields and values of the specified record and product’s block information |
| Ex:Url: VTE_URL//restapi/v1/vtews/retrieveinventoryParameters: {"id":"16x104"} | |||
| delete | Delete the specified record | id (String) | Return the request status (successful or not) |
| Ex:Url: VTE_URL//restapi/v1/vtews/deleteParameters: {"id":"3x306"} |
|||
| query | Execute a query and return the result’s rows | query (String) | Return all rows of the executed query |
| Ex:Url: VTE_URL//restapi/v1/vtews/queryParameters: {"query":"SELECT * FROM Accounts WHERE accountname like '%vte%';"} | |||
| listtypes | Describe each one module which contains uitype of the specified format | fieldTypeList (Encoded) | Return module information of the specified fieldtypes |
| Ex:Url: VTE_URL//restapi/v1/vtews/listtypesParameters:{"fieldTypeList":"[\"integer\",\"file\"]"} | |||
| describe | Describe the specified module and their relative fields | elementType (String) | Return all module information and its fields properties(no hidden fields) |
| Ex:Url: VTE_URL//restapi/v1/vtews/describeParameters: {"elementType":"Accounts"} | |||
| describeall | The describeall method is different from describe one because it shows hidden fields too | ElementType (Encoded) | Return all module information and its fields properties(hidden fields too) |
| Ex:Url: VTE_URL//restapi/v1/vtews/describeallParameters: {"elementType":"Accounts"} | |||
| getlabels | Return all labels and translated ones of the specified module,language | username (String)language (String)module (String) | Return labels and translated ones of the specified module, language |
| Ex:Url: VTE_URL//restapi/v1/vtews/getlabelsParameters: {"username":"admin", "language":"it_it", "module":"Accounts"} | |||
| getlangs | Return all languages installed into the CRM | Return all CRM languages | |
| loginpwd | Return user webservice access key if username and password are valid | username (String)password (String) | Return user webservice access key |
Ex:Url: VTE_URL//restapi/v1/vtews/loginpwdParameters: {"username":"admin","password":"123456789"} |
|||
| getmenulist | Return all modules information (visibility, tabid, name, sequence, ...) | Return modules information and properties | |
| oldoquery | Return records that contain the searched value into specified module’s fields | module (String)search_fields (Encoded)search_value (String) | Return some record basic information where searched value is contained into the specified module’s fields |
| Ex:Url: VTE_URL//restapi/v1/vtews/oldoqueryParameters: {"module":"Accounts", "search_fields":"[\"accountname\", \"website\"]", "search_value":"vtenext"} | |||
Is possibile to register a new custom method with this SDK call:
SDK::setRestOperation($rest_name, $handler_path, $function_name, $parameters);
$rest_name: method name called by REST webservice
$handler_path: file path where the funtion is defined
$function_name: defined function name
$parameters: associative array with parameterName and parameterType
Example
SDK::setRestOperation('check_exists','modules/SDK/examples/RestApi/CustomRestApi.php','vtws_check_exists', array('id'=>'string'));