14 PDF Maker
- 14 PDF Maker
- 14.1 Create a PDF template
- 14.1.1 Insert images in PDF
- 14.1.2 Insert tables in PDF
- 14.2 Products block within PDF templates
- 14.3 Barcodes
- 14.5 Export to PDF
- 14.6 Products Images in PDF
- 14.7 Custom Functions in PDF
- 14.8 PDF file name
- 14.9 Export/Import PDF Template
14 PDF Maker
The PDF Maker module allows you to create PDF documents that are generated with the rationale of "printing and merging" the data contained in vtenext and in an export model.
![14 [1].png](https://usermanual.vtenext.com/uploads/images/gallery/2022-06/RPL14-1.png)
14.1 Create a PDF template
To create a new template for the PDF Maker module, click on the ADD TEMPLATE key or button on the right and indicate the name for the template and the reference module: the template will be available for the indicated module only. This means that we will find it in the PDF Print options only if it is located in that module. For example, if I create a template to print invitations to contacts, I will only find it inside a registry in the OTHER menu at the top right.
![14.1 [1].png](https://usermanual.vtenext.com/uploads/images/gallery/2022-06/cO814-1-1.png)
The content of the template is organised into three different sections:
- Body: template body
- Header: repeats on every page
- Page footer: repeats on every page
![14.1 [2].png](https://usermanual.vtenext.com/uploads/images/gallery/2022-06/A3V14-1-2.png)
Within the three areas you can enter:
- Fixed text parts
- Variables: they are replaced with vtenext data when exporting the document in PDF format
Fixed text
It is possible to insert fixed text inside the Header, Body or Footer by positioning the cursor and starting to write the content:
![14.1 [3].png](https://usermanual.vtenext.com/uploads/images/gallery/2022-06/7u514-1-3.png)
Variables
To insert variables, position the cursor at the point where you want to insert the variable, choose the type of variable to insert from the MODULE item above, and then click on Insert in the template:
![14.1 [4].png](https://usermanual.vtenext.com/uploads/images/gallery/2022-06/pbg14-1-4.png)
The system inserts a variable string that will be replaced with the value assumed by the field when the PDF is generated:
![14.1 [5].png](https://usermanual.vtenext.com/uploads/images/gallery/2022-06/CFZ14-1-5.png)
Once the text has been entered, you can format fixed and variable text using the editor tools.
All the fields on the main module (Module) to which the template has been associated are available in the linked drop-down menu.
It is possible to insert variables on modules related to the main module (Module) also. There are two types of variables:
- modules connected in a 1-to-1 relation with the main module: there is a field within the registry that refers to another vtenext module. Example: in the Quotes form, you will find the Company Name field linking to a company registry.
![14.1 [6].png](https://usermanual.vtenext.com/uploads/images/gallery/2022-06/fLs14-1-6.png)
- blocks connected with modules with 1-to-many relations with the main module: the module item is in the relations menu. Example: in the Quotes module, you can find the Sales Orders block, with numerous orders inside (you can generate a number of orders from one Quote).
![14.1 [7].png](https://usermanual.vtenext.com/uploads/images/gallery/2022-06/kfa14-1-7.png)
Variables in 1-to-1 relations
- a) position the cursor at the point where you want to insert the variable
- b) choose the related module
- c) choose a field to insert
- d) click on Insert in the template
Variables in 1-to-many relations (connected blocks)
- a) move the cursor to the point where you want to insert the variable
- b) click on the Insert button in the template under Related Blocks:
You can now select one of the already existing blocks (check that they refer to the module for which we are building the template) or start the wizard procedure to create a new block through Create Related Blocks:
![14.1 [8].png](https://usermanual.vtenext.com/uploads/images/gallery/2022-06/RBs14-1-8.png)
Click on CREATE A RELATED BLOCK
![14.1 [9].png](https://usermanual.vtenext.com/uploads/images/gallery/2022-06/vnI14-1-9.png)
![14.1 [10].png](https://usermanual.vtenext.com/uploads/images/gallery/2022-06/JL114-1-10.png)
Choose the fields you want to display (from the left-hand column, using the cursor, shift the fields into the right-hand column)
![14.1 [11].png](https://usermanual.vtenext.com/uploads/images/gallery/2022-06/f2k14-1-11.png)
If appropriate, set a filter to display the desired data (e.g.: all Sales Orders in Approved status)
![14.1 [12].png](https://usermanual.vtenext.com/uploads/images/gallery/2022-06/1wE14-1-12.png)
Refine the table as desired and name the block
![14.1 [13].png](https://usermanual.vtenext.com/uploads/images/gallery/2022-06/NaE14-1-13.png)
Once the configuration is finished, the result will be like the one shown in the figure
N.B.: the "Table Fields" can be inserted in a PDF using the linked blocks.
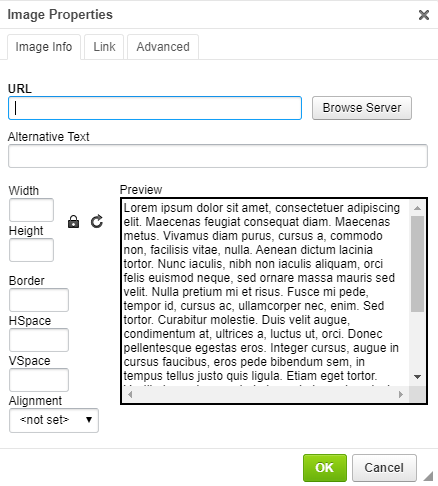
14.1.1 Insert images in PDF
Press the Image button in the editor:
![14.1.1 [1].png](https://usermanual.vtenext.com/uploads/images/gallery/2022-06/nB714-1-1-1.png)
|
URL |
insert the URL of the image (if already present); if the URL is not already present, click Search on the server to upload an image |
|
Width / Height |
to change the image size in the template |
|
|
blocks height-width proportions |
|
|
resets the original size |
|
Border |
enter a numerical value in pixels corresponding to the thickness of the border for the image (blank for no border) |
|
HSpace / VSpace |
enter the coordinates for positioning the image with respect to the text base line (blank to set the default position, in line with the text) |
|
Alignment |
define the alignment of the text |


14.1.2 Insert tables in PDF
To create a table in the PDF Maker, simply use the appropriate function in the editor, which is highlighted in the following image:
![14.1.2 [1].png](https://usermanual.vtenext.com/uploads/images/gallery/2022-06/vnn14-1-2-1.png)
When the "table creation" icon is clicked, a dialog window will open that will allow us to enter the values of the specific table we want to create:
![14.1.2 [2].png](https://usermanual.vtenext.com/uploads/images/gallery/2022-06/jbI14-1-2-2.png)
|
Border dimension |
put zero if you do not want to display the border |
|
Cells spacing |
space between cells |
|
Cells Padding |
space between the border of the cell and the beginning of the content (text) |
When you click OK, the table appears in the BODY tab of the editor.
![14.1.2 [3].png](https://usermanual.vtenext.com/uploads/images/gallery/2022-06/CqQ14-1-2-3.png)
Right-click to change the properties of the table. You can also set properties solely for the cell where the cursor is located.
14.2 Products block within PDF templates
For the Quotes, Sales Orders, Purchase Orders and Invoices modules, you can insert the product block into the templates. There are predefined product block models that can be quickly inserted into the template.
To insert a product block model, select the block type and press Insert in the template button. The table corresponding to the product block will be created. You can customise the block later as if you were working on a table. It is possible to create custom tables for the offer rows; the basic structure must be as follows:
- a row with the header of all the columns;
- a line with the #PRODUCTBLOC_START# tag that marks the beginning of the portion that must be repeated for each line on offer;
- a line with line variables;
- a line with the #PRODUCTBLOC_END# tag that marks the end of the portion that must be repeated for each line on offer.
|
intestazione_1 |
intestazione_2 |
intestazione_3 |
intestazione_4 |
…. |
intestazione_n |
|
#PRODUCTBLOC_START# |
|||||
|
variabile_1 |
variabile_2 |
variabile_3 |
variabile_4 |
variabile_n |
|
|
#PRODUCTBLOC_END# |
The start and end-block tags are found as variables in:
![14.2 [1].PNG](https://usermanual.vtenext.com/uploads/images/gallery/2022-06/9Pc14-2-1.PNG)
It is possible to insert the variables of the product block through the functions available in the Product Block tab:
![14.2 [2].png](https://usermanual.vtenext.com/uploads/images/gallery/2022-06/Wdp14-2-2.png)
14.3 Barcodes
It is possible to insert barcodes inside the template through the "Other information" Tab:
![14.3 [1].png](https://usermanual.vtenext.com/uploads/images/gallery/2022-06/zZi14-3-1.png)
It is possible to insert a fixed number or a variable within this string. The number or variable will be inserted instead of "YOURCODE":
Example of a result:

14.5 Export to PDF
To generate a PDF, access the main module registry (e.g.: Quotes) and click the Other button in the top right-hand corner. The PDF Maker panel for exporting the document will appear. Choose the desired model and press Export in PDF.
![14.5 [1].png](https://usermanual.vtenext.com/uploads/images/gallery/2022-06/jTH14-5-1.png)
At this point the system will generate the document.
You can generate a PDF merge for multiple entities: select the entities from the list view and press PDF Export:
![14.5 [2].PNG](https://usermanual.vtenext.com/uploads/images/gallery/2022-06/7NR14-5-2.PNG)
Then choose the template for massive export:
![14.5 [3].PNG](https://usermanual.vtenext.com/uploads/images/gallery/2022-06/0Rb14-5-3.PNG)
14.6 Products Images in PDF
In the product block models, you can also add thumbnails related to the images uploaded in the product sheet.
![14.6 [1].png](https://usermanual.vtenext.com/uploads/images/gallery/2022-06/14-6-1.png)
Warning! The appropriate variable for the product image must be inserted in the template.
![14.6 [2(1)].png](https://usermanual.vtenext.com/uploads/images/gallery/2022-06/14-6-21.png)
![14.6 [2(2)].png](https://usermanual.vtenext.com/uploads/images/gallery/2022-06/14-6-22.png)
The $PRODUCTS_IMAGENAME$ variable must be inserted between the #PRODUCTBLOC_START# and #PRODUCTBLOC_END# tags.
In the PDF generation phase, click first on the Product Images item, choosing for each product the image to be inserted in the PDF (we can select the images that we intend to display in the PDF). It is possible to define the dimensions of the image in terms of width and height; if one of these two values is left empty, the system will resize the image proportionally to the specified size. If the two values are left blank, the image will be printed with its original size.
Warning! It is not possible to associate images to services.
![14.6 [3].png](https://usermanual.vtenext.com/uploads/images/gallery/2022-06/14-6-3.png)
Select Product Images and Export to PDF
![14.6 [4].png](https://usermanual.vtenext.com/uploads/images/gallery/2022-06/14-6-4.png)
Product Images selection window
![14.6 [5].png](https://usermanual.vtenext.com/uploads/images/gallery/2022-06/14-6-5.png)
PDF exported with Product Images detail
14.7 Custom Functions in PDF
It is possible to define custom functions for data processing within the PDF Maker. To add a custom function, place the PHP file with the function code inside the modules/PDFMaker/function folder; the file will be included automatically.
The its4you.php function is inside the folder. Do not modify this file; any changes will be overwritten the next time you update the application.
To add a custom function to your template, go to the More information tab and choose the desired function and then click Insert in the template:
![14.7 [1].PNG](https://usermanual.vtenext.com/uploads/images/gallery/2022-06/Ipx14-7-1.PNG)
Guide example: if-else:
If you choose the if-else function, the following text will be added to the template: [CUSTOMFUNCTION|its4you_if|param1|comparator|param2|return1|return2|- CUSTOMFUNCTION]
Replace:
param1 – control range
comparator – benchmark, possible values: = , != (different), >, < param2 – benchmark
return1 – value to be displayed if the condition is verified
return2 – value to be displayed if the condition is NOT verified
Let's see how to configure the function so that the final discount in the Quote will be printed only if not invalid:
[CUSTOMFUNCTION|its4you_if|$TOTALDISCOUNT$|!=|0,00|Discount$TOTALDISCOUNT$ €||CUSTOMFUNCTION]
14.8 PDF file name
In the PDF Maker Settings tab, you can define the name of the output PDF file. This option allows you to define the file name according to your needs. It is possible to combine text strings, module variables and standard variables such as the template name, current date, etc.
![14.8 [1].png](https://usermanual.vtenext.com/uploads/images/gallery/2022-06/c9v14-8-1.png)
14.9 Export/Import PDF Template
You can import or export the templates of the PDF Maker module in XML format using the appropriate buttons.
This feature is only available to CRM administrator users.
![14.9 [1].PNG](https://usermanual.vtenext.com/uploads/images/gallery/2022-06/12b14-9-1.PNG)