15 Other Functions
- 15.1 RSS
- 15.2 My Sites
- 15.3 License and number of users
- 15.4 Synchronizations
- 15.5 Recycle Bin
- 15.6 Push Notifications
- 15.7 Synchronization with Zapier
- 15.8 Employees Module
- 15.9 Klondike Co-Pilot (Your Personal Assistant)
15.1 RSS
It is possible to provide constant and real time updates to all vtenext users through the RSS Feed links available on the web or specially created by the company. vtenext provides the option of choosing from a list of RSS feeds available for users and viewing every available article on the display.
Each RSS feed has a unique address similar to the web URL searched for on the Internet. To see an RSS feed, you must enter this address in vtenext.
![15.1 [1].png](https://usermanual.vtenext.com/uploads/images/gallery/2022-06/zAn15-1-1.png)
15.2 My Sites
This area allows you to view websites of interest directly on vtenext. The system is also very useful for connecting to shipment tracking or communicating with web-based suppliers.
![15.2 [1].png](https://usermanual.vtenext.com/uploads/images/gallery/2022-06/15-2-1.png)
15.3 License and number of users
The Copyright and the License icon is found on the bottom right-hand corner of all vtenext pages; by clicking on it, you can access a popup containing all the terms of use of the program’s Business license.
Since the 19.10 version, and only for On-Site installations, you can see how many users are available for that particular license and how many of them have been activated.
The expiration date of the installed license is also available in the same popup.
![15.3 [2].png](https://usermanual.vtenext.com/uploads/images/gallery/2022-06/J5I15-3-2.png) License on Cloud
License on Cloud
![15.3 [2].png](https://usermanual.vtenext.com/uploads/images/gallery/2022-06/15-3-2.png)
License On-Site
15.4 Synchronizations
From vtenext settings the crm synchronization function can be accessed with other applications. The synchronizable platforms available are as follows:
- VTENEXT
-
Hubspot
- Jira
- Magento
- PrestaShop
- Salesforce
- Shopify
- SuiteCRM
- vtiger
- WooCommerce
- Zapier
- ZenDesk
The synchronizable modules are different and based on the chosen platform. The following diagram summarizes which modules can be synchronized.
| VTENEXT
|
Note: This function is essential when linking two vtenext installations, for instance, to synchronize the TEST environment with the PRODUCTION environment. Warning: The vte authentication password for synchronization with another vte must be defined using its access key and NOT the user’s login password |
|
Hubspot (only cloud version) |
*record deletions from Hubspot to vtenext are not covered
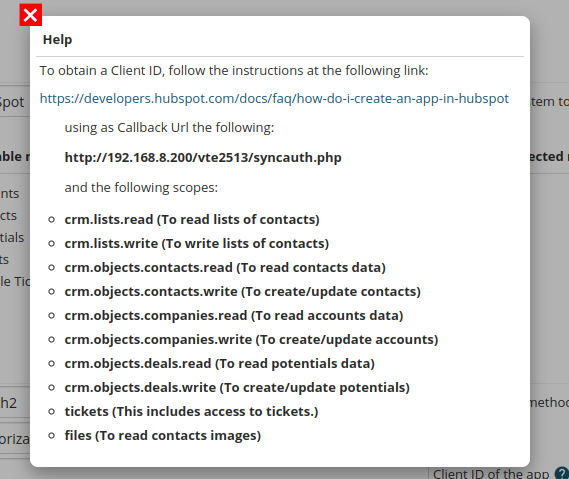
N.B. The "scopes". The crm indicates to insert the following "scopes":
ATTENTION: it is essential to select exactly those indicated, otherwise the synchronization will not work! |
|
Salesforce |
|
|
SuiteCRM (only on-premise version) |
*images are not imported |
|
Jira (only cloud version) |
|
|
vtiger (only cloud version) |
*images are not imported |
|
Magento (only on-premise version 2.4.0) |
*images are not imported |
|
Prestashop (only on-premise version 1.7.6.7) |
*images are not imported |
|
Shopify (only cloud version 2019-20) |
*images are not imported
ATTENTION: To synchronize Shopify products, it is necessary to also set up the Configurable Products module in the configuration. |
|
WooCommerce (only on-premise version 4.4.0) |
*images are not imported |
| Zapier
|
PAY ATTENTION: To properly set up the Zapier connector, it's essential to carefully read the ZAPIER MANUAL provided in Chapter 15.7. FOTO |
|
Zendesk |
|
When accessing the configuration page from SETTINGS > BUSINESS PROCESS MANAGER > SYNCHRONIZATIONS the synchronization to be set and towards which system can be configured with a few simple steps. The page is identical to the page shown in the image below.
![15.4 [1].png](https://usermanual.vtenext.com/uploads/images/gallery/2022-06/tCK15-4-1.png)
View of the synchronizations configuration page
Configuration
- The first required action is to choose the External system in the available drop-down menu
- Specify the Instance address to which you wish to connect (where required)
- Now choose the required synchronization modules from those available and take them to the Selected modules column by means of the right-pointing arrow
- Once the operation in step 3 has been completed, a popup will open in which you can select the synchronization method for each of the selected modules (see example in the image below)
![15.4 [2].PNG](data:image/PNG;base64,iVBORw0KGgoAAAANSUhEUgAAA2MAAAFwCAYAAAA17KMVAAAAAXNSR0IArs4c6QAAAARnQU1BAACxjwv8YQUAAAAJcEhZcwAAEnQAABJ0Ad5mH3gAAI8aSURBVHhe7b17dBzlneedeWd3Z/fsnN39Y9czs7Pa43OWzcD0vEHj+GgRvNaEyCyyg4yRcUQsYmTHMkjGbWEZJIMkCwlb2LRx+9IKbrCMoWPoOM0YE3Ihl2GSQAKESwhJSAwJkHANEMLVQNDvrW9VPd1Pl56uvkvd0vd7zudIXfd6qvrXv289l/rYsWPHhBBCCCGEEELI1EIzRgghhBBCCCHTAM0YIYQQQgghhEwDNGOEEEIIIYQQMg3QjBFCCCGEEELINEAzRgghhBBCCCHTAM0YIYQQQgghhEwDNGOEEEIIIYQQMg3QjJFZxZ133kkIIYQQ4osphyCkHNCMkVmBKdASQgghhPhhyikIKSU0Y6QqMQVMQgghhJDpxJSzEOIHzRipGkxBjxBCCCGkEjHlMoR4oRkjFY8pwBFCCCGEVAOm3IYQBc0YqUhMwYwQQgghpJox5TxkdkMzRqaUbx46JPdt2yYPX355Rn68aVPRfGffPmMQJIQQQgiZTkz5EZm90IyRKeUHo6Py3MKF8vZf/3VZeayzU44ePUoIIYQQUnJMJitfTHkSmX3QjJEp5YdDQ/LyvHkiH/tYWfn5ypXG4Jkr//zP/0wIIYSQGYbpN7+UmExXLphyJjI7oBkjU8pUmbGfff7zxiBMCCGEEFIoJgOWCZPp8sOUN5GZD80YmVJoxgghhBAyUzCZMBMm82XClDuRmQ3NGJlSMpqxf/fvRP73/xb5L/9l8jwv/+bfiPzN34j8z/9pnm/xxIUXyh133EEIIYQQUjJMhkzHZMR0TAbMiyl/IjMXmjEypUwyY3/2ZyL/9t+KLFwosmOHyAUXiPz1X6cZqzRgxE49VWTjRpG+PpG/+zvjciYzlkgkCCGEEEJywptHmDAZMmAyYgqTAfNiyqHIzIRmjJQdFVTwd5IZ+3/+H5H/+l9F/uVfRN55R+TRR0UuuUTkv/23NHNl8+d/LhIIiOzfL/L734v87nci27c7tWqeZX/a1iZf+cpXCCGEEEJKRjajlo8x082XCW8+RWYmNGOk7OiBZZIZg8H6H//DMWNvvSUyMSHy05+KBIMi//k/p5aDaftf/0vk1ltFXn/dWe4PfxCJx401abmasSNHjhBCCCFklmPKEXLBz5zlYsr0HMmEKa8iMwuaMVJ29GCTsc/YySeLfOtbIu++K7Z++UuRK65war1gxGC4rPXlzTcdIwbj9qUvOQbNuy0LmLEvf/nLhBBCCCElIVfz5mfKvGZMoRswL6bciswcaMZIWUEQQfBRASWjGYPh+od/EGthkRMnRD76SOTXvxaxlpf//t8do6Zqzl57TWTPHpGPf9xZz7sti8dXrLADZzwez8rtt99OCCGEkFmKKTfw4jVmCj9zlsmQZTJlKlcyYcqxyMyAZoyUDRVAcjJjAAN5YB6aIr73nsiHH4q8+qrTbBE1ZjBizz3nDN7xt3/rDOZh2o4FzJgp4OrcdttthBBCCCE2plxBJ5tBy2TMMpkyGjICspox3Hzj4+PyxS9+Ufbu3UtITuzZsydJOBxO/n+0s1OeOeUUo4Gy+Yu/EKmrcwbpUAbsT39ymi4+84xIV5dTU5ahRkzxvcWLZceOHTbbt28nhBBCiEUoFLJ/p2+66Sb50pe+RAwcPnw4jUxmLZMxM5kyvV8ZDRnRyWjGcONEo1ErJ94vhw4dMt6chGRCD2q33HJL8v/v9vbK85/4hNFAJflP/8kZURGjJer69rdF/s//yWrEwIMtLfb96wX3c77ccMMNhBBCyIwAD9f37dtnm7KdO3faD9xvvfXWGU0sFssbPY/R0XOdTObMz5TlYshMJkxhytlJdWM0Y7ih8NQEJgz/qxtKv4kI8UONLgRw/6j/v9/fLy/W1hoNlA0G7Fi0SKybTeSPf3RdmKvf/Ebk6qudvmKmdXVGR92VKIqiKIqiyqOJiQl577335LnnnpPvfe97k0yZXy1ZIYbMlLeT6maSGcNNAiOGJwm4iXCDmG4GQjLhDSgIOirY3Dc4KC/94z+aDRSM2Gc+4wziASOGgTx+9Stn1EQ1iuLTT4tcc43I3/+9eRsKmjGKoiiKoqZQ77//vrz++uvyzW9+M2nKkEubTBkNGVFMMmNoyoUaMdwovOikEPSAARBwVGC5f8sW8wAeMGKLF4t89auO8cIAHj/+schll4mgWaN1P9rTIYyyeO21/oaMZoyiKIqiqGkQasv+9V//1TZkqoVZIYbMm08pTLkXqV7SzBhuGPSRwQ3Di00KwRswgKoZM5qxP/szZxTFhQudPmEYvh5G7MEHRdatE/kP/8EZNbGhwTFqb7zhRDoM5hEKifzd36WbMAXNGEVRFEVR0yQYsm984xtJQ5ap2aLq3mEyYzRks4M0M4ZOnBhsARdfn05ILpiCBUCwyWjG/vzPRf7qr0TuvVfknXecpokPPCCydq1jxHSDtWCB8+JnZciefVZkZMTZhr4coBmjKIqiKGoa9dprr9kDfaiRGGnIiIk0M4YRdnCj8AKTQvAGCYVeMzapzxhqxTDU/b/+q8jrrztNEy+8UOTf//t0c6U44wynySIMGczY9deL/OVfTl6OZoyiKIqiqGkU+pDde++9GQ2ZMmNsrji7STNjGLgDNwQvMCkEb5AACCIqwBjNmOLkk0XGxpx+Y3jXmHe+Dt5DtnOnyNatZiMGaMYoiqIoippmPfPMM8kh8ZUhgxnLZsh0MwZMOZYpFyPVxyQzhhtAn0ZILpiCBEAAUUEFfzOaMbw7DCYM/cO887ygWSKWBehzZlqGZoyiKIqiqGkWhr1X7y0rxpCZcixgyslIdTHJjOGC69MIyQVTgFABJCczVmpoxiiKoiiKmmZhIA/14mmTIWPtGKEZI0VjCg5ABQ8VVGjGKIqiKIqabcIro3RDpsxYvobMlGsBU25GqoeCzdjY4DpZNzhmnFex3H5A9u09IHHP9Pj4Ptk3Hk+bRnLHFBiAHkBoxiiKoiiKmo26+eabMxoyb3NFmrHZR/nN2PiobJi03B2y58pNsv1WfVr5uXFkvazr3yN3pE2/UYaD6+SqvXdo0yqXo2MDsu7SARn7Z/P8Qrl52wYZGDPPy4YpMOjBA6ig8vVoVH6webM80tFh8/CaNfLjL3zB5qHVq20eaG+3+dFFF8kPV650BvbIl0cecUMgRVEURVHU9OngwYNJMwZUc0W/2jGTGQOmnMuUm5HqoexmLLZj0+Tl7hyTgUun2Izdud82XZMMx/5hWQ9zc6dn+qwiJts3GcomB0xBAeiBQwUUPOlBgFHBBoEHAQiBCE+IEJzwxAiBCkELT5Lw7juKoiiKoqhqFXKZbLVjbKo4eynSjIXlwI6rZON66/91Fus3ycDuW9xl4rJnYL0zPYllwPaOppZX2GbNMQRDY7fJvqFNlkFy5q2/fEj2fUnb952Yf0Vy/rpL18vGvlHZ/2XMv0P2DVjTNlwjB9TyCtQoBYdlv8d04TzWX70/adauuH5yc0X7XLUatdsiQ3KFtaza/xVWOdys11RhX+ssg6c+u9jGdNN2idmflQE6KjeHrDK0z+cq2XNH+jqT8G4bny+/Tm6+abtctdEtb+uYNg3ukVu0cz2iz0e5brhCrgpb1yq+RwbUuSjUMcZvlOsGr5AN6nrhXK/ZL0fUvq1zuBbXLHJY9mrXpOuyPtn6xXgycNjB5I6YhPt7pKvzErn44ovl4s510rvjkP2+DQSim/cMycauDlm9erWsWn2JBPt3yg1W8LrpppvcUEZRFEVRFFV9Qi6jDNktt9wyqXbM++4xmLFMtWMmIwZUvkeqj+LMmJV8X7HtRonbRuSoxPcOyIZ1G+SamzzLeWvGbt0um2DM0mrGHHOy7tKNtkm4A0bin+Ny4zbLwAQHZN8RZ7mbRzda5mO73OyalqNHYnLgiwfkNnsbmczYHbKn3zIgIzdq0yzu2CNXWQZjOOp8tpsxXrHT3Za+TKrW6Lbrr7CO5wrZfpNr2u64xTIZG+xjSpqfPMzYxo2bZONAWGIow1xq50xmDEbpilG58Xbn2h29fZ8MbLC2PXqzs4x9DhtkYK9lkPD5zjvkyKEx2Z8s/zEZsLYxqWbszgOyc9Qy3O527xi3rptVFqkmnY4ZW2dt+6pdhyRx1AoIRxMyvs0yXeuulPBXlBmLyY7LO+WSjSMyduuX7UBz281flOjNbq3Y/iG5dM3F0jN6kxyyAtTBG7ZK9xfa5eIrwzRjFEVRFEVVtZQZ05sr5lI7ZjJjgGZsZlGcGeselZvTpjsGY9OOWPpy+ZixKz19uixDcE13apvYnl2TpS+TDZiRdRtl9Ob06XfsvkrWbdTO4eZR2bjuCtl5m7bMXmuZZI2a07/sitBtyfk2drNLzaTkYcbs/ediwhRGM7ZBRse1ZSzS9mWXd/p5pZPBjE0Cff10U+uasSt3S0ILCEeP7pP+ri7p3+easS9ukXWd1vW+JdVEEUHHqRVDOayRjr7r7eCEJ0Z4cnTj1etl5UVBGYne6IYyiqIoiqKo6tONN96YsXZMmTFVO0YzNvsozowN7PNML96MbbxWNXNMoW/jjhuGZINlfDZsHpWxW3MbdOO20BWaCVLcJjuvSD/Wycfv1qgp82c8bnc53aTkYcY2bHNrr3LFaMYGZJ/H0Hn3hXNdd+kmGQofcGsydXI1Y97r6ZixjaOH0gKCbsYQRA6NbpRLNmyTcSuwIMCovmKOGQtLb8ca6dme6iuGJ0fj4c3SsbJDrtgZdUMZRVEURVFU9SkajWasHfNrqphPvzFvvkaqhxIP4FG8GUs3Rw7ebRz90phsH3T7lW28SrbfdCRt+XSc7U6qzcpQW2QbN1Vb5mnGmNmMeY4xDzNmOl9fMpgx/31Z3BmXm8PXyOaN1nGiT9nQPrktaeAymLH4jbJzaLNs9PYp85ixTdtvTQsIRjN22VY56DFjdhPF23bKpi98Qb5gsWrVKpv29nZZuXKlfP7zHXL5dTe4oYyiKIqiKKr6dMMNNyRrx5QZQ+2YX1PFfPuNpeVvpKqoODOWrWYsjTtukX1DGy1z4dMETzU9jKdPt/ue9e6c9M4xp0mj0+zPbqKoN8X80nXWcW8sac3YlJmxJEclHt0umzeskw3J5oYGM3bnjTKMZfp3yoHbUjWQ6ddishlzAkUGM2YFF68ZO3w4ZJuxnh2pJop4coSAhSdJCGAURVEURVHVKuQyeu1YpoE8dDOmDJnJjAHdiIFk/kaqjoozY5MG0PAZ5dDhZhntztzEDu/PmvxuMWcd87vFnKaJG7bdaP9NDoJhY6230VDL5g7ykdzeDUO2QUpvOugYtuk3Yw52f7nkfIMZ87tGeZox9BnruqRHtt/i7S8GM3aTDK//gqzdHE41UbQCFZ4gIXB98YtfdEMZRVEURVFU9Qm5DHIa5Dbepoq6GSum31gqVyPVRtnNmG0KNljGBDVTd1o3EAyKO+DFpmtvtkf3O/rP2Keb6GNkPm00xbGrN1rrD8l+d/TEm/dul7FDR5xRAe1anms00+AZTdE1cpNMl/1uMZ9h5DF/0ybZdOnkQT+OWOZnw6WbZDTqjkxoGk3RNWc4P/s87rxDbgm7w9dPhxmLj8nO8AG5TZ0vjvnK9bLeun6OSXWOZcPgPonb5W5dj/hOuWLd+tQIjPbIlu7w9Tmasav2OgHkjjtgYi+xyuhaid7m1IrddotltPY7baVvDl0hHas7ZMPwHrlp/KD95Gh/ZJdsG94u1+MFzlWm1157TYaGhuS0006zGRkZkbffftudSyn96U9/kl/84hfywAMPyOuvv+5Oza73339fHnvssbzXoyiKoqjp0JiVy5iaKpay35ieA5Lqouxm7Nidt8jOfstQoa8RmhO67ww7st8yUeutadb09SMYIMNd99r9ae8R875n7OZQeh+m9Rs3y+gNqtbMY8ZgqgzvFtt/tWVE/EZkdE1cppql2yLoe5V6p9ek94xZOO/1co8Ty6CP1tjQtJmx4Ss2JMvUeMy37kwdb69TO4n3qalrtG79RrkqdLPcErK2m6cZs9s9f/mg7Lpqo3RecrGsXbtWOi7ulMuvHbefCCEQ3XT9kFzWtVouuugiu7/YhSvbpSM4JNdHIm4oK06/+93vZPv27bJ48WI55ZRTpKWlxX5S9fLLL7tLlEYTExP2drEPBT5/97vftY1ZxDofmBBK5L333pMtW7bYZfTwww+7U7PrD3/4g3R0dOS9XibhB09dKzQdoSiKoqhSCr/93qaKpe43lsznSNVRsBkrPQWak7LgHMuk5ogkDW8gAHqgUMFDBRMEFr2/GAIPAhCeDJn6i8HEIIAVq5/+9KeydOnSZMKtaGhokMcff9xdqjSCwRgYGLC3/41vfEM+/PBDOXHiRNKMHThwgGbMVSWYsXfffVeuvPJKmT9/vpxxxhnS3d0tb775pjuXoiiKoooXchnVVDFTvzEO4jF7oRkzYXjf2FRh1ziiJspAZRhVB1MQAHqgyMeMZeovVqwZ++Mf/2gn2EjcBwcH5ZVXXrFrr5577jm72QDml1KlrrWZafrggw/spomoqUTTzek2Y08++aQ0NTXJNddcI9ddd51t0J944gl3bvUJTTh37Nhhlw/KiaIoipp+6WYsU7+xUpgxYMrZSGVDM+bljptl++X6SIPEhCkAAD1QmMwYgowyY2gj7TVjqDlCoEJ1PgLXvn373FBWmJCso9ajtbVVfvvb37pTJwtJ7Fe/+lW7iSSSfDRnRNB844037PmqFgdJ7tNPP53sE9bY2Gg/2cJ81Kjs2rXL3h+2AVAj9+tf/1ruuusu+zMMoBJMCYyivrxaB/NMRsW7HczD57vvvlseeeQRufDCC9MScX0fOFYk6r///e/teV6pbeE63nPPPXLuuefa66Hm6IUXXpAf/ehH9vaxzPr16+1tK2UrPwjlhuuA+QAPGLymylROKD+UiTqvTGYsn3NVQvt8bAc1lz/84Q/tdXEfwrArofYM1xhNW7Eszg0/pLjmWO5nP/uZbNq0yb4fsP6ll15qT4Nyva+855LpOuO79+1vfztZjvp1wLbwncExYJ4C6+IccMyqmS7Wx3ePfRkpiqLKL+QyiM+q3xhyHa8Z00dUBDRjs4dJZgwXW582dUy3GXNGFESCuLF/Z2owDmLEFACAHih0M4agosxYaiTFyWYM1ffKjCERLdaM4TiQfA4PD9vNBU1Cs0EERj2BVSC5R+2ZSpqR6P7f//t/Jy0H86JMgz49kxlDzVBbW1vasgDbR/vxd955J68kHfuBAcH/aCaJ40Wtz2c+8xl7mo46J6/Uts4880zbWOjrmKZhOzCguZSfag6IaZ2dnfLNb35Trr766uRy6hwLNWP5niuEY8d8ZdTRfxB9FmFw1DooR9Saebe7detW22hh/6rcFar5az73Faapc4EyXWfTdVDHa7r/wI9//GPbTHqnr1692q4ppiiKosor5DKI55kG8dDNWK4jKppyMGDK2Uhlk2bG4Npx4fVphJgwBQCgB4pczBiMh9eMoeYAAQvV+nhAUIwQ/JB46sm9V88//7ysWLHCTqJ/8IMfyEcffWRPu+SSS+x1UWuiJ809PT12jQuScdSE6dvPVGvjTa6/9rWv2Z9hnFA78eKLL9r7U8Yg3yQdJg5li/UgGIE9e/bY8zASEz5j3vXXX29Pu+++++zldKltqXLAOuj3hmkA1xJlgxoyLKOMZi7lh1ox1LTBMB0/ftzeHwwEjASWUedYiBkr5FwhNEfEMStjhfVwPTFN9SVUy+C4sS/UhMFYYsRMNLm89tpr7X3gL6bj3NW9ke99pcoA8rvOMLLYFmrfcFzqOkDesoL0faDpC84BRhRNdfUaQIqiKKo8Qi6DnAa5DXIcrxkzjahIMzZ7SDNjaMaCG4IXk2TD++VX6IEiXzOG+6/UZgwdZJGEIslGsm0ShklHkqsnsBASYZUQ6wktzk3JmzTnasaQiOOz14whcYcByDdJRy0HDIKSqvXBPBPYjldqW3o5qOQepgJGAsJ+sD9lAnIpP9O2TefoPT8omxkr5FxhQvBDaFoe4MEUltFNM45XF8ykMlYPPfSQOzWlfO8rVQZQLtdZlUM2MwbBVKsaNTQ1xXdQn09RFEWVTyYzhpyHZoyANDOGmwA3CS8myYb3yw/0IAGymTFUy5fbjCnTozc98yrfpFlP7r1Js0qQMc0vuX711VftJrGYppOt+Zp+TJBK0r3Hrh+HCZNBMW3LlNyrbU+VGfOuq/av1tM/mzCdq14rZwLbwzvM1PHgOL1mzHscXhVjxvRlIG8ZQGr/uZgx6K233rL7FqKZKLaFWthnnnnGnUtRFEWVS7mYMeRE+ZgxYMrFTDkbqWzSzBjATYIbwjudEB1TAPAGCa8ZUyMpes0Y+rN4zRhqJkphxvS+WWizjYQUQhKMgQ+QsOrNyWDesjUn05N7r3lQCTKm6cm1dzlsD+eM4dQx3TvghL4/lAVq9fRj8kvSIX19lDc+Q9gOllOfdZm2lYsZy6X8nn32WTn//PPtZnXo3wX5NVPEuigLHCfuA/241P7VeoWcK5oh4nhhflGzpoRayt7eXttEYdvKUHmbKf7qV7+y7yX0RcR+9WaKaP6H/mf53lf5XmfvdYDU9ULtF7aD7eG4fv7zn9vL4/hxjps3b7a3p8qdoiiKKp+UGUOc95ox5EAmM6aPqEgzNrOZZMZw4XHT4GbwziNEYQoA3iCRjxnL9I6xYs0Ykk8k+EiokXzqqCQWy5gGOAAwC2gWpifNpTBj2KapZgbTYBJxTKZmdEjs8TebGYMefPDBSYNLAD1512Xalkru/UxALuWHPlQwm5iGvmPoz6XKCaiyUiZJTQcwrHoNk9q/vl4+56qXLe4zfNalmraiHxpGPezr60vbJsC9gHsCfcFM9xaOK5dyKeY6e68DpAygvi2MEqnuXR08pMDDCoqiKKq8ymTG1LvGaMZmN5PMGMDNgBuHNWQkE6YAoAcIFTgwoMJ0mjEICe+jjz6aHH4ciSiGKcf2VWKLGgSMiLhq1Sp7PoYARzKu+ueU2owhCVYvh/aiamtgBNDXDccMo4GaPfUC61zMGM4btVAYxVA/bzSJMNUWmbaVixmDspUfpJ8PDBmazOFewPKqrLAdTFfD6qMsMFAFyl4dg9q/vl4+54rmh2p91E55hf5fmKdGG8Q5hMPhpNlD8z70wcKxorbr/vvvT5439o332aFmDMq3XPK5zqbrgHLA0PcoPyyPIfVRK4bvohpeX5Wr/moCiqIoqnwq1owhlzIZMlMuZsrZSGVjNGMANwBuGIAbBDcDLzJReL/8QA8Q2cyYeuFzNjOGxHWmSTXPQ1Oy3/zmN+5Up1bD+54wiqIoiqKqW8hlcjFjyI1oxmYfGc2YAi4dNwxuIDh7QgACi5fdu3engdoEgKf+aJa2c+dOCYVCct1119lN1rZv3y6jo6Oybds2+11O6H+Dd0+hFgS1RldddZXdRGymSTUl080YhklHLQ1qRrz9mCiKoiiKql4hR8rVjCHvphmbXWQ1Y4SYMAUAPUCooGGqGUOgUTVjaEam14zhZYiqZgzNtRDAZpr0/lNe0IQMzfQoiqIoipoZQi6DnEaZMeQ6uhlDLkQzNnuhGSMFYQoAeoCgGfMX+gnh3NCHCCYMNWL9/f12vyf0+6EoiqIoamaIZoz4QTNGCsIUAPQAQTNGURRFURRFM0b8oRkjBWEKAHqAyMeM4T0bmcwY+p5RFEVRFEVVq5DLZDJj6sXPNGOzF5oxUhCmAKAHiGLM2P79+2nGKIqiKIqaEdLNGHIcmjGiQzNGCsIUAPQAQTNGURRFURRFM0b8oRkjBWEKAHqAoBmjKIqiKIqiGSP+0IyRgjAFAD1A0IxRFEVRFEXRjBF/aMZIQZgCgB4gaMYoiqIoiqJoxog/NGOkIEwBQA8QNGMURVEURVE0Y8QfmjFSEKYAoAcImjGKoiiKoiiaMeIPzRgpCFMA0APEVJmxxx9/nBBCCCFk2skkmjHiB80YKQhTANADxFSZMYqiKIqiqEoWzRjxg2aMFIQpAOgBgmaMoiiKoiiKZoz4QzNGCsIUAPQAQTNGURRFURRFM0b8oRkjBWEKAHqAoBmjKIqiKIqiGSP+0IyRgjAFAD1A0IxRFEVRFEXRjBF/aMZIQZgCgB4gaMYoiqIoiqJoxog/NGOkIEwBQA8QNGMURVEURVE0Y8QfmjFSEKYAoAcImjGKoiiKoiiaMeIPzRgpCFMA0AMEzRhFURRFURTNGPGHZowUhCkA6AGCZoyiqHz0xz/+UZ577jl58skn5ac//ak8/vjjhBAyJSDmIPYgBiEWlVo0Y8QPmjFSEKYAoAcImjGKonLRu+++K08//bQcP35cXnjhBXn11Vfl9ddfJ4SQKQWxBzEIsQgxCbGpVKIZI37QjJGCMAUAPUDQjFEUlU14Ao0n0i+++KK88cYb8tZbb8k777wj7733nrz//vuEEDIlIOYg9iAGIRYhJiE2laqWjGaM+EEzRgrCFAD0AEEzRlGUn/DUGcnOK6+8Im+//bZ88MEH8tFHH8nExAQhhEwLiEGIRYhJiE2IUaWoIaMZI37QjJGCMAUAPUDQjFEU5Sc0A8LTZzyRViaMoihquqVMGWITYhRiVbGiGSN+0IyRgjAFAD1A0IxRFJVJaPqDfhl4+oykh6IoqtKE2IQYhVhVbHNFmjHiB80YKQhTANADBM0YRVGZhBHLXnrpJfnTn/7kTqEoiqo8IUYhViFmFSOaMeIHzRgpCFMA0AMEzRhFUZmEIaTffPNNNk2kKKqihRiFWIWYVYxoxogfNGOkIEwBQA8QNGMURWUSOsWfOHGCZoyiqIoWYhRiFWJWMaIZI37QjJGCMAUAPUDQjFEUlUl4yeqHH37ofqIoiqpcIVYhZhUjmjHiB80YKQhTANADBM0YRVGZhMSG/cUoiqoGIVbRjJFyQjNGCsIUAPQAQTNGUVQm0YxRFFUtohkj5YZmjBSEKQDoAYJmjKKoTCrGjP3hD3+Qjo4OOeWUU5I0NjbKZZddJg8++GBJ+qHh/UJbtmyRu+66y51CUdRsFc0YKTc0Y6QgTAFADxCVZsbGxsYmJW/9/f32CEkcRICiplalMGMPP/ywO0Xkgw8+kO9+97vS3NwsDz30kDs1N+E4EHN+/etfu1NoxiiKSolmjJQbmjFSEKYAoAeISjRjQAnJ1g9+8ANpbW21j1MlhkjohoaG7PlTqenaL0VNh0ptxiBloBA/8tHrr78umzZtohmjKMoomjFSbmjGSEGYAoAeICrdjCk9/fTT0tbWVvSwtfnolVdekcHBQTuppKjZqHKasXg87k5xhqX+0Y9+JKtWrbJrxBcvXiw33XSTvP322/Z81IzjgYxea444obaFeIUYhfUwr7Ozc0pjBUVRpRHyCbwvzKRf/OIX9vxMohkj5YZmjBSEKQDoAaJazBiC7J49e+z9IXFDgockTNVQYR30Q8G5oGnjwMCAPQ/r3X333clEDsneI488ktbk8Ze//KX09fXJ/Pnz5bTTTpPt27fLT37yEzn33HOTid/SpUvtJ/Le/WL799xzTzKJxH6++tWvyvvvv2/Px3I7duyw19u1a5e9fYD/33jjDXsZiqpUldqMqWaKwWBQXnzxRXeqyHe+8x37O/TEE0/Y38233nrLjivDw8Py7rvv2svg+7dmzRpjzRiaPWK7OFaA2Nbe3i4vvPCCuyRFUZUufOfxO3reeedNMmTf/va3pa6uzp6P/03Cd59mjJQTmjFSEKYAoAeIajFjEJoiKSNkMmNIvnAOMEIfffSRndTBiGE51HLhM56wI6FTb+l/5pln5KKLLkpL5FRNGPaBZFKvGfPuF9vHU3hsB9tXtWm33HKL/Vkli9jOr371K3vaH//4R7n66qvl4MGD9meKqlSVwoypBxoKPCh5/vnn3aXETrq6u7vthxq60CzxkksukR/+8If2Zz8zhocb+nFmqpWjKKpyhViAB5+IE7ohUyYNbN68OWPNGc0YKTfVZ8YORyUUCllEJW6aXwSJQxFn23tjkjDMr0hUeeR5zMWeqykA6AFiJpmxrVu3JmukIARs9DHB03YlmB8cL84Dwl/UuJkSzmxmTCWRKllUgtGDQXv55ZeTySLKWhcGL9CPn6IqUeWoGfv+978vK1assGuyIZPJgrBfmCz1XfUzY97vF80YRVWnvIbs0ksvTRox5CB+mvlmLCGxvcirQxI5lDDMrwAKzHXLR6rMoodN8zMRlyjOw7NeUWYsEeqQQE2N1IAVoyU3RyA+2i611vZrL3K3v7vL2V9Nl4Q9yxZLbLDZ2faSAYkZ5lckqjzyPOZiz9UUAPQAMZPMmLcT/7PPPivnn39+MpDrYPkTJ07YzaAydf7PZsawfcz3JpFYHs2wYMpUsuhNCr3HT1GVqFKbMSX0F1P3fyYzBunxwM+Meb/DNGMUVb3SDRlA88RMTRN1VYMZu/36oLQuqHXyusB8aVzeJQO7Y8b8bTIxGViCvLpGmgdzXWeKKTDXLR+pMuvabZqfibB04Tw86xVhxhISWhOwNhiQQAAbbpPRuGm54kiasbVhxw0XZMZyu9FoxnJHN2EKPUBUixnzPiX3mhms403I0BSqq6vLmORBxZqxTNunGaNmisplxvCdU98t9VADg/To8n7nacYoavZIGTKAgTtyUaWbsa/s6ZIGOy/2sCqUYy0SzVj+VIoZS4SkHRusD8rw5iZ7w21b4+ZlSwnNmCQORyW8OyqxI9ZnmrGclMmM/exnP5MLL7xQjh8/bn/2mhmTGUPH/yuvvFK+973vuVMmC+dTaDNFjPTW29sr9913nzvXkamZojcp9B4/RVWiymHG0FQY/SXx3cF3SH1PvX3G0P8S5iuXPmM0YxQ18wRDBnJVZZux22XbCie/rV97ndxu5WLHEjEJBZulY0euTQ7LY8Yi3Q3WNptl4JB5fjZKkeuWlKMJGR8LSeRg3DK5FWLGEjva7Y3Vd0fk2IE+acLGlw+7TRXjMrzc2VnT5nFtvYgE6zE94BzE0ZiEB7uktXG+29yxVhqWd8lwNHUDTTINJjMWC8tAZ6s01qGmzpo3r0FaO4cligtoL5MqtI4d4zK8qsmubQvUNUn71tTxGQ3K4bAElzfYy6vjGz2otuvF3U/AOrbDEek5zz2vedZ+BqOSOBKVAXffqEZuCYbTm3bGQta+GmW+XdMYkPmL26Rnl25wExLuxM2N+aBB2i70HrO60OlfgHCns476opnNWFzCwVZpmOcsW7ugVbpG9es3LiGrnNV8lF/bxuvk1q9UnxlDIMY5YWRDDJahBrzwmhmTGYPwjjIkZRjmGoN6IFg/99xztlGC1AAe9957b3I+5uGvSv4w2iL2i/ne/WIUuFwG8PAmhd7tUFQlqtRmDNvCd7KlpcX+7iih/xi+h4899pj9PTONpqgG9EA8wDLof0YzRlGUEuJL5ZqxW1P57fVOLpbK2VIkogPSvtjNSa38s2lFn0SSrdnMZsx/HRCX6GC7NGvNI+1lrOONbm518+YUqW1nyzVzyXU9uN6geXBcxkfapcnetpVHnxe08vFjEt8VlBbXI9Se3S4Dms+YdB6TPITFwQFpsXNzh4CVn7ed5fyvTFUyr+4Mp9Y7NCDN9jrKs5TUjMVl1Hbi9RIcw+dx6bMPqlWG3Q5pyqzVnN0n42q9saDUY1p9UCL2tPHkDZBGoENCCWednMyYVUjOyaYTWKOqaFM3WsMC/QKDBvccDPs6EpJ2rfCTBNpk1NhhT+0nILXzXGOYxDRNq008NJx2oVMEksuk+ujVSnNwWEYHO6RJrVO0GUtIaNXk49P37zzl8My3rtV1VWLG9L5deG8QhppHEyZlxCCvmclkxrCO/v4iDCvf3d2d9nQdTSAwTQ1tj/NBoofAjr4tGCofwNB594uk8P777/cd2p5mjKpWlcKM6d9nfMfQIR/fSXx3lPA9hSHDPCzjfc+YEswaasixDGrXaMYoilKqbDN2p+wL1jv52LxmCW7bL/GjqdzPRlWYeFmgcnGDGcu6TkIi6ww5oZ3fpwyHjrPt7LlmbrmuB+UN5tVOMoHGaUkfkuE8QPJcLY9ztjMt0NgufaPD0rM8tU7RZswq68LMWHxU2rCx5Mkck/HeRnvjrSOuuUiEpMMuvCbpO+AsE+50LkCqtsxyoyNdqU6HSQLStddZJyczFo/KsFZjkyTQ5R5f6kYLrBiWGG7Uo1bhqmnrIsZ9jbvNL+vXhtyb23L7lzvTGnt1F69I7admiWVCYSiPRqTLrg20qLdMpv1UQTOh7kWLdLtfJrWeta/xze7xuOUcXuuskzKZltsfaXXXK9KMqS8ejlEZ6ht6nGlnwVCnzq3JOncEgDu/fKvsv+l25/8KN2MURVWOijFjFEVRU6lKN2N3fnm/9C3X8mjVGsvO/9T4Dlb+Z+Xe9rSjcRl1DVG73ZTRa8ZyWEf5AJioIdfAoRlfzPUAGXLR7Llmrrmuh6Q3qJeOHc4xxIbcdSxwHpiW2NXhVAqp40qeR2q9Y4ct/+Lm7bZBTFb4pPxMqqVfsWbMKeuCzFiyUExoBRVx3bpjvqwDsM2ZujA+btRi0smp7XrNWMIyOwvS102hTt7g+g3bTv+sav8yoBd2EvN+lBGym3S608b79YsWk+Flk9dLXUSUmXnbyfJIlnthZiy+tc35bMQpx5h13dXThUBdi7Rv3iYHbneMGM0YRVG5imaMoqhqUcWbMZfbb9omPRc0urVKNdJg55wp02DCyQm9+WUO6+ztcvfTkaoYScOci2bPNXPNdT2YKmqSObQ+wGBYOuxp7nElz0Nbz0LlzHaObtq2dpzFmTGnrAswY6n+YGa0grcccCOmWW43oqodk/3KLBPlVjs2Xx5xa568BznZNEwqlGRBNkvPmOtqJxWc+eL6m7HUOkYKMGPGfU+JGZu8bsZzN6LdgAn08wtK29mqjXCLXH0zzRhFUbmLZoyiqGpRtZgxBUYht/Niu3VYKq824eSE3hwxh3WMBkXHlIvmkmvmmut6MB3PJCMEPMdVbjM2ad1U2TrrOZ/zN2OHh6XV3pB3KHu0A3V2kCpA1c6yRdouRC1ZQDpCqtNc6oDaRp1p8VBqeM6czVjys3U86Gx3NC6hZMc/dfKpQgssG5DxHJspqmaV9atGJeb2YQOJeEziese+JOabKLsZ05sp9kjULtfJzRQj65zjCWjDlWZupmjtr9+tlrVMsXNDpo7BVK72DVnfLqP6S/+OxCV2GJ/jMr4rIuNxZ96ddx6QvsXONrvCNGMUReUu9JP88MMP3U8URVGVK8QqxKxiVD4ztk8GOgdk1/jt8hVlxra6ZszOHbW8NFnxARJ23/W4ndt6c9cc1okNSwv24W2muDviyUUbpecGZ/0E1suaa+aa63qYZHoscjFjWjPF9q3ueXibKSbPNcdmivUdElZ+ZK2b22c0Y05Z523G/AokWf2oDdrhLO++i0zrY2auYWuQxkbnIuRsxpLmUGNBozTatW6TzdhkfAbw8IyeoqOOLx3vDe1Mz8WMHTts3RDGfQWkRd3oY0HXrGKEmHYJrmpOdUpMXg9zzWUg4JRrRjOGfmzLnGUm4dbeGcsw0CbbvkQzRlFU7sJrGtRohhRFUZUsxCrErGJUPjO2K5ncpxNI9ZOy8mbje8iStVaTc9fs62QaiEPl3ZObOjrbzpZrWuvmlOt6KNSMWdOMg9OBBV0Ssc0qui25xzyvSdrWdkir61VA0g+oQQp1rNw7vebNa8acss7TjKUumN7/KYmpk1tyIA9rnaBnnYOj0u42d0MfpJ698eQojDmbMYvxrfowlj0SiataOrWMOm7LicdSQ85jn0Ft6PjJBsUiFpKeFU3ucPMW8xqkedVA+pCXSYowY+BwWNuXdS6NrRIMpdYBqeE53SE7D7rlqx8zhuNPDqvfIK0bI9Z6ztOIzGbM4mhMQhvbpEm9IgBD+S9RQ4AmJLK5LTX0J/a/2Jq3/yu2EaMZoygqV+E1EL///e/TRjKlKIqqNCFGIVYhZhWj8pmx22XX5nbtFVFO7tg1ogbwcIjfMCxdydc0If9tlNbk65XMuav/OhbIGbUh6u18U5ufGOtJDiePdTtG3XzbN9d0951LrqtThBlDfps2mKDK8/XWf/qrqdwBUiLuIH+pyhlrO4OaH7Fy5OGDasC+zGYMFDSAByHKgOnoAYJmjKKoTPrjH/8oTz31FM0YRVEVLcQoxCrErGJUPjM2ORcz5WyksqEZIwVhCgB6gKAZoyjKT3jH36uvvup+oiiKqjwhRiFWFSuaMeIHzRgpCFMA0AMEzRhFUX5CPwx0in/zzTfdKRRFUZUjxCbEqFL0b6UZI37QjJGCMAUAPUDQjFEUlU1o+oNkhzVkFEVVkhCTEJuKbZ6oRDNG/KAZIwVhCgB6gKAZoygqF+GpM5oBoV8GEqATJ06wLxlFUVMqxBzEHsQgxCLEpFKO+EozRvygGSMFYQoAeoCgGaMoKh/hCTRGLMMQ0ngijZesEkLIVICYg9iDGFSq2jBdNGPED5oxUhCmAKAHCJoxiqIoiqIomjHiD80YKQhTANADBM0YRVEURVEUzRjxh2aMFIQpAOgBgmaMoiiKoiiKZoz4QzNGCsIUAPQAQTNGURRFURRFM0b8oRkjBWEKAHqAoBmjKIqiKIqiGSP+0IyRgjAFAD1A0IxRFJWPOJoiIWS64GiKZDqhGSMFYQoAeoCgGaMoKhep94wdP35cXnjhBfs9P6+//johhEwpiD2IQYhFfM8YmUpoxkhBmAKAHiBoxiiKyiY8gcYT6RdffFHeeOMNeeutt+Sdd96R9957T95//31CCJkSEHMQexCDEIsQkxCbSlVLRjNG/EgzY9FolJCcQDDxcsMNN6SBoDM2NmYTiUTsQLR3717Zs2ePhMNh2bVrl+zcuVNCoZDs2LFDrr32Wtm2bZtcc801Mjw8LENDQzI4OOiGMoqiZpLw1BnJziuvvCJvv/22fPDBB/LRRx/JxMQEIYRMC4hBiEWISYhNiFGlqCFDLoOcBrkNchzkOsh5kPsgB0IuhJwIuRFyJORKyJmQO6k8CjmVN88y5WKmnI1UNqwZIwVhehqjP61hzRhFUX5CMyA8fcYTaWXCKIqiplvKlCE2IUYhVhUr1owRP2jGSEGYAoAeIGjGKIrKJDT9Qb8MPH1G0kNRFFVpQmxCjEKsKra5Is0Y8YNmjBSEKQDoAYJmjKKoTMKIZS+99JL86U9/cqdQFEVVnhCjEKsQs4oRzRjxg2aMFIQpAOgBgmaMoqhMwhDSb775JpsmUhRV0UKMQqxCzCpGNGPED5oxUhCmAKAHCJoxiqIyCZ3iT5w4QTNGUVRFCzEKsQoxqxjRjBE/aMZIQZgCgB4gaMYoisokvGT1ww8/dD9RFEVVrhCrELOKEc0Y8YNmjBSEKQDoAYJmjKKoTEJiw/5iFEVVgxCraMZIOaEZIwVhCgB6gKAZmznC8L659u/Bj9YvfvELef31190pUye8GwYjXuUzOl8+50aVTjRjFEVVi2jGSLmhGSMFYQoAeoCoNDOGFyaecsopSVauXGkfB5Jxyl933XWXbNmyJaeywjJY9uGHH3anTJ2wz46ODvnDH/7gTsmufM6NKp2KMWO4vrjO+ve5sbFRLrvsMnnwwQdLYqzVfYz7g6Ko2S2aMVJu8jZjeGs4IVu3bp0E3iqvMzIyYoM3zl999dU2eAM9khy8jX5gYECuuuoq2bx5s/T19Ulvb69cfvnl0tPTIxs3bpQNGzbI+vXr3VBWnNQb7CHUnDzzzDOyadMmOXDgAJ/QZxHNGFVqlcKM6fcYakW/+93vSnNzszz00EPu1NyE40By9Otf/9qdQjNGUVRKNGOk3NCMkYKoZjOmhOCKpO7ll192p1Sv3n33Xfsa6AllqVRuM4Yfm1IkvVNhxn74wx/aP6ZUcSq1GYPUvYdEJx+hSS0ezNCMURRlEs0YKTc0Y6QgvEYMVJsZQ/K1Zs0a+y+47rrr5Omnn7abO6Hpk3rC/uKLL8q1115rN4U67bTT7GP/3e9+Z8+DkBTu3btXvvWtb0lra6u9bmdnZ9pQuO+//77E43G7eSTmL1682P6sElL8vfvuu5Pr62D7mP/tb3/bTkLnz59vHwsCO0wYju/iiy+etA6EpBJBHvvDet3d3fY5ZtLbb79tb1ed665du+waB92w+G1TJbF6oozjQ5lhe+q4sR/UZuzZs8fehjpudY285bFq1Sp55JFHkk3QVHmqY7jyyivlvvvus++dTGYsl3PDefT399vLqHNDLSqE/WE9daxqPZj57du328eijvWxxx6z16HMKqcZw3VSwv3yox/9yL4muDa4RjfddJN9L0B4d5D3O4d7UG0LCZG61zHP+72mKKo6hNiP/sEmoZ8z5mcSYhXNGCknNGOkIGaCGUMy19XVZQ/6ADN20UUX2ceAN+0jiUNzxtdee81OyBEYkaAhKCOBh4lThgzbaWhosIOmvgy2pxJ5TMM+1I/B888/b+9bJZSoccG5vvDCC/a+kSRecsklacYJ20Iiivk4ZpSfenKvG0sl7BPNMPED8NZbb9nnc//999vbfemll9ylUsLyMCi4TmogDJiKCy+8MGk8sm1TJbHqvFB+qHVAeWBdzMcPEfajPmN5bw0EjBimv/LKK8nywPnhLz7jeqxbty5ZXigbfM5UM5bLuUGoJcF1xfIAP4D6fNN9hMQe+4e5xHZ/8IMf2McyHYOYVItKbcZUM8VgMGibf6XvfOc7thF74okn7PsE9yzuXcQkPMiATN8ddV+i2aO6dwGSn/b2dvu+oyiqOoTvPB6mnHfeeZMMGR5y1tXV2fPxv0n47tOMkXJCM0YKoprNGAIrnoThKTdMAJI0JGIXXHDBpICLRAy1Lipxg7A+Env1BB5JIZJDPflGzQ3KRH9K7xWOR5kQ/NWTfJUM6gmnV/o6poQShg9GEn+VsF2UO87LKyyH8zh+/Lg7xRF+LJQhybZN73FjGmoVkSwrwWDCvGEbanndjOHHEgYOCbQSrhF+yHAsmI9jgIHVhX1lMmO5nJtJKE+9tk2/jzIJy2Id/VpQ6SqFGVM1WQrcg/p9qe6Te+65x53iCN9T3H/q/jF9d9R9qR4aKJmMIEVRlS3EgqVLl9pxQjdkyqQB5CFqulc0Y6Tc0IyRgvAaMVDpZkwFXTQ/u/TSS+3mS6jJgLxJtxKCpin5hnlQiRoSM1NCj0Cp1sU8BFg8pdeb5SkTYqoZQ4KozAP2g6QSBlJvKqe2b0ooUfOj70tHNz9KWN5kZrCsOr9s21RJrEpWUX6mZfHDiGNVy+vH8+yzz8r5559vXA/ni/k4Tv1cIezTdPxQLucG/fKXv7TvS9UsDejrYf/e+wE1MWim2NLSklxHnR9lVjlqxr7//e/LihUr7BEVIdN3AsJ+8d1FEgSZllP3Jb7Dukz7piiq8uU1ZMgBVLyGGfITzRgpNzRjpCCq0Yx5k2hdSMRMZgyB0rQekvhsZgy1YlgXy6BvFM4ZibsygJinTAiWQZA944wz7B8HmDaYRRgzCAFZNVvEshDWVcdmSihRs4SmkN5zyqRcDEu2baokViWrmcpPSS2vygFC7Qb2oZ+LrnKZMRhf9B9SNXyQ977Auejng2aUKHf8cKqnqlgW62Q6fqo8fcYgfOfU9UT5m8wYpF9H03Km+xLy2zdFUZUt3ZABNE/M1DRRF2IVzRgpJyUzY90tAZnzqdWyxTCPzDxmixnDoBA4LtXhH0Jg9jZTRP8wfVRGvZmiKYFDsofzV8meGg1R7yOmZEoMVbM9v4QSRgFP/37+85+7U/yVyQTpCW62bapjVeeKGj+UX6bmH6ZzQ1mgaej3vvc9d0q6sC00P/MmxLhWmcxYLuemGzMlDOKib9N7H+EYvPvENVy9evWkfVEplcuM4Rqq66FMu/c7pb6/udSM6fcl5LdviqIqX8qQAXRXyEU0Y6TclMaMjXTKOR8/XU6vq5MVVxjmkxmHbsIUM9GMYbAHHAsCIxI0BGXUnCB50wfwwFM2BFV9GTWAh0rsEGQxD58RYDHoh0r2kDhi8AG9z4sSjBcC+PXXX5+2fQwuoM4J/WAwaAQG08DyWAZ/cdzof6UGJUFzLiSn3vOEsA6SVFwnNcgFfqz0QS6ybVOdq0pWMWACjBV+dPA/hB/DX/3qV/Z6WB/nhvOAgcU+MQ2DYCDpxch1mIZjw/5geNUx6AN44FrAoKlE3Ktczg3HDBP129/+1t6maVAQXC/ctzDn2AbOGwM64DixDswq7nE0s6QZy6xymDGU/8GDB5MPT5Sp9/YZU7WZufQZoxmjqJkn/AZlekBoEmIVzRgpJyUxYyOd58hJn+mUTW118snP9RqXqWRw/HPPXW+cR8zMFjMGYUTAcDicHBIdx+4d2h7ngiCohsnGcetP3ZDYYxrmYRkkiFheJXtIHHfs2JFsPqGWQxMKJJk4BuwX/bXQnwk1OmjGqM4Jy2DZc8891z5GDLMP4UdEHyIe54Br8Pvf/96e7xWSWPxg6MO/Yz+jo6N2ggr5bdNrxqA33ngjWX5YHn2rDh8+nBzUQy8blMGJEyfs89GHJMexwGyphNk0tD2aIuJ+Ml1DKNu54bywTTUf5wTTiPNR29SvA44H56bKXU372c9+Zr8mgWYss0ptxrAtGHjcWxhBUQn9x/BQBPcGzLNpNEU1oAd+37AM7kuaMYqilBBfqs2MxUdapaY+KBEtfyeVSwnM2BZZ/am5sjRo/T+wWs4MLJNu7zID66V1YZ2cNGeOzJkzV06et0zWjzjzRi5fLUsXnCxz7XknyamfXim97nr2vE+d6qw392SpW7RSNm1Jbbf/otNlzhkrpd/97LBels45XVZudj8Hl8qc5k7pX7dMFpwy19rHHJl7ygJZtm6LPX/T59RxuajtWce8TO3bPuYzZWlnv7af2U21mbFyCokZzkmZlXyF9TDiIGq7kAxCMCMYxAOJH2rNKGomqRRmDCZdASPsHZQHwvcIhgzz1IMM/T1jSjBrqCXFMqhdoxmjKEqp+szYuPSd3STN59RKRygxKY8nlUfxZmzzSjk9acAcY3ZO50hq/ki3LP3EXFnwuW7Zco0zbWRgi4zY666WBXNPlXPW9juft43IlgF3Xe+8a7ZI9+cWyNxPpMxezmZs7lypa1mf3P+WzqVy6pwzZfWA83n9uZbhSqsZ2yIdC+fI6W297nFZx9y/SXrd5QnNmK5izVimWjnUwuAF1KxhoWaaijFjFEVRU6mqM2MH+qTp7D6JhjoksCokCUMuX9nATDbLwCHTvJlJ0Wast61O6izToj6rJovKxGxZs1Dm1K1I1nbpdJ8fkLnastnn9cqK+XNk0cWOYcvZjM05R9anLdMrK+vnOLV51mc/M5aaRnRoxlIq1oyhDwuGrEfNmEpQ0a8JgRrlo5pTUdRMEc0YRVHVomozY5FgvTQPxqycPSLB+lYZPuzN5eMS3tgmTfNqpKamRgJ1jRLcpWrQfOYdDkvPiiaZH8C8WmlYHpRQTNvu7i5repeE1WebmAwsqZGu3e7nQwPSfM6ARKMD0n52rb2PmnlN0j4YdUxjfFTa6wLOdBd73SNRGVil9l0jtQuapa3fXWcGUKQZ65ZlAbd5XxqpWqfu8+Z6jI6iX1b/k2V4LjI1/cs8D8ZJ9UvL2YxNWqZfVp7hZ8Ys+jpkUd1JctInzpSlF62XfrdZJXGgGUupWDMGoX8ZBsVAXyU0u0Lfl2g0avdJoqiZJpoxiqKqRdVlxnZJVyBlwGDMmjaPa3l8QiLrGiSwrE8iyqQdiUs8kWVeIiJdCwLS0huR+FFn2dhohzQE2mRULZurGasJSMOFwzJu7/OYJA4MSEugXoJj+jLpNWOR7nqpXxty922tEx+X8UMzpwlmcWbssmUSWDS5ZgvD3J+52umTVZgZc2umptOMuYxsXi8rzz1dTpr7SWt5rfnlLIdmjKKoQoXRJz/88EP3E0VRVOUKsQoxqxhNlRn7ynUdUrtGa5roNlkcV5/jo9JW0yR9B9zPOj7z4lvbpEbfjk1CQqtqpLHXNXs5mzHLaB3Ulzkm4bU1bm2etozJjLmfZxpFmLER6fzMXFm4xjFdacCkuU0TC22m2Pu5T8qcSUYvh2aK6MNWQjOmGFlrncc/rfZsZ/ZCM0ZRVKHC4DRsfktRVDUIsQoxqxhNjRm7Xa5enmrel0KrddrbJYFJhin7vMi6gNR0hidNjw02S43ql5azGZu8j3Cnvxk7diQiPefNl9q6JmnbOCrRSU0vq5vCzdiWDlk4Z6F0aKMbpkDzxYAsu8z6PzmAx6bkC6FH+vqd/7VBOpz1RmTLZndwjwFr+1kG8LBNn2W8Vlzh1liN9EvHZz4pc+fmZ8YcU2cZRneAD9TM9W7YJP1D7mdr353nnprROM5GaMYoiipUeGccXoWA0Q4piqIqVYhRiFWIWcVoSszYl66W1rO8tVfOMPf1wYjzuVAz1l0/vWZMcTgqoxtbpTFQK61DevPL6qZgM7Zl9ZkyZ2FH0mB5QVPFQEu389k7TPxpK2STu9zI5Stl0Wna0Paf0bbZ35lazzC0PczbposWSZ07ZD36d7VaJmrlP+VnxrYNdUurO7z+3FNg9rbI+vPPlFM/jmPS9q3MGaEZoyiqYGGAmqeeeopmjKKoihZiFGIVYlYxmgozdmBzk9R375ucux8eltZAh4TQR6vAZoqJHe1SM8no5dJMMSxdgRKaMUW0xzJkXTPmPWpFDuBBZis0YxRFFaOnn35aXn31VfcTRVFU5QkxCrGqWJXfjO2TYH29BCPOS5/Ticvw8hpp2xq3/k8N0hGNu/OPjEvMbvbnNy8iwWwDeNhmrl46dmA/1uejcYn0tkptvmbMNnDWdkLudixiY2EZj6sBOxIy3t8igUl92KoXmjFSEDRjFEUVI/TDQKf4N998051CURRVOUJsQowqRf/WspuxSFDq64Oyz/rflLujqWLN8mF3AIy4hIOt0pAcvr5J+m5Qy/rMi+vDyxuGtreI7wpK6wJnyHqs2z4yLuF1gTzN2DEZ39ruDq9fK61bYzI+1CZNySHvnX2HZ1C/MZoxUhA0YxRFFSs0/UGywxoyiqIqSYhJiE3FNk9UmpoBPBxMuTupbGjGSEHQjFEUVQrhqTOaAaFfBhKgEydOsC8ZRVFTKsQcxB7EIMQixKRSjvhKM0b8oBkjBUEzRlFUKYUn0BixDENI44k0XrJKCCFTAWIOYg9iUKlqw3TRjBE/aMZIQdCMURRFURRFZRfNGPGDZowUBM0YRVEURVFUdtGMET9oxkhB0IxRFEVRFEVlF80Y8YNmjBQEzRhFURRFUVR20YwRP2jGSEHQjFEUVUpxAA9CyHTBATzIdEIzRgqCZoyiqFJIDW1//PhxeeGFF+yhpV9//XVCCJlSEHsQgxCLOLQ9mUpoxkhB0IxRFFWs8AQaT6RffPFFeeONN+Stt96Sd955R9577z15//33CSFkSkDMQexBDEIsQkxCbCpVLRnNGPGDZowUBM0YRVHFCE+dkey88sor8vbbb8sHH3wgH330kf3yVUIImQ4QgxCLEJMQmxCjSlFDRjNG/KAZIwVBM0ZRVDFCMyA8fcYTaWXCKIqiplvKlCE2IUYhVhUrmjHiR8nMWHdLQOZ8arVsMcwjMw+aMYqiChWa/qBfBp4+I+mhKIqqNCE2IUYhVhXbXJFmjPhRGjM20innfPx0Ob2uTlZcYZhPZhw0YxRFFSqMWPbSSy/Jn/70J3cKRVFU5QkxCrEKMasY0YwRP0pixkY6z5GTPtMpm9rq5JOf6zUuU3p6ZUXd6bJys2keKTc0YxRFFSoMIf3mm2+yaSJFURUtxCjEKsSsYkQzRvwogRnbIqs/NVeWBq3/B1bLmYFl0q3PH9okKxfVyclz58icOXPkpE+cLgs/v0lGss2zGLl8pSw67WSZa82b8/FT5czPdjvNILd0yKJT5trrKOz9bxuRTRctkjo1z1rn9IUrZdOIsz1SOmjGKIoqVOgUf+LECZoxiqIqWohRiFWIWcWIZoz4UbwZ27xSTk8aMMeYndM5kpzffX5AAs2dsuUa5/PIll7p3ezM95u3bfNqWfDxBbLisi3O55FeWflPc6VO1bxhv3M8NWOXLZNA4BzpHHA/j2yR3iv6k+aOlA6aMYqiChVesvrhhx+6nyiKoipXiFWIWcWIZoz4UbQZ622rk7q2VNNE1WRRGaCk4XI/62Sdd353+vR158gcZfz8zNgWbRopCzRjFEUVKiQ27C9GUVQ1CLGKZoyUkyLNWLcsC6SaCqY4U1ar2qmhbmldcLKcdEqdLPxsh2xS033n9cvqfzJtFyyV9VjGZMa2jUj3ZxfIyR8/WeoWtkrH5W6tGik5NGMURRUqmrGZIdWfBkOAU9RMVTWasfhIq9TUByXiyeFJZVKcGUNN1KJULZgCw9yfudpjhAY2Scdnz5RPzj1Jzmz3DPIxad4W6Vg4R06/qD99OR2jGXO5ZotsWtsqZ86bKyd9arX0eueToqEZo8ohvM/l+eefdz+lC0MMo93++++/706hqlXFmLE//OEP0tHRIaeccsok7rrrLncpaioEE4Z4znIvTqoc4/G4OyVdL7/8srS3t9uJu+m+VyxdulR+/etf29fDNB/fG3x/qPxUfWZsXPrObpLmc2qlI5SYlMeTyqMIMzYinZ+ZKwvXGGqfYNLqVphN0OWtlulamj7Ih2Eemj/O+b8dmft7+ZmxJJukdf5cWbrBNI8UQ7WZMby4Efs87bTT7B+llpYWOyC+88477hLl09jYGJOVHOVXVkgycG8wmah+lcKMPfzww+6UmS8k6ZV4vtNtxjDC3U033eR+mh6V6hhQhvgNxEMnr+677z5ZvXq1vPLKK+4U/7LHNMxjjWVpVHVm7ECfNJ3dJ9FQhwRWhSRhyOXLwfhmywAOxozziD+Fm7EtHbJwzkLpMPbPQvPFgCy7bJv0X7ZeereoAT1GpPfzC2Sua9T85m0b6pRFc0+VhRd1pw3wsf4yVVu2XpbODcg5nZoZ3Nwt6/u2pEZjvGKlLJjLd5+Vg2oyY3hZI7aH4IYfJzStQUKHWpZCE8J8NN1mDM2INm3aJA899JA7ZWr13e9+177uuSQG+ZixfLZbbZrJ5wbRjOUu3AOImTRjk4X9ImZMp0p1DL/97W9l5cqV8sQTT7hTHH3wwQdy7bXX2km8PvqoX9ljGs1Y6VRtZiwSrHdNUUSC9a0yfFjP4xMSHWyXprqA1NTUSM28BmleMSDRRLZ5IC7hYKs0zLPm1QRk/uJ2GT7oTB9dNV8CWEfRGbbXie8KSuuCWmdaYL40Lu+SUExtjygKNmNbVp8pcxZ2GAffAGiqGGjplt72hamh5uecJKd+apmsd/uG+c2zGVgvyz51qpzk9hezh77Xmjj2rlkkdR931j1zjWXSrlgtC9VQ+PbyZ8qydew3Vg6qyYwhib/sssvktddec6dMrabbjFWT8jFj+eiHP/yh/SM4naqEY6gUldOMqST1xz/+sdxzzz1y7rnnykUXXWQ39YJ+8YtfSHd3t8yfbyUGjY2yY8cO+f3vf2/Pg3CfXXHFFfZyV155pb3c4sWL7dop1FogacJnTMd81Lr76Y033pBwOGzvCzXzu3btsqdB7777rh0Lb7nllmSijb/4rUVMfOqpp2TdunVpTc30JFs/F5zn3XffnSxXv3JA2SEuP/roo2llgRoeHJMSYiYSR7QkwL5VOXj3kek7i3P50Y9+JKtWrbLXx/ljfz/5yU/sY8L/eFikC+WPJnnHjx9PKzusj+PAMeIBGxJb1dIBqCZ6kF+ZQ4gzKGOUF8oF549jeeaZZ3zLVBdMkt8xoGzUvYJ5KAM8ZPnoo4/s+V6h+TV+R5Gc60Kz7ba2tkn3u1/Z04xNFq6V915TwjXH/EyqLjO2S7oCKQMGY9a0eTyZwx8bC0p9fYeElEFLxGX8QMypPfObZxm1yLoGaVgzKjHXnMVDXdIQaJfQEXyOycCSmvSasfiotNU0S98Bt6nk0YTEouMSV/NJkiIH8CCzFa8RA5VqxvBjhuTN9NJG/Kjjh9f7Q6fWQUKAH+7vf//7dsKEH3dTEoZgjeTiwgsvtH948QOMH3EI6yOw+q2PZR588EE70GIZlA1+SNV2VTLT2toqX/3qV5P9prAMkkkcPxIOJAbe5EP9aKtzxL5U8qDQf7j1ZEQlX5n6aWGbe/fulW9961v2sWFbnZ2dae9kwTL69rOVlUoukMh973vfs++FV199dZIZ07frTfpUGb7wwgv28esJE9ZBwplpeZNwzDhGdY5Y75FHHkkm0NnuEdMx4LhxDlj3Zz/7mb1NJH/oN2cqs0z79zv3StVUmLFLL73UTnxwrZEAo5xwXy5fvlx+8IMf2NOwLL6biDO4xyDcZ+eff779HUAZYj3EjgsuuMDeLxJqHDvWRVKF2Jfp+4F9I/5hOSyv1sE0ZXpwvWGS1HcGn2FGVLzKdL5qvfvvv98+FxwrzgPfHxyzXzlgW7hHEY9V0zesD+OH5E/prbfekm9+85u2KdPLAQ8WILWPTGYM8XPNmjX2elgfBgbHje0hxuI8vUku9o9togn5nj17kmWH9VEWalsQvjtAVy5ljnUaGhrsnEa/ljB7+H1DmajzRW2VXyJuOgbcD4jLo6OjybKD0UNsVNfHJJNBxf2G64rfKl1+ZY9pmIdlKMeIITaed955kwzZt7/9bamrq7Pn43+TcI9Uixn7ynUdUrtGa5roNlkcV5+V4Yq7n3X85tnGqk1G0+aNy8A5NdK2NW7972PG7Noz4gfNGCkIrxEDlWrGEEgPHDhgJ2H33nvvpB8oBDv86OvJIX4U1Y8ZfmjxIw2zpBI4BFOcs0rCkCjjhxY/uPihxY++/sOfbX0sg8QEQRfTVNLk3S6SBP1JOraF40Sy9qtf/cqehh9tlPXBgwfTljElrzhGzFNmCPtBQvbYY4/Zx6C2hR8GbMsrbBNJDcoQ+0EZInlAkohtqWVUWULZykolFyivYDCYHNDDz4xhma6urrSk77nnnksrX6CUbXmvcMzYl56kqSQTyvUa68cA4RxUAqiSNqxvKrNM+8/3XCpBU2HGEFNgJpRQLmjupb4XSmp5ZUJwn6GGA/10lHCseMChX08IZY57WdW6eQXTguRaT6TVYAzq+HEsuOdh3jEP8RK/teoYTeeL40HM8p4LjhnLvv766xnLAcK2mpqakvevUrYkXpWDqr1R+zAZAgj7MRkJyHQOiAMoB8RftW38n0mm71QuZY51vP2zUBa47nrSrc4XD1MyyXQMaGoIE4emh7qwf3xvlQH2yttUMdM9C/mVPabBXHjxHudsEQwYri3KQDdkyqQB5CGZas5wH1SHGbtdrl6uNRVMUi/BMZXHJySysUXmz5svTSt6ZDQKI5XDvL1d6c0QNRwDZjBjFuNb26VpXq00LO+Sgd2qlo14oRkjBYGkxEulmjEICS6eIKP2ADUHCIIq8OLpLZJZlVAh2cL5qCQAP2AIovqPIZ7uoukjEiVsBz/+6mmxV9nWh7AM9qknepm2qyeA6gcZQVkX+odhOuarZfRkDsLxwNQh2cCPDYQfBpVoKWFb3qe1StimSv6UVPmpBAbLqGPJpayQSMDUoMO6avID5WLGfvnLX9rzvMJ2gVK25XXhmNHnTu/LgbLDNVVlles11o8BwjmgtsuUtOll5rf/fM6lUlQKM6aSKIVqIqbud28CrdZD2XqFZZH0IvnFNnDv4frpMl0/LIvkWr9PdSHp8t4X6vj0JBomBHESDzEwTz2cgEzHDaNxySWX2N9NXfrxZCoHCNvCOeIBgC4ck7rvMkkvB9O56ML2EcsRr9Bc0nvNcRw4DxU/EItxrur78I1vfEPOPPNM+2Ga91gh0zXJpcyxjneZTNfStA9dpvmZyhExG+fn7RempGKniiv4bptqDyG/ss/lOs42IY7qhgw1xip2wAz5qWrM2JeultaztFowFwxzXx+MpE07djQu0dEeaW0MSO3y4fR1TPNQa1bTJWF9uTTMZswhIbHdA9K1pFYCjdY27GaNRIdmjBQEfjC8VLIZU8KPL2oNkNyqp6de84VEAPvFDyGEH1rvDx5+sJUxePbZZ+0fWO+PuFK29SHTMpm2i3VQYwRTpn6QvQkmPqsf40zLwPCoJoDQiRMn7GulfqB0cBzqWHXp+9GFHwmVoOjL5FJW27dvtw0Kath0ectM3y6uK5qYoHkZnqxjnp74YbvqeKBsy+vCMWM5U7mobeJvLtdYPwYoU/l5y8xv//mcS6WoFGYM52kSygxl570efuthWVXeuG65JuWZllXC8qbrBrzHhya5mO69703HraZ5twm8ptS7Hwjbwvrq3lTSywGCAULCiNoafR+qHPz2oQRjifloluztg4X4qz+cQeKpTDGEexumGL85qIHH/e1t3u29JrmUuWm9fK67LtN8bzkqZbt3IVx/9fArUxNFyK/sM+1/tks3ZADNEzM1TdSF+7UazNiBzU1S371vcu5+eFhaAx0SSg7EoROVnrMC0rU3y7xESDoCjdIT9S6j8DNjioSMXlgjLUN+y8xOaMZIQXiNGKgGM6akmq2gOR6E5j04Bxgz/JDptUX4ofX+4OEHu9xmTNV4eLeLdYo1YzBgKGMYMiXVJMZ7HH7S96MLT+NVgqIvk0tZISHC+nhi/tJLL7lzJpeZad+4ZpiuzLYymtiuOh5dmZbXlek66DJdP9M19h5DpvLTp+eyfyiXc6kUTYcZy1SbBHlrxkppxrzrmIRrhViH48ZffUAR0/lmKwMoUzlAWA/rq3tTCcuq+04ZJQyEgeOBMYL0c/Lbh1e43uirh2a53/nOd9ypTtkj3iJRhtnSm4fqQtM+9MPCMSlzYipf0zSvTMvkc911meZ/7Wtfs3/fUD66stWMQao2DH1CcU+qWjKv/Mpev45UupQhA+gfnYtw71a+Gdsnwfp6CUaclz6nE5fh5W7frkMRCR+MJ5sLJg4MSEugSfoOWJ/95lmfx3ubJLC4S0KH9AE5IjLu9iMLdwakfm0oNUBHfFwi0ZgkjrqfD4eka0GA7z4zQDNGCsJrxEA1mTGVzCgzhh96NClDcMYx6s3o8EPr/cHDD7ZKtBHckSBka3qnS18fMi2D/gwoE29yYmqm6E3K8Fn9GHuXwQ8Lkh9TPzAE/lAolHOijG2qEdqUStFMEfvHjxXuHdVky1tm+na9wvo4DyRFELYLMsm7vC7VjwU1F5mU6zX2HkOmc9Cn57J/XX7nUimaDjOG/Zn6Wanyxb0P4bqVyoyhth0xDfd9JuG4cK/DaOBYkKwBVT6m81XfMSRu3u+wUqZygLCtbGbMdG5qm6oc/PaRSfqDGkg1E8cAOIj3mfpTQYgzeBCljsl0TXIpc9N6ma6laVldpvne5pZKiHvYh985qodi119/vb2NTMbNr+z160hNFu4Nv/vDK3wXK96MRTD4RlD2Wf+bcnc0VaxZPizxA8PStjg1DH3tglYJ7nL7hvnNs/EMfW8PVR+UsBrU4+CotJ/tDGNfe8GoxOJhCS5vkFp3e4G6JmkfjLLfmAGaMVIQuglTVKoZww84BrdQTV/wA4VAB1Og+iEgoUGSdt1119k1C3ofKPzQen/w8IOtJ9pqUAo0gYSQVKlt57K+aRkIT5Cx3WwDeHgTUz2Z9y6DY8V1wTF6hZoo1B7gu471sA8cY6b+SNgmmnvgBwXL40cr1wE8spUVpuPeUefqLTN9u5iG5kzqGquR5ZTpwzZxv8Hgov8grq/f8l7hiT4SI4x4h/Vxnjh+ZUJzucbeY8A5ectGyTvdb//Zzr0SNR1mDEI54d7EPYr9Y1nEApSXqknEdSuVGcN9jW0jCVODaOA64TjUfYHaaWzjd7/7nf0Z30GcH0bIhNT5IIGDCfvwww+T9w6e7qtzgZBgqljnVw5YF/tQx6CEZdV9p2po9JEnkRhi9FNVDn77gHCPYl/q3kT8gvHVl8c5YdRBvE5AH0gJ6+BBlKqVw3TEQz1uYzsYcAhlhvkglzLP51qaltVlOgaAZBuxGueM40c8RNzD8vjsJ1xTlDN+izKZBr+yxzR1HanihetZ+TVjKbx5O6l8aMZIQVSTGcOPMH4E1dDi+JHDj776QVdCjRNGGPM+OccPsfcHDz/YeqKNYA2ToYYexz7wpBfKZX3TMhCSIDXwCLaL7XuHtkd5ehNTfFY/xvoy6n9sS0dPzNAnA9dHlRf6i3z961+353mFbeI64gdAnTuumd78Qz8WKJ+yUskzElZvmenbRcKG/9UxY9vYB/YF4VrjnDCcN5I5bMtvea9wP5jel6QSt1yusfcY0NTKWzZK3ul++8927pWo6TJjEB4swBCgvDCYj+k9Y6UyYxBeMRGNRu37HNcH+0QcxD5V80S92R4EA4QBNlQzXSTyWA7r43jRvxPSzwXz0ATw8OHDJTFj6p5Tr6DAfYVaJ8QfVQ7ZyhrlgvtUvzeRWKr4pYTt4nuhX1OcA84F54R1sQ2cq3rIA+GBDRJczMNxqgc8fmUO5XMtTcvqynQMKBsk1ThnHAO+uzBZiOnZhIcsiHuqdYFJfmWPadinF9M1p7ILsYpmjJQTmjFSENVkxnIVkmXUCvm156fSlclMUJSfijFj1MwT4oh6QEFRlSaaMVJuaMZIQcxEM4aEAMdjar5HmUUzRhUimjFKCfeBqS8fRVWKaMZIuaEZIwUx08wYmgOZmgtR/qIZowoRzRgFqWbYep85iqo00YyRckMzRgpippgx1f8EfQrQPp8JYn6iGaMKEQYiwUAU1OyV6teEflZqVFuKqkQhViFmFSOaMeIHzRgpiJlixiiKmnphsBw2B6YoqhqEWIWYVYxoxogfNGOkIGjGKIoqVBhxDiPbsY8QRVGVLMQoxCo1SmahohkjftCMkYKgGaMoqlBh1LynnnqKZoyiqIoWYhRiVbEjfdKMET9KY8b6O6V14ely6sfnyJw5FnNPlk9+6hzp6DMsS2YENGMURRUjvENOvWiZoiiqEoUYhVhVrGjGiB9Fm7GR4FI5de4nZdFF3bJlxJ0+1C+bOrul37MsmTnQjFEUVYzQDwOd4t988013CkVRVOUIsQkxqhT9W2nGiB/FmbGhTlk0d64sungkfXo5GOmUc+YulfWmeQXRKyvqTpeVm03zSDZoxiiKKlZo+oNkhzVkFEVVkhCTEJtK9SJymjHiR1FmbMuahTJn/grp1aYZGVgvrQvr5OS5aMZ4kpz6qWXS2a/NDy6VOc2d0r9umSw4Za7d1HHuKQtk2botzvyNK6RONYG0USZqi6z/7EI5/RMnOdM/fqqc+dluGVHbBe6+T7LXmysnz1sm6/s7ZJG7H8XSoLXs0CZZuUgd5xw56ROny8LPb0rfHrGhGaMoqhTCU2c0A0K/DCRAJ06cYF8yiqKmVIg5iD2IQYhFiEmlHPGVZoz4UZQZW3+uZVrOXZ82bRIj3bL0E3Nlwee6Zcs1mDYi/WvPkVPnLpSOAXcZmLG5c6WuZb27jGX0OpfKqXPOlNX6MnO8NWPWtjZukv4h9/NAp5wTmOsYK3yetO9tMjKwxTFXm1fK6UlT59B9fkAClilMLrulV3o3T0GtXxVCM0ZRVCmFJ9AYsQxDSOOJNF6ySgghUwFiDmIPYlCpasN00YwRP8puxuzaszpv7dmIdC6aI5/8XK/z2TZa53iMVq+srHdrrJLLZG+miGM6/aJ++3/zvl38zJi+HDFCM0ZRFEVRFJVdNGPEj7Kbse7z5hqX6b/odJmzqNOppYLROmOlZ8CPfll5RjYz5jZTnHeyzNWaHCozlmnfNgYztm2oW1oXnCwnnVInCz/bIZtUrRyZBM0YRVEURVFUdtGMET+KMmO2ocrSZwy1TeUxYyPS+Zm5MvefVkh3f6opoV4zlrcZUwxsko7PnimfnHuSnNnu1t6RNGjGKIqiKIqisotmjPhRlBnbNrBazpwTkHPWZe5XNXLxIoNhMzRTzNuMrZelauCN5DSnaWOhzRQncXmrZciWSrdp3iyHZoyiKIqiKCq7aMaIH8WZMYveixbI3Ll1snTtpuTAF9tGtkj/5b1u36tuWZbLAB7ZzJhrnlYkXyTtzK+7wB3t8Jot0v25M+WkuSkzlhrAwzo2ex3LHPb1u/9bZm6uZSQ73REbLfovWy+9W5SxHJHez1vnlsnMzXJoxiiKoiiKorKLZoz4UbQZA1s2rpalnzrVHT7e4uOnyic/tTJlYrboQ8ZnGNo+mxmzzFH3Zxc425h7sizbYE3r65BFdc6w9nNPqZNFq3stc3h6yoyBgfWyLHlsc+Xk01bIJnde75pF7pD5J8mZa/qlt32h1CWHvHeOcz37jRmhGaMoiqIoisquKTVj8agMd7ZKY11AampqLGqlYUmb9O1NGPN6Mv2UxIyR2QfNGEVRFEVRVHZNmRkbH5CWQK00B0MyfsTN3RNxGd8dlvFEej5PKgeaMVIQNGMURVEURVHZNTVm7ID0nV0jTb3jxvy9tIxb+2qWgUOmeYUxvrlJmgdjxnkzHZoxUhA0YxRFURRFUdk1JWYsEpT6mnYJZa0Bi0t4Y5s0uc0Yaxe0SjCkmaBDA9J8zoBEowPSfnat09RxXpO0D0YlgfnxUWlPNoF06NrtrJs4MCpdyxtlfgDTAzJ/cbuMHnS3a+Pue56zXqCuUYK7YjK6ar4EtO3VdIbt5eO7gtK6wD2GwHxpXN4loZi+vZkBzRgpCJoxiqIoiqKo7JoKM3brYLPULBmQmCF3T5GQyLoGCSzrk8hhZ1ri0Kh0LAhI29a4swzMmGWkGi4cTjZtTBxA88d6CY6527GXMdSMHY5K5GDcMW3WvsY368c0ed/HjsQlbu8jJgNLatJrxizT12bto++A29ftaEJi0XGJq/kzCJoxUhA0YxRFURRFUdlVMWbMNjhNlsFJn57Y0S41Z/XJOD4ro5VWo3VMwms1s5TJjHmxl+uSMP7PsG8HHzPmOY6ZCM0YKQiaMYqiKIqiqOyqGDO2t0sCyhzp2KbJbeKoGyiNcGd2M5aIDtvNFBvcZogO7rYy7dvGYMYsxre2S9O8WmlY3iUDu2NujdvMg2aMFATNGEVRFEVRVHZNSZ+xMMxOlj5jY+hXViYzdqBPmmoapGN03G16qJYr3Iw5JCS2e0C6ltRKoNFaX40SOYPI24wRAtICgIseIFTQQABBIEFAQWBBgEGgQcBB4EEAQiBCQEJgQoBCoELAQuBCAKMoiqIoiqpWTYkZu3OfBOstQ9PvM5piIiTtNY05NFPM34zFTDVzuzpSNWP5NlOcREJGL6yRliG/ZaoTmjFSEOkBwEEPEDRjFEVRFEVRU2XG7pSvhLukoaZB2jaHJaZqp44mJH5wPPk50p3LAB5ZzNixsHQF6qUj5K4DdndJINAuo/p2GwNabVhqAI9o3F3niHVc7vLhzoDUrw2lBuiIj0skGpPEUffz4ZB0WcfZEZp5L6+mGSMF4Q0AQA8QNGMURVEURVFTZ8bAsVhIelY0ucPLu0PCL+mSkDJAx+ISHWz3H9o+qxlT/bmwj1pp3Yrpltna2OLuF/28eiQSt0xb2rbiEg62JvuUBeqapO8Gd97B0eRQ+rUXjErMWje4vEFq7X5nzrLJ4fVnGDRjpCBMAUAPEDRjFEVRFEVRU2zGDDkbqWxoxkhBmAKAHiBoxiiKoiiKomjGiD80Y6QgTAFADxA0YxRFURRFUTRjxJ/qM2PoiBifeZ33qg1TANADBM0YRVEURVEUzRjxpzgzZhjasuzs7pLkMJlk2jAFAD1A0IxRFEVRFEXRjBF/aMZIQZgCgB4gaMYoiqIoiqJoxog/NGOkIEwBQA8QNGMURVEURVE0Y8SfMpsx/X0CAZm/uF2GD2rzD4elZ0Vz8n0DeNdBz5jeHywukY3a+ucFJbw3/f0H8V1BaV3gvJfAfpfC8i4JxdT6pFyYAoAeIGjGKIqiKIqiaMaIP2U0Y86bthvWjCbf+h0PdUlDoF1CR9xlEjGJam/Xju/okPpAymiN9zZJzQLLXGV6m3d8VNqs/fcdcA3c0YTEouOpt3eTsmEKAHqAoBmjKIqiKIqiGSP+lM+M2UapTUaTb/wG4zJwTo20bY1r03Twpm61vYgE6wPSEUofOTG+tS3VTFGZMb22jUwJpgCgBwiaMYqiKIqiKJox4k/5zNjeLgmg6aCB5sGYs4zbTLGxLqDNd7cXG5YW07Y9fcbGt7ZL07xaaVjeJQO7Y5LQlyVlwxQA9ABBM0ZRFEVRFEUzRvwpnxkbC0q930AbiZB0BALS0huRmGq2qNeM5WjGHBIS2z0gXUtqJdBozUtuj5QLUwDQAwTNGEVRFEVRFM0Y8ad8Zsw2W43SEzXMAyZTdVDfntNMsWu3Nt8isaPdYMYUCRm9sEZahtyaN1I2TAFADxA0YxRFURRFUTRjxJ8yDuDhDMARWNwloUP6ABsRGUc/MnvdJum5wZ13OCJ9y2sloG1v0gAeh0PSlTaAx7hEtAFAjmH+gsn9zEjpMQUAPUDQjFEURVEURdGMEX9KYMbS+4PZLBmQmL1MQqKD7dKk+oTZQ88HJewO6uH098I6atj7cRlYops7w9D2B0elPWnGwhJc3iC17n4DdU3SPhhlv7EpwBQA9ABBM0ZRFEVRFEUzRvwpzoyRWYspAOgBgmaMoiiKoiiKZoz4QzNGCsIUAPQAQTNGURRFlVUnToj1IyMT3d0y0dAgE3/7tzLxF38hEx/72MwC54Rzwzla54pzts99mvT+Bx/K3Q/8RPpvvkOWDO6RUy8elP/xuR6Zs3xDxYLjw3HieHHcOH6cx1SJZoz4QTNGCsIUAPQAQTNGURRFlUUPPCATq1c7JuXTnxbp7xfrx0XkoYdEfvMbkRdemFngnHBuOEfrXHHO9rlbZYCymCo9cvwZ2TB22DY2LVfvk9Hb75Y7739UHn3qOXnuldfkpdf/WLHg+HCcOF4cN44f54HzwXmVWzRjxA+aMVIQpgCgBwiaMYqiKKqkevppmVixwq4lsg3Y44+bzctsAOcOY4YaM6tMUDbl0jMvvSqdu2+xa5ZgZH7+7AtGw1Nt4DxwPjgvnB/Os1yiGSN+0IyRgjAFAD1A0IxRFEVRpdKE9btg1wZdfrnZnMxiUCZ22VhlVGrd8q377Bqkq2+902hoZgo4P5wnzrccohkjftCMkYIwBQA9QNCMURRFUaWQ3Sfs1FNFvv51oxkhFlbZoIzsPmUlEvpWfWrTdvnOoz83GpiZBs4T54vzLrVoxogfNGOkIEwBQA8QNGMURVFUsbL7hi1aNDP7gpUaq4xQVnZfsiKFvlSf23pDxfcFKzU4X5w3zr+UohkjftCMkYIwBQA9QNCMURRFUcXIrhGDETMZD5IR25AVUUOGmiEYEpNZmS3g/EtZQ0YzRvygGSMFYQoAeoCgGaMoiqIKld1HDE0TWSOWP6ghQ5NFqwzzFfpMoanebKsR84LzRzmUqg8ZzRjxg2aMFIQpAOgBgmaMoiiKKkgYNfEv/oJ9xIoBfchQhnmMsojRBDGIxWzpI5YNlAPKoxSjLNKMET9oxkhBmAKAHiBoxiiKoqhCZA9fz1ETi8YeZRHD3ucoDO8+00dNzBeUB8qlWNGMET9oxkhBmAKAHiBoxiiKoqi8hRc64z1iBnNB8scuyxxeDI0XH+N9WyZDMttBuRT7YmiaMeIHzRgpCFMA0AMEzRhFURSVr+yRAPFCZ4OxIAWAF0PnMLoiRg/EC5BNZmS2g3IpdnRFmjHiB80YKQhTANADBM0YRVEUlZdOnHD6OT3+uNlYzHSe+FeZ+Ppj5nmFYpWlXaZW2WbS+x98aPeN+vmzLxjNyGwH5YLyQTkVKpox4gfNWBbi0ZBEDiWM82YzpgCgBwiaMYqiKCovWb8XE5/+tNlUlIQnZeJAr0yc8b9l4mMfc/jkYpm47h7DstPAXdaxNUcmTy8Su0ytss2kux/4ibRcvc9oRIrm6e/L9v5e+cflG2SOxd+vukou2XGPPGxatoJB+aCcChXNGPGjODN2aECaa2qkRhGYL43Lu2Q4OnPMS7izRpoHY8Z5sxlTANADBM0YRVEUlY/sd2OVrYnij2Ti/DmW2RmUiQfUcPnW3wfukon7K2T4/DKZMbupos97x/A+rbI0UXz1Udm+doO03/qoHH/Vmfbs756Ub37vCXnWu2yFg/Ip5r1jNGPEjxKYsWYZOOR+TsQlMtgmDYEWGVbTKoz41japXTIgMcM8EzRjZkwBQA8QNGMURVFUPppoaBDrR8JsKIpk4rpGmfj0TpkwzKsYymXGrDK1yzaDlgzukTvvf9RoQori+DFZsXy/fNM1YtUMygflVKhoxogfpTVjNnEZXl4jjb3j2jR/xjc3lcfwJELSEeiSsGlejtCMmTEFAD1A0IxRFEVR+cge+e+hh8yGoijukYnAx2Ti9iw1YE/cJRMXLZaJuaoJ4+dk4lupdSYut6YdeUwm+s+TiTlYZo5MLB2UiSf07fzGaQp5sjUP25j7SZkY+1Fq3tglqXnY/tefTK1bLjNmlaldthmE0QIffeo5owkpiufukeDyIRl7wjDP5dkn7pGR/qvktBVOM8bTNkTkyJOY97zEBjfIJV99Pn2dVx+S7at6ZfuD7vqPHpPLN/TI36MZ5IW9csnNDyVr4UoJygflVKhoxogfZTBjjoGp6Qy7nxMSHemS1gW1dlPGQF2TtA9GJW7Pi8voqvkS0Js66usNtktTXcCeXrugVXr2xt15Fru7pGZtSGK7gtLiLhOoa5HgLneZG/qkaZ62XXWcWE+vGTsclp4VzdLgLmvvZyzVzDLdjKUfU828BmleMSDRhLutWYQpAOgBgmaMoiiKykf2QBO/KUOTwYcjlvmxTNbDhnk6v7GM1vceE3nO/Xz7Bst0WQbJnW+bsTmNMnGXa6Cee9KaZpmt1ptS29hvGbVPWus97J7Hb6xlj2vzzt+ZMm/3W8eF7d3vfi6XGbPK1C7bDMLgFM+98prRhBTHa3LvWK9lkq6R7d98wmySnnlC7v35y/Is5r36mjx8+zUyp/eYPGHNO/61kMzZ8OX0/mX37Ze/X3VI7sXyx49J+4XXytiPXcP28pMyvnmDLLv1idTyJQLlg3IqVDRjxI8ymLGYDCypkZYhx8DEhloksKBDRtUgGIcj0rcsIA3dkbTlvbVPWK92WZ9EDjufEwcGpCXQJH0H3GVgqgIBaQqGJX7UmRYPdUlDTasMu+vYy9R4asa8ZiwRk2g0Jgm1jR0dUq/VpqWZsbGg1Nd3SEhtPxGX8QPWuu6yswlTANADBM0YRVEUlY9QW2Q0E8WSqxmbxF1p69lm7LK70pd5ANtWhg01cHNk4ojJUGLeP8jEt9KnT1xmbXPIHUCkXGbMwi7bDEKNlMmAlIbX5Il7D8klX+iROSt6pH3/v8jDvzMt56KaNuL/F78vV60YkrGfq/mvybGdltm6/Un787039krDjZ7mld/bL3Ng1vRpJQLlVKhoxogfpTVjR8YlvBHmyzIzRzAtIsH6gHSEPAN6HOiTxpp2Cdk1SiYzhvXqJTimPjuE19ZIvTJxttHq8DRBHJeBc2qka7f7ORczNomwdGnnZDRjcX352YkpAOgBgmaMoiiKykfTXjOmmimqZoQ2HjM25hl63t62a8Yeuynzfux5apseLncN3oyrGUvn2Se/LyMbN8ictW7NFqY9+jW7meJZFzrNFB1cM2bxzX0b5BxV05Vmzp6R2GZ9HZ3U+qWCNWOknJTAjGlNAec1SGvnsESVWYkNS4uhGaNjeBrdWi6DGbPX07aro5oxGk2Vs628zJjbTLFRNT20yWDGjiUkYpnN+fPmS9OKHhmNas0mZxmmAKAHCJoxiqIoKh+Vr8+YZbLQx8uvz9hvvmwtY5kwDHOvmhWaasYKNWNP3pp5nmKm9Rkz8eK/yOWWYRr5ofX/z78sy5b3ylXffFKOv+zO12vGwIOHpMFtlmg3Wxz8mhy35z0vR67eICsST6W2XUbYZ4yUk7L0GUsSH5W2QsxYxvU0SmHG7AE+AtLSG5GYXZMHfGrGFEfjEh3tkdbGgNQuH5Zxfd4swRQA9ABBM0ZRFEXlo7KOptj/D/5GB0Yo2dzQxW6CmIcZ822m+COZ+LS1fszHEJbLjFllOi2jKRr5oYy4ZuyJRKp/WHI+mhmm1Ww9IWPrMGDHM/aAHsGvpQb0ePj2IZmz7V+mZJh8jqZIykl5zdixcek7q0bad+TbTNFa7+waaRv1eV9ZKcyYaf7B9HMymrEkUek5KyBde03zZjamAKAHCJoxiqIoKh+V9T1jx++SiU9aZmj1TstcaYboScsk4bNtqhpl4rvuvCcsY9X6P/M0YxZqAI/H3M8YwOMJd5u3X2LNWyUT31IjKFrT8Z4zVVtWLjM2Xe8ZO/6oHPvJM87gHPj86vNy763Xyt+vPSD3vmh9xmAcKyJy5BmnieSzT/6LXHXJBvl7TzNDmK6GHREJWssew3pq3u/+RS5f0SvBhOc9Zg+WvraM7xkj5aTMZsx5r5f/AB4wPAGpXxtyR1h0SOxot9Zrk4Ex1RQwIfGDYYmofeVixtzj6zuoLaOvZ89vkp4btGNbXiuBTGbsUETCB+PJATsmDSoyizAFAD1A0IxRFEVRecn6vZj49KfNhqIUPPeYTFxjmaFknzDr7xmW2TrimqNDllmyh7W3pp9l/f+AZdSa8zRj3uHrMbR9TJkvi6ODliGDycN+rL/N1vGUeTRFu0ytss2kux/4ibRcvc9oQoriiTvkknW98o+qL9eFvbJixzG5/zm1zMty783XuMPa98hZ/Yfl3ue+LyPePl/PfE0usdZv2P9Qapri6e/L9v7UPv7xC9dI8E5ngI9SgvJBORUqmjHiR9nNGIiFghmGtnc5OCrtZzvzay8YTRqs+K7UejU1tdKwpE2G9dEUs5kx1ccrYK0fmC9B1GB51hvf2u4OgR+Q+YvbZfjguLWNDGbswLC0LU4NxY9h8JND6c8yTAFADxA0YxRFUVReOnHCGWji8ceNpoIUgFWWdplaZZtJ73/woT04xc+ffcFoRGY7KBeUD8qpUNGMET+KM2Nk1mIKAHqAoBmjKIqi8tXE6tXla6o4G0ETRZRpFm0YO1yepoozAJQLyqcY0YwRP2jGSEGYAoAeIGjGKIqiqLz1wAPOyH8mY0Hyxi5Lq0yz6ZHjz9ijBZrMyGwH5YLyKUY0Y8QPmjFSEKYAoAcImjGKoiiqEE2sWCETl19uNBckd1CGKMtc1bn7Frn61juNhmS2gvJAuRQrmjHiB80YKQhTANADBM0YRVEUVZCeftrp5/T1rxtNBskBq+zsMrTKMlc989Krdt+o7zz6c6MxmW2gHFAeKJdiRTNG/KAZIwVhCgB6gKAZoyiKogrVhPU7MHHqqSK/0YahJ7lhlRnKDmWYr2751n3yqU3b5blXnOHmZys4f5QDyqMUohkjftCMkYIwBQA9QNCMURRFUcUI78aaWLTIbDhIRlBmfu8Vyya8T+tzW28wmpTZAs6/mPeKeUUzRvygGSMFYQoAeoAoxoxFo1GaMYqiKMoeCdA2ZKwhyw5qxGDEchg9MZsweiAMyWyrIcP54ryLHT3RK92MIcehGSM6NGOkIEwBQA8Q+ZixW265JaMZ27NnjxvKKIqiqNkou4YMTRbZhywz6COGpolF1Ih5hZohNNWbLX3IcJ4431LWiCkhl8lkxpAD0YzNbmjGSEGYAoAeIGjGKIqiqFLJ7kP2F3/BURYN2KMmomwK6COWTegzhUEsZvooizg/nGep+oh5RTNG/KAZIwVhCgB6gKAZoyiKokoqjLKIYe/x7iy8GPrxx43mZFaAc8cLna2ysIevz2PUxHyF0QQxvDvet4UXIP/82ReMhqbawHngfHBeOL9SjJqYSTRjxA+aMVIQpgCgB4hSmLFIJEIzRlEURaULL4ZGXzLUBn36044xs35b5KGHZmbfMpwTzg3nCANmnbN97ugblsMLnUslvPgYfalQg9Ry9T7byNx5/6Py6FPPVXzfMhwfjhPHi+PG8eM8cD7FvtA5FyGXQU5DM0ZM0IyRgjAFAD1A+JmxeDxOM0ZRFEUVpxMnxPqRcfqUNTQ4tUQwKR/72MwC54RzwzmiT5h1zva5T5Pe/+BDufuBn9h9q5YM7rFrlmBs5izfULHg+HCcOF4cN44f5zFVyseMIUeiGZtd0IyRgjAFAD1AZDNjePJDM0ZRFEVR1ExXrmYMuRHN2Oyj+sxYIm7dqAnzPDJlmAKAHiCAChw0YxRFURRFzVYVa8ZMRgyYcjFTzkYqm+LM2KEBaa6pkRpFYL40Lu+S4Wj5zFJssFlqlgxIzDCPTB2mAOANErmYsVgsZgcivGcDgemmm26iGaMoiqIoasbIa8aQ6yDnQe6DHAi5EM3Y7KUEZqxZBg65nxNxiQy2SUOgRYbVtBJDM1YZmAKAN0h4zRigGaMoiqIoajapEDOm8iaasZlPac2YTVyGl9dIY++4Nq10lNqMjW9ukubBmHEeyYwpAAA9SGQzY4cPH85qxvbu3euGMoqiKIqiqOoTcplsZgw5UT5mzJSDAVPORiqbMpixYxLurJGaznDy/67dCYlubpX5AWv6OQMybi9nTRvpktYFtXYTx0Bdk7QPRiWubefY0XEZXtXkrFdTK02rBiQ62qWZsbB0Wet27dbWsbANm7t/h7iEN7ZJ0zynOWWgrlGCu2Iyumq+BFQTS2CvYx3XYLs01QWcafMapHmFtd9E+j5mO6YAAPRAQTNGURRFUdRsF80Y8aMMZiwmA0tqpGXIqW2CGWtobJLW3nSjFRtqkcCCDhk95PYvOxyRvmUBaeiOuMskJLQqIIFllnlzjVB8rE9a51kmKS8zlpDIugZrO30SOewucyQucXubzrGm1YyNBaW+vkNCatlEXMYPxCSh5hMbUwAAeqDIxYyhWj6TGRsbG6MZoyiKoiiqqoVcBjlNJjOGXIhmbPZSWjN2ZFzCG2GyuiR8xJlm15ItH06v8ToWkWB9QDpCnoE+DvRJY027hGCU4qPSVtMkfQe0+RaR7vr8zFiG7Tj4mLG4vhzxYgoAQA8UuhlThsxkxjCKkNeM3XDDDTRjFEVRFEVVvZQZQ27jNWNqJEWTGVP5E83YzKYEZkxr5jevQVo7hyWqGRmYsUl9smLD0mJo3uiYq0bHOO3tkkCNZerS5nv7jOVgxjJsx8FgxlCTZhnK+fPmS9OKHhmNxrV5RGEKAEAPFIWYsQMHDtiBav/+/Xbg2rdvnxvKKIqiKIqiqk/IZZDTILdBjoNch2aMKMrSZ0zHaMbs2qpKNWMuR+MSHe2R1saA1C4fdvu5ER1TENADRb5m7ODBg2lmDNX5CGATExNuOKMoiqIoiqoeIYdBLoOcRjdjyHlKbcZMuRqpfKbHjB0bl76zaqR9R7ZmipO3Pd7bmNWMhTsDhTdTnERUes4KSNde0zziDQR6oMhkxoDJjOHlhwhQqL5XZgwdXt955x03pFEURVEURVWPkMOowTuQ2yDHQa6DnMdkxlSelK8ZM+VopDqYJjN2TOJb2/IewCMRHfAM4BGX0RU1Ur82JPGj7nbVIB+GATySzSePjEvMHaADxs1e317W4lBEwgfjyQE7EgcGpCWQycwRbzDQA4WfGcOTn9tuuy1pxtCBFYFJ7zemzNjx48fdkEZRFEVRFFU9Qg5jGkkROQ9yH2XGkBOpWjGasdnFtJkxEAsF8x/afm+fNCbNmMXhsASXN0gt+qwF5lvLDMv4ri4JJM0YiEs42CoNyaHtLXN1gzvv4Ki0n+0cQ+0FoxI7MCxti1ND3tcuaJXgLvYby4Q3GOiBQgWPO+64I2nG8EZ5ZcbwBAgBCEO6Ihh5zRg6uiKAffWrX5UTJ064YY2iKIqiKKryhdwFOQxyGe/gHch5kPsgB0IupDdRRK6kzBhyKJqxmU1xZozMerzBQA8UuZgxVMsrM4bqemXGbrzxxuSIimhr/fLLL7uhjaIoiqIoqvKF3EUN3oGcBrmNMmOqiaLpHWM0Y7MLmjFSFN5gAPzMGPCaMdVUEYEJHVoRpBCw9KaKWJ4DeVAURVEUVQ1CzoLcRW+iiNwGOU4ug3f4mTFT7mXK0Uh1QDNGisIUELxmDGQyY3q/MQQmU78xPFHCOzruuusuGjKKoiiKoipayFWQs2R62TNyHd2MIRfKZMb0XIpmbGZCM0aKwhQQVLDQDZmpqaJuxkxNFRG4MPIQAhmeLCGoYXlU+7/33ntuyKMoiqIoipp+ITdBjoJcBTkLchfkMGpIe1MTRd2MITcqpIkiMOVopDqgGSNFYQoIesDwM2N4AoQA5O03ppoqImjpQ9wjsO3Zs0fC4bC97V/+8pf2kLGsLaMoiqIoajqEHAS5CHIS5CbIUZCrKDOGHEYNaY/cRm+iqPqLIRdStWI0Y7MPmjFSFKaAAFTAMJkxoMyYt6miaYh7ryHbvXu3Heyuv/56CYVCct1118mOHTtk+/btMjo6arNt2zbZunWrzTXXXCMjIyNJhoeH5eqrr86JoaEhQgghZNYycMm58t8Dp8l/LJYFK+UKw/anCtNvvAnkCHrOgBxC5RPILVSegZwDuQdyEOQiyEmQmyBH8RoxbxNF75D2mZoomsyYKecCphyNVAc0Y6QoTAEBeM0Y0M1YtqaKeHKkXgCNIIaAhqp+jEqkDNmuXbsmGTJw7bXXJg2ZbsqUMfOaM0IIIYRkYkh6Ljxb/ipprM6QeYuWSfN5edK2Xq4ybr+yUHmCnjuofAK5BXIMlW/oRgw5iTJiagRF5C7KiCGn8daKZWqiqMyYnkPRjM1caMZI0ZiCggoauiHL1FQRQUgfVVGvHUPw8taOKUOGJ1DKkO3cuTOjKVOoYOo1aJlQAZkQQgiZ3QzLps83yV/9Q738R1DXIp0DpuUqG9NvvRc9V9BzCJMJQ+6hjBhyEmXEvLViyGVMtWLeURTZRHF2QjNGisYUGEAuZsxUO4ZAZaodwzs6vIZMNVnUa8m8pkwZM68580MPxoQQQgi5Rq64aJFlyE63DJnF/1km64ZMy1U2pt98Eypv0HMJZcKAbsL0GjFlxPSXPOu1YshxTLViuZgxU64FTLkZqR5oxkjRmAID8DNjuiFTZsyvdszPkKlBPRAUvTVlyph5zRlAe+98UcGZEEIImX1sk772xfLX/+8Z8h/BaefL+mHTctOP6Tc8G948QeUPKp/Qa8KUEVODdfgZsUy1Yn5NFGnGZg80Y6QkmIKD14x5DRkCj9eQIUApQ4YnSH6GTB/yHsHQZMoUujnzooKtwhuMCSGEEKK4Vq5c/Rn560/8f/KXoH65BK8xLVe5eH/3TbkBUOZL4TVhyoghF1F9xDIZMdVXTOU5XiOmzJjXiAE/M2bKyUh1QTNGSoIpQACvIctUO2bqO5aPITOZMoXJnCkQaAkhhBCSD9dJ/5pm+ZtTF8hfgtNbpXvUtFz1YMoRdPOl8JqwfIyYMmOZ+oqZzJifEQOmnIxUFzRjpGSYgoTXjHkNmXoapGrHvIZM9R/zGrIbb7wxoylTzRd1c6b6luWCCr6EEEIIycROGexYYhmyBsuQWZxxgWzcblqu8jD99ptA7qCbL6CaI5pMGHITkxHzNk9U+Q5rxQigGSMlwxQogNeQIdAA9RRImTFlyLz9x4BuyIBuyHRTZjJmujkzoQKtMm2EEEIIyYVdMnTxufI3tf8kf3P2xTIUNi1Tmei//abcQKHyCK8B002YbsRUnpKpRkxvnqjMmMqHVH6UixEDplyMVB9FmrGERAfbpakuIDU1NRa10rCkTXp2xw3LkpmOKVAArxlThsxUO6aaK/oZMoxIpAyZ15RhGFndmHnNmY4KsIQQQggplN0yuPEyGdljmlddmHIF3XwB5BhqyHrdhCkjhhwlmxHTmycqM5ZvrRgw5WKk+ijKjMW3tklgQYeMHko4044mJBYNSeTQ5GVLR1R6FtRK1y53n6SiMAUL4DVk6umPehpkMmQIXMqQ6S+E9poy1XTRa8wAgqZCD6b5gmBMCCGEkOrC9JueK3oOoecWugFTTRJ1E6aMmBrCXuUzmYwYUHkRjdjsoygzFu6skeb+ceM8MnsxBQ2gm7FcDZkyZbohy2TKTMZMoQdRHTzdIoQQQsjsxpQjAD2X8BqwTCbMa8RUPpOrEQM0YrOHosxYpLteAqtCkjDMUySiA9K+eL4E0IxxXoO0boxIXM0/NCDNSwZk/HBIus6utZs6XtTZKjXLh1PLuESC9VIfjFj/x2RgSY107U7NS0SHpes8dx9oKnmBtc3kPJ/9H4nKwKommR/AejVSu6BZ2vqjvudDsmMKHEA95dGDTb6GzM+UeY2ZMme6QcsVPfgSQgghZGZg+s33Q+URem6hDJifCSvWiNGMzR6K6zN2aFhaAgFpvKhPwqqponf+vBbpG3P7kCXGZWBZQJp63do0mLFAozQu6ZDRmLtOfFTaapqk74D72SYsXYF6CY7hf48Zs4+hQTpGY66JSkj8sHssWfYPM1m/NiTxo862EnHrS2Y6D5I3puABCjFkypQhqOm1ZCZTpshkzryoIEsIIYSQ2YspR1CYzJdCN2HKiKl8RZkwGjHiR5EDeFjEU7VLtWe3S9/e1OAdttnpRm2WtvyuDqmpD0oE/8OM1SiTpUhIaI1lmDanmj8mQh0SOLvPre1KN2N27dwac+1ctv0nzZg+n5QEUwBReM0Y8DNkployZcpMxgyoIfG9qGCaDwjChBBCCKlOTL/t2TDlEGqIeoVuwLwmTBkxlcfkYsSAnxEDppyLVDfFmzHF0bhEBtukoSYgbVthyGIyvMxp/jeZLgljHduMuf/r7O6SwFnKfHnNmW7GnH00D8bceTo57P9IRHrOmy+1dU3StnFUooe92yCFYgogCvXURw8+KijphkyZMt2Q6aZMjbhoMmZec6aDYJoLpkBMCCGEkOrE9FtvwpQ7AD3H8BowNVKiMmFeI6bnNnrOo+dCKj8y5U4KU85FqpvSmTGX8d5GqVk2LLFjcRldkckouWQyY8ciEqx3a8zsZoutMpw0SrmasRz2rzgcldGNrdIYqJXWIQ5IUipMQUSRryHzM2VeY6abMx09iAJToCWEEELI7MSbJ5hyCT3X0A0YMJkwGjGSjZKbsdhgs2vGLGO2uUlqLhzNPCBGRjPmmDoM2BEbaZWaFaNaU8Lcmylm3b+XaI9lyLqcJpSkJJiCiSKbIVPvIVN4TVkmYwb0YJkNU7AlhBBCyOzAlBtkwptveA0YMJkw9R4xhZ770IjNboowY3EZ3xWR8XhqwIvEoVHpWBCQliG3NupISNoDDdI2GEkbJCM85s73MWPHDvRJU327tK8ISEdIH1Qj8wAezvyExA/FHQOWZf+xsbB2/AkZ72/R+qaRUmEKKgqTIQN6wNKDGTCZMqACosIbMDOBJ1uEEEIImZ2YcgMT3jzDm4eYTBjQcxpvvkMjRooyY6HOZmmsC7j9sAIyv7FVgiFPs8DDYQkub5Bat7+WPXy8agroZ8as7Q8vt9ZRg30k8Zgxi7Th6zG0/RqtJs1n/+NDbdKUPH5rveVBCbPfWFkwBRedbIYMeIMbUIHPZM4U3uCpYwq2hBBCCJldmHIEhSm3AHoOYspRvHmMN8/JZsKAKaciM4uSN1MkJBOmIKOjng55g5U3mHmbL+rogVFhCqCEEEIIIblgyi1MOQjwNkcE3rxG5TumXEjHlEuRmQfNGJlSTMHGi8mQKbwBDkHPz5zpmIIpIYQQQogJUy7hReUh3vzElMOAXEwYMOVQZGZCM0amHFPQ8aKeGpkCGfAGPUU+5owQQgghJB8ymS+FKWcBKq8x5TxeTLkTmbnQjJFpwRR8TGQzZQpTQMyGCqgKU9AlhBBCyMzEmweYcoVsmHISnXxMGDDlTGRmQzNGpg1TEMpErqZMYQqYhBBCCCHFYMo5TORrwoApVyIzH5oxMq2YglE2VIDLx5wRQgghhJQLPTcx5S7ZMOVIZHZAM0YqBlNwyoYe/IApQBJCCCGElBJv/mHKUbJhyoXI7INmjFQcpoCVL94gSQghhBBSLKacI19MuQ+ZvdCMkYrEFLymElMAJoQQQkh1Y/rNn0pMOQ+Z3dCMkYrHFMwIIYQQQqoBU25DiIJmjFQNpgBHCCGEEFKJmHIZQrzQjJGqxBT0CCGEEEKmE1POQogfNGNkVmAKmIQQQgghfphyCkJKCc0YmVWYAi0hhBBCiI4phyCkHMx4MxaPhiRyKGGcN6UkYhIJRSVumkcIIYQQQgiZdRRsxmKDzVJTU5OR5sGYcb1SEu7Mvp9cljETli7DeaXokrBxvQwcGpDmfNchhBBCCCGEzFhKUzNmG41mGThkmFdGymvG0sF2ajrDnulR6VlQK127cqh5oxkjhBBCCCGEaNCM5YjZjOVBsWYsEZKOAM0cIYQQQgghM4XymrHdXbaBSUT7pLUuIDVY5qAzLxEdlq7lDVKLJn+B+dK0akCicbVuTAaWGEwUtrdkQGLuZ9tobQ7J8KommR9A08FaZztHUutMNmNxCQdbpWEelg/I/MXtMuwekx9mM+YcZ9dubdrhsPSsaHLOC9tvDEo4YU33mrEjUelbVistg+PuugmJDrZLk11ONVK7oFV69sadeTf0SZN9vAq3rK1tDCTPHes0S1t/VBJqH4QQQgghhJCKpfxmbEGjNC3v04yWxaFhaQk0SMdozDEOR+MS6W2RwIKgROxlcjdjMCY9Y65psbYT6myQwLLhdMOW3E5CIusapGHNqMRgkKxp8VCXNATaJaQZOBM5mbFERLoWBKSlNyLxo860xOG4c45pZmxcBmDEelPGKTbUIrXL+iRy2F3vwIBVRk3Sd8D5bJ+7p2Yt0l0v9WtDqX3Fx2W8EgYrIYQQQgghhGSl/GasplWGXYOhgIkIrAl5anDGpe+sGmnfATORhxlb6zFIiZC01zQmTUyaGYuPSltNm4zqxhDG6JwaadvqGroM5GLG4lvbpObsPhlPW8YlacYcI9a4Lqydf0SC9fUSHNOWtwivrZH67ojz2c+MadMIIYQQQggh1UH5zZhmnhxiMrzMYLQsYHgae9FsL3czNnk7jrlSBiltmb1dEkg29UvHdDw6uZixyLqAYRkXu4zapKuzQWo+1SNRfV5sWFoMx2SjtmcwY8eORKTnvPlSW9ckbRtHJeoxvYQQQgghhJDKZRrMWFxGV0yTGRsLSr3X0ORIacxYQJq6h6VvmfXXPk93nl1jZyg/HZMZUxyOyujGVmkM1ErrkLZdQgghhBBCSMUyDWbsmIz3NkrNqvybKdrvNvOYsUnb8WumaI9I2Cg9UW35HMnFjOXWTNH6/yD6gzVY66n+Xda5n10jbaM+/b38zJgi2mMZsi633x0hhBBCCCGkkpkWM3bs8Ki0+Q7g4fSHqlliGRt3oI3EoVHpaAxIwGPGAoEmCe5WA3jEZHSN3wAeMIJNEljcJSE10MXRhMSiERlP60c2mVzMWGoAj2iyH1fiYMz5XzdjmG6VTUOgTUbVgB072q3zb5MBNRjJsYTED4YlosrULeM+beTH2FjYOm5l4BIy3m+VYSYzSAghhBBCCKkopseMgVhIghmHtrdIG7a9VhqW90gkOiAtaWasXoJ7x/Mc2j59CHnsu3F5UMKlMGPgcDh1XvbQ+X1O/zCPGcNxhO2RHweS5im+KyitC2qd48I5L2mTYTWaIkaC3NjinKd1zMG9lrEcakudh11G1nmw3xghhBBCCCFVQWnMGCGEEEIIIYSQvKAZI4QQQgghhJBpgGaMEEIIIYQQQqYBmjFCCCGEEEIImQZoxgghhBBCCCFkGqAZI4QQQgghhJBpgGaMEEIIIYQQQqYBmjFCCCGEEEIImQZoxgghhBBCCCFkGqAZI4QQQgghhJBpgGaMEEIIIYQQQqYBmjFCCCGEEEIImQZoxgghhBBCCCFkGqAZI4QQQgghhJBpoDgztrtLamq6JJxp3pIBiZnmEUIIIYQQQsgsh2aMEEIIIYQQQqYBmjFCCCGEEEIImQamyIwlJDrYLk11AWv5GqmZ1yDNKwYkmlDLxyUcbJWGeda8moDMX9wuwwfVvGMS7qyRrt3WNja3yvyAtcw5AzJuTY/vCkrrglpnm4H50ri8S0Kx1HqEEEIIIYQQUqlMjRkbC0p9fYeEDrvzEnEZPxCThL1sQiLrGqRhzajEXHMWD3VJQ6BdQkeczzBjDY1N0toblbi9jkV8VNpqmqXvQML5fDQhseh4aj4hhBBCCCGEVDBTa8binmWAbaraZDRt3rgMnFMjbVvj9meYsZrlw+lGS5kxrQaNEEIIIYQQQqqFKWumGNnYIvPnzZemFT0yGnVMls3eLgmgmaGB5sGYvQzMmPpfZ3xruzTNq5WG5V0ysFvVtBFCCCGEEEJI5VOcGUONVyYztqtj8gAeR+MSHe2R1saA1C4ftvt9+W7DJZMZc0hIbPeAdC2plUCjtR23aSMhhBBCCCGEVDLFmbFESNprmqTvwOR5kWC9BDrDk6Y7RKXnrIB07bX+t7bREWiUnqh3mRT+ZkyRkNELa6RlKNtyhBBCCCGEEDL9FGfGLCLdDRJY3CWhQ6mBNMZHO6Qh0CIDqj/XoYiED8aTzQgTBwakJZAyceO9TZO2EYtGZNztR2Y0Y/FxiURjkjjqfj4ckq4FAekIudsghBBCCCGEkAqmaDNmD1s/0pU2xDz6haUNMX9gWNoWz0/2Datd0CrBXVq/MWxDH/reHqY+KGFfMxaW4PIGqXW3GahrkvbBKPuNEUIIIYQQQqqCEpgxQgghhBBCCCH5QjNGCCGEEEIIIdMAzRghhBBCCCGETAM0Y4QQQgghhBAyDdCMEUIIIYQQQsg0QDNGCCGEEEIIIdMAzRghhBBCCCGETAM0Y4QQQgghhBAyDdCMEUIIIYQQQsg0QDNGCCGEEEIIIVPOMfn/AYRpMqTYniBlAAAAAElFTkSuQmCC)
View of the synchronization configuration of the Trouble Ticket module selected in point 3 - Enter the authentication data, stating the authentication mechanism Type, Username and Password for login. By clicking on the
 icon it is possible to have further information to retrieve the data to be entered in the username and password that differ for each synchronizable platform.
![15.4 [2].PNG](https://usermanual.vtenext.com/uploads/images/gallery/2022-06/7LZ15-4-2.PNG)

N.B.: synchronization occurs in accordance with the interval set for the crons, which is every minute by default, but which can be subject to variation depending on the number of synchronizations set, other cron processes, and the machine workload.
15.5 Recycle Bin
The crm has a module called Recycle bin which allows to restore every removed entity from every module. Using the research placed in the lower left and typing "Recycle Bin" you will be able to click on the menu item to visualize it.
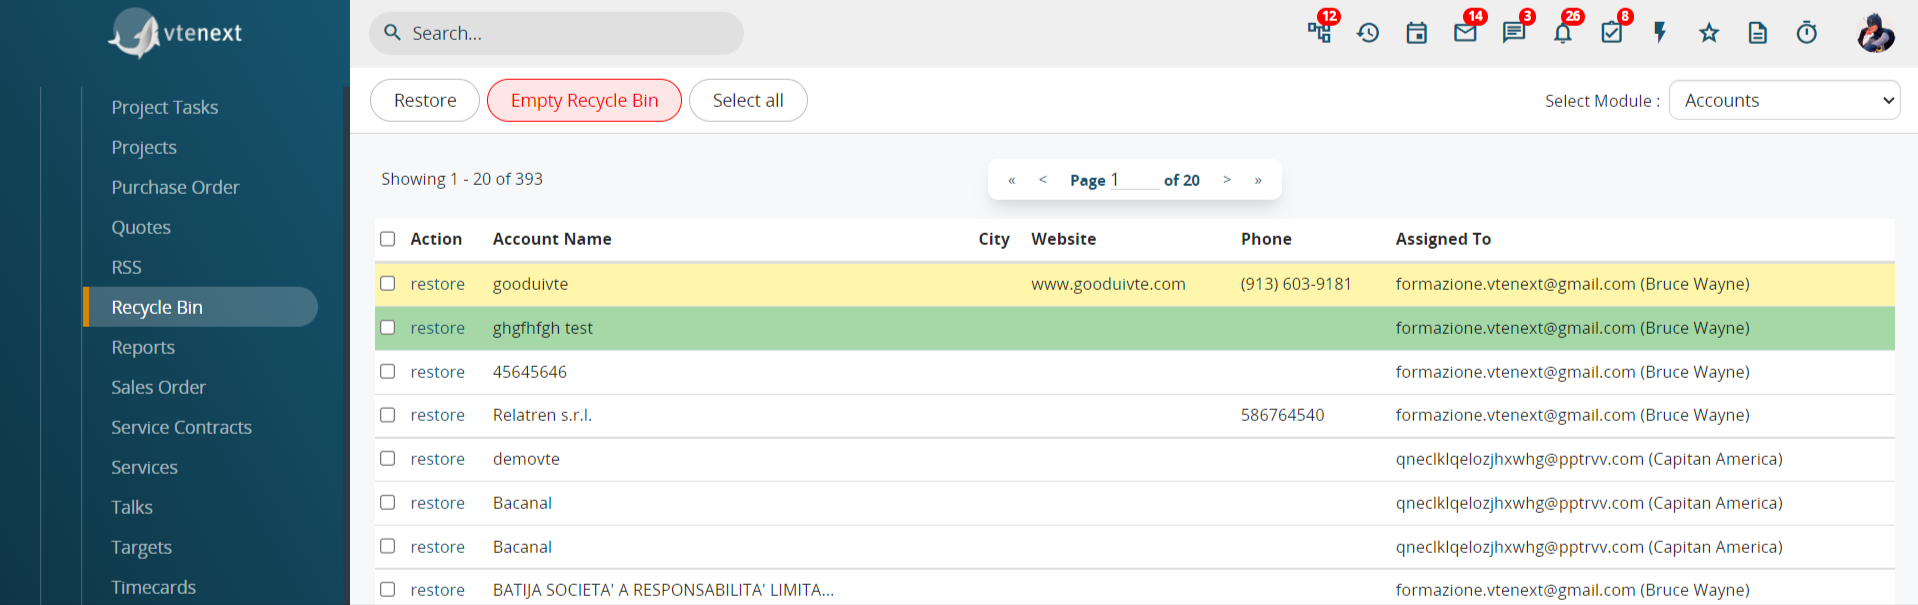
Recycle Bin detail
How to restore a deleted record?
Firstly, in the upper right you must select the module form where the record has been deleted (ex. Accounts or Help Desk).

Module selection from where restore the entities in detail
Once you have selected the module, a list of removed records will appear. From here, you can filter among the provided fields by searching for deleted item.

Here you can find several possibility:

- By selecting manually different entities it is possible to restore them by clicking on the appropriate button placed in the upper left: RESTORE
- It is possible to restore a single entity by clicking the button "Restore" placed on the row of the selected record.
- By clicking SELECT ALL placed in the upper left you will select every removed record from the module you have chosen. Then, you can click on "Restore" to restore all the records. If you do this, you will be able to find those records by opening the module itself.
- Eventually, by clicking EMPTY RECYCLE BIN, EVERY RECORD OF EVERY MODULE WILL BE REMOVED DEFINITELY!
15.6 Push Notifications
As soon as the version 23.08 is installed or updated, in the CRM's notification area, you will find the following notice:
With this update, it's now possible to send push notifications to devices using the Wilson app. Each user can select the events to enable on their own device. If you want to provide this functionality to your users, click here to enable the service.
Once you click the link, you will be directed to the SETTINGS > OTHER SETTINGS > PUSH NOTIFICATIONS area.
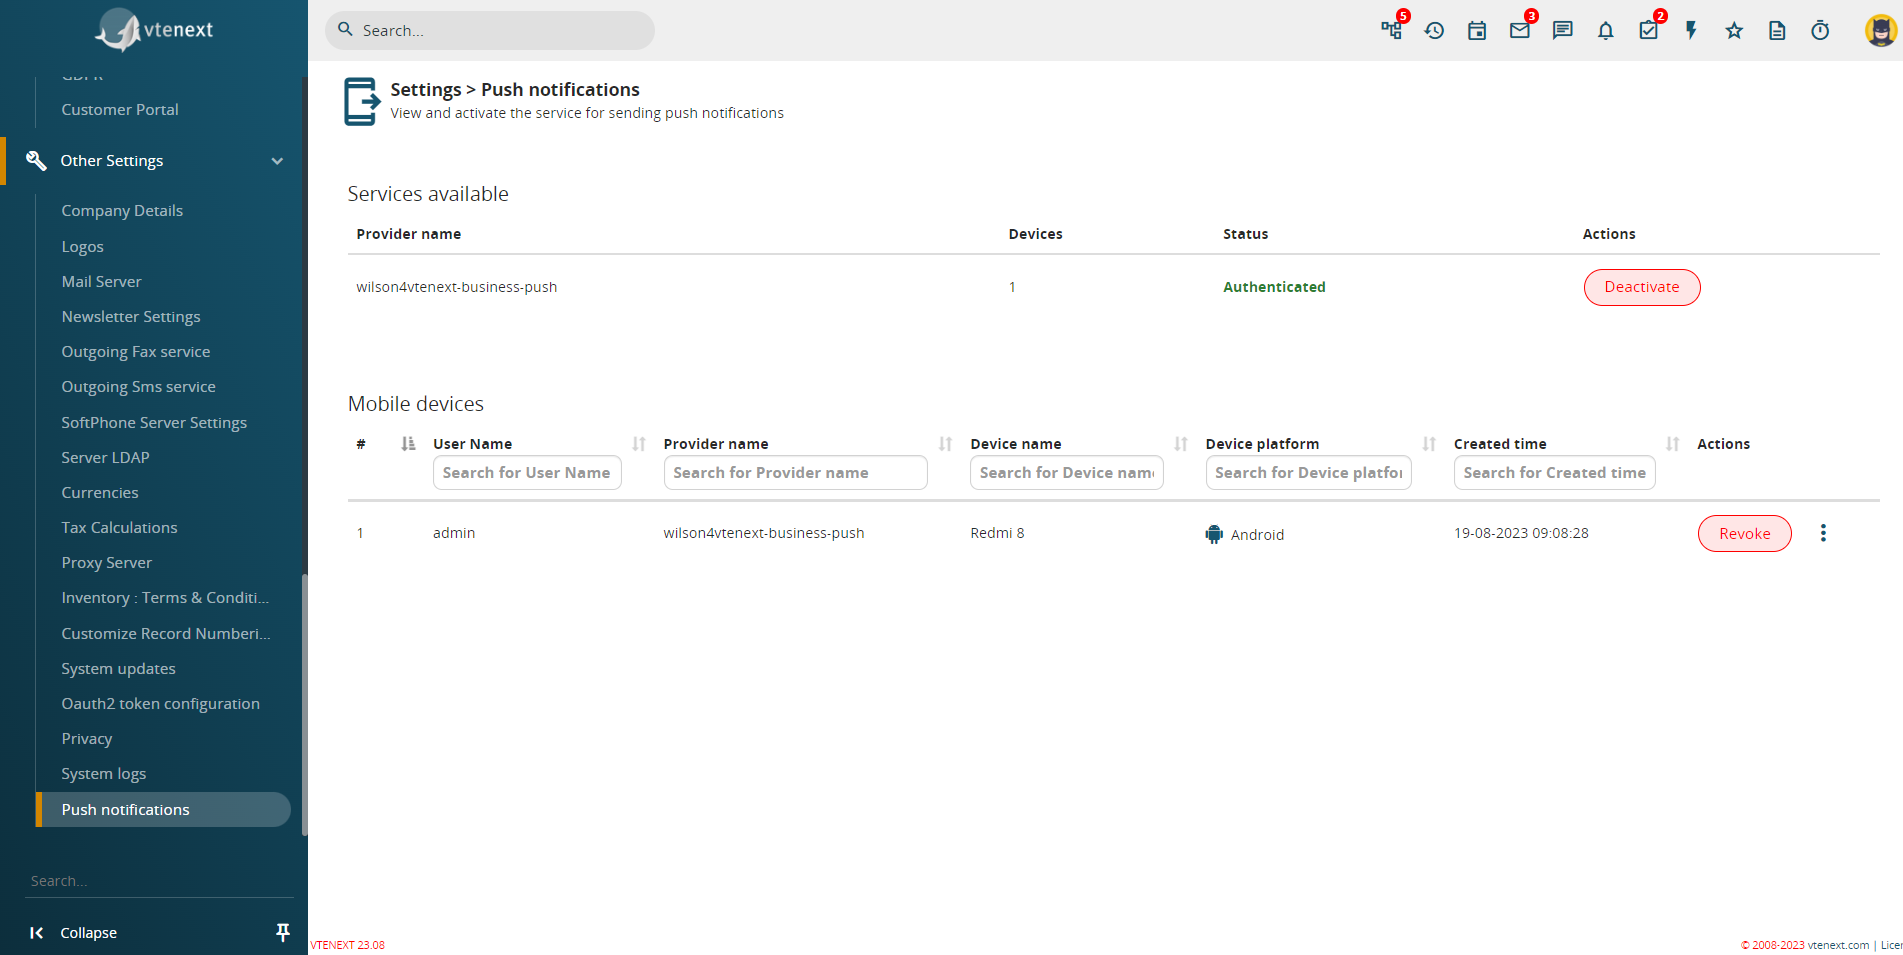
Push Notifications Page in the vtenext Settings
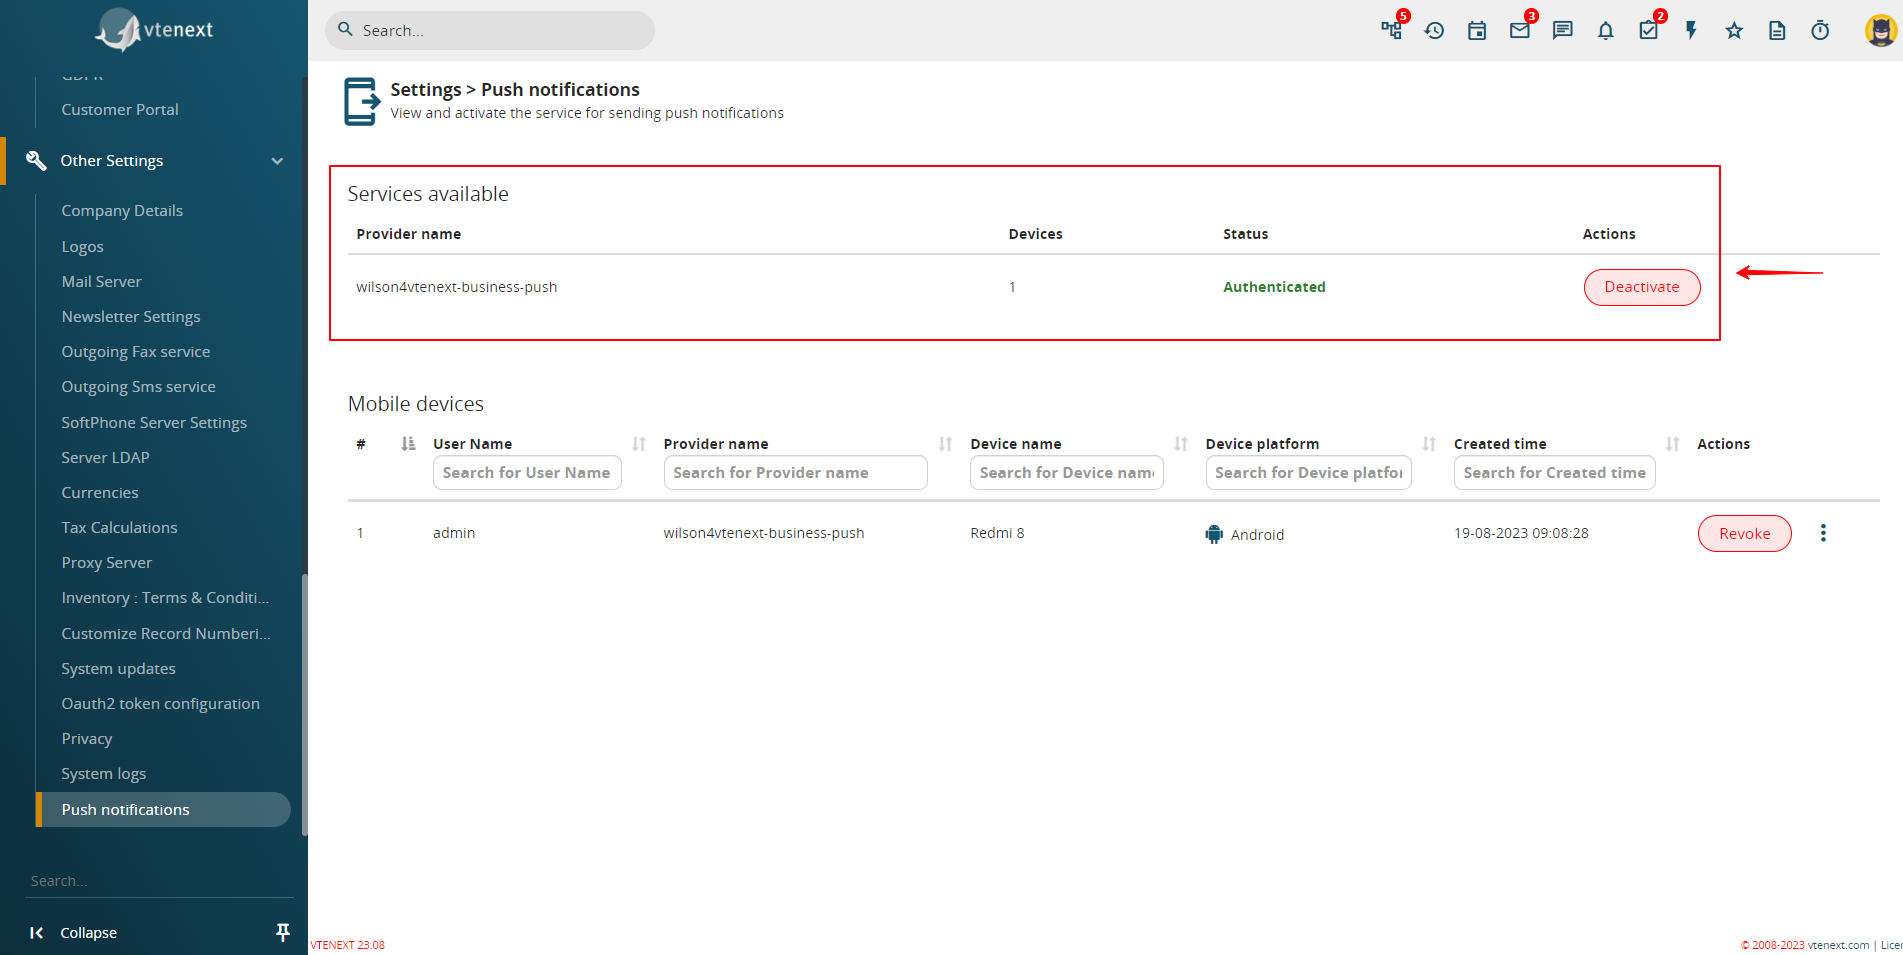
From this page, you can enable notifications for all CRM users by clicking the ACTIVATE button directly on the right side of the screen.
Once done, in the AVAILABLE SERVICES area, the status label will change from NOT AUTHENTICATED to AUTHENTICATED. Further down, you will find another section called MOBILE DEVICES, where you will see the list of all devices of users who have chosen to activate vtenext's push notifications from the Wilson app (but we'll see that shortly).
So, once push notifications are activated, you will need to access the Wilson app and proceed as follows:
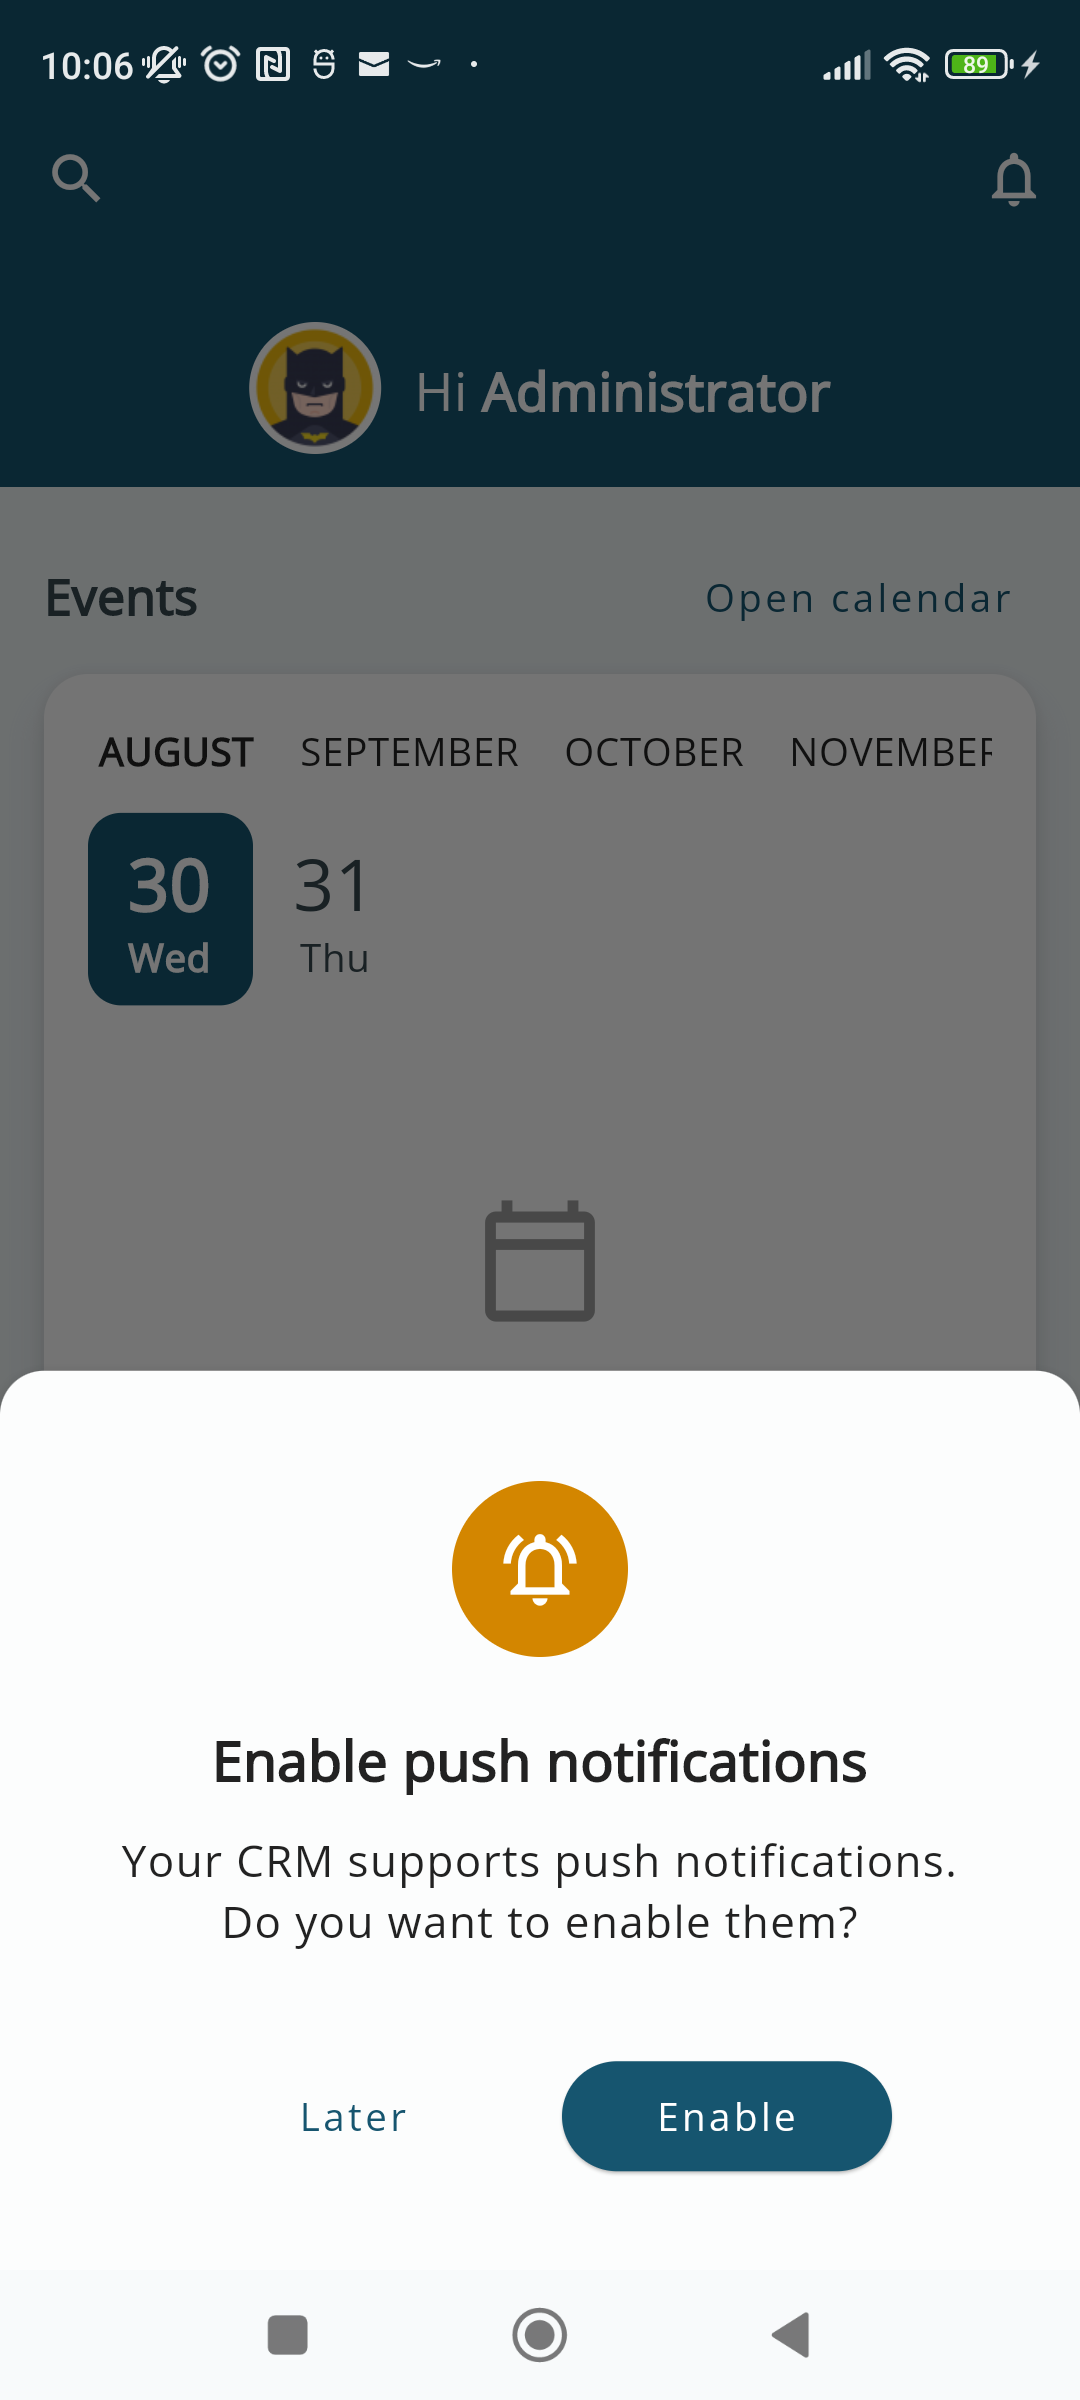
Firstly, Wilson will ask to ENABLE push notifications. Simply tap the ENABLE button to activate them. If you choose to enable them 'later', you can always do so from the app settings.
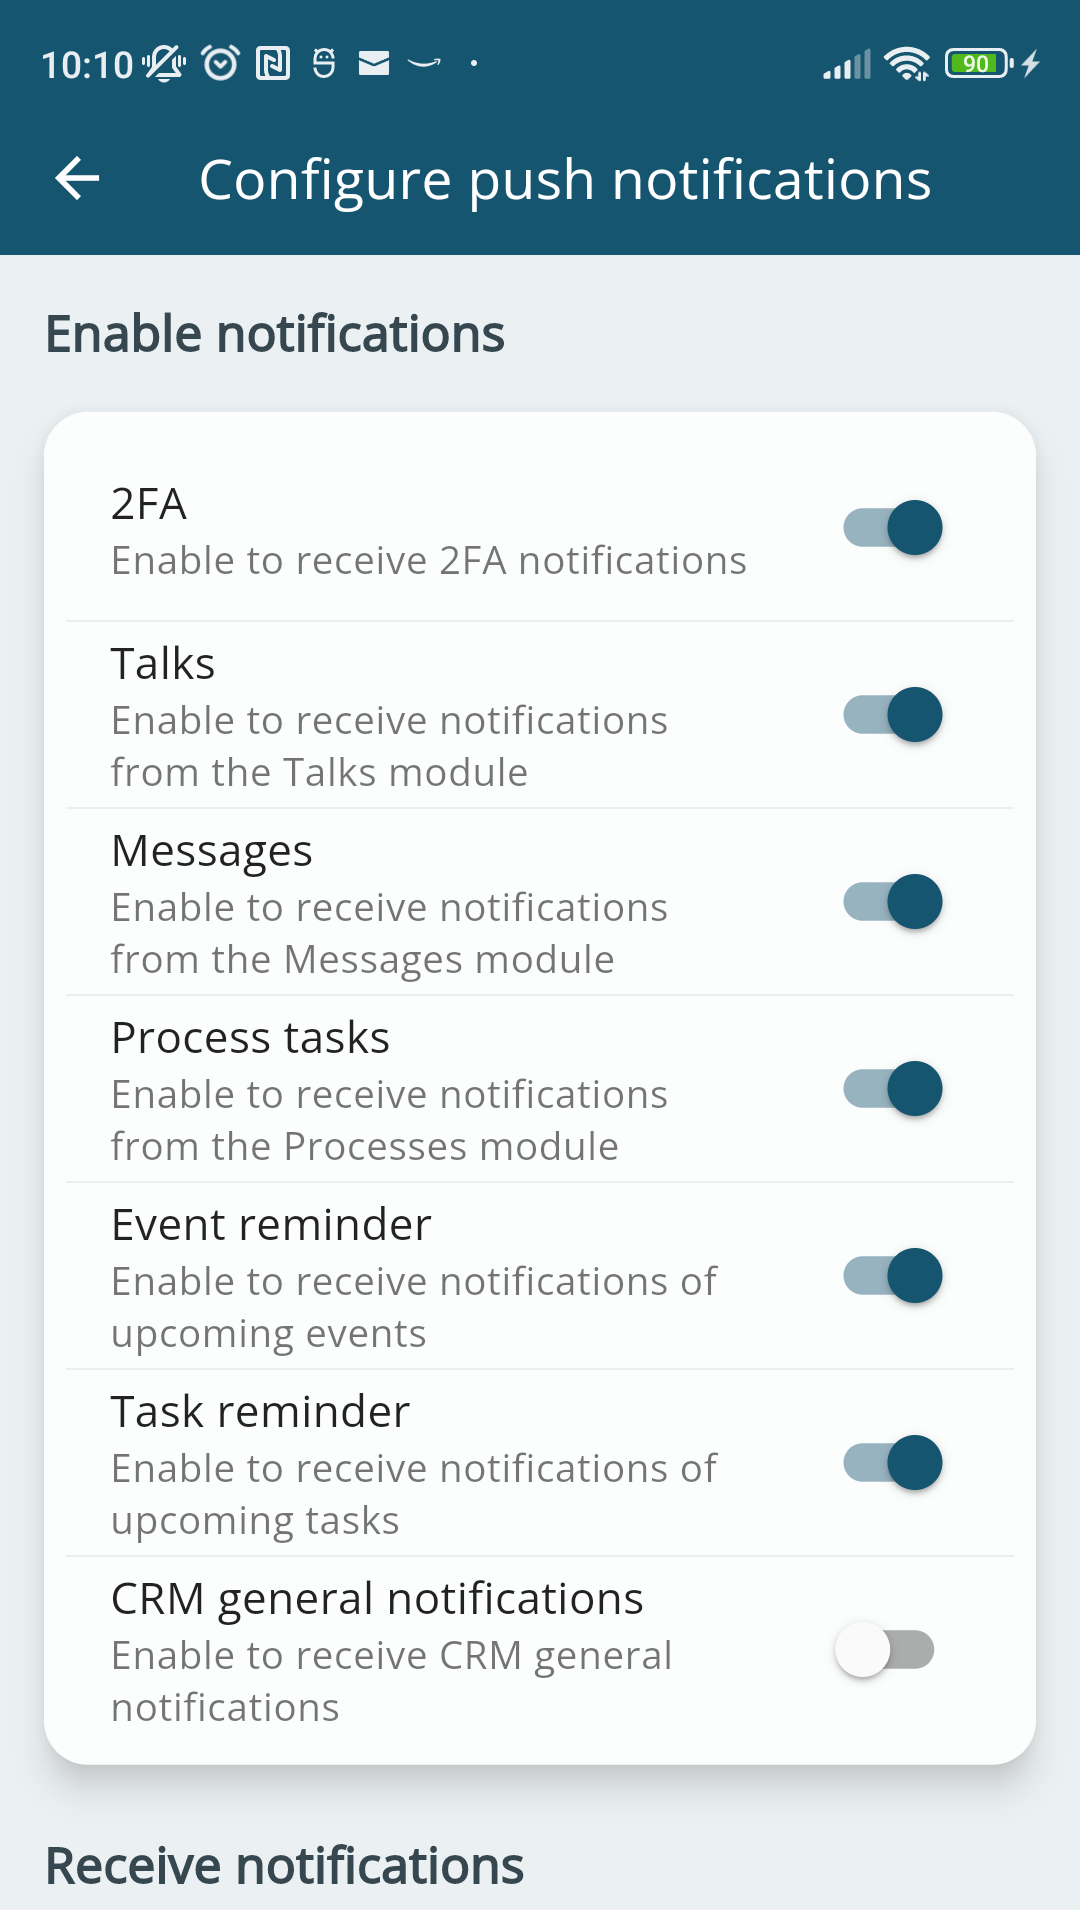
By clicking on ENABLE, the Wilson app will show us this screen, giving us the option to choose which notifications to enable. Specifically, you can enable notifications for:
|
2FA |
allows receiving notifications for two-factor authentication |
|
Talks |
enables receiving notifications for the Conversations module. CAUTION: A notification won't be sent each time a new conversation is received; they are grouped. |
|
Messages |
enables receiving notifications for the Messages module. CAUTION: A notification won't be sent for every new email received; they are grouped |
|
Process Tasks |
allows receiving notifications for process tasks involving the logged-in user |
|
Event Reminders |
enables receiving notifications for upcoming Events |
|
Task Reminders |
enables receiving notifications for upcoming Tasks |
|
General CRM notifications |
enables all generic CRM notifications (by default, this option is disabled due to the potentially high number of push notifications it could generate) |
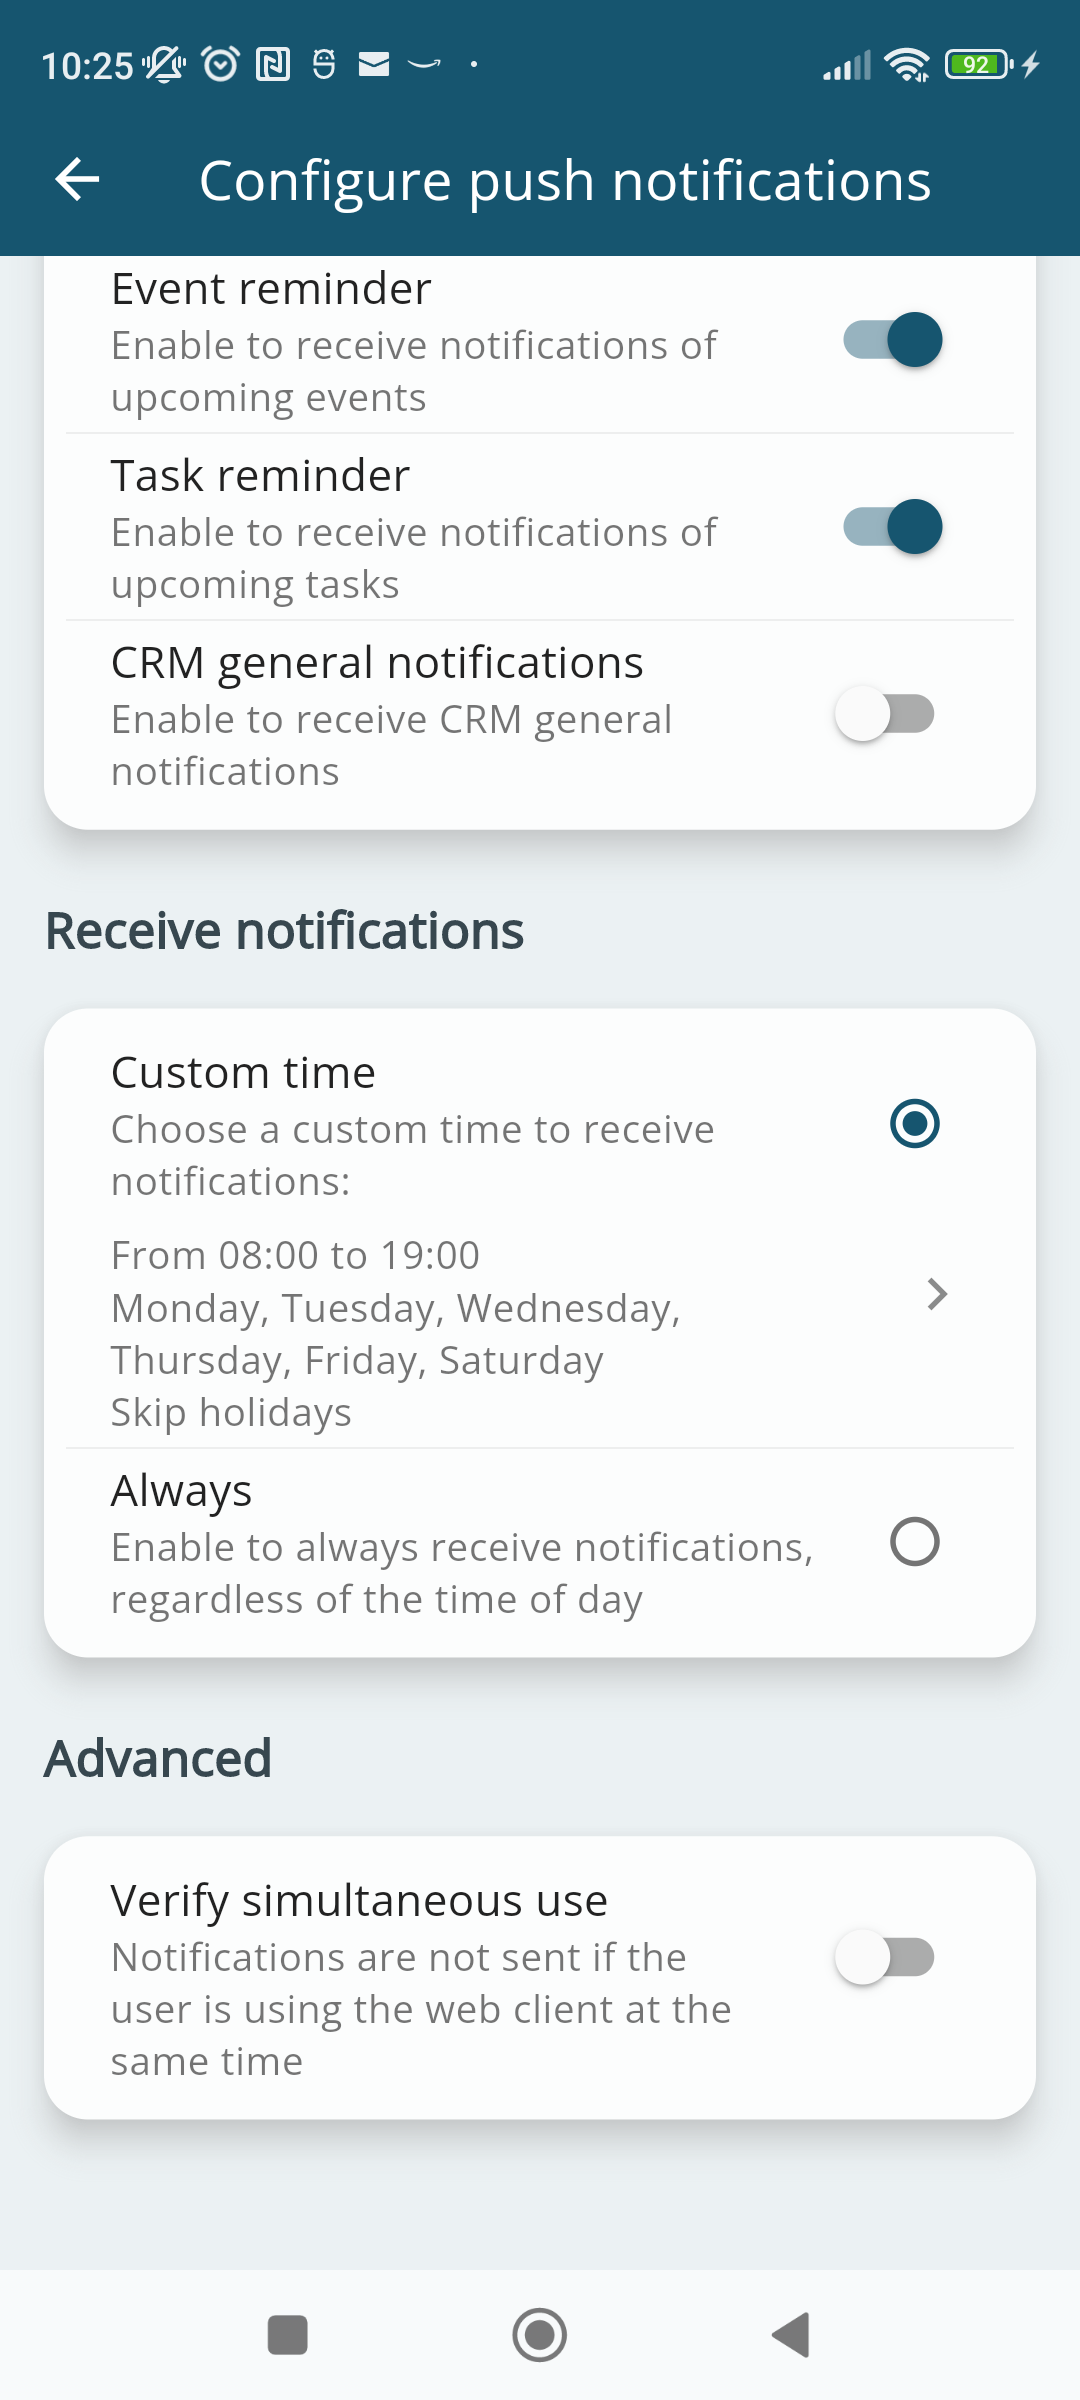
Additionally, you can configure WHEN TO RECEIVE NOTIFICATIONS, with the following options:
|
Custom Schedule |
allows receiving notifications during user-selected days and hours. For example, you can set to receive notifications from Monday to Friday, between 8:00 AM and 7:00 PM |
|
Always |
allows receiving app notifications at all times, any day of the week. |
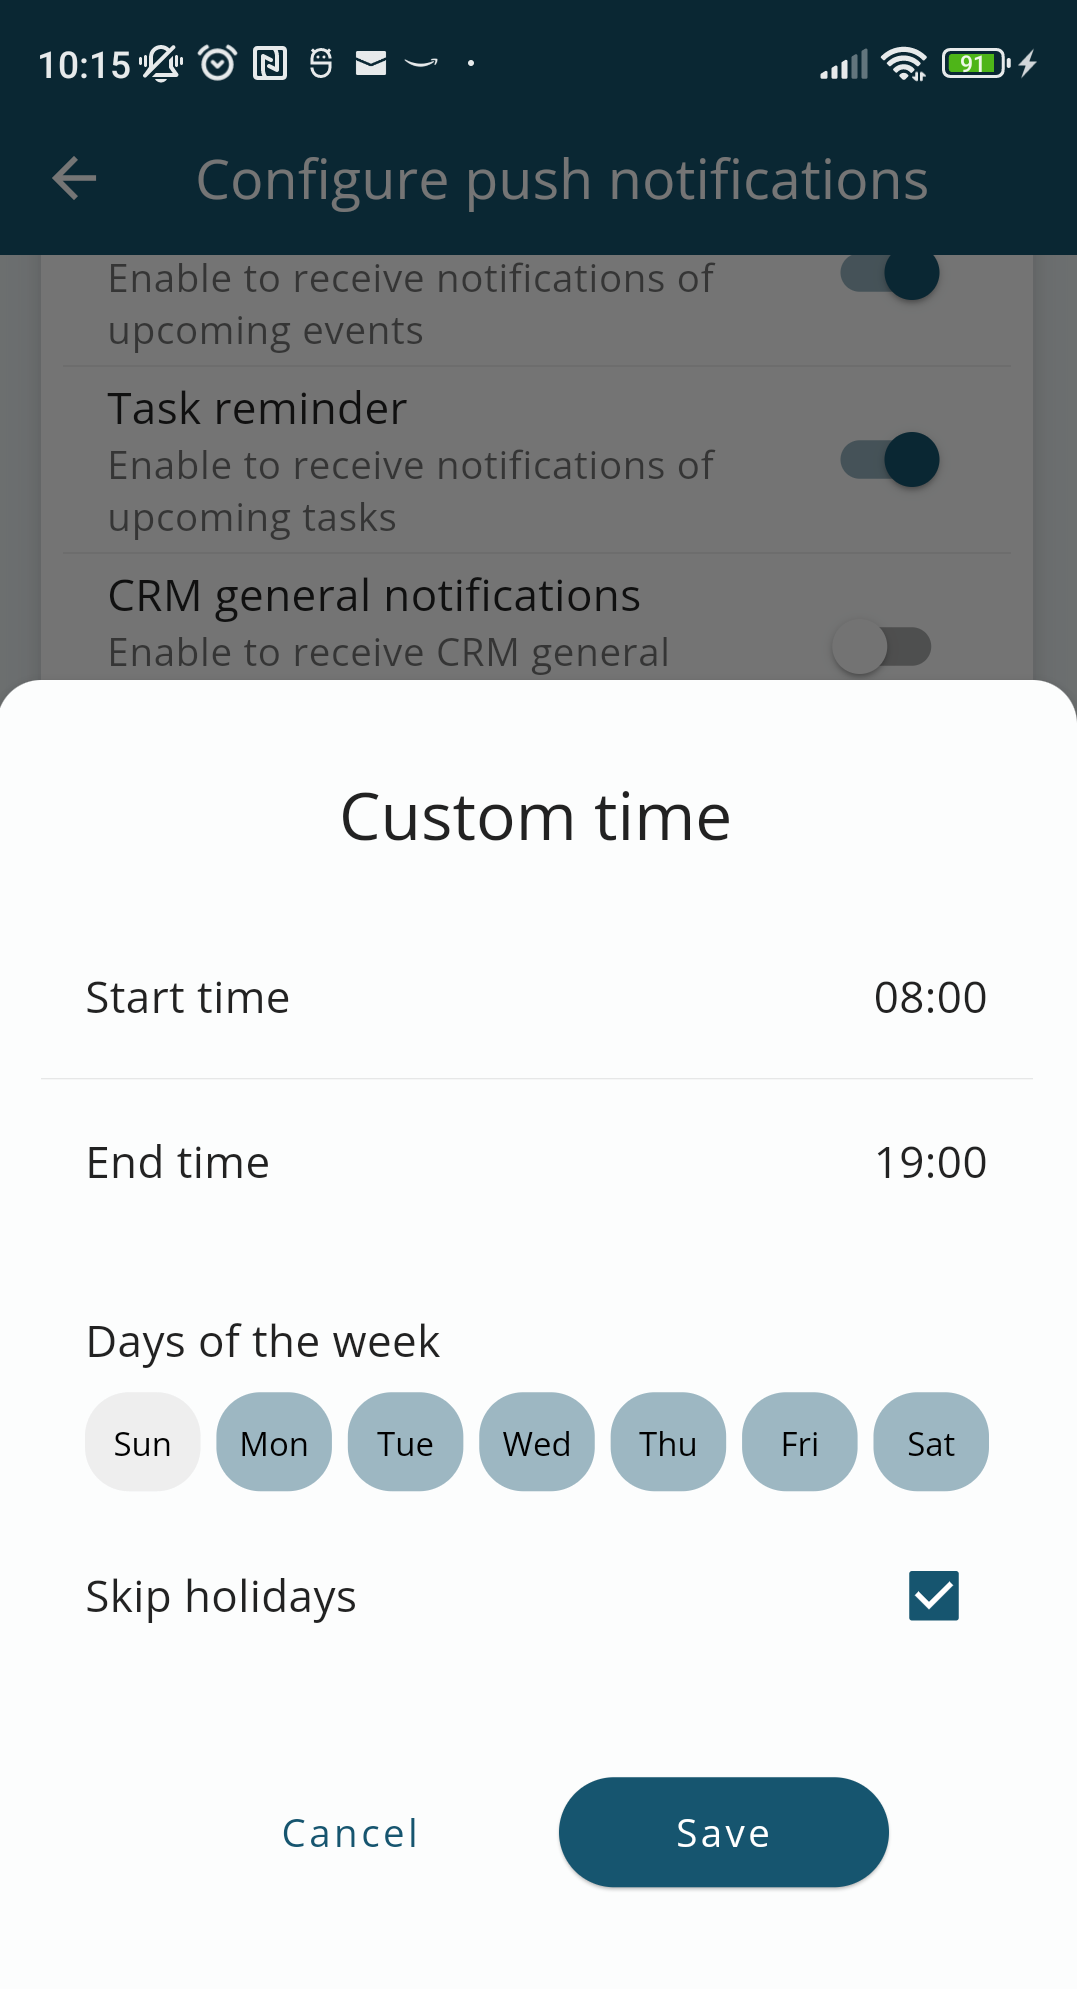
Here's how the screen for choosing the custom schedule for receiving Wilson app notifications looks:
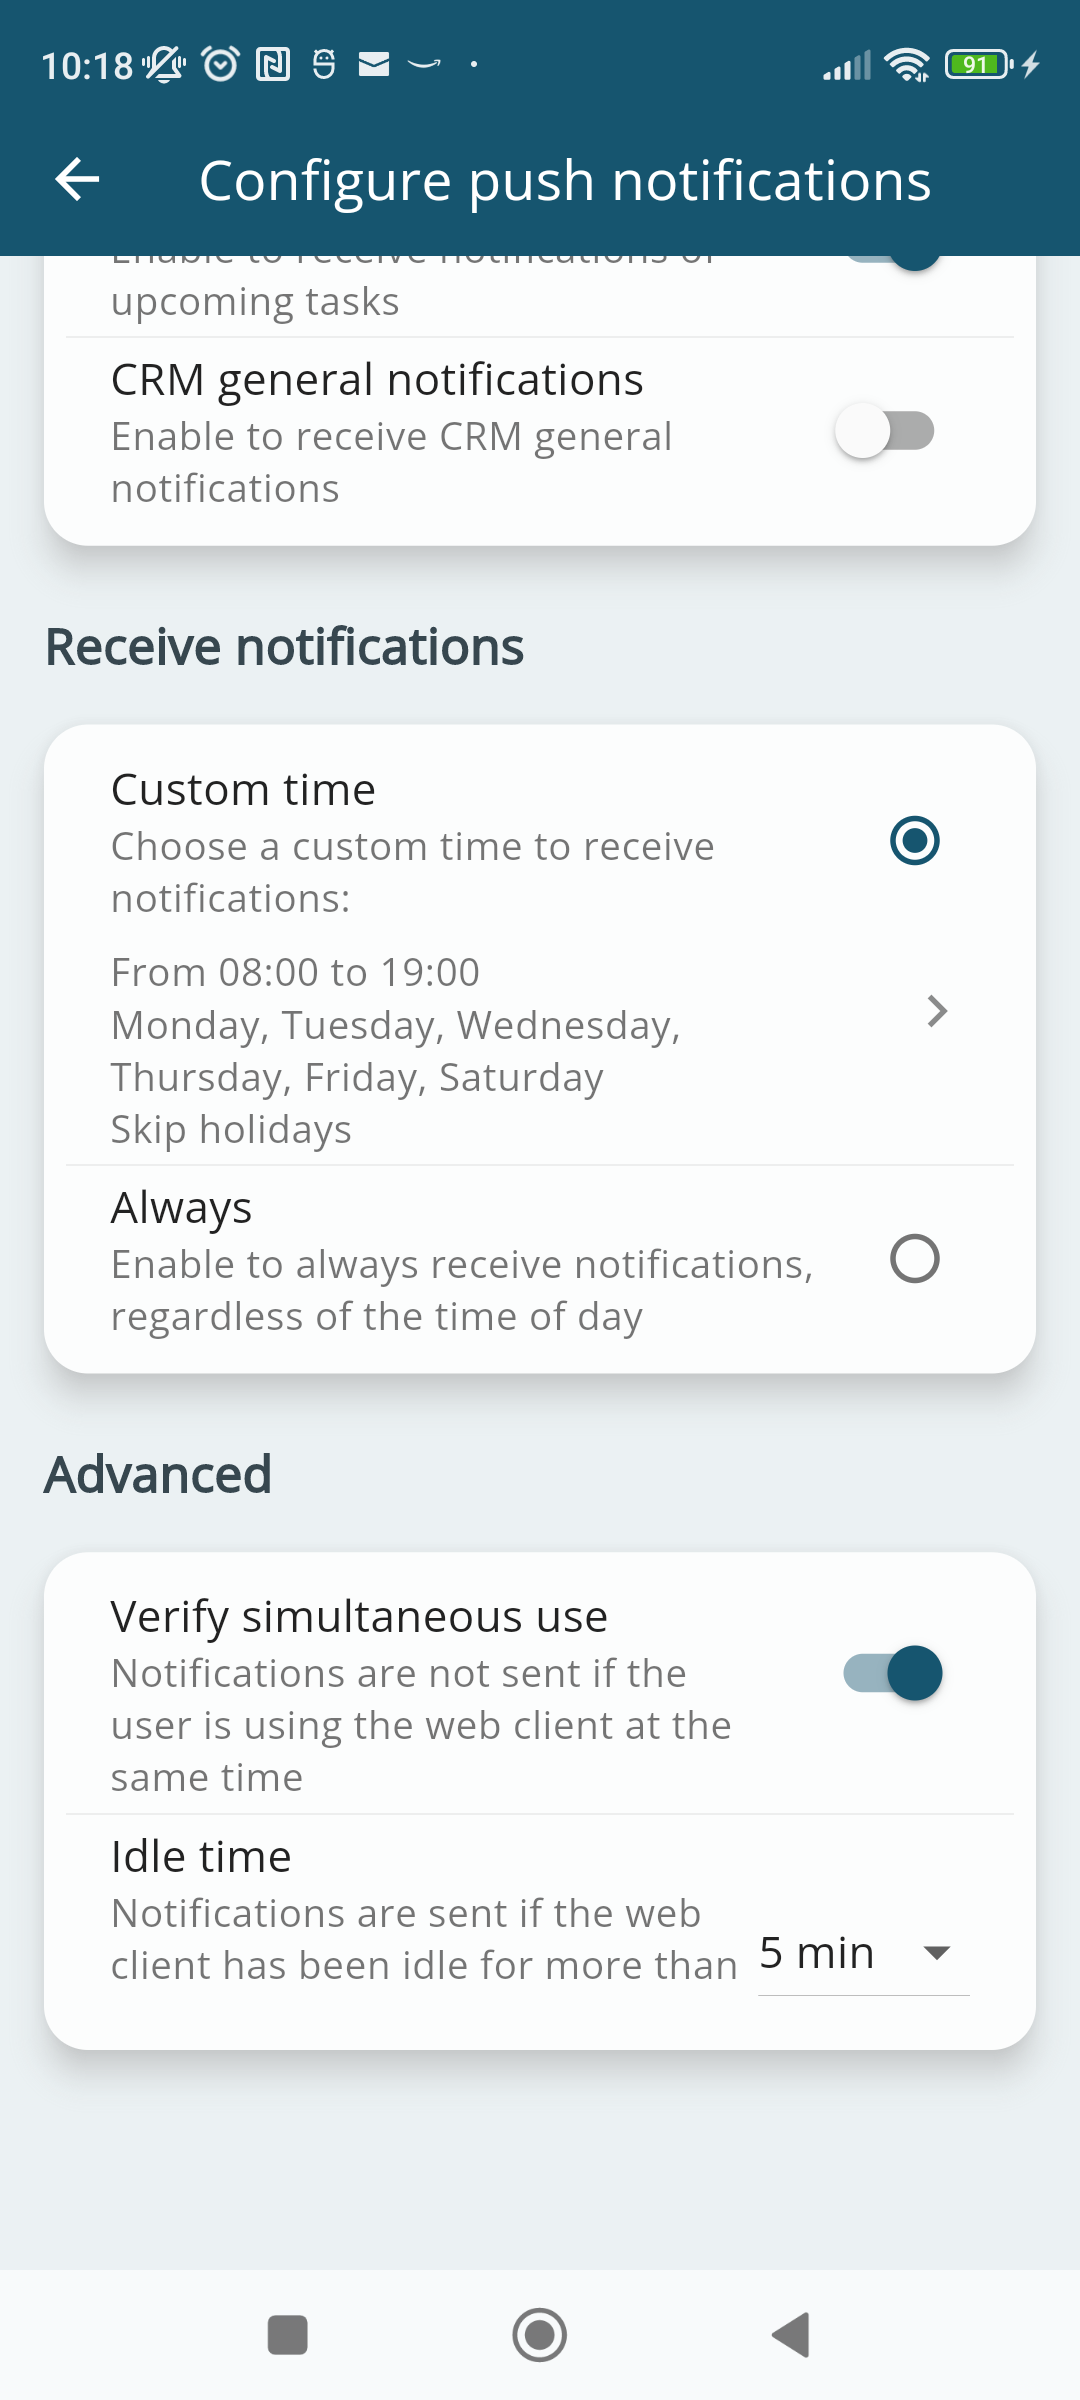
Finally, you can enable or disable the app's concurrent usage check. This feature allows vtenext to check if the user is using the app concurrently with the web client. You can set an idle time, so if the user is using the web client and is away from their workstation for a certain number of minutes, as determined by the idle time, they will start receiving notifications on their mobile device. If the web client continues to be used with this option active, push notifications will stop being sent to the mobile device.
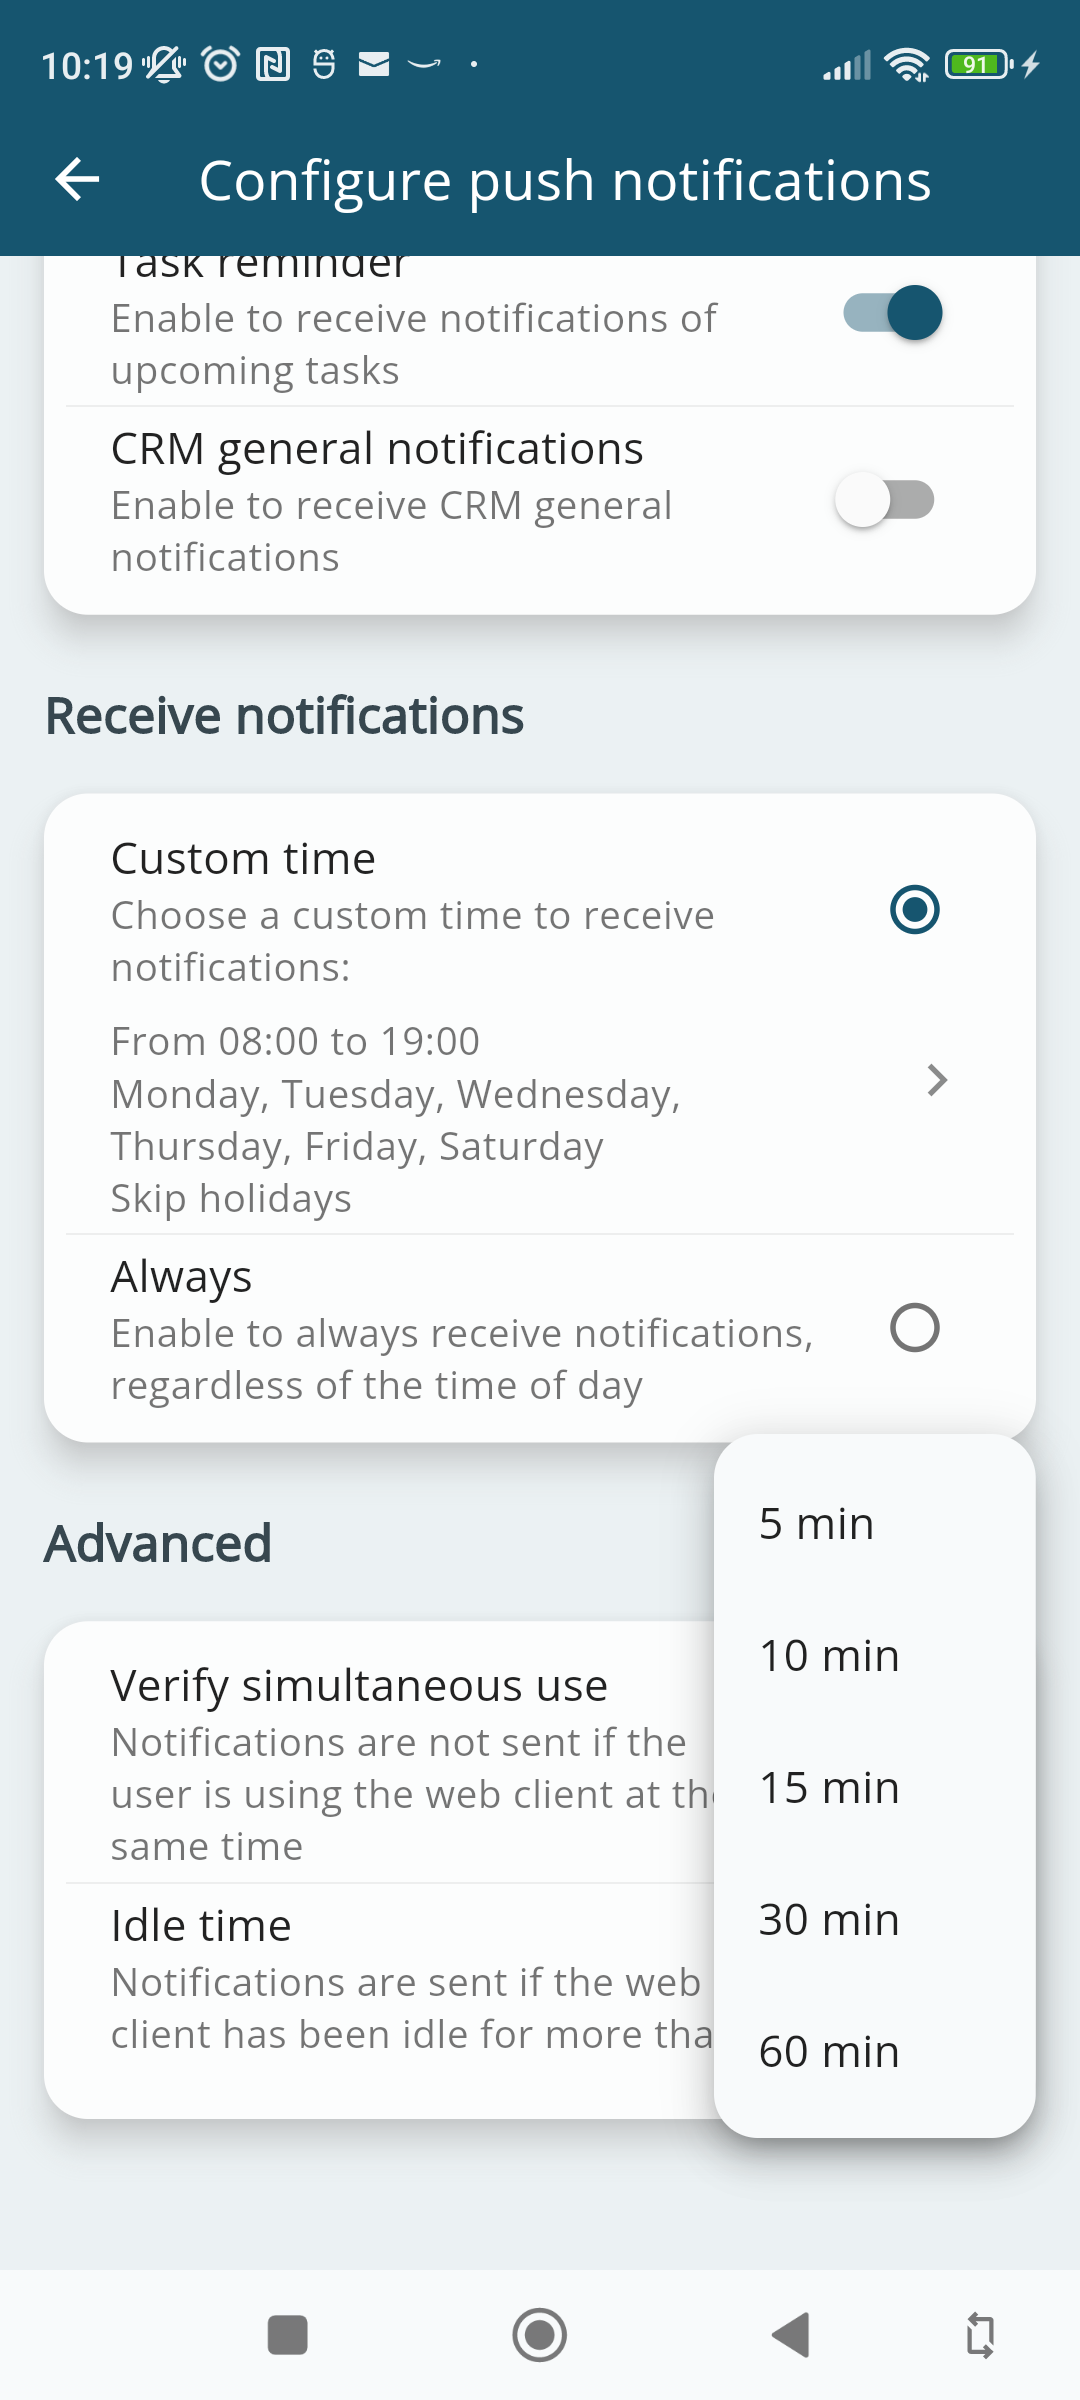
And here is how the interface for selecting the idle time looks. The available options, determined in minutes, are: 5, 10, 15, 30, 60.
15.7 Synchronization with Zapier
Zapier is a product that allows end-users to integrate web applications and automate workflows. It enables the connection of various web applications through "ZAPs," which can be customized based on user needs. Zapier functions as a bridge between different applications, allowing the automation of business processes and saving valuable time.
The purpose of this tutorial is to configure the integration with vtenext in Zapier and aftwerwards 2 examples will be shown.
Hot to create an integration with vtenext in Zapier
1. The first step is to go to https://developer.zapier.com/, log in with your Zapier credentials, and click on "Start a Zapier Integration".

2. It is then necessary to fill in all the fields that the Zapier screen requests.
Example:
Name: vtenext
Description: Integrate vtenext with Zapier
Audience: Private
Role: I have no affiliation with...
Category: CRM

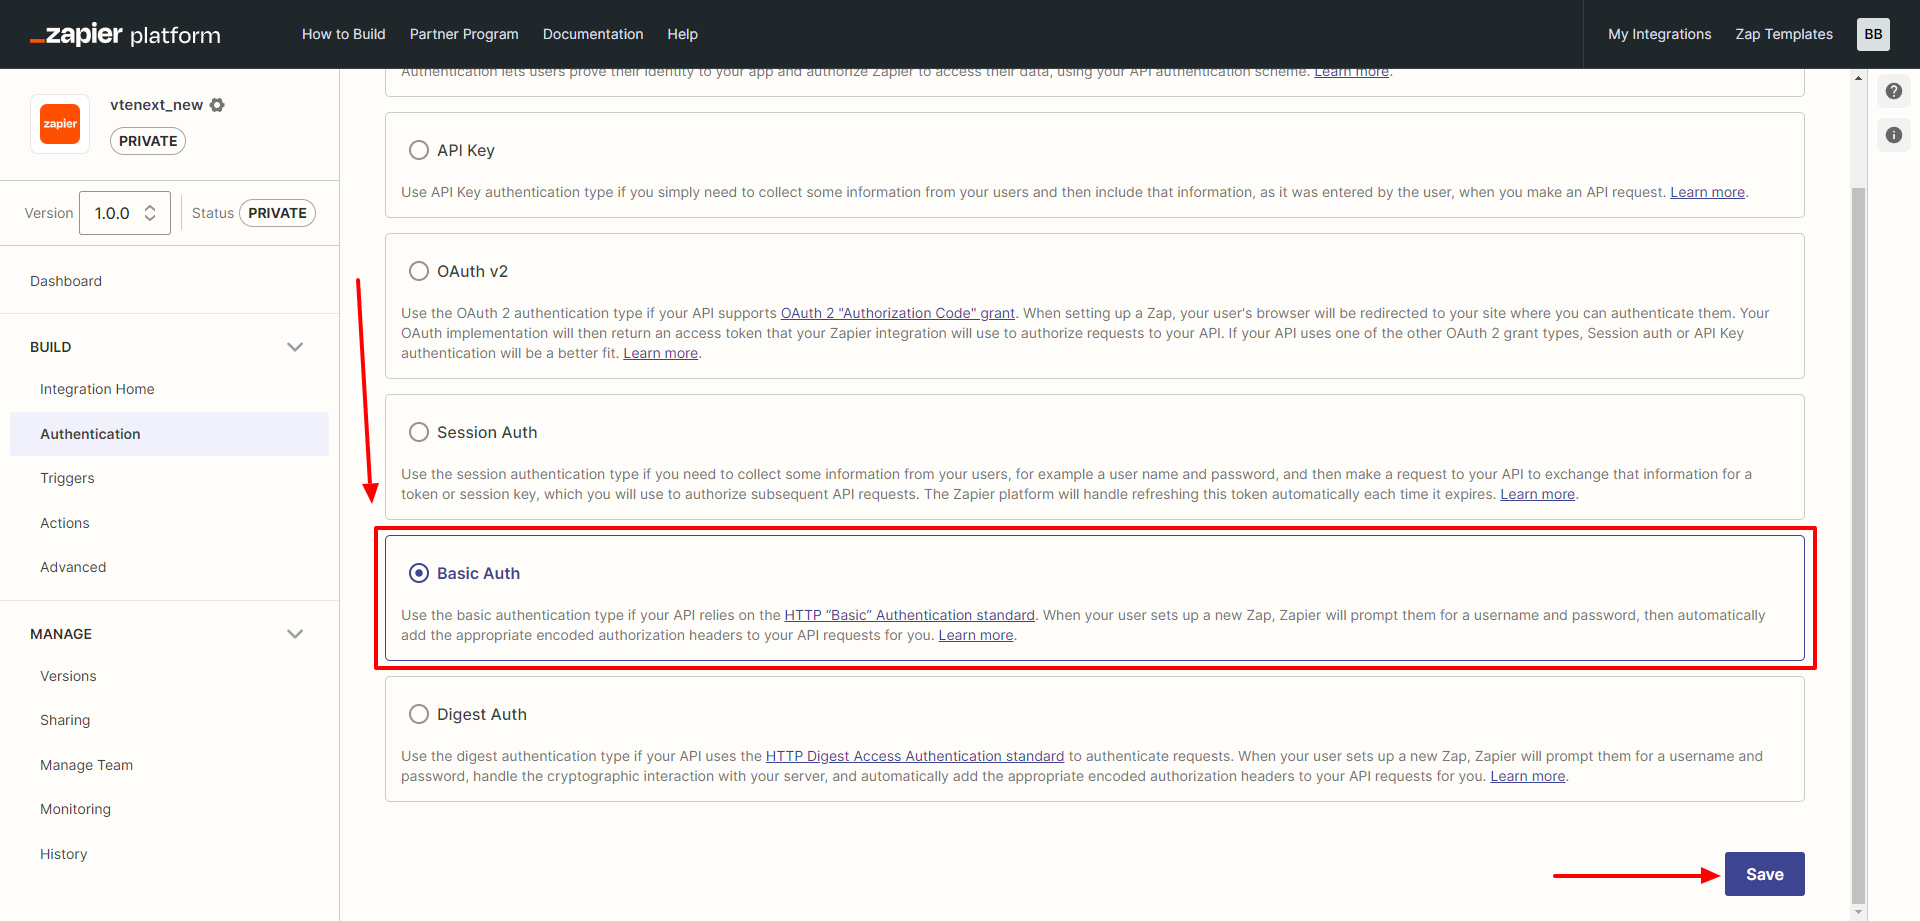
3. After a successful save message and successful creation, you will be able to configure the type of authentication.

You should select BASIC AUTH and then click on SAVE accordingly.
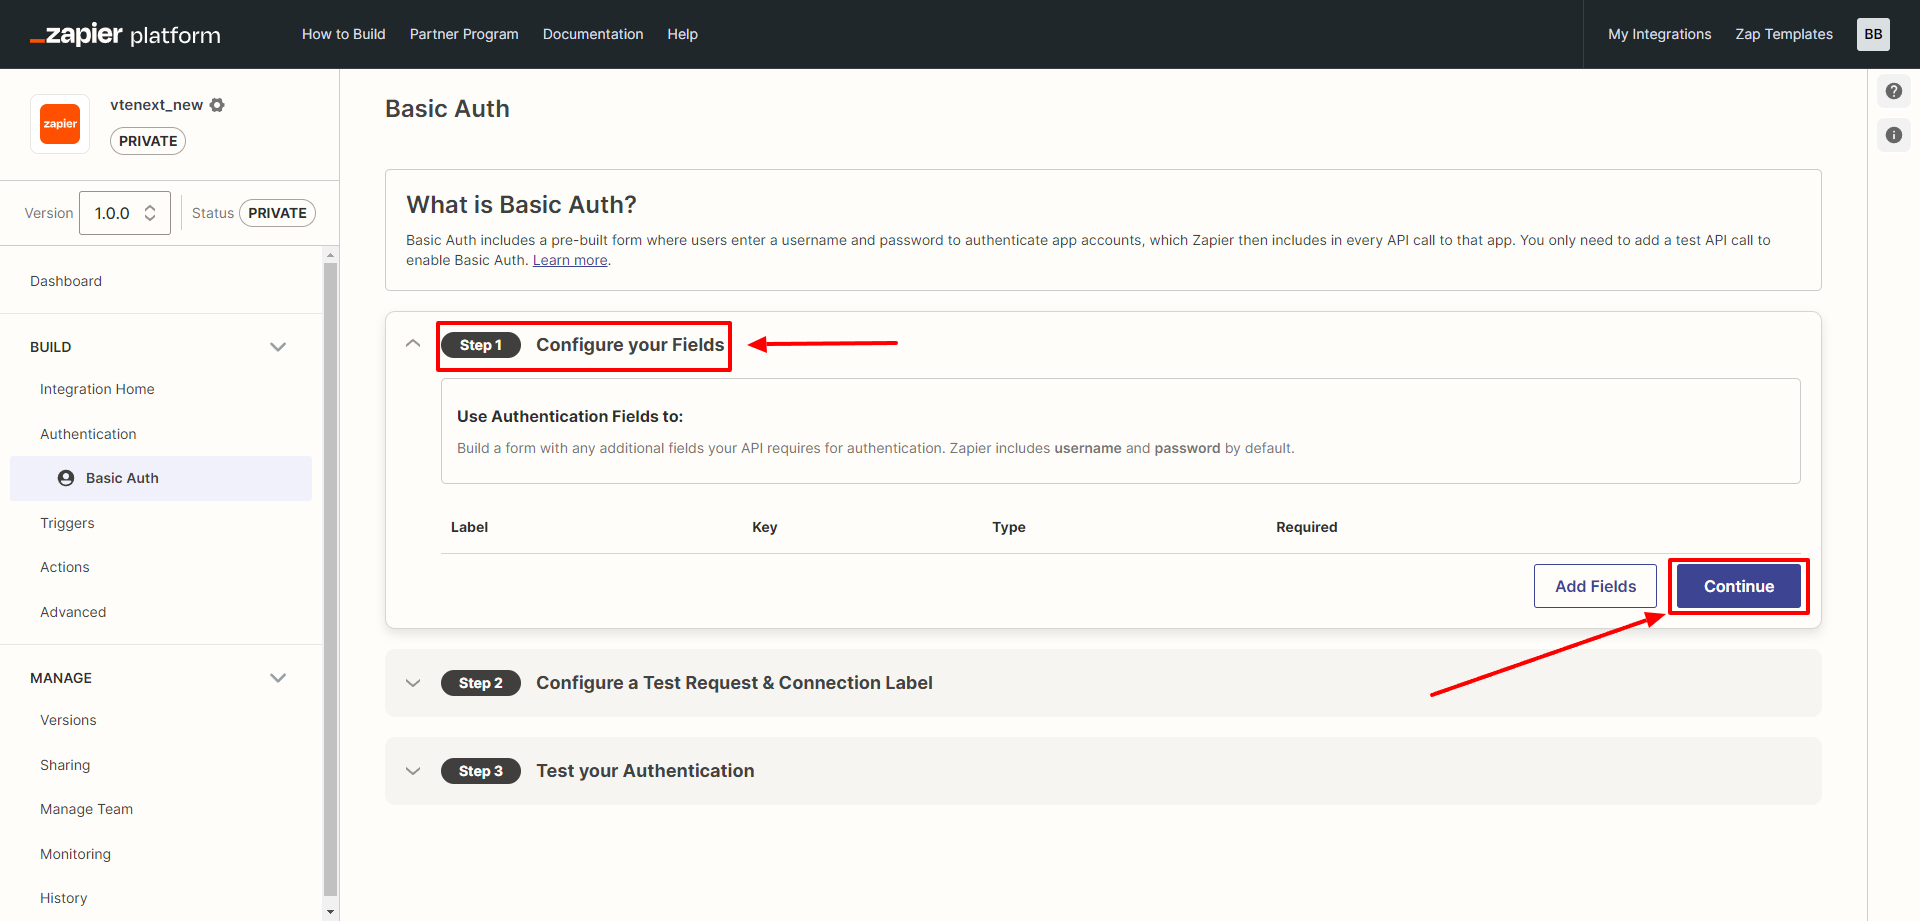
STEP 1: Leave it blank and click on CONTINUE.
STEP 2: Enter in the test, the POST method, and configure the URL with the following string: https://VTE-URL/restapi/v1/vtews/listtypes (where VTE-URL is the absolute address of your vtenext installation).
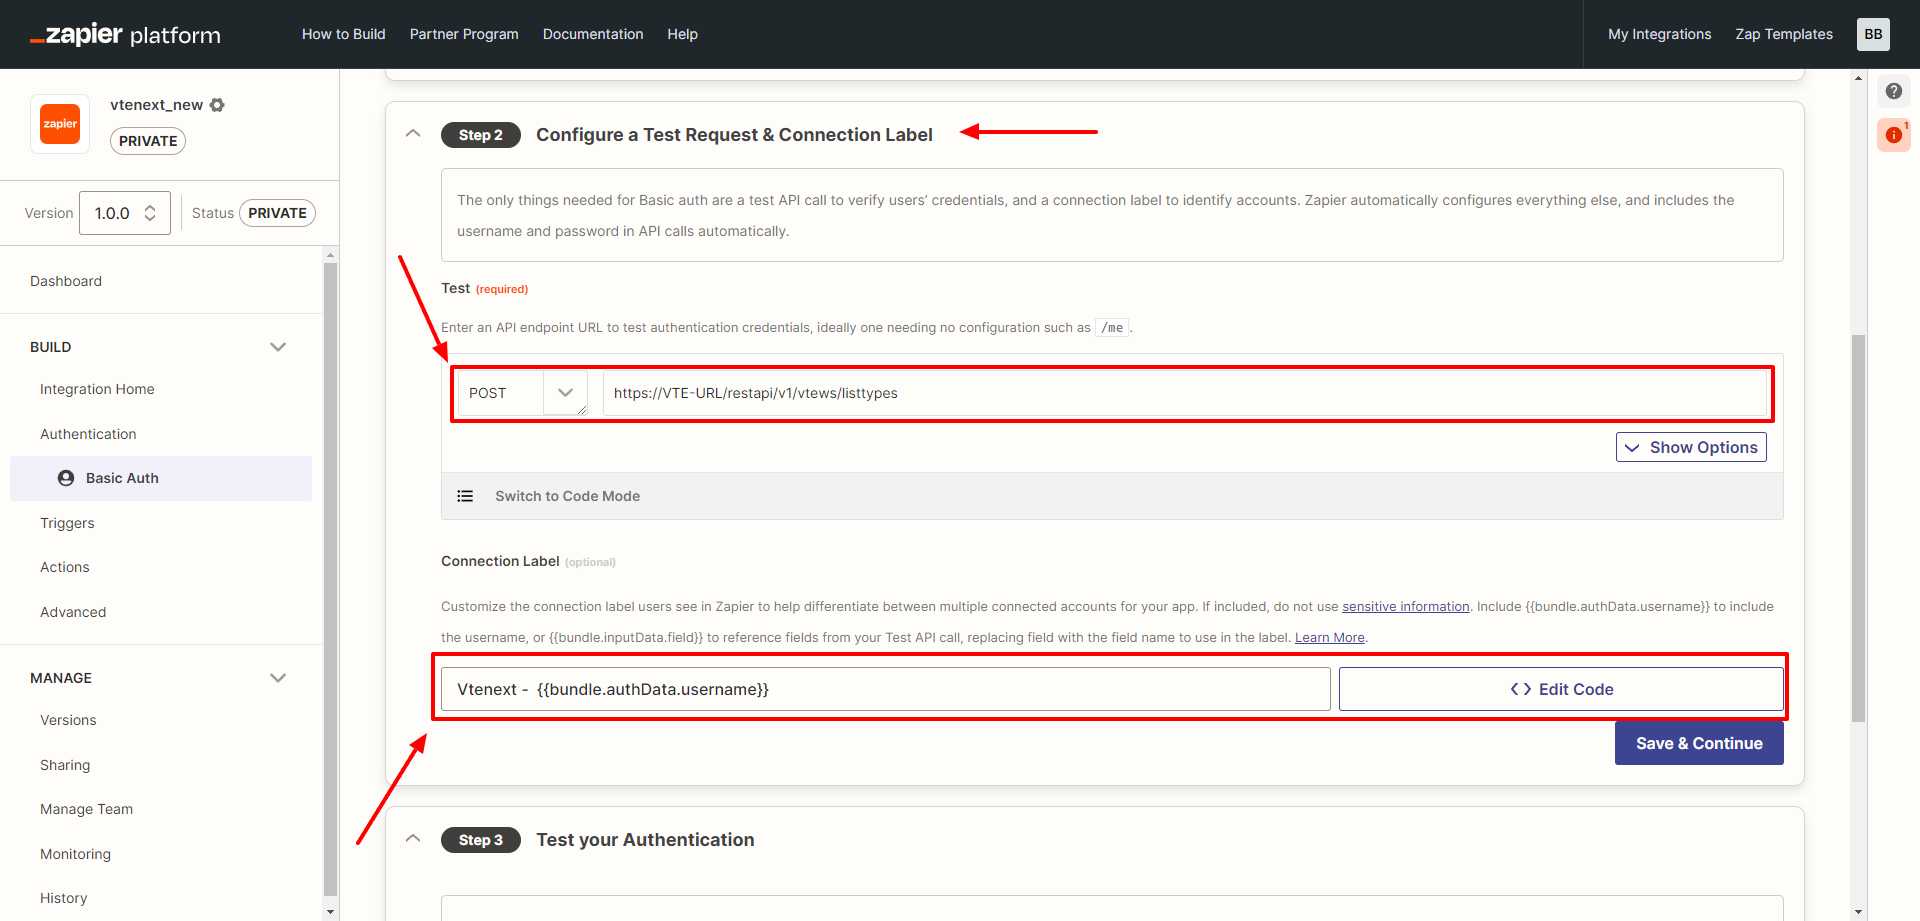
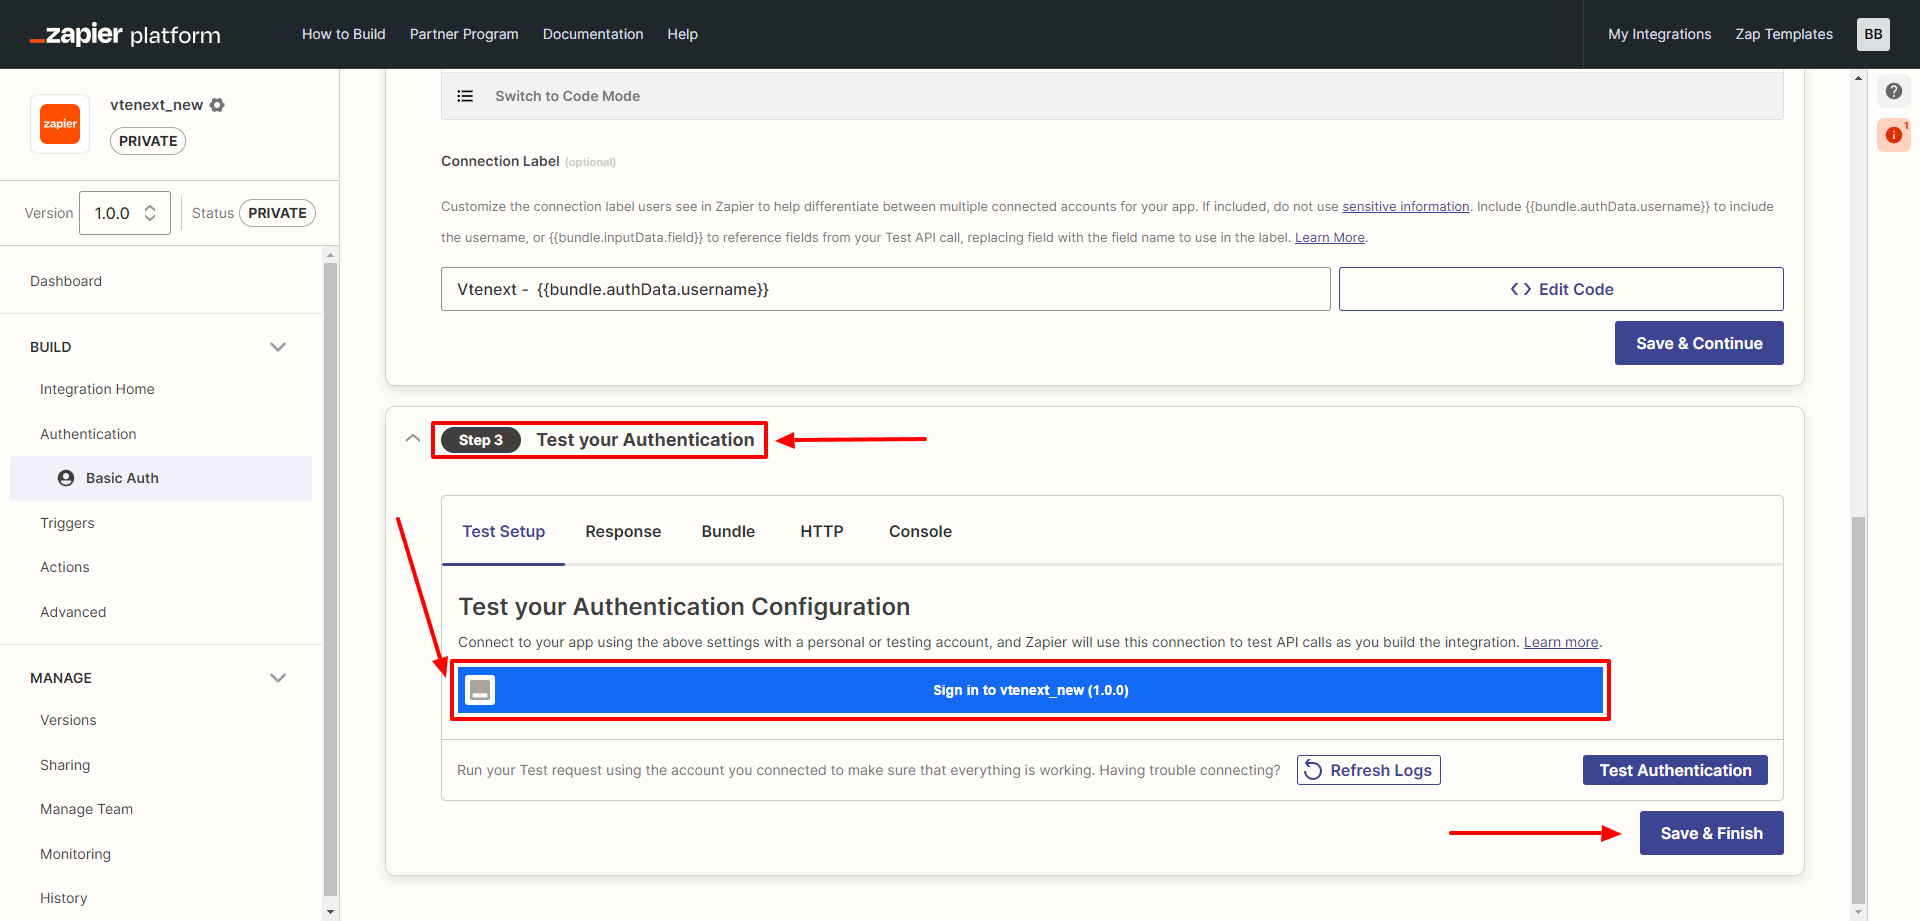
STEP 3: It's time to test the authentication by clicking on the blue "Sign In" button and finally clicking on SAVE & FINISH.
CAUTION: The password to use is the access key of the vtenext user, which can be found in the user's preferences.
4. Trigger creation
This step is optional, it's necessary only if we want to execute Zapier actions when in vtenext some condition is met (for example, when a Lead is created, or when a condition of a process is satisfied).
Let's add a trigger as shown below:
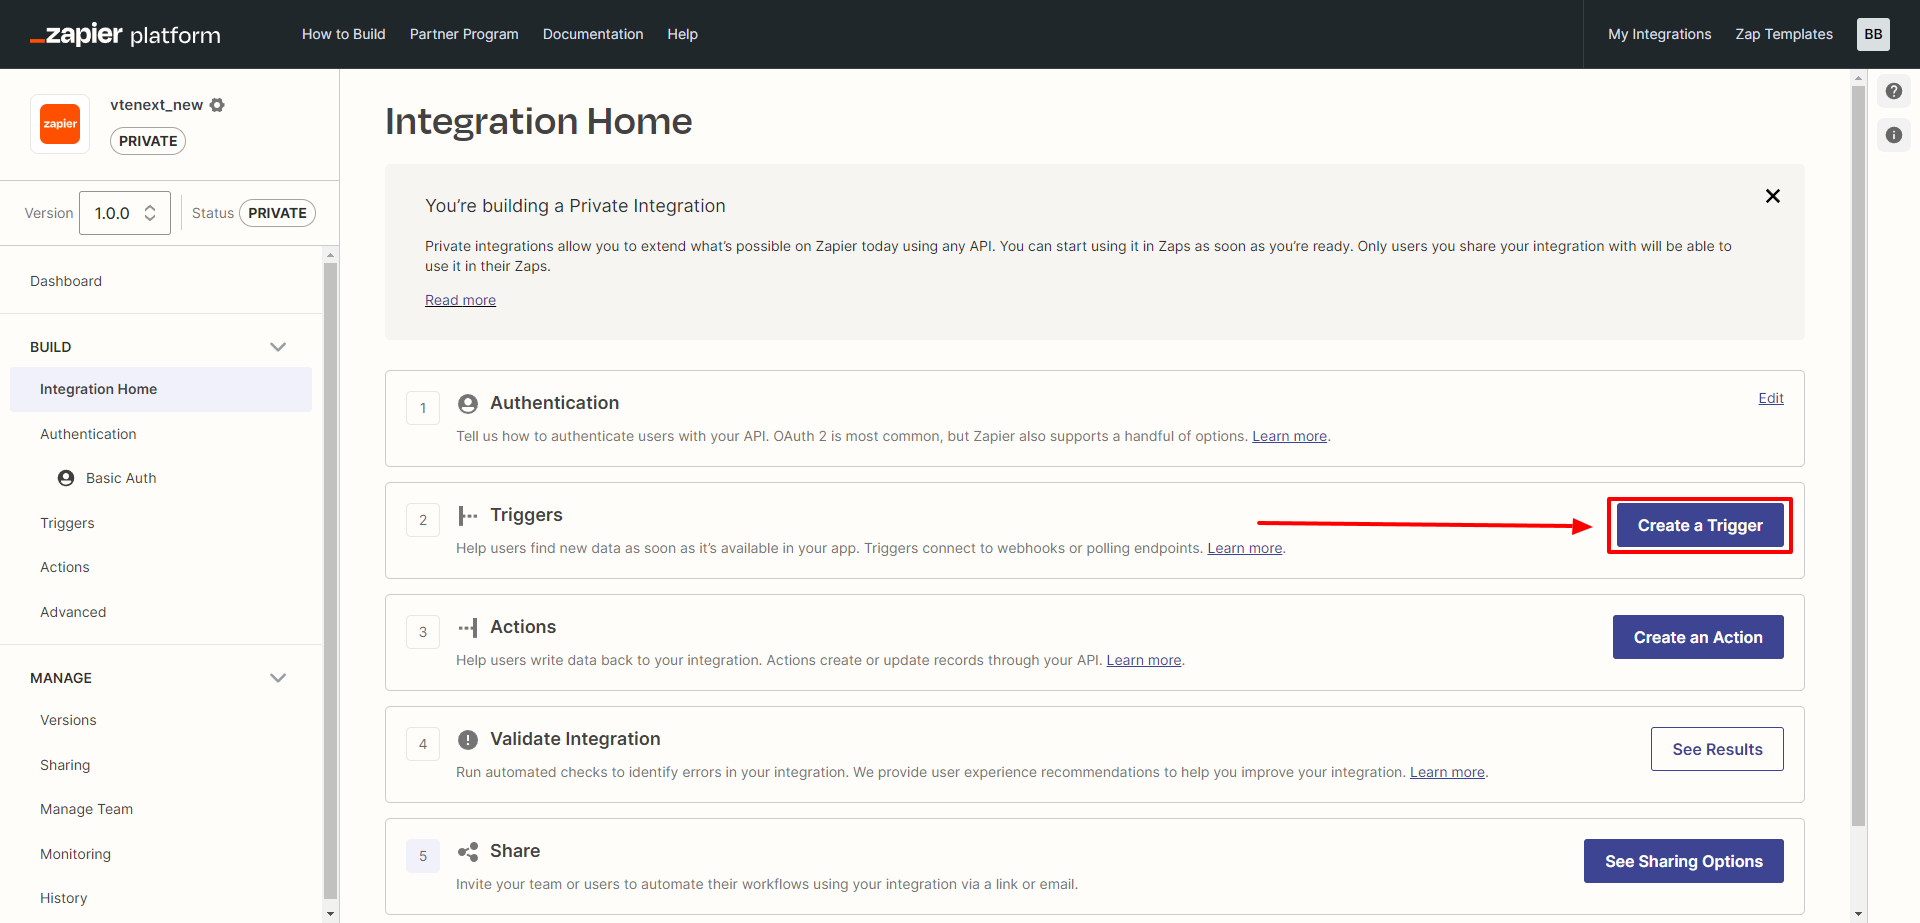
Clicking on the CREATE A TRIGGER button will present a screen with some fields to fill in. These fields should be managed based on what you want to achieve with the trigger itself (in the example, it involves intercepting the creation of a new Lead).
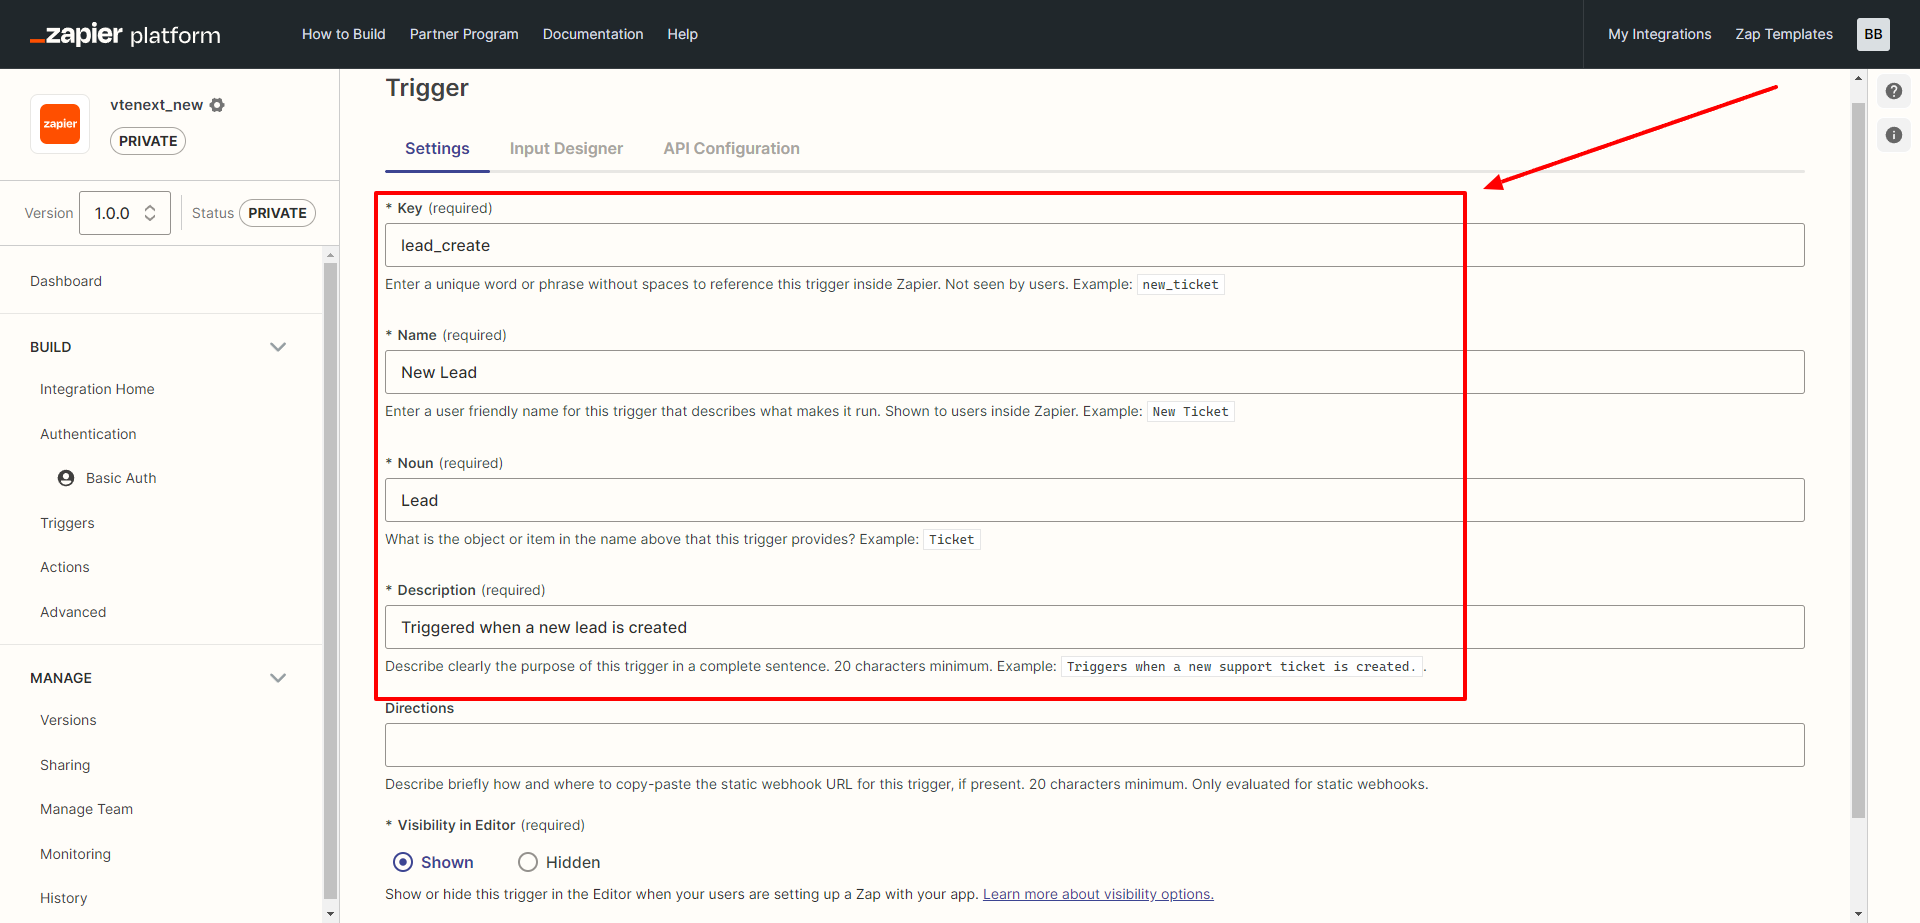
Once all the fields are filled in, click on SAVE & CONTINUE at the bottom of the page on the right.
Immediately after, the following page will appear, where you will need to click on API CONFIGURATION to create a webhook.
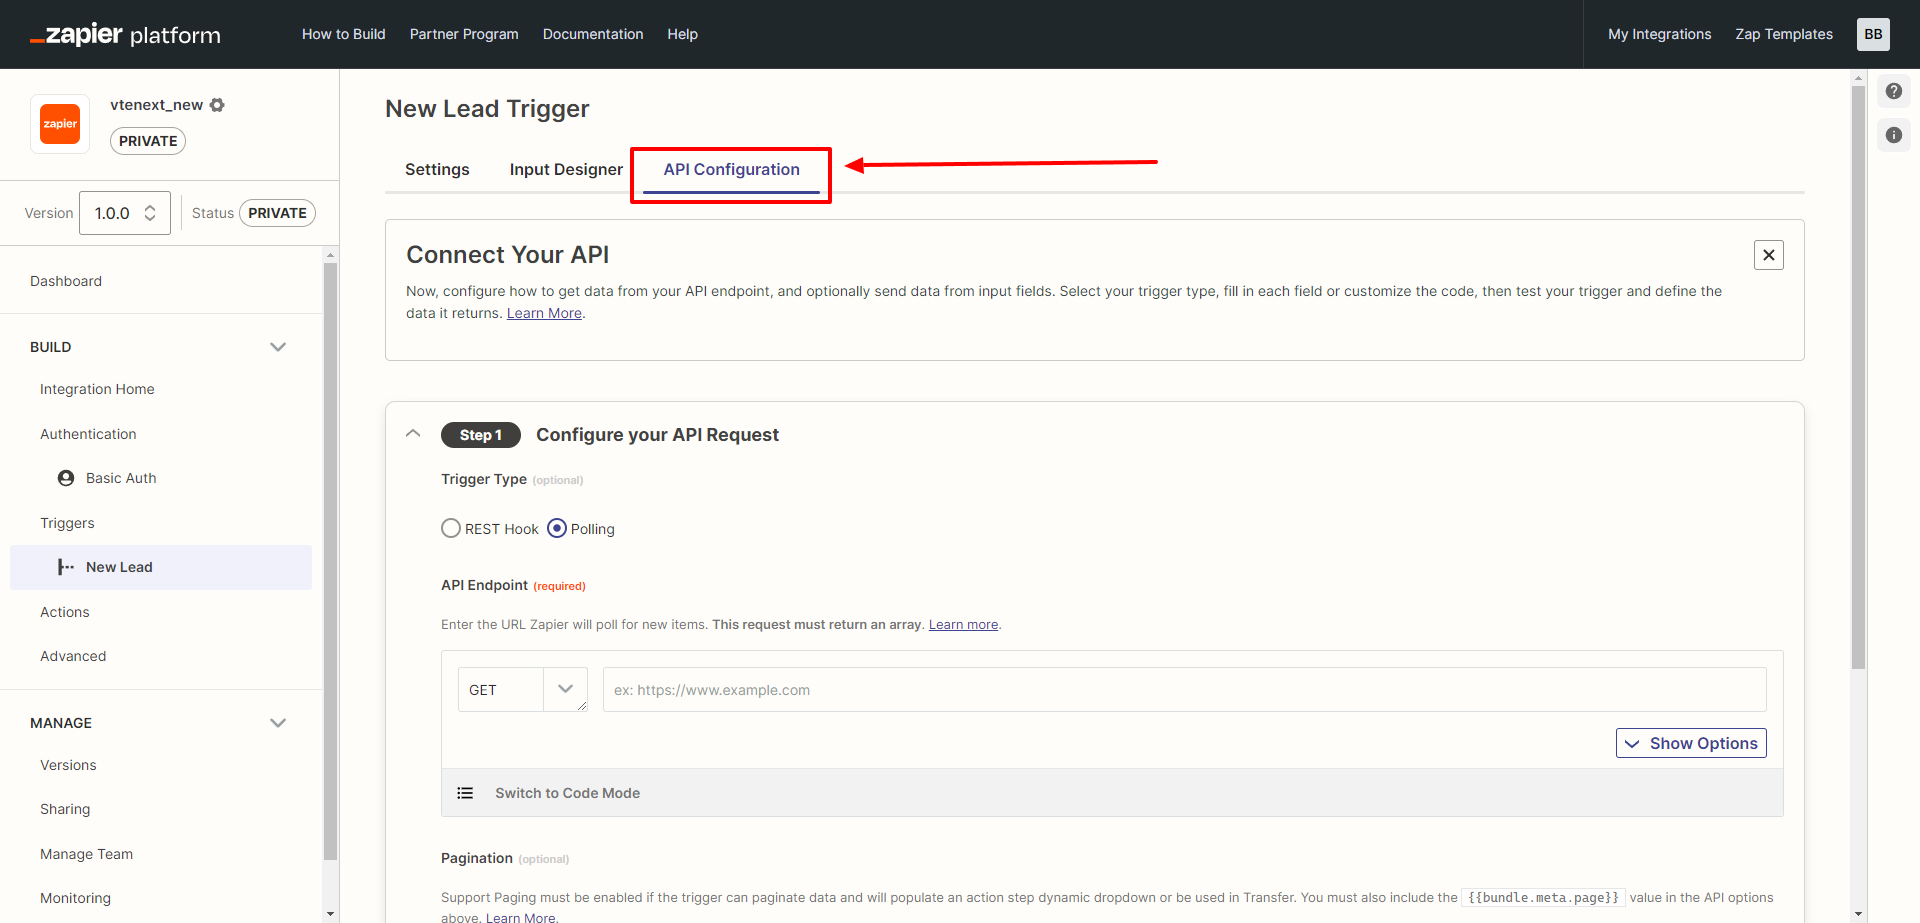
In STEP 1, choose the following parameters:
SUBSCRIBE
- REST Hook (select it)
- POST (select it from the dropdown menu, then enter the following webhook, replacing VTE-URL with the correct address of your CRM)
https://VTE-URL/restapi/v1/vtews/zapier.subscribe
{"module":"Leads","hookUrl":"{{bundle.targetUrl}}","zapid":"{{bundle.meta.zap.id}}"}In this code, you can replace "Leads" with the module you want to configure.
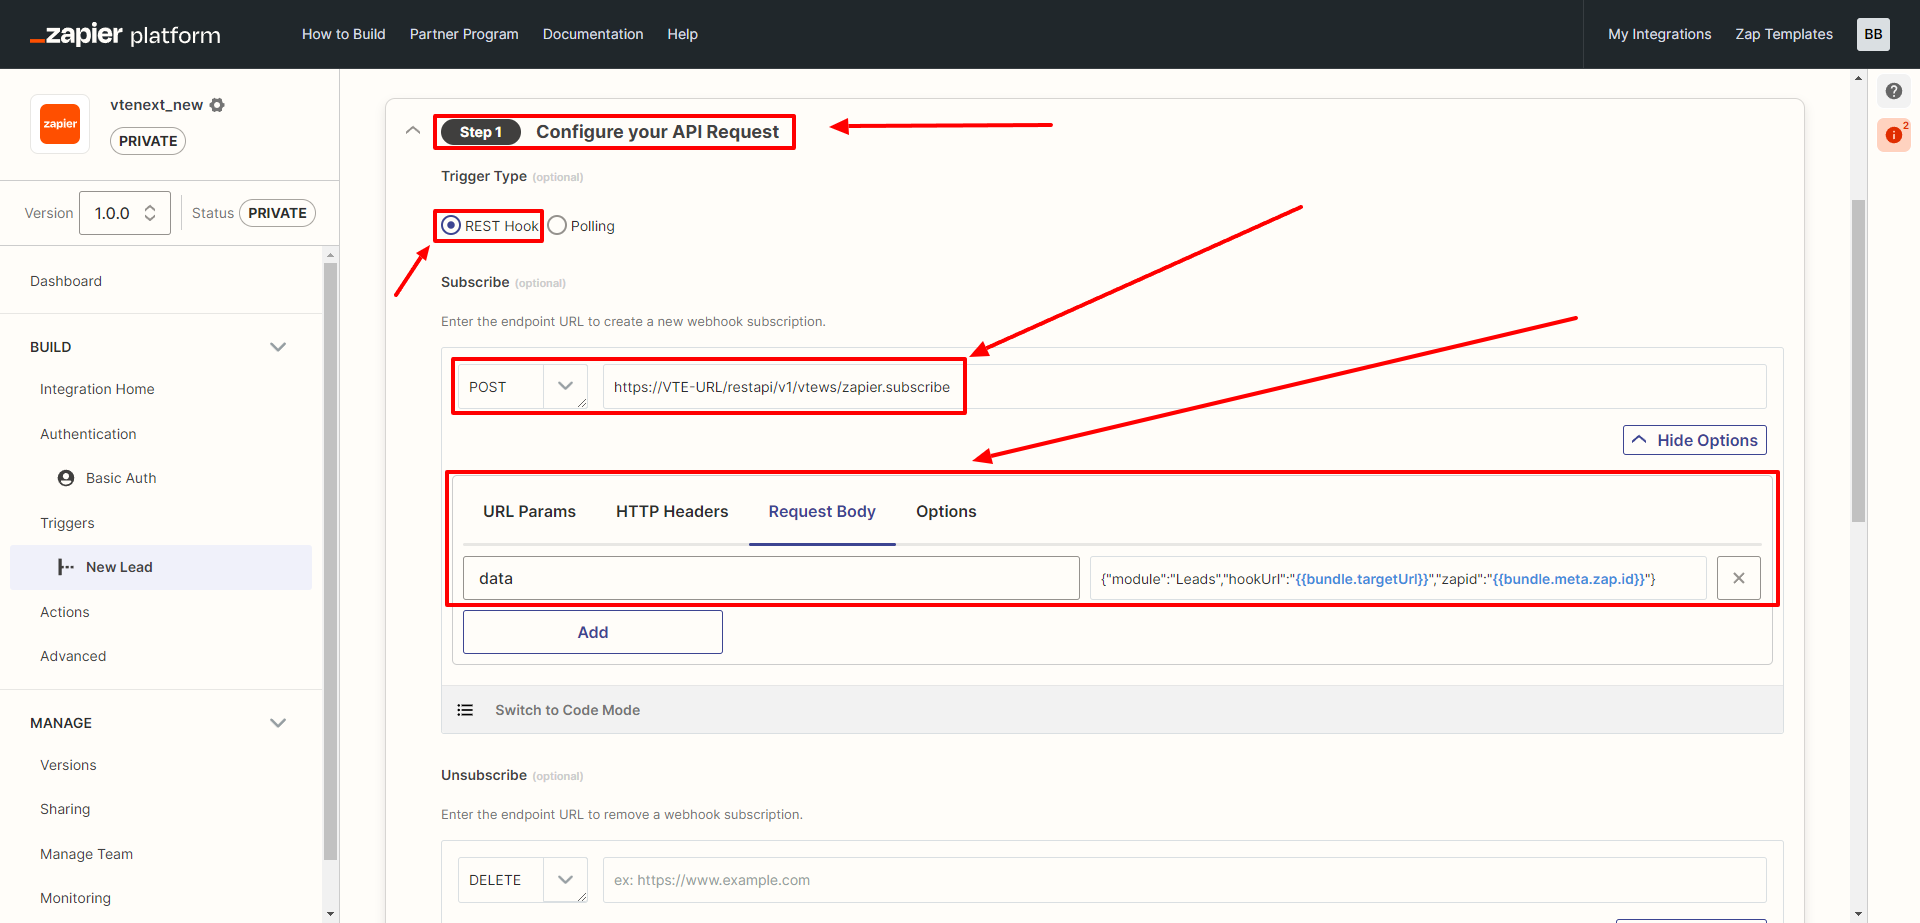
Continuing the configuration, scrolling down the page, we find the UNSUBSCRIBE option, which should be configured with the following code.
https://labs2.vtecrm.net:8443/restapi/v1/vtews/zapier.unsubscribe
{{bundle.subscribeData.id}}Continuing with the PERFORM LIST parameter, you will need to configure the following code:

https://VTE-URL/restapi/v1/vtews/zapier.perform_list
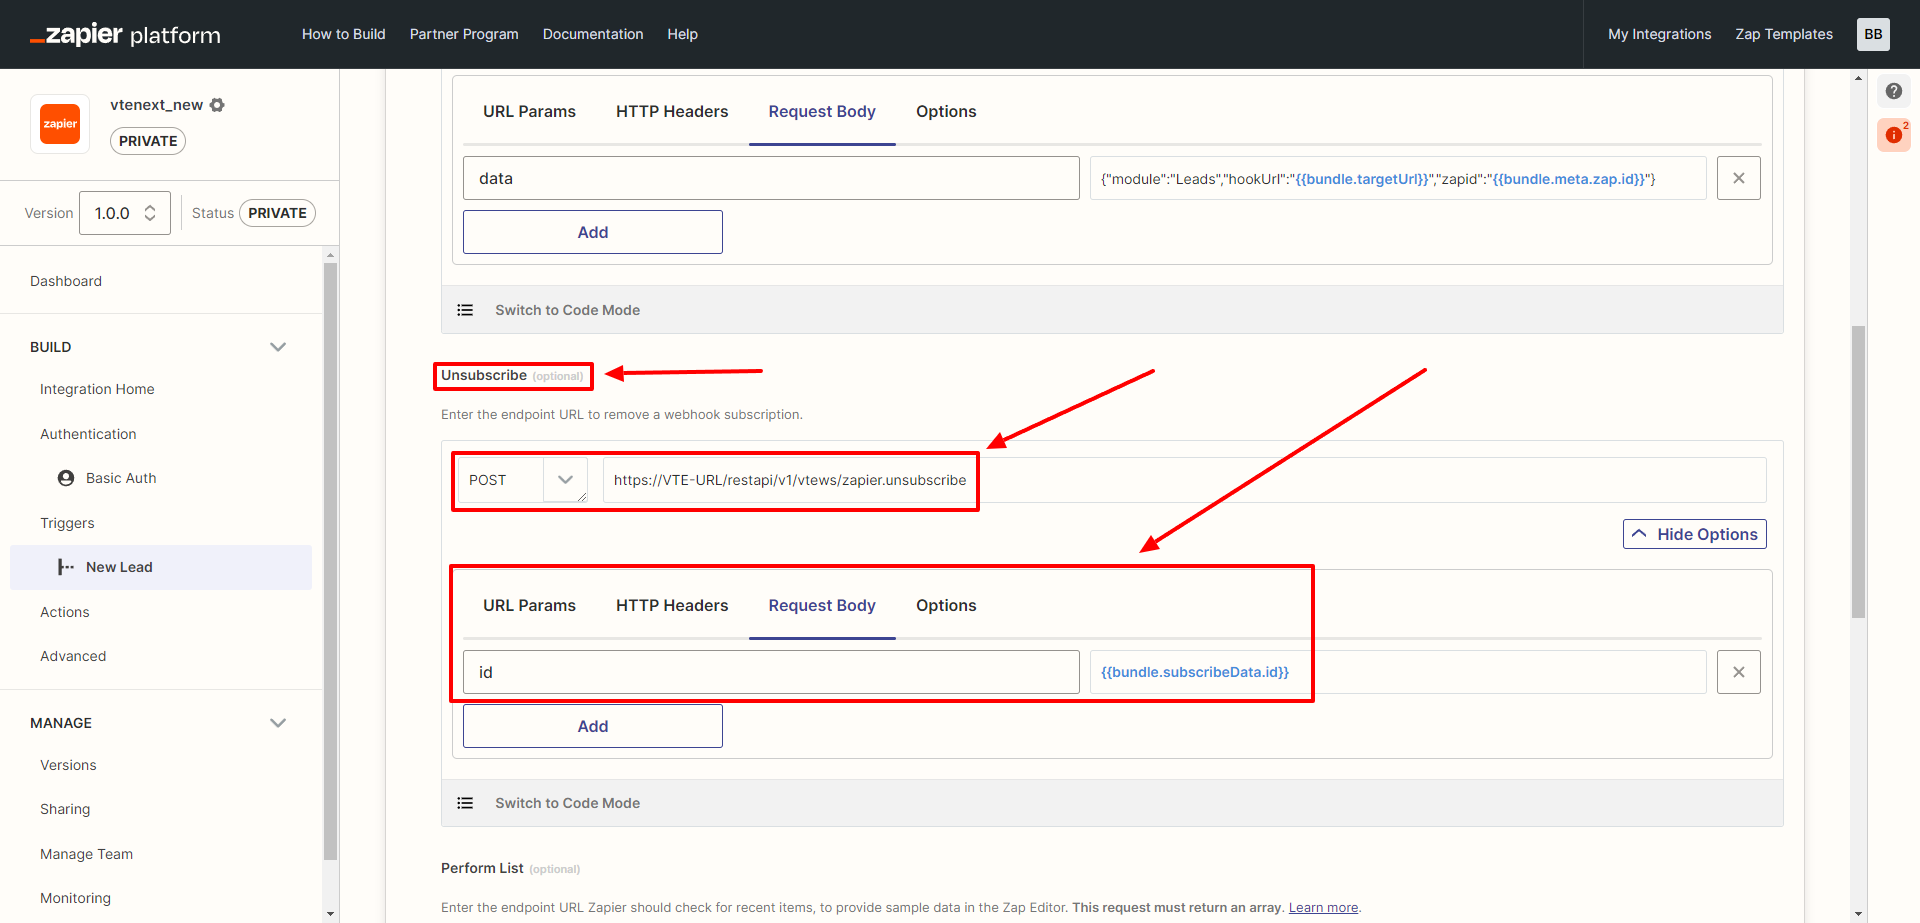
LeadsFinally, for PAGINATION, there is nothing to configure, and you can click on SAVE API Request & Continue.
At STEP 2 of the Trigger configuration, nothing needs to be configured.
At STEP 3 of the Trigger configuration, it is necessary to leave the field in that block empty.

5. Creating Actions
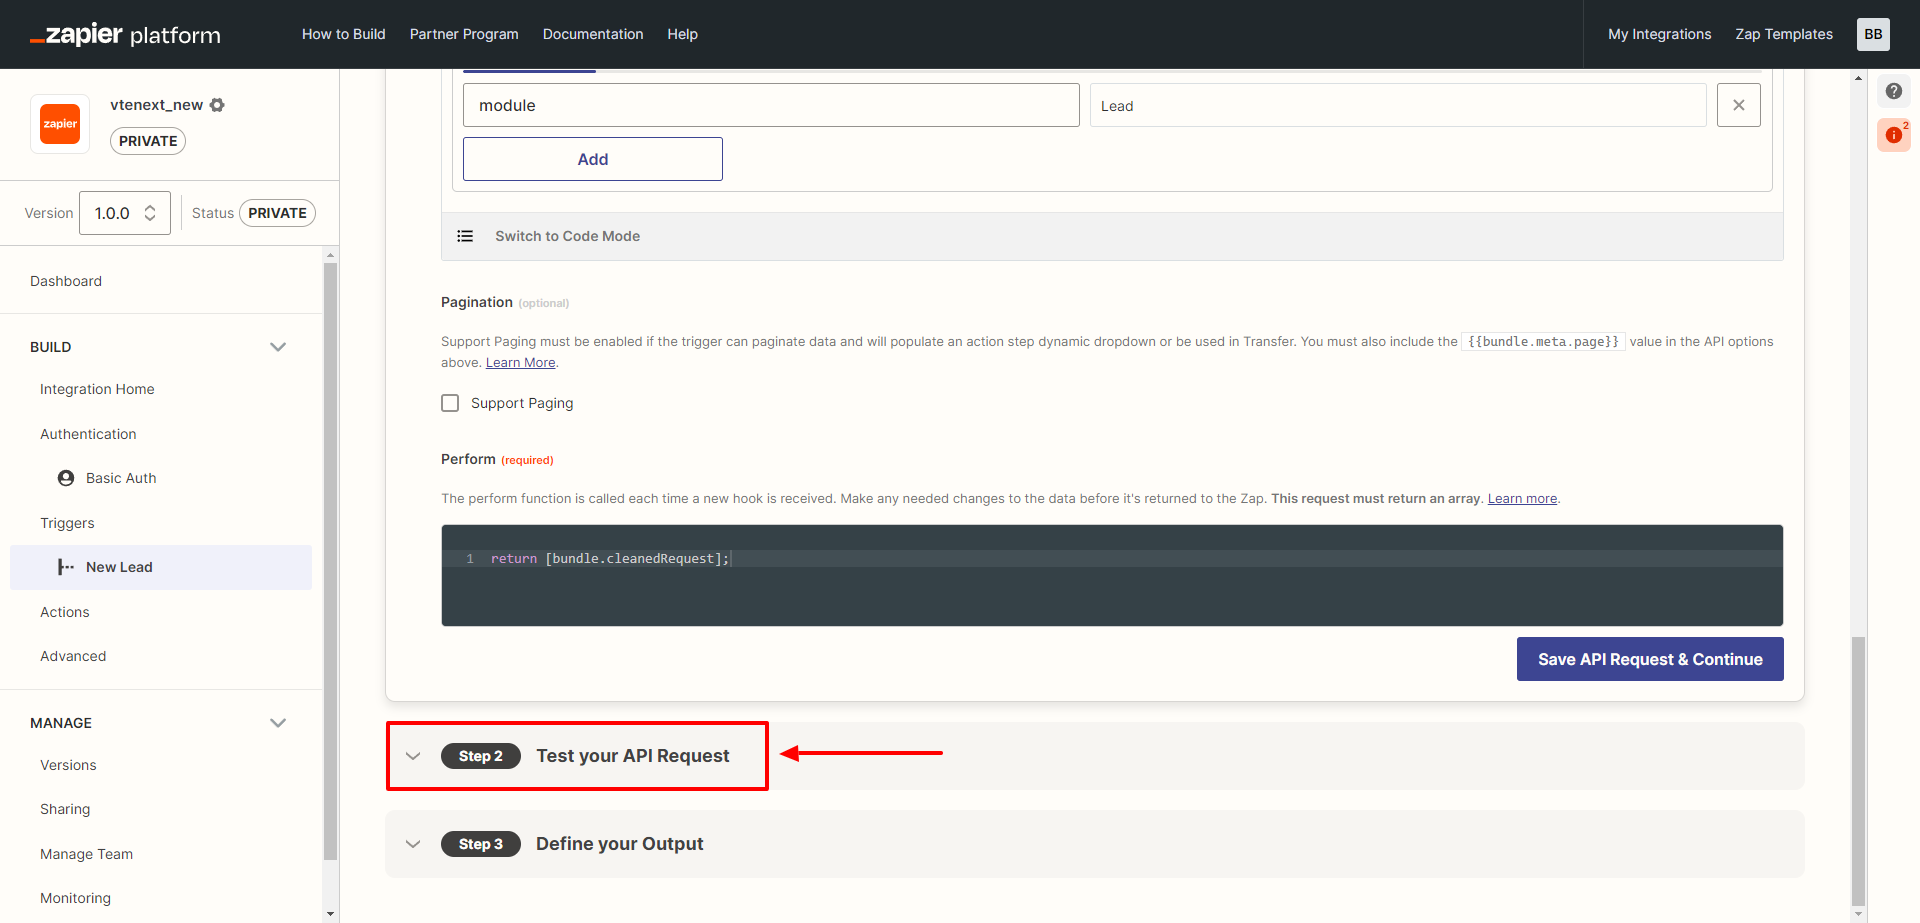
Also in this case, this step is optional, it's necessary only if we want to execute actions in vtenext when the Zapier trigger satisfies its conditions. Actions available in vtenext are: search of a record, creation, update or deletion.
Moreover, it's possible to only create the actions required by your own integration.
I. Search Action
On the left-hand column, click on the ACTION item, and then on the right, click on the CREATE ACTION button.

It will open the following screen, which needs to be filled out as shown.
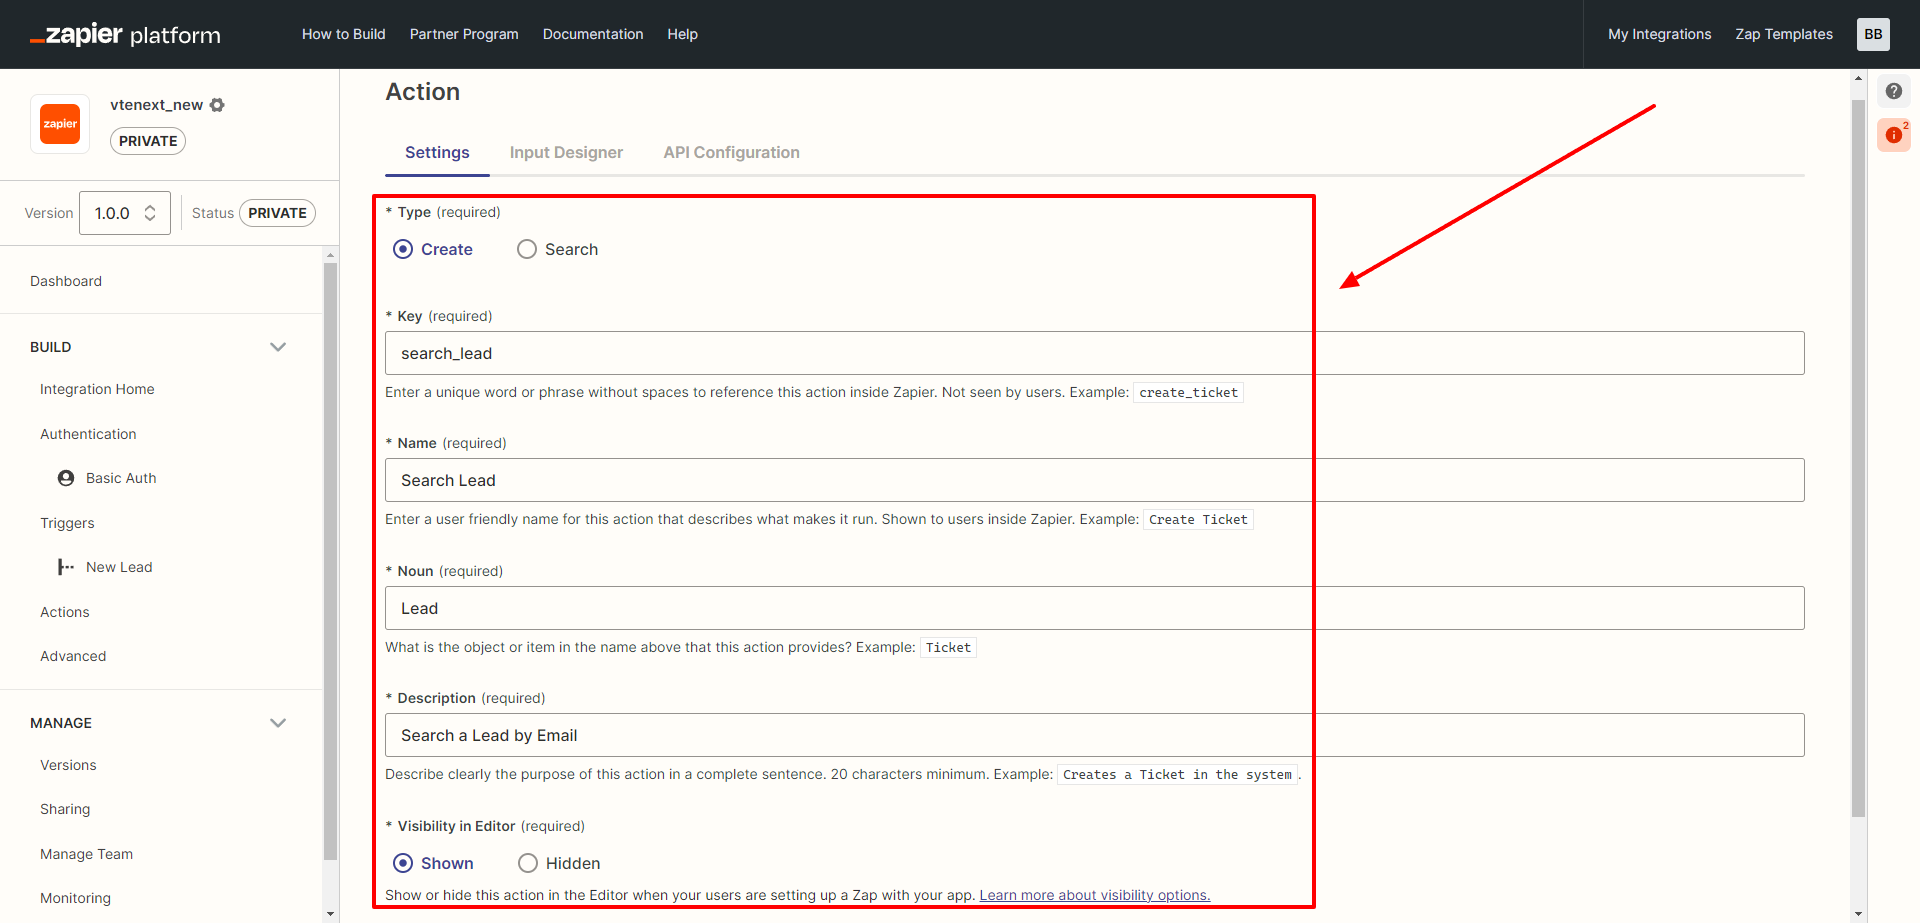
After completing the fields as shown in the previous image, you can click on SAVE AND CONTINUE. This will allow you to move to the next TAB to configure the INPUT DESIGNER.
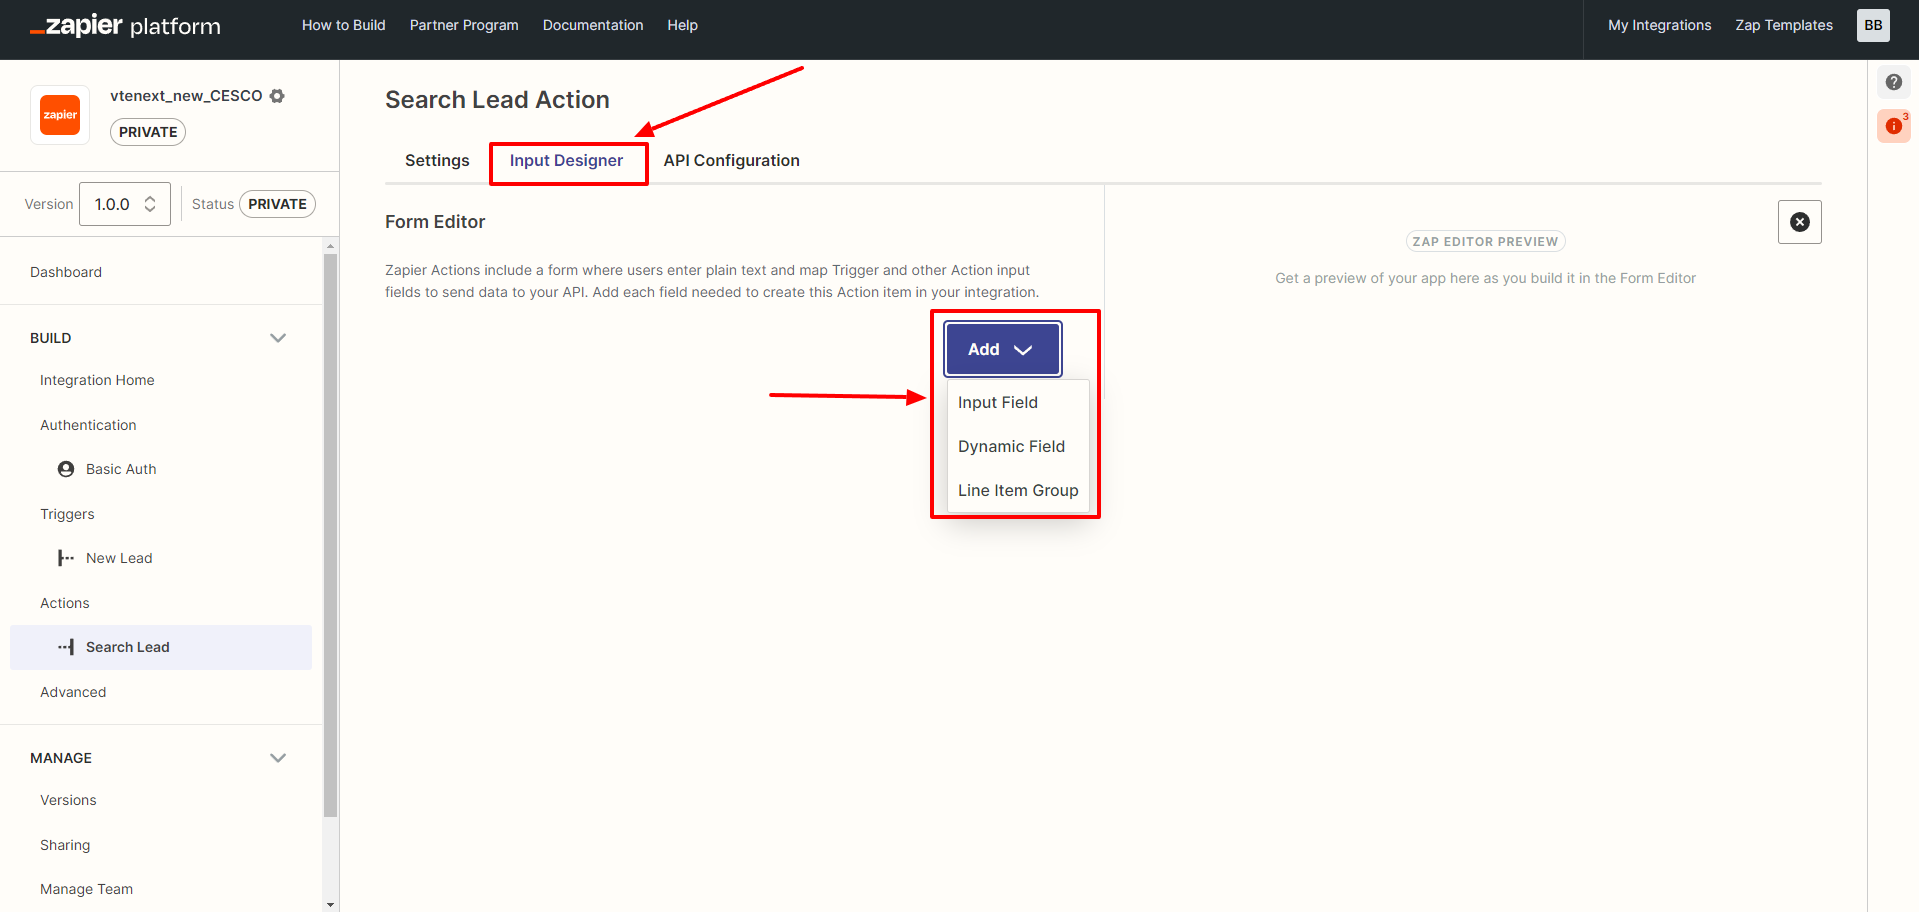
In this screen, click on ADD, choose INPUT FIELD, and the next configuration screen will appear.
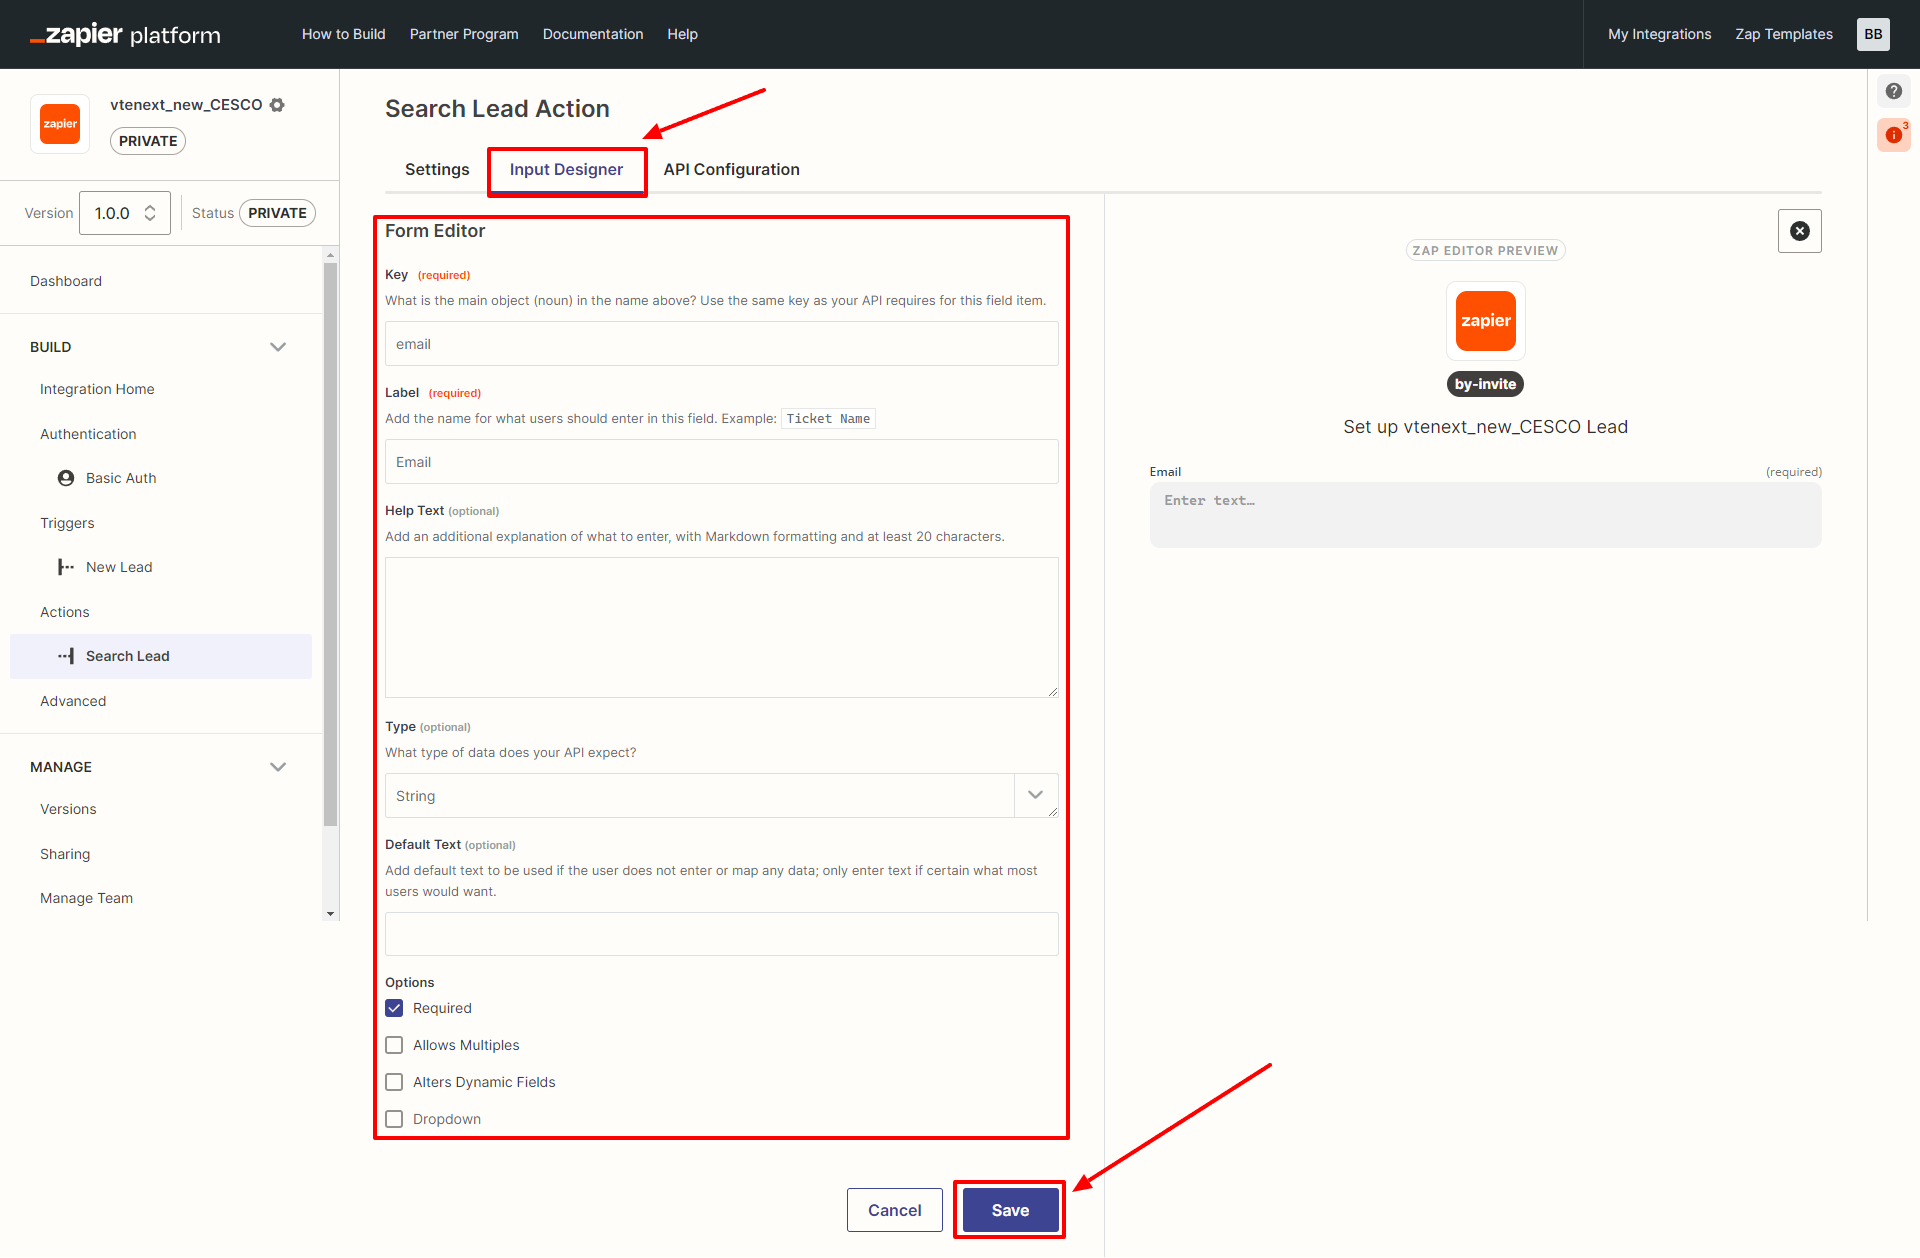
Enter the variables in the appropriate fields as indicated and then click on the SAVE button. This will move you to the API CONFIGURATION tab.
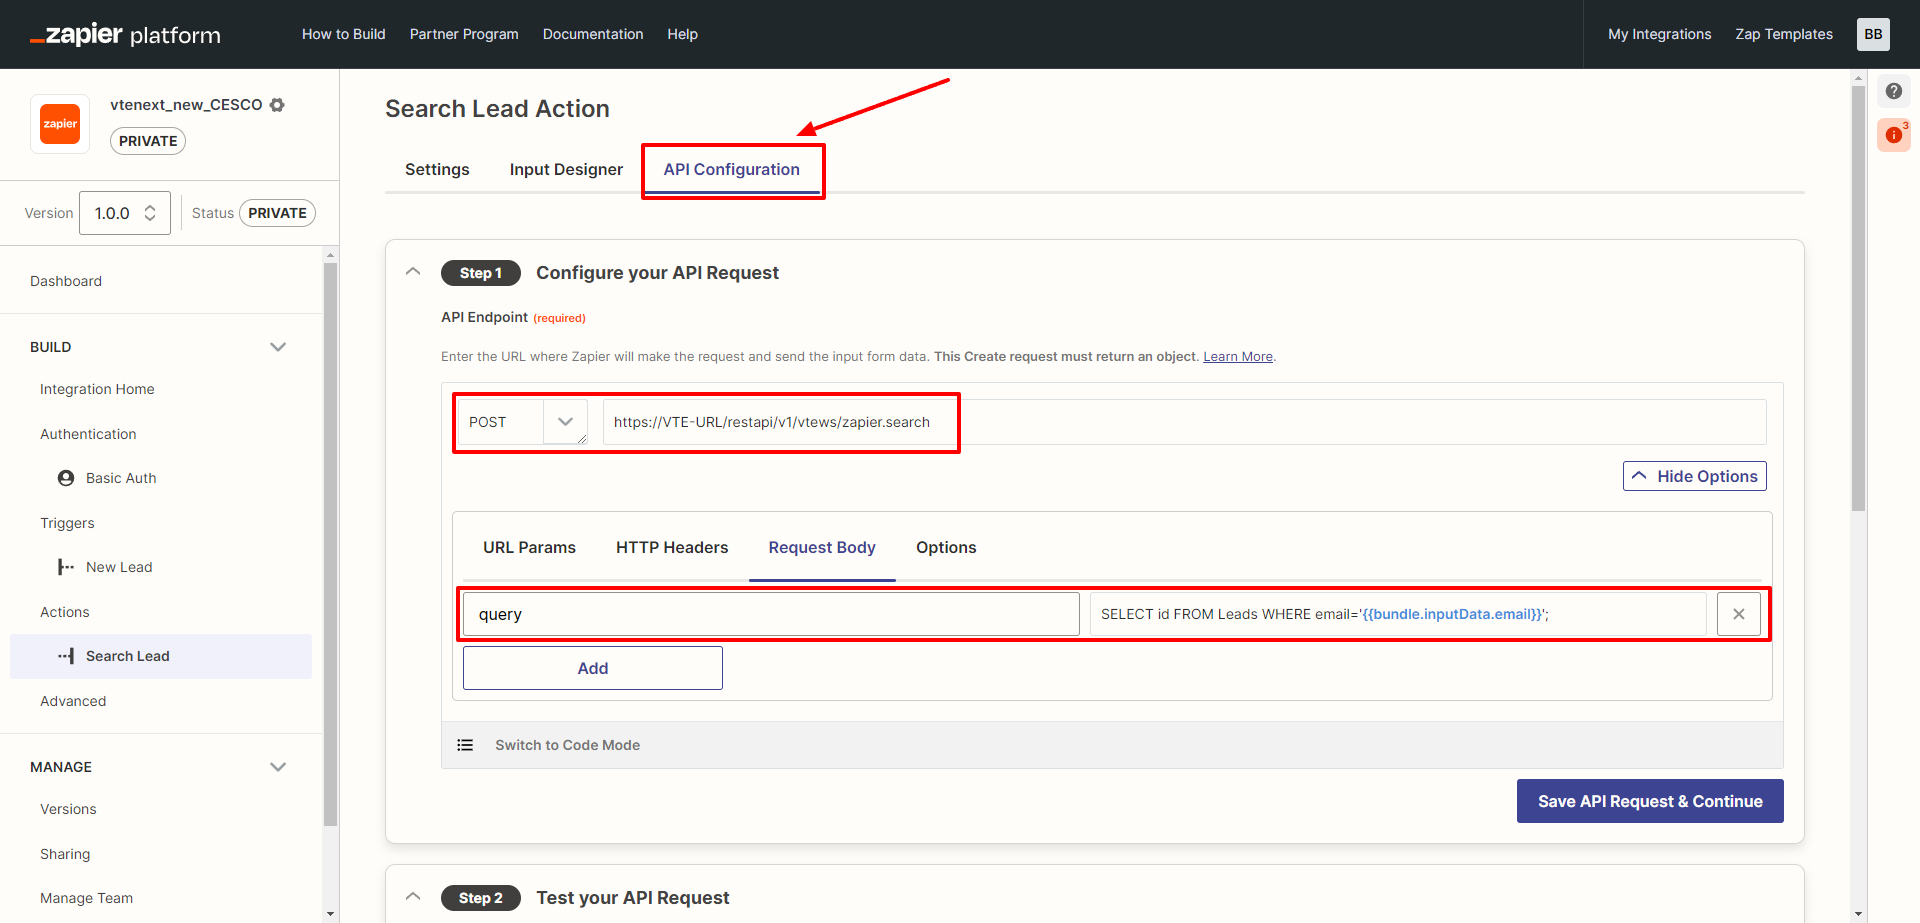
In this screen, enter the variables as shown. Replace "VTE-URL" with the full address of your vtenext installation. Finally, click on SAVE API REQUEST & CONTINUE.
https://VTE-URL/restapi/v1/vtews/zapier.search
SELECT id FROM Leads WHERE email='{{bundle.inputData.email}}';In the TEST phase of STEP 2 on this page, enter a valid and existing email address for connection testing.
For the OUTPUT tab:
- Use the response from the test data.
- Generate output field definitions.
- Set the appropriate type for each field.
Finally, click on SAVE OUTPUT & FINISH at the bottom right.
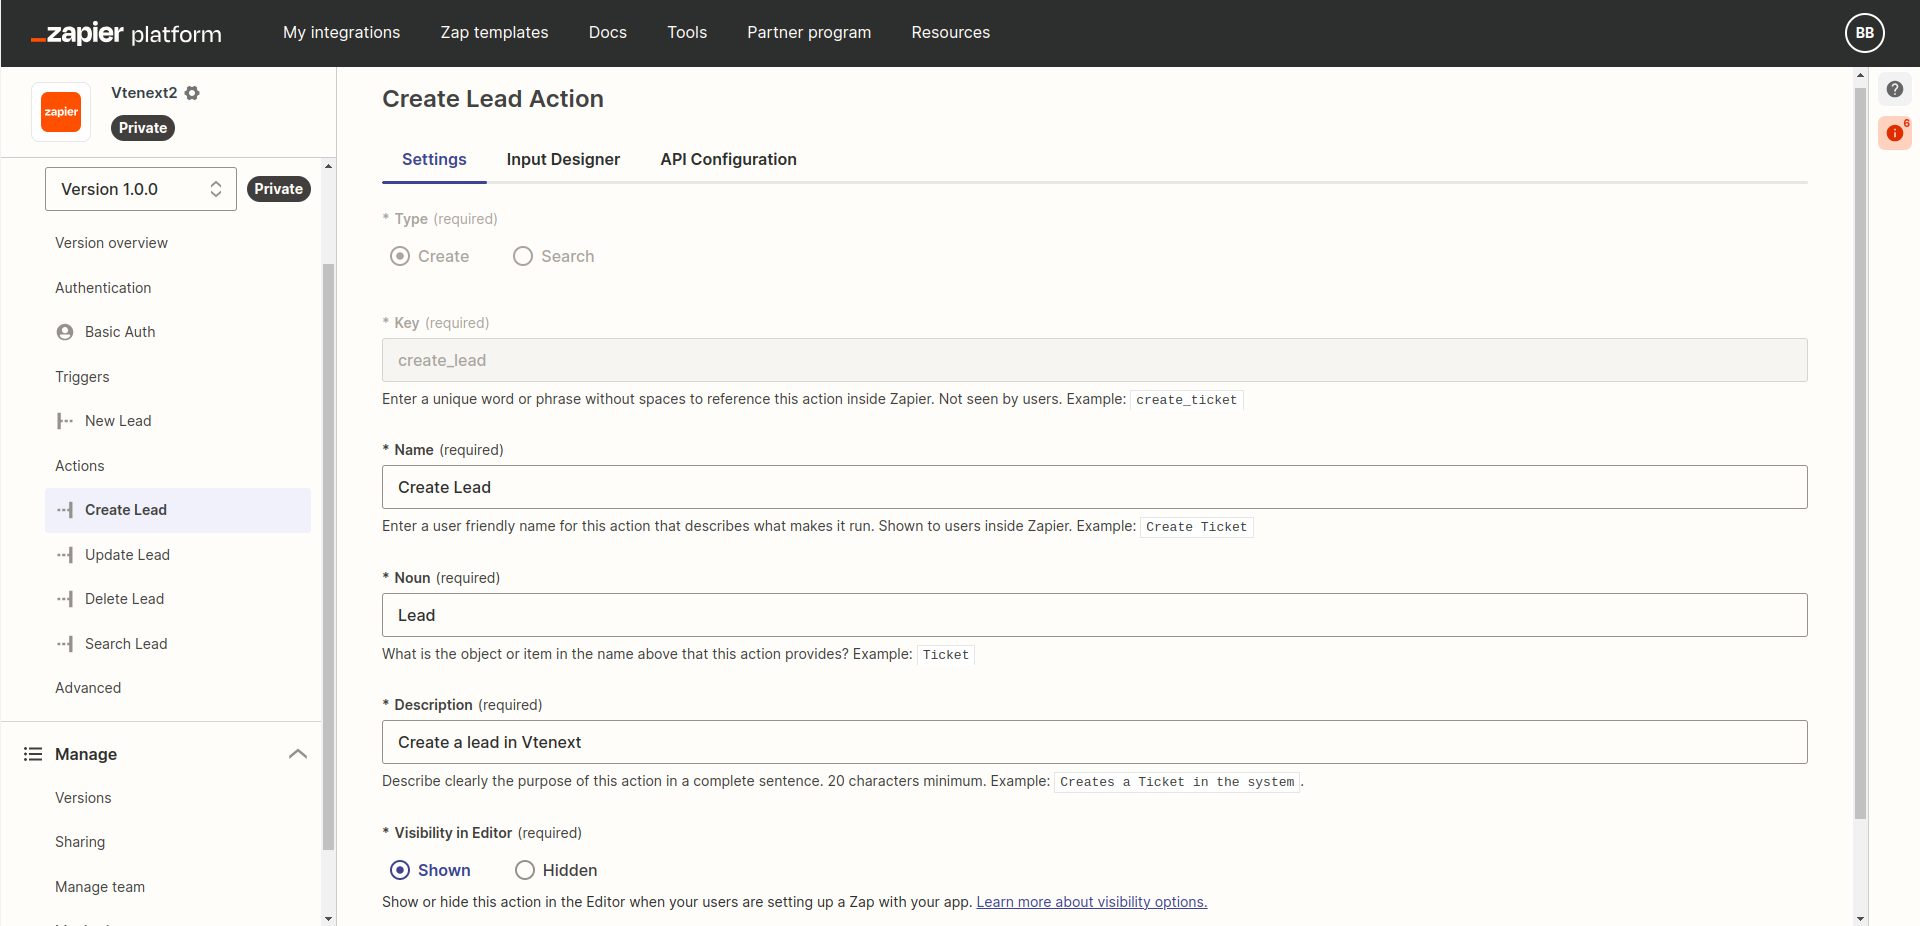
II. Create Action
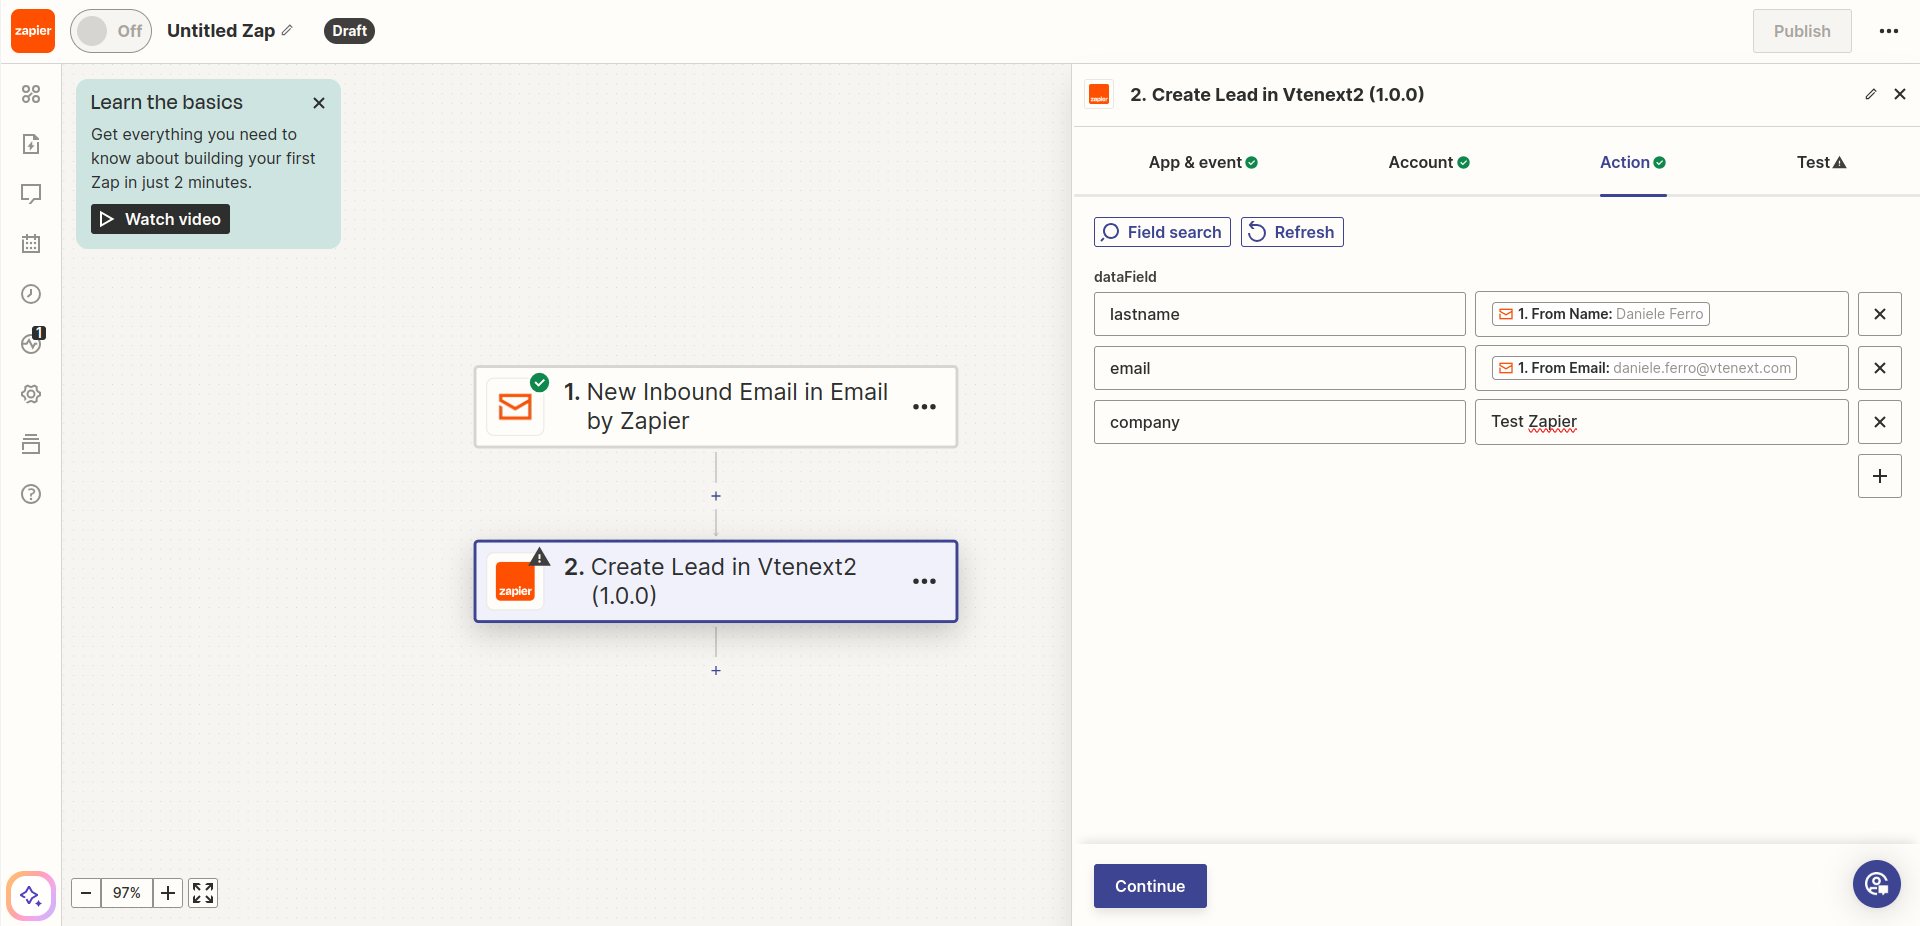
Click on ADD ACTION to create a new action and fill the Settings tab as the following image:
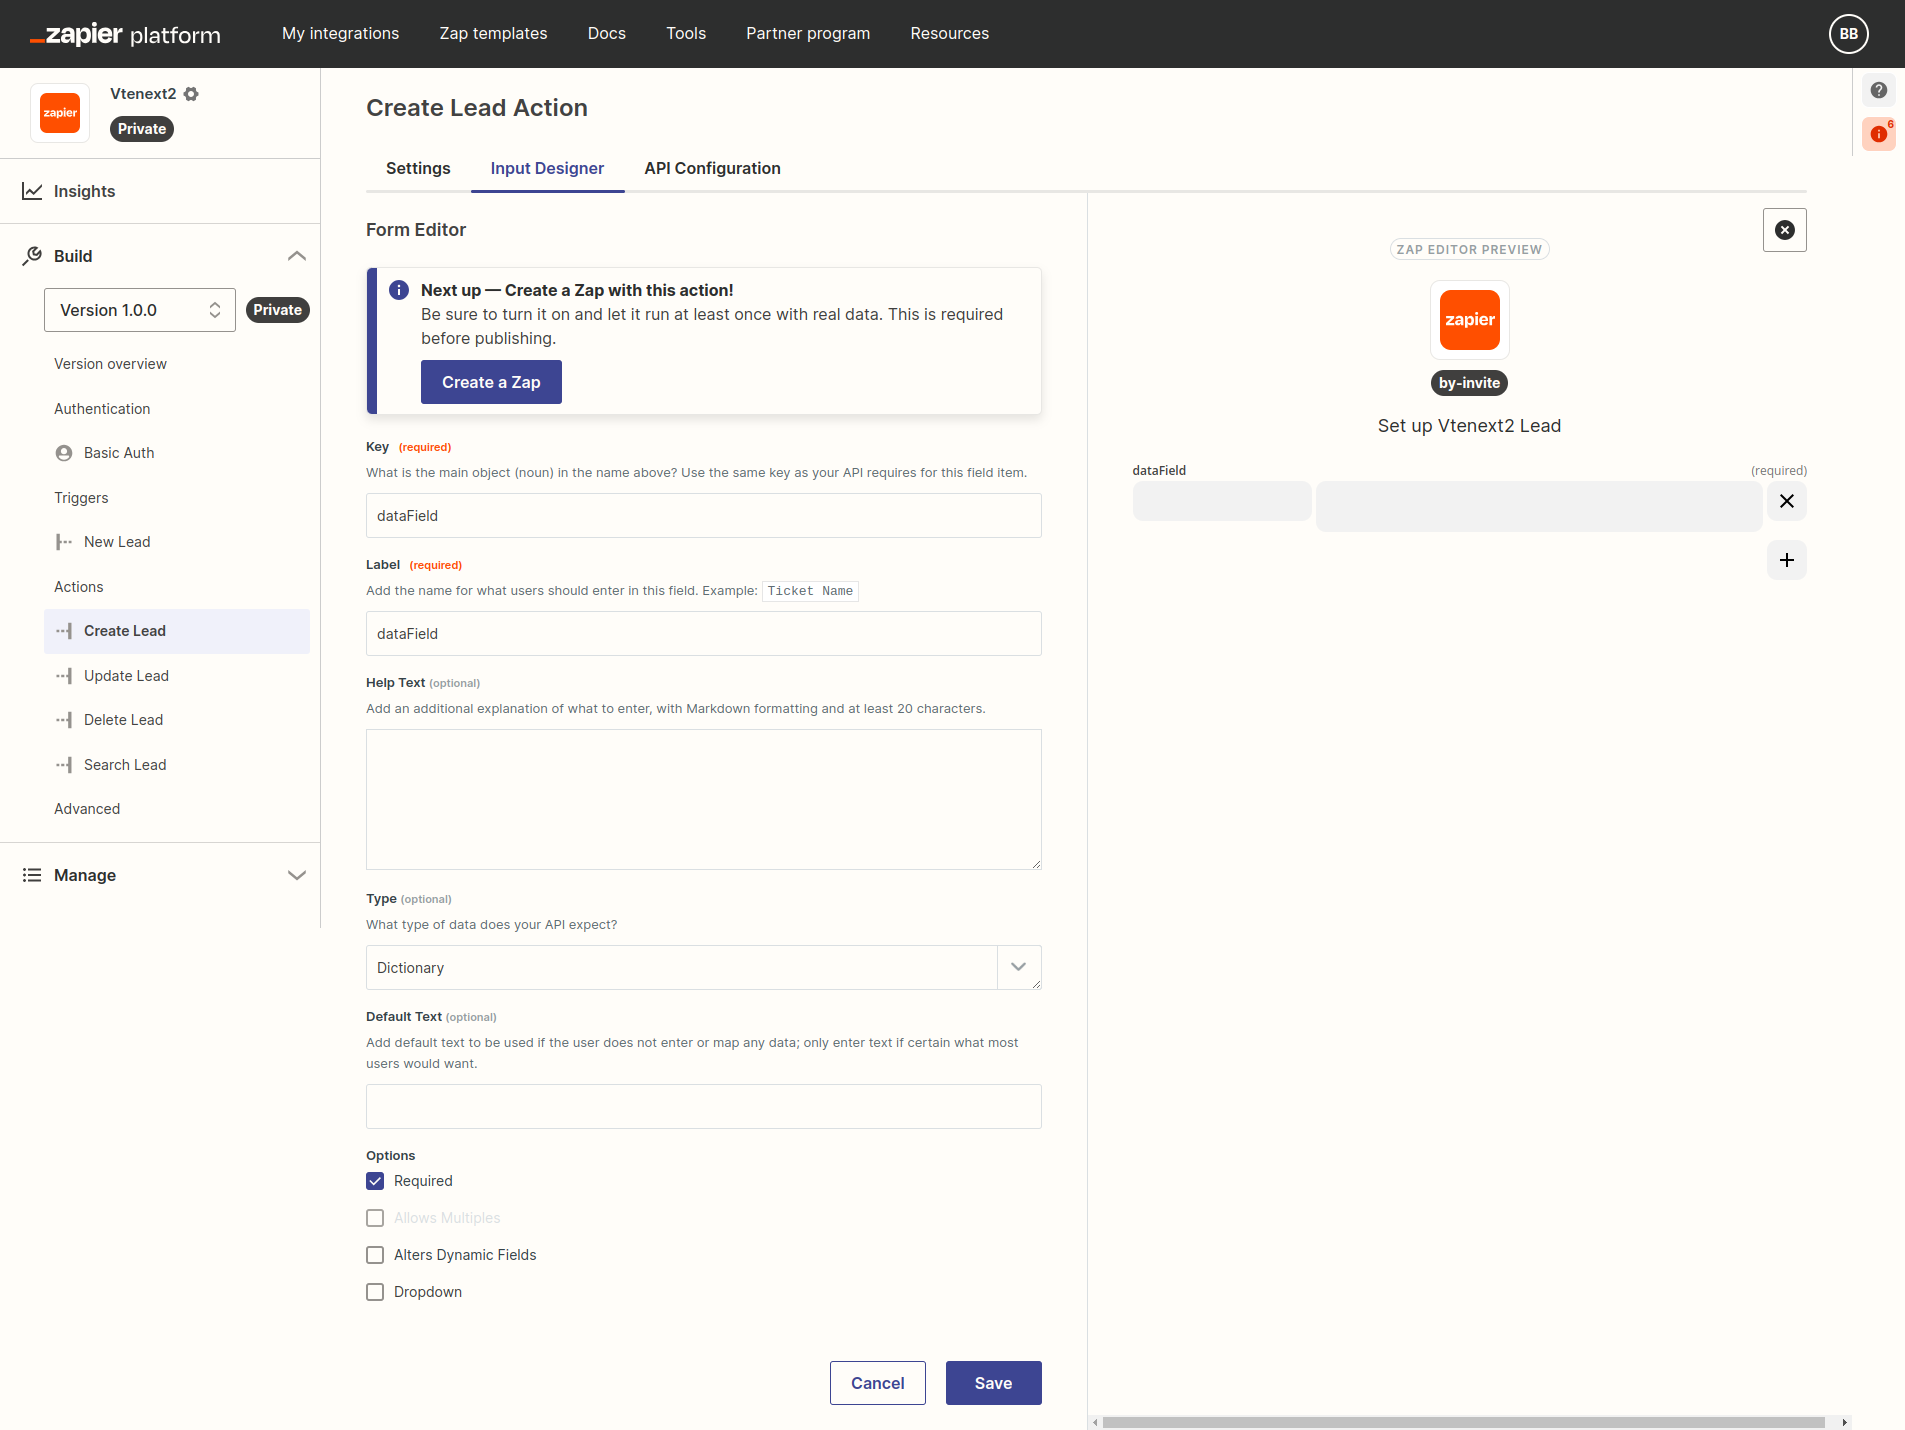
Click SAVE AND CONTINUE and move to the next TAB, to configure the INPUT DESIGNER, where a new INPUT FIELD should be added and configured in this way:
Click on SAVE and move to the tab API Configuration and configure parameters in the STEP 1 like this:

https://VTE-URL/restapi/v1/vtews/zapier.create
module = Leads
data = {{bundle.inputData.dataField}}
Clearly, VTE-URL should be replaced with the complete address of your vtenext installation, while the term "Leads" can be replaced with another module, in case you wish to create a different entity (for example Contacts or Accounts). Then click on SAVE API REQUEST & CONTINUE.
In STEP 2, to make a test choose "Raw" and replace all the code with the following:
{
"inputData": {
"dataField": {
"firstname":"Test lead",
"lastname":"Zapier",
"phone":"123456789",
"company":"Test Company Zapier"
}
},
"authData": {},
"environment": {},
"subscribeData": {},
"cleanedRequest": {
"url": "https://example.com/hook-request-origin",
"method": "POST",
"body": {},
"headers": {
"Content-Type": "application/json"
}
}
}and click on Test Your Request, which should result in the creation of a Lead with name "Test Lead" and surname "Zapier" in your vtenext instance. Then click Finish Testing & Continue.
In STEP 3 click on Use Response from Test Data and then Generate Output Field Definitions to automatically map the returned fields. Finally, click on Save Output & Finish.
III. Update Action
Click on ADD ACTION to create a new action and fill the Settings tab as the following image:

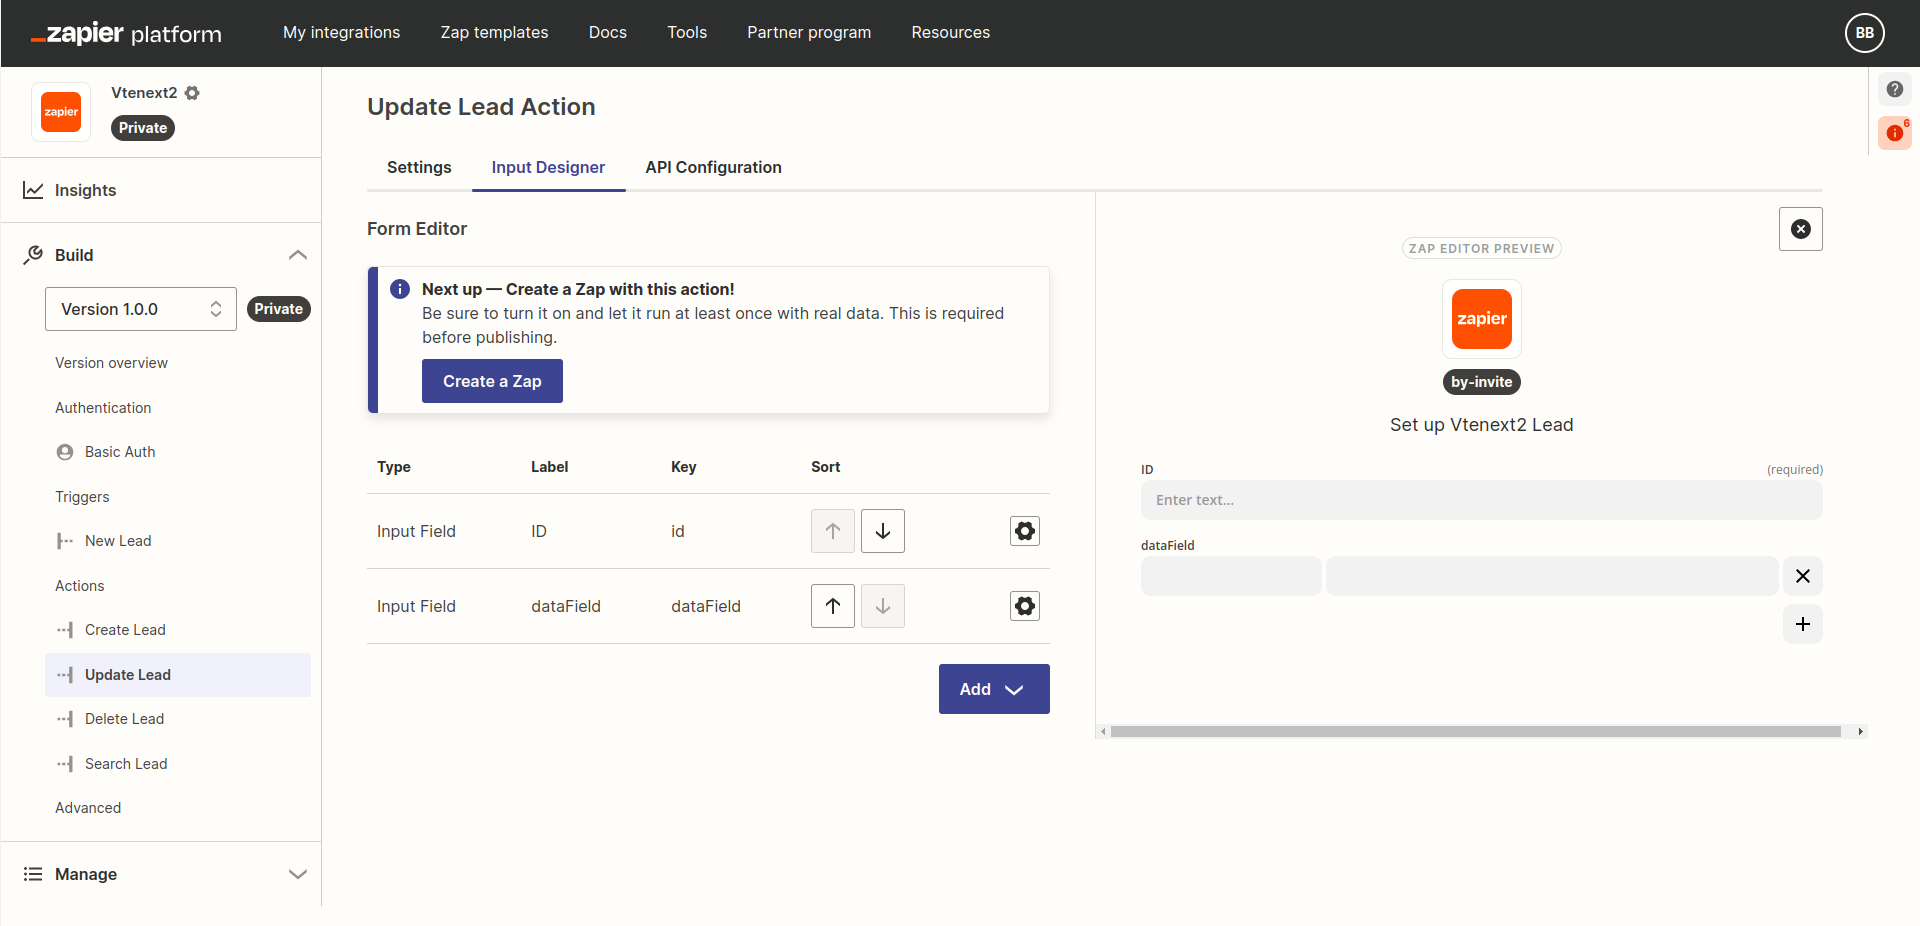
In the INPUT DESIGNER tab, create 2 fields of type Input Field, with the followinf characteristics:
- Key = id, Label = ID, Type = String, Required = yes
- Key = dataField, Label = dataField, Type = Dictionary, Required = no
Once created, we should have the following situation:
Move to the tab API Configuration and configure parameters in STEP 1 like this:
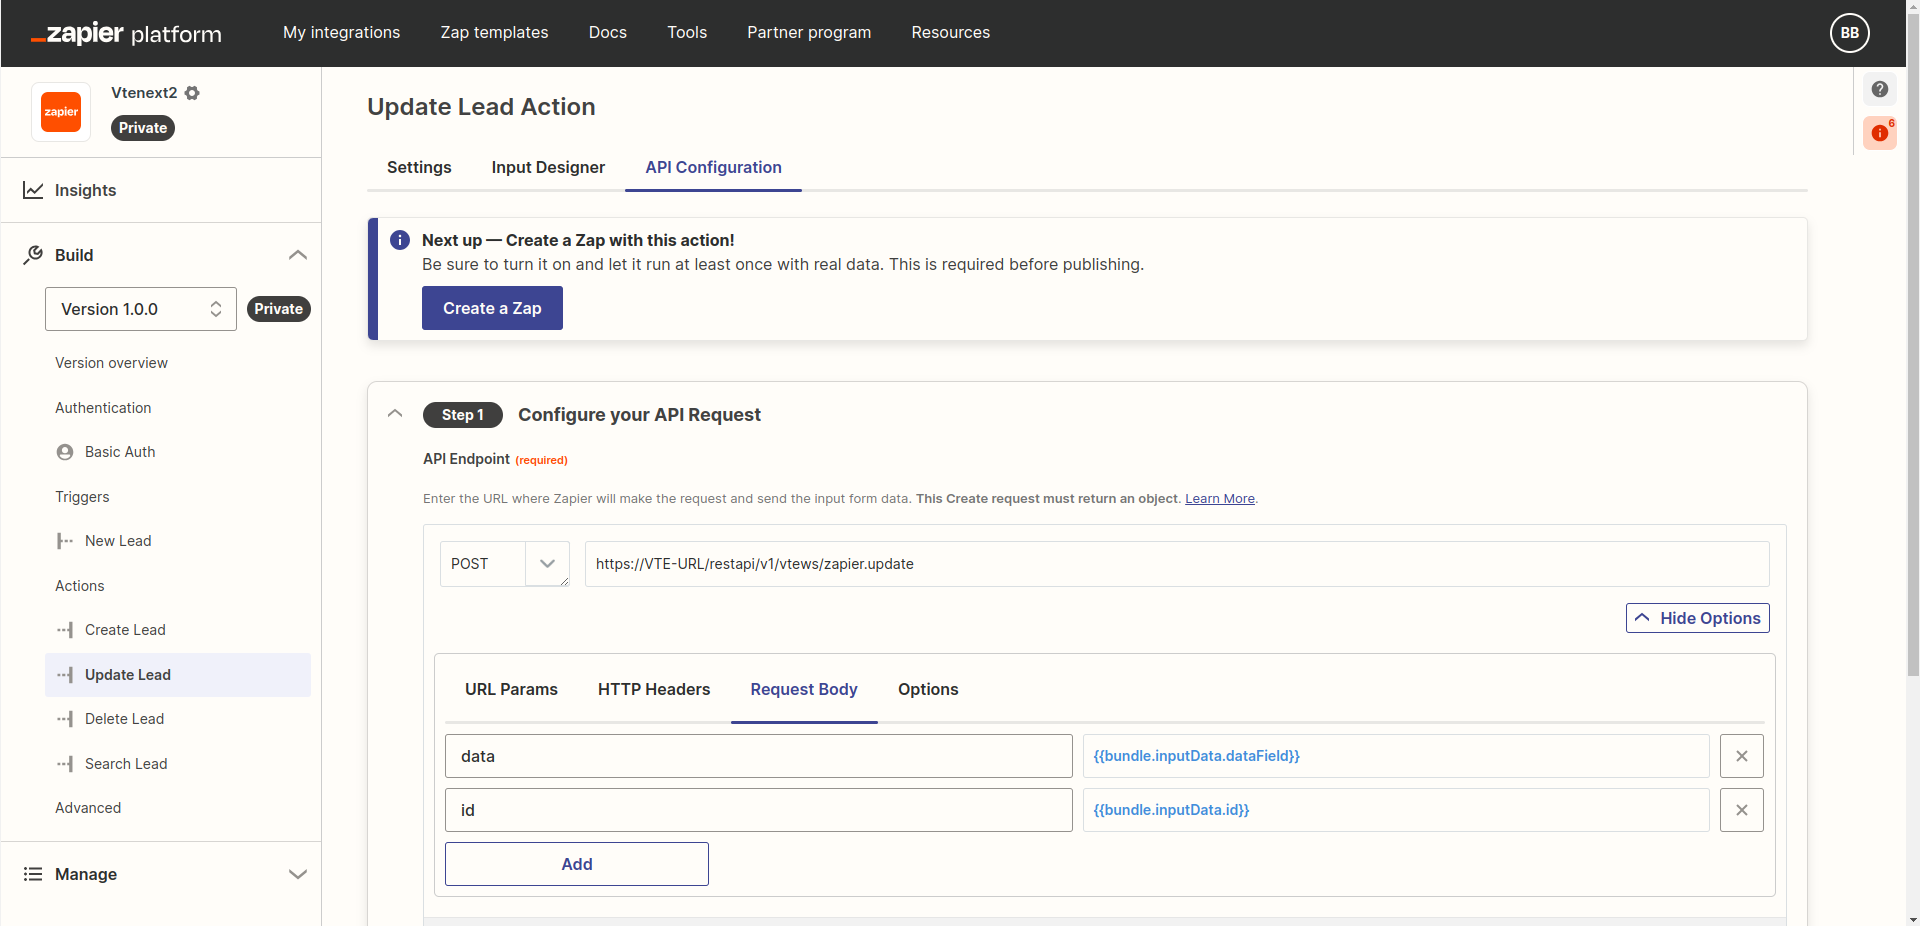
https://VTE-URL/restapi/v1/vtews/zapier.update
id = {{bundle.inputData.id}}
data = {{bundle.inputData.dataField}}
Replacing VTE-URL with the full address of your vtenext installation. Then click on SAVE API REQUEST & CONTINUE.
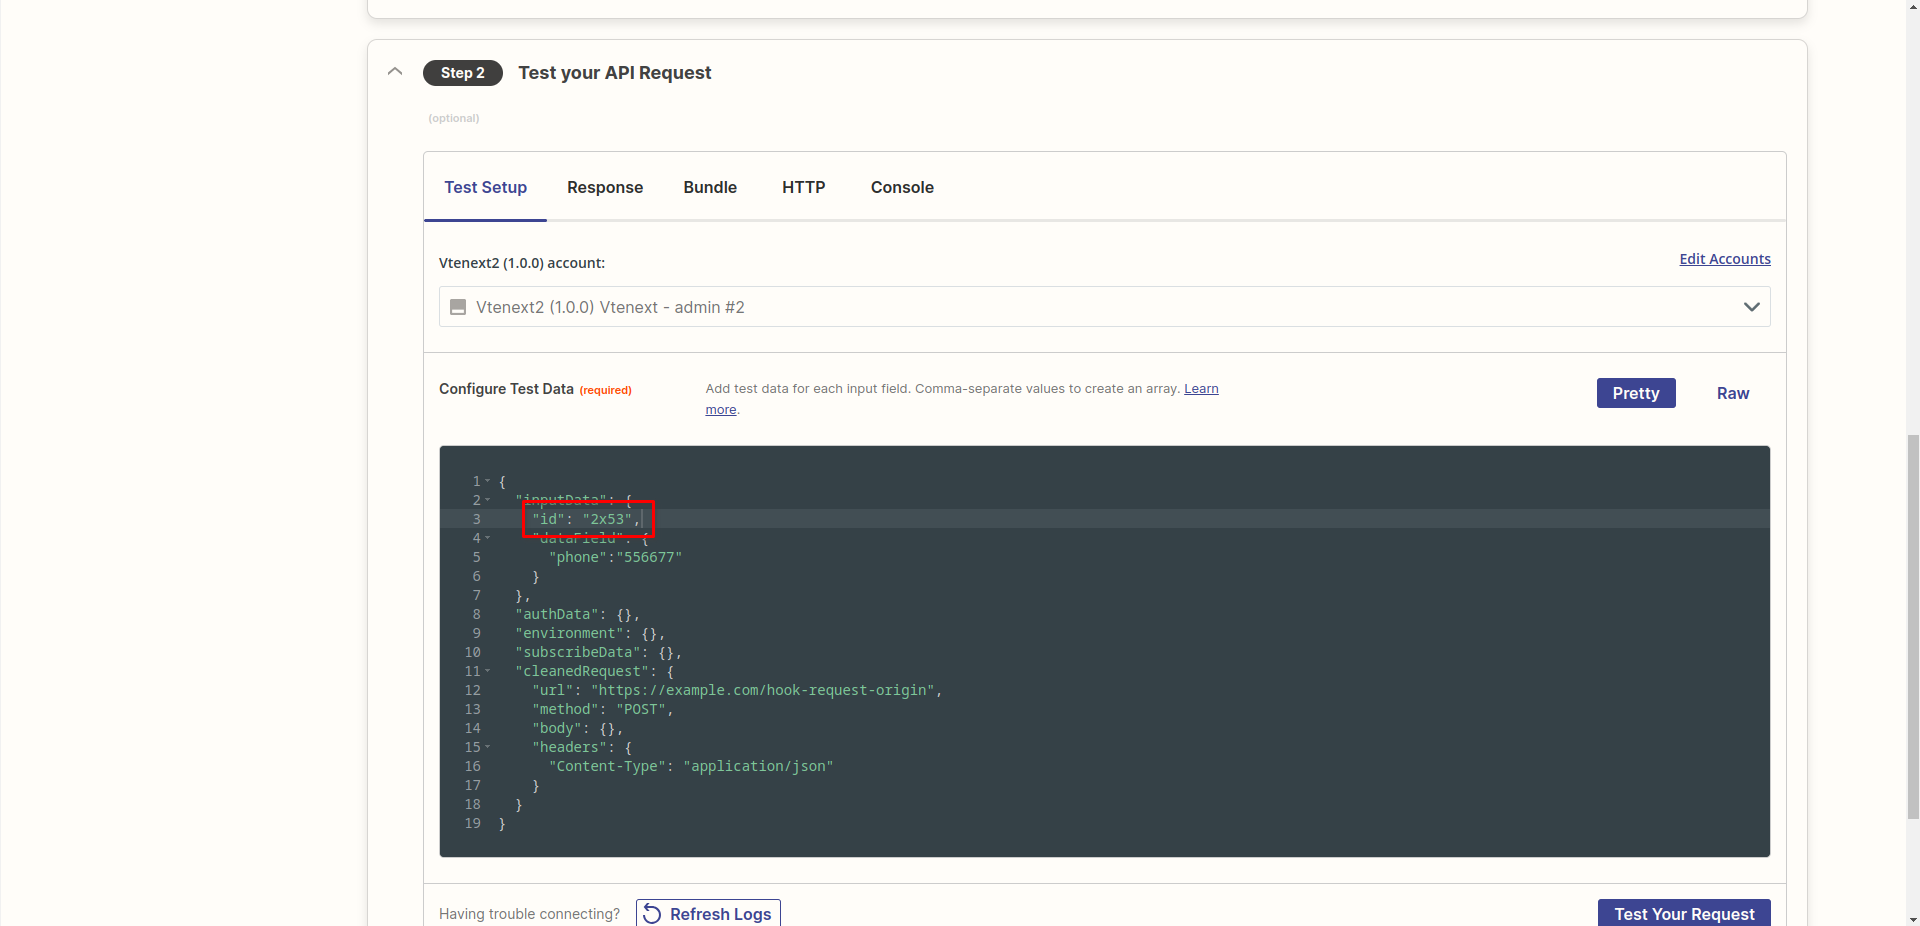
In STEP 2, to make a test choose "Raw" and replace all the code with the following:
{
"inputData": {
"id": "2x53",
"dataField": {
"phone":"556677"
}
},
"authData": {},
"environment": {},
"subscribeData": {},
"cleanedRequest": {
"url": "https://example.com/hook-request-origin",
"method": "POST",
"body": {},
"headers": {
"Content-Type": "application/json"
}
}
}but replacing the "53" at line 3 with the ID of a lead in your installation:

By clicking on Test Your Request you should get a result like the following:
Finally, in STEP 3 click on Use Response from Test Data and then Generate Output Field Definitions to automatically map the returned fields. Click then on Save Output & Finish.
IV. Delete Action
Click on ADD ACTION to create a new action and fill the Settings tab as the following image:
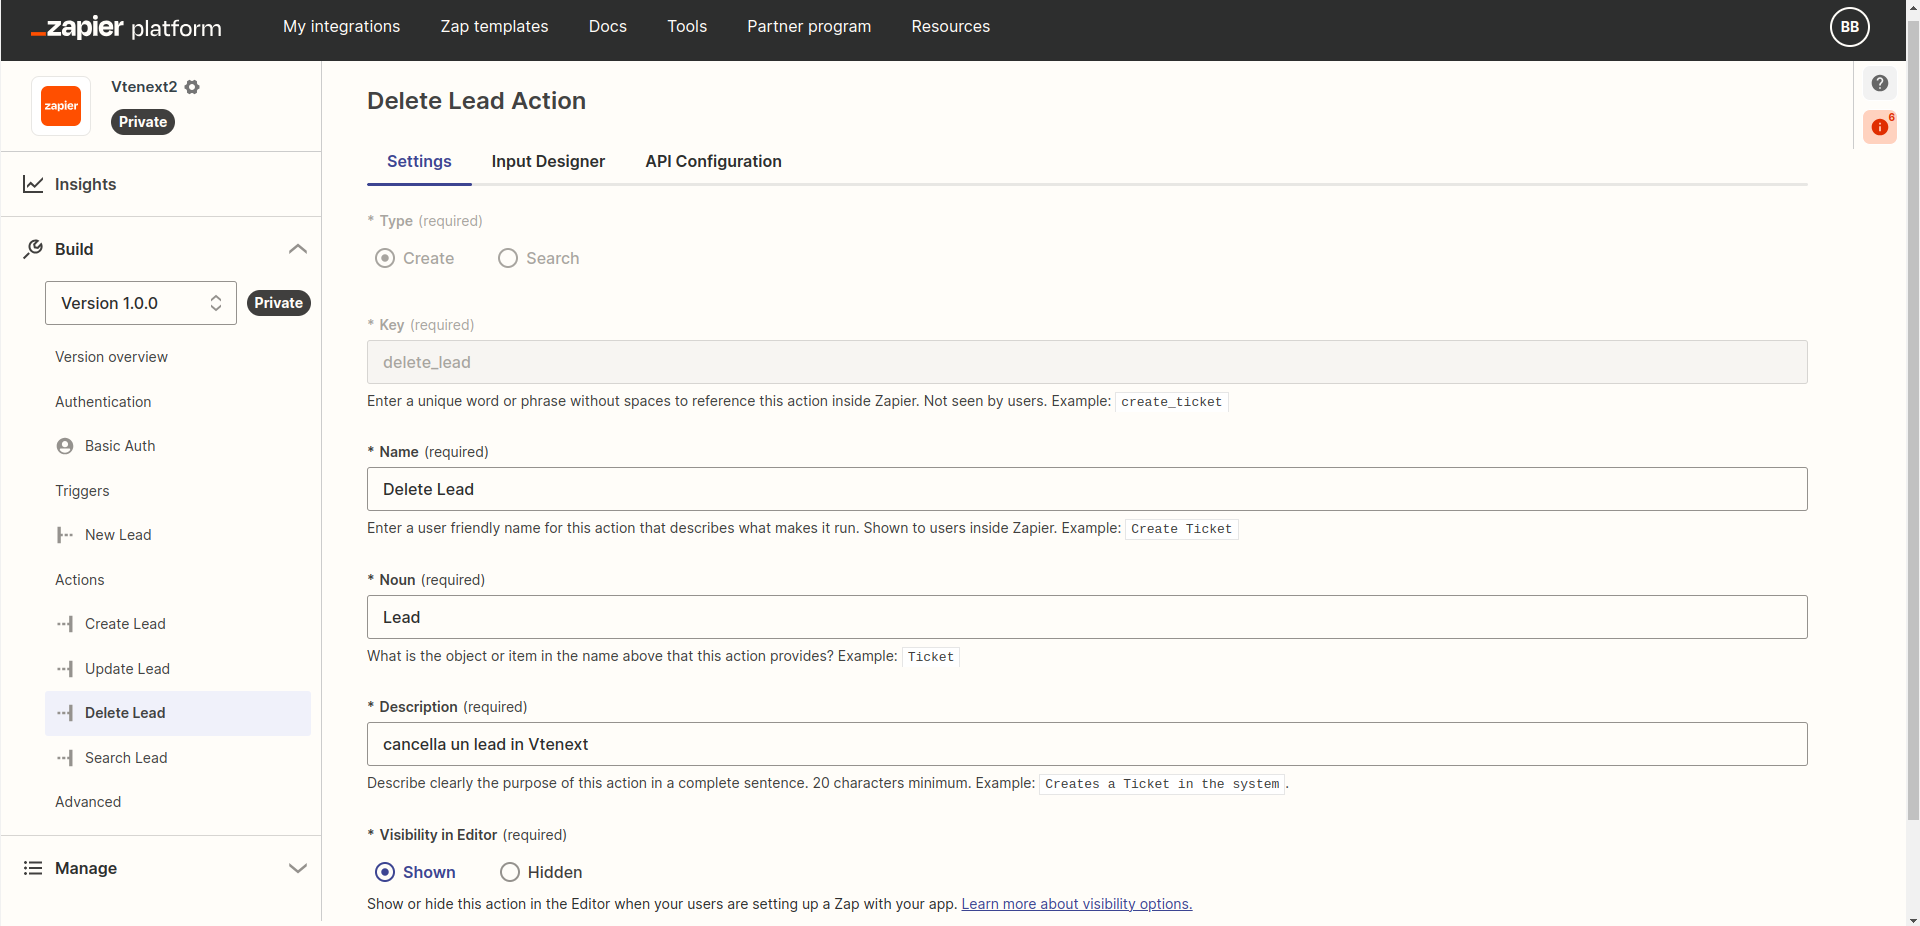
In the INPUT DESIGNER tab, create a field of type Input Field, with the following characteristics:

Move to the tab API Configuration and configure parameters in STEP 1 like this:
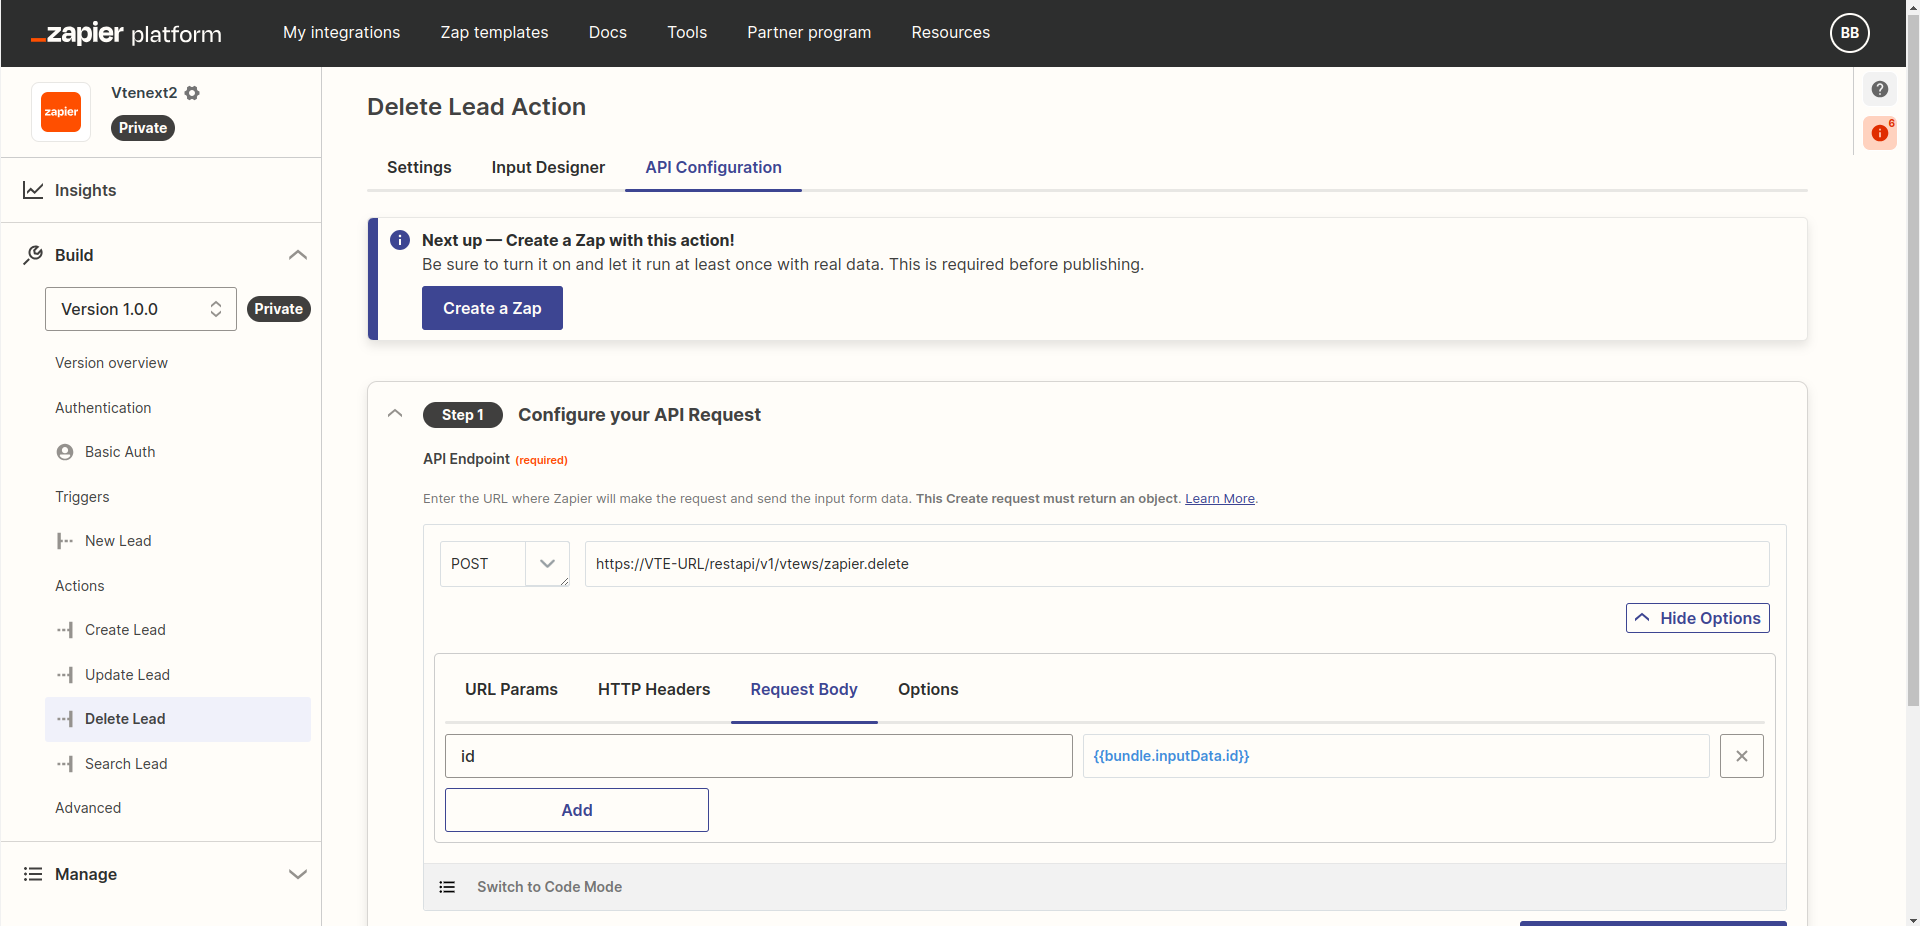
https://VTE-URL/restapi/v1/vtews/zapier.delete
id = {{bundle.inputData.id}}
Replacing VTE-URL with the full address of your vtenext installation. Then click on SAVE API REQUEST & CONTINUE.
In STEP 2 insert as test value the ID of the Lead you wish to delete, in webservice format, so like "2xCRMID", for example:

In this action it's not necessary to configure STEP 3 about the output fields.
Congratulations! The creation of the integration is complete!
You can now configure specifics ZAP to integrate different services with vtenext.
Examples: How to create ZAP
Example 1 - Trigger from vtenext with action in Zapier
in this example we send an email when a Lead is created in vtenext:
- Go to https://zapier.com/app/dashboard
- Click on Create
- Trigger: vtenext, event = new lead, account = use a valid account
- Test it, you should get a Lead, click on Continue with selected record
- Add an action, for example Email by Zapier -> Send Outbound Email
- In this action, configure the fields:
- To: email address which will receive the email
- Subject: Lead Created + variables from the email
- Body: Text of the email with variables
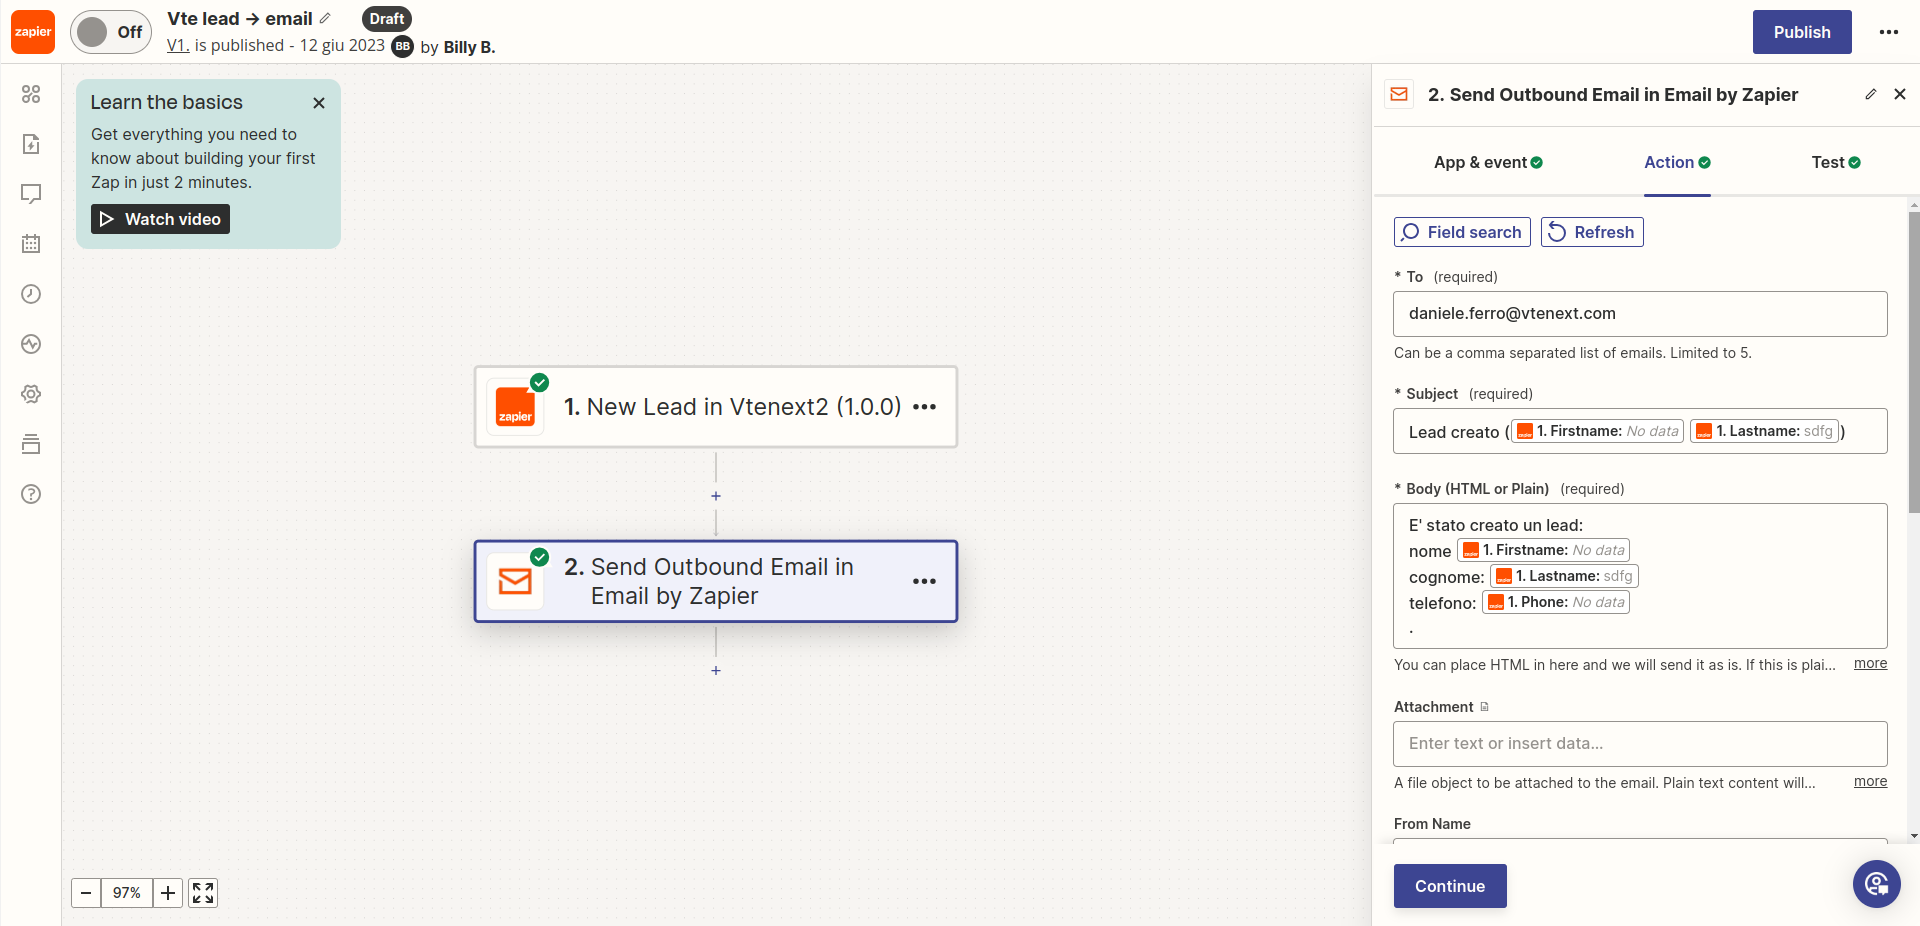
Click on Continue and check if you received the email. Click then on PUBLISH and verify that the Zap is active.
Now, to set off the trigger from vtenext a process containing the call to Zapier must be created.
In the simplest case, the process can have this flow:
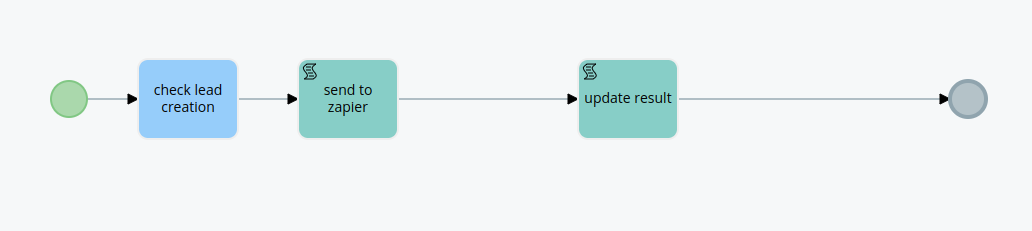
And one of the actions should be of type "Call External Webservice", using the webservice that was automatically created when the Zap was actrivated. The action should be configured as follows:
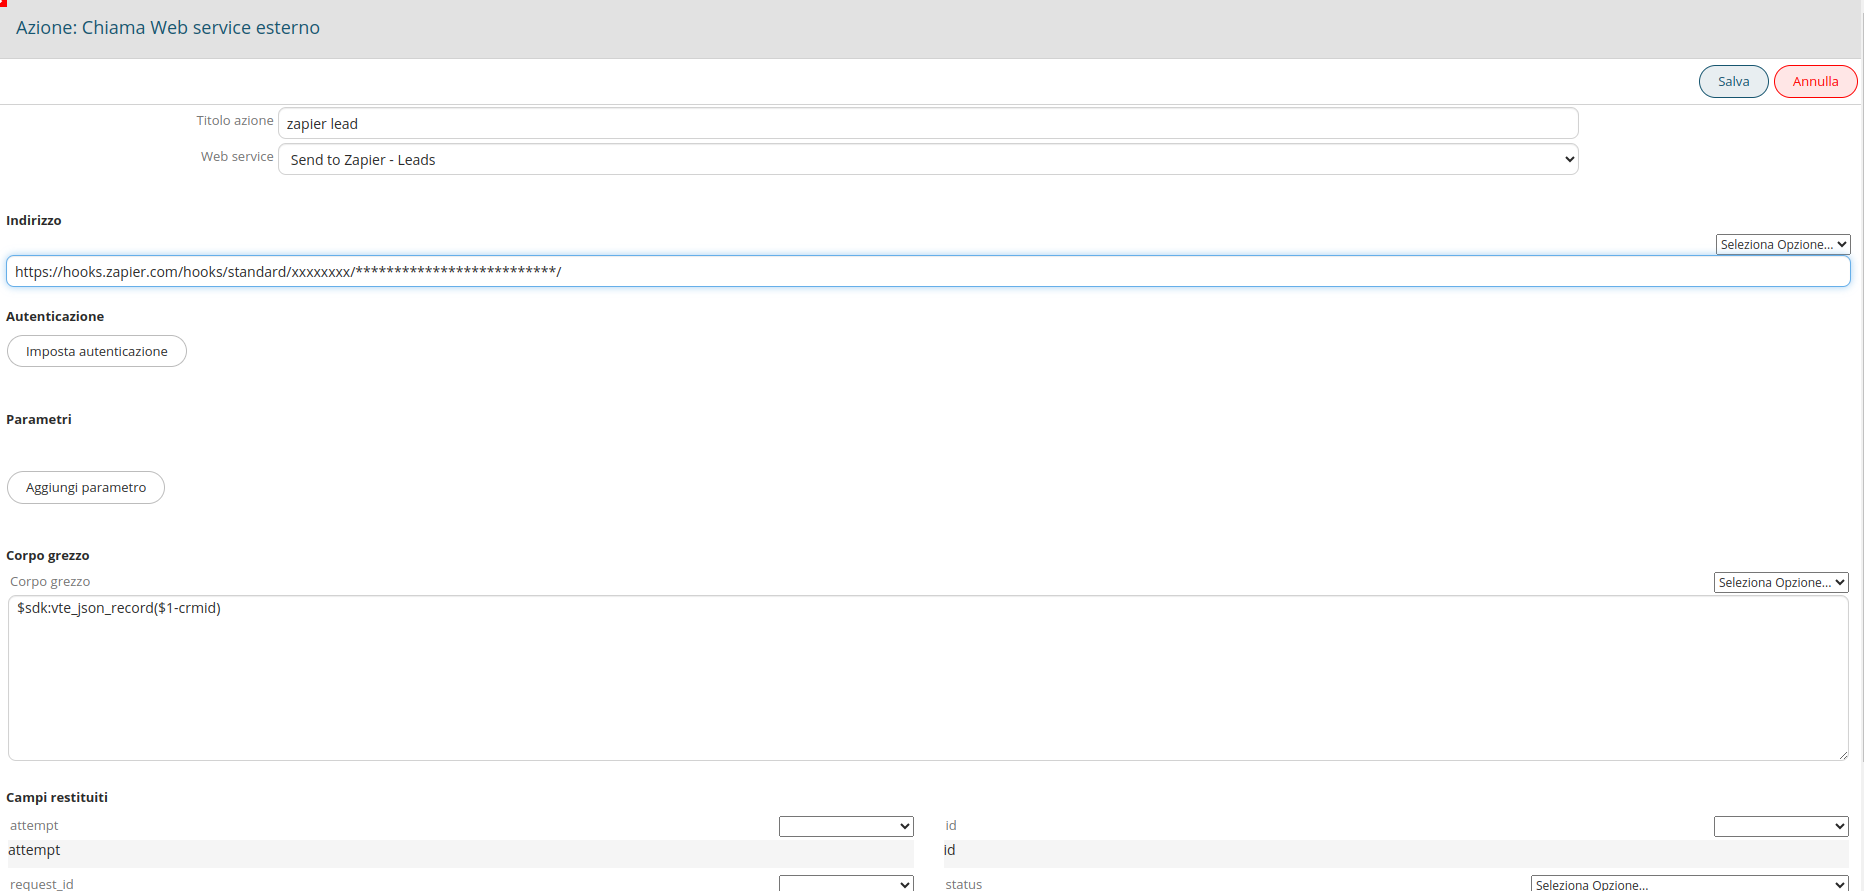
In the Raw body the string to use is
$sdk:vte_json_record($1-crmid)where $1-crmid is the record handled by the process, that we want to send to Zapier
or
$sdk:vte_json_field_string($1-crmid, firstname, lastname, phone, ...) To send only some fields. You can choose the ones that interest you the most.
Once the process is active, when the action is executed, Zapier will receive the record and on it the action configured in the Zap will be executed.
NOTE: If the zap is deactivated and recreated, the process must be modified to use the new webservice.
Example 2 - Trigger from Zapier and action in vtenext
In this example, we will try to create a lead in vtenext when an email is sent to a Zapier address:
- Go to https://zapier.com/app/dashboard
- Clock on Create
- Trigger: Email by Zapier ->New Inbound Email
- Configure a prefix for the mailbox, for example: testvte.trkbqw@zapiermail.com
- Send an email to that address and verify that Zapier receives it
- Create a new action: Vtenext -> Create Lead
- Use the proper account and configure the fields to send to vtenext, remembering to map all mandatory fields (otherwise the Lead cannot be created), for example:

- Make a test to verify the proper creation of the lead.
Finally, click on PUBLISH.
At this point, by sending emails to that configured Zapier address, leads are created in vtenext.
These are just a few examples of what the integration with Zapier can do. You can try and come up with all the triggers you want! Just think that, using Zapier paths, it is possible to create or update records by searching directly in the attributes of incoming emails. But it's just an example that helps you understand the power of the tool.
Name of the fields in vtenext
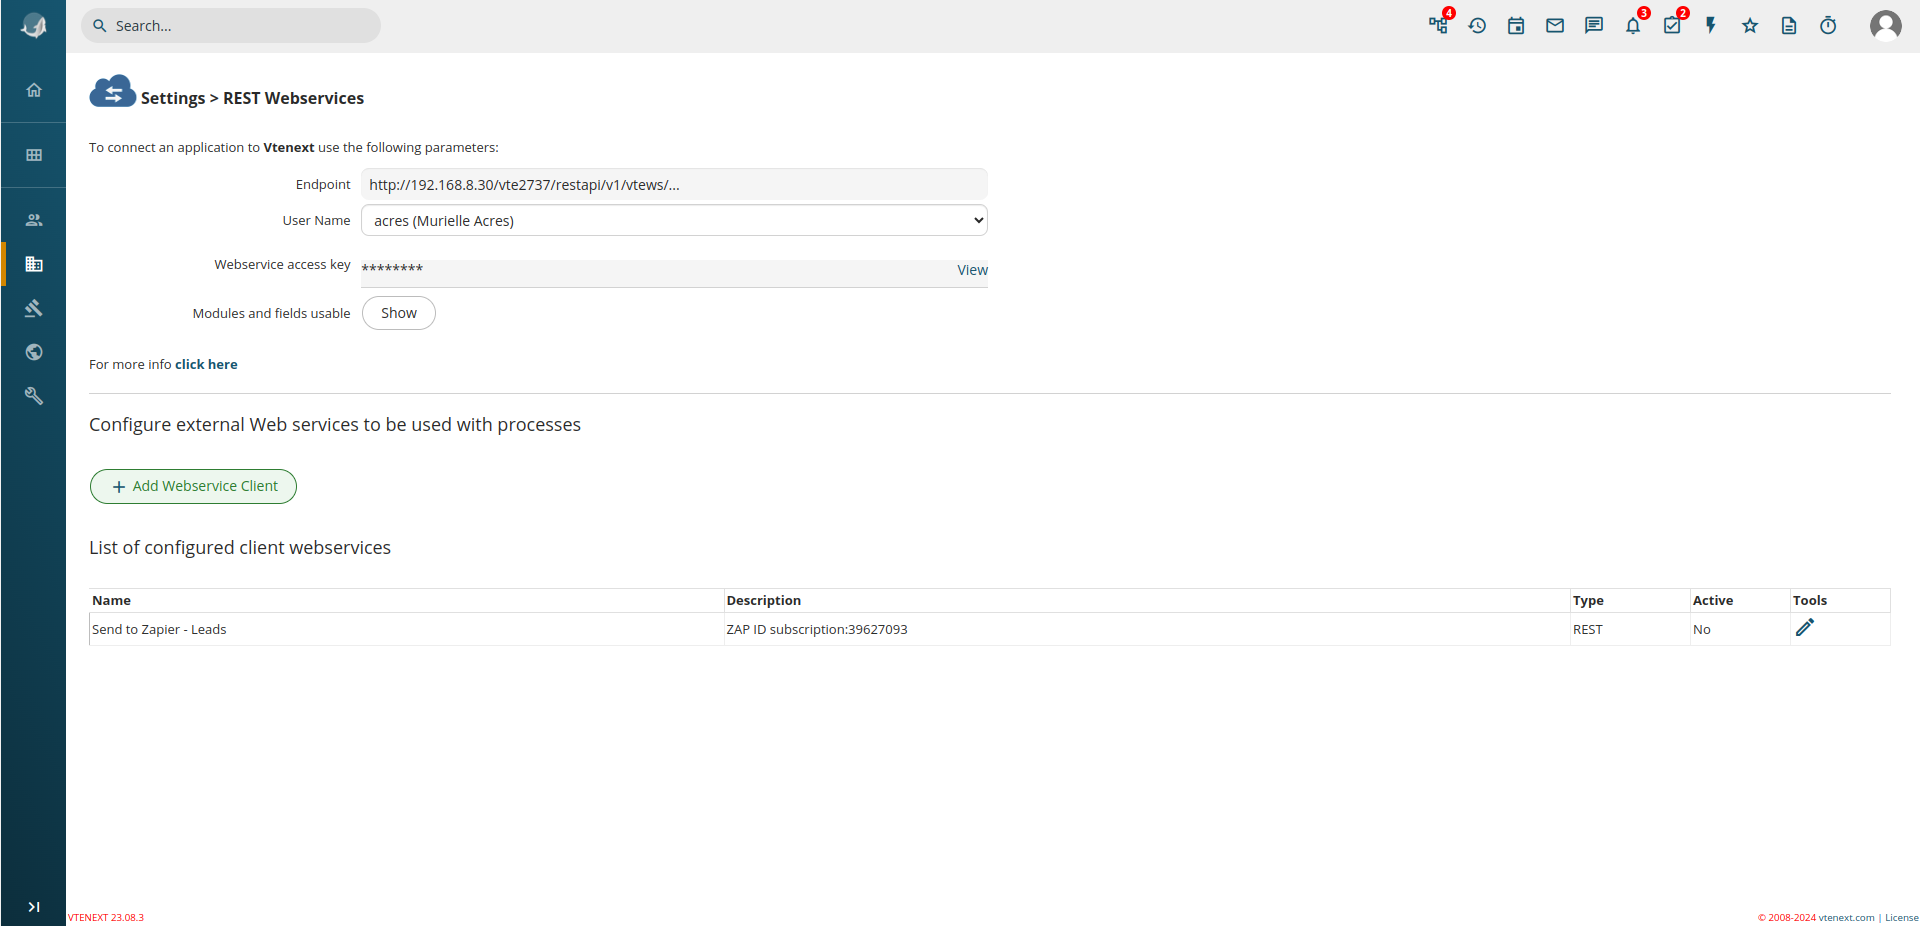
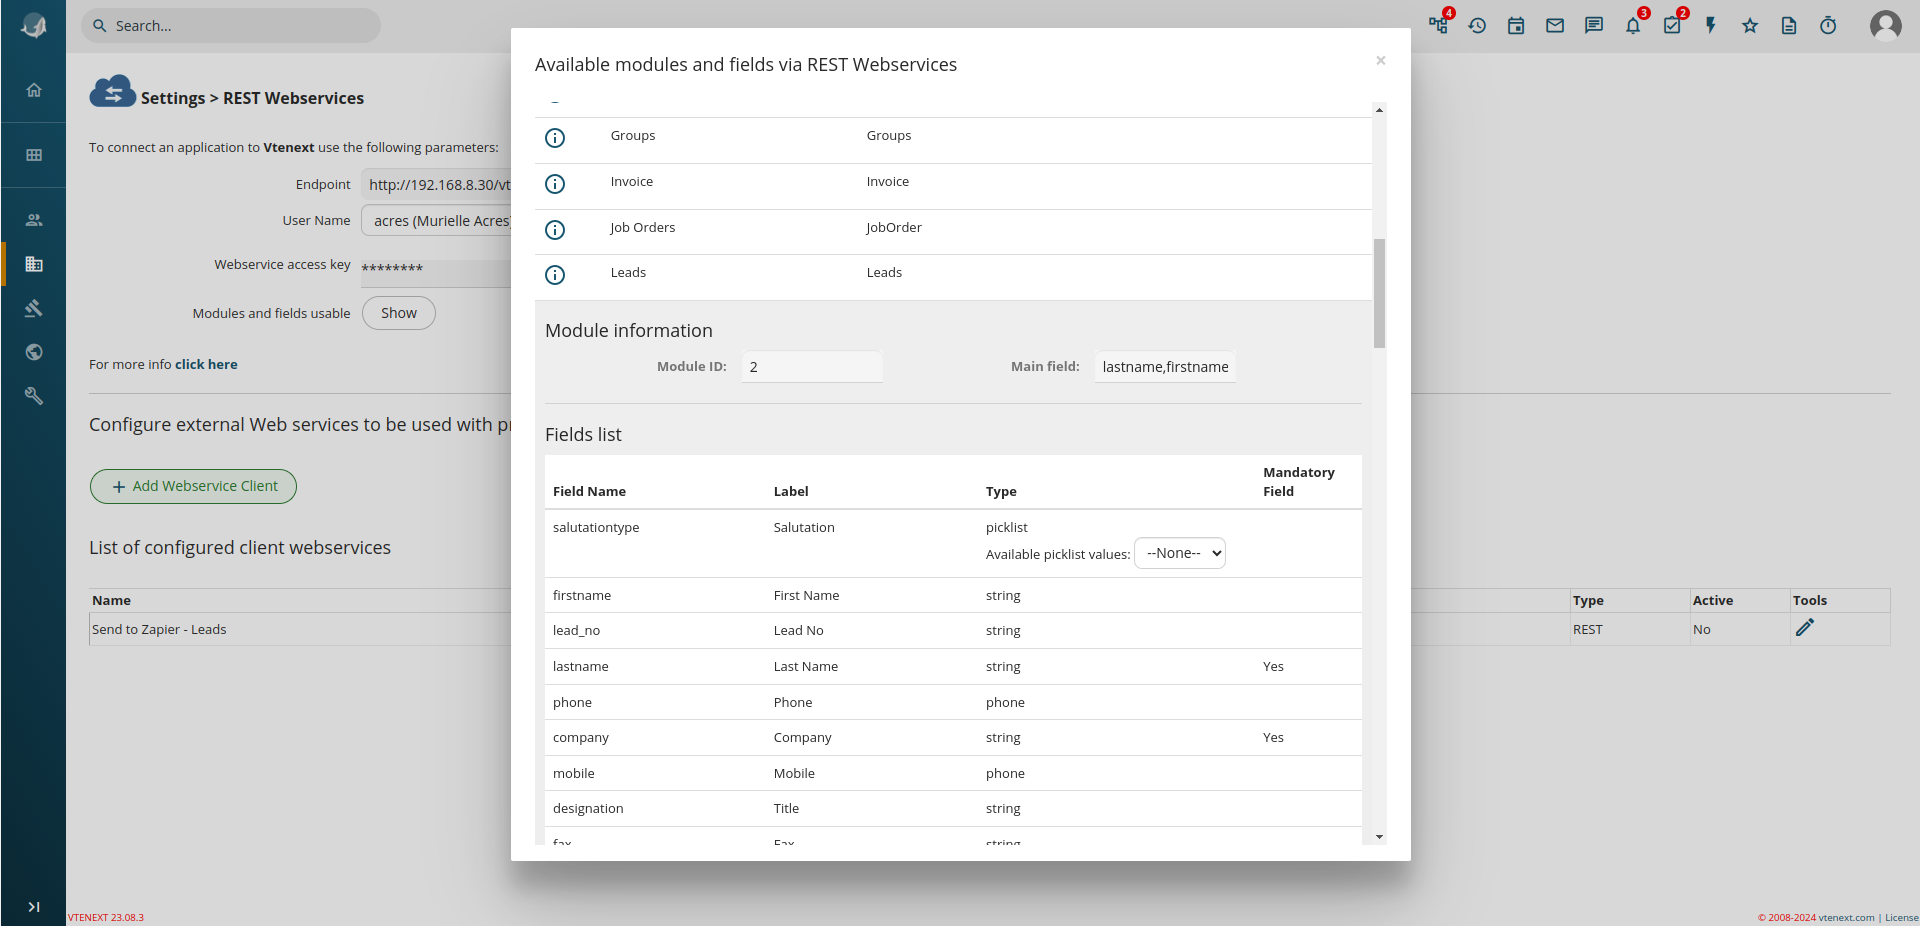
In this tutorial several internal field names of vtenext have been used. These names are not normally visible from the web interface, so a special page has been prepared, where all field names can be seen, to be used in integrations using the API.
To see them, go to Settings -> REST Webservices and click on Show:
A popup will open, showing the id of the modules and field names:
15.8 Employees Module
The Employees module allows you to register your employees or co-workers, both internal and external, within vtenext. Every time a new user is created, a new collaborator profile is automatically generated.
The module can be managed like all the others, by modifying the picklist entries for "collaboration type" or by adding new fields as desired.
The default fields, such as First Name and Last Name, as well as all those present in the "User Information" section, cannot be modified through the module. Changes can only be made through "User Preferences." Any modifications made in the user preferences reflect within the Collaborators module.
A collaborator profile can be linked to one of the four profiles present in vtenext: Lead, Company, Contact, or Supplier.
![Employee - Administrator [18] - VTENEXT 23.08.png](https://usermanual.vtenext.com/uploads/images/gallery/2023-08/employee-administrator-18-vtenext-23-08.png)
A practical example of using this module could be to input personal evaluations for each collaborator into a field that's only visible to the Human Resources department (dedicated profile).
In this scenario, the Employees module in vtenext allows the HR team to maintain individual performance assessments for employees or co-workers. This information can be entered into a custom field within the module, specifically designed to store performance ratings or comments. The visibility of this field can be restricted to the HR profile only, ensuring that sensitive performance data is accessible only to authorized personnel.
By utilizing the Employees module in this manner, the company can effectively manage and monitor the performance of its workforce while maintaining data confidentiality and security.
15.9 Klondike Co-Pilot (Your Personal Assistant)
(This plugin is sold separately)
Klondike Co-Pilot is an advanced solution that enhances the capabilities of the vtenext CRM, offering automated and assisted support for managing business processes and customer interactions. This integration aims to improve operational efficiency, reduce human errors, and optimize workflow through intelligent automation and proactive assistance.
Key Features
-
Proactive Assistance: Provides real-time suggestions while performing complex tasks, helping users make quick and informed decisions.
-
Artificial Intelligence: Uses AI to analyze data and customer needs, optimizing responses to their requests.
-
Seamless Integration: Integrates smoothly with vtenext and its main modules, ensuring a continuous workflow and synchronization of all shared customer information with all users.
Where to Find Klondike Co-Pilot
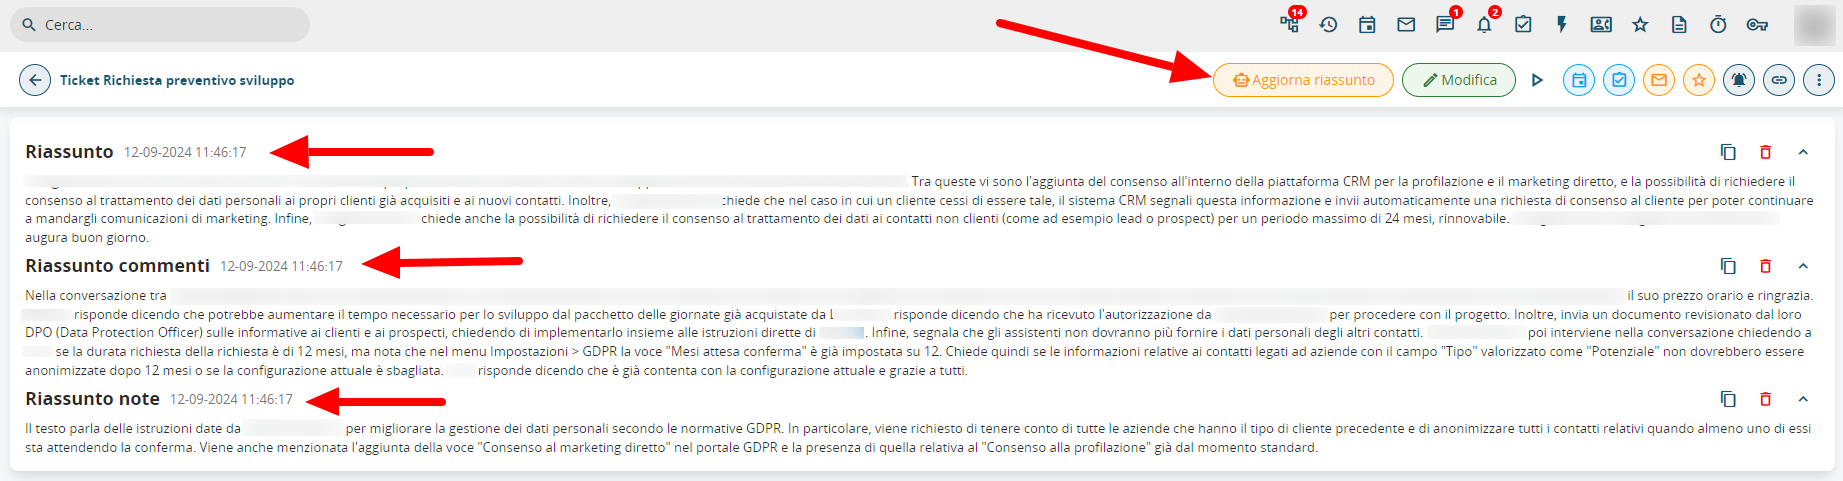
-
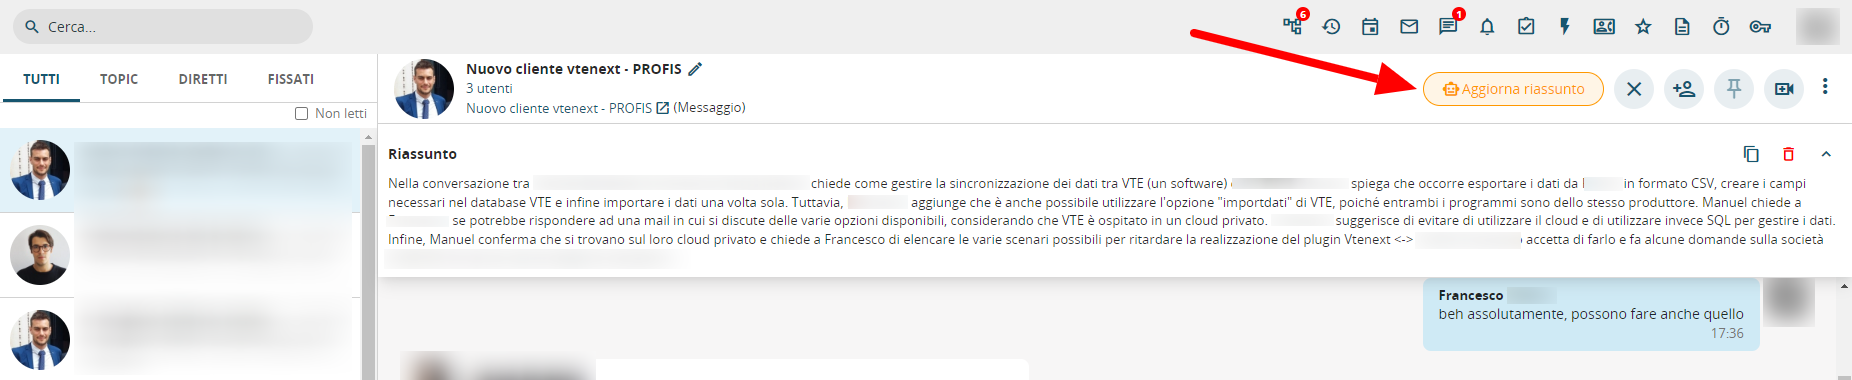
Trouble Tickets: You can request a summary within a ticket when dealing with a large amount of information represented by the ticket's DESCRIPTION, COMMENTS, and NOTES. Klondike helps by summarizing all the relevant content (with the possibility to update the summary when new details, comments, or notes are added to the ticket).


-
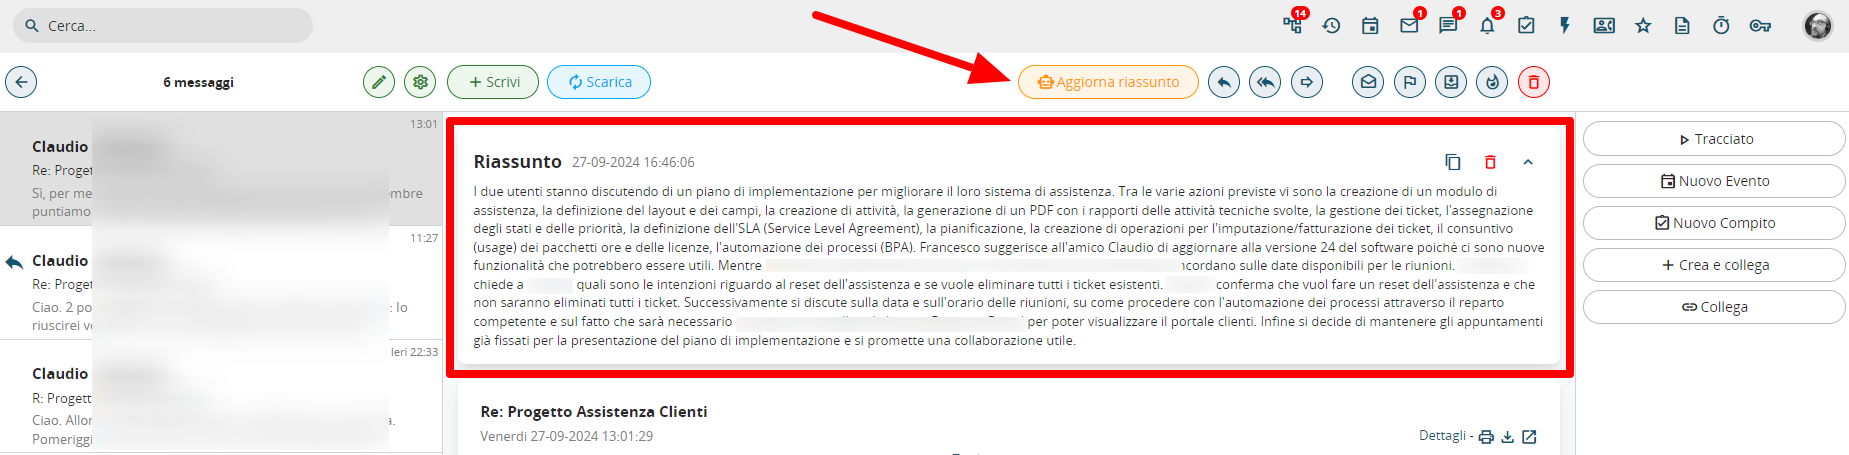
Messages Module: You can request a summary of an email or a series of threads in the same email to make them easier to understand, especially when dealing with long text or multiple responses. This function is very useful when involving another user in conversations, as it allows them to grasp the essence of the entire email exchange.


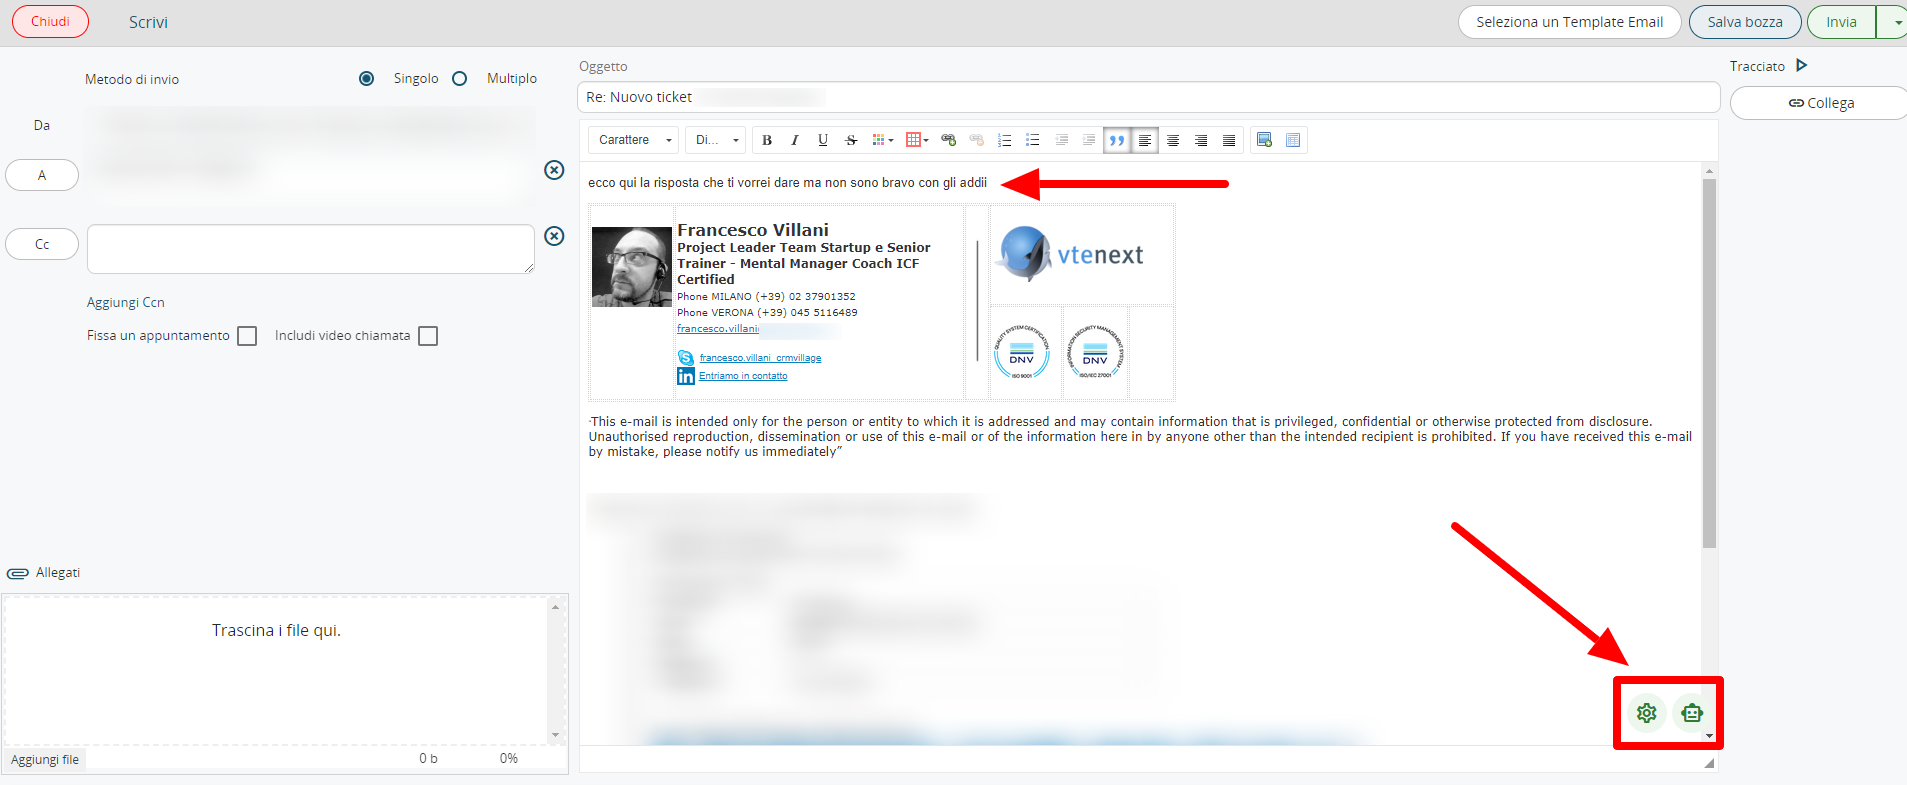
Additionally, Klondike Co-Pilot can help users respond to emails by reformulating the content and constructing a coherent reply according to the chosen "character traits."
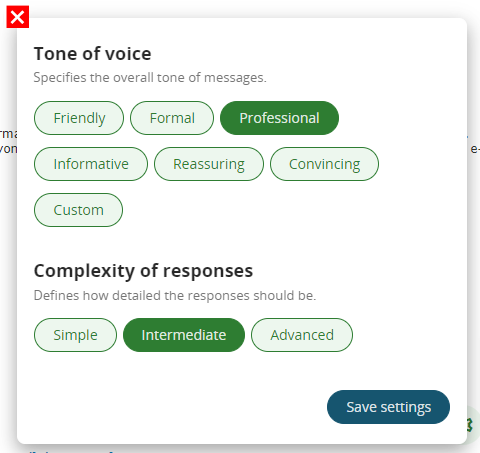
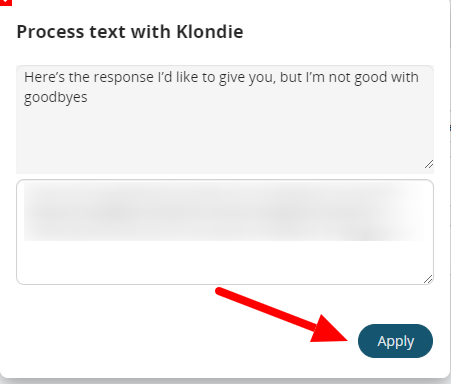
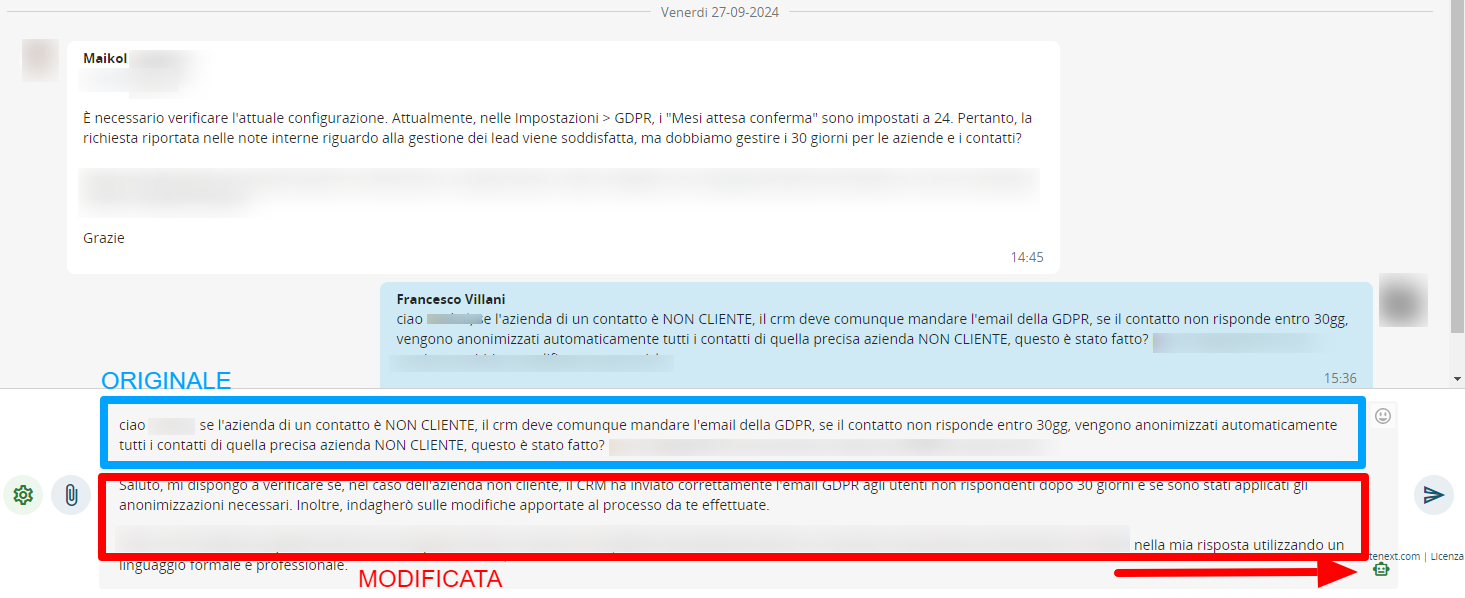
In the email composition popup, at the bottom right, there are two icons: a GEAR and a ROBOT. Clicking on the gear opens the "Tone of Voice" selection screen.
Once the selection is made and you click SAVE SETTINGS, Klondike Co-Pilot can act. To do so, simply select the text (or portion of text) you want to reformulate (after having written it) and finally click on the robot icon.
This will open a popup that will display the transliteration and reinterpretation done by Klondike, as shown below:
By clicking the APPLY button, the original text in the email body will be replaced with the one rewritten by Klondike Co-Pilot.

- Conversations: In the Conversations module, just like in the Messages module, Klondike can help respond to colleagues. You can choose a Tone of Voice, write what you intend to communicate, and let your personal assistant do the rest.

Of course, Conversations also have the summary processing feature, simplifying the reading of complex or long conversations for users.
- Co-Pilot From the Conversations, you can request assistance from Klondike Co-Pilot in two ways (by selecting the Klondike user, which will appear in the list of available users to chat with):
- General inquiries (ChatGPT-style)
- Internal document inquiries (e.g., an online manual)


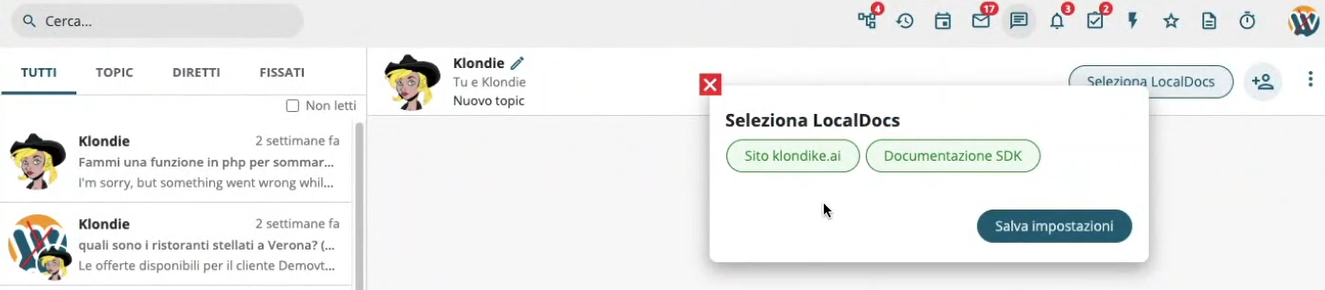
In case 1, you can ask general questions, either related to or beyond the current context, for personal information or customer assistance. Essentially, you can use the conversation as if it were ChatGPT, by selecting Klondike as the user.
In case 2, you can query Klondike to search within specific documents or online manuals that it is linked to. For example, the manual you are currently reading could be connected to Klondike in vte, allowing you to search chapters or topics directly through a conversation.
Conclusion Klondike Co-Pilot for vtenext represents a significant step forward in automating customer relationship management and business processes. With its ability to automate, analyze, and provide real-time support, this tool makes vtenext even more powerful and indispensable for companies aiming for efficiency and excellence in customer service.