5 Personal communication tools
- 5 Personal communication tools
- 5.1 Outbound mail configuration (SMTP)
- 5.2 Messages Module
- 5.2.1 IMAP configuration and folders
- 5.2.1.1 Set Centralized Signature
- 5.2.2 Writing and reading emails
- 5.2.3 Email Functions
- 5.2.4 Emails Sharing
- 5.2.5 .ics support for calendar
- 5.2.6 Other Settings of Messages Module
- 5.2.7 Mass email
- 5.3 Email Templates
- 5.4 Talks Module
- 5.5 Notification Module
- 5.5.1 vtenext version update notification
- 5.6 Documents
- 5.6.1 Documents revision and sharing
- 5.6.2 Create new document from related list
- 5.7 Notes
5 Personal communication tools
The main purpose of a CRM system is management of customer relationships, in regard to which communication tools take on a role of critical importance. vtenext offers different kinds of tools to manage communication towards customers (existing or potential) and towards your work team, distinguishing between personal communications and marketing communications.
This chapter describes the tools used for personal communications:
- Messages Module Email Template
- Talks Module
- Notifications Module
- Notes Module
- Documents Module
In particular the Messages that allow the transmission of individual emails or emails to a limited number of recipients in which each message is linked to the recipient's record.
5.1 Outbound mail configuration (SMTP)
To activate the transmission of emails from CRM, fill in the SMTP server data in Settings > Mail server > Simple Mail Transfer Protocol (SMTP).
![5.1 [1].png](https://usermanual.vtenext.com/uploads/images/gallery/2022-06/5-1-1.png)
|
Account |
choose the server type from among the ones on the list; if your mail server type is not included choose CUSTOM. Warning! If you use Gmail may not be possible to send email from addresses other than the one shown in this page. |
|
Server Name |
mail server address for SMTP access |
|
Port |
indicate the port; the system proposes the default port |
|
User Name |
indicate the account to log on to the mail server; usually the same as the complete email address. |
|
Password |
access password associated with the account |
|
Requires Authentication |
Yes/No Warning: if you are configuring an email server with Office 365, you need to enable the SMTP Authentication option for the specific user on the Office 365 server side before proceeding with the configuration on vtenext. More informations, can be found here: |
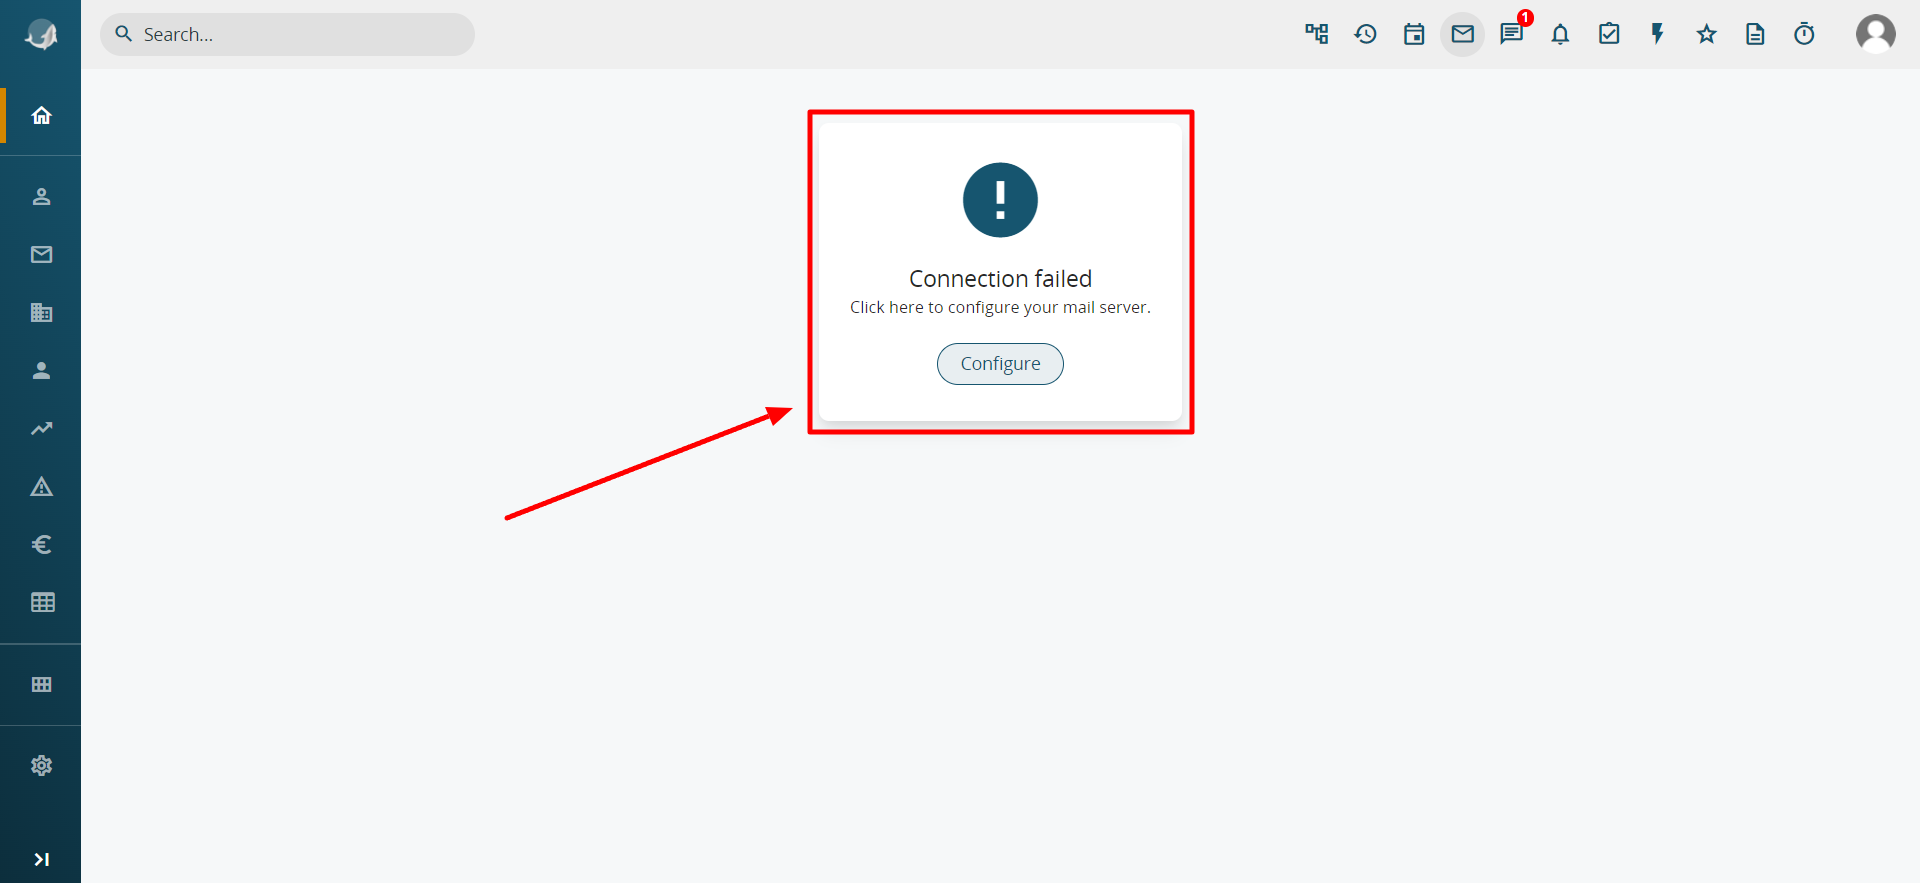
When you save the data the system will test the entered data, sending a mail to the admin user and an error message will be displayed if it was not possible to send the email (see example in figure).

The main causes that occurs in configuration errors in the smtp server are the following:
- difference between the email in user preferences (visible in USER PREFERENCES under the avatar in the top right corner) and the email actually specified within the SMTP configuration. It is important to remember that the SMTP username (email address) must match the email address of the admin user. For this reason, the email address configured in the admin user's preferences should be changed (even if only for the configuration);
- wrong server name;
- wrong port number;
- wrong password we remember as mentioned above to use the email password.
The SMTP server is used not only for personal mail in the Messages module (optional, as a different SMTP can be set for each mailbox directly in the Messages module) but also for sending emails and notifications through processes. However, for Newsletters, there is a dedicated configuration, for which it is recommended to read Chapter 6.2.3 Newsletter Configuration (SMTP).
N.B.: the mail servers on protected SSL port must be specified with the server name ssl://servername (e.g. ssl://smtps.aruba.it).
5.2 Messages Module
The vtenext Messages module uses the IMAP email account. You can work on emails through vtenext as if you were working on the server, namely without any downloading of emails to a folder. Any operations that you do in the messages module will be carried out directly on the server: the new folder creation in vtenext corresponds to the creation of a new folder on the email server, deletion of an email in “Messages” corresponds to deletion of the message from the server, etc. Therefore, a copy of the email not created unlike the customary procedure for Outlook/ Thunderbird clients that connect to the mail server in POP3 mode. The emails will therefore continue to be physically resident on the mail server.
In addition to IMAP main account, it's possible to configure secondary accounts in IMAP or POP3 mode. It is also possible to configure PEC mailboxes. Multiple SMTPs can also be set, which can be associated with a single email account within the message module.
![5.2 [1].png](https://usermanual.vtenext.com/uploads/images/gallery/2022-06/5-2-1.png)
5.2.1 IMAP configuration and folders
To proceed with the email configuration you need to open the module Messages:
First of all you need to click the "Configure" button (only the first time). Once you have set the SMTP server (see above), the IMAP server can be set up here or directly from the Messages module of each user through the cogwheel icon > Account.
Each user will be able to manage multiple mailboxes, both on servers configured in the Admin Settings and on other servers.
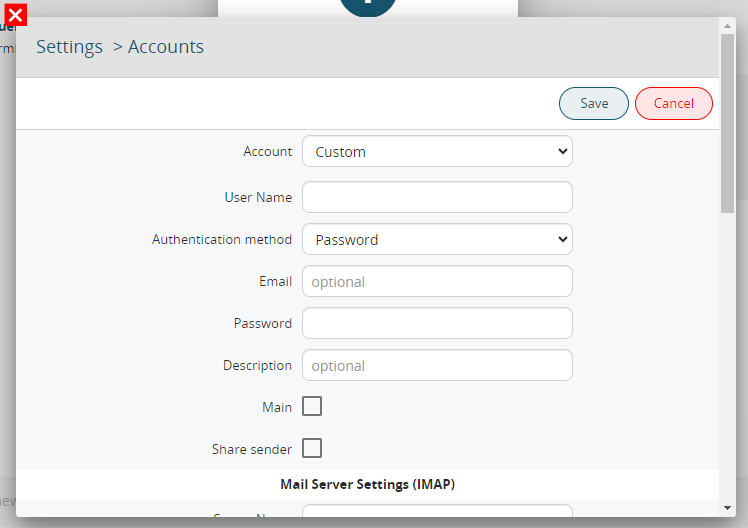
|
Account |
Select the account type from the options provided or choose Custom |
|
Username |
Email address of the mail server for access via IMAP |
|
Authentication Method |
You can choose whether the authentication is done via Password or OAuth2 |
|
|
To enter the email address (optional, and it auto-fills upon saving by copying the Username if left blank) |
|
Password |
If the Password option is selected in Authentication Method, this field will be used to enter the password for your email account |
|
Description |
To enter a description of the email account (optional, and it auto-fills upon saving by copying the Username if left blank) |
|
Main |
It is used to determine the primary email address for sending emails (in case multiple accounts are configured in the Messages module) |
|
Share sender |
It allows configuring a shared mailbox with all users (this configuration is only allowed for the admin user, and the mailbox is shared solely as a sending email address, not for receiving) |
|
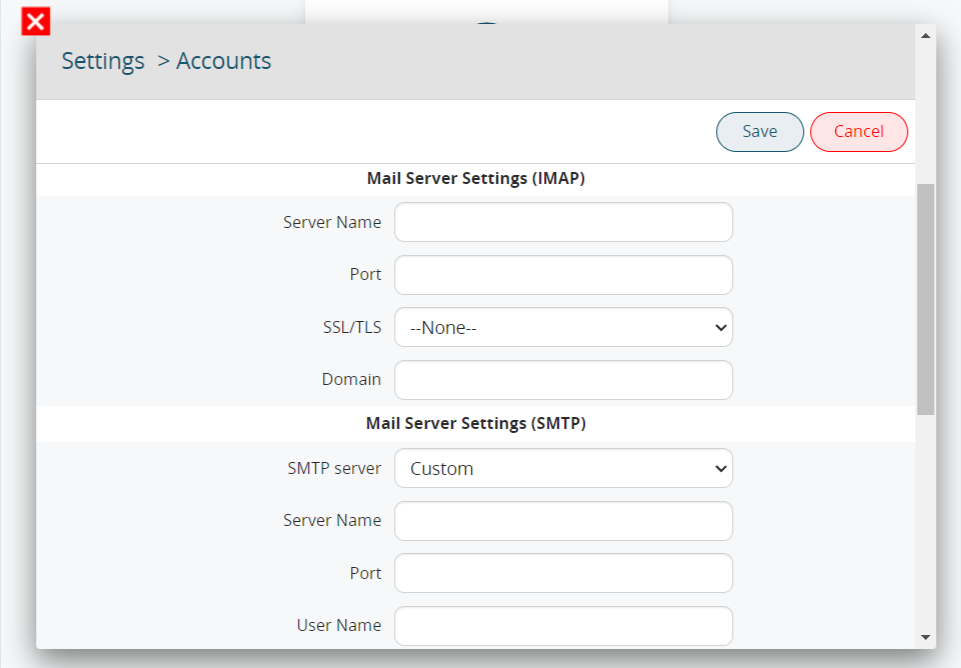
Mail Server Settings (IMAP) |
|
|
Server name |
This field should be filled in with the server name details provided by your Maintainer (e.g., Aruba). For example, you would enter imaps.aruba.it if Aruba is your Maintainer, as an example |
|
Port |
It is used to enter the port number that the email account connects to for incoming mail |
|
SSL/TLS |
SSL/TLS if present |
|
Domain |
specify the domain, for example company.com |
|
Mail Server Settings (SMTP) |
|
|
SMTP server |
Select the type of account from the options provided or choose Custom |
|
Server Name |
This field should be filled in with the server name details provided by your Maintainer (e.g., Aruba). For example, you would enter ssl://smtps.aruba.it if Aruba is your Maintainer, as an example |
|
Port |
It is used to enter the port number that the email account connects to for outgoing mail |
|
Username |
indirizzo mail del server di posta per l’accesso via SMTP |
|
Password |
It is used to enter the password for your email account for SMTP authentication (typically, the password is the same as the one used to access the email account) |
|
Requires Authentication? |
To determine whether the server requires authentication for outgoing mail |
|
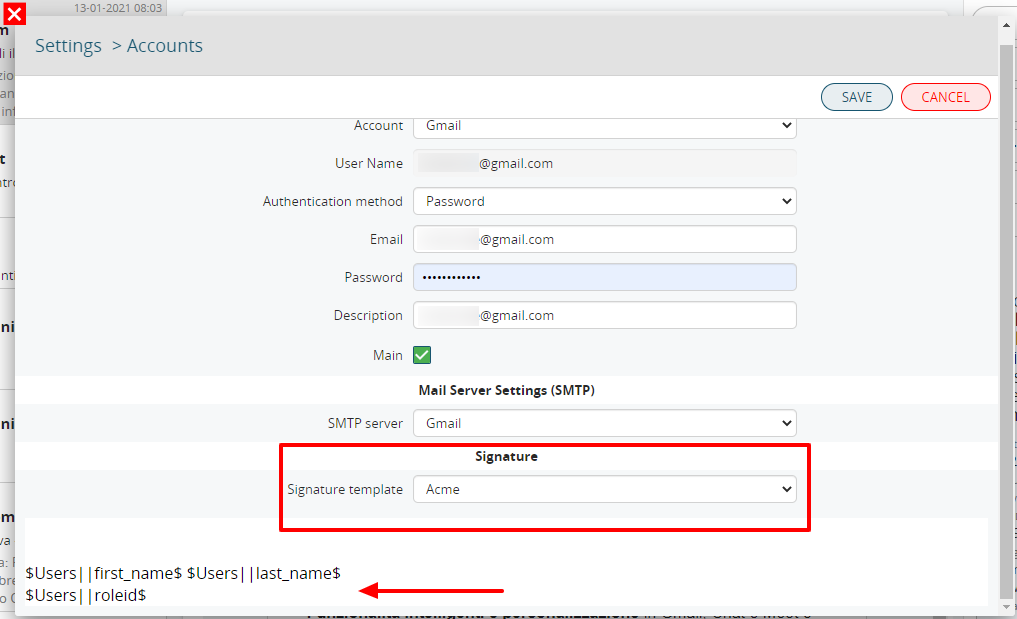
Signature template |
selecting "Custom" makes it possible to enter text, images, and links as a personal signature at the foot of email messages, while selecting "Company Name" (Acme, in the example) allows the signature configured in settings to be used. This new function is called "Centralized signature" (see section 5.2.1.1 Set Up Centralized Signature) |
|
Other Settings |
|
|
Account |
It allows you to access the configuration of new email accounts (in the Messages module, you can configure as many email accounts as you wish) |
|
Folders |
You can access the configuration of the email account folders, correctly matching them with the folders required by the CRM view: INBOX, DRAFTS, SENT, SPAM, TRASH |
|
Layout |
it allows to set the email layout choosing between the following configurations: - enable thread view; - merge account folders. |
|
Filters |
it allows to create rules to move mail within folders of the selected account |
|
POP3 |
it allows to manage mail coming from pop3 mailbox directly within the account created. |
|
Out of office |
it allows to apply rules to send automatically email. |
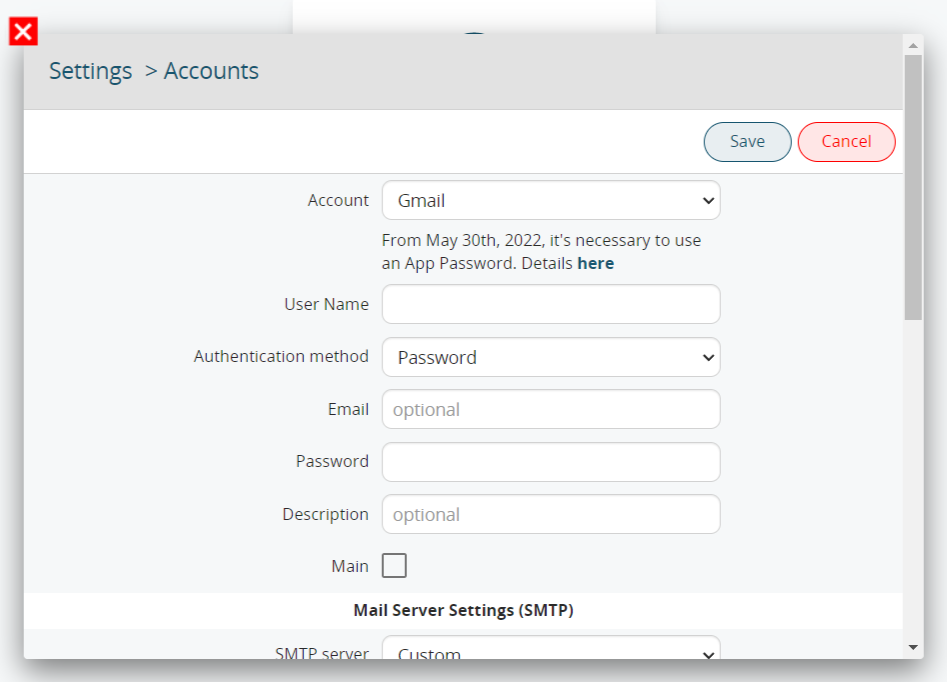
In this pop-up you can select the kind of account you are configurating. Here you can see every selectable value:
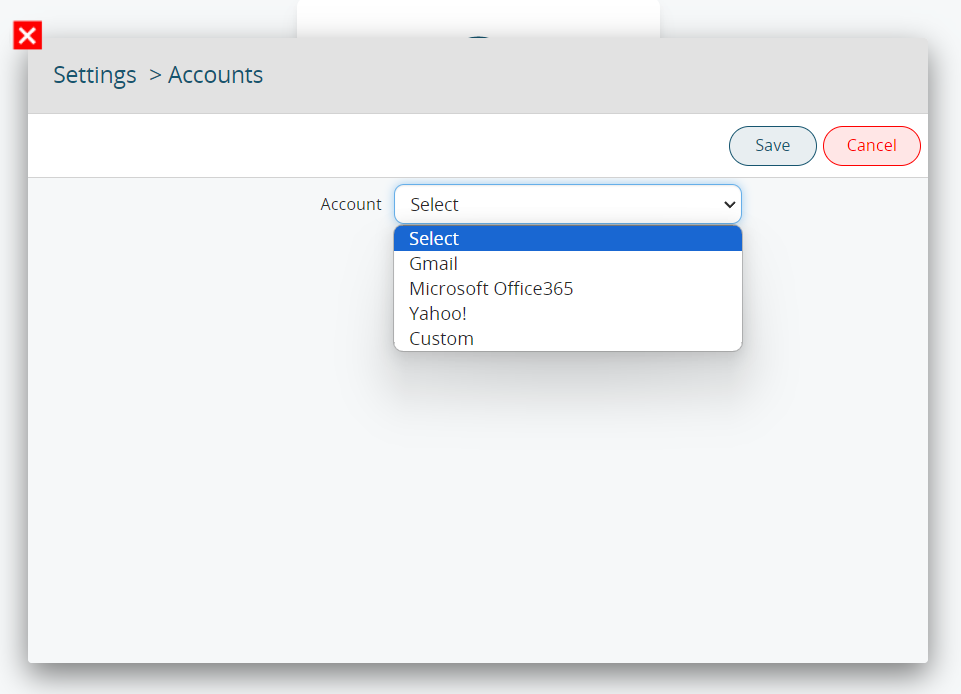
|
Gmail |
Selecting Gmail the window will be like this:
As you can see right after the field: From May 30th, 2022, it's necessary to use an App Password. Details here
This action must be done in order to complete the configuration.
You can also use the Two-factors Authentications (OAuth2). |
|
Microsoft Office365 |
Here you need to provide username and password. PAY ATTENTION: if the Outlook Authentication is made by OAuth2 you must not use a custom imap account but the standard one. We remind you that the IMAP Office365 is listening to the port 993 (do not use the 443). |
|
Yahoo! |
You just need to type username and password. |
|
Custom |
Here you can configurate completly every connection parameter (IMAP, SMTP, ports) |
After having entered the access credentials, set up the main folders for incoming emails, sent emails, drafts, bin and spam.
The user can change the layout at any time by accessing Folders from the Messages module ![]()

Once the configuration, of one or more accounts is ended, you can find in the Message module the list of the folders (standard and special) divided for each account or in a unified version.
This allows the user to display, for example, all the incoming emails from different addresses in one single folder.
Special folders
There are two special folders in the folders list:
- Shared: contains emails that other users have shared with you via a conversation (see below);
- Imported: contains all the Messages that are not included in any of the user's IMAP accounts for various reasons, but are linked to a vtenext record;
- Flagged: contains emails marked

- Scheduled: contains all the scheduled messages that have to be sent, according to the chosen time and date.

Below examples of PEC email configuration:
PEC Aruba
|
Name |
Choose the Custom option |
|
Server |
IMAP: imaps.pec.aruba.it |
|
Port |
IMAP: 993 |
PEC Legailmail
|
Name |
Choose the Custom option |
|
Server |
IMAP: mbox.cert.legalmail.it |
|
Port |
IMAP: 993 |
5.2.1.1 Set Centralized Signature
The Centralized Signature makes it possible to set a default signature, identical for all crm users, with the same graphic layout and characteristics. Go to SETTINGS > OTHER SETTINGS > COMPANY DETAILS and scroll down to the bottom of the page to find the "Signature" options.
![5.2.1.1 [1].png](https://usermanual.vtenext.com/uploads/images/gallery/2022-06/5-2-1-1-1.png)
Company Details Page with the options for Signature in messages
Clicking on the EDIT button at the top right makes it possible to configure the centralized signature, using all the variables provided. The variables refer to user details and various custom input fields, e.g. for input of the current date.
![5.2.1.1 [2].PNG](https://usermanual.vtenext.com/uploads/images/gallery/2022-06/5-2-1-1-2.PNG)
View of variables available and composition of the Centralized Signature
5.2.2 Writing and reading emails
There are three equivalent options to send an email, e.g. to a contact:
1. clicking on the email address shown in the record or in any vtenext page;
2. clicking on the icon in the light blue toolbar, selecting Write
3. from the Messages module interface, clicking on![]()
All three options lead to the same New Email page.
|
To |
The recipient email address must be entered; you can write the email address or select it from the list (Leads, Accounts, Contacts, Vendors and Users) |
|
CC |
Carbon Copy: you can enter the address of recipients who are to receive a copy of the email |
|
Add BCC |
The copy to email addresses added with BCC will not be visible to the other recipients |
|
Subject |
The subject of your email |
|
Attachments |
You can add attachments to the email by means of the Add file function or by dragging the file to the drop area N.B. when an email is sent from a detail view of a Document (from within the registry, click on the related of the Messages and then click on New Message), any attachments of that email are linked in the Documents related to that same registry |
|
Send method |
Single: send a single mail with all visible recipients in the “to” field |
|
Select email Template |
Select one of the available templates saved in Settings > Email templates |
|
Send |
Sends the email |
|
Save draft |
Forces a save of your draft (also occurs automatically) |
The account view mask is divided into three parts:

|
1° column: |
2° column: |
3° column: |
|
Email list, or |
Sender’s data |
Operations and links available for the email |
|
Folders list by clicking on the Folders button, or |
Body of the email |
|
|
Accounts list, clicking on the Mailboxes button (shown only if more than one account is configured) |
Attachments |
N.B.: Starting with the version 20.04 every time a user answers to an email and the recipient's address is not a record in the CRM a new contact is automatically created.
Programmed transmission of an email from the Messages module
From version 19.10, you can program an email to be sent at a later time. In the compose screen, after having entered the subject, the body and the recipient(s), you can click on the arrow located next to the Send button.

This will open a menu item labelled “Program send”.

Selecting this option will open a popup with the facility to set the date and time for sending the email in question (choose one of the preset options or click on “other” to configure the exact time and date to send the email).
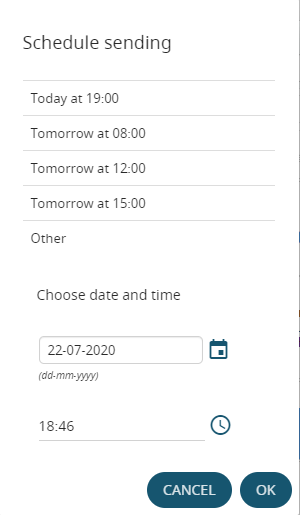
Once the email has been programmed, the following functions can be used:
 |
Send now: send the programmed email immediately |
 |
Scheduled sending: reschedule the previously set sending |
 |
Delete: delete the programmed email permanently |
To view the functions mentioned above, simply go to the dedicated folder from the message module (see chapter 5.2.1)
N.B.: Once the sending date and time have been reached, the email will disappear from the scheduled list.
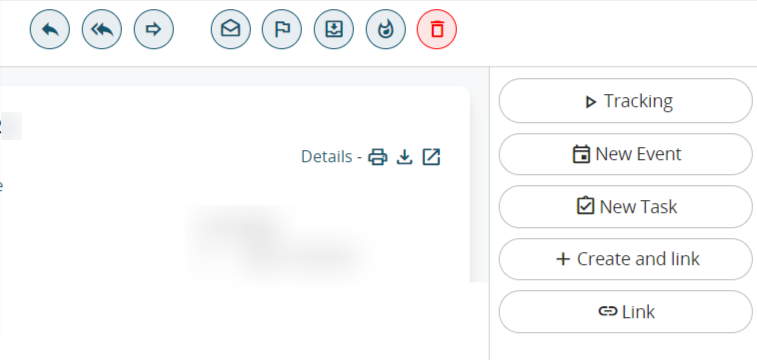
5.2.3 Email Functions
|
|
Compose a new email. |
|
|
Download emails from the email server |
|
|
Messages module settings (user's personal settings) |
|
|
Mark message as read/unread |
|
|
Mark message as important |
|
|
Move email to another folder |
|
|
Mark as spam (the email is moved to the Spam Folder) |
|
|
Delete email (the email is moved to the bin) |
|
|
|
|
Create Event/to-dos |
Create calendar activity from the email |
|
Link |
Link the email to an object in vtenext |
|
Translate |
Open Google Translate for instant translation of the body of the email |
|
Download attachments |
Download a single zip file containing the attachments, if more than one |
|
|
Download attachment |
|
|
File attachment as a CRM document / View document tab |
|
|
Link document to an object in vtenext |
|
|
Open attachment preview (supported extensions: odt, pdf and common image formats) |


Emails can be linked to CRM modules by means of the Link function:
Through the “Link” function it is possible to relate the emails to the CRM modules:
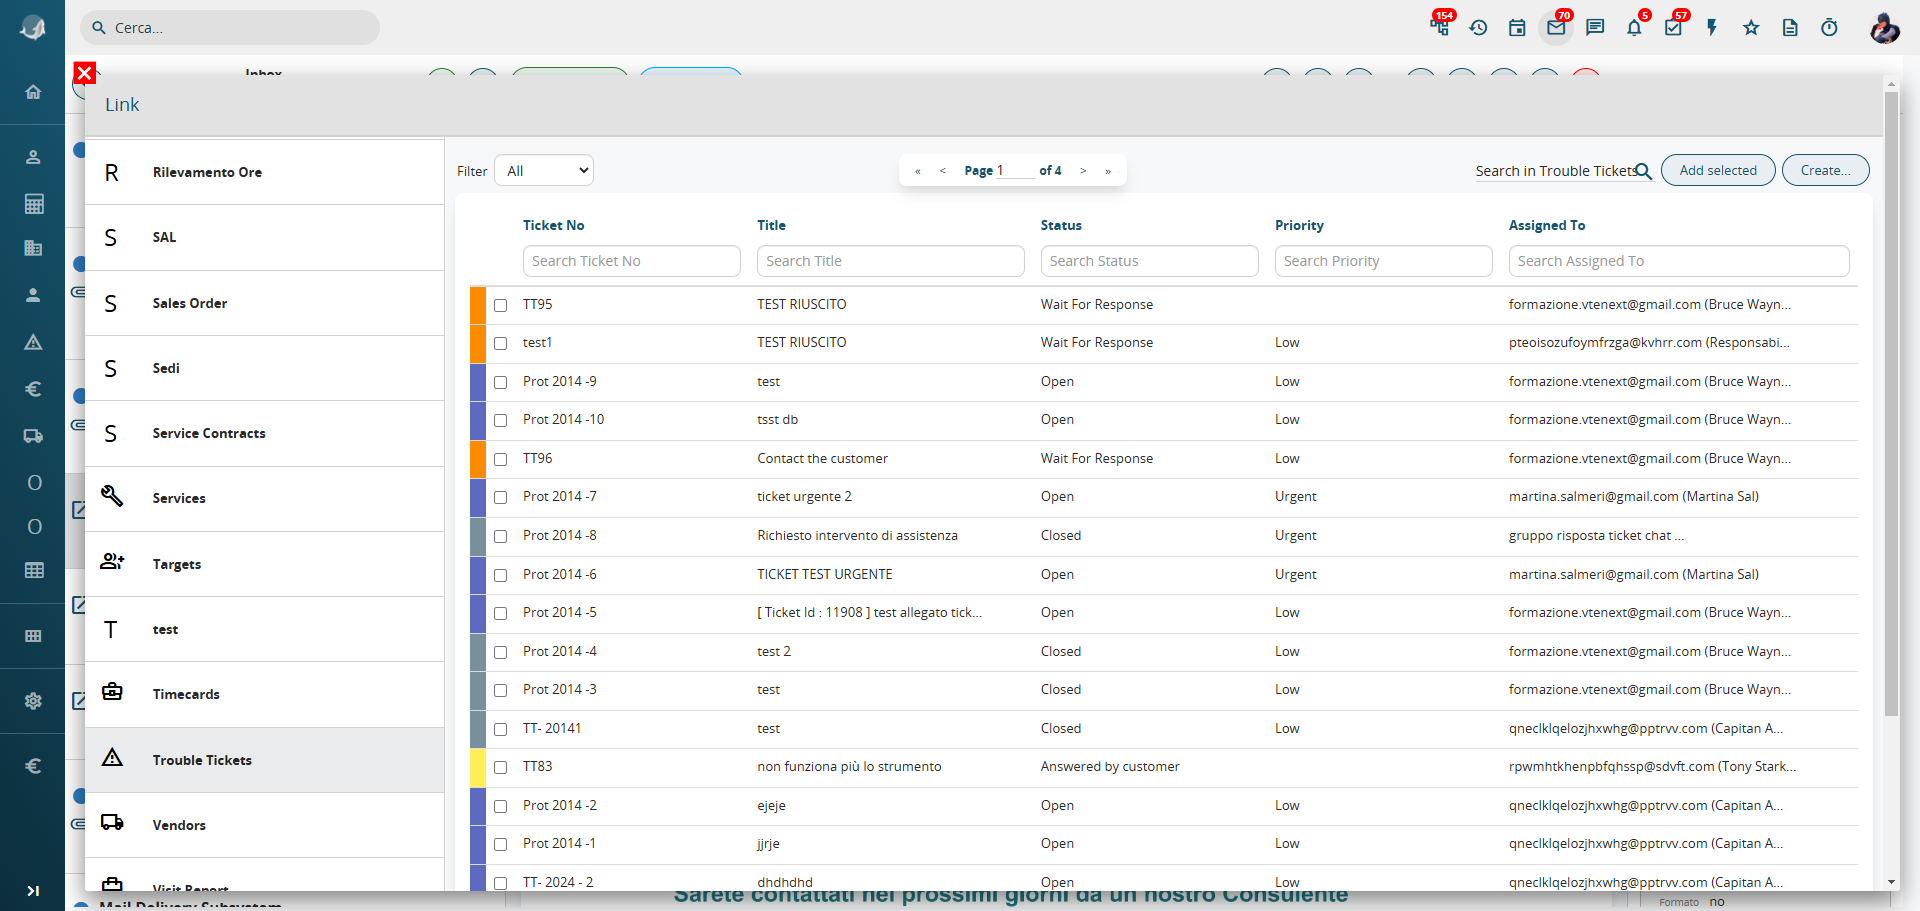
The system suggests possible links automatically based on the sender's email address. You can edit the “Filter” item to extend to search also to include results beyond the suggested ones. The “Recents” button, which is accessible from the “create and link” function, allows you to access the modules most recently visited.
If you can’t find a match with an existing element, you can create a new record (for example a new account) by means of the “Create” button.
Once the connection has been made, it will be highlighted with the symbol  , which will be visible both in the email list view and in the email detail with an indication of the linked record.

Linked emails will be also visible in the records, via Relations > Messages. Visibility of emails is subject to the Sharing Access configuration (Linked Messages module item).
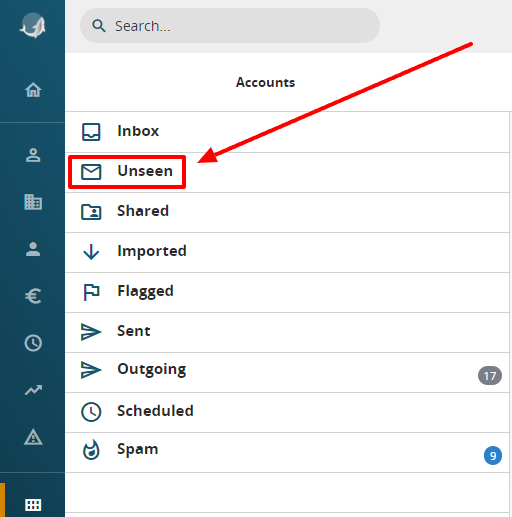
Display the folders in the email inbox.
To view all the folders of an email inbox, simply click on the arrow located at the top left of the Messages Module, as shown in the following image.
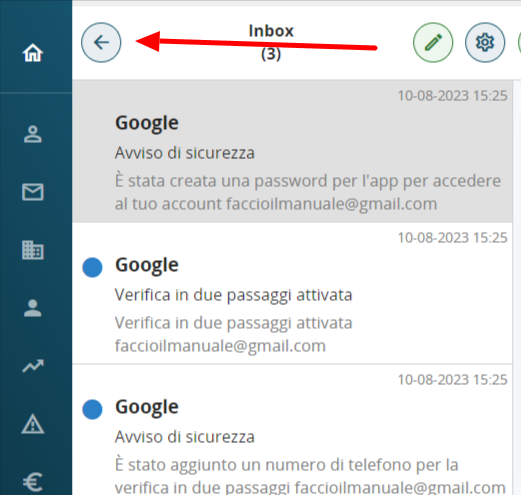
After that, the complete list of available folders, previously created either directly from the browser or from another email client, will appear.
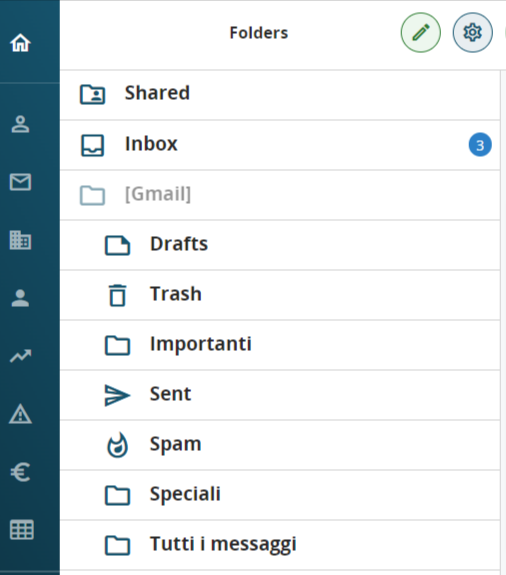
The "UNSEEN" email folder has been added to the list of folders for convenient searching and access to emails.
Mark all emails as read.
To mark all emails as read, it is essential to follow these simple steps:
1. From the left column of the Message module, click on the edit icon (pencil) as indicated in the image below.
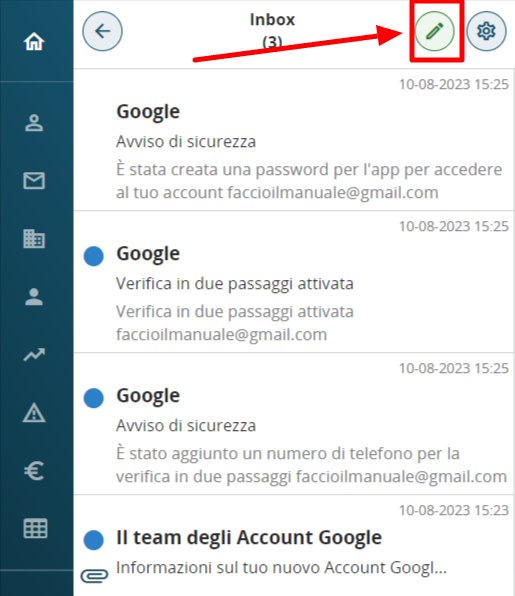
2. Finally, select all the emails you wish to mark as READ and click on the MARK AS READ icon, as indicated in the image below.
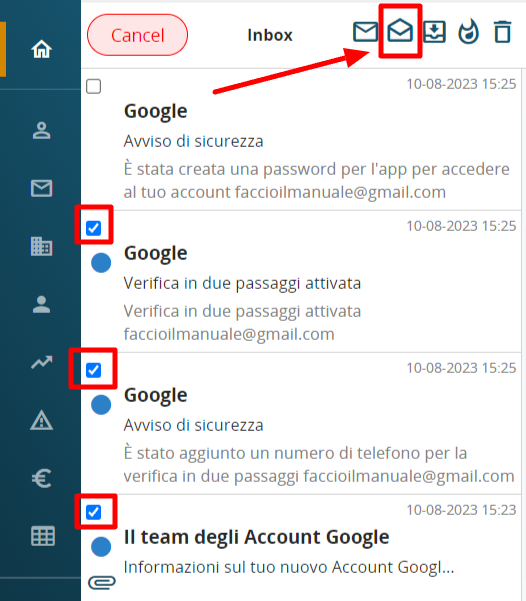
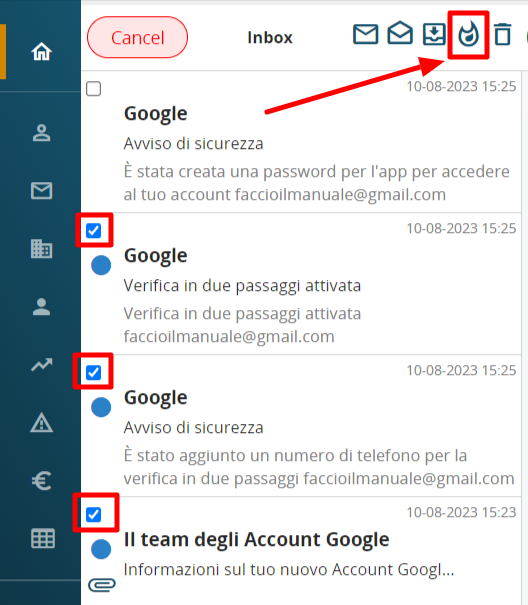
Using the same method, you can also bulk mark emails as SPAM/JUNK by clicking on the flame icon, as shown in the image below.
You can search for messages using the search function located in the top left corner. Additionally, you can conduct searches that include subfolders.

5.2.4 Emails Sharing
Emails shared by means of a Conversation are flagged with the symbol  . The user who receives the conversation can view the email in the “Shared” folder.
Conversations allow you to make the mail visible to a colleague who has not received the message directly (allowing your colleague to perform the usual actions of reply, forward, etc., and also view any links between the email and CRM objects). This allows a significant reduction in the volume of internal email traffic.
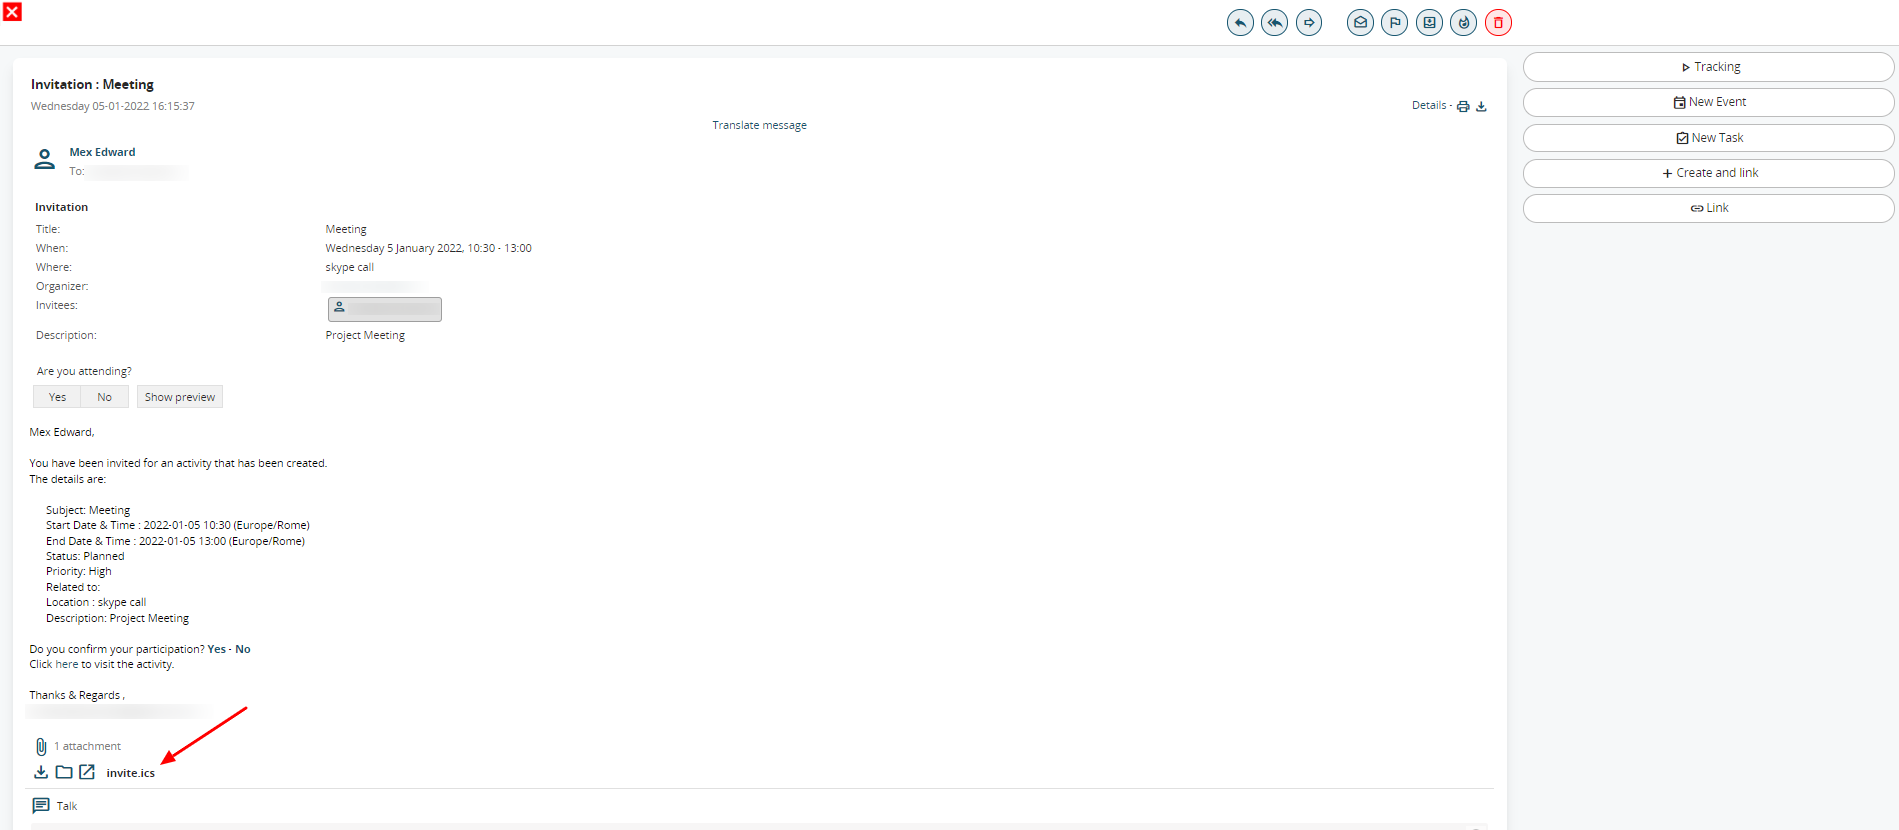
5.2.5 .ics support for calendar
Attachments in .ics format are identified as invitations to attend an appointment and they create a pre-linked calendar event. The recipient can specify his/her intention of participating/not participating in the event. The message interface appears as shown below:
5.2.6 Other Settings of Messages Module

-
Layout: change the emails list layout
-
Filters: set up filter rules for automatic transfer of emails into folders
-
POP3: set up a secondary account in POP3 mode
Warning! Once a secondary account has been configured in POP3 mode, a copy of the secondary account emails will be created on the email server of the main account. The main account mailbox may therefore tend to run out of storage space.
Out of Office
From version 19.10 an automatic “Out of Office” notification can be set, in order to respond to emails informing the sender of your out of office status. Clicking on  from the Messages module allows you to access this function, by means of the specific item of the same name. An additional window will open in which you can Enable or Disable this function and set the automatic replay message text.
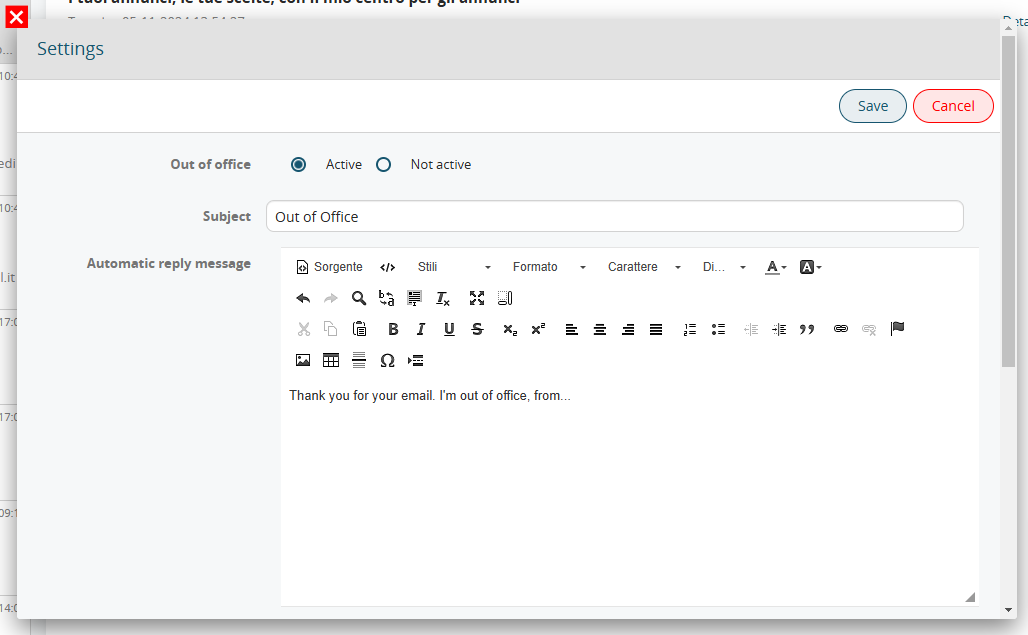
Out of Office Activation Screen with Customizable Auto-Reply Message for Email
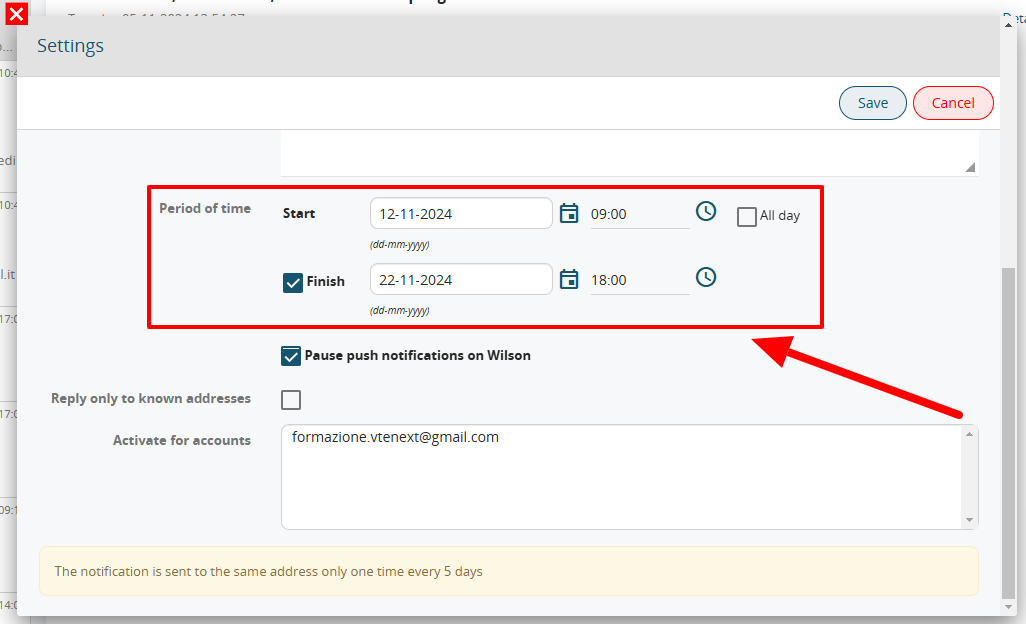
Out of Office Configuration Screen to Set the Time Frame for Automatic Email Responses
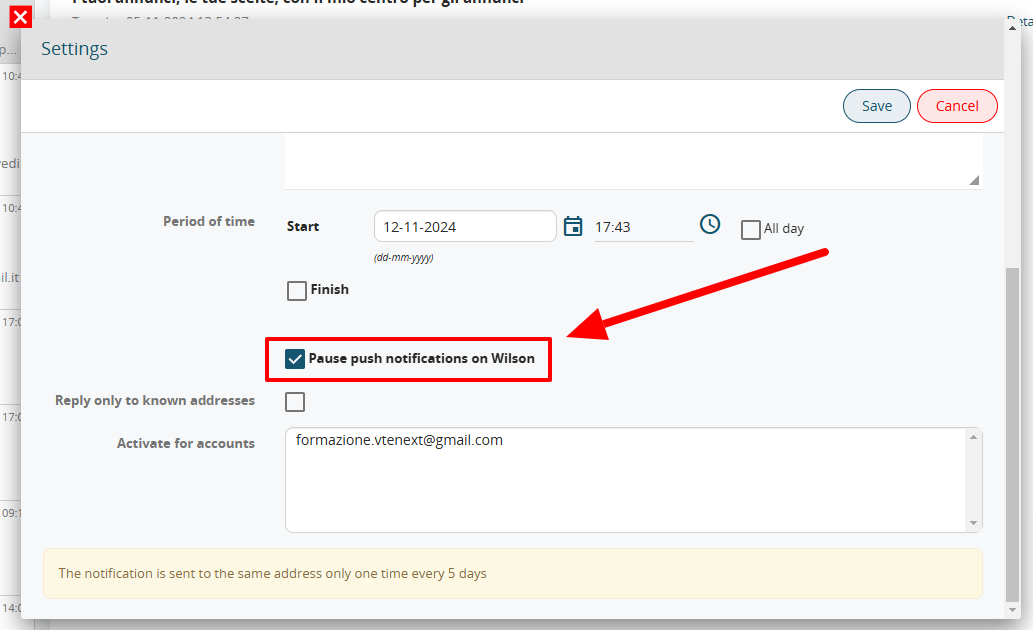
Pause push notifications on Wilson
It is also possible to pause Wilson app push notifications when an 'Out of Office' interval is set. By activating the specific checkbox shown in the image, app notifications will no longer be delivered during the designated period.
5.2.7 Mass email
A mass mailing tool is available send an email to multiple recipients (20 max) in a single shot. Select the email recipients from the list view of the desired module, e.g. Leads, then click on the button ![]() followed by Email, located above the records list.
followed by Email, located above the records list.

The system prompts you to choose one or more of the email type fields available in the record (can be Email address, Other email address, Yahoo ID).
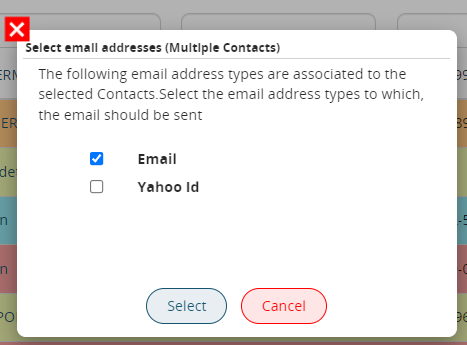
The new email composition window will then appear. The email addresses in the chosen fields will be set as recipients (“To” field).
Before sending the email check the “Sending Method”, setting it to Multiple in order to keep recipients hidden (recipients will only see their own address).

5.3 Email Templates
The vtenext admin user can make email templates available to other users for use for single emails and for newsletters. The general characteristics of email templates applicable to both mails and newsletters are described below, while specific functions concerning emails are shown in the subsequent sections.
To create a new Email template go to Settings > Customer Tools >Template Email.
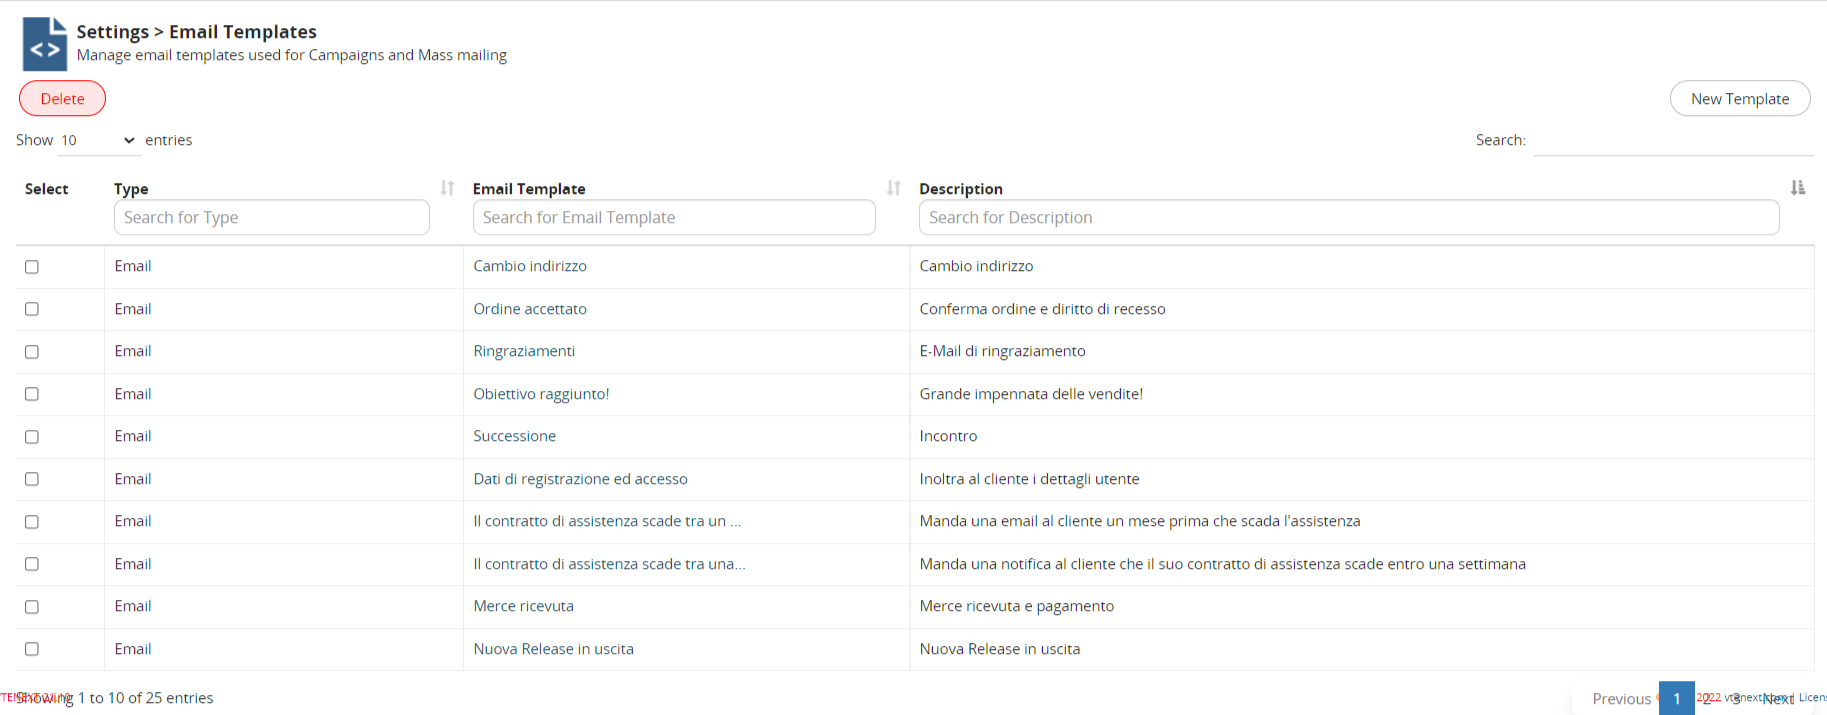
The email templates configuration mask contains an initial internal information section and a second section (grey box) composed of the body of the email and the data visible to the recipients.

|
Name |
Template name |
|
Description |
Template description (optional) |
|
Folder |
Public: the template is available to all |
|
Type |
Email: templates available for emails (Messages Module) |
|
Subject |
Email subject |
|
Message |
Body of the email |
Note. If a template contains variables related to leads and is set to contacts, the variables will be displayed but not completed. We suggest creating two different templates with different variables, one for the Leads module and one for Contacts. Note that it is helpful to inform users of the module for which the template is available, providing the information in the Description, for example.
N.B. For additional information on new newsletter editor refer to the chapter 6.1.6 New Newsletter editor.
5.4 Talks Module
vtenext proposes an alternative solution to manage the exchange of information within your organisation, avoiding the transmission of emails or paper notes that cannot be tracked.
To open the Talks module click the icon  on the right-hand toolbar.

The screen presents at its center, the welcome greeting for the logged user, this area wil be used to show all the conversations linked to a specific topic.
On the left part of the screen we find the list of all the active conversations, subdivided by four tabs:
|
All |
All the active conversations, read and unread, presents in the crm that involve the user |
|
Channel |
Is possible to create group to talk with the collegues, for examples of the same department |
|
Direct |
Conversations where is involved the user which is logged in |
|
Pinned |
Is possible to pin a conversation, that is tick as important to maintain in this area to reach them easily |
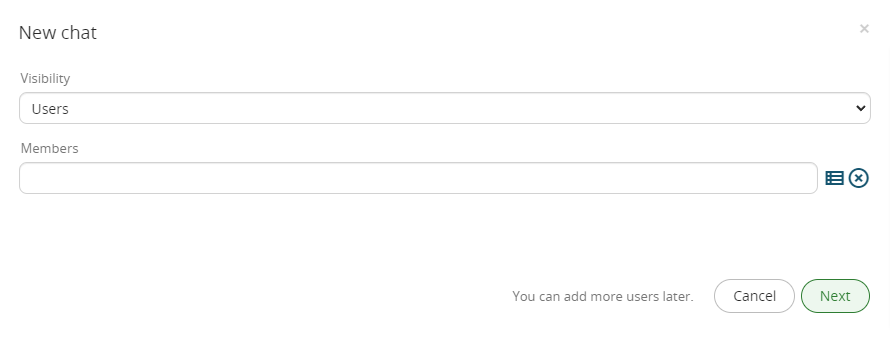
To start a Talk, click on the button ![]() and select whether to publish the Conversation to all users or to a defined subset of users (is possible to add new users in a second moment).
and select whether to publish the Conversation to all users or to a defined subset of users (is possible to add new users in a second moment).
 Other participants can be added to Conversations already in progress by means of the icon next to the name of the user to whom you are talking
 ![]() .The newly contacted user can view the entire Conversation from the beginning.
.The newly contacted user can view the entire Conversation from the beginning.
To start a Talk on a specific topic, like for an example, use the dedicated Talks tool at the foot of the page in the concerned record.
Once the Conversation text has been entered into the “Start new conversation” field, click the “Public” button and select .

In this way the conversation will be interrelated with the subject in which you are currently located. For users who receive the conversation, the subject can be clicked to access it (assuming the user has the required access credentials in accordance with his/her profile). The conversation will also be listed at the bottom of the record.
Like any self-respecting chat the talks module has a set of emoj available for a greater comunication experience.

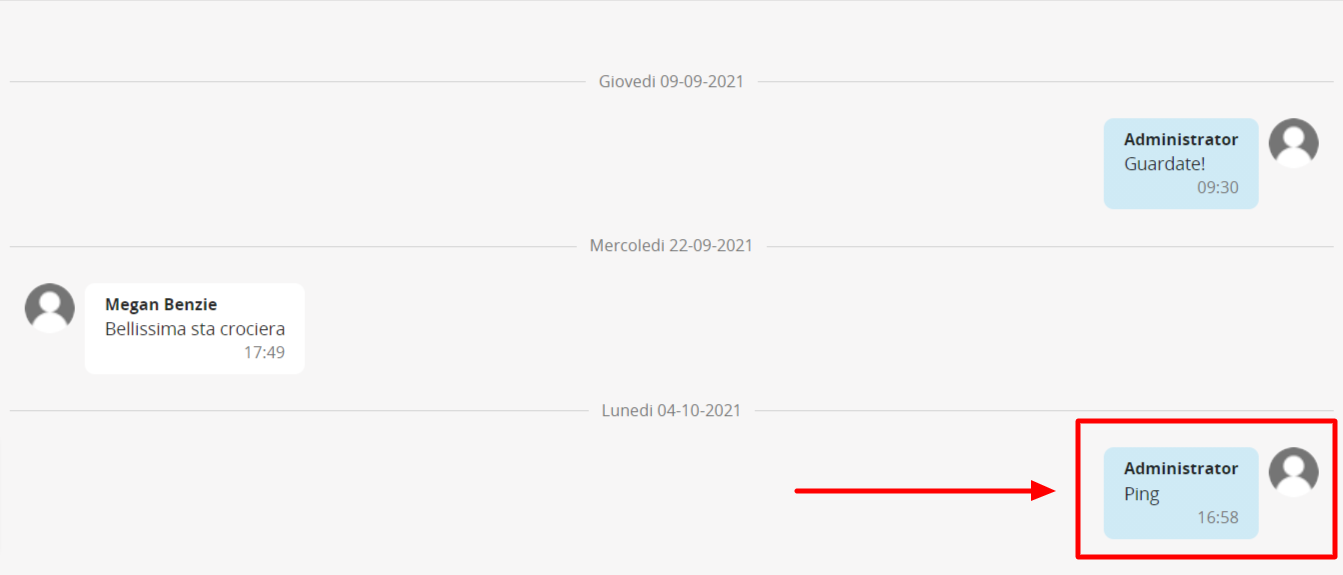
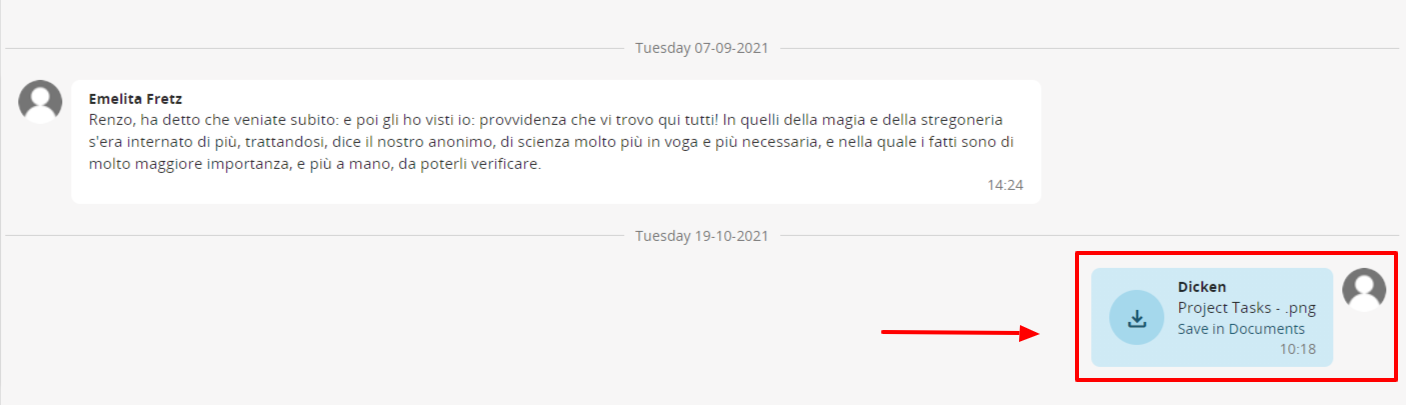
From an already started conversation, clicking on the button with three dots, is possible to enter in a a menu with three options: Ping, create or link, send file.
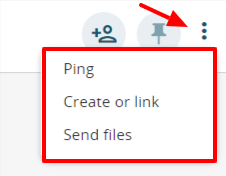
|
Ping |
Allows to ping a conversation, which is a request for a response to the people involved in that conversation (when is pressed the button will be displayed the word "Ping")
|
|
Create or link |
Is possible to create or link a module to the current conversation
|
|
Send file |
Is possible to send file that will be linked only with the current conversation |

Warning! A conversation can be linked to only one entity.
Whenever a user writes a new conversation or replies to a conversation already in progress in which you are participating, you will receive a notification on the icon.
Search in Talks
You can perform searches in Talks module by means of the specific command located in the window at the top right. The search does not include words inserted in linked elements.

Delete comment
Users can delete their comments published in conversations by means of the X button shown on the right. This action will also remove all comments posted in reply to the deleted comment.
Warning: the primary conversation can be deleted only by the person who created it. In addition the conversation or comment can't be removed after 24 hours.

Public and generic Talks
Not all users can be enabled to conduct public conversations (addressed to all users) or generic conversations (unrelated to vtenext subjects).
From the user tab, the CRM administrator defines whether or not to enable the user for public or generic conversations.

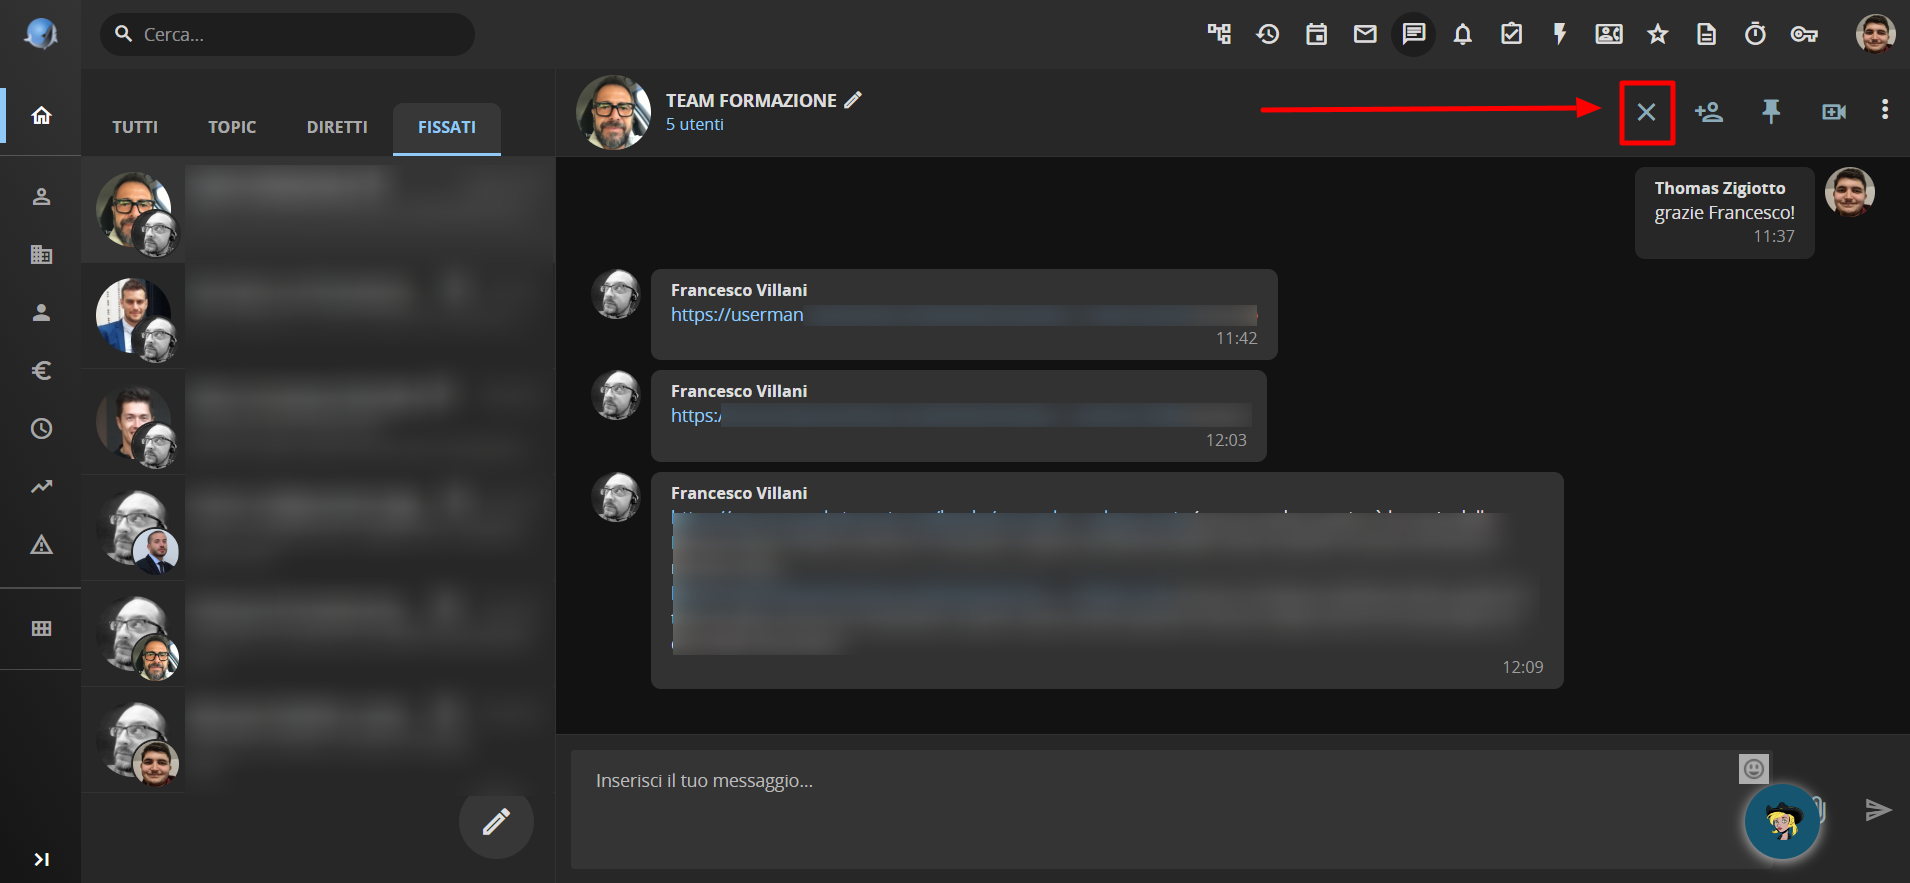
Leave a Conversation
When a user is part of a conversation he/she didn't initiate, he/she can choose to leave it if it's no longer of interest to it or if they're not interested in that topic. To do so, simply click on the X button at the top right of that same Conversation, as shown in the following image.
5.5 Notification Module
vtenext keep users informed of the data of interest by means of the Notifications tool.
Each user can define the following details from the Preferences tab:
- notification method: Email/vtenext (“Notify me via” field);
- frequency of unread notifications summary emails since the latest click on the globe icon, selecting the time frame from the preset values (“Notifications summary” field);
- the topics for which you require notification (module notification Settings), selecting updates for creation and/or editing for each module.
Warning! Notifications of the Modules Notification Settings are related to the functions assigned to the user. This means you will receive a notification whenever a different user creates/edits a record assigned to you.
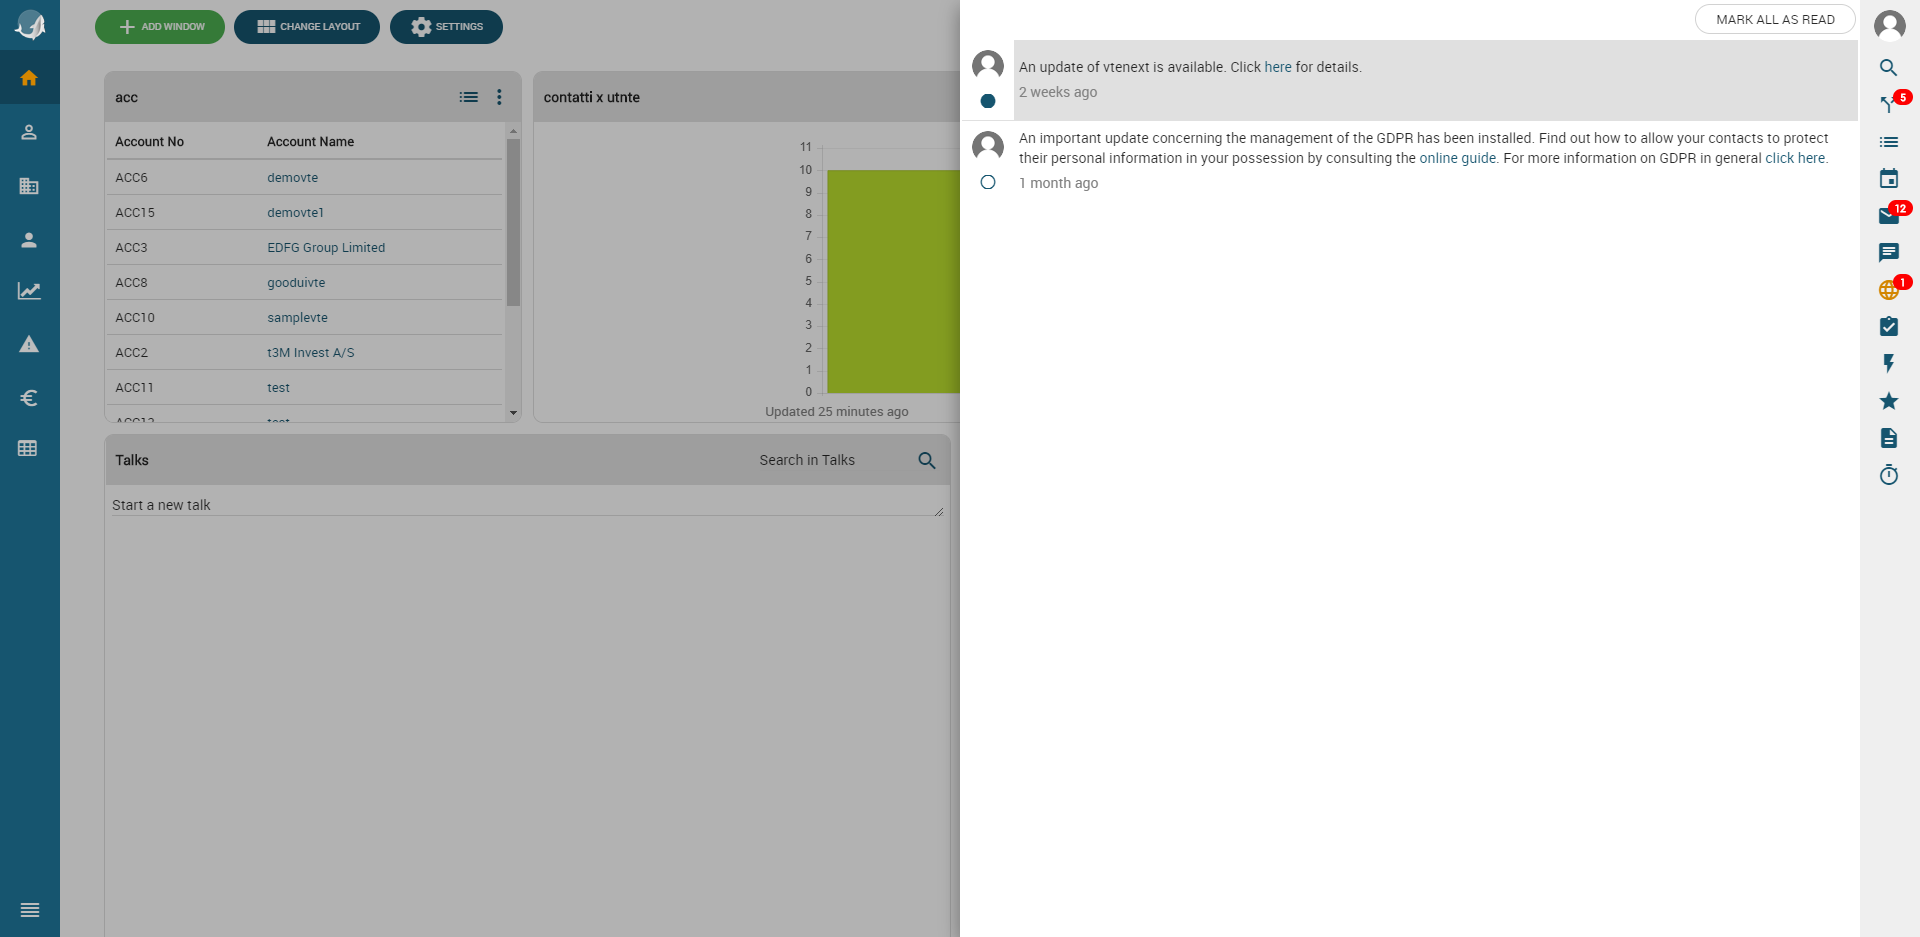
To display notifications click on  Unread notifications are shown by means of a red number. To mark a notification as read, click on the notification as shown in the figure:
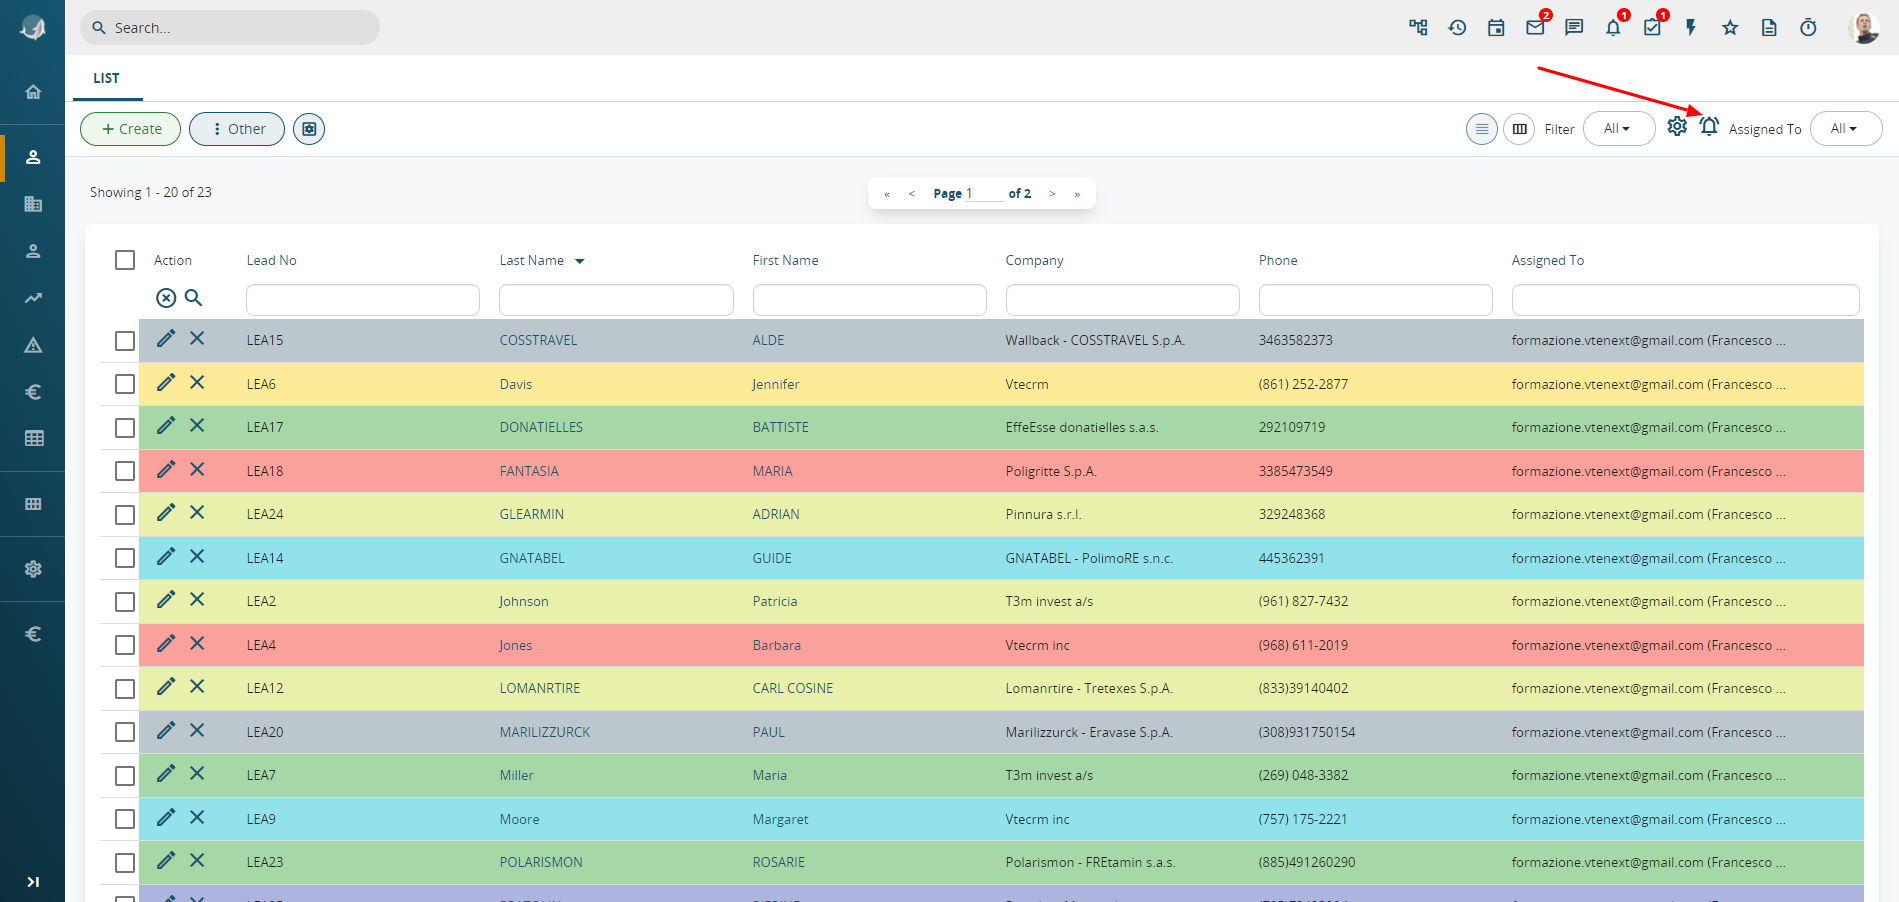
 You can also receive notifications on records assigned to other users or on updating of a filter, by selecting the bell icon alongside the list of filters or in each record.
 Notification disabled on record/filter
 Notification enabled on record/filter
Example of use of notification on filter: receive an alert when a new Trouble Ticket enters the “Urgent Requests” filter (filter based on a priority class).
The ability to enable and receive desktop notifications will be implemented from version 19.10. Whenever a new conversation or a new email is received, the notifications will alert you with popups at the bottom right of your preferred browser.
 |
 |
N.B.: to enable browser notifications, refer to the official online guide for Chrome, Firefox or any other browser used on your computer. Notifications are not displayed if we are using Http protocol to reach the crm.
5.5.1 vtenext version update notification
From version 19.10 you can receive a notification from the CRM when a new vtenext version update is available.
Clicking on the update details will open a dedicated page that allows you to plan or postpone the vtenext update.

Plan Update
Click on PLAN UPDATE to display the following window in which you can select the DATE and TIME of the update, the users to alert when the updated is completed, and the contents of the email sent by the system automatically:

Click on the PLAN button at the top right of the page to set the date and time when the system is to auto-install the update.
Remind me
This function is used receive an update available reminder from the CRM at a later date.
The options are:
- 4 hours
- Tomorrow
- Next week

Once you have decided when you wish to be alerted, the following screen page will be displayed:
N.B.: note that even if it has been read, the notification is not removed from the notifications log and if a new attempt is made to access the record it will not be possible to view or edit the choices made previously. The screen page will thus be similar to the screen shown below.

5.6 Documents
vtenext features a simple but invaluable documents manager.
Documents manager main characteristics:
- Store file type documents (uploaded locally) or links (url from the web);
- Create folders to store documents digitally;
- Assign documents to the user responsible for managing them: e.g., if the module is set as private, each individual users can view only the documents assigned to their name;
- Share documents without sending them by email, by means of the download link;
- Share and provide read/write access to third parties without a vtenext account for revision purposes by means of a special authorisation token;
- Monitor the number of document downloads.
The documents display is arranged in folders or in list mode (List button). Folders can be created (Add Folder) and removed (Delete folders selected with flags).
By default, vtenext have two folders loaded:
- DEFAULT: example folder that allows you to upload your first files
- MESSAGE ATTACHMENTS: which automatically collects all the attachments of the emails connected to the various entities or modules of the crm. For example, if an email is linked from the Messages module to a Contact, the attachment present will turn into a document that we will find directly linked to that same Contact and within this folder.
- MY PRIVATE FILES: collects all files that were previously located in the folder MY FILES present in the homepage.
N.B.: folders containing documents cannot be deleted. First remove all the contents and then you will be able to delete the folder.

Folder list present by default in the module Documents.

Clicking on the folder (in the example it was chosen the default folder), we can note that within this folder there is a sub- folder.
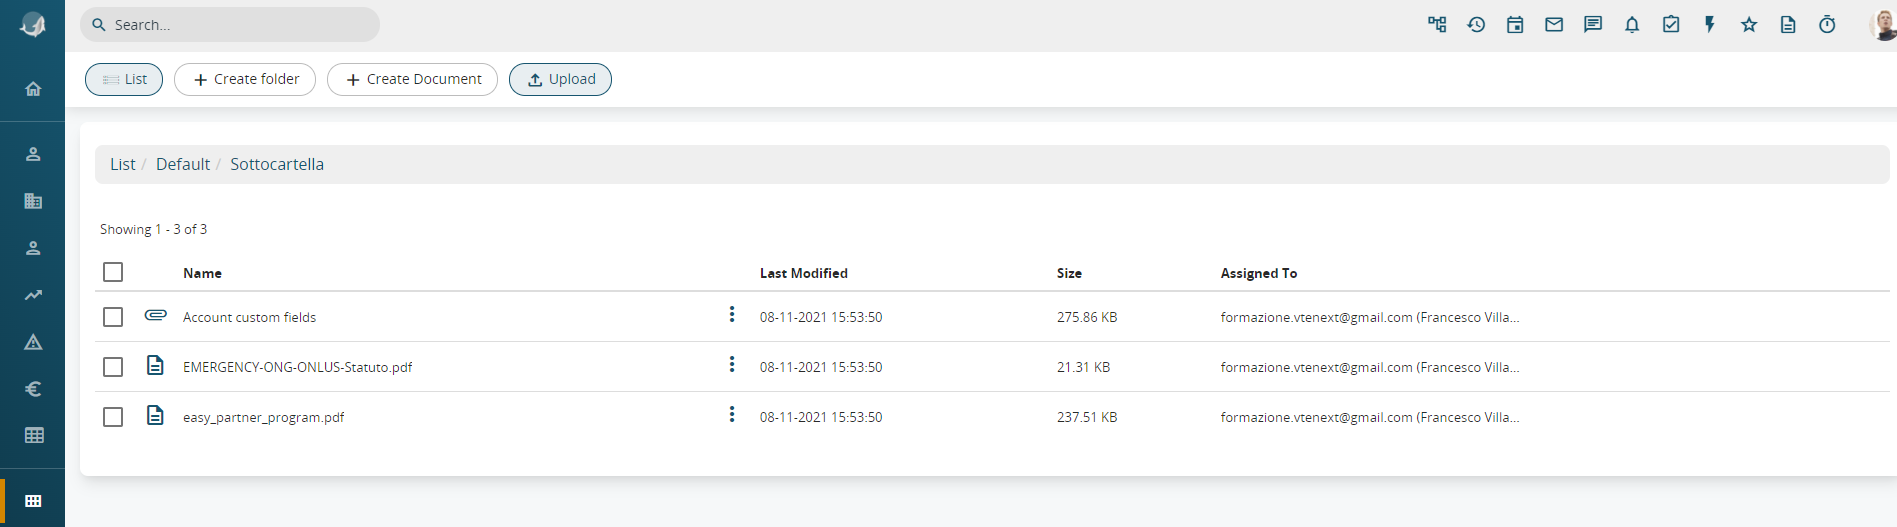
Finally, within the sub-folder there can be other files and sub-folders that can create a infinite structure. Note the path present in the head of the module.

For each folder or sub-folder, it will be possible to create a new folder, create a new document, or directly upload a file in the active folder.
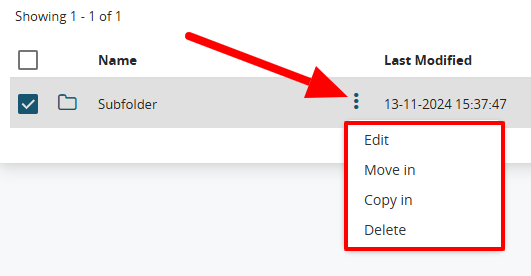
By clicking on the three dots next to the name of each Folder or Subfolder (except for the three standard ones named Default, Message attachments, and My private files), an options menu will open:
|
Edit |
to rename the folder or enable its display on the Customer Portal. In the popup screen that appears, you can choose a new name for the folder or decide whether to activate it on the Customer Portal, specifying which profiles can view this folder. Note: if the folder is not set as "Active on portal," the documents it contains will not be visible from the portal, even though they are available and active on the portal
|
|
Move in |
to move the folder to another level, you’ll need to select the new folder/level where the folder will be relocated |
|
Copy in |
to duplicate the folder and its contents into another folder, you’ll need to select the new folder/level where the duplication will be made |
|
Delete |
to delete the folder and its contents |

When a user clicks on Create Document it will be possible to access the following screen: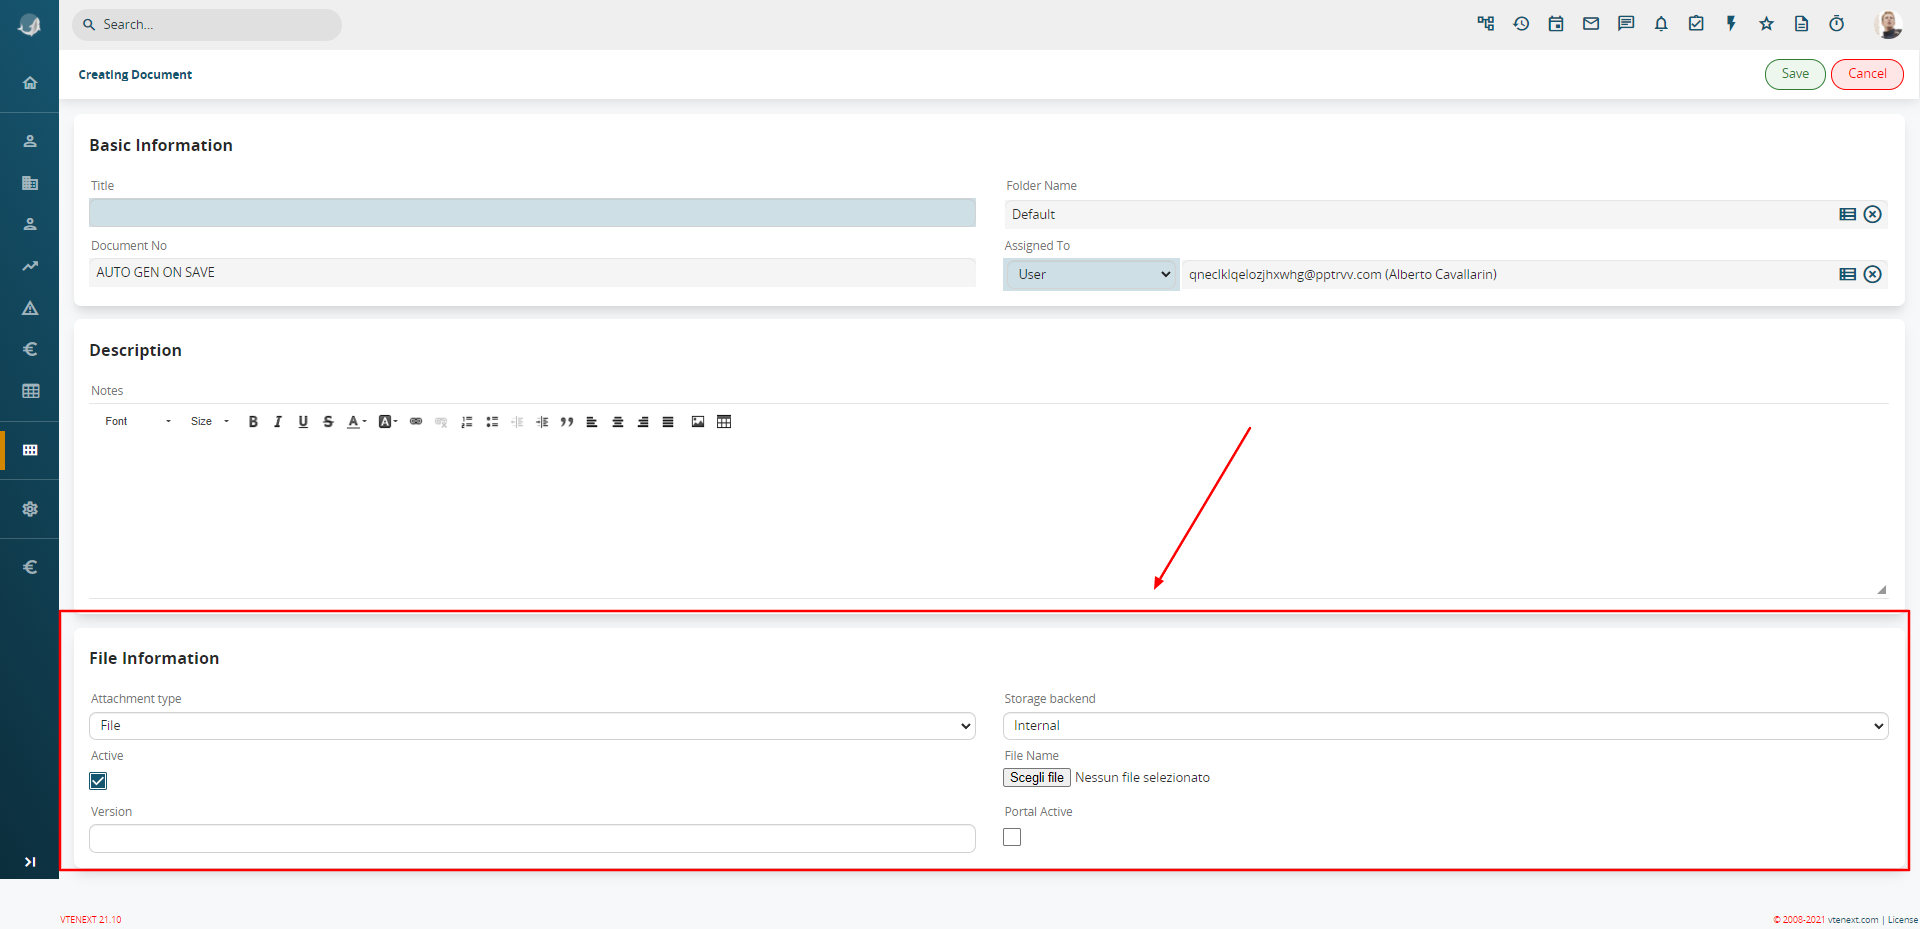
In addition to the essential information it must be added other fields as shown in the previous image.
The “Attachment type” field offers the following options:
- FILE: upload a file from your computer to the CRM (upload); the file will be saved in the vtenext folders.
- URL: indicate a link to the file position (the file will not be saved in the vtenext folders)
The "Visible on Portal" or "Portal Active" field allows the uploaded document to be viewed by authorized contacts within the Customer Portal (see dedicated chapter). Always remember to check that the folder containing the document is also visible on the portal, as explained in this chapter.
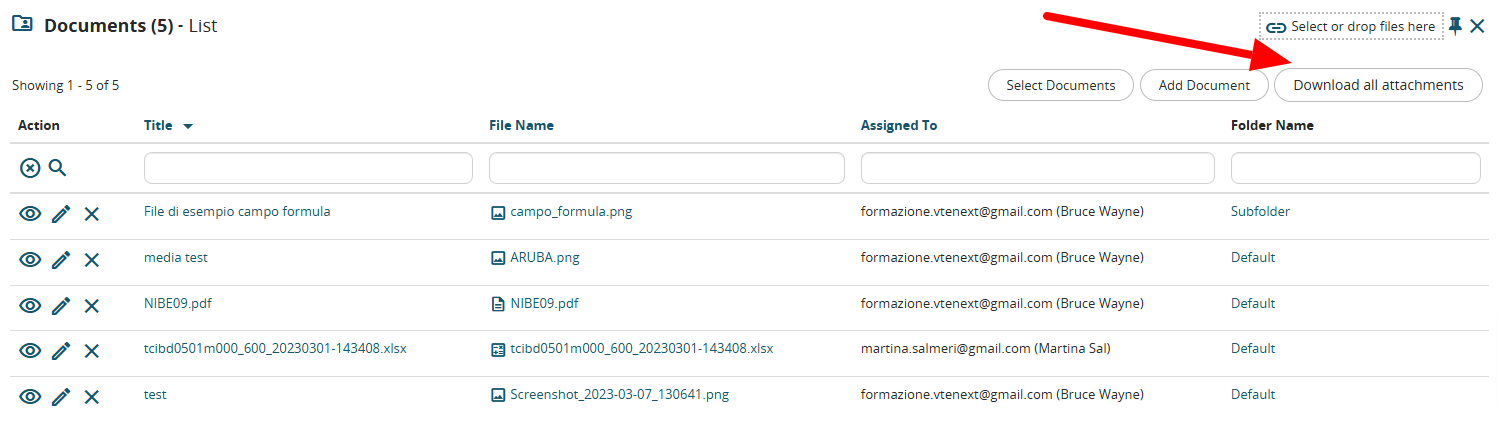
Download All Attachments Function
Starting from version 22.05.1, a button has been added in the related Documents section within CRM records, allowing users to download all related documents in a single zip file.
5.6.1 Documents revision and sharing
Document revisions can be managed by means of the “Add Revision” button in the OTHER tab.

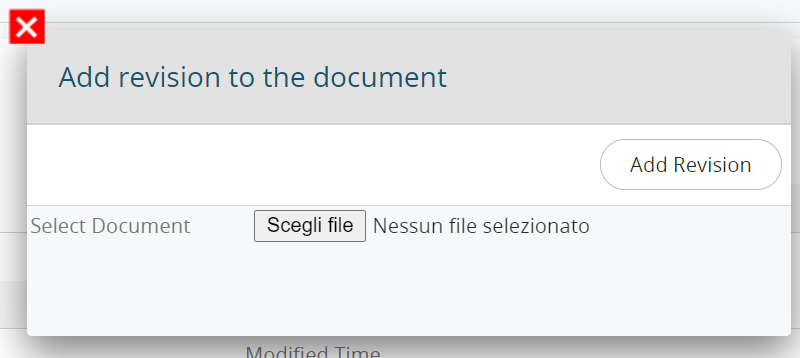
Once the revision is created, the list of previous versions will be available in the OTHER tab.

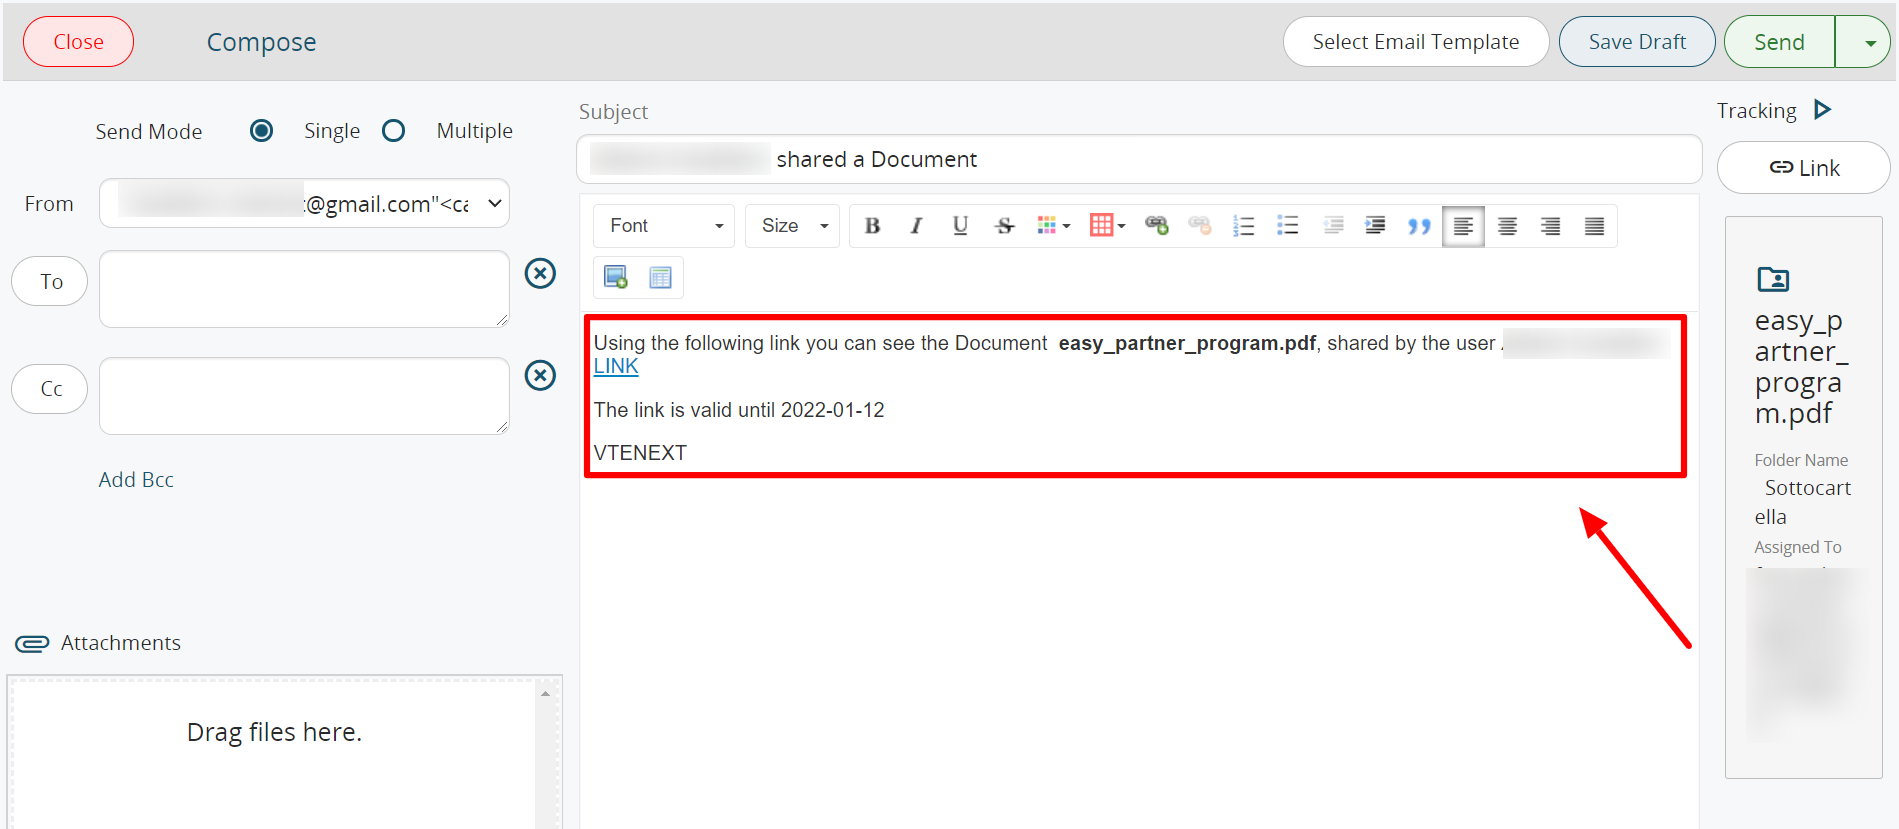
The compose new message window will open with a pre-compiled text and the link required to access the file. The link remains valid for 5 days before being disabled. Any of your contacts lacking a vtenext account can thus access the document.
5.6.2 Create new document from related list
Opening DOCUMENTS in a CRM entity makes it possible to upload one or more files using drag and drop. The system will present a popup that allows you to choose the upload method: individual files or single file in .zip format. The next step allows the user to change the name of the document, choose the destination folder and add an optional description.
Two checkboxes allow the user to select whether or not the document is active and visible on the Customer Portal.

![5.6.2 [2].png](https://usermanual.vtenext.com/uploads/images/gallery/2022-06/5-6-2-2.png)
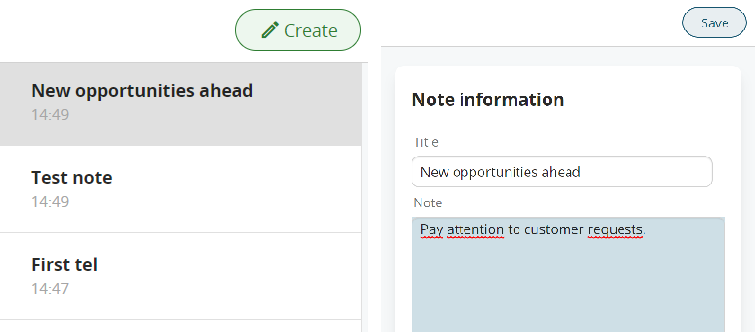
5.7 Notes
Notes can be found in the vtenext records, located at the bottom left (available in most modules), and on the main management panel, which is accessible from the icon on the light blue toolbar.
The following options are available from the record:
- Make a temporary note, which will be already linked to the record;
- Browse previous/subsequent notes (always related to the record in question);
- Convert the note into an evolved CRM object (e.g. if a customer note gives rise to a potential, it can be converted without having to re-input the same information).
These notes can be viewed with two modes: List or Slider.
Visibility of Notes in the record is regulated by Sharing Access:
- Personal: notes can be accessed only by the author;
- Public: notes can be in read-only mode by whoever has access to the record.
Warning! The note contents cannot be filtered using the module’s Filter function, nor can they be displayed as a column in the list view or tracked by means of the global search function. This is a personal tool that is independent with respect to the data entered in the record.
The main Notes page also allows the following actions:
- Browse through all the notes generated by the user in the CRM;
- Perform searches;
- Write notes that are not related to any particular object. The notes will remain private, meaning they cannot be viewed by other users.
