6 Marketing Communication Tools - Newsletters
- 6 Marketing Communication Tools
- 6.1 Newsletter Campaigns
- 6.1.1 Step 1: Campaign
- 6.1.2 Step 2: Target
- 6.1.3 Step 3: Newsletter
- 6.1.4 Special variables in the newsletter template
- 6.1.5 “Create Newsletter” wizard
- 6.1.6 New Newsletter editor
- 6.1.7 Newsletter Template Creation
- 6.1.8 Common Email Display Issues with Outlook
- 6.2 Email Sending Statistics and more
- 6.2.1 Manual unsubscriptions management
- 6.2.2 Requirements and settings for use of the Newsletter module
- 6.2.3 Newsletter Configuration (SMTP)
- 6.3 SMS Module
- 6.4 FAX Module
6 Marketing Communication Tools
vtenext contains various tools for mass communications:
6.1 Newsletter Campaigns
In addition to sending marketing campaigns, this module allows you to track all movements related to single newsletters, with statistics for email openings and clicks on links for each campaign, etc.
In general, a newsletter is contained in a campaign and a campaign contains all the newsletters that are sent though time. Campaigns therefore make it possible to segment this marketing activity, calibrating transmissions based on objectives and targets.
There are two possible ways of creating a new newsletter with vtenext:
A. Wizard: the “Newsletter Wizard” button, that can be found in the Newsletters and Campaigns modules, facilitates the creation of a new campaign (see chapter 6.1.5).

B. Manual procedure: consisting in the execution of the steps of the procedure without the wizard and in the extended version. Makes it possible to understand the logic of the Campaign-Target-Newsletter relations underlying the transmission; we therefore recommend using this method initially, and then exploiting the wizard shortcut once you have understood the logic.
Below, we examine the 3 steps in detail.
Step 1: Create a campaign or access an existing campaign.
Step 2: Define the campaign Target recipients.
Step 3: Define the email template for the newsletter.
Warning! The manual procedure is recommended when you need to create another newsletter within the same campaign.
6.1.1 Step 1: Campaign
In order to create a regular newsletters (e.g. with weekly frequency) addressed to a specific target in your database, you must first create a new campaign that will act as the newsletters “container”.
Note that “Campaigns” is a horizontal module that can be used also for other kinds of campaigns, such as telemarketing or events.
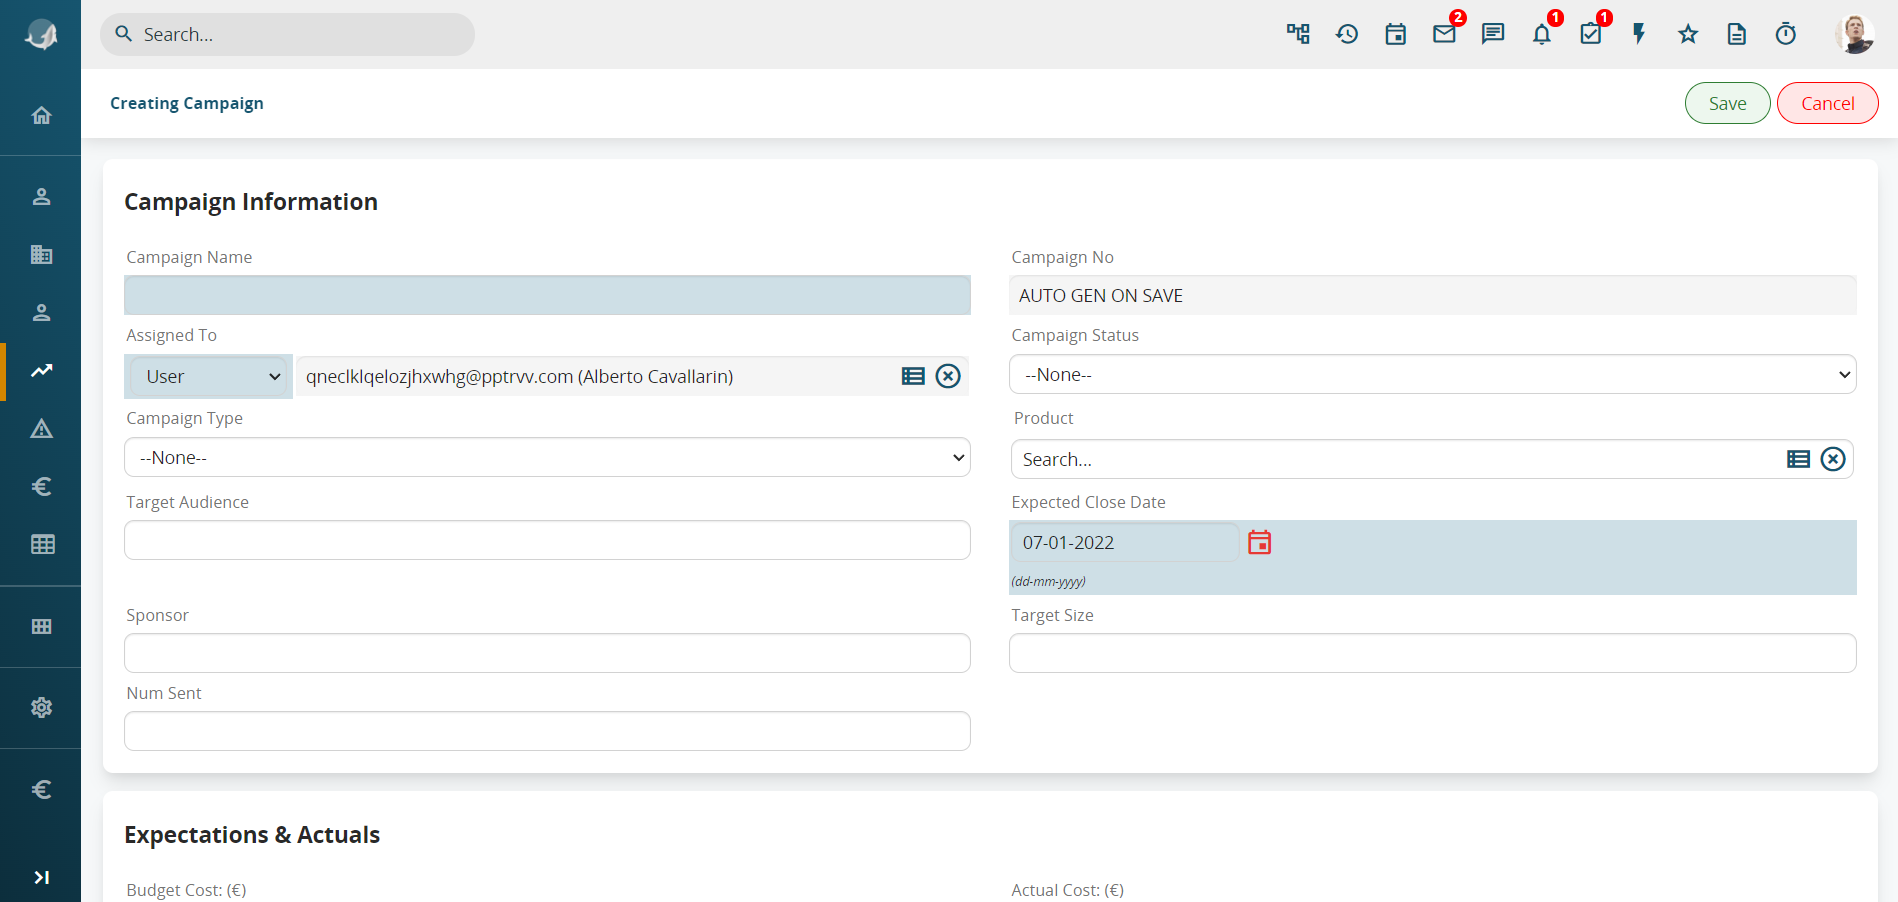
Create a new record from Campaigns with the CREATE button
Most of the fields shown are optional. If you are creating a newsletter-type campaign, fields like Revenue, Budget and Costs are less relevant (so you can omit them) compared, for example, to a trade show type campaign.
|
Campaign Name |
Choose a name based on the objective |
|
Campaign Type |
Choose the campaign type from the picklist (admin-editable values) |
|
Product |
Select a product from the CRM and link it to the campaign, if relevant |
|
Campaign Status |
Select the status (list can be changed by the administrator) |
|
Expected Close Date |
Date on which campaign will be ended |
|
Expected Revenue |
Amount of profit expected to be generated by the campaign |
|
Budget Cost |
Costs incurred for the campaign (indicated e.g. for trade show type campaigns) |
|
Assigned to |
User or group responsible for campaign management |
|
Target |
Describe target to which the campaign is addressed (Information text field) |
6.1.2 Step 2: Target
At this point the campaign recipients target must be defined, associating Targets and Campaigns. In the campaign tab, select the Target module and then Add Target in the Relations menu. If the target has already been created, use Select Target to select it.
N.B.: you can add more than one.

The target is composed of lists of names, a set of accounts, contacts and/or leads (also of other targets). The names are loaded either individually (with single name search) or by means of filters.

Choose the module concerned in the relations menu, select the filter from the drop-down menu and click Load List.
The filter must be already available (e.g.: Filter Customers in Foreign Companies) and then used as a target.

N.B.: With this new function it is no longer necessary to reload a target in order to manage a newsletter. The target will be updated automatically in two ways (user selectable):
- Incremental: names are added to the target based on the initial filter. Does not take into account filter variations that result in record exclusions;
- Synchronised: varies upward and downward based on the filter.
This update will occur automatically every 6 hours thanks to a cron that allows you to reload the records to the target automatically. In addition, automatic synchronisation is performed when the Newsletter is sent, or when the user decides to click on the Send Email button.
If the Target is set to Target Type = Dynamic and Synchronisation Type = Synchronised, in the Accounts, Contacts and Leads relationships, the Add and Select buttons of the relative entities will not be available.
In the example in the above figure, the target includes 498 accounts, 2 contacts and 0 leads. The campaign, which involves sending a newsletter in our case, will be addressed to this set of recipients.
The targets can be nested and included, exclusively in order to group specific customers together. For example, you can create an Italy target (parent target) containing a target for each Italian region (included targets). When you send the newsletter, it is sent to all recipients indiscriminately. The function is display only.

6.1.3 Step 3: Newsletter
Return to the campaign record and, through the “Relations” menu, choose the Newsletter module then choose Add Newsletter. A new newsletter tab will be created.
|
Newsletter Name |
Choose a name that is connected to the newsletter objective (the name remains internal to vtenext) |
|
Campaign |
This field is filled in with a connection to the “parent” campaign |
|
Date scheduled |
Schedule the date on which the newsletter is to be sent out |
|
Newsletter sending hour |
Schedule the time when the newsletter will be sent out |
|
From Name |
Name of the sender, which will be visible to the recipients |
|
From Address |
The newsletter will appear to recipients as having been sent from the indicated address, to which they can send replies (we suggest using an existing and monitored address) |
|
Scheduled |
The default field is set with the value “No”. It will automatically switch to “Yes” when you give the order to send. Therefore No identifies a newsletter created but not scheduled / sent, while Yes indicates a scheduled / sent newsletter. |

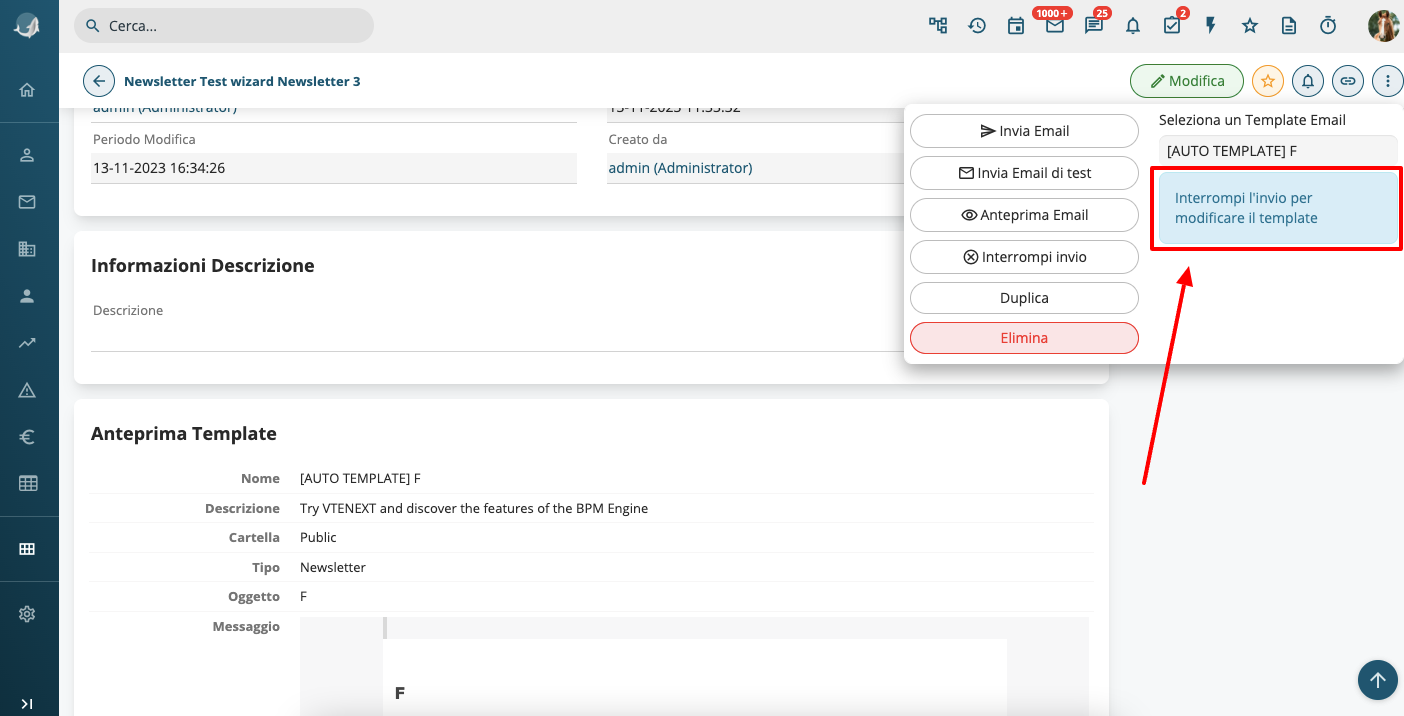
You must now associate a template with the newsletter, subsequently defining the contents that your target will receive in the mailbox. Use the “Select an Email template” panel located in the “Other” menu.

|
|
select a template from among those present in the system |
|
|
create new template |
|
|
edit the selected template |
|
|
Send or schedule transmission in accordance with the Campaign-Target-Newsletter setting |
|
|
a test of the newsletter is sent to the user’s email address (always recommended) |
|
|
displays a template preview window (always recommended) |
|
|
It allows to stop sending newsletter |


Notes on sending. Once you have clicked on “Send email” the newsletter is scheduled to be sent on the date and at the time indicated in the Schedule Date and Schedule Time fields (if these values are referred to the past the newsletter will be sent immediately), with the parameters entered in “Sender Name” and “Sender Address”. Once you have clicked the button the action cannot be cancelled from the interface.
Warning! To ensure the Newsletter sending operation is successful, you must configure cronjob on the server on which vtenext is installed. For more details, refer to the chapter CRONJOB – Processes to schedule.
6.1.4 Special variables in the newsletter template
Refer to the previous sections for the general template configuration instructions. There are special variables available for newsletter templates.
Variables common to the target
A single variable for mapping different fields according to the target.
For example, with Name you can map:
- Account name for the Accounts recipients included in the target;
- Contact name and surname for the Contacts recipients included in the target;
- Leads name and surname for the Leads recipients included in the target.
How to insert a special variable: after taking a block of text, it is possible, by clicking inside it (double click), to insert the variables coming from the Lead, Companies, Contacts modules.
The button “GDPR and Privacy” re-adresses the receiver to the Web App.
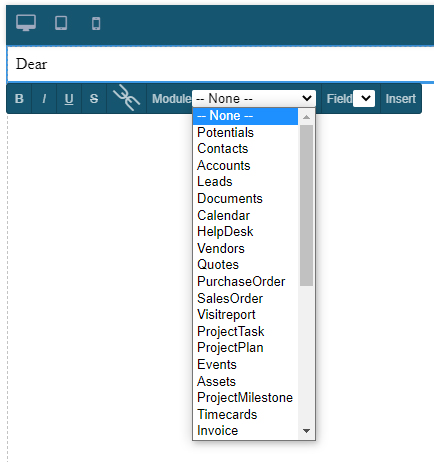
Detail of the choice of the module for inserting the variable

Detail choice of the variable

By clicking on INSERT, the variable will be positioned where desired
Unsubscribe link
To respect the right of the contact to stop receiving communications, an unsubscribe link must be inserted in the Newsletter template.
To insert the link, which is a special variable, go to the bottom of the email body and write a phrase such as: “to stop receiving these messages, click”.
N.B.: in the "test email" this link does not work because it cannot recognize you as a target, so it will deliver a blank page.
Position the cursor after the word “click”, leaving a space, then enter the variable as shown below:
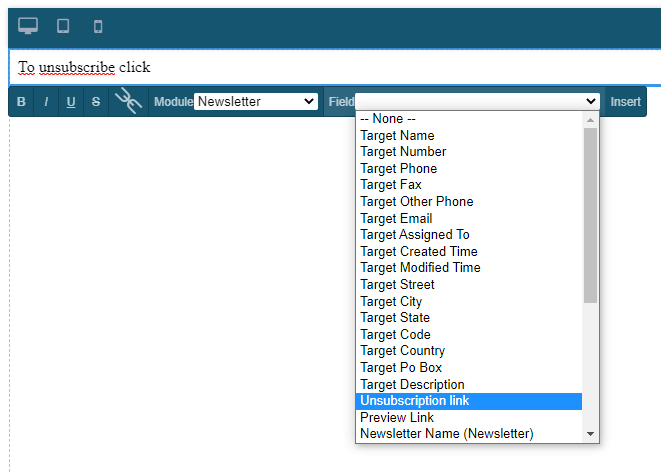

The variable will still be shown in the template in its original state. Only the recipient, on receiving the email, will see the word “here” in place of the string (hence the wording will be “click here” and the word “here” will be clickable).
The recipient will be asked whether they wish to unsubscribe from all communications or only from this campaign newsletter (in this case it may occur, for example, that the user is still interested in receiving newsletters concerning a different topic, if the user's name is within the target of another campaign).

Preview link
We suggest inserting a special variable in the template, to be replaced with a link to view the newsletter as a web page. This is because some clients could restrict the display of newsletter elements (e.g. blocking images).

6.1.5 “Create Newsletter” wizard
As explained in section 6.1, the create/send procedure can be facilitated with the "Create Newsletter” wizard. In practice, the wizard proposes a 5-step procedure to create a newsletter.
Warning! If you click the "Create Newsletter" button from the Campaign module list view, a new campaign will be created containing the new newsletter.
Steps of the newsletter wizard:
- Select recipients: select Target, Accounts, Contacts and/or Leads and filters available
- Template: choose one of the existing newsletter templates or create a new one
- Newsletter data: information concerning the newsletter transmission (Sender's Name and Address will be visible to recipients, Newsletter Name and Description are vtenext internal data. Note: the email subject is part of the template, step2)
- Test: display preview and send a test email. In the test email the preset fields will be mapped with the variables.
N.B. The unsubscribe link doesn't work in the test mail while the preview link works correctly. - Schedule: send immediately or schedule transmission for a future date / time
N.B. When a creating a newsletter using the Wizard you can create a new template or edit an existing one. If you opt for the latter solution, the template created can be used exclusively for the newsletter created with the wizard and not for other newsletters.
Warning: from vtenext 20.04 a new newsletter editor composer has been included.
This tool combines different functionalities in order to help users building HTML templates without using code strings. It is a perfect solution to replace the common WYSIWYG editors, which are helpful to change contents but not fit to create HTML structures.
The CRM creates a copy of the original template with the changes made during the wizard, but it is not possible to retrieve the modified template to create other newsletters.
If a search is performed from SETTINGS > EMAIL TEMPLATES, the only template available will always be the original or starting template.
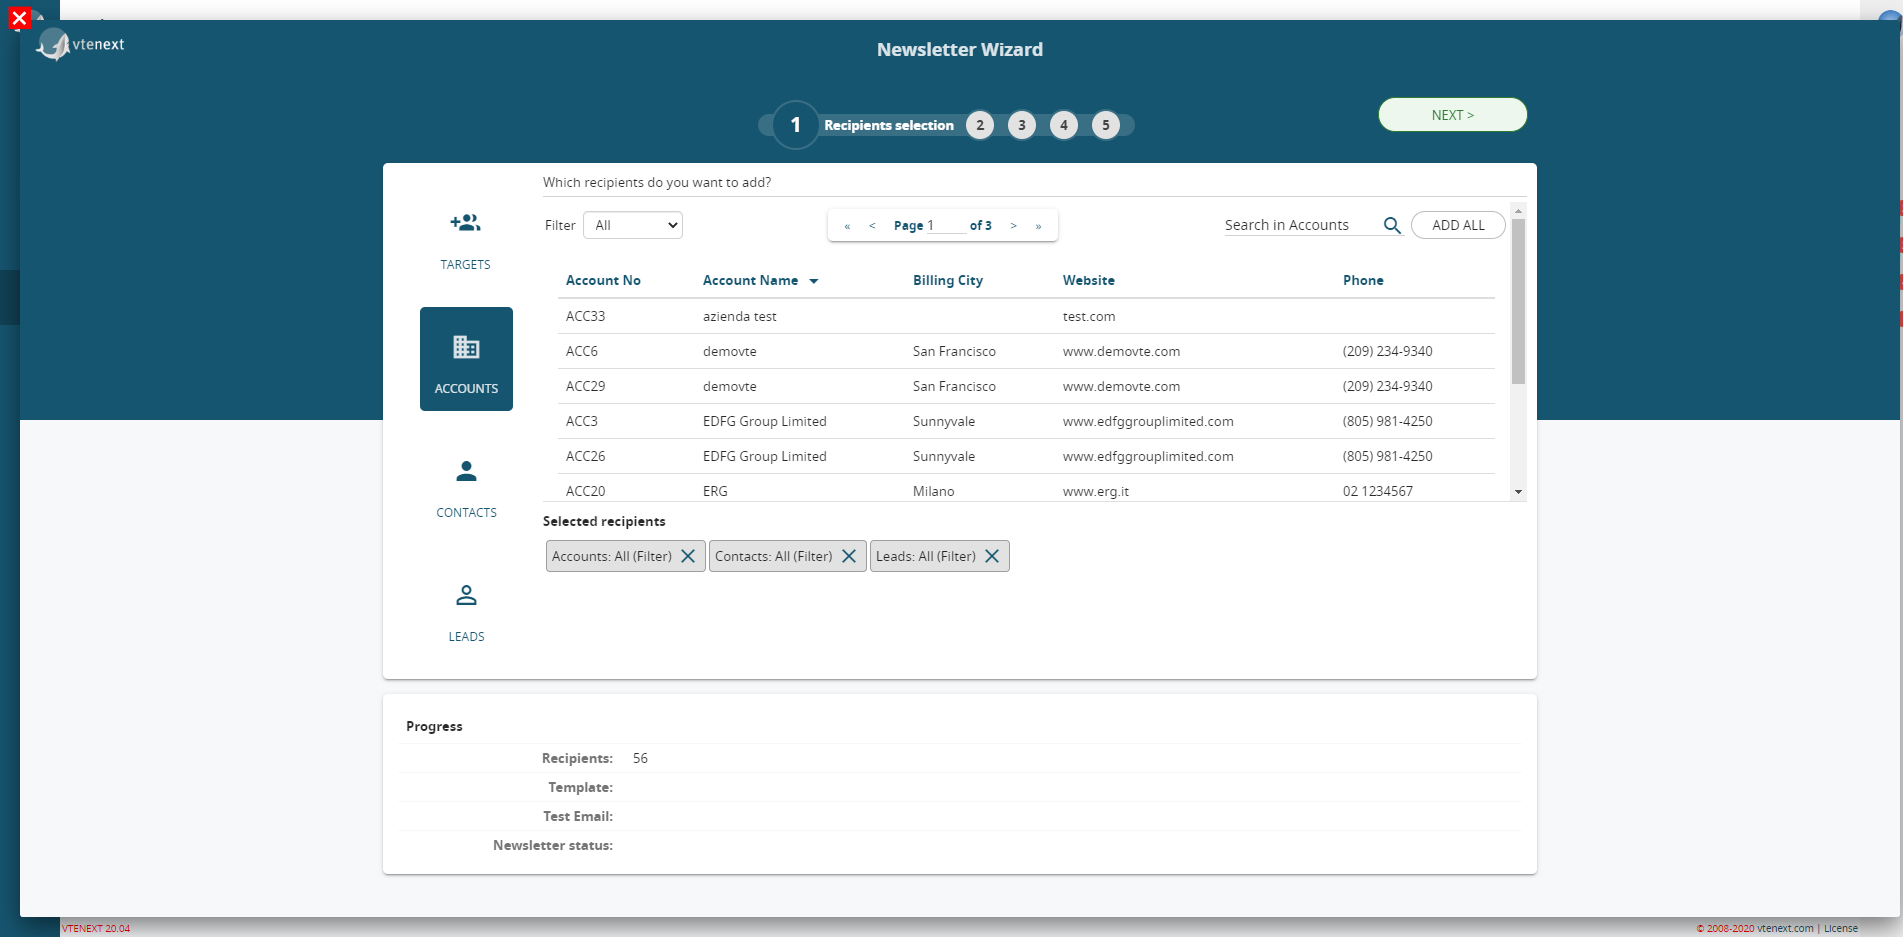
Wizard Step 1

Wizard Step 2
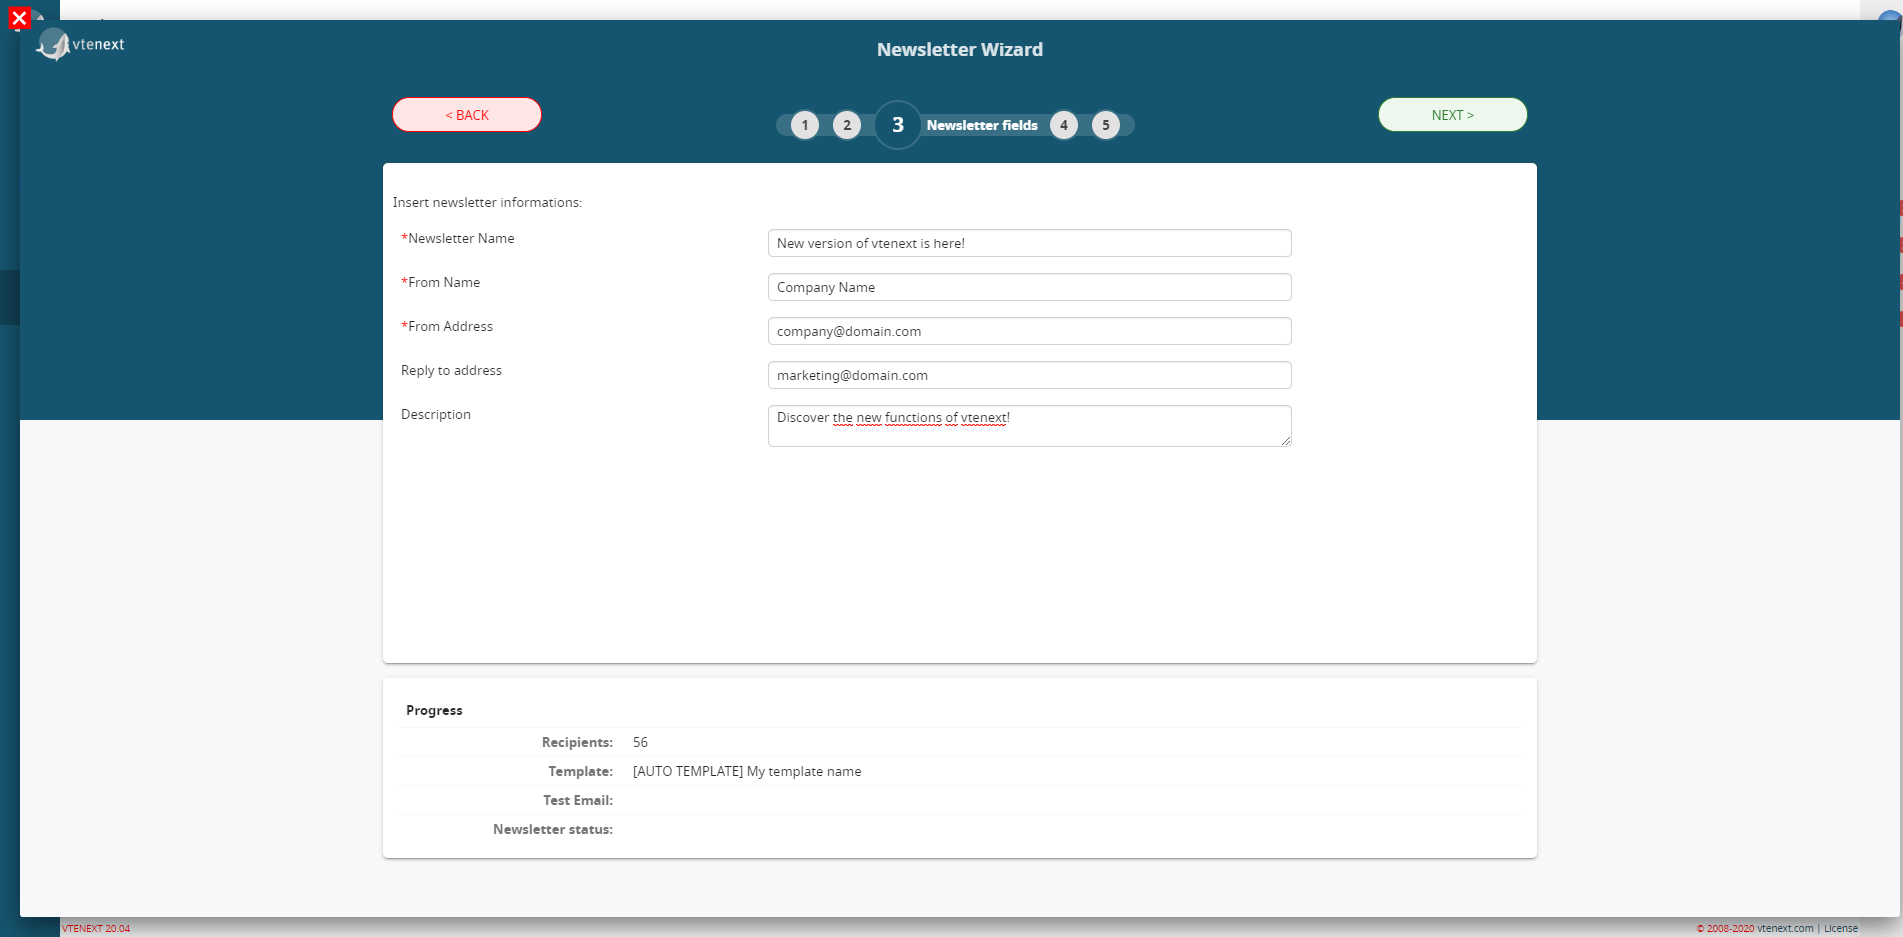
Wizard Step 3

Wizard Step 4

Wizard Step 5
6.1.6 New Newsletter editor
From vtenext 20.04, a new newsletter editor is available and allows creating newsletter in a easier way. HTML code knowledge is not needed, all the elements needed can be managed using the drag and drop function.
Here you can see the new tool:
![6.1.6 [1].png](https://usermanual.vtenext.com/uploads/images/gallery/2022-06/6-1-6-1.png)
Here below you can find all the icons of the tools available:
|
Allows to test the preview choosing among:
|
|
 |
Allows to activate/deactivate the templates' construction lines |
 |
Allows to activate/deactivate the full screen display mode. This mode eases the construction of templates |
 |
Allows the HTML code visualization |
 |
Allows the template import by coping and pasting the source code |
 |
Allows to momentarily hide all the pictures in the template |
 |
Allows to edit the source code |
 |
After selecting an element in the newsletter template click on this icon to access all the editing options available (Size, Style, Decorations) |
 |
After selecting an element in the newsletter template click on this icon to access all the setting options available. The options change according to the selected element. Here below some examples:
|
 |
Allows to display the layers on where the template is built. In this way the user can easily switch from one div to another. |
 |
Activates the display of all the blocks and elements available to build the template |
|
Available blocks
|
|
 |
Adds a tab with a cell |
 |
Adds a tab with two cells vertically divided |
 |
Adds a tab with three cells vertically divided |
 |
Inserts a tab with two cells vertically divided, 25% on the left and 75% on the right |
 |
Adds a button with the possibility of generating a link and changing its title |
 |
Adds an horizontal division line |
 |
Tool to add a text block, text can be formatted only by diversifying the blocks (each block can have only one format) |
 |
Tool to insert a text area |
 |
Allows to insert an image, uploading it from the computer or linking the URL |
 |
Allows to insert a “quoted” text |
 |
Allows to insert a link. Once this tool is selected click on the settings icon to set the link’s URL |
 |
Allows you to set an area, where you can insert an image that will have to be linked, for example, to your website |
 |
Tool to create a numbered list |
 |
Tool to create a bullet list |
 |
Allows to insert the unsubscription link |
 |
Allows to insert the preview link |
 |
Tool to insert a space, among the newsletter’s elements |
6.1.7 Newsletter Template Creation
Now we will learn how to create a new Newsletter Template by using the drag&drop editor. Accessing the editor, at the top right we will find the edit / action buttons, while the right column will change according to the selection made on the previously indicated buttons. By default, we find all the blocks with the elements available to create a new template (see following image).
![6.1.7 [1].png](https://usermanual.vtenext.com/uploads/images/gallery/2022-06/6-1-7-1.png)
Use the button to create 1 section by dragging it into the workspace (white space in the centre of the screen).
![6.1.7 [2].png](https://usermanual.vtenext.com/uploads/images/gallery/2022-06/6-1-7-2.png)
At this point it is possible to insert an element inside this cell, like for example a logo or a block of text. We proceed with the insertion of the image of a company logo, dragging the Image button in the space previously created.
![6.1.7 [3].png](https://usermanual.vtenext.com/uploads/images/gallery/2022-06/6-1-7-3.png)
Select the image to upload on the pc or paste the absolute URL near the button Add Image.
![6.1.7 [4].png](https://usermanual.vtenext.com/uploads/images/gallery/2022-06/6-1-7-4.png)
Now you can manage length and height in order for the image to be responsive. It is best to click on the image to make it active and then click on the icon to Manage Styles ![]() and provide a percentage size for the lenght (eg. 30%) while leaving all the other dimensions in Auto.
and provide a percentage size for the lenght (eg. 30%) while leaving all the other dimensions in Auto.
In this way the image size will auto adapt into each device (you can test it by acting on the icons ![]() ).
).
![6.1.7 [5].png](https://usermanual.vtenext.com/uploads/images/gallery/2022-06/6-1-7-5.png)
By clicking on the icon that allows to go black to the complete blocks ![]() list we can continue the creation of our example template by adding a list of elements that could useful to use the combo image/text. Now select the button Open Blocks and drag it on the work area.
list we can continue the creation of our example template by adding a list of elements that could useful to use the combo image/text. Now select the button Open Blocks and drag it on the work area.
![6.1.7 [6].png](https://usermanual.vtenext.com/uploads/images/gallery/2022-06/6-1-7-6.png)
In this way, two lines will be created containing images and text, which can be modified as desired as previously seen. By clicking on the icon Open style manager ![]() it will be possible to manage the text style.
it will be possible to manage the text style.
Attention! Each text block can have only one format. So, taking as an example the two lines previously created, I can decide what are the dimensions and the font for the titles and for the pure texts, but if I decide that for the first title (Supercar in the example) I want to put the Arial font and size H1, the second title will also change accordingly (Old School in the example). The same will happen for the texts in the cell below.
Now insert a block text dragging the text button ![]() in the work area and write the desired text.
in the work area and write the desired text.
![6.1.7 [7].png](https://usermanual.vtenext.com/uploads/images/gallery/2022-06/6-1-7-7.png)
Now let’s suppose we want to create a link for a portion of the text previously created, just select it and click on the link icon that will appear in the toolbar.
![6.1.7 [8].png](https://usermanual.vtenext.com/uploads/images/gallery/2022-06/6-1-7-8.png)
In the end we add the preview and the unsubscription links. By dragging and placing the two buttons we can complete the configuration of our template.
In the example image we can see how to insert the unsubscription link.
![6.1.7 [9].png](https://usermanual.vtenext.com/uploads/images/gallery/2022-06/6-1-7-9.png)
That’s all. You can add, remove, arrange all the newsletter components by using your new tools. In addition you can also add a pre created HTML code, designed by your marketing department or downloaded by the internet by using the button ![]() .
.
6.1.8 Common Email Display Issues with Outlook
Even though email templates created in vtenext are designed to be displayed correctly on all email clients, some display issues may arise when a user opens an HTML email in Outlook, particularly in versions 2007, 2010, or 2013. This occurs because these versions of Outlook use Microsoft Word to render emails, offering limited support for HTML and CSS.
Let's analyze the most common display issues faced by Outlook users and provide suggestions to resolve them.
Common Display Issues in Outlook and Tips for Fixing Them
- Margins Not Displayed
All versions of Outlook (except Outlook.com) and Gmail do not support margins. It is preferable to use padding to create space around content blocks. Padding is supported by all versions of Outlook and other major email providers. However, this may compress the content on mobile devices. - Inconsistent Line Height
Outlook 2007, 2010, 2013, and Office 365 do not consistently support line height. Some versions accept a percentage value (e.g., 140%), while others only accept integer values (e.g., 4). If you're manually writing the CSS, it is advisable to specify both values. With the drag-and-drop editor, this setting is automatically applied. - Image Distortion
Outlook does not properly resize images with widths greater than 1000 pixels, displaying them at their original size and distorting the layout. It is recommended to use images between 400 and 650 pixels wide. In the email designer, images are automatically resized up to 1300 pixels in width. - Non-Animated GIFs
Animated GIFs are supported by Outlook 365 (desktop and mobile) and Outlook.com, but versions 2007, 2010, and 2013 will only display the first frame. Ensure that the most important part of the GIF (such as offers or CTAs) is included in the first frame. - Button Duplication
Some email services, like Gmail and Apple Mail, handle buttons via standard CSS, but Outlook uses a different system. A fix has been implemented to ensure that Outlook renders buttons correctly. However, if the email is forwarded or redirected, this may cause button duplication. A solution is to create an image of the button and insert a link. - Background Image Not Displayed
Background images may not appear in some versions of Outlook. It is advisable to set a fallback color. This applies to both HTML emails and those created with the email designer. - Text Alignment
Outlook does not support justified text alignment. Unfortunately, there is no solution to force Outlook to support this feature. The email designer, launched in 2022, does not include the option to justify text, so there are no issues in this case. - Text Breaks in Buttons
If text in buttons breaks onto multiple lines, it is due to a rendering issue in Outlook. You can increase the padding to prevent this issue or use a button image. - Incorrect Font in Buttons
Outlook may replace the button's font with Times New Roman due to extra spaces at the beginning or end of the text. Removing these spaces resolves the issue. Alternatively, you can create a new button or use an image. - Unclickable Links
In some versions of Outlook (2007 and 2013), links next to images in the same text block may not be clickable. It is recommended to remove images from the text block and place them in a separate image block to avoid this issue.
6.2 Email Sending Statistics and more
IMPORTANT: vtenext inserts an image in the newsletter with the function of communicating to our system that the email has been visualized correctly and so the stats can be updated in the right way. Some servers with the service "Libraesva Email Security" or similar activated tend to complitely disable this image. These services cause the non-updating of the stats about the opening of the newsletter. We know that the tracking system is not completely reliable but actually it is not possible to avoid this problem (which is not wide-spreaded). We want to clarify that the use of this image is also done by other newsletter sending services.
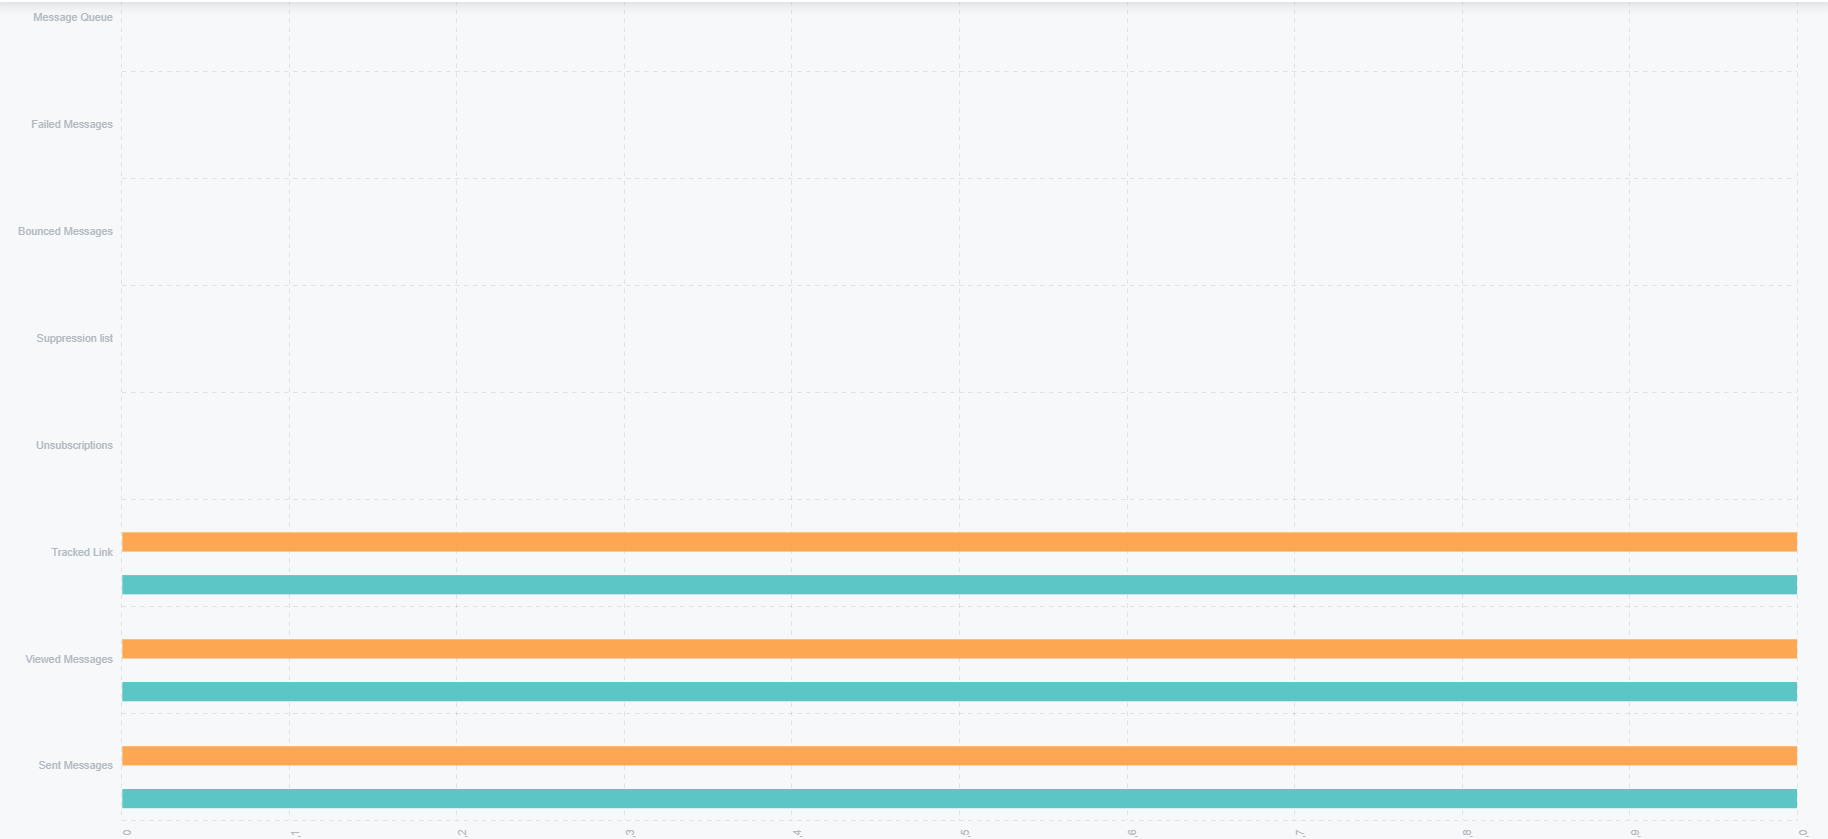
Once you send an email, you can access the Statistics tab from the Campaigns module to view an overview of statistics and details for individual statistics.
|
Message Queue |
emails that have not yet been sent (when sending is complete, this column must be blank) |
|
Sent messages |
correctly sent and received emails |
|
Viewed Messages |
for each opened email: number of times the email has been opened, date and time of first and latest opening, link to recipient’s record |
|
Tracked Link |
if there are any links in the body of the email, the system tracks the number of clicks by each recipient for each link |
|
Unsubscribes |
recipients who clicked the unsubscribe link |
|
Bounced Messages |
emails sent but not received by the recipient (due to unresponsive server, full mailbox…) |
|
Email failed |
email that have not been sent (probably due to the address error) |
|
Suppression List |
suppressed email addresses |
N.B.: bounces are processed once a day via a cron job.
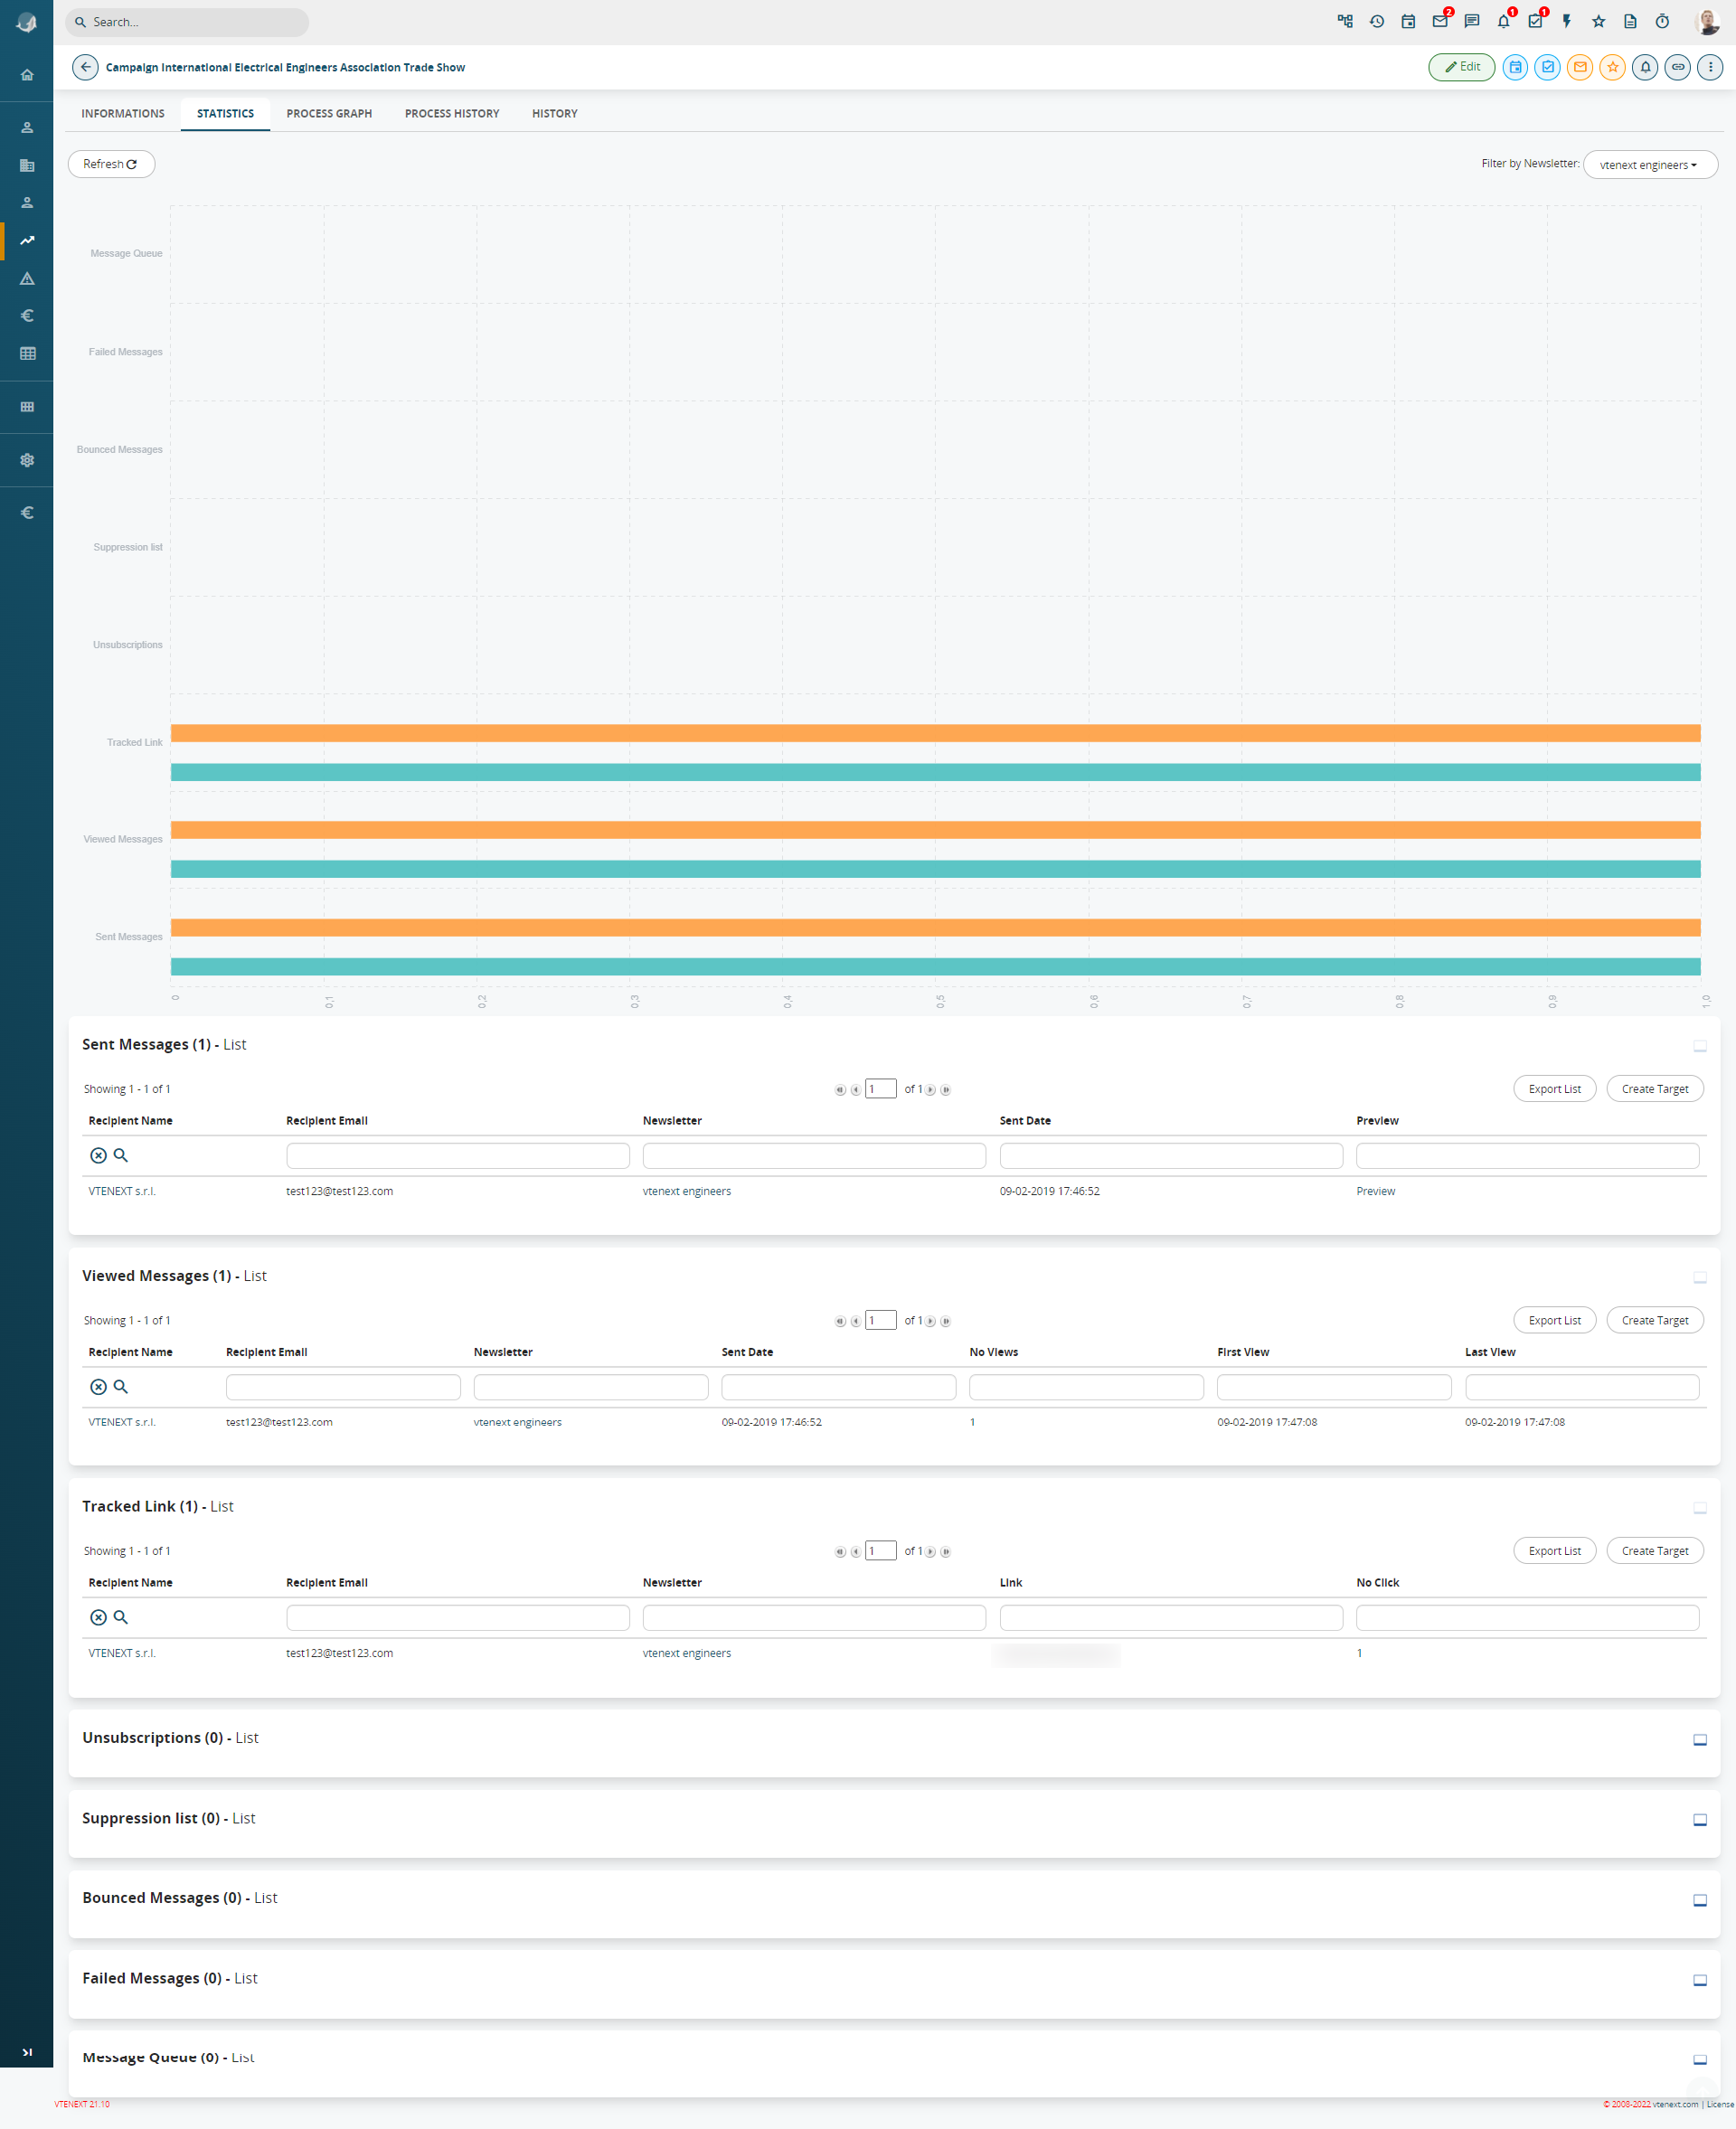
From each of these headings new targets can be created with the ‘Create a target’ button or the records can exported to an Excel file with ‘Export list’. The Statistics section provides access to statistics for the entire campaign (thus considering all the emails related to that campaign), or for a specific newsletter.
6.2.1 Manual unsubscriptions management
You can decide manually to send or not send newsletters to a single Contact, Account and/or Lead by means of the “Receive Newsletter” field (enabled by default). In this manner, no further newsletter campaigns will be sent to the email address in question.

Alternatively, by means of the OTHER button located at the top right of each record detail view, you can click on the DISABLE NEWSLETTER RECEPTION button.

6.2.2 Requirements and settings for use of the Newsletter module
For correct use of the Newsletter module the following requirements must be met, or the following configuration must be applied:
vtenext must be public (accessible via Internet): this requirement guarantees correct tracking of the opening of emails and clicks on the links they contain. Make sure the variable
$site_URL of the file /htdocs/config.inc.php is set to the vtenext public address.
Example: $site_URL = ‘https://crm.dominioazienda.it’;
Configuration of email address for Bounces:
Bounces are invalid email addresses to which Newsletter sending has failed. A dedicated email address is needed for the management of bounced messages, using the company mail domain, i.e. the domain show in Settings > Mail server > SMTP.
Warning! If the domain is different there’s a risk that the emails sent from the Newsletter module are marked as spam.
6.2.3 Newsletter Configuration (SMTP)
From Settings > Other Settings, is possible to access the newsletter configuration page, which allows, interface side, to configure a dedicated SMTP for mass mailing with marketing purpose.

Configuration interface of the dedicated SMTP for Newsletter
 Editing dedicated SMTP for Newsletter
Clicking on Edit, is possible to set a series of parameters to configure a dedicated SMTP to send Newsletter, below parameters details:
|
Server name |
es. smtp.nomedominio.it |
|
Port |
The SMTP server port to use for sending emails es. 465 |
|
User name |
The username for the account used to send emails linked to the particular SMTP with relay rights on all inbox |
|
Password |
The password for the account used to send emails |
|
Requires Authentication |
Check if the server needs authentication for the login |
|
Send rate |
Maximum number of email sent daily |
|
Address exclusion policy |
Campaigns: it excludes only the unsuscribe people of that campaign Global: it excludes all unscribe people of the crm |
|
Bounce settings IMAP |
All the settings for the bounce inbox. In that folder will be directed the bounced emails, that are emails which even if have been set correctly, they are blocked and sent back to the sender. Thanks to the configuration of this inbox all the bouced emails will be located in that inbox without clogging the sender. |
6.3 SMS Module
vtenext can be enabled to send SMS text messages. To configure the transmission of SMS messages, login in as an Admin user and go to Settings > Outbound SMS server.
To enable the transmission of SMS messages from vtenext you need to set up an email-to-sms service. This service can be requested from your mobile communications provider or by contacting vtenext partners. Once the service has been set up you can define the email addresses authorised to use the service.
In general, to send an SMS from the email function simply send an email to a recipient address with the following structure:
country code and callee number @ service provider domain.it/ com/…
To use the service directly from the recipient record (lead or contact), click SEND SMS in the green OTHER tab: the system automatically composes the recipient’s email address without the user being aware or being able to view this operation.
In summary, to set an SMS message you must specify the following information in vtenext:
- data of the mailbox enabled to send SMS messages;
- country code;
- SMS service provider domain.
|
Server Name |
Specify the outbound email server address referred to the mailbox enabled for sending SMS messages |
|
User Name |
Login to access the mailbox |
|
Password |
Password associated with the mailbox |
|
Requires Authentication? |
Specify Yes/No depending on the characteristics of the email server (generally Yes) |
|
Domain to apply to SMS numbers |
This info is supplied by the SMS service provider |
|
SMS service account |
State the account name for the SMS service; this information is supplied by the SMS service provider |
|
Code to apply to SMS numbers |
Specify the country code (39 for Italy) |
|
Name displayed in the SMS message |
This function depends on the service provider - it might not be enabled |

Server name * = It may be necessary to add the port (e.g. mail.miodominio.it:port) SMS service account * = It may be necessary to use the email address entered in the Username field.
(es. box.enable@mydomain.com)
6.4 FAX Module
vtenext can be enabled to send faxes. To configure the transmission of Fax messages login as an Admin user and go to Settings > Outbound Fax server.
To enable the transmission of faxes from vtenext you need to set up an email-to-fax service. This service can be requested from your mobile communications provider or by contacting vtenext partners.
Once the service has been set up you can define the email addresses authorised to send faxes (faxes can only be sent from authorised email addresses). To send a fax from the email function simply send a mail to an address with the following structure:
country code and callee number @ service provider domain . it/ com/…
The following must therefore be indicated in vtenext:
- Data of the mailbox enabled to send Faxes
- Country Code
- Fax service provider domain
|
Server Name |
Specify the outbound email server address referred to the mailbox enabled for sending faxes |
|
User Name |
Login to access the mailbox |
|
Password |
Password associated with the mailbox |
|
Requires Authentication? |
Specify Yes/No depending on the characteristics of the email server (generally Yes) |
|
Domain to apply to fax numbers |
This information is supplied by the fax service provider |
|
Fax service account |
State the account name for the fax service; this information is supplied by the fax service provider |
|
Code to apply to fax numbers |
Specify the country code (39 for Italy) |
|
Name displayed in the fax message |
his function depends on the service provider - it might not be enabled |
