# 18 Other vtenext Settings

# 18 Other vtenext Settings

You can define further settings within vtenext:

- **Template email**
- **Webforms**
- **Webform with GDPR fields**
- **Customer Portal**
- **How to enable the Customer portal**
- **Customer Portal interface**
- **GDPR module settings**
- **Account Details**
- **Server SoftPhone Settings**
- **Requirements and configurations**
- **LDAP**
- **Currencies**
- **Taxes Calculation**
- **Proxy Server**

# 18.1 Template email

<div class="relative z-1" id="bkmrk-as-for-the-newslette"><div class="z-1 relative md:sticky md:top-(--sticky-padding-top)" data-testid="writing-block-header-sticky-container"><div class="relative isolate flex w-full items-center justify-between gap-3 font-sans py-2.5 pe-3" data-testid="writing-block-header-surface"><div class="relative z-1 flex w-full items-center justify-between gap-3" data-writing-block-fullscreen-header-chrome="true" data-writing-block-fullscreen-header-layout="inline"><div class="flex grow gap-3 items-center"><div class="flex min-w-0 grow items-center self-start px-2"><div class="z-2 relative flex min-w-0 items-center self-start shrink-0" data-header-magic-edit-entrypoint-version="v1" data-testid="writing-block-header-magic-edit-entrypoint"></div></div></div><div class="flex shrink-0 items-center"><div class="flex items-center gap-1">As for the newsletter module, the admin user will be able to access the email template editor. An email template can be used for messages or newsletters and can be saved in either a public or private folder. Variables can also be added within the template.</div></div></div></div></div></div>[![image.png](https://usermanual.vtenext.com/uploads/images/gallery/2026-05/scaled-1680-/cOUimage.png)](https://usermanual.vtenext.com/uploads/images/gallery/2026-05/cOUimage.png)

# 18.2 Webforms

Through the vtenext Webforms tool it is possible to create a web form to embed in your website, for example the classic “Contact Us” form. The data entered in the webform will be automatically sent to the CRM into the selected destination module. Basically, you can create a Webform for almost all modules available in the CRM, including all custom modules created from **Settings &gt; Module Builder**. The only modules excluded from this feature are those that contain the product block, such as **Quotes, Sales Orders, Invoices, Purchase Orders, and DDTs**.

<span style="color: rgb(224, 62, 45);">**WARNING:** if you create a Webform for a module that contains mandatory related fields, those fields will prevent the form from submitting data. Therefore, those fields must be set as optional to allow the form to work properly.</span>  
<span style="color: rgb(224, 62, 45);">For example, in the Contacts module the related field **Account Name** might be mandatory. This field must be set as “not mandatory” from **Settings &gt; Module Manager &gt; Accounts &gt; Layout Editor** to ensure the form works correctly. If you still need that field to be mandatory, you can manage this through **User Profile permissions** instead.</span>

[![image.png](https://usermanual.vtenext.com/uploads/images/gallery/2026-02/scaled-1680-/7u2image.png)](https://usermanual.vtenext.com/uploads/images/gallery/2026-02/7u2image.png)  
*Warning that allows you to see whether there are mandatory related fields to be checked*

[![image.png](https://usermanual.vtenext.com/uploads/images/gallery/2026-02/scaled-1680-/pH5image.png)](https://usermanual.vtenext.com/uploads/images/gallery/2026-02/pH5image.png)*Main Webforms creation page*

[![image.png](https://usermanual.vtenext.com/uploads/images/gallery/2026-02/scaled-1680-/stvimage.png)](https://usermanual.vtenext.com/uploads/images/gallery/2026-02/stvimage.png)  
*Creating a Webform – note the ability to choose from the various modules available in the CRM*

It is also possible to enable the **“Find Duplicates”** function for the entries submitted through the related Webform. This function is directly linked to the saved mappings available in the duplicate management of the relevant module. For further information on this topic, see Chapter **“3.5.5 Save Mapping.”**

[![image.png](https://usermanual.vtenext.com/uploads/images/gallery/2026-02/scaled-1680-/z2kimage.png)](https://usermanual.vtenext.com/uploads/images/gallery/2026-02/z2kimage.png)  
*Find Duplicates during Webform submission*

To create a new webform, from Settings &gt; Webforms, click on the button [![image.png](https://usermanual.vtenext.com/uploads/images/gallery/2026-02/scaled-1680-/DHBimage.png)](https://usermanual.vtenext.com/uploads/images/gallery/2026-02/DHBimage.png)

[![18.2 [1].png](https://usermanual.vtenext.com/uploads/images/gallery/2022-06/scaled-1680-/4tp18-2-1.png)](https://usermanual.vtenext.com/uploads/images/gallery/2022-06/4tp18-2-1.png)

- Assigned to --&gt; vtenext user that will manage the lead
- Return URL --&gt; By clicking on the confirm of the webform, the user will be redirected to the address here indicated

Once you have created the form by selecting all the desired fields and determining which ones are mandatory, you can click on VIEW FORM at the top right to access a window that reveals the HTML code to copy and paste onto the desired website page (or landing page). This HTML code is not formatted and will need to be managed with CSS files by your webmaster.

**ATTENTION:** Any changes made to the web form fields in the CRM require that the HTML code be re-uploaded to the site.

**HOW TO RECEIVE NOTIFICATIONS UPON RECEIVING NEW LEADS.**

During the form creation process, it is necessary to choose the LEAD SOURCE field and determine the desired default source (e.g., WebSite). This field should be set as hidden. This way, you can create a filter in the lead module that filters leads coming from the WebSite source and set up the notification bell on that filter.

At this point, every time someone fills out the form on the site, a new lead will be automatically created and the CRM will notify you with a notification.

# 18.2.1 Webform with GDPR fields

GDPR fields have been enabled inside the webforms from version 18.12 onwards. For example, you can request Marketing Consent, Third-Party Consent, Profiling Consent, etc., and save the choice made with IP and date-time in the lead data sheet.

**Here are the configuration details:**  
The GDPR fields are grouped in blocks of three (view, date-time, IP).  
It is therefore necessary to set the information view fields as mandatory, to display the field in the webform as a picklist (YES/NO) and then force the user to make a choice. The date and IP fields must be hidden fields (so set the hidden flag to yes in the webform configuration).  
The following must be entered as default value in the date field:

**“<span lang="en-US">$(general : (\_\_VteMeta\_\_) date\_Y\_m\_d) $(general : (\_\_VteMeta\_\_) time”</span>**

The following must be entered as default value in the IP field

**“<span lang="en-US">$(general : (\_\_VteMeta\_\_) clientip”.</span>**

By doing so, the setting of the consent + date-time and IP of the request is obtained in the GDPR block.

[![18.2.1 [1].PNG](https://usermanual.vtenext.com/uploads/images/gallery/2022-06/scaled-1680-/RBt18-2-1-1.PNG)](https://usermanual.vtenext.com/uploads/images/gallery/2022-06/RBt18-2-1-1.PNG)

<table border="1" cellpadding="0" cellspacing="0" class="t1" id="bkmrk-assegnato-a-assegnat" style="width: 100%; background-color: #ebf7ff;"><tbody><tr><td class="td1" style="width: 141.818px; vertical-align: middle;" valign="top">**Assigned to**

</td><td class="td1" style="width: 667.273px; vertical-align: middle;" valign="top">Lead Recipient

</td></tr><tr><td class="td1" style="width: 141.818px; vertical-align: middle;" valign="top">**Return Url**

</td><td class="td1" style="width: 667.273px; vertical-align: middle;" valign="top">When the webform confirmation button is pressed, the user will be redirected to the address indicated here (for example, the thank you page)

</td></tr></tbody></table>

Once the webform has been created, click on the "Show Form" button to display the HTML code to be included inside your web page.

# 18.3 Customer Portal - Business Portal

It's possible to configure the functions of your customer portal through the 'Customer Portal' section within the settings.

In updated versions of vtenext (i.e., when transitioning from an old release to the current one), you will be able to choose via a dropdown menu which version of the portal to make available for your customers.

[![image-1702294773155.png](https://usermanual.vtenext.com/uploads/images/gallery/2023-12/scaled-1680-/image-1702294773155.png)](https://usermanual.vtenext.com/uploads/images/gallery/2023-12/image-1702294773155.png)

However, for new installations there won't be a choice, and you can only use the new Portal (Version 2).

**CUSTOMER PORTAL VERSION 1**

In Basic Settings, you can:

1\. choose which items (modules) should be active on the portal side;  
2\. define the order of the items;

**In Advanced Settings, you can further define**:  
the visibility of data through the option to View all records.

[![18.3 [1].png](https://usermanual.vtenext.com/uploads/images/gallery/2022-06/scaled-1680-/50R18-3-1.png)](https://usermanual.vtenext.com/uploads/images/gallery/2022-06/50R18-3-1.png)

- **Yes:** the customer displays both the data related to their contact details (tickets, documents, etc.) and the data related to the company registry to which they are linked
- **No:** the customer displays only the data related to their contact details and not those related to the company to which they are linked.

Through the Select user option **(a disabled user can also be chosen)**, it is possible to select a CRM user, also disabled, with a specific configuration of entries for the standard fields. The portal will display precisely those items in the available drop-down menus. When a Ticket is created by the Client Portal, it is assigned to this user. It is possible, however, to assign the Ticket to another CRM user. The assignee will receive an immediate email notification. This function is very useful for the management of active Tickets.

[![18.3 [2].png](https://usermanual.vtenext.com/uploads/images/gallery/2022-06/scaled-1680-/icN18-3-2.png)](https://usermanual.vtenext.com/uploads/images/gallery/2022-06/icN18-3-2.png)

Through the Select the email template option you can decide which email template the system should use to communicate portal access information.

**CUSTOMER PORTAL VERSION 2 (some functions are paid)**

The new version of the Customer Portal provides an entirely new experience for the accessing customer. It allows configuring interface views through the creation of dedicated Profiles, directly assigning them to individual Contacts from the CUSTOMER PORTAL INFORMATION section.

[![image.png](https://usermanual.vtenext.com/uploads/images/gallery/2026-05/scaled-1680-/z06image.png)](https://usermanual.vtenext.com/uploads/images/gallery/2026-05/z06image.png)

Now let's see how from the Customer Portal Settings, it's possible to create new Profiles **(this feature requires a fee)**. By selecting Version 2 of the Portal (where this option is applicable), the new profiles configuration or management page will appear.

[![image.png](https://usermanual.vtenext.com/uploads/images/gallery/2026-05/scaled-1680-/xnsimage.png)](https://usermanual.vtenext.com/uploads/images/gallery/2026-05/xnsimage.png)

By default, only the profile named **DEFAULT** is available, allowing users to start with a basic configuration. Many modules are deactivated by default in this profile. To activate all the desired modules, it is necessary to upgrade to the Business Portal version (sold separately). Let’s see how to create a custom profile.

By clicking on **NEW PROFILE** on the right side, you will access the creation page as shown in the following image:

[![image.png](https://usermanual.vtenext.com/uploads/images/gallery/2026-05/scaled-1680-/w3Himage.png)](https://usermanual.vtenext.com/uploads/images/gallery/2026-05/w3Himage.png)

The page resembles the one for creating standard user profiles, so you should essentially follow the same process – choose a name, a description, and select which profile to start from for the new configuration. Finally, click on NEXT at the bottom right.

Click this button to be redirected to the support ticket list.

[![image.png](https://usermanual.vtenext.com/uploads/images/gallery/2026-05/scaled-1680-/Mnzimage.png)](https://usermanual.vtenext.com/uploads/images/gallery/2026-05/Mnzimage.png)

On this page, you can configure several functions, which we'll summarize in the following table:

<table class="t1" id="bkmrk-nome-azienda-nome-de" style="background-color: rgb(235,247,255); width: 100%; border-collapse: collapse; border-width: 1px; border-spacing: 0px;"><tbody><tr><td class="td1" style="width: 196px;">**Owner**

</td><td class="td1" style="width: 613px;">You can select the CRM user to whom all records created from the portal will be directly assigned;

</td></tr><tr><td style="width: 196px;"></td><td style="width: 613px;"></td></tr><tr><td style="width: 196px;"></td><td style="width: 613px;"></td></tr><tr><td class="td1" style="width: 196px;">**Notifications**

</td><td class="td1" style="width: 613px;">It offers the possibility to select email templates, which can be customized through creation or modification using the dedicated EMAIL TEMPLATE section in SETTINGS, for exchanging information with the portal user. The options are:

- Template used for the portal registration email;
- Template used for the successful password change email;
- Template used for the password recovery email;
- Template used to notify the customer about the creation of a ticket;
- Template used to notify the customer about the ticket response;
- SMTP account for sending credentials (Default/Global)**\***;
- Sender mail;
- Sender name

**Default/Global\*  
Default:** If the user has a configured account in the Messages module, the system will use the server associated with it. If no account is configured, the system will use the server specified under Settings -&gt; Mail Server.

**Global:** The system will exclusively use the server configured under Settings -&gt; Mail Server.

</td></tr><tr><td class="td1" style="width: 196px;">**Home**

</td><td class="td1" style="width: 613px;">It allows configuring buttons for quick actions on the portal home page.

By clicking on ADD BUTTON on the right, you can enable a window from which to set:

- Button Title
- Button Description
- Button color
- Icon representing the button's function
- Action that allows choosing to link a module or trigger the creation of a record in a specific module

[![image.png](https://usermanual.vtenext.com/uploads/images/gallery/2026-05/scaled-1680-/amDimage.png)](https://usermanual.vtenext.com/uploads/images/gallery/2026-05/amDimage.png)

  
*Button Creation Screen*

[![image.png](https://usermanual.vtenext.com/uploads/images/gallery/2026-05/scaled-1680-/QzKimage.png)](https://usermanual.vtenext.com/uploads/images/gallery/2026-05/QzKimage.png)

  
*Button List Viewing Screen*

**The order of the buttons can be changed through drag-and-drop.**

</td></tr><tr><td style="width: 196px;">**Conditionals**

</td><td style="width: 613px;">It is possible to set up conditional fields for the Customer Portal, so that they work exactly like in the vte interface. When they are activated, the conditions will function properly on the portal as well. There are three ways to configure them:

- **Import from another portal profile**
- **Import from roles and groups**
- **Create a new rule directly on the portal (Add button)**

[![image.png](https://usermanual.vtenext.com/uploads/images/gallery/2026-05/scaled-1680-/lhHimage.png)](https://usermanual.vtenext.com/uploads/images/gallery/2026-05/lhHimage.png)

  
[![image.png](https://usermanual.vtenext.com/uploads/images/gallery/2024-10/scaled-1680-/1rXimage.png)](https://usermanual.vtenext.com/uploads/images/gallery/2024-10/1rXimage.png)

By clicking on **Import from another portal profile**, a popup will open, allowing you to select other existing profiles. Once you've selected the desired profile, you can click **Import** at the bottom right of the window to complete the process.

[![image.png](https://usermanual.vtenext.com/uploads/images/gallery/2024-10/scaled-1680-/A5Zimage.png)
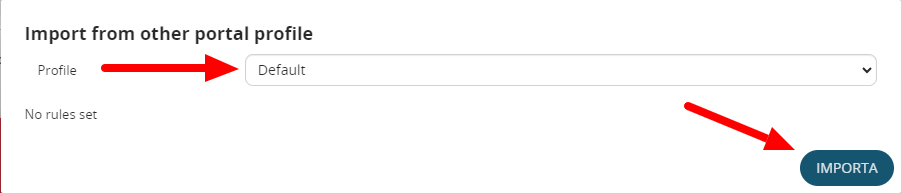
](https://usermanual.vtenext.com/uploads/images/gallery/2024-10/A5Zimage.png)

By clicking on **Import from roles and groups**, a popup will open, allowing you to select predefined rules for the CRM directly in the Conditional Fields section. For more details on this topic, refer to *Chapter 17.4 Conditional Fields*.

[![image.png](https://usermanual.vtenext.com/uploads/images/gallery/2024-10/scaled-1680-/kV4image.png)
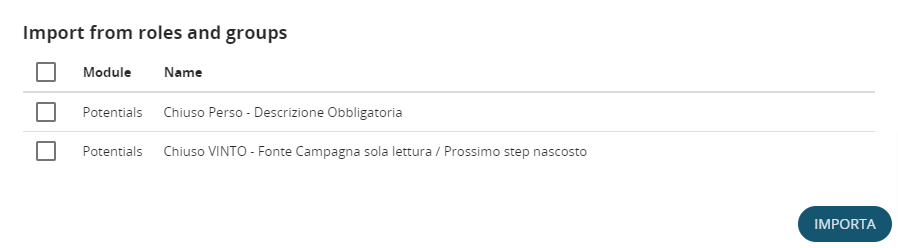
](https://usermanual.vtenext.com/uploads/images/gallery/2024-10/kV4image.png)

By clicking on **Add**, you can create a new rule for the portal's conditional fields, exclusive to the portal itself (it will not reflect in the CRM). The configuration follows the standard process explained in Chapter 17.4. In the example shown in the image below, you can see a rule where the company's profile becomes entirely read-only when the Status field takes the value Blocked.

[![image.png](https://usermanual.vtenext.com/uploads/images/gallery/2024-10/scaled-1680-/cz5image.png)
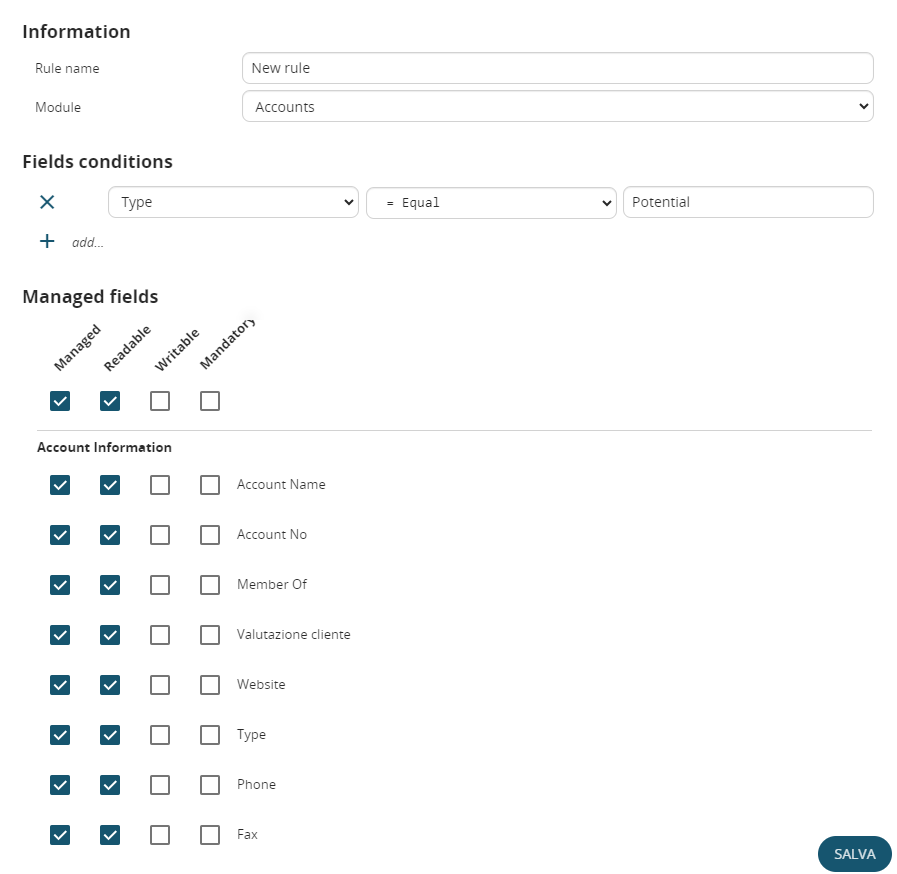
](https://usermanual.vtenext.com/uploads/images/gallery/2024-10/cz5image.png)

</td></tr><tr><td class="td1" style="width: 196px;">**Global Privileges**

</td><td class="td1" style="width: 613px;">It offers the possibility to configure all privileges for each individual user profile, determining what they can or cannot do or see through the customer portal. You can apply these settings to all modules of vtenext.

<span style="color: rgb(224,62,45);">**WARNING:** One particularity to note is that it is not possible to CREATE company records from the Business Portal. Therefore, even if the profile allows enabling the CREATE/EDIT flag, this function is actually disabled.</span>

<span style="color: rgb(224,62,45);">**FIELDS NOT DISPLAYED IN LIST:** a field that is set as not visible to the portal user through profile configuration cannot be added to the list fields. In fact, even if it can be selected during the configuration of the portal list view (for example, for Customer Support Tickets), when saving, that field is automatically removed (due to the profile configuration).</span>

</td></tr><tr><td style="width: 196px;">**Note on Custom Modules Created via Interface**

</td><td style="width: 613px;">When creating a **custom module**, in order for it to be added to the list of those supported by the Business Portal—and thus appear in the **portal profile management**—it must have at least one relationship linking it to either the Contacts module or the Companies module.  
This requirement has been added because permissions in the Business Portal are based on this type of relationship; if such a relationship is not present, the module will not be visible in the portal profile permissions.

</td></tr></tbody></table>

---

**Unlocking a portal user**

Just like CRM users, a portal user gets locked after five failed login attempts for security reasons. It is possible to unlock them through the settings in vtenext, by navigating to the **Check Business Portal login** section. On this page, you can view all blocked users and add them back to the whitelist, exactly as you would with a standard user.

[![image.png](https://usermanual.vtenext.com/uploads/images/gallery/2026-05/scaled-1680-/KFBimage.png)](https://usermanual.vtenext.com/uploads/images/gallery/2026-05/KFBimage.png)

# 18.3.1 Enabling the customer portal for a user

Only contacts present in vtenext can be enabled for the Customer Portal. Within the individual contact record, it's necessary to check the checkbox in the PORTAL USER section and input a start support date and an end date.

Upon enabling the checkbox, the system autonomously sends a message to the email address provided in the contact's email field, containing the credentials to access the Customer Portal. The specified dates determine the actual access period.

[![image.png](https://usermanual.vtenext.com/uploads/images/gallery/2026-05/scaled-1680-/DUKimage.png)](https://usermanual.vtenext.com/uploads/images/gallery/2026-05/DUKimage.png)Additionally, it will be necessary to choose the Profile that the specific Portal User will have for their usage and viewing. The Profile determines how each portal user sees their data and how they can interact with the available modules.

[![image.png](https://usermanual.vtenext.com/uploads/images/gallery/2026-05/scaled-1680-/CNJimage.png)](https://usermanual.vtenext.com/uploads/images/gallery/2026-05/CNJimage.png)

# 18.3.2 Customer Portal Interface

**INTERFACE VERSION 1**

Once they have entered their login details, your customer can first enter a new request for assistance and then access the entities that you have related to his contact card (only enabled modules) from the menu items on the left. Support requests by default provide for an email to be sent to the contact's email address, with the summary and ID of the ticket. Any subsequent comments will always be notified by email. Once you have dealt with the contact request, you can close the ticket (if satisfied with the result).

[![Customer_Portal_Login.png](https://usermanual.vtenext.com/uploads/images/gallery/2020-06-Jun/scaled-840-0/Customer_Portal_Login.png)](https://usermanual.vtenext.com/uploads/images/gallery/2020-06-Jun/Customer_Portal_Login.png)

[![Customer_Portal_Detail.png](https://usermanual.vtenext.com/uploads/images/gallery/2020-06-Jun/scaled-840-0/Customer_Portal_Detail.png)](https://usermanual.vtenext.com/uploads/images/gallery/2020-06-Jun/Customer_Portal_Detail.png)

**INTERFACE VERSION 2**

Based on the configurations made in Chapter 18.3 and 18.3.1, the Customer Portal can appear differently for each user who uses it. This is determined by the profile assigned to that specific user. The **portal language will be automatically selected** based on the default language set in the browser.

**ATTENTION: the v2 portal is responsive.**

[![Sign in - Customer Portal.png](https://usermanual.vtenext.com/uploads/images/gallery/2023-08/scaled-1680-/sign-in-customer-portal.png)](https://usermanual.vtenext.com/uploads/images/gallery/2023-08/sign-in-customer-portal.png)

*This image represents the Login page for the Customer Portal.*

[![Home - Customer Portal.png](https://usermanual.vtenext.com/uploads/images/gallery/2023-09/scaled-1680-/home-customer-portal.png)](https://usermanual.vtenext.com/uploads/images/gallery/2023-09/home-customer-portal.png)

*Upon the first access, the Customer Portal prompts you to change the password, so you can immediately set a different one from the system-generated default password.*

[![Home - Customer Portal (1).png](https://usermanual.vtenext.com/uploads/images/gallery/2023-09/scaled-1680-/home-customer-portal-1.png)](https://usermanual.vtenext.com/uploads/images/gallery/2023-09/home-customer-portal-1.png)

Here's how the portal interface looks once you've logged in:

- On the left, you will find all the modules that the user's profile allows them to access. For each module, the portal user can search among their records, create new records, and consult existing records;
- In the center, there are all the buttons that have been configured in the settings. These buttons facilitate a more user-friendly experience of the Portal;
- On the right, in addition to the LOGOUT button that allows quick logout from the platform, there is also a small button that activates full-screen mode;

[![Ticket details - Customer Portal.png](https://usermanual.vtenext.com/uploads/images/gallery/2023-09/scaled-1680-/ticket-details-customer-portal.png)](https://usermanual.vtenext.com/uploads/images/gallery/2023-09/ticket-details-customer-portal.png)

*Here's the interface for viewing an existing ticket. Notice the 'RETURN TO LIST' button on the left, which allows you to go back to the list view of all the customer's reports. The comments section has been placed at the top for easy access, while the area for uploading new Documents is located on the right, with the option to drag and drop them. Using the 'OK RESOLVED' button, the portal user can autonomously close the ticket. This type of display is repeated for other modules as well, with different field types*

[![Ticket details - Customer Portal (1).png](https://usermanual.vtenext.com/uploads/images/gallery/2023-09/scaled-1680-/ticket-details-customer-portal-1.png)](https://usermanual.vtenext.com/uploads/images/gallery/2023-09/ticket-details-customer-portal-1.png)

*Here's how the Comments section looks. In the center, you have the back-and-forth communication between the Portal User and Customer Support. In the top-right corner, the small blue background number (3) represents the number of Comments*

*In this screen, you can see the list of all the tickets in the Portal. With this view, you can search based on any of the displayed fields, matching multiple columns together, or perform a general search using the box in the top-right corner. This display pattern is repeated for other modules, with field types changing accordingly*

# 18.3.3  GDPR module settings

For privacy management, you can customise certain configurations, the templates proposed for communication through GDPR campaigns and the privacy policy of your company through the different features of the GDPR module.

[![image.png](https://usermanual.vtenext.com/uploads/images/gallery/2026-05/scaled-1680-/LiJimage.png)](https://usermanual.vtenext.com/uploads/images/gallery/2026-05/LiJimage.png)

[![18.3.3 [2].png](https://usermanual.vtenext.com/uploads/images/gallery/2022-06/scaled-1680-/MJp18-3-3-2.png)](https://usermanual.vtenext.com/uploads/images/gallery/2022-06/MJp18-3-3-2.png)

<table class="t1" id="bkmrk-nome-utente-ogni-ute" style="width: 100%; background-color: rgb(235,247,255); border-collapse: collapse; border-width: 1px; border-spacing: 0px; height: 506.969px;"><tbody><tr style="height: 35.3906px;"><td colspan="2" style="vertical-align: middle; width: 100.124%; height: 35.3906px;">**WEBSERVICE**

</td></tr><tr style="height: 36.5469px;"><td style="vertical-align: middle; width: 50.0618%; height: 36.5469px;">**Webservice endpoint**

</td><td style="height: 36.5469px; width: 50.0618%;"> </td></tr><tr style="height: 35.75px;"><td class="td1" style="width: 50.0618%; vertical-align: middle; height: 35.75px;">**Webservice username**

</td><td class="td1" style="width: 50.0618%; height: 35.75px;"></td></tr><tr style="height: 35.3906px;"><td class="td1" style="width: 50.0618%; vertical-align: middle; height: 35.3906px;">**Default language**

</td><td class="td1" style="width: 50.0618%; height: 35.3906px;"></td></tr><tr style="height: 35.3906px;"><td class="td1" style="width: 50.0618%; vertical-align: middle; height: 35.3906px;">**Default logo**

</td><td class="td1" style="width: 50.0618%; height: 35.3906px;"></td></tr><tr style="height: 10px;"><td class="td1" style="width: 50.0618%; vertical-align: middle; height: 10px;">**Sender name**

</td><td class="td1" style="width: 50.0618%; height: 10px;"></td></tr><tr style="height: 35.3906px;"><td style="width: 50.0618%; vertical-align: middle; height: 35.3906px;">**Sender email**

</td><td style="width: 50.0618%; height: 35.3906px;"></td></tr><tr style="height: 35.3906px;"><td style="width: 50.0618%; vertical-align: middle; height: 35.3906px;">**Number of waiting months for confirm**

</td><td style="width: 50.0618%; height: 35.3906px;"></td></tr><tr style="height: 35.3906px;"><td colspan="2" style="vertical-align: middle; width: 100.124%; height: 35.3906px;">**TEMPLATE**

</td></tr><tr style="height: 35.3906px;"><td style="width: 50.0618%; vertical-align: middle; height: 35.3906px;">**Support request Template**

</td><td style="width: 50.0618%; height: 35.3906px;"></td></tr><tr style="height: 35.3906px;"><td style="width: 50.0618%; vertical-align: middle; height: 35.3906px;">**Access Template**

</td><td style="width: 50.0618%; height: 35.3906px;"></td></tr><tr style="height: 35.3906px;"><td style="width: 50.0618%; vertical-align: middle; height: 35.3906px;">**Confirm update template**

</td><td style="width: 50.0618%; height: 35.3906px;"></td></tr><tr style="height: 35.3906px;"><td style="width: 50.0618%; vertical-align: middle; height: 35.3906px;">**Contact updated template**

</td><td style="width: 50.0618%; height: 35.3906px;"></td></tr><tr style="height: 35.375px;"><td class="align-center" colspan="2" style="vertical-align: middle; height: 35.375px; width: 100.124%;">**PRIVACY POLICY**</td></tr><tr style="height: 35.3906px;"><td style="width: 50.0618%; vertical-align: middle; height: 35.3906px;">**Description**

</td><td style="width: 50.0618%; height: 35.3906px;"></td></tr></tbody></table>

# 18.4 Account Details

In Company Details you can specify the details of your company.

[![image.png](https://usermanual.vtenext.com/uploads/images/gallery/2026-05/scaled-1680-/p37image.png)](https://usermanual.vtenext.com/uploads/images/gallery/2026-05/p37image.png)

This information can then be retrieved within the PDF Maker templates or Email or Newsletter for invoices, quotes, orders, etc. Make sure that the size of your company logo fits in the space available for it.

**N.B.:** The recommended size is 150x60 pixels. The logo must be uploaded in .png or .jpg format.

# 18.4.1 Logos and Backgrounds

In Settings, you will also find the section for 'Logos,' which allows us to change both the logos for the Access and Login pages, including their backgrounds, as well as the logo within the CRM, located at the top left.

As soon as you access this area, you will be able to:

[![image-1692885355681.png](https://usermanual.vtenext.com/uploads/images/gallery/2023-08/scaled-1680-/image-1692885355681.png)](https://usermanual.vtenext.com/uploads/images/gallery/2023-08/image-1692885355681.png)

**Change the Login Page Logo, recommended dimensions are 200 x 77 pixels.**

[![image-1692885330968.png](https://usermanual.vtenext.com/uploads/images/gallery/2023-08/scaled-1680-/image-1692885330968.png)](https://usermanual.vtenext.com/uploads/images/gallery/2023-08/image-1692885330968.png)

**Change the Logo (LIGHT THEME) within the CRM when the left menu is in collapsed mode, recommended dimensions are 32 x 32 pixels.**

[![image-1692885385920.png](https://usermanual.vtenext.com/uploads/images/gallery/2023-08/scaled-1680-/image-1692885385920.png)](https://usermanual.vtenext.com/uploads/images/gallery/2023-08/image-1692885385920.png)

**Change the Logo (DARK THEME) within the CRM when the left menu is in collapsed mode, recommended dimensions are 32 x 32 pixels.**

[![image-1692885428667.png](https://usermanual.vtenext.com/uploads/images/gallery/2023-08/scaled-1680-/image-1692885428667.png)](https://usermanual.vtenext.com/uploads/images/gallery/2023-08/image-1692885428667.png)

**Change the Logo (LIGHT THEME) within the CRM when the left menu is in expanded mode, recommended dimensions are 129 x 50 pixels.**

[![image-1692885531210.png](https://usermanual.vtenext.com/uploads/images/gallery/2023-08/scaled-1680-/image-1692885531210.png)](https://usermanual.vtenext.com/uploads/images/gallery/2023-08/image-1692885531210.png)

**Change the Login Page Logo for the Customer Portal, recommended dimensions are 200 x 77 pixels.**

[![image-1692885565191.png](https://usermanual.vtenext.com/uploads/images/gallery/2023-08/scaled-1680-/image-1692885565191.png)](https://usermanual.vtenext.com/uploads/images/gallery/2023-08/image-1692885565191.png)

**Change the Logo within the Customer Portal, when the left menu is in collapsed mode, recommended dimensions are   
32 x 32 pixels.**

[![image-1692885599156.png](https://usermanual.vtenext.com/uploads/images/gallery/2023-08/scaled-1680-/image-1692885599156.png)](https://usermanual.vtenext.com/uploads/images/gallery/2023-08/image-1692885599156.png)

**Change the Logo within the Customer Portal, when the left menu is in expanded mode, recommended dimensions are   
129 x 50 pixels.**

[![18.4.1 Logos and Backgrounds_final picture.png](https://usermanual.vtenext.com/uploads/images/gallery/2023-08/scaled-1680-/18-4-1-logos-and-backgrounds-final-picture.png)](https://usermanual.vtenext.com/uploads/images/gallery/2023-08/18-4-1-logos-and-backgrounds-final-picture.png)

**Furthermore, you can choose a background image for the Login Page, either from the system-provided options or uploaded directly by the admin user. Recommended size is 1920 x 1200 pixels. Changing the order of the image sequence can be done simply by dragging and dropping.**

For the Login Page backgrounds, you can choose the background selection mode, which can be:

- **Sequential**: displays the images in the same order as they were uploaded.
- **Random**: displays the uploaded images in a completely random order within this area.

[![image-1692885975572.png](https://usermanual.vtenext.com/uploads/images/gallery/2023-08/scaled-1680-/image-1692885975572.png)](https://usermanual.vtenext.com/uploads/images/gallery/2023-08/image-1692885975572.png)

# 18.5 Server SoftPhone Settings

vtenext can be integrated with Asterisk, an open source telephone PBX application that allows you to route phone calls. Asterisk is a free implementation of PBX software that offers the same features as other proprietary systems at a much lower cost and with greater flexibility.  
Today it is a benchmark within the sector; the full range of its contents and its reliability make it an ideal platform for a wide range of applications: it is used as a supporting element to create RTG/IP switchboards (PBXs able to use both traditional telephone lines and IP channels), Centrex systems (Virtual and centralised PBXs), Call Centre management applications and more.

**Features and objectives:**

1. Make phone calls by clicking on phone numbers directly from vtenext.
2. Receive notifications within vtenext with caller information when a call comes to the user. Notifications appear in the lower right corner of the screen.
3. View call history in the PBX Manager Module (Call Manager Module)
4. Associate the phone calls with the Contact/Account/Lead in the Activity History.
5. Set user extensions through the User Preferences data sheet.
6. Phone numbers format: you can save the number in vtenext in any format, with or without prefixes and also with SIP and PSTN if you use the character, to separate this prefix from the number itself.

**Note:** We do not recommend using special characters or hyphens in the phone/cell phone field.

---

**Requirements and configuration:**

- vtenext installed on the system
- Asterisk installed on the system.
- The server containing Asterisk and the one containing vtenext must be able to see each other online.
- You must have a valid Asterisk user extension and a VoIP phone configured with that extension.

When the Asterisk server is configured to function with vtenext, you must configure the vtenext settings to connect to Asterisk.

To enter Asterisk server settings, choose SoftPhone Server Settings:

[![image.png](https://usermanual.vtenext.com/uploads/images/gallery/2026-05/scaled-1680-/yCXimage.png)](https://usermanual.vtenext.com/uploads/images/gallery/2026-05/yCXimage.png)

Within User Preferences, point 6. Asterisk Configuration, you can associate the extension (internal) for the user:

[![image.png](https://usermanual.vtenext.com/uploads/images/gallery/2026-05/scaled-1680-/9Nhimage.png)](https://usermanual.vtenext.com/uploads/images/gallery/2026-05/9Nhimage.png)Receive Incoming Calls enables caller recognition for incoming calls. Once the incoming call has been answered, this option makes it possible to display a pop-up on the CRM screen, which appears at the bottom right with the caller's name and the link to access the details.  
If the caller's number is not present in vtenext, the popup proposes the creation of a lead, a contact or an account.

**Warning!** SoftPhone Server Settings is only available in “on-premise” vtenext solutions.

**Warning!** In order for caller recognition to be active, it is also necessary to activate the relevant CRON on the vtenext installation server. See CRONJOB – Processes to be planned chapter.

# 18.6 LDAP

<span style="color: rgb(224, 62, 45);">**WARNING: This feature has been added to the Single Sign-On configuration (refer to Chapter 18.11).**</span>

You can configure the LDAP server data in vtenext to synchronise user passwords. <span class="_fadeIn_m1hgl_8">Note </span><span class="_fadeIn_m1hgl_8">that </span><span class="_fadeIn_m1hgl_8">when </span><span class="_fadeIn_m1hgl_8">the </span><span class="_fadeIn_m1hgl_8">LDAP </span><span class="_fadeIn_m1hgl_8">authentication </span><span class="_fadeIn_m1hgl_8">method </span><span class="_fadeIn_m1hgl_8">is </span><span class="_fadeIn_m1hgl_8">used, </span>**<span class="_fadeIn_m1hgl_8">the </span><span class="_fadeIn_m1hgl_8">password </span><span class="_fadeIn_m1hgl_8">is </span><span class="_fadeIn_m1hgl_8">entirely </span><span class="_fadeIn_m1hgl_8">managed </span><span class="_fadeIn_m1hgl_8">by </span>**<span class="_fadeIn_m1hgl_8">**LDAP**, </span><span class="_fadeIn_m1hgl_8">and </span><span class="_fadeIn_m1hgl_8">therefore </span><span class="_fadeIn_m1hgl_8">the </span><span class="_fadeIn_m1hgl_8">standard </span><span class="_fadeIn_m1hgl_8">password </span><span class="_fadeIn_m1hgl_8">field </span><span class="_fadeIn_m1hgl_8">of </span><span class="_fadeIn_m1hgl_8">the </span><span class="_fadeIn_m1hgl_8">vtenext </span><span class="_fadeIn_m1hgl_8">user </span><span class="_fadeIn_m1hgl_8">is </span><span class="_fadeIn_m1hgl_8">hidden </span><span class="_fadeIn_m1hgl_8">because </span><span class="_fadeIn_m1hgl_8">it </span><span class="_fadeIn_m1hgl_8">is </span><span class="_fadeIn_m1hgl_8">not </span><span class="_fadeIn_m1hgl_8">used.</span>

For configuration from Settings, choose LDAP Server. Then fill in the LDAP server information as shown in the figure:

[![18.6 [1].png](https://usermanual.vtenext.com/uploads/images/gallery/2022-06/scaled-1680-/PLL18-6-1.png)](https://usermanual.vtenext.com/uploads/images/gallery/2022-06/PLL18-6-1.png)

When creating a user, you can search for the user once you have configured the LDAP server data:  
The connection with LDAP allows:

[![18.6 [2].png](https://usermanual.vtenext.com/uploads/images/gallery/2022-06/scaled-1680-/18-6-2.png)](https://usermanual.vtenext.com/uploads/images/gallery/2022-06/18-6-2.png)

- the pre-compilation of some user information (name, surname, email)
- the synchronisation of user access passwords

# 18.7 Currencies

It is possible to manage different types of currencies in the event there are users who have to draw up offers in a currency different from the one proposed by default by the system (Euro).  
From Settings &gt; Currencies you can view the currencies configured in the system and add new ones.

[![image.png](https://usermanual.vtenext.com/uploads/images/gallery/2026-05/scaled-1680-/rQaimage.png)](https://usermanual.vtenext.com/uploads/images/gallery/2026-05/rQaimage.png)

The following information is required to create a new currency:

<table class="t1" id="bkmrk-nome-della-valuta-il" style="width: 100%; background-color: #ebf7ff;"><tbody><tr><td class="td1" style="width: 17.1605%; vertical-align: middle;">**Currency Name**

</td><td class="td1" style="width: 82.716%; vertical-align: middle;">The name of the currency you want to manage, for example "USA, Dollars (USD)"

</td></tr><tr><td class="td1" style="width: 17.1605%; vertical-align: middle;">**Conversion Rate**

</td><td class="td1" style="width: 82.716%; vertical-align: middle;">The conversion rate must always be linked to the base currency of vtenext

</td></tr><tr><td class="td1" style="width: 17.1605%; vertical-align: middle;">**Status**

</td><td class="td1" style="width: 82.716%; vertical-align: middle;">Active/Inactive

</td></tr></tbody></table>

[![image.png](https://usermanual.vtenext.com/uploads/images/gallery/2026-05/scaled-1680-/Iz0image.png)](https://usermanual.vtenext.com/uploads/images/gallery/2026-05/Iz0image.png)

Once you have configured the currency, you can:

- create quotes, sales orders, invoices, DDT, and purchase orders with the new currencies.
- associate the default currency to each user through the Preferences data sheet. This setting will allow the user to view all currency type fields (e.g., the Invoiced field in the Account registry) in the currency chosen by default, according to the conversion rate indicated in the settings.

# 18.8 Tax Calculation

You can set the tax items to be used on Quotes, Orders, Invoices and Delivery Notes.

[![image.png](https://usermanual.vtenext.com/uploads/images/gallery/2026-05/scaled-1680-/tcnimage.png)](https://usermanual.vtenext.com/uploads/images/gallery/2026-05/tcnimage.png)

Negative tax values can also be managed, for example for the management of ENASARCO or withholding tax.

The calculation of taxes in Quotes, Orders, Invoices and Delivery Notes can be calculated per line or per group, depending on the setting chosen by the user when creating the document:

[![image.png](https://usermanual.vtenext.com/uploads/images/gallery/2026-05/scaled-1680-/BYLimage.png)](https://usermanual.vtenext.com/uploads/images/gallery/2026-05/BYLimage.png)

# 18.9 Proxy Server

If your company is using a proxy server to access the Internet, you can use the Proxy Server Settings menu, as shown in the figure.

[![18.9 [1].png](https://usermanual.vtenext.com/uploads/images/gallery/2022-06/scaled-1680-/6f918-9-1.png)](https://usermanual.vtenext.com/uploads/images/gallery/2022-06/6f918-9-1.png)

# 18.10 Internal REST Webservice Methods

These Web services allow you to do HTTP requests to the specified endpoints (VTE\_URL/restapi/v1/vtews/METHOD\_NAME).

The requests need POST method, basic authentication (you must set ‘Authentication basic’ into the header which is calculated through a function based on username\* and password\*) and their relative parameters.  
Each one method will give a JSON response with a status and the data or in case of error an error code and its relative message.

**Notes:**  
• The “id” parameter is always specified as ‘moduleid\* x recordid’ (ex: 2x313) moduleid\*: You can get the the moduleid from webservice ‘describe’ method (idPrefix)

**Headers:**   
• Authorization: Basic base64\_encode("username\*:password\*")  
• Content-Type : application/json  
  
username\* (VTE) password\* (User preferences’ Webservice Access Key)

Authorization Example:  
‘Basic ZmVkZXJpY28ucGVybGluOjB5cm5MRjNhS2RhMDZ2c3E=‘

  
**Requirements for Apache2:** • Activate apache rewrite module  
• Set AllowOverride All into the virtualhost file to the vte path folder.   
Example:

```
<Directory /var/www/html/VTE_FOLDER>
Options -Indexes +FollowSymLinks +MultiViews
AllowOverride All
Require all granted
</Directory>
```

**Requirements for Nginx + PHP FPM** As Nginx does not handle htaccess file, some special rewrites are needed in order to handle WS requests.  
Below an example of nginx conf file:

```
server {
	listen 80;

	root /var/www/vtenext/;
	
	autoindex off;
	
	index index.php index.html index.htm;

	# Make site accessible from http://localhost/
	
	server_name localhost;

	location / {
		# First attempt to serve request as file, then
		# as directory, then fall back to index.html
		try_files $uri $uri/ index.html;
	}

	# pass the PHP scripts to FastCGI server listening on 127.0.0.1:9000
	location ~ [^/]\.php(/|$) {
		include snippets/fastcgi-php.conf;
		
		# With php cgi alone:
		#fastcgi_pass 127.0.0.1:9000;
		
		# With php fpm:
		fastcgi_pass unix:/var/run/php/php7.0-fpm.sock;
		fastcgi_param SCRIPT_FILENAME $document_root$fastcgi_script_name;
	}

	# deny access to .htaccess files, if Apache's document root
	# concurs with nginx's one
	location ~ /\.ht {
		deny all;
	}
	
	# special folder handling, since .htaccess files are not supported
	
	# REST API
	
	location /restapi/v1 {
		rewrite ^(.+)/vtews/(.*)$ /restapi/v1/index.php/vtews/$2;
	}

    # Business Portal

    location /portal/v2 {
        rewrite ^\/portal\/v2\/(?!public)(.*)$ /portal/v2/public/$1;
    }
	
	# STORAGE
	
	location /storage {
		deny all;
		
		location /storage/uploads_emails_ {
			allow all;
		}
		
		location /storage/images_uploaded/ {
			allow all;
		}
		
		location ~* /storage/logo/.+\.(jpg|jpeg|png|gif)$ {
			allow all;
		}
		
		rewrite ^/storage/(.*)$ /getStorage.php?file=$1;
	}
	
	# PROTECTED FOLDERS
	
	location /logs {
		deny all;
	}
	
	location /plugins/dataimporter {
		deny all;
	}
	
	location /cache/sys {
		deny all;
	}
	
	location /cache/pdfmaker {
		deny all;
	}
	
	location /cache/import {
		deny all;
	}
	
	location /cache/session {
		deny all;
	}
	
	location /cache/pdf {
		deny all;
	}
	
	location /dataimport {
		deny all;
	}
	
	location /modules/VteSync/VteSyncLib/storage {
		deny all;
	}
	
	location /modules/Messages/src/attachment_tnef/plugins/attachment_tnef/class/ {
		deny all;
	}
	
	# SMARTOPTIMIZER
	
	# disabled by default, enable it if needed
	#location ~* \.(gif|jpe?g|png|swf|css|js|html?|xml|txt|ico)$ {
	#	rewrite ^(.*)$ /smartoptimizer/?$1;
	#}
}

```

**Web Service Methods:**

<div id="bkmrk-name-description-par"><table border="1" cellpadding="5" cellspacing="0" style="width: 100%;" width="100%"><colgroup> <col width="138"></col> <col width="162"></col> <col width="143"></col> <col width="201"></col> </colgroup><tbody><tr><td style="width: 24.1975%;" width="138">**Name**</td><td style="width: 22.4691%;" valign="top" width="162">**Description**</td><td style="width: 22.0988%;" valign="top" width="143">**Parameters**</td><td style="width: 31.1111%;" valign="top" width="201">**Response**</td></tr><tr><td bgcolor="#e0efd4" rowspan="2" style="background: #e0efd4; width: 24.1975%;" width="138">**create**</td><td bgcolor="#e0efd4" style="background: #e0efd4; width: 22.4691%;" valign="top" width="162">Create a record of the specified module</td><td bgcolor="#e0efd4" style="background: #e0efd4; width: 22.0988%;" valign="top" width="143">elementType (String)element (Encoded)</td><td bgcolor="#e0efd4" style="background: #e0efd4; width: 31.1111%;" valign="top" width="201">Return all fields and values of the created record</td></tr><tr><td bgcolor="#e0efd4" colspan="3" style="background: #e0efd4; width: 75.679%;" valign="top" width="522">Ex:**Url**: VTE\_URL/restapi/v1/vtews/create**Parameters**:   
{"elementType":"Accounts", "element":"{\\"accountname\\":\\"account1\\", \\"assigned\_user\_id\\":\\"19x1\\"}"}</td></tr><tr><td rowspan="2" style="width: 24.1975%;" width="138">**update**</td><td style="width: 22.4691%;" valign="top" width="162">Update the specified record</td><td style="width: 22.0988%;" valign="top" width="143">id (String)columns (Encoded)</td><td style="width: 31.1111%;" valign="top" width="201">Return all fields and values of the updated record</td></tr><tr><td colspan="3" style="width: 75.679%;" valign="top" width="522">Ex:**Url**: VTE\_URL/restapi/v1/vtews/update**Parameters**:   
{"id":"3x310", "columns":"{\\"accountname\\":\\"test fede postman\\"}"}</td></tr><tr><td bgcolor="#e0efd4" rowspan="2" style="background: #e0efd4; width: 24.1975%;" width="138">**revise**</td><td bgcolor="#e0efd4" style="background: #e0efd4; width: 22.4691%;" valign="top" width="162">Update the specified record. It’s different only for parameters, the result is the same</td><td bgcolor="#e0efd4" style="background: #e0efd4; width: 22.0988%;" valign="top" width="143">element (Encoded)</td><td bgcolor="#e0efd4" style="background: #e0efd4; width: 31.1111%;" valign="top" width="201">Return all fields and updated values</td></tr><tr><td bgcolor="#e0efd4" colspan="3" style="background: #e0efd4; width: 75.679%;" valign="top" width="522">Ex:**Url**: VTE\_URL//restapi/v1/vtews/revise**Parameters**: {"element":"{\\"id\\":\\"3x27\\",\\"employees\\":\\"5\\",\\"industry\\":\\"Banking\\"}"}</td></tr><tr><td bgcolor="#ffffff" rowspan="2" style="background: #ffffff; width: 24.1975%;" width="138">**retrieve**</td><td bgcolor="#ffffff" style="background: #ffffff; width: 22.4691%;" valign="top" width="162">Illustrate the fields of the specified record and their relative values</td><td bgcolor="#ffffff" style="background: #ffffff; width: 22.0988%;" valign="top" width="143">id (String)</td><td bgcolor="#ffffff" style="background: #ffffff; width: 31.1111%;" valign="top" width="201">Return all fields and values of the specified record</td></tr><tr><td bgcolor="#ffffff" colspan="3" style="background: #ffffff; width: 75.679%;" valign="top" width="522">Ex:**Url**: VTE\_URL/restapi/v1/vtews/retrieve**Parameters**:   
{"id":"3x310"}</td></tr><tr><td bgcolor="#e0efd4" rowspan="2" style="background: #e0efd4; width: 24.1975%;" width="138">**retrieveinventory**</td><td bgcolor="#e0efd4" style="background: #e0efd4; width: 22.4691%;" valign="top" width="162">Illustrate the fields of the specified inventory record, their relative values and the product block’s information</td><td bgcolor="#e0efd4" style="background: #e0efd4; width: 22.0988%;" valign="top" width="143">id (String)</td><td bgcolor="#e0efd4" style="background: #e0efd4; width: 31.1111%;" valign="top" width="201">Return all fields and values of the specified record and product’s block information</td></tr><tr><td bgcolor="#e0efd4" colspan="3" style="background: #e0efd4; width: 75.679%;" valign="top" width="522">Ex:**Url**: VTE\_URL//restapi/v1/vtews/retrieveinventory**Parameters**: {"id":"16x104"}</td></tr><tr><td bgcolor="#ffffff" rowspan="2" style="background: #ffffff; width: 24.1975%;" width="138">**delete**</td><td bgcolor="#ffffff" style="background: #ffffff; width: 22.4691%;" valign="top" width="162">Delete the specified record</td><td bgcolor="#ffffff" style="background: #ffffff; width: 22.0988%;" valign="top" width="143">id (String)</td><td bgcolor="#ffffff" style="background: #ffffff; width: 31.1111%;" valign="top" width="201">Return the request status (successful or not)</td></tr><tr><td bgcolor="#ffffff" colspan="3" style="background: #ffffff; width: 75.679%;" valign="top" width="522">Ex:**Url**: VTE\_URL//restapi/v1/vtews/delete**Parameters**:   
{"id":"3x306"}</td></tr><tr><td bgcolor="#e0efd4" rowspan="2" style="background: #e0efd4; width: 24.1975%;" width="138">**query**</td><td bgcolor="#e0efd4" style="background: #e0efd4; width: 22.4691%;" valign="top" width="162">Execute a query and return the result’s rows</td><td bgcolor="#e0efd4" style="background: #e0efd4; width: 22.0988%;" valign="top" width="143">query (String)</td><td bgcolor="#e0efd4" style="background: #e0efd4; width: 31.1111%;" valign="top" width="201">Return all rows of the executed query</td></tr><tr><td bgcolor="#e0efd4" colspan="3" style="background: #e0efd4; width: 75.679%;" valign="top" width="522">Ex:**Url**: VTE\_URL//restapi/v1/vtews/query**Parameters**: {"query":"SELECT \* FROM Accounts WHERE accountname like '%vte%';"}</td></tr><tr><td bgcolor="#ffffff" rowspan="2" style="background: #ffffff; width: 24.1975%;" width="138">**listtypes**</td><td bgcolor="#ffffff" style="background: #ffffff; width: 22.4691%;" valign="top" width="162">Describe each one module which contains uitype of the specified format</td><td bgcolor="#ffffff" style="background: #ffffff; width: 22.0988%;" valign="top" width="143">fieldTypeList (Encoded)</td><td bgcolor="#ffffff" style="background: #ffffff; width: 31.1111%;" valign="top" width="201">Return module information of the specified fieldtypes</td></tr><tr><td bgcolor="#ffffff" colspan="3" style="background: #ffffff; width: 75.679%;" valign="top" width="522">Ex:**Url**: VTE\_URL//restapi/v1/vtews/listtypes**Parameters**:{"fieldTypeList":"\[\\"integer\\",\\"file\\"\]"}</td></tr><tr><td bgcolor="#e0efd4" rowspan="2" style="background: #e0efd4; width: 24.1975%;" width="138">**describe**</td><td bgcolor="#e0efd4" style="background: #e0efd4; width: 22.4691%;" valign="top" width="162">Describe the specified module and their relative fields</td><td bgcolor="#e0efd4" style="background: #e0efd4; width: 22.0988%;" valign="top" width="143">elementType (String)</td><td bgcolor="#e0efd4" style="background: #e0efd4; width: 31.1111%;" valign="top" width="201">Return all module information and its fields properties(no hidden fields)</td></tr><tr><td bgcolor="#e0efd4" colspan="3" style="background: #e0efd4; width: 75.679%;" valign="top" width="522">Ex:**Url**: VTE\_URL//restapi/v1/vtews/describe**Parameters**: {"elementType":"Accounts"}</td></tr><tr><td bgcolor="#ffffff" rowspan="2" style="background: #ffffff; width: 24.1975%;" width="138">**describeall**</td><td bgcolor="#ffffff" style="background: #ffffff; width: 22.4691%;" valign="top" width="162">The describeall method is different from describe one because it shows hidden fields too</td><td bgcolor="#ffffff" style="background: #ffffff; width: 22.0988%;" valign="top" width="143">ElementType (Encoded)</td><td bgcolor="#ffffff" style="background: #ffffff; width: 31.1111%;" valign="top" width="201">Return all module information and its fields properties(hidden fields too)</td></tr><tr><td bgcolor="#ffffff" colspan="3" style="background: #ffffff; width: 75.679%;" valign="top" width="522">Ex:**Url**: VTE\_URL//restapi/v1/vtews/describeall**Parameters**: {"elementType":"Accounts"}</td></tr><tr><td bgcolor="#e0efd4" rowspan="2" style="background: #e0efd4; width: 24.1975%;" width="138">**getlabels**</td><td bgcolor="#e0efd4" style="background: #e0efd4; width: 22.4691%;" valign="top" width="162">Return all labels and translated ones of the specified module,language</td><td bgcolor="#e0efd4" style="background: #e0efd4; width: 22.0988%;" valign="top" width="143">username (String)language (String)module (String)</td><td bgcolor="#e0efd4" style="background: #e0efd4; width: 31.1111%;" valign="top" width="201">Return labels and translated ones of the specified module, language</td></tr><tr><td bgcolor="#e0efd4" colspan="3" style="background: #e0efd4; width: 75.679%;" valign="top" width="522">Ex:**Url**: VTE\_URL//restapi/v1/vtews/getlabels**Parameters**: {"username":"admin", "language":"it\_it", "module":"Accounts"}</td></tr><tr><td bgcolor="#ffffff" style="background: #ffffff; width: 24.1975%;" width="138">**getlangs**</td><td bgcolor="#ffffff" style="background: #ffffff; width: 22.4691%;" valign="top" width="162">Return all languages installed into the CRM</td><td bgcolor="#ffffff" style="background: #ffffff; width: 22.0988%;" valign="top" width="143"> </td><td bgcolor="#ffffff" style="background: #ffffff; width: 31.1111%;" valign="top" width="201">Return all CRM languages</td></tr><tr><td bgcolor="#e0efd4" rowspan="2" style="background: #e0efd4; width: 24.1975%;" width="138">**loginpwd**</td><td bgcolor="#e0efd4" style="background: #e0efd4; width: 22.4691%;" valign="top" width="162">Return user webservice access key if username and password are valid</td><td bgcolor="#e0efd4" style="background: #e0efd4; width: 22.0988%;" valign="top" width="143">username (String)password (String)</td><td bgcolor="#e0efd4" style="background: #e0efd4; width: 31.1111%;" valign="top" width="201">Return user webservice access key</td></tr><tr><td bgcolor="#e0efd4" colspan="3" style="background: #e0efd4; width: 75.679%;" valign="top" width="522">  
Ex:**Url**: VTE\_URL//restapi/v1/vtews/loginpwd**Parameters**: {"username":"admin","password":"123456789"}</td></tr><tr><td bgcolor="#ffffff" style="background: #ffffff; width: 24.1975%;" width="138">**getmenulist**</td><td bgcolor="#ffffff" style="background: #ffffff; width: 22.4691%;" valign="top" width="162">Return all modules information (visibility, tabid, name, sequence, ...)</td><td bgcolor="#ffffff" style="background: #ffffff; width: 22.0988%;" valign="top" width="143"> </td><td bgcolor="#ffffff" style="background: #ffffff; width: 31.1111%;" valign="top" width="201">Return modules information and properties</td></tr><tr><td bgcolor="#e0efd4" rowspan="2" style="background: #e0efd4; width: 24.1975%;" width="138">**oldoquery**</td><td bgcolor="#e0efd4" style="background: #e0efd4; width: 22.4691%;" valign="top" width="162">Return records that contain the searched value into specified module’s fields</td><td bgcolor="#e0efd4" style="background: #e0efd4; width: 22.0988%;" valign="top" width="143">module (String)search\_fields (Encoded)search\_value (String)</td><td bgcolor="#e0efd4" style="background: #e0efd4; width: 31.1111%;" valign="top" width="201">Return some record basic information where searched value is contained into the specified module’s fields</td></tr><tr><td bgcolor="#e0efd4" colspan="3" style="background: #e0efd4; width: 75.679%;" valign="top" width="522">Ex:**Url**: VTE\_URL//restapi/v1/vtews/oldoquery**Parameters**: {"module":"Accounts", "search\_fields":"\[\\"accountname\\", \\"website\\"\]", "search\_value":"vtenext"}</td></tr></tbody></table>

</div>  
Is possibile to register a new custom method with this SDK call:

**SDK::setRestOperation($rest\_name, $handler\_path, $function\_name, $parameters);**

*$rest\_name: method name called by REST webservice*  
*$handler\_path: file path where the funtion is defined*  
*$function\_name: defined function name*  
*$parameters: associative array with parameterName and parameterType*

Example

```PHP
SDK::setRestOperation('check_exists','modules/SDK/examples/RestApi/CustomRestApi.php','vtws_check_exists', array('id'=>'string'));

```

# 18.11 Single Sign-On

Single **Sign-On (SSO)** is an authentication mechanism that allows users to access multiple applications or services with a single set of login credentials (e.g., one username and password). Instead of authenticating separately for each service, the user logs in once and can then seamlessly access all applications that are part of the same ecosystem or trusted domain. This functionality is available starting from vtenext 24.08.2

By navigating to **Settings &gt; Single Sign-On Configuration**, you can view a series of preconfigured external providers (currently, no new providers can be added via the interface). These providers allow access to vtenext through the authentication configured for each of them.

[![image.png](https://usermanual.vtenext.com/uploads/images/gallery/2024-12/scaled-1680-/Hrgimage.png)](https://usermanual.vtenext.com/uploads/images/gallery/2024-12/Hrgimage.png)

*Single Sign-On Configuration Screen*

**vtenext provides the following Single Sign-On (SSO) providers:**

<table class="table table-hover" id="bkmrk-ldap-configura-il-se" style="width: 100%;" width="100%"><tbody><tr><td style="width: 26.9368%;">**LDAP**</td><td style="width: 73.0632%;">Configure the server to access via LDAP (LDAP configuration has been moved here)

[![image.png](https://usermanual.vtenext.com/uploads/images/gallery/2024-12/scaled-1680-/7MWimage.png)
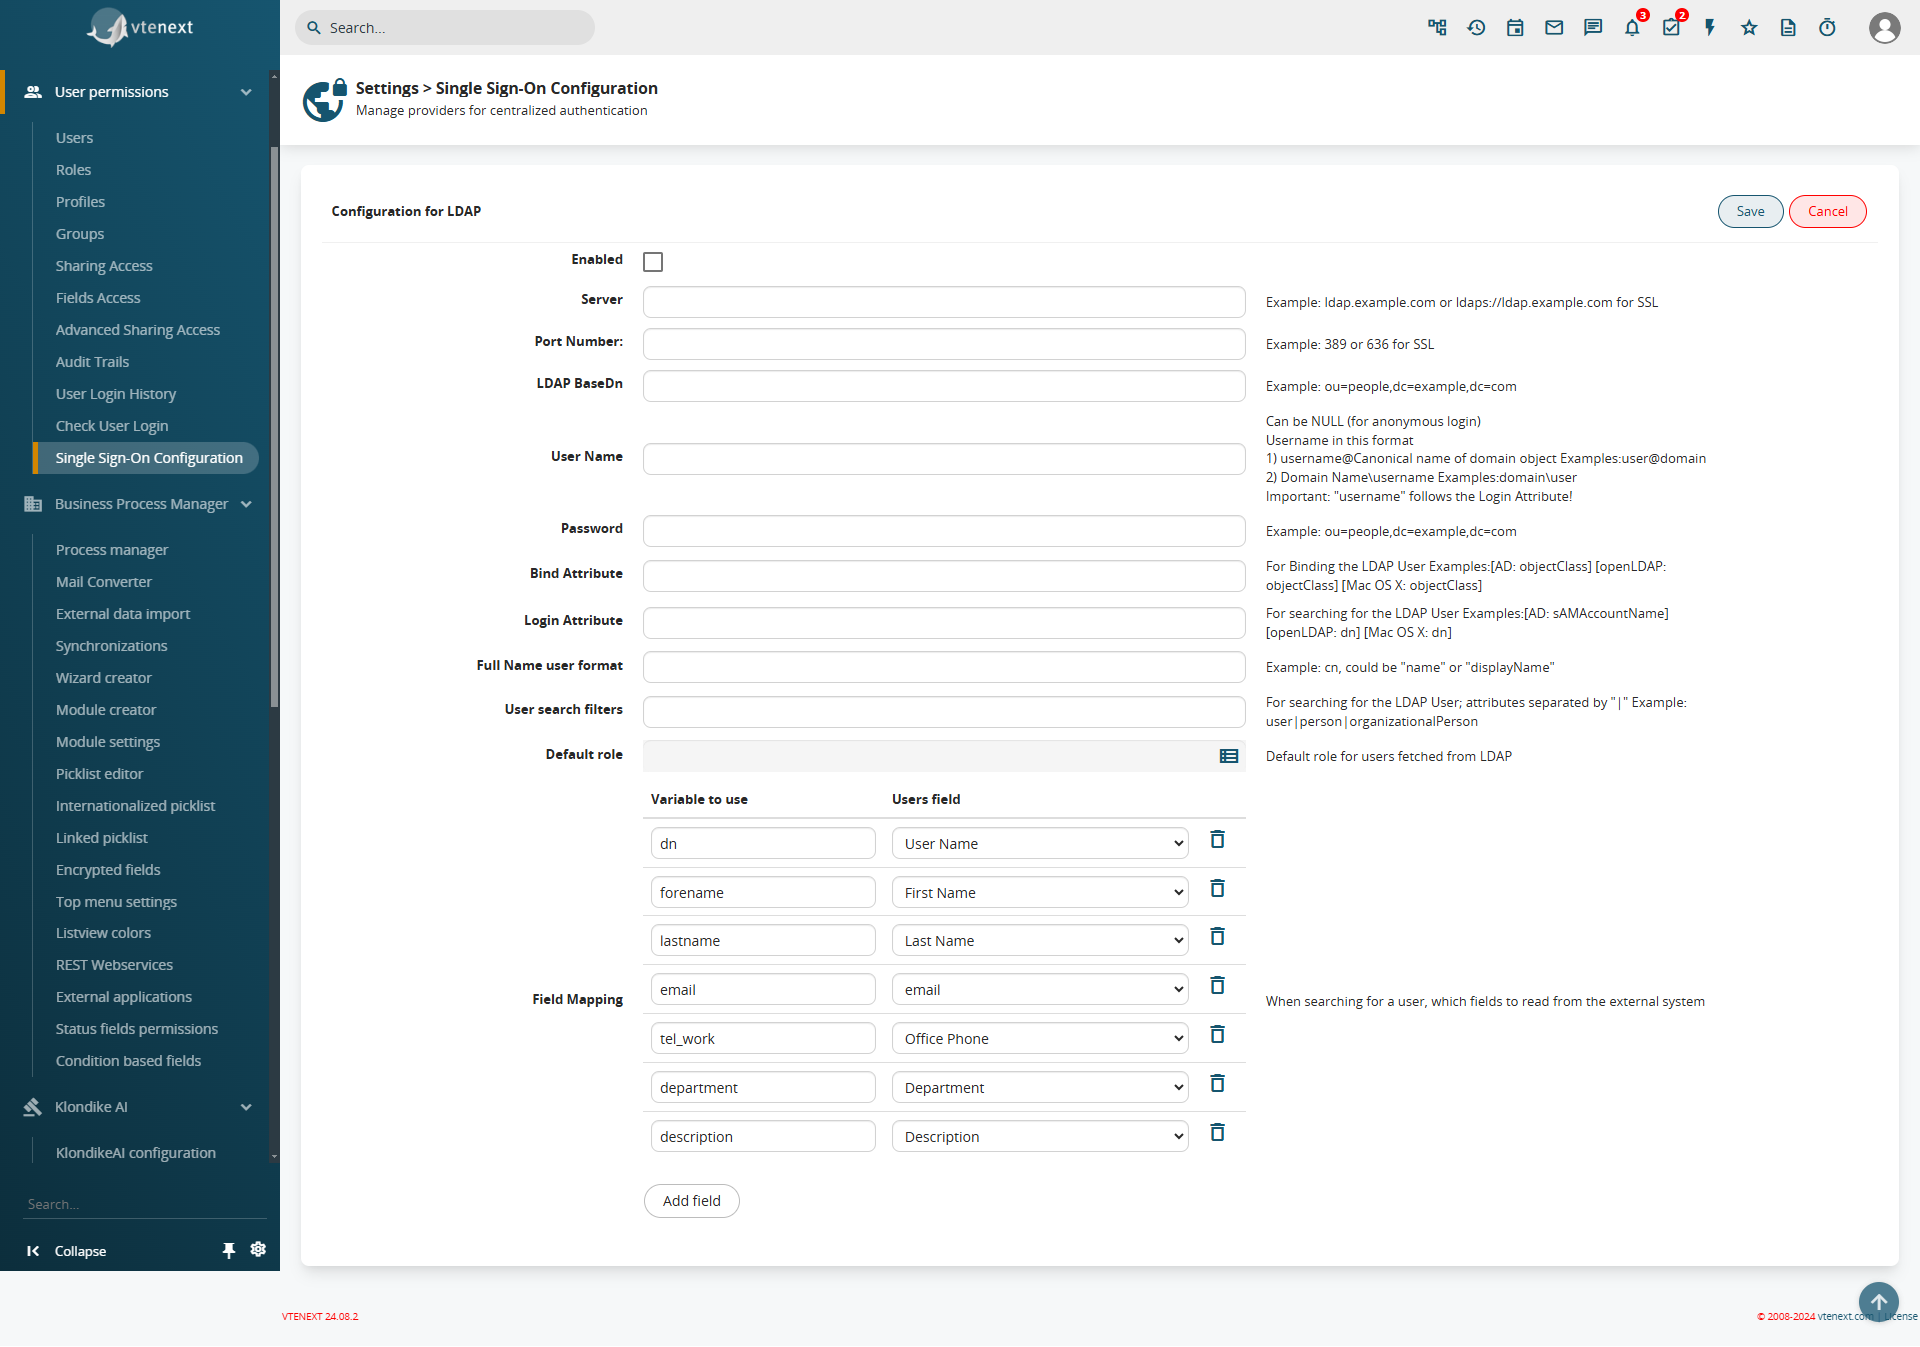
](https://usermanual.vtenext.com/uploads/images/gallery/2024-12/7MWimage.png)

</td></tr><tr><td style="width: 26.9368%;">**OAuth 2.0**</td><td style="width: 73.0632%;">Login via OAuth 2.0

[![image.png](https://usermanual.vtenext.com/uploads/images/gallery/2024-12/scaled-1680-/6gNimage.png)
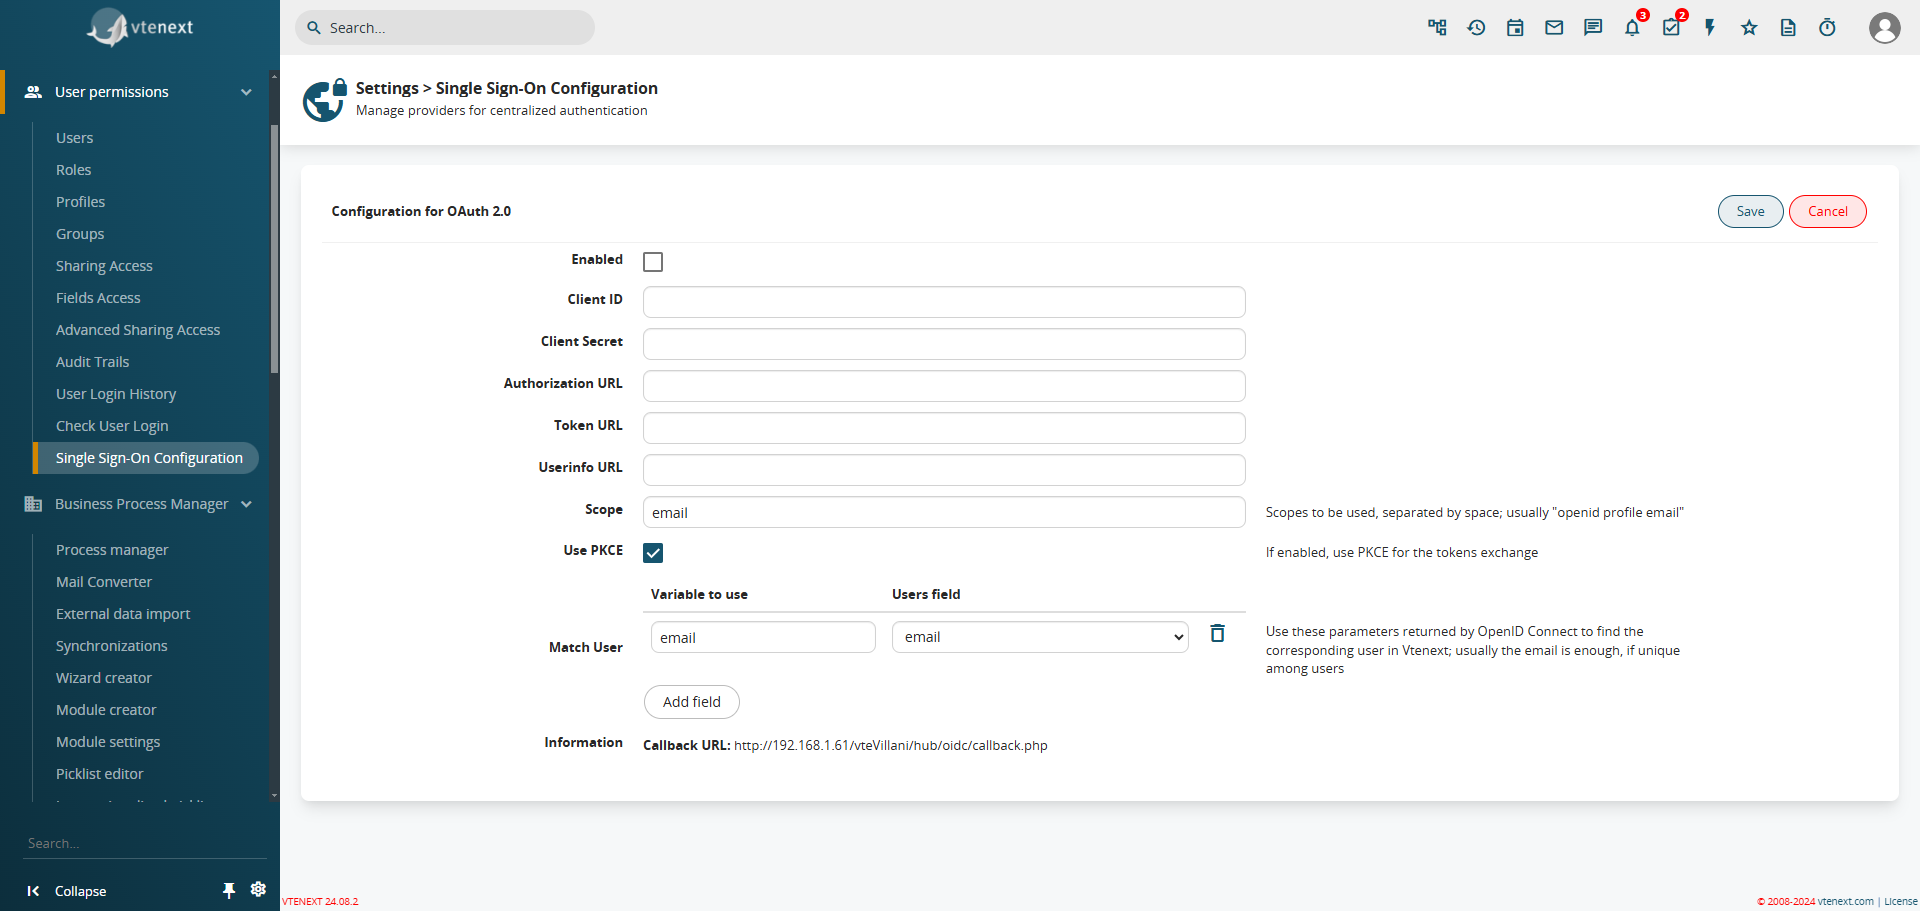
](https://usermanual.vtenext.com/uploads/images/gallery/2024-12/6gNimage.png)

</td></tr><tr><td style="width: 26.9368%;">**OpenID Connect**</td><td style="width: 73.0632%;">Login via OpenID Connect

[![image.png](https://usermanual.vtenext.com/uploads/images/gallery/2024-12/scaled-1680-/CBcimage.png)
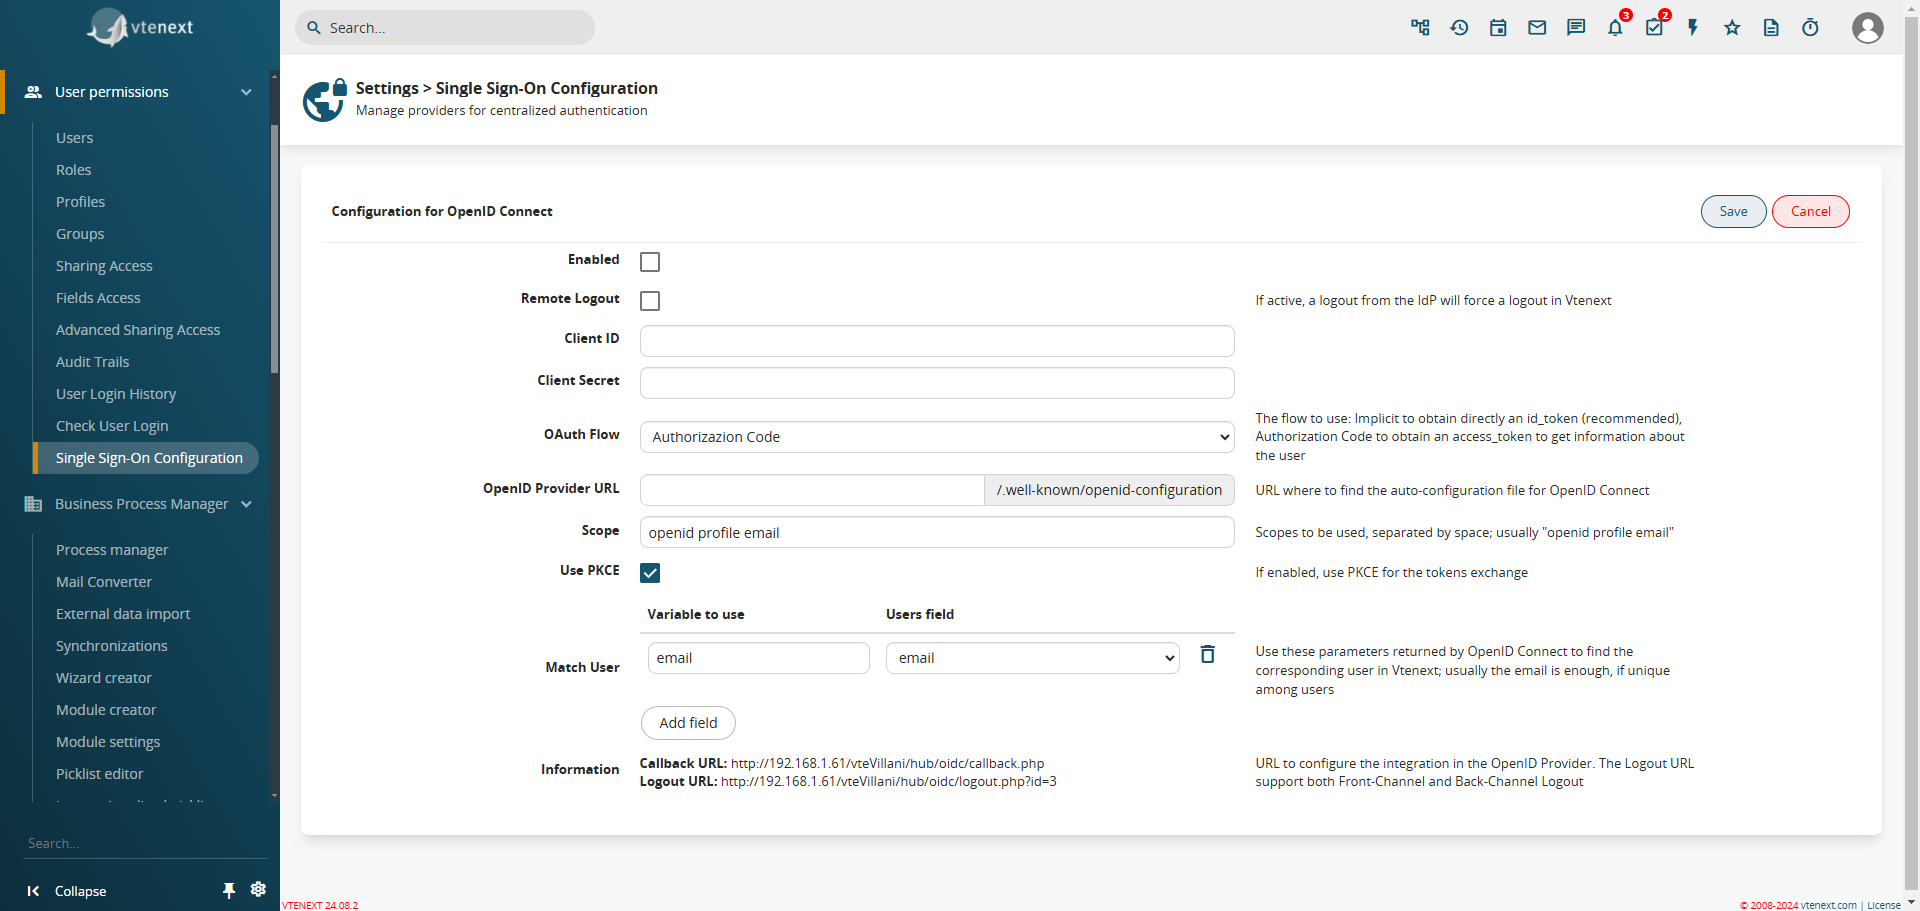
](https://usermanual.vtenext.com/uploads/images/gallery/2024-12/CBcimage.png)

</td></tr><tr><td style="width: 26.9368%;">**SAML**</td><td style="width: 73.0632%;">Login via SAML 2.0 Protocol</td></tr><tr><td style="width: 26.9368%;">**Microsoft Azure - OIDC**</td><td style="width: 73.0632%;">Login via an Azure App with OpenID Connect

[![image.png](https://usermanual.vtenext.com/uploads/images/gallery/2024-12/scaled-1680-/3Sfimage.png)
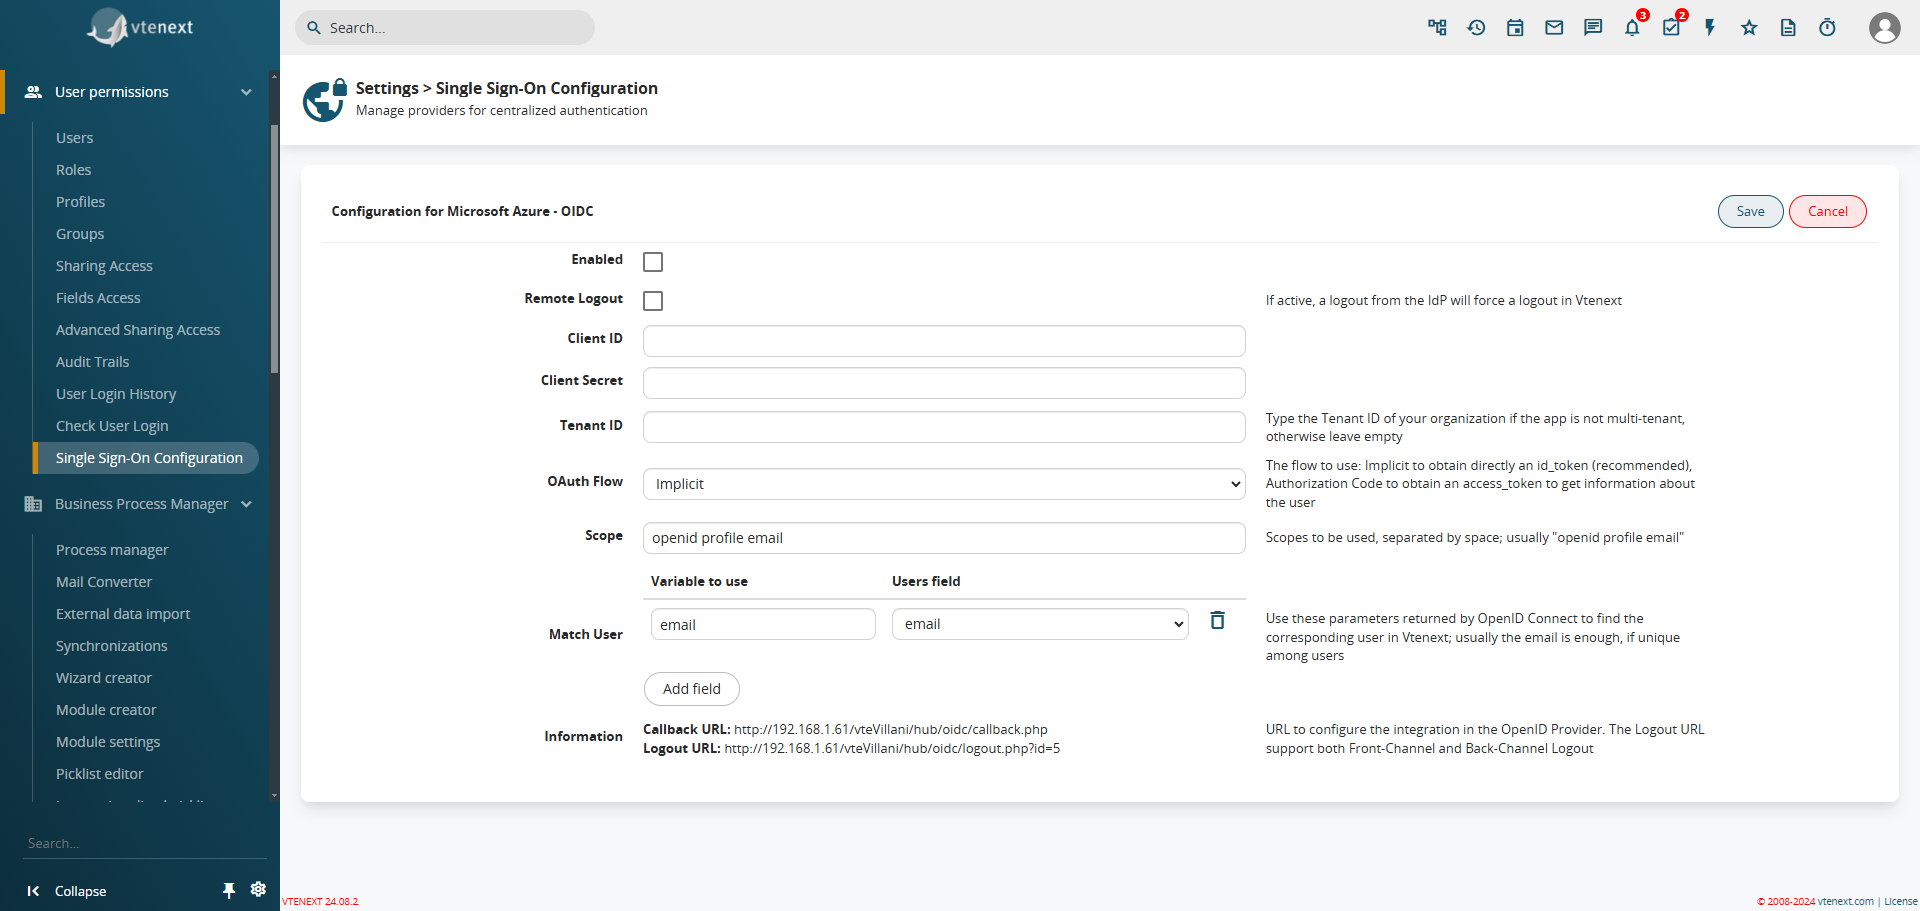
](https://usermanual.vtenext.com/uploads/images/gallery/2024-12/3Sfimage.png)

For information on how to create the app in Azure, please refer to the **[specific guide](https://usermanual.vtenext.com/books/creation-of-external-apps/page/oidc-openid-connect)**

</td></tr><tr><td style="width: 26.9368%;">**Microsoft Azure - SAML**</td><td style="width: 73.0632%;">Login via an Azure App with SAML

For information on how to create the app in Azure, please refer to the **[specific guide](https://usermanual.vtenext.com/books/creation-of-external-apps/page/saml)**

</td></tr><tr><td style="width: 26.9368%;">**Google - OIDC**</td><td style="width: 73.0632%;">Login via Google with OpenID Connect

[![image.png](https://usermanual.vtenext.com/uploads/images/gallery/2024-12/scaled-1680-/bYFimage.png)
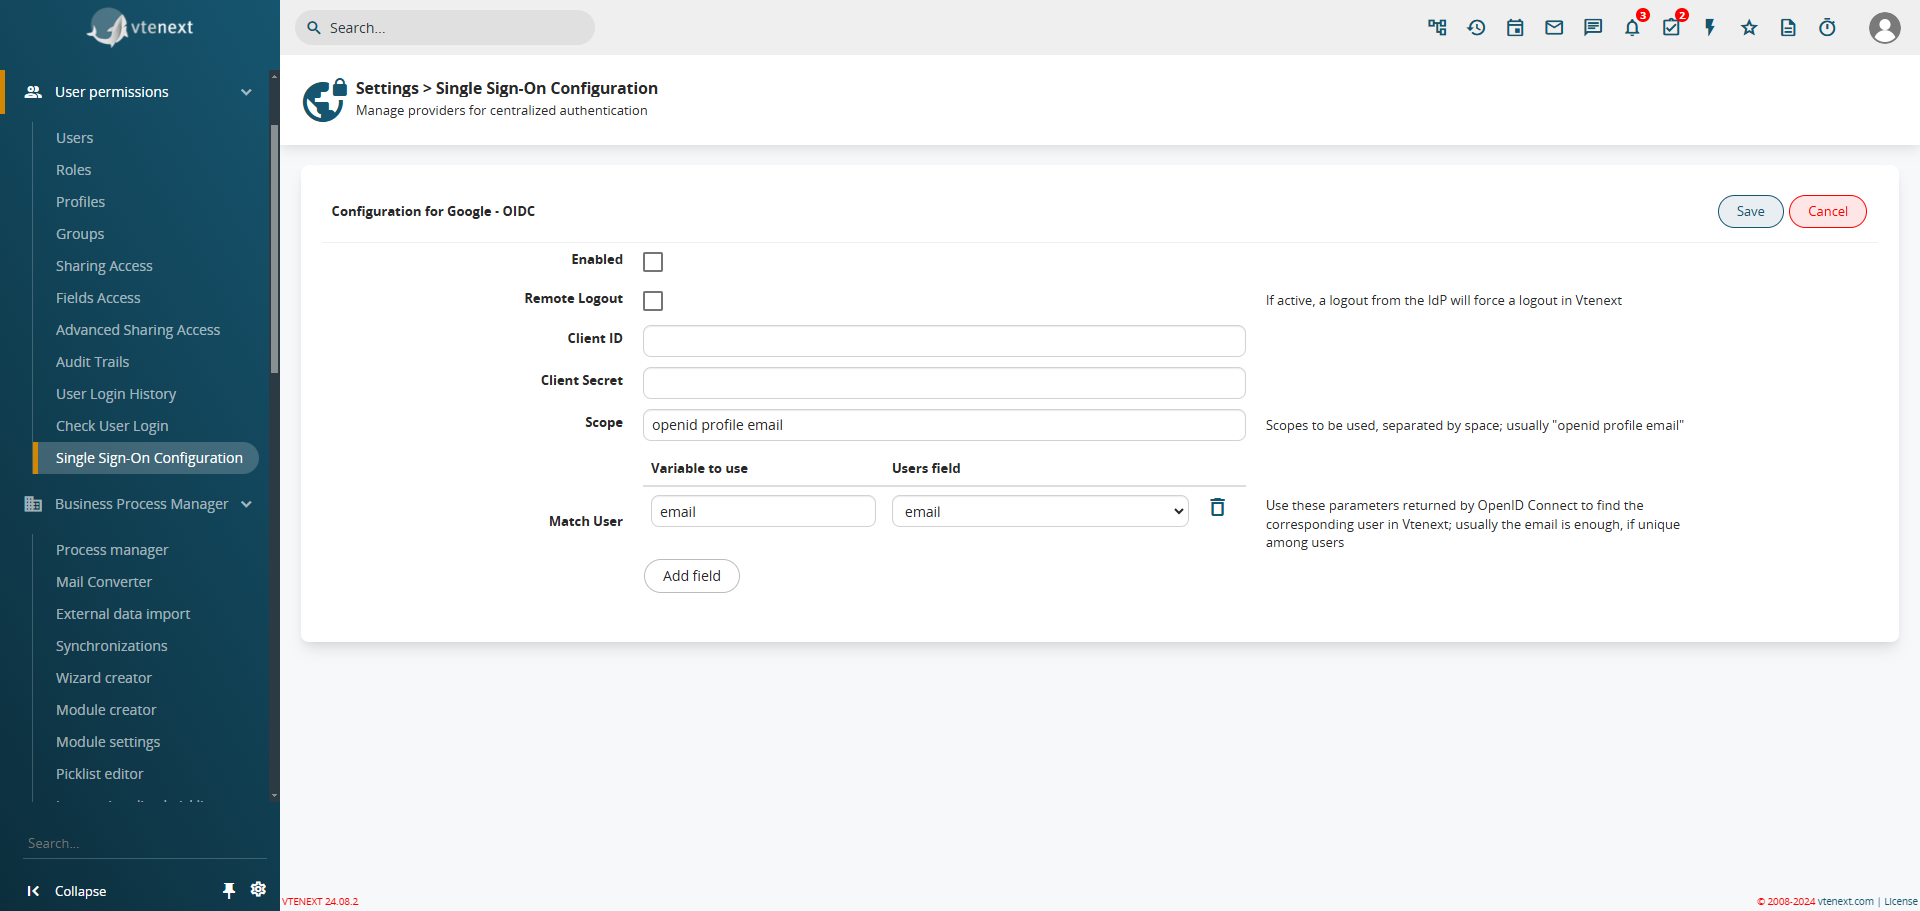
](https://usermanual.vtenext.com/uploads/images/gallery/2024-12/bYFimage.png)

</td></tr></tbody></table>

For all users, except the ADMIN user (this does not refer to users created after the admin and set as administrators, but only the superuser), it will be possible to select which type of authentication to use. In the dropdown list, only the configured and active authentications can be selected:

*User preferences with the option to choose the Single Sign-On.*

**How the Login Screen Changes**

[![image.png](https://usermanual.vtenext.com/uploads/images/gallery/2024-12/scaled-1680-/kxhimage.png)](https://usermanual.vtenext.com/uploads/images/gallery/2024-12/kxhimage.png)

We can notice that the login screen no longer includes the password field, as it will call the external authentication system that was previously configured (e.g., Google or Facebook). Once the login is completed in the external system, the user will return to vtenext already authenticated, or the password field will be activated to manually enter the password and log in.

[![image.png](https://usermanual.vtenext.com/uploads/images/gallery/2024-12/scaled-1680-/LsEimage.png)](https://usermanual.vtenext.com/uploads/images/gallery/2024-12/LsEimage.png)

**Single Sign-On also on Wilson**

Naturally, as soon as Single Sign-On is activated for a user, it also reflects on Wilson. The password field, in this case, is always disabled, and the system will always redirect to the chosen app for authentication, then return authenticated to Wilson.

[![image.png](https://usermanual.vtenext.com/uploads/images/gallery/2024-12/scaled-1680-/CPTimage.png)](https://usermanual.vtenext.com/uploads/images/gallery/2024-12/CPTimage.png)