| [](https://usermanual.vtenext.com/uploads/images/gallery/2019-10-Oct/notifica_messaggio_vtenext.png) | [](https://usermanual.vtenext.com/uploads/images/gallery/2019-10-Oct/notifica_conversazione_vtenext.png) |
|  | 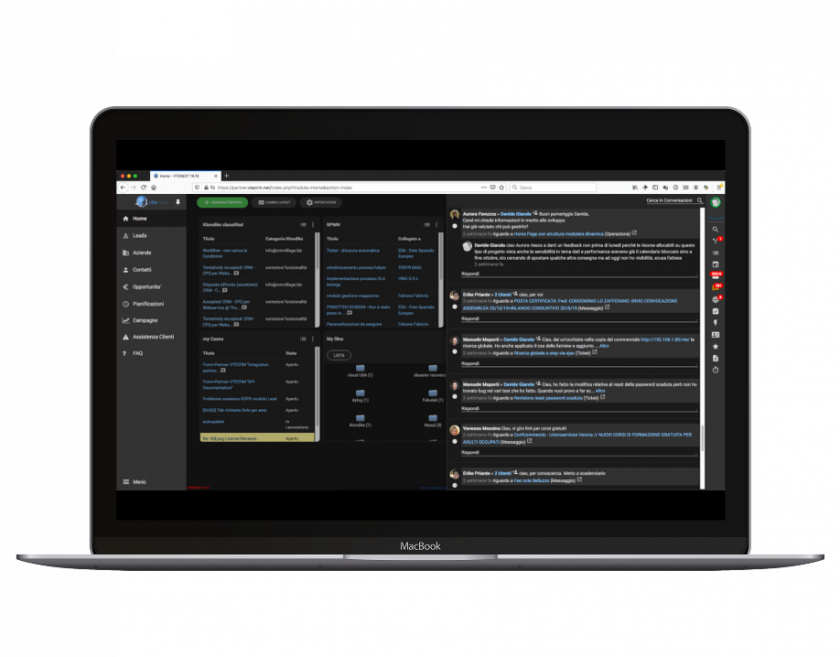 |
| **News and Manual** | The latest vtenext updates box and a link to the Online Manual |
| [](https://usermanual.vtenext.com/uploads/images/gallery/2021-09-Sep/2_3_Navigation-methods-menus_3.png) | The dark blue navigation bar provides access to all vtenext active modules. Depending on the theme chosen in “my preferences”, the layout of menus and colours may differ, with the related functions. A module is a container of files of a specific category and hence the set of CRM information subdivided by type. Not all the available modules are immediately displayed on the dark blue toolbar, but they are listed under the specific Modules heading. The admin user can choose the order of menu items from the menu settings. --- In the case of admin, on the bottom of the left bar , will be available a cogwheel to enter into the system settings. [](https://usermanual.vtenext.com/uploads/images/gallery/2021-09-Sep/2_3-Navigation-methods-menus_2.png) |
| [](https://usermanual.vtenext.com/uploads/images/gallery/2021-09-Sep/2_3_Navigation-methods-menus_4_.PNG) Within the bar on the top of screen horizontally there are a series of fixed icons dedicated to commonly used functions, that are notifications of the main modules, like, Messages, Talks, Processes etc. [](https://usermanual.vtenext.com/uploads/images/gallery/2021-11-Nov/2_3-Navigation-methods-menus_5_2.png) The icon/thumbnail of the user, providing access to preferences and to the logout procedure, is displayed at the top right. | |
|  | **Processes:** clicking on this icon gives access to the detailed view of all processes implemented in the CRM. |
|  | **Last viewed:** by clicking on this icon you can visualize the user’s lists consulted recently. |
|  | **Calendar:** Access to a simplified mini-calendar which allows, at a glance, to visualize all (open and closed) the pre-set commitments in the chosen month. Laterally it is reported the list of all the upcoming events. |
|  | **Messages:** Direct access to the Messages module and to the composition of a new email. The icon will show, in case of new emails, a number in the upper right corresponding to the number of not read messages. |
|  | **Talks:** Solution for the handling of information exchanges among the users. Every talk can be published to one or more users. Furthermore it can be related to every other elements of the CRM. |
|  | **Notifications:** Functionality with the purpose of updating users on issues and data of their interest. The system allows to mark as read or not read the notification, even in massive form. The notifications of invitations or activities allow to accept or not them without positioning on the related reference. |
|  | **Tasks:** Direct access to the expiring tasks with the possibilities to create new ones. |
|  | **Quick Creation:** it allows, in any point, to create a new entity (Account, Contact, Event, Lead, Vendor, Task, Document, Ticket and Potential). By clicking on this entity, a new browser tab containing the creation mask will open. |
|  | **Favorites:** Quick access to the customers lists through the icon favorites (star). Each user can define his/her own list and modify it constantly. If you want a customer record to appear among the Favorites, it is necessary to turn on the star with a click on the mouse from the detail view. If you don’t want a customer record to appear among the Favorites, turn off the star with a click on the mouse from the detail view. |
|  | **Notes:** A panel in which there are summarized all the notes created by the user opens. There is also the possibility to compose new ones and to convert every note in other CRM objects. |
|  | **Tracking:** accesses the screen that displays the trackings in progress and paused. |
| **Delete** | Deletes one or more records by ticking the box at the beginning of the line. |
| **Mass Edit** | To modify the data of one or more selected records. |
| **Email** | To send emails in a massive way. |
| **Fax** | To send fax in a massive way. |
| **SMS** | To send SMS in a massive way. |
| **Select all/deselect all** | To select/deselect all the records in the filter (in all the pages, not only the displayed ones). |
| **Filter** | To define the active view on modules (see Filter chapter). |
| **Assigned to** | To quickly filter records according to the assigned user. |
|  | - Edit |
|  | - Tracking |
|  | - Add Event |
|  | - New Task |
|  | - Link new email |
|  | - Favourite |
|  | - Notify me of changes |
|  | - Link |
|  | - Other |
| **Set as Default** | If you want to apply the filter automatically every time you open the module |
| **Set as public** | Option to make the filter public. It must be previously agreed by an admin user in order to be displayed and used by all the other users. Note: remember that the filters, even if they are not public, are visible according the users roles (ex: the sales manager can see all the filters created by area manager/sellers |
| **Set for Mobile App** | Select this option if you want to make that filter available on the Wilson Mobile App as well |
| **Select Column** | Select a Date type field to make a time selection. |
| **Select duration** | It allows to set a customized or pre-estabilished time frame related to the field you’ve chosen in “Select" |
| **Starting/ Ending date** | They are automatically set through the option “Select duration”, except for the personalized option |
| **Order initially for** | It allows organize the data in ascending or discending order. |
| **Label** | This is used to give a name to the column header (e.g., "Financial Sector") |
| **Condition** | This step determines which records will be displayed in that column based on a condition (e.g., the "Sector" field is EQUAL to "Financial") |
| **Enable drag here** | This option enables the "drag here" functionality, allowing records to be moved into that specific Kanban column |
| **Action** | This option allows the configuration following the "drag here" action, meaning that when a record is moved into that column, the value of the dropdown field (in our example, the "sector" field) will change from one value (X) to the value selected for the column (in this case, Financial |
| **Asterisk plugin** | If vtenext is integrated with an Asterisk switchboard, indicate here your own internal telephone (es: SIP/111). |
| **Receive Incoming Calls** | Tick this option to enable incoming calls recognition. |
| **Static** | the access key remains unchanged forever |
| **Automatically update on password change** | the access key is recalculated every time you change the password |
| **Disabled** | the access key does not allow any web service access |
| [](https://usermanual.vtenext.com/uploads/images/gallery/2021-11-Nov/Accounts---Customers-records-and-basic-data-management.png) | [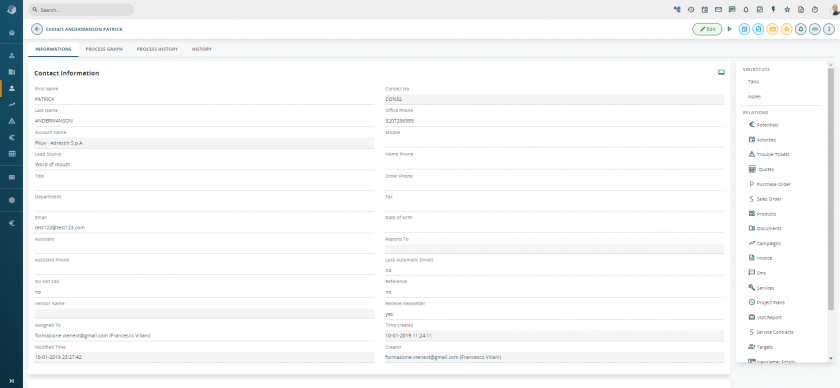](https://usermanual.vtenext.com/uploads/images/gallery/2021-11-Nov/Contacts---Customers-records-and-basic-data-management.png) |
| [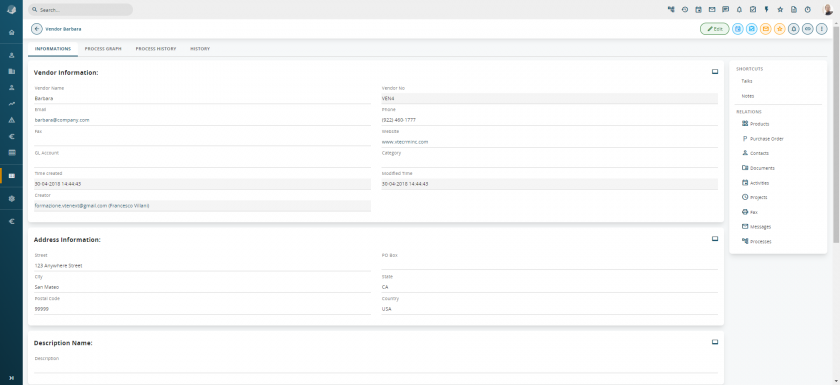](https://usermanual.vtenext.com/uploads/images/gallery/2021-11-Nov/Vendors---Customers-records-and-basic-data-management.png) | [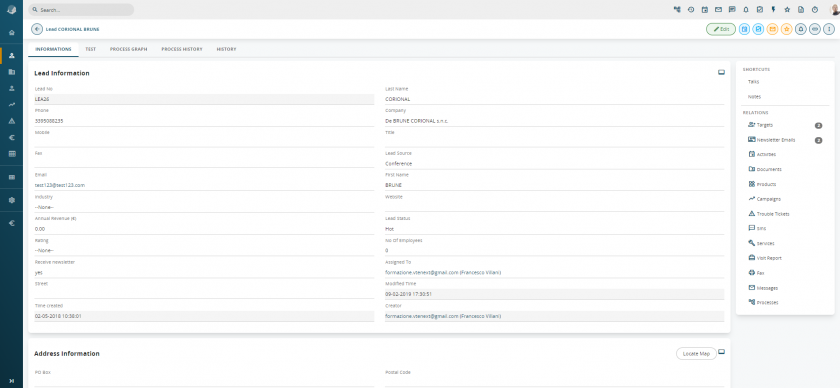](https://usermanual.vtenext.com/uploads/images/gallery/2021-11-Nov/Leads---Customers-records-and-basic-data-management.png) |
| **Name/Surname** | Name and surname of the contact person. |
| **Company** | Company name in which person is employed or that he/she represents. |
| **Title** | Role of the contact person (Proprietor, Sales Manager, CEO). |
| **Lead source** | Channel through which the lead was obtained. |
| **Assigned to** | User or group of users assigned to the lead management; the new lead is first assigned to the user who created it, but a different user can be chosen if required. |
| **Account Name** | Business name. |
| **Member of** | Manages a hierarchy between companies by interrelating the account being created with another account present in the CRM. |
| **External Code** | Indicates the customer code of the company on another system (e.g. generated by an ERP application). This field is subject to a uniqueness check. |
| **Assigned to** | User or group of users that manage the account. |
| **Lock Automatic Emails** | Allows you to not send notifications of opening and ticket management to the email linked to the company |
| **Report to** | Link to another contact, e.g. superior in the company. |
| **Do Not Call** | Tick the flag if you want the contact to not be called; this is for simple information purposes and is not linked to automatic functions or blocks. |
| **User Portal** | Enables the contact to access the vtenext Customer Portal (see dedicated chapter): when the contact is saved, the system will send an email with the credentials. |
| **Support Start and End Date** | Defines the vtenext Customer Portal access expiry date. |
| **Lock Automatic Emails** | Allows you to not send notifications of opening and ticket management to the email linked to the contact |
| **Vendor name** | Business name. |
| **GL Account** | Allows classification of vendors by macro-sectors according to the GL account code used by the departments. |
| **Ignore** | the records present in vtenext will be maintained and the csv file data will not be imported; |
| **Replace** | the records present in vtenext will be deleted and new records will be created corresponding to those of the csv file. |
| **Update** | it includes an update of the records so that if a field in the CSV file is mapped, it is taken into account for the update and modified accordingly. Therefore, if the target field in the CRM is empty, it will be filled in; if the field in the CRM already contains a value, it will be updated with the new value from the CSV file. |
| **Default Value** | priority is given to the values to be imported from the CSV. Once those fields are mapped, the system checks all the record fields and applies the default value only if: 1. the value previously present in the record is empty 2. the field has not already been populated by the CSV import 3. the default value is not empty |
| **Name** | **Surname** | **Account** | **Email** | **Creation Date** | **Relations** |
| Giorgio | Rossi | Rossi SPA | grossi@rossispa.it | 01.01.2018 | 1 calendar activity |
| Giorgio | Rossi | Rossi SPA | grossi@rossispa.it | 02.12.2018 | 1 Email |
| **Name** | **Surname** | **Account** | **Email** | **Phone** |
| Giorgio | Rossi | Rossi SPA | grossi@rossispa.it | 3331234567 |
| **Nome** | **Surname** | **Account** | **Email** | **Creation Date** | **Relations** |
| Giorgio | Rossi | Rossi SPA | grossi@rossispa.it | 01.12.2018 | 1 calendar activity |
| Giorgio | Rossi | Rossi SPA | grossi@rossispa.it | 02.12.2018 | 1 Email |
| **Name** | **Surname** | **Account** | **Email** | **Phone** | **Creation Date** | **Relations** |
| Giorgio | Rossi | Rossi SPA | grossi@rossispa.it | 3331234567 | 03.12.2018 | No |
| **Name** | **Surname** | **Account** | **Email** | **Phone** | **Creation Date** | **Relations** |
| Giorgio | Rossi | Rossi SPA | grossi@rossispa.it | 3331234567 | 03.01.2018 | 1 Email |
| **CRM field** | Proposes the standard and customised fields in the module in which you are working. |
| **Default Value** | You can define the default value to set if the cell is empty in the csv file. |
| **Name** | **Surname** | **Account Name** |
| Lynda | Carter | Accounts::::Wonder LTD |
| **Modulo Name** | **Prefix Name** | **Modulo Name** | **Prefix Name** |
| Accounts | Accounts:::: | Assets | Assets:::: |
| Calendar | Calendar:::: | Campaigns | Campaigns:::: |
| Contacts | Contacts:::: | DDT | Ddt:::: |
| Documents | Documents:::: | Employees | Employees:::: |
| FAQ | Faq:::: | Trouble tickets | HelpDesk:::: |
| Invoice | Invoice:::: | Job Orders | JobOrder:::: |
| Leads | Leads:::: | Potentials | Potentials:::: |
| Product lines | ProductLines:::: | Products | Products:::: |
| Project Milestones | ProjectMilestone:::: | Projects | ProjectPlan:::: |
| Project Tasks | ProjectTask:::: | Quotes | Quotes:::: |
| Purchase Order | PurchaseOrder:::: | ||
| Sales Order | SalesOrder:::: | Service Contracts | ServiceContracts:::: |
| Services | Services:::: | Timecards | Timecards:::: |
| Vendors | Vendors:::: | Visit Report | Visitreport:::: |
| **Export with search records** | Export only records returned in search results |
| **Export without search records** | Export all records irrespective of search results |
| **Export all data** | Export all records |
| **Export data in current page** | Export records shown in current page |
| **Export selected records** | Export only flagged records |
| **Default (1000.5496)** | With dot as the decimal separator |
| **Italian (1000,550)** | With comma as the decimal separator |
| **English (1,000.550)** | With comma as the thousands separator and dot as the decimal separator |
| **User (1000.55)** | According to user settings |
| **Activity Type** | Select Call, Meeting or other customised values |
| **Visibility** | Classify an event as Public, Private or Standard |
| **Subject** | Enter a name (title) for the event |
| **Description** | You can add a brief description of the event |
| **Status** | Status is Planned by default. Defines the state of completion of the project |
| **Priority** | Set a priority level |
| **Assigned to** | Events are assigned by default to the person who creates them, but this can be changed if necessary |
| **"Event starts at” and “Event ends on”** | Each event has a start and end; events can last one or more days |
| **All day** | Select if the event lasts all day. By default it has 24 hous and it is placed at the top, in the Task section. |
| **Subject** | Enter a name (title) for the to-do |
| **Priority** | Set a priority level |
| **Description** | Add a short description to the to-do |
| **Status** | By default the status is “not started”; the value can be changed if necessary |
| **Assigned to** | By default, the user who creates the task is the assignee, with the facility to change the user if necessary |
| **Time & Date and Due Date** | Each to-do has a start and end and it can proceed also over several days |
| **Default Calendar View** | Defines the default calendar view (daily, weekly, etc.) |
| **Date Format** | The user selects the date format |
| **Reminder Interval** | Frequency for activities reminders check by means of pop-ups |
| **Day starts at** | Defines the starting time of the working day (this will be the first time available in the calendar to fix events) |
| **Disable Sunday in week view** | Allows you to disable the display of Sunday, when the calendar is set as a "Week" view |
| **First day of week** | You can choose whether the week starts on Monday or Sunday |
| **Share calendar with** | Allows you to choose which users to share your calendar with |
| **Share calendar with (only occupation)** | Allows you to choose which users to share the calendar of the user you are configuring with, assuming that it is, for example, an object such as a company car or a meeting room |
| **Show calendar users** | Allows you to activate the calendar display of all those users who, in the "Share Calendar with" option, have decided to select our user (or the current user for whom the configuration is being made) |
| **Holiday Countries** | Makes it possible to display national holidays on the calendar for the selected Country (European countries) |
| **Event assigned to** | **Event visibility** | **What assignee sees/does** | **User** |
| MANAGER (higher) | Standard | Read Only | AGENTS (inferior) |
| Private | Only resource commitment | ||
| Public | Read/Edit/Delete |
| **Event assigned to** | **Event visibility** | **What assignee sees/does** | **User** |
| AGENT 1 (same role) | Standard | Read Only | AGENT 2 (equal role) |
| Private | Only resource commitment | ||
| Public | Read/Edit/Delete |
| **Event assigned to** | **Event visibility** | **What assignee sees/does** | **User** |
| AGENT 1 (lower) | Standard | Read Only | MANAGER (superior) |
| Private | Only resource commitment | ||
| Public | Read/Edit/Delete |
| **Event assignee** | **Event visibility** | **What assignee sees/does** | **User** |
| MANAGER (higher) | Standard | Read Only | AGENTS (inferior) |
| Private | Only resource commitment | ||
| Public | Read/Edit/Delete |
| **Event assignee** | **Event visibility** | **What assignee sees/does** | **User** |
| AGENT 1 (same role) | Standard | Read Only | AGENT 2 (equal role) |
| Private | Only resource commitment | ||
| Public | Read/Edit/Delete |
| **Event assignee** | **Event visibility** | **What assignee sees/does** | **User** |
| AGENT 1 (lower) | Standard | Read Only | MANAGER (superior) |
| Private | Only resource commitment | ||
| Public | Read/Edit/Delete |
| **Event visibility** | **Users see the event** | **Users see the content** | **Users edit/delete** |
| Public | yes | yes | yes |
| Standard | yes | yes | according to position hierarchy |
| Private | yes | no | no |
| **Enable Book me** | enable/disable the calendar booking function when compiling a new email. This function enables a flag in the email composer and makes it possible to use / not use this function with the recipients of the email in question |
| **Events selection mode** | defines event selection mode: semiautomatic, automatic, or manual (as illustrated below) |
| **Event duration** | allows you to set the duration of the event |
| **Minimum time between events** | defines the minimum time that must exist between one event and another (only in automatic mode) |
| **Email compilation default** | determines if the Book me flag in the email compose popup is enabled by default. This involves the automatic insertion of the Book me link in the signature |
| **Book me url** | it allows you to easily copy and paste the direct link to your calendar and share it |
| **Account** | choose the server type from among the ones on the list; if your mail server type is not included choose CUSTOM. Warning! If you use Gmail may not be possible to send email from addresses other than the one shown in this page. |
| **Server Name** | mail server address for SMTP access |
| **Port** | indicate the port; the system proposes the default port |
| **User Name** | indicate the account to log on to the mail server; usually the same as the complete email address. **Warning:** for a proper configuration, the username ( mail address), must match with the mail address of the admin user. For this reason it should be modified ( eventually just for the initial configuration) , the email address with the one set in the admin Preference. |
| **Password** | access password associated with the account |
| **Requires Authentication** | Yes/No **Warning:** if you are configuring an email server with Office 365, you need to enable the SMTP Authentication option for the specific user on the Office 365 server side before proceeding with the configuration on vtenext. More informations, can be found here: [https://learn.microsoft.com/en-us/exchange/clients-and-mobile-in-exchange-online/authenticated-client-smtp-submission](https://learn.microsoft.com/en-us/exchange/clients-and-mobile-in-exchange-online/authenticated-client-smtp-submission) |
| **Account** | Select the account type from the options provided or choose Custom |
| **Username** | Email address of the mail server for access via IMAP |
| **Authentication Method** | You can choose whether the authentication is done via Password or OAuth2 |
| **Email** | To enter the email address (optional, and it auto-fills upon saving by copying the Username if left blank) |
| **Password** | If the Password option is selected in Authentication Method, this field will be used to enter the password for your email account |
| **Description** | To enter a description of the email account (optional, and it auto-fills upon saving by copying the Username if left blank) |
| **Main** | It is used to determine the primary email address for sending emails (in case multiple accounts are configured in the Messages module) |
| **Share sender** | It allows configuring a shared mailbox with all users (this configuration is only allowed for the admin user, and the mailbox is shared solely as a sending email address, not for receiving) |
| **Mail Server Settings (IMAP)** | |
| **Server name** | This field should be filled in with the server name details provided by your Maintainer (e.g., Aruba). For example, you would enter **imaps.aruba.it** if Aruba is your Maintainer, as an example |
| **Port** | It is used to enter the port number that the email account connects to for incoming mail |
| **SSL/TLS** | SSL/TLS if present |
| **Domain** | specify the domain, for example company.com |
| **Mail Server Settings (SMTP)** | |
| **SMTP server** | Select the type of account from the options provided or choose Custom |
| **Server Name** | This field should be filled in with the server name details provided by your Maintainer (e.g., Aruba). For example, you would enter **ssl://smtps.aruba.it** if Aruba is your Maintainer, as an example |
| **Port** | It is used to enter the port number that the email account connects to for outgoing mail |
| **Username** | indirizzo mail del server di posta per l’accesso via SMTP |
| **Password** | It is used to enter the password for your email account for SMTP authentication (typically, the password is the same as the one used to access the email account) |
| **Requires Authentication?** | To determine whether the server requires authentication for outgoing mail |
| **Signature template** | selecting "Custom" makes it possible to enter text, images, and links as a personal signature at the foot of email messages, while selecting "Company Name" (Acme, in the example) allows the signature configured in settings to be used. This new function is called "Centralized signature" *(see section 5.2.1.1 Set Up Centralized Signature)* |
| **Other Settings** | |
| **Account** | It allows you to access the configuration of new email accounts (in the Messages module, you can configure as many email accounts as you wish) |
| **Folders** | You can access the configuration of the email account folders, correctly matching them with the folders required by the CRM view: INBOX, DRAFTS, SENT, SPAM, TRASH |
| **Layout** | it allows to set the email layout choosing between the following configurations: \- show previw description in message list; \- enable thread view; \- merge account folders. |
| **Filters** | it allows to create rules to move mail within folders of the selected account |
| **POP3** | it allows to manage mail coming from pop3 mailbox directly within the account created. |
| **Out of office** | it allows to apply rules to send automatically email. |
| **Gmail** | Selecting Gmail the window will be like this: [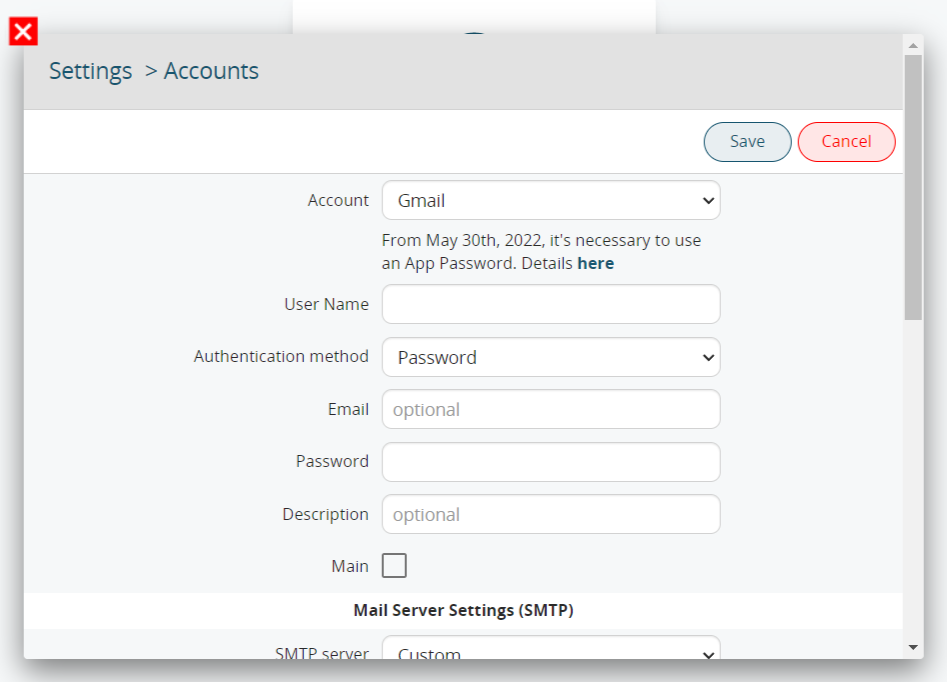](https://usermanual.vtenext.com/uploads/images/gallery/2023-08/messages-vtenext-23-08-2.png) As you can see right after the field: **From May 30th, 2022, it's necessary to use an App Password. [Details here](https://support.google.com/mail/answer/185833?hl=en)** This action must be done in order to complete the configuration. Additionally, **two-factor authentication (OAuth2)** is also supported for **Google Workspace** users. In this case, it will be necessary to request the activation of advanced settings for the dedicated OAuth2 configuration. > We would like to clarify that this dedicated OAuth2 configuration **does not work for free Gmail accounts**. |
| **Microsoft Office365** | Here you need to provide username and password. **PAY ATTENTION**: if the Outlook Authentication is made by OAuth2 **you must not use a custom imap account but the standard one**. We remind you that the **IMAP Office365 is listening to the port 993** (do not use the 443). |
| **Yahoo!** | You just need to type username and password. |
| **Custom** | Here you can configurate completly every connection parameter (IMAP, SMTP, ports) |
| **Name** | Choose the Custom option |
| **Server** | IMAP: imaps.pec.aruba.it SMTP:smtps.pec.aruba.it |
| **Port** | IMAP: 993 SMTP: 587 SSL/TLS if present |
| **Name** | Choose the Custom option |
| **Server** | IMAP: mbox.cert.legalmail.it SMTP: sendm.cert.legalmail.it |
| **Port** | IMAP: 993 SMTP: 465 SSL/TLS if present |
| **To** | The recipient email address must be entered; you can write the email address or select it from the list (Leads, Accounts, Contacts, Vendors and Users) |
| **CC** | Carbon Copy: you can enter the address of recipients who are to receive a copy of the email |
| **Add BCC** | The copy to email addresses added with BCC will not be visible to the other recipients |
| **Subject** | The subject of your email |
| **Attachments** | You can add attachments to the email by means of the Add file function or by dragging the file to the drop area **N.B.** when an email is sent from a detail view of a Document (from within the registry, click on the related of the Messages and then click on New Message), any attachments of that email are linked in the Documents related to that same registry |
| **Send method** | Single: send a single mail with all visible recipients in the “to” field Multiple: send a separate email to each recipient in the “to” field, without showing the recipients’ names or email addresses |
| **Select email Template** | Select one of the available templates saved in Settings > Email templates **WARNING:** When an email template is selected, the **Sending Method** automatically switches from **SINGLE** to **MULTIPLE**. |
| **Send** | Sends the email |
| **Save draft** | Forces a save of your draft (also occurs automatically) |
| **1° column:** | **2° column:** | **3° column:** |
| Email list, or | Sender’s data | Operations and links available for the email |
| Folders list by clicking on the Folders button, or | Body of the email | |
| Accounts list, clicking on the Mailboxes button (shown only if more than one account is configured) | Attachments |
| [](https://usermanual.vtenext.com/uploads/images/gallery/2020-05-May/invia_ora.png) | **Send now:** send the programmed email immediately |
| [](https://usermanual.vtenext.com/uploads/images/gallery/2020-05-May/riprogramma_invio.png) | **Scheduled sending:** reschedule the previously set sending |
| [](https://usermanual.vtenext.com/uploads/images/gallery/2020-05-May/elimina_programmazione_invio.png) | **Delete:** delete the programmed email permanently |
| [](https://usermanual.vtenext.com/uploads/images/gallery/2021-12/compose-button.png) | Compose a new email. |
| [](https://usermanual.vtenext.com/uploads/images/gallery/2021-12/update-button.png) | Download emails from the email server |
| [](https://usermanual.vtenext.com/uploads/images/gallery/2021-12-Dec/image-1638891885150.png) | Messages module settings (user's personal settings) |
|  | Mark message as read/unread |
| [](https://usermanual.vtenext.com/uploads/images/gallery/2021-12-Dec/image-1638893786732.png) | Mark message as important |
|  | Move email to another folder |
|  | Mark as spam (the email is moved to the Spam Folder) |
| [](https://usermanual.vtenext.com/uploads/images/gallery/2021-12-Dec/image-1638894541297.png) | Delete email (the email is moved to the bin) |
| [](https://usermanual.vtenext.com/uploads/images/gallery/2022-01/email-functions.png) | [](https://usermanual.vtenext.com/uploads/images/gallery/2022-01/email-functions-2.png) Search in emails (simple, including subfolders, including all accounts, or advanced)\* |
| **Create Event/to-dos** | Create calendar activity from the email |
| **Link** | Link the email to an object in vtenext |
| **Translate** | Open Google Translate for instant translation of the body of the email |
| **Download attachments** | Download a single zip file containing the attachments, if more than one |
|  | Download attachment |
|  | File attachment as a CRM document / View document tab |
|  | Link document to an object in vtenext |
|  | Open attachment preview (supported extensions: odt, pdf and common image formats) |
| **Name** | Template name |
| **Description** | Template description (optional) |
| **Folder** | Public: the template is available to all Personal users: only the template is available only to admin users |
| **Type** | Email: templates available for emails (Messages Module) Newsletter: templates available for the Newsletters module |
| **Subject** | Email subject |
| **Message** | Body of the email |
| **All** | All the active conversations, read and unread, presents in the crm that involve the user |
| **Channel** | Is possible to create group to talk with the collegues, for examples of the same department |
| **Direct** | Conversations where is involved the user which is logged in |
| **Pinned** | Is possible to pin a conversation, that is tick as important to maintain in this area to reach them easily |
| **Ping** | Allows to ping a conversation, which is a request for a response to the people involved in that conversation (when is pressed the button will be displayed the word "Ping") [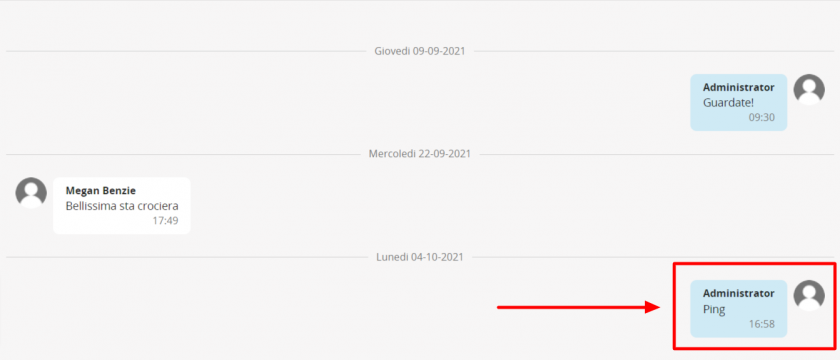](https://usermanual.vtenext.com/uploads/images/gallery/2021-10-Oct/Ping_conversazione_VTENEXT-21-09.png) |
| **Create or link** | Is possible to create or link a module to the current conversation [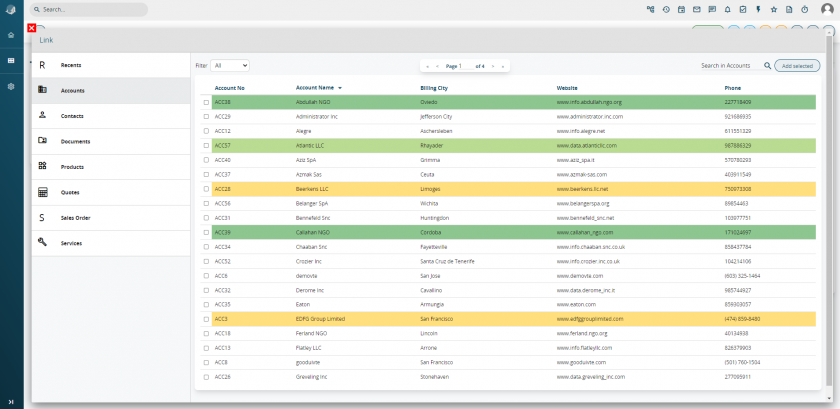](https://usermanual.vtenext.com/uploads/images/gallery/2021-10-Oct/5_4-Conversation-module_9.png) |
| **Send file** | Is possible to send file that will be linked only with the current conversation [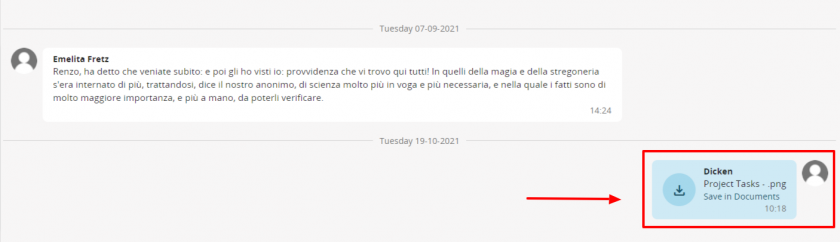](https://usermanual.vtenext.com/uploads/images/gallery/2021-10-Oct/5_4-Conversation-module_5.png) |
| [](https://usermanual.vtenext.com/uploads/images/gallery/2019-10-Oct/notifica_messaggio_vtenext.png) | [](https://usermanual.vtenext.com/uploads/images/gallery/2019-10-Oct/notifica_conversazione_vtenext.png) |
| **Edit** | to rename the folder or enable its display on the Customer Portal. In the popup screen that appears, you can choose a new name for the folder or decide whether to activate it on the Customer Portal, specifying which profiles can view this folder. **Note**: if it is possible to create/modify documents for a profile, in the "portal active" folders it will be possible to create and modify all the files contained by all the contacts of that profile. [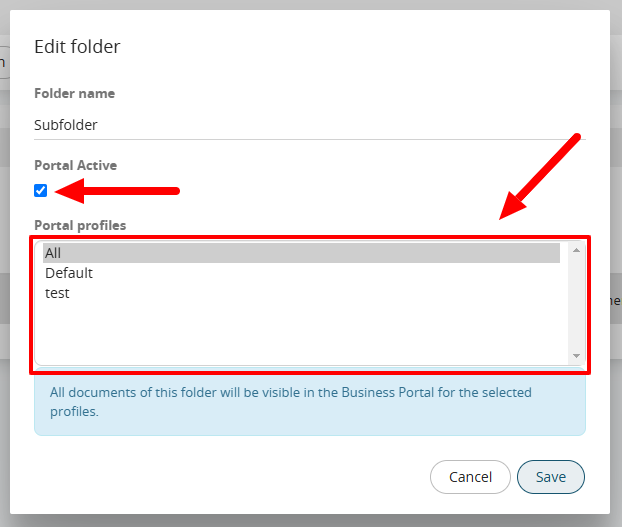](https://usermanual.vtenext.com/uploads/images/gallery/2024-11/tAQimage.png) |
| **Move in** | to move the folder to another level, you’ll need to select the new folder/level where the folder will be relocated |
| **Copy in** | to duplicate the folder and its contents into another folder, you’ll need to select the new folder/level where the duplication will be made |
| **Delete** | to delete the folder and its contents |
| **Campaign Name** | Choose a name based on the objective |
| **Campaign Type** | Choose the campaign type from the picklist (admin-editable values) |
| **Product** | Select a product from the CRM and link it to the campaign, if relevant |
| **Campaign Status** | Select the status (list can be changed by the administrator) |
| **Expected Close Date** | Date on which campaign will be ended |
| **Expected Revenue** | Amount of profit expected to be generated by the campaign |
| **Budget Cost** | Costs incurred for the campaign (indicated e.g. for trade show type campaigns) |
| **Assigned to** | User or group responsible for campaign management |
| **Target** | Describe target to which the campaign is addressed (Information text field) |
| **Newsletter Name** | Choose a name that is connected to the newsletter objective (the name remains internal to vtenext) |
| **Campaign** | This field is filled in with a connection to the “parent” campaign |
| **Date scheduled** | Schedule the date on which the newsletter is to be sent out |
| **Newsletter sending hour** | Schedule the time when the newsletter will be sent out |
| **From Name** | Name of the sender, which will be visible to the recipients |
| **From Address** | The newsletter will appear to recipients as having been sent from the indicated address, to which they can send replies (we suggest using an existing and monitored address) |
| **Scheduled** | The default field is set with the value “No”. It will automatically switch to “Yes” when you give the order to send. Therefore No identifies a newsletter created but not scheduled / sent, while Yes indicates a scheduled / sent newsletter. |
|  | select a template from among those present in the system |
| [](https://usermanual.vtenext.com/uploads/images/gallery/2019-12-Dec/crea.png) | create new template |
|  | edit the selected template |
| **[](https://usermanual.vtenext.com/uploads/images/gallery/2022-01/send-email.png)** | Send or schedule transmission in accordance with the Campaign-Target-Newsletter setting |
| [](https://usermanual.vtenext.com/uploads/images/gallery/2022-01/send-test-email.png) | a test of the newsletter is sent to the user’s email address (always recommended) |
| [](https://usermanual.vtenext.com/uploads/images/gallery/2022-01/preview-email.png) | displays a template preview window (always recommended) |
| [](https://usermanual.vtenext.com/uploads/images/gallery/2022-01/stop-sending.png) | It allows to stop sending newsletter |
| [](https://usermanual.vtenext.com/uploads/images/gallery/2020-06-Jun/newsletter_responsive_icons.png) | Allows to test the preview choosing among: - Desktop - Tablet - Mobile |
| [](https://usermanual.vtenext.com/uploads/images/gallery/2020-06-Jun/newsletter_view_components.png) | Allows to activate/deactivate the templates' construction lines |
| [](https://usermanual.vtenext.com/uploads/images/gallery/2020-06-Jun/newsletter_fullscreen.png) | Allows to activate/deactivate the full screen display mode. This mode eases the construction of templates |
| [](https://usermanual.vtenext.com/uploads/images/gallery/2020-06-Jun/newsletter_view_code.png) | Allows the HTML code visualization |
| [](https://usermanual.vtenext.com/uploads/images/gallery/2020-06-Jun/newsletter_import_template.png) | Allows the template import by coping and pasting the source code |
| [](https://usermanual.vtenext.com/uploads/images/gallery/2020-06-Jun/newsletter_toggle_images.png) | Allows to momentarily hide all the pictures in the template |
| [](https://usermanual.vtenext.com/uploads/images/gallery/2020-06-Jun/newsletter_edit_code.png) | Allows to edit the source code |
| [](https://usermanual.vtenext.com/uploads/images/gallery/2020-06-Jun/newsletter_open_style_manager.png) | After selecting an element in the newsletter template click on this icon to access all the editing options available (Size, Style, Decorations) |
| [](https://usermanual.vtenext.com/uploads/images/gallery/2020-06-Jun/neewsletter_settings.png) | After selecting an element in the newsletter template click on this icon to access all the setting options available. The options change according to the selected element. Here below some examples: - Text: ID e Title - Link: Title, Href (Url), Target (Same window, Different window) - Image: Alt - ecc. |
| [](https://usermanual.vtenext.com/uploads/images/gallery/2020-06-Jun/newsletter_open_layer_manager.png) | Allows to display the layers on where the template is built. In this way the user can easily switch from one div to another. |
| [](https://usermanual.vtenext.com/uploads/images/gallery/2020-06-Jun/newsletter_open_blocks.png) | Activates the display of all the blocks and elements available to build the template |
| Available blocks | |
| [](https://usermanual.vtenext.com/uploads/images/gallery/2020-06-Jun/newsletter_1_section.png) | Adds a tab with a cell |
| [](https://usermanual.vtenext.com/uploads/images/gallery/2020-06-Jun/newsletter_1_2_section.png) | Adds a tab with two cells vertically divided |
| [](https://usermanual.vtenext.com/uploads/images/gallery/2020-06-Jun/newsletter_1_3_section.png) | Adds a tab with three cells vertically divided |
| [](https://usermanual.vtenext.com/uploads/images/gallery/2020-06-Jun/newsletter_3_7_section.png) | Inserts a tab with two cells vertically divided, 25% on the left and 75% on the right |
| [](https://usermanual.vtenext.com/uploads/images/gallery/2020-06-Jun/newsletter_button.png) | Adds a button with the possibility of generating a link and changing its title |
| [](https://usermanual.vtenext.com/uploads/images/gallery/2020-06-Jun/newsletter_divider.png) | Adds an horizontal division line |
| [](https://usermanual.vtenext.com/uploads/images/gallery/2020-06-Jun/newsletter_text.png) | Tool to add a text block, text can be formatted only by diversifying the blocks (each block can have only one format) |
| [](https://usermanual.vtenext.com/uploads/images/gallery/2020-06-Jun/newsletter_text_section.png) | Tool to insert a text area |
| [](https://usermanual.vtenext.com/uploads/images/gallery/2020-06-Jun/newsletter_image.png) | Allows to insert an image, uploading it from the computer or linking the URL |
| [](https://usermanual.vtenext.com/uploads/images/gallery/2020-06-Jun/newsletter_quote.png) | Allows to insert a “quoted” text |
| [](https://usermanual.vtenext.com/uploads/images/gallery/2020-06-Jun/newsletter_link.png) | Allows to insert a link. Once this tool is selected click on the settings icon to set the link’s URL |
| [](https://usermanual.vtenext.com/uploads/images/gallery/2020-06-Jun/newsletter_link_block.png) | Allows you to set an area, where you can insert an image that will have to be linked, for example, to your website |
| [](https://usermanual.vtenext.com/uploads/images/gallery/2020-06-Jun/newsletter_ordered_list.png) | Tool to create a numbered list |
| [](https://usermanual.vtenext.com/uploads/images/gallery/2020-06-Jun/newsletter_unordered_list.png) | Tool to create a bullet list |
| [](https://usermanual.vtenext.com/uploads/images/gallery/2020-06-Jun/newsletter_unsubscription_link.png) | Allows to insert the unsubscription link |
| [](https://usermanual.vtenext.com/uploads/images/gallery/2020-06-Jun/newsletter_preview_link.png) | Allows to insert the preview link |
| [](https://usermanual.vtenext.com/uploads/images/gallery/2020-06-Jun/newsletter_spacer_block.png) | Tool to insert a space, among the newsletter’s elements |
| **Emails Sent** | color-coded breakdown between **Delivered Emails**, **Bounced Emails**, and **Failed Emails**, where you can see the number of emails that were actually delivered, along with the number of bounced and failed emails. |
| **Emails Opened** | color-coded breakdown between **Opened Emails** and **Unopened Emails**. |
| **Unsubscribed Emails** | color-coded breakdown between **Unsubscribed Emails**, meaning all email addresses that unsubscribed by clicking the appropriate link, and **Emails**, meaning the remaining email addresses that have not unsubscribed. |
| **Email Clicks** |
| **Message Queue** | emails that have not yet been sent (when sending is complete, this column must be blank) |
| **Sent messages** | correctly sent and received emails |
| **Viewed Messages** | for each opened email: number of times the email has been opened, date and time of first and latest opening, link to recipient’s record |
| **Tracked Link** | if there are any links in the body of the email, the system tracks the number of clicks by each recipient for each link |
| **Unsubscribes** | recipients who clicked the unsubscribe link |
| **Bounced Messages** | emails sent but not received by the recipient (due to unresponsive server, full mailbox…) |
| **Email failed** | email that have not been sent (probably due to the address error) |
| **Suppression List** | email addresses unsubscribed from the specific campaign |
| **Server name** | es. smtp.nomedominio.it |
| **Port** | The SMTP server port to use for sending emails es. 465 |
| **User name** | The username for the account used to send emails linked to the particular SMTP with relay rights on all inbox |
| **Password** | The password for the account used to send emails |
| **Requires Authentication** | Check if the server needs authentication for the login |
| **Send rate** | Maximum number of email sent daily |
| **Address exclusion policy** | **Campaigns:** it excludes only the unsuscribe people of that campaign **Global:** it excludes all unscribe people of the crm |
| **Bounce settings IMAP** | All the settings for the bounce inbox. In that folder will be directed the bounced emails, that are emails which even if have been set correctly, they are blocked and sent back to the sender. Thanks to the configuration of this inbox all the bouced emails will be located in that inbox without clogging the sender. In this configuration, the following information must be entered: - **Server Name**: required to configure the mailbox - **Port**: the one recommended by the provider - **Username**: corresponds to the email address you want to configure for bounce handling - **Password**: the password of the email account specified in the previous step - **SSL/TLS**: the option recommended by the provider - **Bounce address**: simply repeat the address entered in the Username field - **Folder to monitor**: once the username and password are entered and you click the contextual icon next to this field, the page will briefly reload to attempt to retrieve the folders available on the server for that mailbox. You must then select the **INBOX** folder (i.e., Incoming Mail) - **Bounce threshold**: defines the maximum number of bounced emails after which an address is automatically classified as unreachable. Once an address is considered unreachable, it is removed from the newsletter and added to the **suppressed addresses list** (not to the unsubscribe list) |
| **Server Name** | Specify the outbound email server address referred to the mailbox enabled for sending SMS messages |
| **User Name** | Login to access the mailbox |
| **Password** | Password associated with the mailbox |
| **Requires Authentication?** | Specify Yes/No depending on the characteristics of the email server (generally Yes) |
| **Domain to apply to SMS numbers** | This info is supplied by the SMS service provider |
| **SMS service account** | State the account name for the SMS service; this information is supplied by the SMS service provider |
| **Code to apply to SMS numbers** | Specify the country code (39 for Italy) |
| **Name displayed in the SMS message** | This function depends on the service provider - it might not be enabled |
| **Server Name** | Specify the outbound email server address referred to the mailbox enabled for sending faxes |
| **User Name** | Login to access the mailbox |
| **Password** | Password associated with the mailbox |
| **Requires Authentication?** | Specify Yes/No depending on the characteristics of the email server (generally Yes) |
| **Domain to apply to fax numbers** | This information is supplied by the fax service provider |
| **Fax service account** | State the account name for the fax service; this information is supplied by the fax service provider |
| **Code to apply to fax numbers** | Specify the country code (39 for Italy) |
| **Name displayed in the fax message** | his function depends on the service provider - it might not be enabled |
| **Product Name** | Name of product |
| **Product Code** | This value appears in Quotes, Sales Orders, Invoices and Delivery Notes |
| **Vendor** | Allows the product vendor record to be linked |
| **Product active** | If active, the product is available for sale (this means that inactive products cannot be entered in quotes, orders, etc.) |
| **Unit Price** | Unit sale price, proposed in the quote, order, etc. |
| **Unit Cost** | Purchase cost |
| **Quantity in Stock** | Quantity in stock; this value is decreased on creation of an Invoice and increased on creation of a Purchase Order (in Status = Shipment Received) |
| **Reorder Level** | Quantity threshold that triggers a reorder request (by default, it sends an internal notification to the product’s assignee, as shown in the image) [](https://usermanual.vtenext.com/uploads/images/gallery/2025-10/2025-10-27-17-02-38-image.png) |
| **Product Name** | **Features names** | **Possible values** |
| **iPhone** | Memory | 32Gb, 64Gb, 128Gb |
| Color | Black, White, Gold | |
| **T-Shirt** | Size | S, M, L, XL, XXL |
| Color | White, Red, Green |
| **Service Name** | Name of the service |
| **Usage Unit and Number of Units** | State the unit of measurement of the service and the number of units |
| **Active** | Active means available for sale (this means that inactive services cannot be entered in quotes, orders, etc.) |
| **Potential Name** | Name of the potential |
| **Amount (€)** | Useful for anyone wishing to make predictions about the value of open potentials, even though the initial value may be indicative. It is self-calculated at the time of linking with a quote if product lines have been organised **Warning: by default, the Amount field is updated only if the related quote is in “Created” or “Delivered” status** |
| **Account name** | Link to the customer company present in the CRM |
| **Expected Close Date** | Expected date of conclusion of the deal |
| **Type** | Allows for cataloguing between existing and new business |
| **Next Step** | The next step in the negotiation |
| **Lead Source** | Reports the origin of the lead, in the event that the potential arises from a lead conversion |
| **Sales Stage** | Important to know the state of progress of the negotiation |
| **Assigned to** | By default, assigned to the user who creates it. Identifies the salesperson who manages the negotiation |
| **Probability (%)** | Probability of success of the negotiation which, multiplied by the amount, makes it possible to obtain a plausible forecast of the value of the single potential |
| **Campaign Source** | If the source is an ongoing or completed campaign, you can link it |
| **Players** | **Players** are the Contacts and Companies involved in the specific Opportunity. The Contacts can be: **- Contacts from the Main Company**: that is, individuals directly linked to the commercial project and thus to the company we are targeting. **- Other Contacts**: individuals who may not be part of the main company but are still involved in the commercial project (e.g. external technicians). The Companies can be: **- Partners**: companies collaborating with the main company, where the *Type* field has been set to "Partner". **- Competitors**: companies that are competitors of the main company, where the *Type* field has been set to "Competitor" [](https://usermanual.vtenext.com/uploads/images/gallery/2025-06/OhDimage.png) |
| **Product Lines** | **Product Lines** are used to define an annual **Budget** that each specific line must achieve. Thanks to a custom report in the Opportunities module, it is possible to monitor the **Budget Delta** that still needs to be reached. See also the dedicated chapter (***Chapter 8.2 – Product Lines***) [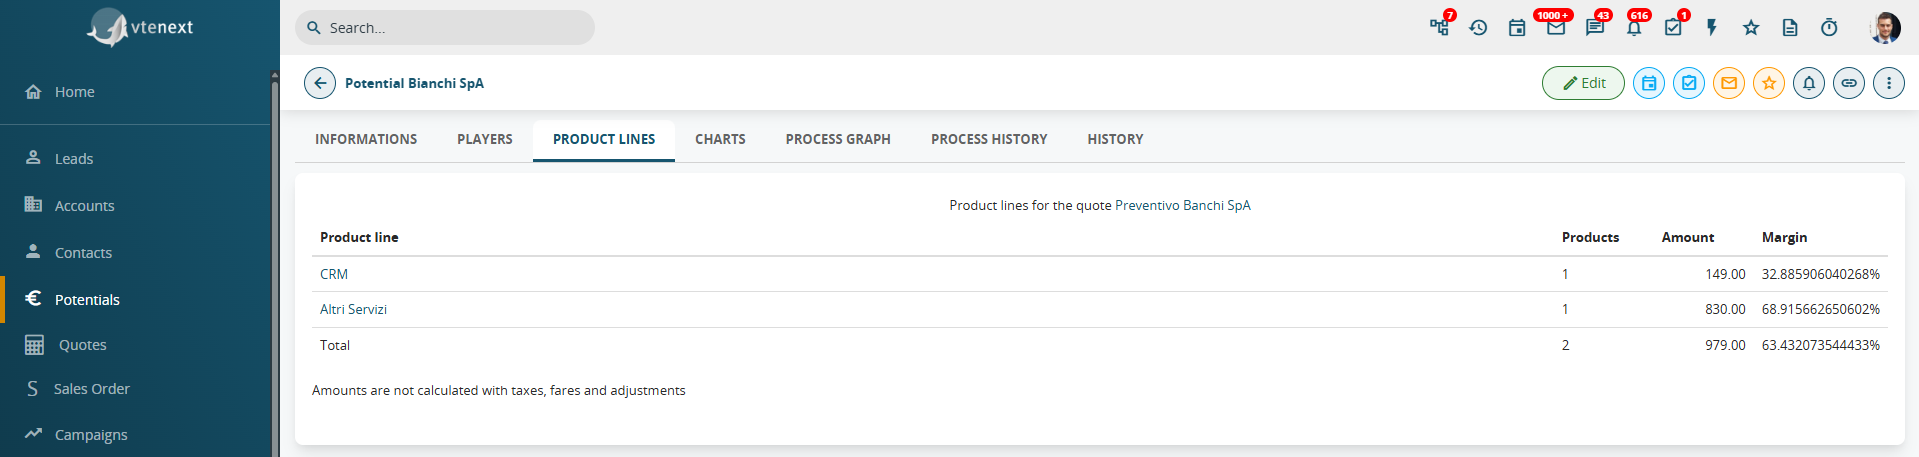](https://usermanual.vtenext.com/uploads/images/gallery/2025-06/m0eimage.png) |
| **Charts** | **Charts** allow you to visualize the historical trend of all the amounts related to that specific opportunity. Each time a quote is created and/or revised, the *Amount* field in the opportunity is updated accordingly. This operation feeds the chart and makes the trend readable through a bar graph. To the right of this chart, there is also a **pie chart** showing the distribution of product lines, which helps in understanding the percentage contribution of each individual line to the total [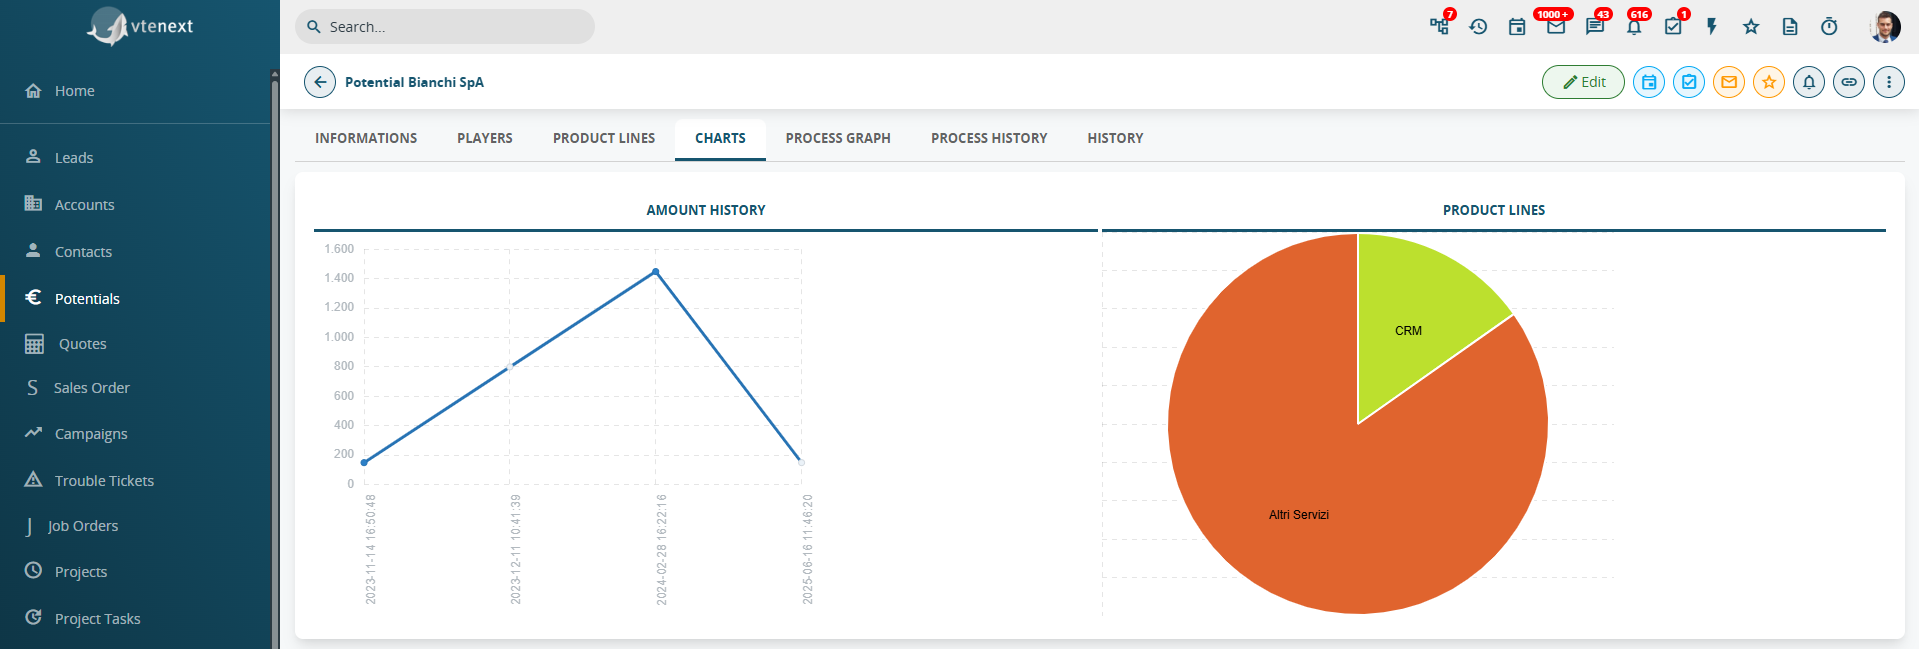](https://usermanual.vtenext.com/uploads/images/gallery/2025-06/9WSimage.png) |
| **Subject** | It is recommended that the name of the company and/or the project be mentioned to facilitate searches |
| **Potential name** | Link field of the quote to the relevant business potential |
| **Quote Stage** | Important for knowing the state of progress of the negotiation. The statuses can be freely set by the system administrator |
| **Valid Till** | Expiry date of the offer |
| **Contact Name** | Connection with the contact person (equivalent to "for the attention of") |
| **Inventory Manager** | The choice of an inventory manager does not involve automatisms, it is a field of view only |
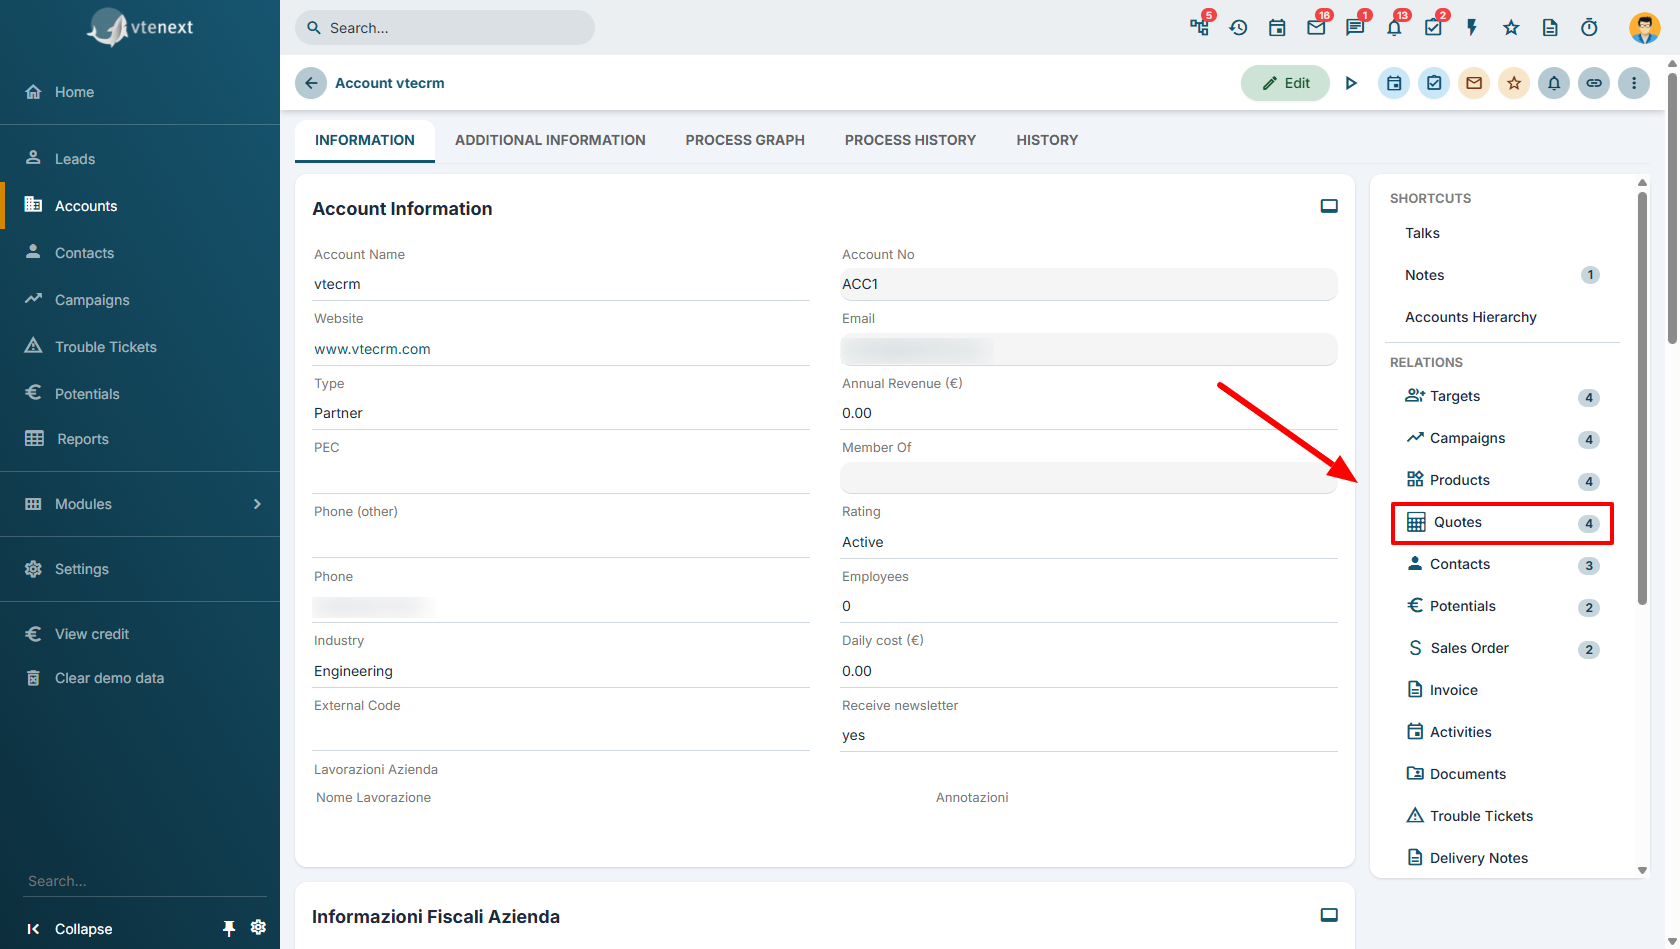
| **Account Name** | Connection with the client company to which the quote refers |
| **Assigned to** | The CRM user who is managing the quote, by default the person creating it |
| **Products** | Select the desired product or service. You can add a comment for each single product offered |
| **Quantity In Stock** | After selecting a product, you will see here the current stock quantity uploaded automatically |
| **Quantity** | Quantity per item per single offer |
| **Unit Price** | It is displayed as set out in the product data sheet |
| **List Price** | You can use the Price List icon to select a different price from the price list; the price lists containing the product will be proposed |
| **Discount** | You can discount per product line and/or in total, expressed as a percentage of the list price or a precise figure. In the case of %, it is possible to indicate several discounts in sequence by separating the percentages with  |
| **Tax** | vtenext calculates taxes based on the information set out in the product data sheet. It is possible to change the tax without changing the product catalogue entry. You can display one tax per line or in total |
| **Margin** | Calculated automatically: it’s the ratio between profit (list price - product cost) and list price |
| **Shipping charges** | You can add additional shipping and handling fees |
| **Tax on shipping charges** | You can add additional taxes on shipping and handling fees |
| **Adjustment** | Rounding the final value upwards or downwards |
| **Subject** | We recommend including the reference to the company and/or potential to facilitate any future search of the order |
| **Potential Name** | Link between the order and relevant potential |
| **Customer Number** | If you use customer number codes, you can enter the one relating to the order here |
| **Quote Name** | Link to the quote that originated the order |
| **Purchase Order** | If the customer sends you a reference to their purchase order, you can enter it here |
| **Contact Name** | Connection with the customer contact (person you deal with) |
| **Due Date** | Order due date |
| **Carrier** | You can indicate the carrier that will make the delivery |
| **Status** | Important for knowing the state of progress of the order. The statuses can be freely set by the system administrator |
| **Excise Duty** | Special taxes or other costs |
| **Account Name** | Connection with the customer company to whom the order refers |
| **Sales Commission** | Any commissions |
| **Assigned to** | The CRM user who is managing the order, by default the person creating it |
| **PBlockRO** | For the Sales Orders module (this field is available only in this module), the **"PBlockRO"** field is available. It can be activated via a process and then managed through conditional fields so that, if checked, it will hide the product block when editing the Sales Order itself. |
| **Enable Recurring** | Tick to enable automatic invoice generation from the sales order, after creating the first invoice |
| **Frequency** | Daily, weekly, monthly |
| **Start Period** | When the recurring billing will start |
| **End Date** | When the recurring billing will end |
| **Payment Duration** | Indicate duration |
| **Invoice Status** | The status that auto-generated invoices will assume by default |
| **Subject** | Invoice name |
| **Sales order** | Link field to the original sales order |
| **Customer Number** | If the customer has an internal code |
| **Invoice date** | Each invoice must have a date |
| **Payment due date** | Due date for payment of this invoice |
| **Purchase Order** | Reference to the customer's purchase order, if any |
| **Manufacturing tax** | Information on manufacturing taxes |
| **Sales Commissions** | Any sales commission |
| **Account Name** | Link to the customer company |
| **Status** | Important for knowing the state of progress of the invoice. The statuses can be freely set by the system administrator |
| **Assigned to** | User who manages the invoice, by default the person creating it |
| **Priority** | Customisable: usually on indication of the assistance service |
| **Severity** | Customisable: usually it is by indication of the sales person according to the customer's value |
| **Category** | Customisable: e.g. complaint, service under warranty or internal request |
| **Related to** | Link field with a customer data base (Accounts, Contacts, Leads) |
| **Status** | It is essential to know the progress of the ticket (statuses can be changed by the admin user) |
| **Hours** | Hours spent on the ticket; when a contract service is connected to the ticket (unit of hours), this value updates the progress of the contract (at ticket closure) |
| **Days** | Days used for the ticket; when a contract service is connected to the ticket (day unit), this value updates the progress of the contract (at ticket closure) |
| **Project** | Link to a planning sheet (project) |
| **Project task** | Connection to an operation sheet (project phase) |
| **Date** | Date of intervention |
| **Assigned to** | User or group of users |
| **Unit number** | Number of units involved in the intervention |
| **Time** | Time spent |
| **Product** | Link to the product concerned |
| **Ticket** | Reference Ticket |
| **Create Timecard** | If active, it allows you to create a new Intervention upon saving |
| **Change Status** | Change reported ticket status |
| **Assign ticket to** | Allows you to reassign the reported ticket |
| **Time elapsed** | Time elapsed since opening the ticket (as explained above) |
| **Time remaining** | Time still available before the expiry of the SLA |
| **SLA start date** | Date and time of counting start |
| **SLA end date** | Date and time when the SLA is expected to close |
| **Update time** | Date and time of the last update of the automatically recognised fields\* |
| **SLA Estimated time** | Time allocated to the ticket to resolve and close the problem |
| **Due Date** | The date of closure status is entered automatically |
| **Due time** | Time the ticket is closed |
| **End SLA** | Recognised if the count is completed |
| **Idle Time Elapsed** | Time spent in suspension (see below) |
| **Out SLA Time Elapsed** | Indicates how much time is being spent in excess of the guaranteed SLA |
| **Reset SLA** | Resets and restarts the count |
| **Days** | **Progressive number** |
| **Sunday** | 0 |
| **Monday** | 1 |
| **Tuesday** | 2 |
| **Wednesday** | 3 |
| **Thursday** | 4 |
| **Friday** | 5 |
| **Saturday** | 6 |
| **Field** | **Description** | **Insertion Criterion** |
| **Due date** | End date of contract service | When the status is set on Complete, or when the units used reach or exceed the total units |
| **Planned Duration** | Period in days in which the service is planned | When saving the record |
| **Current Duration** | Actual period used (in days) | When saving the record or when the unit used is updated |
| **Progress** | Percentage progress of the service | When saving the record or when the unit used is updated |
| **Related to** | Connection to company or contact | Upon creation, manual if you create from scratch, auto-completed if you generate the service from a connected module. Priority is given to Accounts |
| **Tracking unit** | Calculated on the basis of the units used | When the contract service is added from invoice, quote, sales/purchase order, the monitoring unit is the one used in the service on the product line |
| **Total Units** | Number of units provided for in the contract | Automatically reports the value of the No. of units field of the connected service |
| **Used Unit** | Number of units used so far | Scaled from the related tickets according to the time used on each ticket in closed state |
| **Residual Units** | Difference between total units and used units | Self-generated |
| **Subject** | Order title |
| **Vendor Name** | Link to the supplier registry present in vtenext |
| **Requisition No** | If you use this code |
| **Tracking Number** | If you have the identifier for tracking the shipment |
| **Contact Name** | Connection to the order contact person |
| **Due Date** | Order expiry date |
| **Carrier** | Carrier who will make the shipment |
| **Sales Commission** | If applied |
| **Excise Duty** | Information on taxes, if applied |
| **Status** | Important for knowing the state of progress of this delivery |
| **Assigned** | User of vtenext that manages the order |
| **Related to** | Link to the customers’ registry (Accounts/Contacts) present in vtenext, if the project relates to the customer. If it is an internal project, it can be left empty |
| **Type** | Customisable according to the types of projects in use in your company |
| **Progress** | Percentage value of project progress |
| **Status** | Important for knowing the state of progress of the project |
| ****Operation Name**** | Field to enter the name of the Operation |
| **Operation Number** | Automatic progressive numbering, filled in when saving |
| **Priority** | Determines the priority of the specific Operation and possibly the color of the bar shown in the GANTT chart, if configured in *Settings > List View Coloring* for this field |
| **Type** | Dropdown menu with preset, editable values |
| **Related to** | The related Project can be found here |
| **Sales Order** | The related Sales Order can be found here |
| **Progress** | Dropdown menu with preset, editable values |
| **Ore Lavorate** | Free input field |
| **Start Date** | Sets the start date (important for calculating the expected duration and therefore for the correct display of the GANTT chart) |
| **End Date** | Sets the end date (important for calculating the expected duration and therefore for the correct display of the GANTT chart) |
| **Auto Calculation of Expected Duration** | By flagging this field, the expected duration is automatically filled in, calculating it in “days” based on the values entered in the Start Date and End Date fields. **WARNING:** if this is not done, the GANTT chart will not correctly display the expected time span for individual operations |
| **Expected Duration** | Field automatically filled as a result of the previous point |
| **Description** | Free description field |
| **Project** | Within a project operation, vtenext, counts the foreseen hours according to the Sales Price of the Product/Service sold, dividing it by Price per day reported on the Company record. The automatic compleation of the fields: Used Hours, Used Budget and Residual Budget take place when an event is closed setting the value “Held” in the field status. Events must be linked directly to projects task as well as tickets that have been linked to projects task. |
| **Pack** | The Operation Pack allows to count a total of sold hours per Product/Service within the field Package Hours.The automatic reduction of Used hours and Residual Hours happen when an event is closed setting the value Held” in the field status. Events must be linked directly to projects task as well as tickets that have been linked to projects task. |
| **Consumptive** | Consumptive operation will count the Used Hours and the Used Budget according to the related tasks or tickets. It will automatically insert the number of hours that have to be invoiced, which will vary from the value set manually from the users in the field Invoiced Hours, when an event is closed setting the value "Held” in the field status. Events must be linked directly to projects task as well as tickets that have been linked to projects task. |
| **STEP 1** | **Report Details:** Give a name to the report (so that, in the future, even at first glance, you will understand its contents), choose the main module, a destination folder and a description (optional). You can also create a new folder by clicking the button +. |
| **STEP 2** | **Report Type:** Choose the report format to display it the way you prefer. Tabulation involves the extraction of the expected results with a standard of all completed cells. Summary allows you to indicate grouping criteria for the data, so as to avoid displaying duplicate fields and thereby making it easier to read. It also allows you to create graphs from the report. For example, you want to view orders grouped by customer, i.e.: when there are two order lines for the same customer, the customer's name will group the two lines and will only be reported once. |
| **STEP 3** | **Time filter:** Choose the time filter to apply to your report. The first drop-down menu line allows you to choose the module to refer to. Starting from the main module previously chosen, it is possible, moving through the various links between the modules, to choose the data of any one of them. In the second line, on the other hand, you choose the field (belonging to the module just chosen) to be used as the subject for the time criterion specified in the "Select Time" picklist. In this menu there are numerous time options, including "Custom", which allows you to filter data for a period of time specified by you. In this example, we want to see the records that have been created ("Time created" column) in the "Sales Orders" module in the last 30 days (as defined in "Select Time"). |
| **STEP 4** | **Advanced Filters:** Choose the advanced filters to apply to your report. As in the previous point, the first line is used to define which module fields you are interested in comparing. In our example, select Accounts because we need to filter by industry. Then once you have chosen the module field (in the "Field” picklist), choose which condition to use to compare the record and the data you are interested in. The options "is equal to", "not equal to", "starts with", "ends with", "contains" and "does not contain" are available. When you enter a value in the text type field on the right, you can use these options to make comparisons between the contents of the record and the data of your choice (also taken from other modules, with the button). It is also possible to make more comparisons and more groups of filters using the New condition and New group buttons, also using different fields from different modules. |
| **STEP 5** | **Top-down clusters:** It allows the creation of clusters to further segment the results, both in the summary tab and within the graphs, and also allows you to set the colour for the latter. By choosing "add segment", you will be able to access a screen where you can choose the name and colour of the individual segment. Repeat this operation by completing the selection of all desired segments. **N.B.: the top-sown cluster does not duplicate the results but only rearranges them. If a record has a link for both segment A and B, it will only be shown in the segment A.** |
| **STEP 6** | **Select Columns:** Select the fields to be displayed in the report columns, using the same picklists used in the previous steps. You can then sort them by dragging them left or right with the mouse, and group the results for a specific field (or even more than one) by clicking on the "Group by this field" checkbox which is contained within each field. Enabling View Report, a tab will appear with a count of the number of records according to the grouping. Warning! If you want to create a graph from the report, you must indicate only one grouping criterion, otherwise the final result may differ from expectations. |
| **STEP 7** | **Calculations:** Select the desired calculations for the numeric or currency fields: maximum, minimum, average and sum are available. The Summary flag allows you to see the calculation entry according to the choice in step 6. Through the Add total button you can add other numeric fields contained in the selected modules. |
| **STEP 8** | **Sharing:** Select sharing type: Private (the report will be visible only to the user), Public (the report will be visible to all users) or Shared (allows you to choose which users to share the report with). Warning! What is shared is not the content of the report, the display of which depends on the user's data access permissions, but the structure of the report, i.e. the series of settings (fields, filter rules, etc.). If a user to whom the report has not been shared enters the Reports modules, they will simply not find it. |
| **STEP 9** | **Charts:** By clicking, or leaving empty, the flag that appears, you can choose whether to generate a graph for the report you are creating. If selected, a number of options will appear for customising the appearance of the chart. These functions are described in the next paragraph. |
| **STEP 10** | **Scheduled execution (admin users only):** This function makes it possible to schedule the execution of the report and send it automatically to the chosen recipients. It is possible to program the frequency of sending, the file format and obviously all the desired recipients, selectable only from the list of CRM users or groups. Starting from version 26.04, two new options are available for scheduled reports: - Exclude report delivery on public holidays. - Prevent report delivery when no records match the report criteria. These features help reduce unnecessary communications and make automated report distribution more efficient. [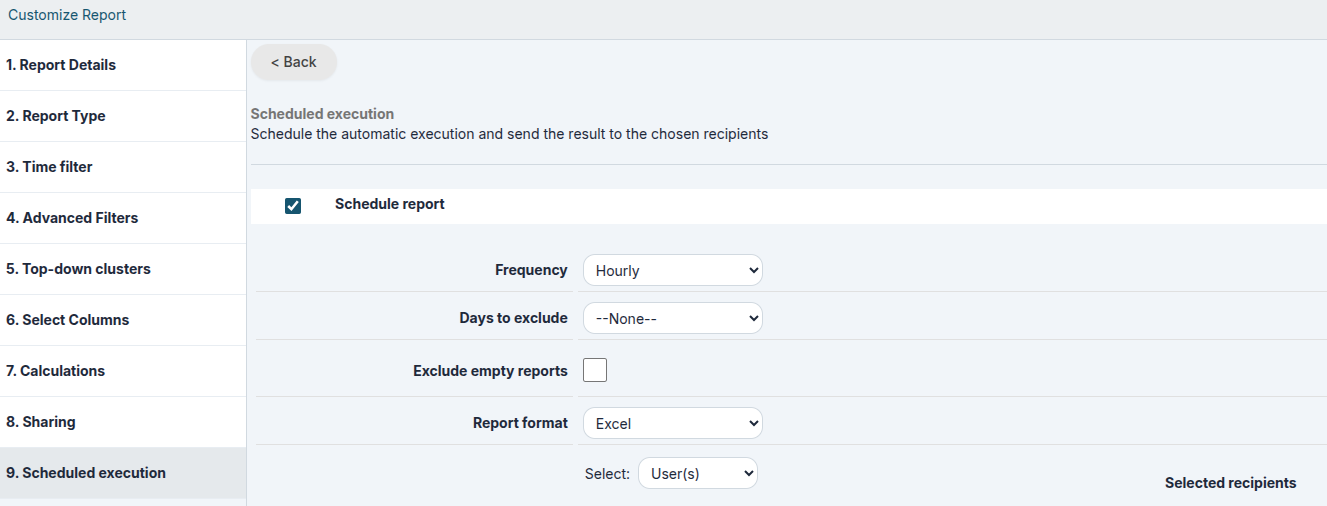](https://usermanual.vtenext.com/uploads/images/gallery/2026-06/screenshot-20260617-075343.png) **Warning:** If you decide to use this function, the CRM will send a report displaying all the records it contains, without considering roles or profiles set in the CRM or the type of report sharing previously selected. |
| **Summary Tab** | Visible only if the report is of the Summary type (step 2), it displays report information (counts and calculations divided according to grouping criteria) |
| **Report Tab** | Table with the results of the report |
| **Charts Tab** | Visible only if set in step 8, it shows the chart based on the report |
| **Time Interval** | Apply a time-based filter (temporary field, cannot be saved) |
| **Edit Button** | To edit the Report by repeating the previous steps |
| **Create Chart** | Generate a new chart relating to the report |
| **Duplicate** | Opens the wizard to save a new report, starting from the settings of the previous one |
| **Export in PDF** | Export the total report in PDF format |
| **Export in Excel** | Export the total report in Excel format |
| **Print** | Print the total report directly |
| [](https://usermanual.vtenext.com/uploads/images/gallery/2026-07/VcPimage.png) | [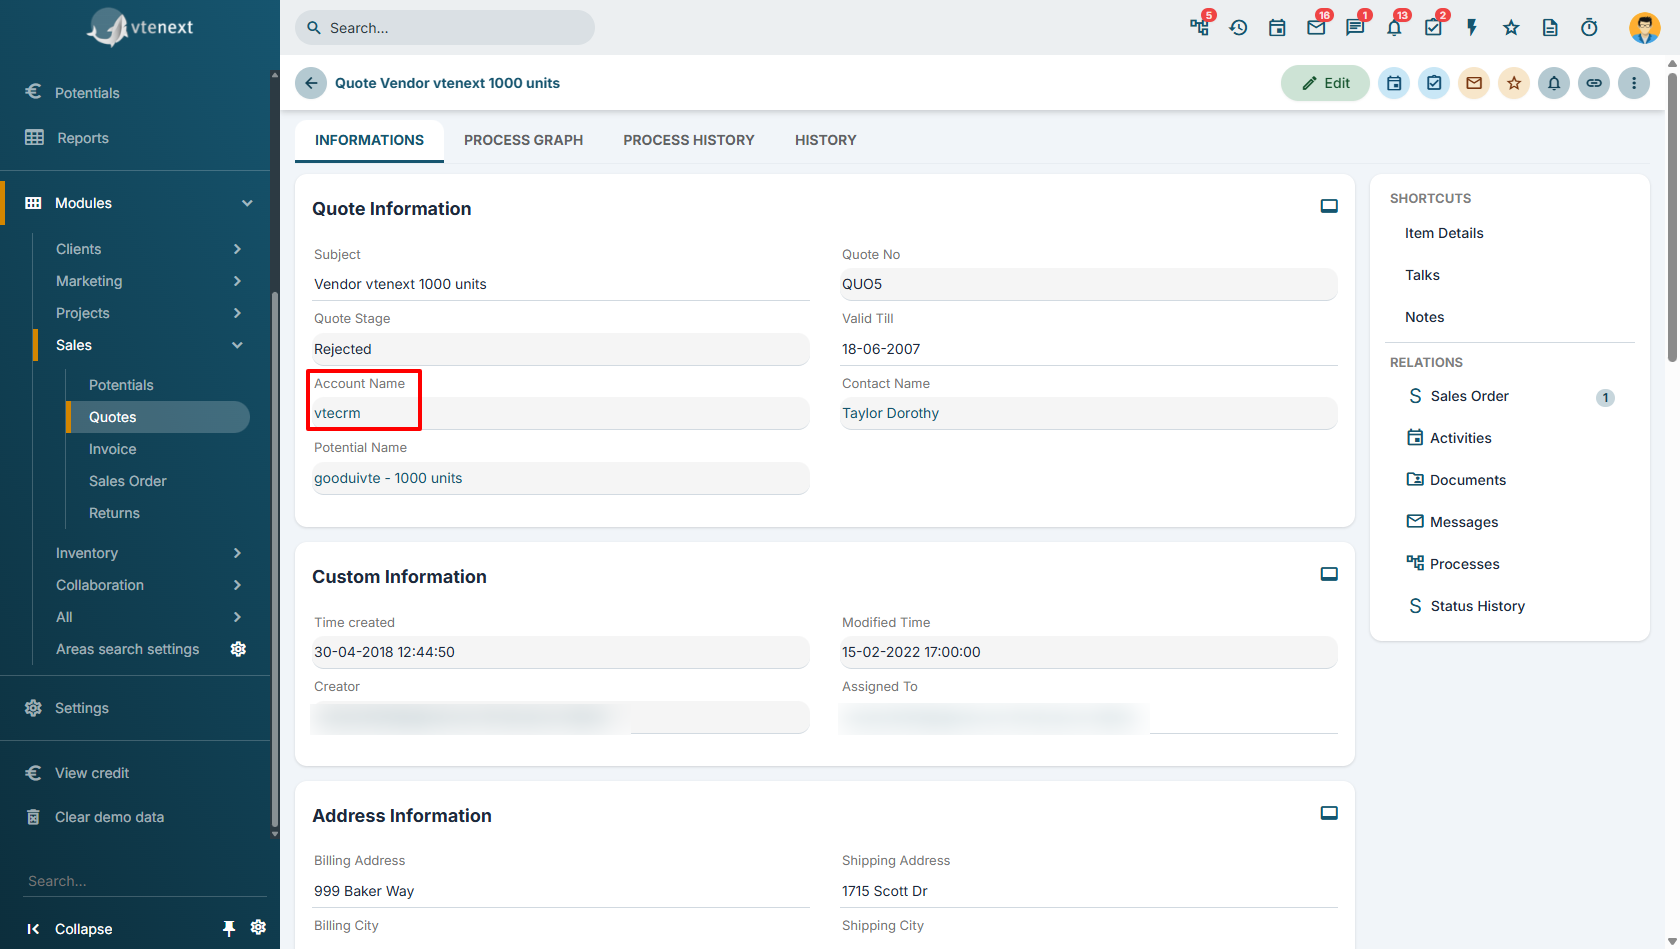](https://usermanual.vtenext.com/uploads/images/gallery/2026-07/Cfyimage.png) |
| [](https://usermanual.vtenext.com/uploads/images/gallery/2026-07/RrVimage.png) | [](https://usermanual.vtenext.com/uploads/images/gallery/2026-07/vTBimage.png) |
| **Type** | Click on the type of chart you want: pie, histogram, bar … |
| **Chart Name** | Enter chart name |
| **Show Legend** | Activate to view the legend |
| **Show Labels** | Activate to display labels in the chart |
| **Show values** | Allows you to choose whether to display values (count) or percentages |
| **Folder Name** | The charts are organised in folders like documents |
| **Formula** | Allows you to choose whether to display the count, the sum, the average, the maximum or the minimum |
| **Palette** | Allows you to choose the colours of the chart, among predefined combinations |
| **Data Order** | Allows you to define data sorting; if not set, it depends on the grouping criteria defined in the report |
| **URL** | insert the URL of the image (if already present); if the URL is not already present, click Search on the server to upload an image |
| **Width / Height** | to change the image size in the template |
| **** | blocks height-width proportions |
| **** | resets the original size |
| **Border** | enter a numerical value in pixels corresponding to the thickness of the border for the image (blank for no border) |
| **HSpace / VSpace** | enter the coordinates for positioning the image with respect to the text base line (blank to set the default position, in line with the text) |
| **Alignment** | define the alignment of the text |
| **Border dimension** | put zero if you do not want to display the border |
| **Cells spacing** | space between cells |
| **Cells Padding** | space between the border of the cell and the beginning of the content (text) |
| intestazione\_1 | intestazione\_2 | intestazione\_3 | intestazione\_4 | …. | intestazione\_n |
| **\#PRODUCTBLOC\_START#** | |||||
| variabile\_1 | variabile\_2 | variabile\_3 | variabile\_4 | variabile\_n | |
| **\#PRODUCTBLOC\_END#** |
| **General Language** | This section contains the label values from all CRM modules. Here you can find any type of label to quickly insert the desired entry. When the PDF is generated, the variable will automatically be translated into the selected language. |
| ****Module Language**** | This section contains the label values of the modules primarily involved in the configuration. For example, if you are creating a PDF for the **Quotes** module, you will have access not only to the labels of the fields within the Quote itself but also to those of related modules — such as **Account** or **Contact**. |
| **VTENEXT** | - HelpDesk
- Accounts
- Contacts
- FAQ
- Providers
- Assets
- Leads
- ProjectTask
- Potentials
- ProjectPlan
- Products
- Services
- TicketComments
- Users
|
| **Hubspot (only cloud version)** | - Trouble Ticket - Accounts - Contacts - Potentials - Targets - Users **\***record deletions from Hubspot to vtenext are not covered **N.B.** The "scopes". The crm indicates to insert the following "scopes": [](https://usermanual.vtenext.com/uploads/images/gallery/2022-09/image-1663685096632.png) **ATTENTION:** it is essential to select exactly those indicated, otherwise the synchronization will not work! |
| **Salesforce** | - Trouble Ticket - Ticket Comments - Ticket Attachments - Emails - Accounts - Campaigns - Contacts - Installations - Leads - Potentials - Products**\*** - Users |
| **SuiteCRM (only on-premise version)** | - Trouble Ticket - Accounts - Campaigns - Contacts - Installations - Leads - Potentials - Products**\*** - Users **\***images are not imported |
| **Jira (only cloud version)** | - Trouble Ticket - Project Tasks - Projects - Ticket Comments - Users |
| **vtiger (only cloud version)** | - Trouble Ticket - Accounts - Contacts - Vendors - Installations - Leads - Potentials - Products**\*** - Services - Users **\***images are not imported |
| **Magento (only on-premise version 2.4.0)** | - Accounts - Currencies - Sales Orders - Products**\*** - Configurable products - Taxes **\***images are not imported |
| **Prestashop (only on-premise version 1.7.6.7)** | - Accounts - Currencies - Sales Orders - Products**\*** - Configurable products - Taxes **\***images are not imported |
| **Shopify (only cloud version 2019-20)** | - Accounts - Currencies - Sales Orders - Products**\*** - Configurable products **\***images are not imported **ATTENTION**: To synchronize Shopify products, it is necessary to also set up the **Configurable Products** module in the configuration. |
| **WooCommerce (only on-premise version 4.4.0)** | - Accounts - Currencies - Sales Orders - Products**\*** - Configurable products - Taxes **\***images are not imported |
| **Zapier** | **PAY ATTENTION: T**o properly set up the Zapier connector, it's essential to carefully read the ZAPIER MANUAL provided in Chapter 15.7. FOTO |
| **Zendesk** | - Trouble Ticket - Accounts - Ticket Comments - Ticket Attachments - Users |
| **2FA** | allows receiving notifications for two-factor authentication |
| **Talks** | enables receiving notifications for the Conversations module. **CAUTION**: A notification won't be sent each time a new conversation is received; they are grouped. |
| **Messages** | enables receiving notifications for the Messages module. **CAUTION**: A notification won't be sent for every new email received; they are grouped |
| **Process Tasks** | allows receiving notifications for process tasks involving the logged-in user |
| **Event Reminders** | enables receiving notifications for upcoming Events |
| **Task Reminders** | enables receiving notifications for upcoming Tasks |
| **General CRM notifications** | enables all generic CRM notifications **(by default, this option is disabled due to the potentially high number of push notifications it could generate)** |
| **Custom Schedule** | allows receiving notifications during user-selected days and hours. For example, you can set to receive notifications from Monday to Friday, between 8:00 AM and 7:00 PM |
| **Always** | allows receiving app notifications at all times, any day of the week. |
|  | edit properties of the role |
|  | add a subordinate role |
|  | delete role |
|  | shift the role above or below |
| **User Name** | Each user has only one user name. Once created, it cannot be changed. N.B. Each user has the option to change their password. |
| **Login via LDAP** | Tick if the active directory is enabled on your server. Reference should be made to the LDAP Configuration chapter. |
| **Administrator** | Tick this box to provide the user with administrator privileges, regardless of their role. |
| **Status** | On / Off. The disabled user can no longer log in to vtenext. |
| **Role** | You can change the role of the user (the role must have already been created). |
| **Public: read only** | All users can access and view the module data. Only the assignee and users with a higher hierarchical role can publish, modify or delete data. |
| **Public: read, create/edit** | All users can view, create and edit the module data. Only the assignee and users with a higher hierarchical role can delete data. |
| **Pubblic: read, create/edit, delete** | All users can view, edit and delete data. With this setting the CRM is completely public. |
|  | Generates the processes that autonomously manage the data flow within the CRM |
|  | Generates automatic actions in the CRM when predefined conditions occur (trigger > action) - **Workflows are available read-only**. |
|  | Generates new wizards, which allow the creation and management of records, belonging to different modules and their relationships. |
|  | Generates new modules, manages their content and relationships with other modules, with advanced SDK editing capabilities. |
|  | Accesses the settings of all modules (including extra modules) to enable/disable them and change their layout |
|  | Customises drop-down menus, to add, delete or overwrite values, change their order and visibility by roles |
|  | Manages multi-language drop-down menus |
|  | Creates dependencies between drop-down menus: the choice in the second menu depends on the choice in the first menu |
|  | Management of status changes of CRM items according to constraints and pre-defined authorisations on roles |
|  | Controls the behaviour of fields (visibility, modification, etc.) on the basis of certain conditions |
|  | Protects the values assumed in the fields |
|  | Selects and orders the modules shown in the main navigation menu |
|  | Assigns a colour to the data, based on the values of the picklist fields, which is displayed in the list view of the module, in the Kanban, in the related items and in the dashboards of the homepage. Warning! Only one picklist per module can be assigned to the colours. |
|  | Reads one or more mailboxes and, when a condition occurs, activates automatic mail operations. |
|  | Imports data from CSV files or databases with the option to schedule the process and create advanced queries for data extraction **Warning!** This function is not available in the cloud version. |
| **Managed** | Means managed by the rule, when it occurs. The fields that you do not have to manage should be left disabled; in conjunction with those to be managed, tick the box and proceed with the others. By enabling only this field, without the subsequent ones, the field will be hidden. |
| **Read** | By enable reading permissions, the field will be visible |
| **Write** | By enable writing permissions, the field will be editable |
| **Mandatory** | Makes the field mandatory (function active only in the event of combined use of Status Manager and Conditionals) |
| **Shared Access** | Private or public in various ways; see Sharing Access chapter |
| **Enable Quick creation** | Makes the form available for Quick Creation, in the menu of the bar on the right |
| **Enable Import** | Allows data to be imported from an external source (CSV file) into the module |
| **Enable Export** | Allows you to export module data to CSV files |
| **Enable Duplicate Management** | Allows verification of duplicate data within the module |
|  | Uninstall the module: it will no longer be usable and the records contained within it will be removed |
|  | Change the settings related to the module, repeating the previous steps. This function is only available if the module has not been previously uninstalled |
|  | Export the XML format module (stored in RAR files) |
|  | Delete the module permanently; before being deleted, a module in use must be uninstalled |
| [](https://usermanual.vtenext.com/uploads/images/gallery/2020-05-May/import_button.png) | Import a module saved locally in XML format |
| [](https://usermanual.vtenext.com/uploads/images/gallery/2024-11/aBKimage.png) | Add custom fields to the module |
| [](https://usermanual.vtenext.com/uploads/images/gallery/2024-11/Cegimage.png) | Move fields from another block to the block where the magnet is present |
| [](https://usermanual.vtenext.com/uploads/images/gallery/2024-11/xCuimage.png) | Display the fields that were hidden during the layout configuration |
| [](https://usermanual.vtenext.com/uploads/images/gallery/2024-11/oPZimage.png) | Use this icon to collapse the blocks. The blocks will appear closed, but if they contain fields, they will still be visible as blocks while hiding the fields they contain. Please note that a block without fields, visible in the Layout Editor, will be entirely hidden and invisible in the module detail view |
| [](https://usermanual.vtenext.com/uploads/images/gallery/2024-11/j1Bimage.png) | It is used to move an entire block, along with its contents, from the tab where it is located to another tab that has been specifically created or already exists |
| **Text** | It is a field that can contain from 1 to 255 characters (letters and numbers). The desired length and the name to be given therefore need to be defined. |
| **Text Area** | Text field with pre-set dimensions, visual width equal to the card and with a maximum number of characters of 66,000 (letters and numbers) |
| **Number** | It is a field that can contain from 1 to 64 numbers (including decimals). The desired length, the name to be given and how many decimal places to enter and display therefore need to be defined. |
| **Percentage** | The name to be given to the field needs to be defined (it is recommended to insert the % symbol in the label, as a reminder). The field is purely numeric with the impossibility of exceeding 100% |
| **Currency** | The name to be given, the desired length and how many decimal places to enter and display need to be defined |
| **Date** | The name to be given needs to be defined. Activate the datapicker and autocomplete with today's date in the entity creation phase **ATTENTION:** The “standard” date fields are pre-filled with the current date when you open the record creation page in the module. However, for custom fields added after the module installation, this functionality is not available. When a module is created from Settings, the date fields defined before the installation are considered “standard.” |
| **Hour** | It allows for the creation of a time field, with the option to assign a name, and provides the ability to click on a clock icon to select the time directly from a clock face. |
| **Datetime** | It allows for the creation of a field that captures both the date and the full time. The format will be dd-mm-yyyy - hh:mm, with the option to assign a name. |
| **Email** | The name to be given needs to be defined. Once the email address is saved, if clicked, it will open the predefined composer window to create a new message |
| **Phone** | The name to be given needs to be defined. Once the number is saved, if the switchboard is configured, you will be able to use click-to-call |
| **URL** | The name to be given to the field needs to be defined. Once saved, the URL address allows you to open it in a new tab |
| **Check Box** | This is a YES/ NO flag field. The name to be given needs to be defined |
| **Picklist** | To create a drop-down menu with the fields of your interest. The name to be given to the field and to the values (one below the other) of the list needs to be defined |
| **Skype** | Define the name to be attributed. Once the Skype ID is saved, it will open the chat directly with the ID setted. |
| **Combo multisection box** | To create a drop-down menu where, using the CTRL key, you can select multiple values. The name to be given to the field and to the values (one below the other) of the list needs to be defined |
| **Multilanguage Picklist** | To create drop-down menus, whose values will be available for translation into other languages. The name to be given to the field needs to be defined and then the values (with related translations) created through SETTINGS > MULTI-LANGUAGE PICKLIST EDITOR |
| **Skype** | It allows for a direct link with the Skype application, typically used to call the Skype contact entered in that field, with the option to assign a name. |
| **Related to** | It allows you to create a related field within a module, but it will not be possible to reference the same module multiple times or to reference itself (e.g., within a Support Ticket, it is not possible to link the Trouble Ticket module) |
| **User** | The name to be given needs to be defined. It is used to insert an additional link to the entity with a user |
| **User without filtering permits** | The name to be given needs to be defined. It is used to add a link between the entity and a user by bypassing roles and permissions |
| **User from filtered list** | The name to be given needs to be defined. It is used to add a link between the entity and one of the users defined upstream |
| **Group** | The name to be given needs to be defined. It will provide a drop-down menu with any available groups |
| **Button\*** | Allows you to create a button that recalls a custom function. You need to enter the code during creation *\*see also 17.7.1 BUTTON field in vtenext* |
| **Table Field** | It allows you to create table fields, which permit you to insert lines with values of choice, recalling them from the modules or creating them specifically **Note: For better usability of the table field, it is advisable not to exceed 60 rows during its use.** |
| **Attach documents** | It allows you create a field for adding documents at the same time as creating an entity |
| **Signature** | It allows the creation of a signature field, to which a name can be assigned, and can be used both via the app and as a variable to be called in PDF Maker. |
| **Rating** | It allows the display of a rating system from 1 to 5 stars, to which a name can be assigned. |
| **Media** | It allows the upload of images/videos/audio and displays a preview (if the connected source permits) in the detail view of a record. When filling in this type of field, it is also possible to specify a remote URL. **ATTENTION:** The Media field uploads images into the CRM’s Documents folders. Therefore, if Folders or Documents are set to Private in Shared Access, any uploaded images will follow the same user permission rules |
| **Text** | It is a field that can contain from 1 to 255 characters (letters and numbers). The desired length and the name to be given therefore need to be defined. |
| **Text Area** | Text field with pre-set dimensions, visual width equal to the card and with a maximum number of characters of 66,000 (letters and numbers) |
| **Number** | Contains up to 9 digits without decimals. |
| **Number with Decimals** | It is a field that can contain from 1 to 64 numbers (including decimals). The desired length, the name to be given and how many decimal places to enter and display therefore need to be defined. |
| **Percentage** | The name to be given to the field needs to be defined (it is recommended to insert the % symbol in the label, as a reminder). The field is purely numeric with the impossibility of exceeding 100% |
| **Currency** | The name to be given, the desired length and how many decimal places to enter and display need to be defined |
| **Date** | The name to be given needs to be defined. Activate the datapicker and autocomplete with today's date in the entity creation phase |
| **Hour** | It allows for the creation of a time field, with the option to assign a name, and provides the ability to click on a clock icon to select the time directly from a clock face. |
| **Datetime** | It allows for the creation of a field that captures both the date and the full time. The format will be dd-mm-yyyy - hh:mm, with the option to assign a name. |
| **Email** | The name to be given needs to be defined. Once the email address is saved, if clicked, it will open the predefined composer window to create a new message |
| **Phone** | The name to be given needs to be defined. Once the number is saved, if the switchboard is configured, you will be able to use click-to-call |
| **URL** | The name to be given to the field needs to be defined. Once saved, the URL address allows you to open it in a new tab |
| **Check Box** | This is a YES/ NO flag field. The name to be given needs to be defined |
| **Picklist** | To create a drop-down menu with the fields of your interest. The name to be given to the field and to the values (one below the other) of the list needs to be defined |
| **Skype** | Define the name to be attributed. Once the Skype ID is saved, it will open the chat directly with the ID setted. |
| **Combo multisection box** | To create a drop-down menu where, using the CTRL key, you can select multiple values. The name to be given to the field and to the values (one below the other) of the list needs to be defined |
| **Skype** | It allows for a direct link with the Skype application, typically used to call the Skype contact entered in that field, with the option to assign a name. |
| **Related to** | It allows you to create a related field within a module, but it will not be possible to reference the same module multiple times or to reference itself (e.g., within a Support Ticket, it is not possible to link the Trouble Ticket module) |
| **User** | The name to be given needs to be defined. It is used to insert an additional link to the entity with a user |
| **User without filtering permits** | The name to be given needs to be defined. It is used to add a link between the entity and a user by bypassing roles and permissions |
| **User from filtered list** | The name to be given needs to be defined. It is used to add a link between the entity and one of the users defined upstream |
| **Group** | The name to be given needs to be defined. It will provide a drop-down menu with any available groups |
| **Rating** | It allows the display of a rating system from 1 to 5 stars, to which a name can be assigned. |
| **Media** | It allows the upload of images/videos/audio and displays a preview (if the connected source permits) in the detail view of a record. When filling in this type of field, it is also possible to specify a remote URL. |
| **Full row** | [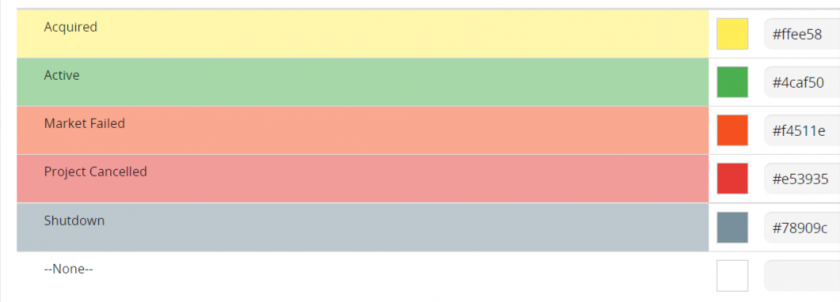](https://usermanual.vtenext.com/uploads/images/gallery/2021-12-Dec/17_13-List-view-colours_1.png) |
| **Little block on the left** | [](https://usermanual.vtenext.com/uploads/images/gallery/2021-12-Dec/17_13-List-view-colours_2.png) |
| **Thin line** | [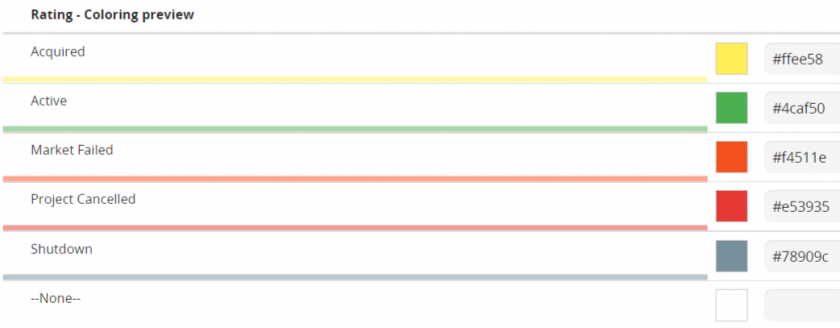](https://usermanual.vtenext.com/uploads/images/gallery/2021-12-Dec/17_13-List-view-colours_3.png) |
| **Field** | [](https://usermanual.vtenext.com/uploads/images/gallery/2021-12-Dec/17_13-List-view-colours_1.png) |
| **Scanner Nome** | Indicate the name, as preferred, to be given to the scanner |
| **Server Nome** | Enter the address of the IMAP mail server, for example: mail.dominiocompany.it |
| **Protocol** | Indicate IMAP4 or IMAP2 |
| **User Name** | Enter the User Name to access the inbox; it usually matches the email address |
| **Password** | Enter the inbox access password |
| **SSL Type, SSL Method** | Indicate the access security protocol information if required |
| **Parameters** | It is used to configure advanced parameters for the imap connection, without using the code. Example: - Parameter name: DISABLE\_AUTHENTICATOR - Parameter value: PLAIN |
| **PEC** | Indicate that the current email address is a PEC By enabling the flag. In this way the ticket will be created using the original email, that is the one contained in the attatched .eml file. |
| **Status** | Enable = mailbox scan is active; Disable = mailbox scan is not active |
| **Find** | Indicate if: - All = all emails after the last scan - Not read = only emails not read after last scan |
| **After Scanning** | Allows you to indicate whether to change the status of the email after scanning: - Empty = does not change the status - Read = the email is marked as read |
| **From** | Indicate a condition in the From field: (sender), if not present leave the field blank |
| **To** | Indicate a condition in the To field: (recipient), if not present leave the field blank |
| **Subject** | Indicate a condition in the Object field, if not present leave the field blank |
| **Body** | Indicate a condition in the body of the email, if not present leave the field blank |
| **Match** | Indicate: - Any Condition: at least one condition must be true (OR) - All conditions: all conditions must be true (AND) |
| **Action** | Indicate the action to be taken when conditions occur. - Create a ticket: Create a ticket from an email, with the following features: - Connected to: the Contact is inserted on the basis of the sender's email address; if not present it remains empty - Title: subject matter of the email - Description: body of the email - Documents: any attachments to the email - Update Ticket: update an existing ticket - Add TO/ FROM: file the email by linking it to the Lead/Account/Contact registry with a check on the email address of the sender \[FROM\] or the recipient \[TO\] of the mail |
| **Mark as Spam** | In this way the email address of the sender will be put in spam. Furthermore, the ticket will be delated. |
| **Answer by mail** | It allows to reply to the email with the email address of the user that is carrying out that operation and not with the email set in the Mail Converter. **Note:** A new feature has been activated that allows, through code (so customers only need to submit a request on the vtenext support portal), the activation of the user's signature when replying using this function. |
| **Answer by Mail (Info)** | It allows to reply to the customer directly with the email address set in the Mail Converter. In this way, we will be able to track the exchange of communications in the ticket. **Note:** A new feature has been activated that allows, through code (so customers only need to submit a request on the vtenext support portal), the activation of the thread for replies. In this case, the thread will consist of the last response received from the customer + the response the user provides to the customer. |
| **Mail From** | the sender’s email address |
| **Mail To** | the recipient’s email address, i.e. the one configured in the Mail Converter |
| **Mail Cc** | any other addresses included in CC |
| **Mail Bcc** | any other addresses included in BCC |
| **Vtenext From Name** | the name of the vtenext sender linked to the email account (only if present) |
| **Mail Mittente vtenext** | the vtenext sender’s email address, which may correspond either to the address used by the Mail Converter (if replying with the generic mailbox “Reply via mail INFO”), or to the user’s email address (if replying with the user mailbox “Reply via mail”) |
| **Data Mail** | the exact date and time when the email generated the ticket (or when the email was delivered to the address configured in the Mail Converter) |
| **Order Num.** | **Product Num** | **Name** | **Descr.** | **Q.ty** | **Price** | **Disc.** | **Total row** |
| SO10 | PR07 | TV | Model 123 | 2 | 350,00 | 0 | 700,00 |
| SO10 | PR11 | Mixer | Bland everything | 1 | 90,00 | 15 | 75,00 |
| **Order Num.** | **Product Num** | **Name** | **Descr.** | **Q.ty** | **Price** | **Disc.** | **Total row** |
| SO10 | PR07 | TV | Model 123 | 2 | 350,00 | 0 | 700,00 |
| SO10 | PR11 | Mixer | Bland everything | 1 | 90,00 | 15 | 75,00 |
| SO11 | PR05 | Computer | Super PC | 1 | 300,00 | 50 | 250,00 |
| SO11 | PR11 | Mixer | Bland everything | 1 | 25,00 | 0 | 25,00 |
| **Order Num.** | **Product Num** | **Name** | **Descr.** | **Q.ty** | **Price** | **Disc.** | **Total row** |
| SO10 | PR07 | TV | Model 123 | 2 | 350,00 | 0 | 700,00 |
| SO11 | PR05 | Computer | Super PC | 1 | 300,00 | 50 | 250,00 |
| SO10 | PR11 | Mixer | Bland everything | 1 | 90,00 | 15 | 75,00 |
| SO11 | PR11 | Mixer | Bland everything | 1 | 25,00 | 0 | 25,00 |
|  | Import enabled/disabled (to change, click on the icon) |
|  | Start import now |
|  | Changing the configuration (the previous steps are re-proposed) |
|  | Reading the last import report |
|  | Delete the Import |
| **Assigned to** | Lead Recipient |
| **Return Url** | When the webform confirmation button is pressed, the user will be redirected to the address indicated here (for example, the thank you page) |
| **Owner** | You can select the CRM user to whom all records created from the portal will be directly assigned; |
| **Notifications** | It offers the possibility to select email templates, which can be customized through creation or modification using the dedicated EMAIL TEMPLATE section in SETTINGS, for exchanging information with the portal user. The options are: - Template used for the portal registration email; - Template used for the successful password change email; - Template used for the password recovery email; - Template used to notify the customer about the creation of a ticket; - Template used to notify the customer about the ticket response; - SMTP account for sending credentials (Default/Global)**\***; - Sender mail; - Sender name **Default/Global\* Default:** If the user has a configured account in the Messages module, the system will use the server associated with it. If no account is configured, the system will use the server specified under Settings -> Mail Server. **Global:** The system will exclusively use the server configured under Settings -> Mail Server. |
| **Home** | It allows configuring buttons for quick actions on the portal home page. By clicking on ADD BUTTON on the right, you can enable a window from which to set: - Button Title - Button Description - Button color - Icon representing the button's function - Action that allows choosing to link a module or trigger the creation of a record in a specific module [](https://usermanual.vtenext.com/uploads/images/gallery/2026-05/amDimage.png) *Button Creation Screen* [](https://usermanual.vtenext.com/uploads/images/gallery/2026-05/QzKimage.png) *Button List Viewing Screen* **The order of the buttons can be changed through drag-and-drop.** |
| **Conditionals** | It is possible to set up conditional fields for the Customer Portal, so that they work exactly like in the vte interface. When they are activated, the conditions will function properly on the portal as well. There are three ways to configure them: - **Import from another portal profile** - **Import from roles and groups** - **Create a new rule directly on the portal (Add button)** [](https://usermanual.vtenext.com/uploads/images/gallery/2026-05/lhHimage.png) [](https://usermanual.vtenext.com/uploads/images/gallery/2024-10/1rXimage.png) By clicking on **Import from another portal profile**, a popup will open, allowing you to select other existing profiles. Once you've selected the desired profile, you can click **Import** at the bottom right of the window to complete the process. [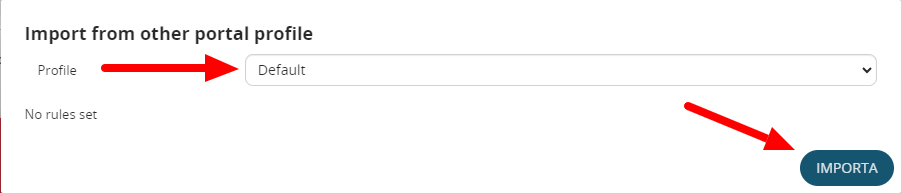](https://usermanual.vtenext.com/uploads/images/gallery/2024-10/A5Zimage.png) By clicking on **Import from roles and groups**, a popup will open, allowing you to select predefined rules for the CRM directly in the Conditional Fields section. For more details on this topic, refer to *Chapter 17.4 Conditional Fields*. [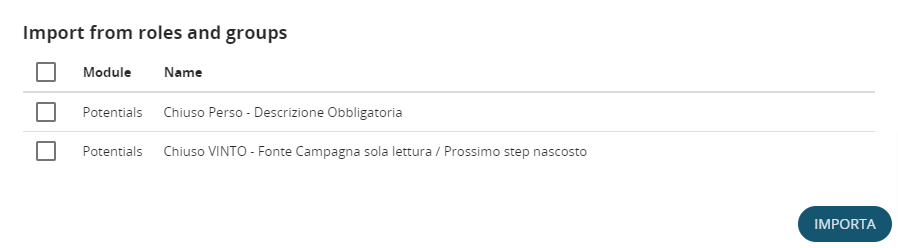](https://usermanual.vtenext.com/uploads/images/gallery/2024-10/kV4image.png) By clicking on **Add**, you can create a new rule for the portal's conditional fields, exclusive to the portal itself (it will not reflect in the CRM). The configuration follows the standard process explained in Chapter 17.4. In the example shown in the image below, you can see a rule where the company's profile becomes entirely read-only when the Status field takes the value Blocked. [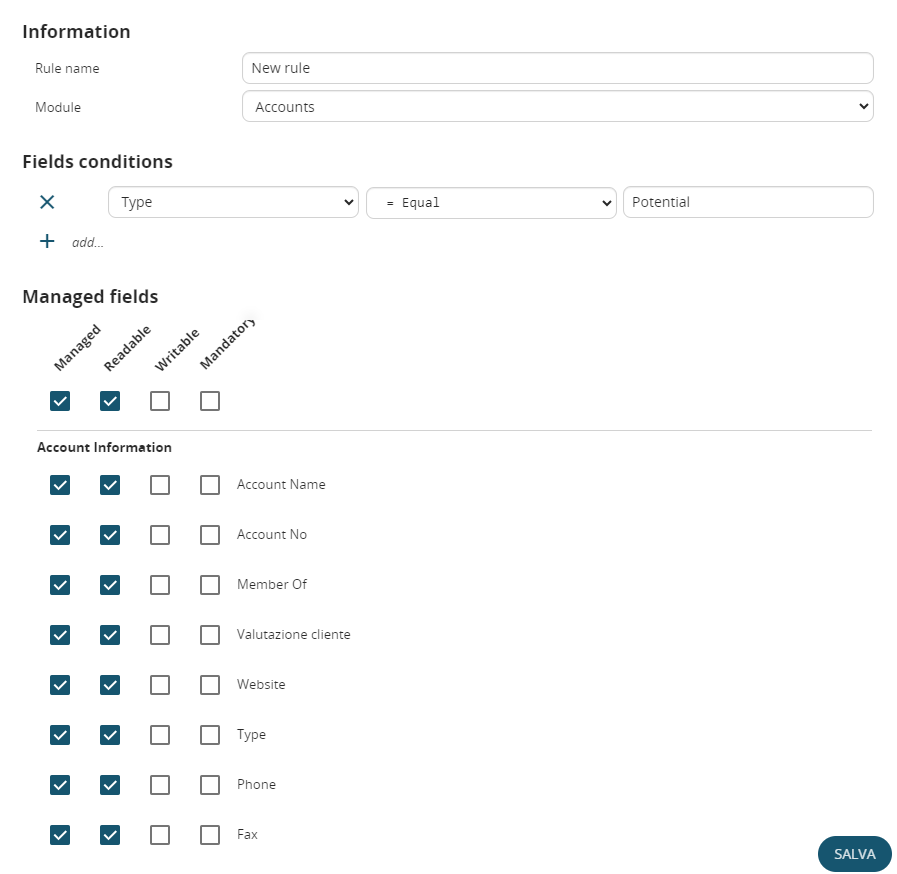](https://usermanual.vtenext.com/uploads/images/gallery/2024-10/cz5image.png) |
| **Global Privileges** | It offers the possibility to configure all privileges for each individual user profile, determining what they can or cannot do or see through the customer portal. You can apply these settings to all modules of vtenext. **WARNING:** One particularity to note is that it is not possible to CREATE company records from the Business Portal. Therefore, even if the profile allows enabling the CREATE/EDIT flag, this function is actually disabled. **FIELDS NOT DISPLAYED IN LIST:** a field that is set as not visible to the portal user through profile configuration cannot be added to the list fields. In fact, even if it can be selected during the configuration of the portal list view (for example, for Customer Support Tickets), when saving, that field is automatically removed (due to the profile configuration). |
| **Note on Custom Modules Created via Interface** | When creating a **custom module**, in order for it to be added to the list of those supported by the Business Portal—and thus appear in the **portal profile management**—it must have at least one relationship linking it to either the Contacts module or the Companies module. This requirement has been added because permissions in the Business Portal are based on this type of relationship; if such a relationship is not present, the module will not be visible in the portal profile permissions. |
| **WEBSERVICE** | |
| **Webservice endpoint** | |
| **Webservice username** | |
| **Default language** | |
| **Default logo** | |
| **Sender name** | |
| **Sender email** | |
| **Number of waiting months for confirm** | |
| **TEMPLATE** | |
| **Support request Template** | |
| **Access Template** | |
| **Confirm update template** | |
| **Contact updated template** | |
| **PRIVACY POLICY** | |
| **Description** | |
| **Currency Name** | The name of the currency you want to manage, for example "USA, Dollars (USD)" |
| **Conversion Rate** | The conversion rate must always be linked to the base currency of vtenext |
| **Status** | Active/Inactive |
| **Name** | **Description** | **Parameters** | **Response** |
| **create** | Create a record of the specified module | elementType (String)element (Encoded) | Return all fields and values of the created record |
| Ex:**Url**: VTE\_URL/restapi/v1/vtews/create**Parameters**: {"elementType":"Accounts", "element":"{\\"accountname\\":\\"account1\\", \\"assigned\_user\_id\\":\\"19x1\\"}"} | |||
| **update** | Update the specified record | id (String)columns (Encoded) | Return all fields and values of the updated record |
| Ex:**Url**: VTE\_URL/restapi/v1/vtews/update**Parameters**: {"id":"3x310", "columns":"{\\"accountname\\":\\"test fede postman\\"}"} | |||
| **revise** | Update the specified record. It’s different only for parameters, the result is the same | element (Encoded) | Return all fields and updated values |
| Ex:**Url**: VTE\_URL//restapi/v1/vtews/revise**Parameters**: {"element":"{\\"id\\":\\"3x27\\",\\"employees\\":\\"5\\",\\"industry\\":\\"Banking\\"}"} | |||
| **retrieve** | Illustrate the fields of the specified record and their relative values | id (String) | Return all fields and values of the specified record |
| Ex:**Url**: VTE\_URL/restapi/v1/vtews/retrieve**Parameters**: {"id":"3x310"} | |||
| **retrieveinventory** | Illustrate the fields of the specified inventory record, their relative values and the product block’s information | id (String) | Return all fields and values of the specified record and product’s block information |
| Ex:**Url**: VTE\_URL//restapi/v1/vtews/retrieveinventory**Parameters**: {"id":"16x104"} | |||
| **delete** | Delete the specified record | id (String) | Return the request status (successful or not) |
| Ex:**Url**: VTE\_URL//restapi/v1/vtews/delete**Parameters**: {"id":"3x306"} | |||
| **query** | Execute a query and return the result’s rows | query (String) | Return all rows of the executed query |
| Ex:**Url**: VTE\_URL//restapi/v1/vtews/query**Parameters**: {"query":"SELECT \* FROM Accounts WHERE accountname like '%vte%';"} | |||
| **listtypes** | Describe each one module which contains uitype of the specified format | fieldTypeList (Encoded) | Return module information of the specified fieldtypes |
| Ex:**Url**: VTE\_URL//restapi/v1/vtews/listtypes**Parameters**:{"fieldTypeList":"\[\\"integer\\",\\"file\\"\]"} | |||
| **describe** | Describe the specified module and their relative fields | elementType (String) | Return all module information and its fields properties(no hidden fields) |
| Ex:**Url**: VTE\_URL//restapi/v1/vtews/describe**Parameters**: {"elementType":"Accounts"} | |||
| **describeall** | The describeall method is different from describe one because it shows hidden fields too | ElementType (Encoded) | Return all module information and its fields properties(hidden fields too) |
| Ex:**Url**: VTE\_URL//restapi/v1/vtews/describeall**Parameters**: {"elementType":"Accounts"} | |||
| **getlabels** | Return all labels and translated ones of the specified module,language | username (String)language (String)module (String) | Return labels and translated ones of the specified module, language |
| Ex:**Url**: VTE\_URL//restapi/v1/vtews/getlabels**Parameters**: {"username":"admin", "language":"it\_it", "module":"Accounts"} | |||
| **getlangs** | Return all languages installed into the CRM | Return all CRM languages | |
| **loginpwd** | Return user webservice access key if username and password are valid | username (String)password (String) | Return user webservice access key |
| Ex:**Url**: VTE\_URL//restapi/v1/vtews/loginpwd**Parameters**: {"username":"admin","password":"123456789"} | |||
| **getmenulist** | Return all modules information (visibility, tabid, name, sequence, ...) | Return modules information and properties | |
| **oldoquery** | Return records that contain the searched value into specified module’s fields | module (String)search\_fields (Encoded)search\_value (String) | Return some record basic information where searched value is contained into the specified module’s fields |
| Ex:**Url**: VTE\_URL//restapi/v1/vtews/oldoquery**Parameters**: {"module":"Accounts", "search\_fields":"\[\\"accountname\\", \\"website\\"\]", "search\_value":"vtenext"} | |||
| **LDAP** | Configure the server to access via LDAP (LDAP configuration has been moved here) [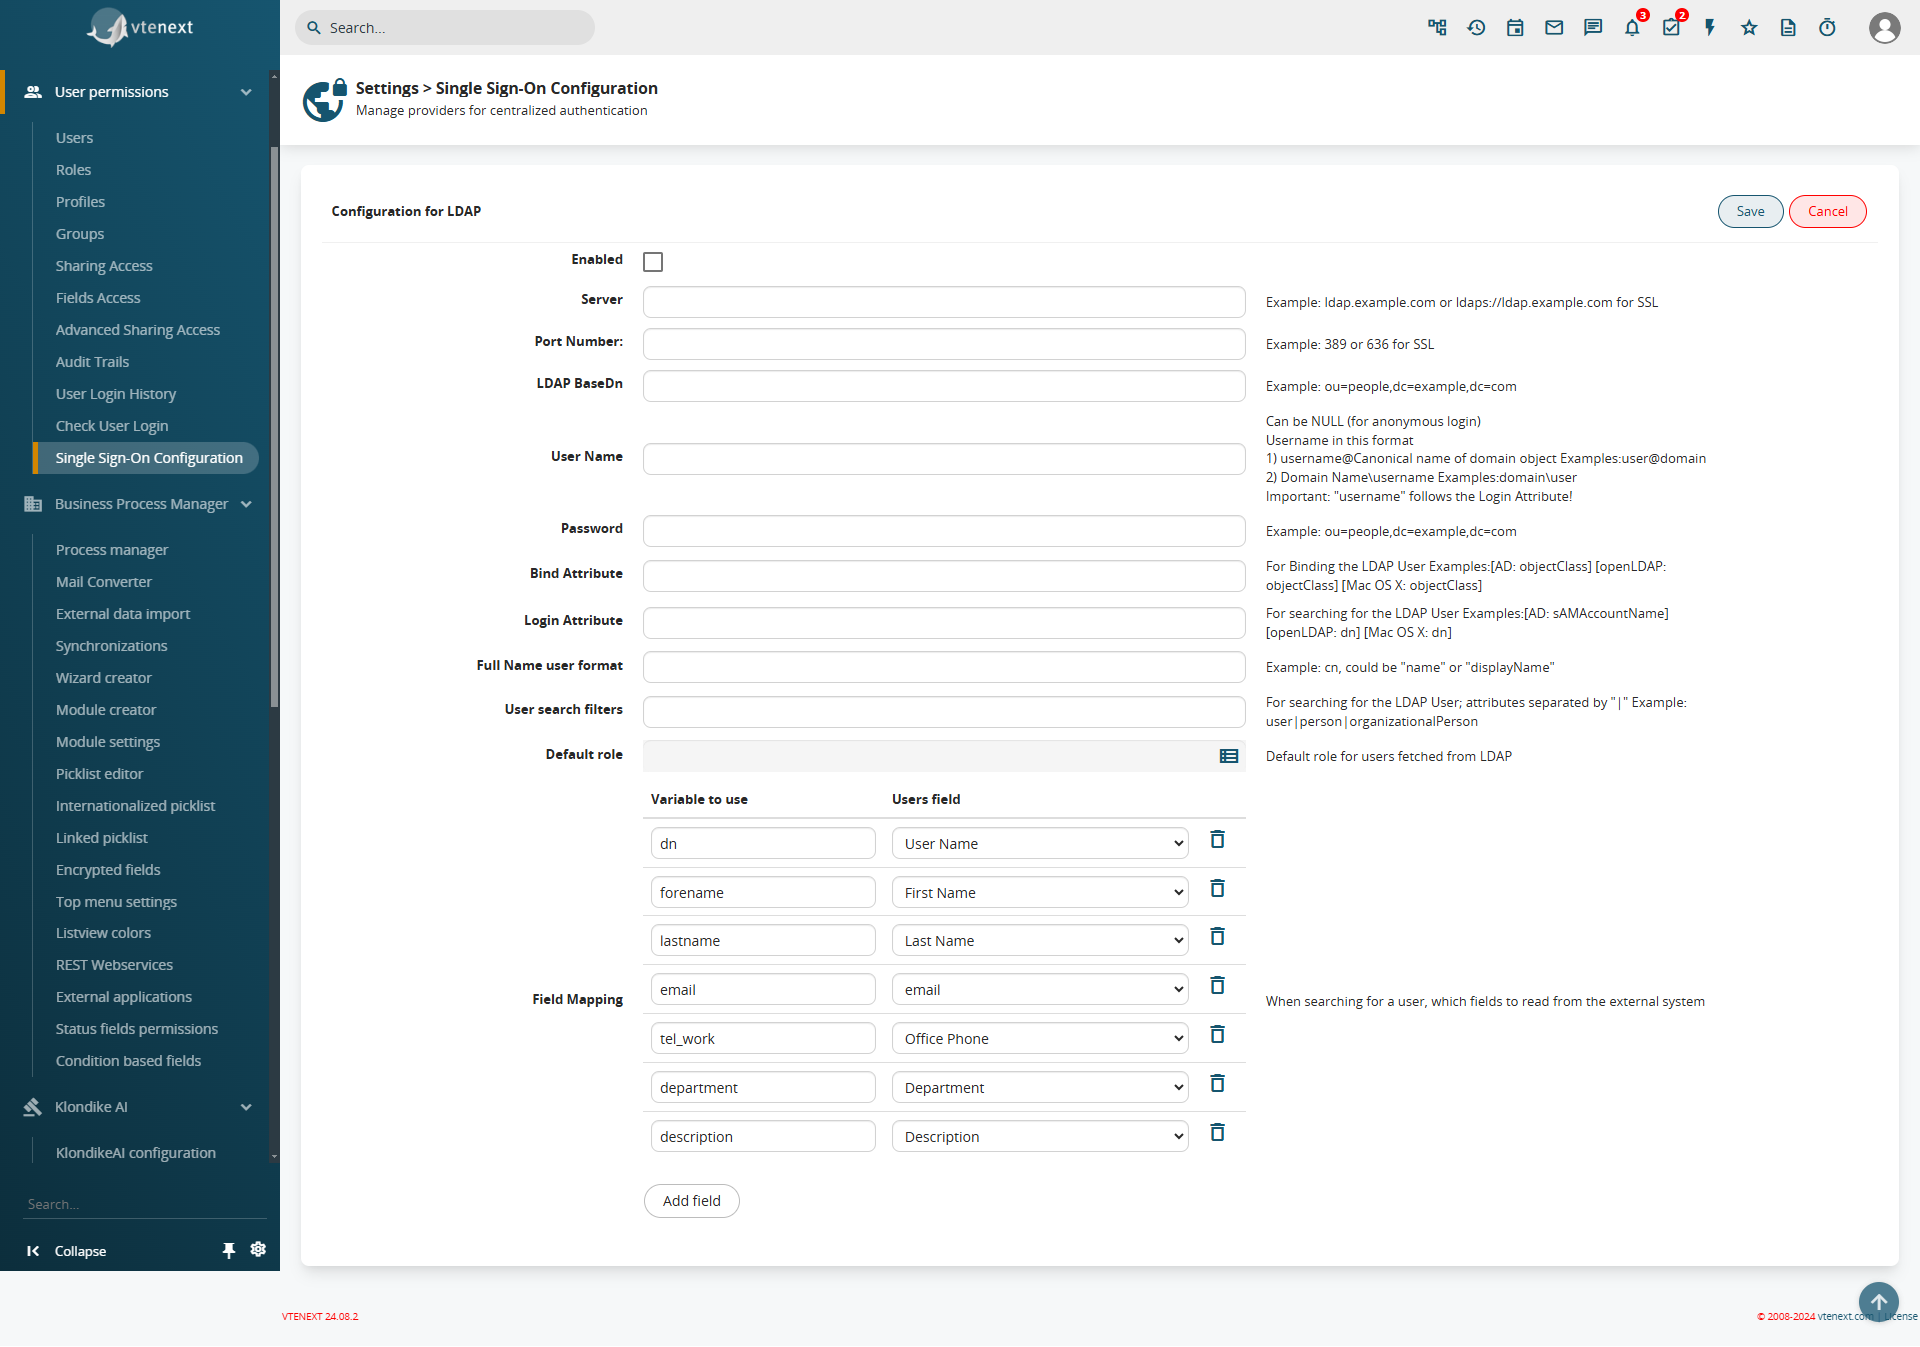](https://usermanual.vtenext.com/uploads/images/gallery/2024-12/7MWimage.png) |
| **OAuth 2.0** | Login via OAuth 2.0 [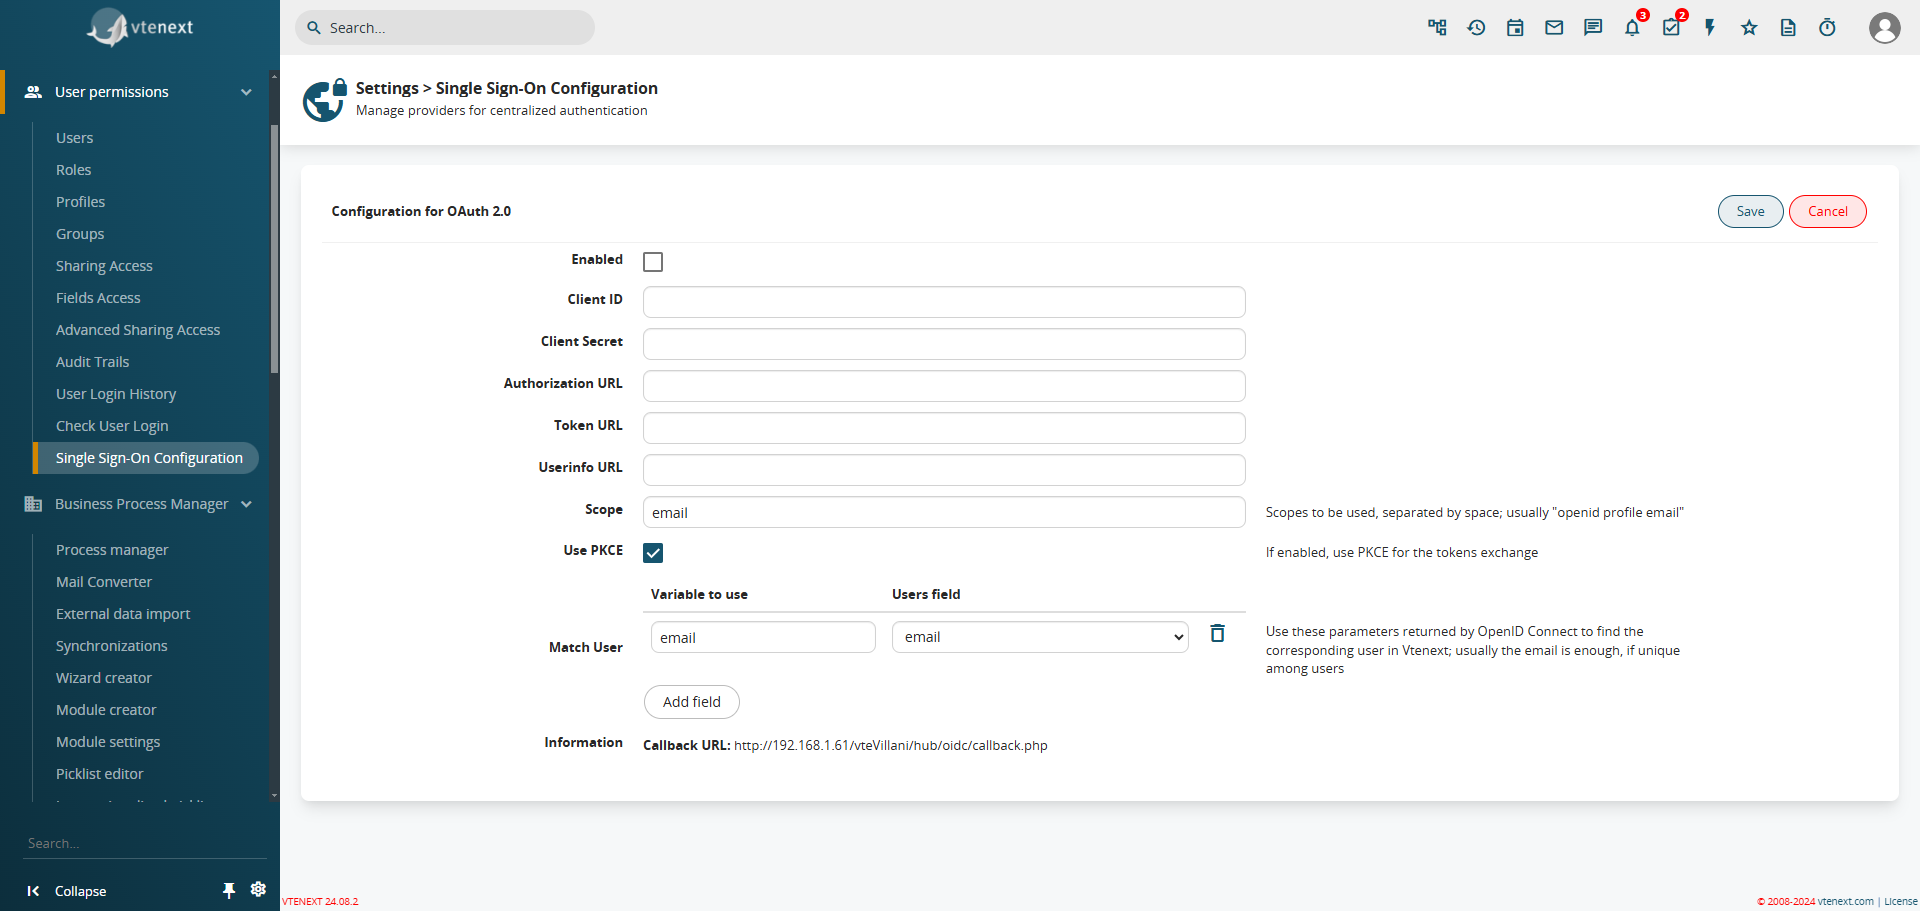](https://usermanual.vtenext.com/uploads/images/gallery/2024-12/6gNimage.png) |
| **OpenID Connect** | Login via OpenID Connect [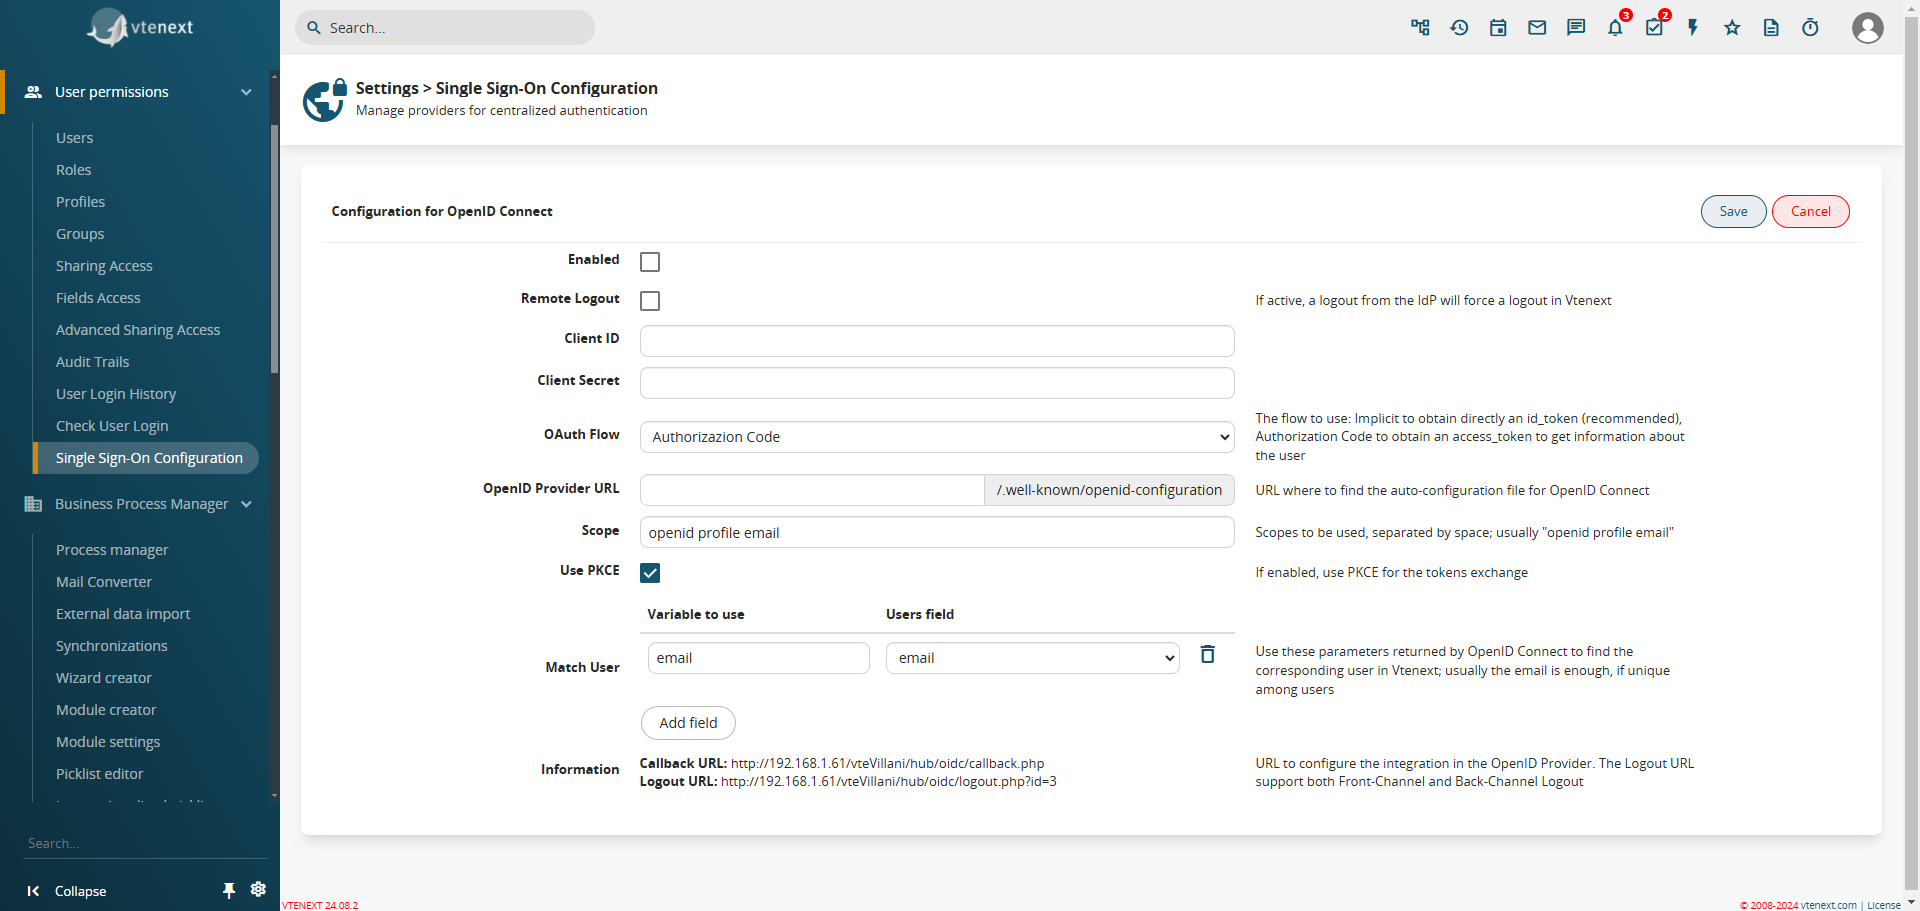](https://usermanual.vtenext.com/uploads/images/gallery/2024-12/CBcimage.png) |
| **SAML** | Login via SAML 2.0 Protocol |
| **Microsoft Azure - OIDC** | Login via an Azure App with OpenID Connect [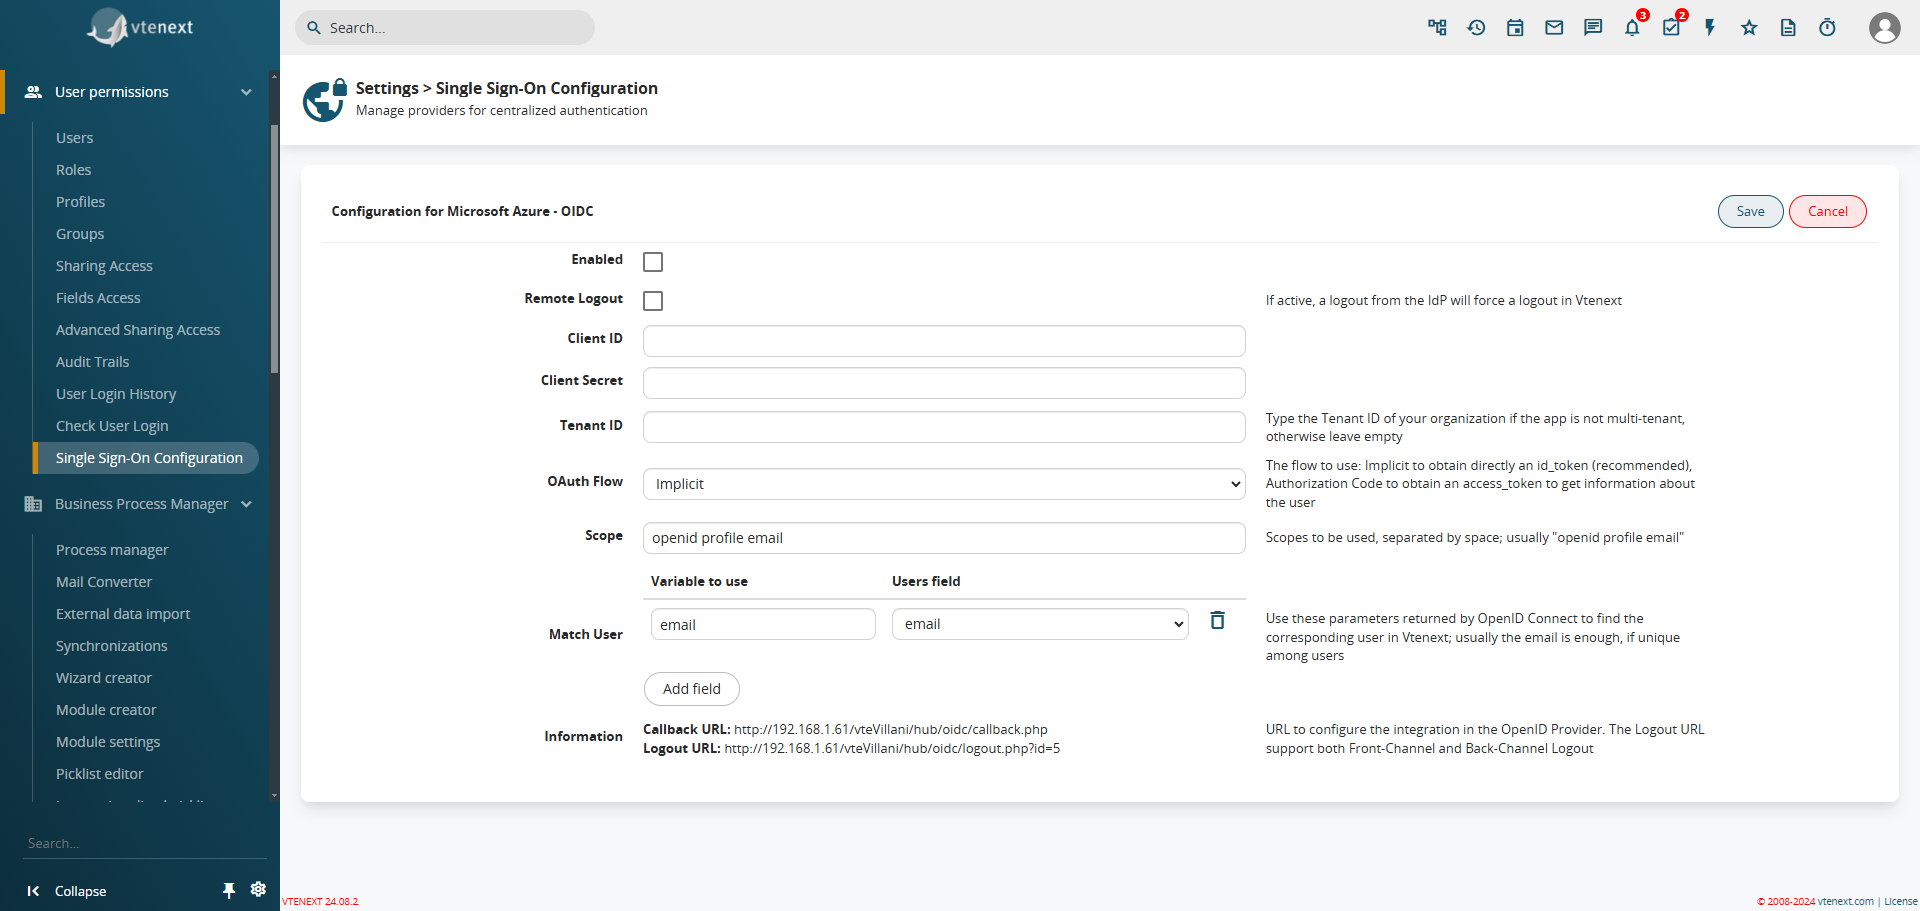](https://usermanual.vtenext.com/uploads/images/gallery/2024-12/3Sfimage.png) For information on how to create the app in Azure, please refer to the **[specific guide](https://usermanual.vtenext.com/books/creation-of-external-apps/page/oidc-openid-connect)** |
| **Microsoft Azure - SAML** | Login via an Azure App with SAML For information on how to create the app in Azure, please refer to the **[specific guide](https://usermanual.vtenext.com/books/creation-of-external-apps/page/saml)** |
| **Google - OIDC** | Login via Google with OpenID Connect [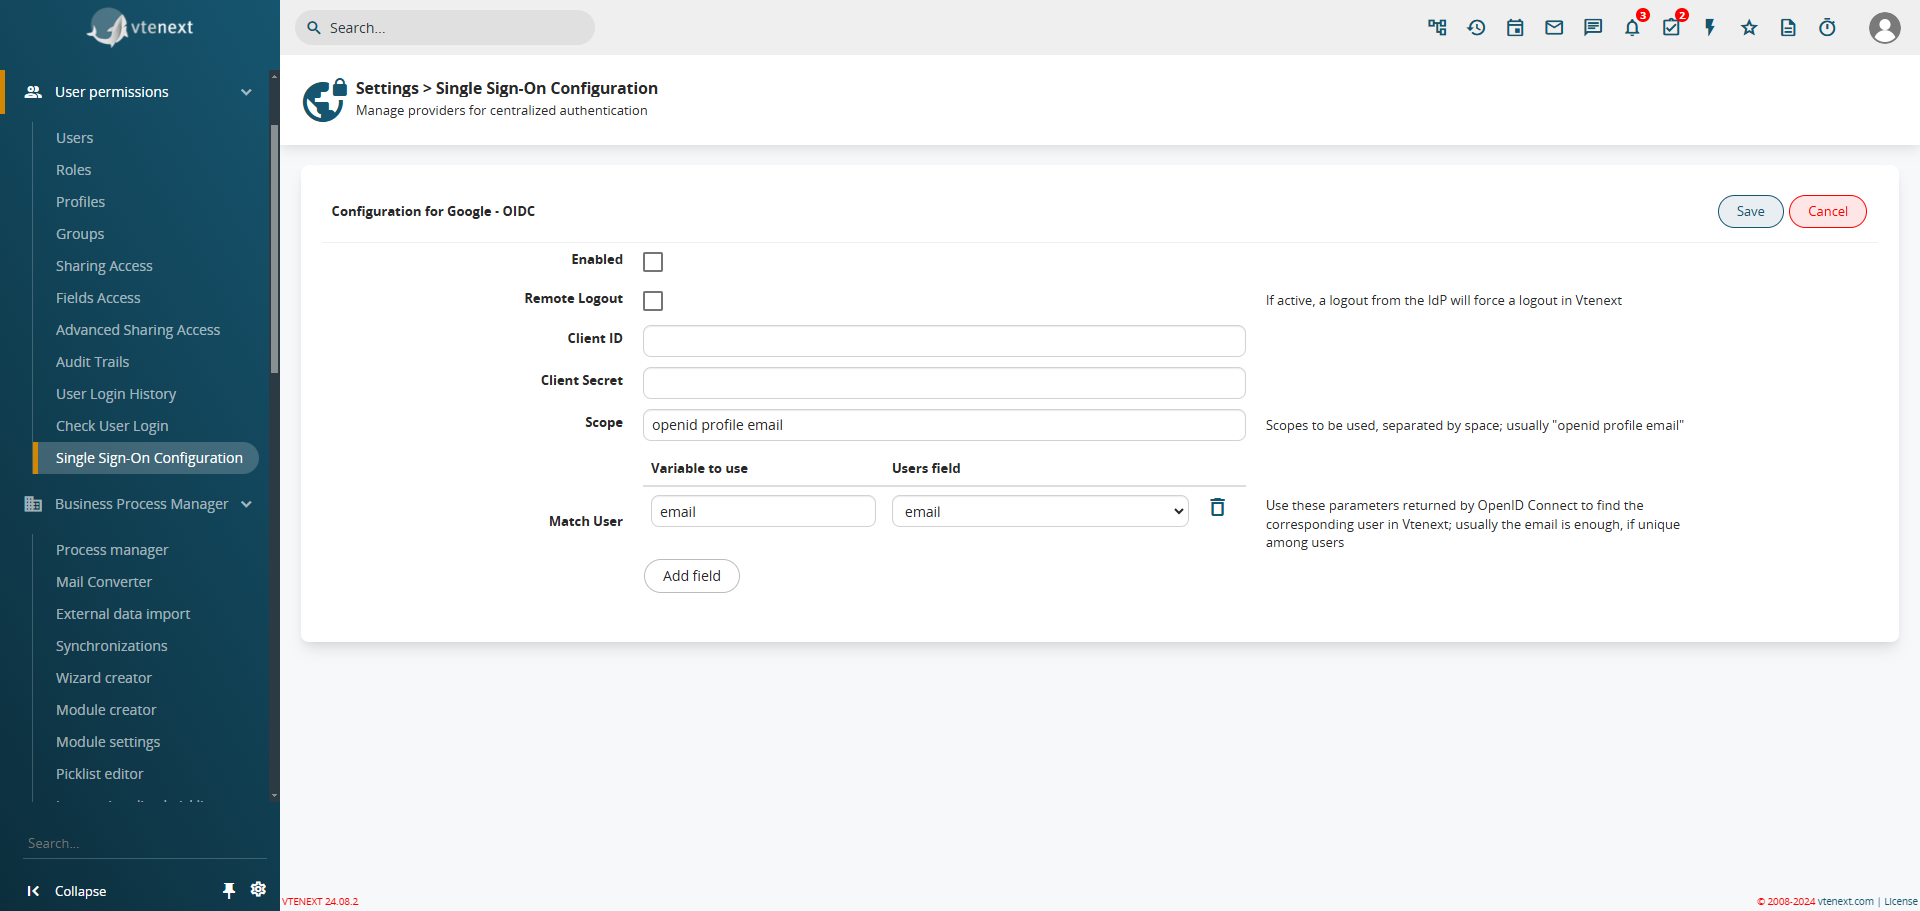](https://usermanual.vtenext.com/uploads/images/gallery/2024-12/bYFimage.png) |