# 22. AI Tools

The **AI Tools** section brings together all the settings related to the artificial intelligence features integrated into the CRM. From here, you can configure the **Large Language Model (LLM)**, manage **MCP clients and servers**, define **AI agents**, and customize the **AI chat** integrated into the system.

# 22.1 LLM

The **LLM** section of the settings allows you to register the **Large Language Models (LLMs)** that vtenext can use for AI agents and other AI-powered features. Here, you can define the model's connection details, assign it a name for identification, and configure parameters that influence the model's response behavior.

<p class="callout warning">vtenext does not include a built-in AI model within the CRM. To configure an LLM, you must have either a remote model accessible through **OpenAI-compatible APIs** or a locally installed model that is reachable by the system. In other words, this configuration is used to connect vtenext to an external or local AI service—the model itself is not built into the CRM.</p>

### **The List View**

The list displays all previously saved configurations. For each entry, you can view:

[![image.png](https://usermanual.vtenext.com/uploads/images/gallery/2026-07/scaled-1680-/2IZimage.png)](https://usermanual.vtenext.com/uploads/images/gallery/2026-07/2IZimage.png)
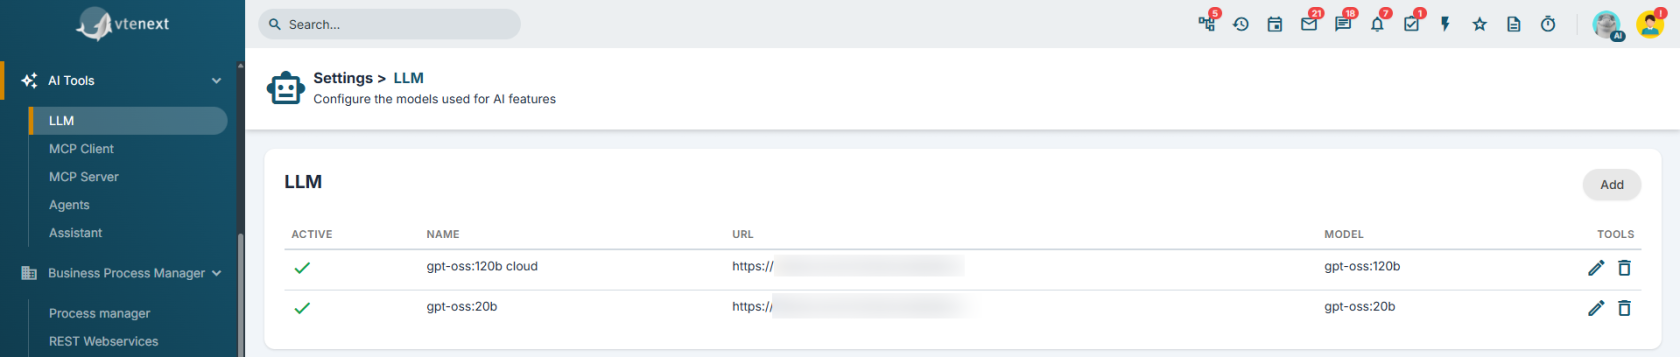
- Active or inactive status
- Configuration name
- Service URL
- Model used

From the list, you can create a new configuration, edit an existing entry, delete it, or quickly enable and disable it.

### **Creating a new LLM**

[![image.png](https://usermanual.vtenext.com/uploads/images/gallery/2026-07/scaled-1680-/Qx9image.png)](https://usermanual.vtenext.com/uploads/images/gallery/2026-07/Qx9image.png)
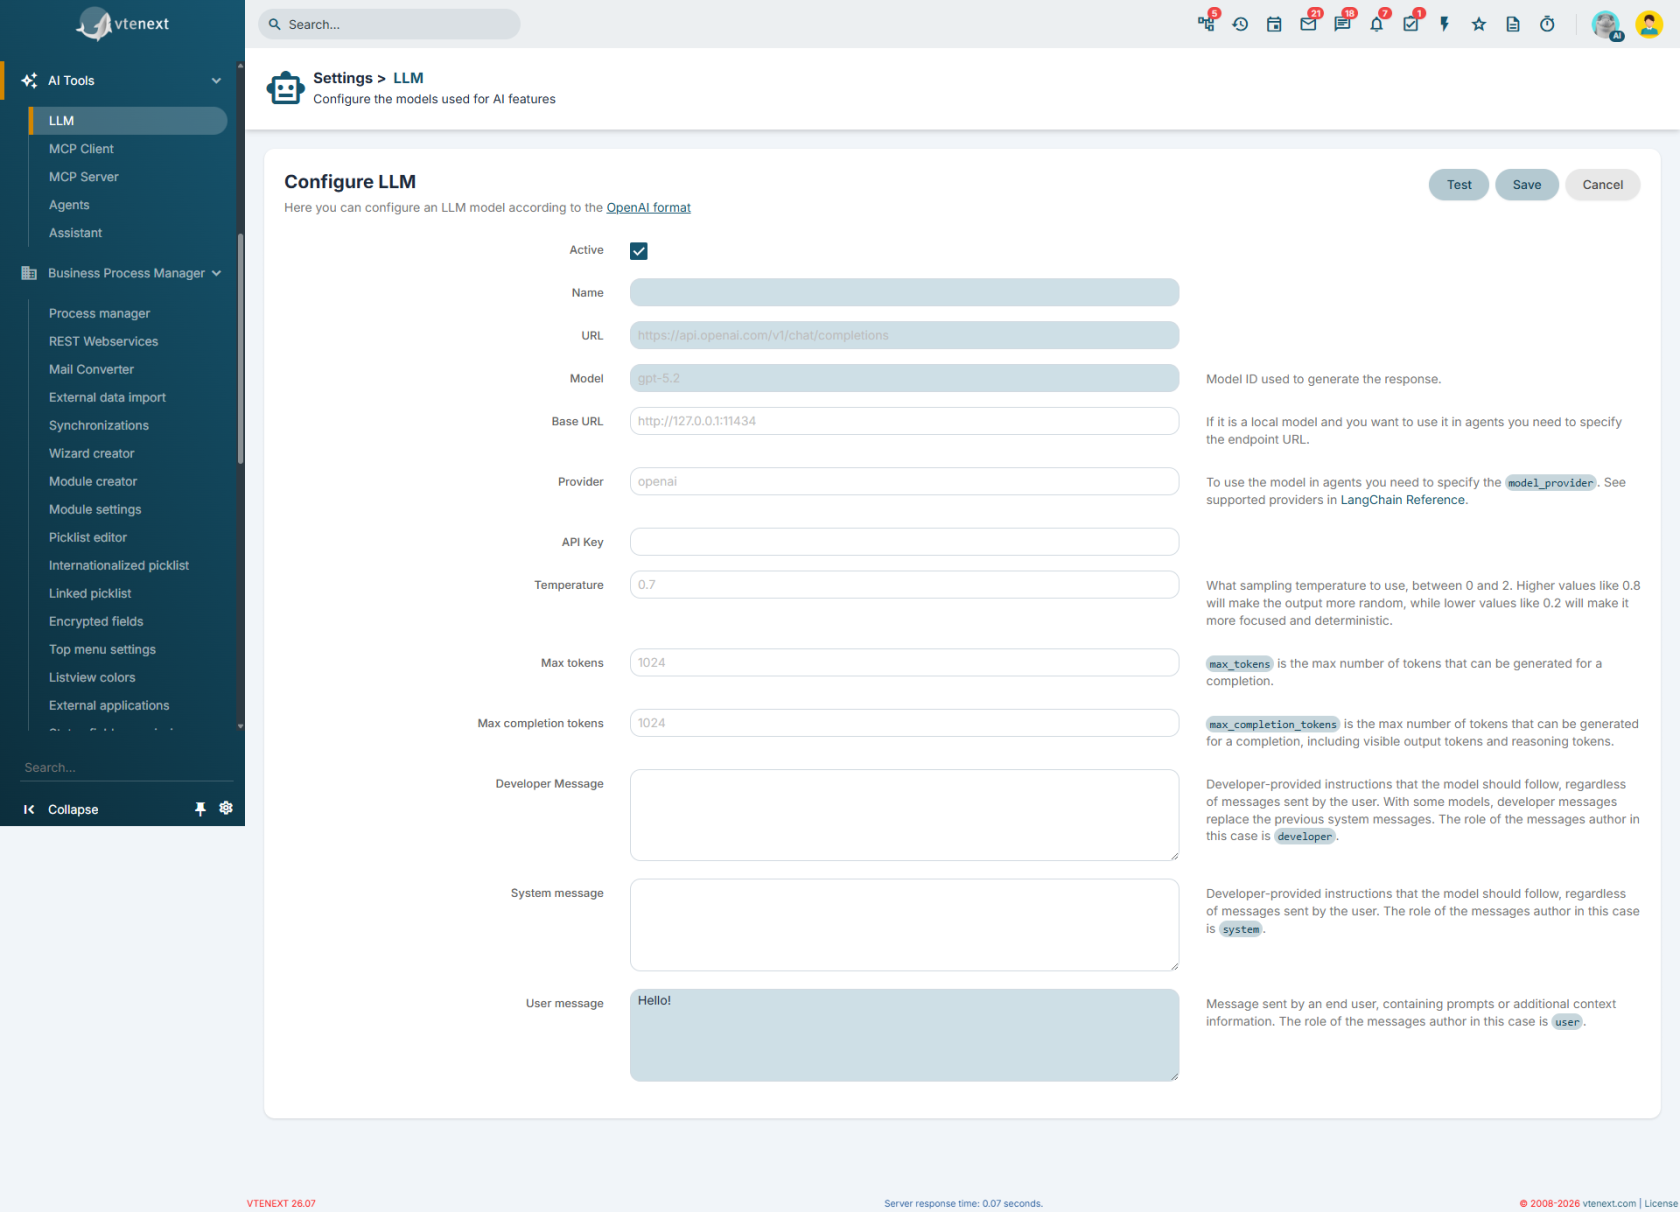
1. Open the LLM section.
2. Click Add.
3. Fill in the required fields.
4. If necessary, run a configuration test.
5. Save.

[![image.png](https://usermanual.vtenext.com/uploads/images/gallery/2026-07/scaled-1680-/o6dimage.png)](https://usermanual.vtenext.com/uploads/images/gallery/2026-07/o6dimage.png)
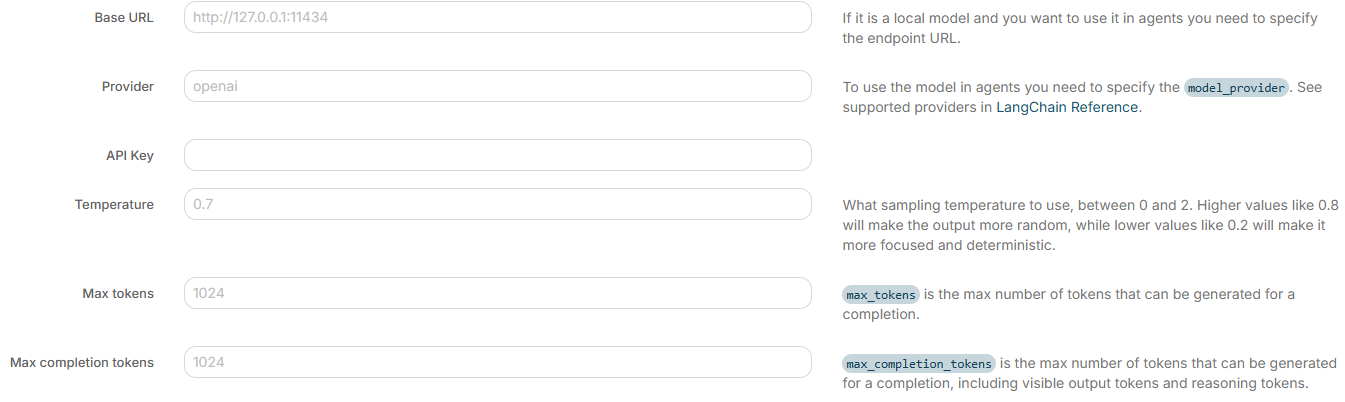
<table border="1" cellpadding="5" cellspacing="5" id="bkmrk-processi%3A-cliccando-" style="width: 100%; border-collapse: collapse; vertical-align: middle; background-color: rgb(235, 247, 255); height: 103.188px;"><tbody><tr style="height: 29.7969px;"><td style="width: 29.7995%; height: 29.7969px; vertical-align: middle;">****Active****

</td><td style="width: 70.2005%; height: 29.7969px; vertical-align: middle;">makes the model available for use</td></tr><tr style="height: 10px;"><td style="width: 29.7995%; height: 10px; vertical-align: middle;">****Name****

</td><td style="width: 70.2005%; height: 10px; vertical-align: middle;">descriptive name of the model displayed in vtenext. Required field

</td></tr><tr style="height: 63.3906px;"><td style="width: 29.7995%; height: 63.3906px; vertical-align: middle;">**URL**

</td><td style="width: 70.2005%; height: 63.3906px; vertical-align: middle;">API endpoint to which vtenext sends requests to the model (for example, [https://api.openai.com/v1/chat/completions](https://api.openai.com/v1/chat/completions)). Required field

</td></tr><tr><td style="width: 29.7995%; vertical-align: middle;">****Model****

</td><td style="width: 70.2005%; vertical-align: middle;">identifier of the model to be used (for example, gpt-5.2). Required field

</td></tr><tr><td style="width: 29.7995%; vertical-align: middle;">****Base URL****

</td><td style="width: 70.2005%; vertical-align: middle;">the base address of the service hosting the model. In practice, it tells AI agents and the Python orchestrator where the model service is located. It becomes particularly important when using a local model or an internal service within the infrastructure, for example an endpoint such as [http://127.0.0.1:11434](http://127.0.0.1:11434)

</td></tr><tr><td style="width: 29.7995%; vertical-align: middle;">****Provider****

</td><td style="width: 70.2005%; vertical-align: middle;">indicates to vtenext and the Python orchestrator what type of service is behind the model, such as OpenAI or Ollama

</td></tr><tr><td style="width: 29.7995%; vertical-align: middle;">****API Key****

</td><td style="width: 70.2005%; vertical-align: middle;">authentication key provided by the provider, required to authorize API requests

</td></tr><tr><td style="width: 29.7995%; vertical-align: middle;">****Temperature****

</td><td style="width: 70.2005%; vertical-align: middle;">controls the level of randomness in generated responses. Lower values (for example, 0.2) produce more consistent, predictable, and repeatable responses; higher values (for example, 0.8 or above) encourage more varied and creative responses

</td></tr><tr><td style="width: 29.7995%; vertical-align: middle;">****Maximum Tokens****

</td><td style="width: 70.2005%; vertical-align: middle;">defines the maximum total number of tokens that the model can use to process the request, including both the messages sent and the generated response (if supported by the provider)

</td></tr><tr><td style="width: 29.7995%; vertical-align: middle;">****Maximum Completion Tokens****

</td><td style="width: 70.2005%; vertical-align: middle;">limits the maximum number of tokens that the model can use exclusively for the generated response

</td></tr><tr><td style="width: 29.7995%; vertical-align: middle;">****Developer Message****

</td><td style="width: 70.2005%; vertical-align: middle;">instructions addressed to the model with the developer role, used to define behavioral rules or application constraints

</td></tr><tr><td style="width: 29.7995%; vertical-align: middle;">****System Message****

</td><td style="width: 70.2005%; vertical-align: middle;">general instructions that define the model’s behavior during the conversation

</td></tr><tr><td style="width: 29.7995%; vertical-align: middle;">****User Message****

</td><td style="width: 70.2005%; vertical-align: middle;">test message sent to the model to verify its operation. Required field

</td></tr></tbody></table>

### **How the test works**

The TEST button sends an actual request to the model using the configured parameters and displays:

[![image.png](https://usermanual.vtenext.com/uploads/images/gallery/2026-07/scaled-1680-/UbJimage.png)](https://usermanual.vtenext.com/uploads/images/gallery/2026-07/UbJimage.png)

- Operation result
- Response code
- Returned headers
- Full response body

[![image.png](https://usermanual.vtenext.com/uploads/images/gallery/2026-07/scaled-1680-/Gh2image.png)](https://usermanual.vtenext.com/uploads/images/gallery/2026-07/Gh2image.png)

*Call Result: RESULT tab*

[![image.png](https://usermanual.vtenext.com/uploads/images/gallery/2026-07/scaled-1680-/Lmcimage.png)](https://usermanual.vtenext.com/uploads/images/gallery/2026-07/Lmcimage.png)

*Call Result: HEADERS tab*

[![image.png](https://usermanual.vtenext.com/uploads/images/gallery/2026-07/scaled-1680-/8qbimage.png)](https://usermanual.vtenext.com/uploads/images/gallery/2026-07/8qbimage.png)

*Call Result: RESPONSE tab*

<p class="callout warning">The test is used to verify the configuration, but it does not replace saving the configuration.</p>

<p class="callout warning">The test sends an actual request to the remote or local model. If the model cannot be reached via API, the test cannot be performed.</p>

### **Practical examples**

#### Example 1: OpenAI-compatible model

Use this configuration when the model is available as a remote service through an external API. Set the name, URL, model, and API Key, then send a simple test message.

#### Example 2: Local model

If the model runs locally or on an internal infrastructure, also fill in the **Base URL** and **Provider** fields. In this case as well, the model must already be installed, active, and reachable over the network.

# 22.2 MCP Server

The **MCP Servers** section allows you to publish, through vtenext, an **MCP endpoint** that makes CRM tools and operations available to compatible external clients. In practice, this section is used to define which MCP server to expose and which tools to publish through it.

<p class="callout info">**In summary:** an **MCP server** is not an AI model and does not replace an AI agent. It is an access point that securely exposes CRM functions, allowing compatible **MCP clients** to invoke them from external applications.</p>

### **When to use it**

- To expose CRM tools to external **MCP-compatible clients**.
- To precisely select which operations should be made available.
- To create a stable internal endpoint for use in AI integrations.
- To generate, if required, an **MCP client** connected to the same server.

### **The List View**

The list displays all previously configured **MCP servers**.

[![image.png](https://usermanual.vtenext.com/uploads/images/gallery/2026-07/scaled-1680-/mLLimage.png)](https://usermanual.vtenext.com/uploads/images/gallery/2026-07/mLLimage.png)

<table id="bkmrk-processi%3A-cliccando-" style="width: 100%; border-collapse: collapse; vertical-align: middle; background-color: rgb(235,247,255); height: 129.188px;"><tbody><tr style="height: 29.7969px;"><td style="width: 16.345%; height: 29.7969px; vertical-align: middle;">****Active****

</td><td style="width: 83.655%; height: 29.7969px; vertical-align: middle;">indicates whether the server is enabled and publicly available</td></tr><tr style="height: 29.7969px;"><td style="width: 16.345%; height: 29.7969px; vertical-align: middle;">****Endpoint****

</td><td style="width: 83.655%; height: 29.7969px; vertical-align: middle;">identifier of the published server

</td></tr><tr style="height: 10px;"><td style="width: 16.345%; height: 10px; vertical-align: middle;">****Description****

</td><td style="width: 83.655%; height: 10px; vertical-align: middle;">descriptive text for the server

</td></tr><tr><td style="width: 16.345%; vertical-align: middle;">******Published Tools******

</td><td style="width: 83.655%; vertical-align: middle;">number of tools made available through the server

</td></tr><tr><td style="width: 16.345%; vertical-align: middle;">******MCP******

</td><td style="width: 83.655%; vertical-align: middle;">associated MCP client, if any, including its synchronization status

</td></tr></tbody></table>

From the list, you can create a new server, edit an existing one, delete it, or copy its full URL.

### **Creating a New MCP Server**

[![image.png](https://usermanual.vtenext.com/uploads/images/gallery/2026-07/scaled-1680-/qJjimage.png)](https://usermanual.vtenext.com/uploads/images/gallery/2026-07/qJjimage.png)

1. Open the **MCP Servers** section.
2. Click **Add**.
3. Check the **Base URL** displayed by the system and verify that it is accessible from outside the network.
4. Enter the **Endpoint** name.
5. Add a **Description**, if needed.
6. Choose whether to also create the associated **MCP client**.
7. Select the tools to publish.
8. Save the configuration.

### **Configuration Parameters**

[![image.png](https://usermanual.vtenext.com/uploads/images/gallery/2026-07/scaled-1680-/1WNimage.png)](https://usermanual.vtenext.com/uploads/images/gallery/2026-07/1WNimage.png)

<table id="bkmrk-active-makes-the-ser" style="width: 100%; border-collapse: collapse; vertical-align: middle; background-color: rgb(235,247,255); height: 129.188px;"><tbody><tr style="height: 29.7969px;"><td style="width: 19.3052%; height: 29.7969px; vertical-align: middle;">****Active****

</td><td style="width: 80.6948%; height: 29.7969px; vertical-align: middle;">makes the server available for use</td></tr><tr style="height: 29.7969px;"><td style="width: 19.3052%; height: 29.7969px; vertical-align: middle;">******Base URL******

</td><td style="width: 80.6948%; height: 29.7969px; vertical-align: middle;">initial part of the server address ($site\_URL), displayed as read-only. It is automatically generated by the system

</td></tr><tr style="height: 10px;"><td style="width: 19.3052%; height: 10px; vertical-align: middle;">******Endpoint******

</td><td style="width: 80.6948%; height: 10px; vertical-align: middle;">final identifier of the server. It is the part that completes the public URL of the MCP server. It must be unique and may contain letters, numbers, underscores, and hyphens

</td></tr><tr><td style="width: 19.3052%; vertical-align: middle;">******Description******

</td><td style="width: 80.6948%; vertical-align: middle;">used to explain the purpose of the server to administrators or users responsible for maintaining it

</td></tr><tr><td style="width: 19.3052%; vertical-align: middle;">******Create MCP Client******

</td><td style="width: 80.6948%; vertical-align: middle;">automatically creates an MCP client pointing to this server. The connection is kept synchronized and, if the server is deleted, the associated client is also removed

</td></tr></tbody></table>

### **Published Tools Selection**

After the main fields, the screen displays the section dedicated to the published tools.

[![image.png](https://usermanual.vtenext.com/uploads/images/gallery/2026-07/scaled-1680-/pPWimage.png)](https://usermanual.vtenext.com/uploads/images/gallery/2026-07/pPWimage.png)

The available tools can come from multiple areas of the system, for example:

- Base Tools
- SDK Tools (see [MCP Server](https://usermanual.vtenext.com/books/developers/page/mcp-server) for further details)
- [Processes](https://usermanual.vtenext.com/books/business-process-manager-manual/chapter/16-tool-processes)

You can select them by group or quickly search for them using the search field. Some basic tools are automatically maintained by the system, even if they are not manually selected, to ensure the correct operation of the integration.

### **Practical examples**

#### Example 1: MCP server for internal CRM tools

You can create a server dedicated to a limited set of tools, for example only those required by an internal assistant or a controlled integration.

#### Example 2: MCP server with connected client

If you want the server to be immediately usable from the client side as well, you can enable the **Create MCP Client** option. In this way, vtenext automatically prepares the client that connects to that server.

#### Example 3: Selective tool publishing

If you do not want to expose all available functions, you can publish only the tools that are actually required. This approach helps keep the integration more organized and controlled.

# 22.3 MCP Client

The **MCP Clients** section is used to connect vtenext to an external or internal MCP server, allowing it to retrieve and use the available tools within processes and agents. In practice, this section is where you configure how to reach the MCP server, how to authenticate, and how to keep the list of available tools up to date.

<p class="callout info">**In summary:** the **MCP client** does not publish functions externally. It performs the opposite operation: it connects to an **MCP server**, retrieves its tools, and makes them available within vtenext.</p>

### **When to use it**

- To connect vtenext to an already available MCP server.
- To use the tools exposed by an MCP server within processes and agents (see [AI Actions](https://usermanual.vtenext.com/books/manuale-dei-processi/chapter/3a-azioni-ai)).
- To keep the list of available tools synchronized over time.
- To quickly connect an MCP server created in the [MCP Servers](https://usermanual.vtenext.com/books/manuale-vtenext-2607/page/222-server-mcp) section.

### **The List View**

The list displays all previously configured **MCP clients**.

[![image.png](https://usermanual.vtenext.com/uploads/images/gallery/2026-07/scaled-1680-/d2ximage.png)](https://usermanual.vtenext.com/uploads/images/gallery/2026-07/d2ximage.png)
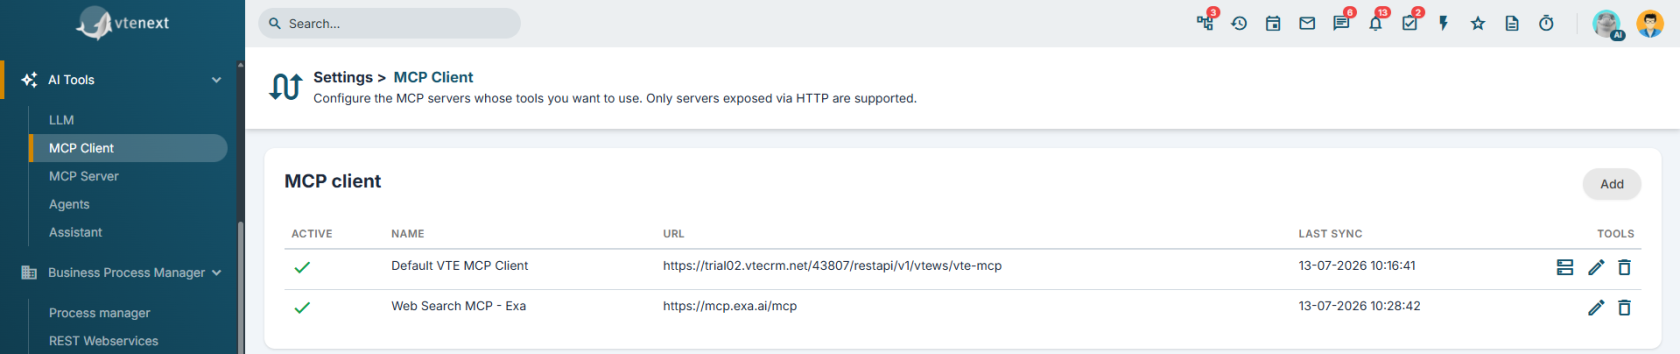
<table border="1" cellpadding="5" cellspacing="5" id="bkmrk-processi%3A-cliccando-" style="width: 100%; border-collapse: collapse; vertical-align: middle; background-color: rgb(235, 247, 255); height: 129.188px;"><tbody><tr style="height: 29.7969px;"><td style="width: 22.2897%; height: 29.7969px; vertical-align: middle;">**Active**

</td><td style="width: 77.7103%; height: 29.7969px; vertical-align: middle;">indicates whether the client is enabled</td></tr><tr style="height: 29.7969px;"><td style="width: 22.2897%; height: 29.7969px; vertical-align: middle;">**Name**

</td><td style="width: 77.7103%; height: 29.7969px; vertical-align: middle;">internal name used to identify the connection

</td></tr><tr style="height: 10px;"><td style="width: 22.2897%; height: 10px; vertical-align: middle;">**URL**

</td><td style="width: 77.7103%; height: 10px; vertical-align: middle;">address of the MCP server to which the client connects

</td></tr><tr style="height: 29.7969px;"><td style="width: 22.2897%; vertical-align: middle; height: 29.7969px;">**Last Synchronization**

</td><td style="width: 77.7103%; vertical-align: middle; height: 29.7969px;">shows when the tools were last synchronized, or indicates that the client has never been synchronized

</td></tr></tbody></table>

From the list, you can create a new client, edit it, or delete it. If the client is connected to an internal **MCP Server**, you can also directly open that server from the list.

### **Creating a New MCP Client**

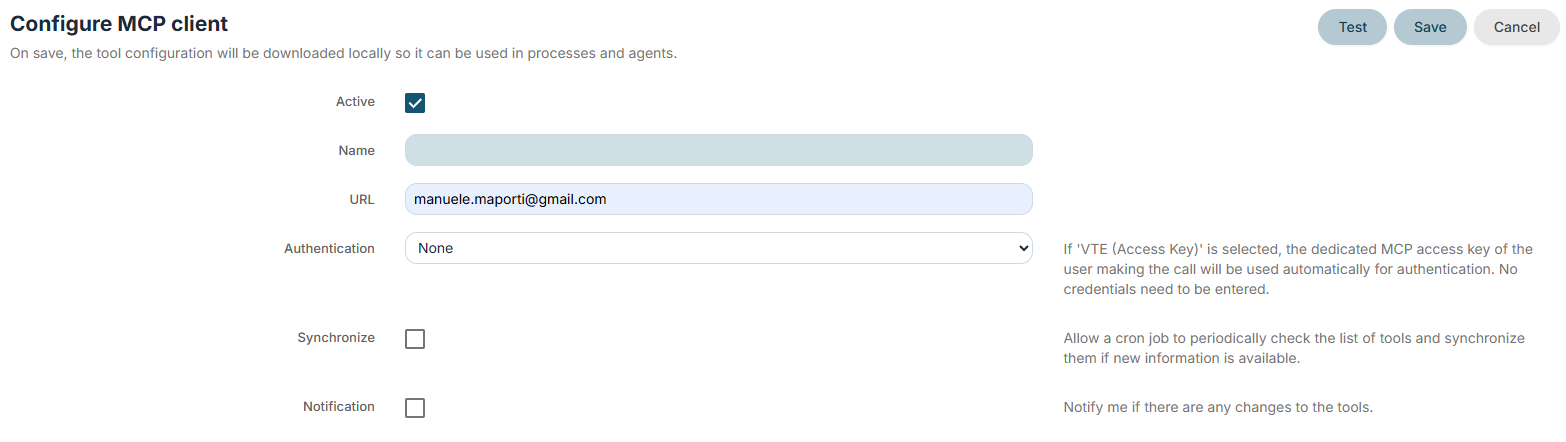
[![image.png](https://usermanual.vtenext.com/uploads/images/gallery/2026-07/scaled-1680-/woJimage.png)](https://usermanual.vtenext.com/uploads/images/gallery/2026-07/woJimage.png)

1. Open the **MCP Clients** section.
2. Click **Add**.
3. Enter an easily recognizable **Name**.
4. Enter the **URL** of the MCP server.
5. Choose the **Authentication** type.
6. Fill in the required credentials, if applicable.
7. Decide whether to enable **Periodic Synchronization**.
8. Enable **Notifications** if you want to be notified when tools change.
9. Save the configuration.

<p class="callout warning">**Important:** when saving, vtenext actually attempts to connect to the MCP server. If the connection fails, the configuration is not accepted.</p>

### **Configuration Parameters**

[![image.png](https://usermanual.vtenext.com/uploads/images/gallery/2026-07/scaled-1680-/aL2image.png)](https://usermanual.vtenext.com/uploads/images/gallery/2026-07/aL2image.png)

<table border="1" cellpadding="5" cellspacing="5" id="bkmrk-attivo-abilita-o-dis" style="width: 100%; border-collapse: collapse; vertical-align: middle; background-color: rgb(235, 247, 255); height: 129.188px;"><tbody><tr style="height: 29.7969px;"><td style="width: 22.2897%; height: 29.7969px; vertical-align: middle;">**Active**

</td><td style="width: 77.7103%; height: 29.7969px; vertical-align: middle;">enables or disables the client

</td></tr><tr style="height: 29.7969px;"><td style="width: 22.2897%; height: 29.7969px; vertical-align: middle;">**Name**

</td><td style="width: 77.7103%; height: 29.7969px; vertical-align: middle;">descriptive name of the connection

</td></tr><tr style="height: 10px;"><td style="width: 22.2897%; height: 10px; vertical-align: middle;">**URL**

</td><td style="width: 77.7103%; height: 10px; vertical-align: middle;">full address of the MCP server to connect to

</td></tr><tr style="height: 29.7969px;"><td style="width: 22.2897%; vertical-align: middle; height: 29.7969px;">**Authentication**

</td><td style="width: 77.7103%; vertical-align: middle; height: 29.7969px;">defines how the client authenticates with the MCP server

</td></tr><tr><td style="width: 22.2897%; vertical-align: middle;">**Username and Password**

</td><td style="width: 77.7103%; vertical-align: middle;">displayed when **Basic Authentication** is selected

</td></tr><tr><td style="width: 22.2897%; vertical-align: middle;">**API Key**

</td><td style="width: 77.7103%; vertical-align: middle;">displayed when **Bearer** or **X-API-Key** authentication is selected

</td></tr><tr><td style="width: 22.2897%; vertical-align: middle;">**Synchronize**

</td><td style="width: 77.7103%; vertical-align: middle;">allows a cron job to periodically check the available tools and update them when new ones are detected

</td></tr><tr><td style="width: 22.2897%; vertical-align: middle;">**Notification**

</td><td style="width: 77.7103%; vertical-align: middle;">sends a notification when synchronization detects changes in the server's tools

</td></tr></tbody></table>

### **How authentication works**

The selected authentication method changes the fields displayed in the configuration form.

<table border="1" cellpadding="5" cellspacing="5" id="bkmrk-nessuna-autenticazio" style="width: 100%; border-collapse: collapse; vertical-align: middle; background-color: rgb(235, 247, 255); height: 129.188px;"><tbody><tr style="height: 29.7969px;"><td style="width: 22.2897%; height: 29.7969px; vertical-align: middle;">****No Authentication****

</td><td style="width: 77.7103%; height: 29.7969px; vertical-align: middle;">no additional credentials are required</td></tr><tr style="height: 29.7969px;"><td style="width: 22.2897%; height: 29.7969px; vertical-align: middle;">**Basic**

</td><td style="width: 77.7103%; height: 29.7969px; vertical-align: middle;">you must enter a username and password

</td></tr><tr style="height: 10px;"><td style="width: 22.2897%; height: 10px; vertical-align: middle;">**Bearer**

</td><td style="width: 77.7103%; height: 10px; vertical-align: middle;">you must enter a token or API key

</td></tr><tr style="height: 29.7969px;"><td style="width: 22.2897%; vertical-align: middle; height: 29.7969px;">**X-API-Key**

</td><td style="width: 77.7103%; vertical-align: middle; height: 29.7969px;">you must enter the API key in the dedicated field

</td></tr><tr><td style="width: 22.2897%; vertical-align: middle;">**VTE (Access Key)**

</td><td style="width: 77.7103%; vertical-align: middle;">vtenext automatically uses the dedicated MCP access key of the user performing the call. No credentials need to be entered manually

</td></tr></tbody></table>

<p class="callout info">**When to use VTE (Access Key):** this option is particularly useful when the client points to an MCP Server exposed by vtenext, because it allows the system to manage authentication automatically.</p>

### **Connection Verification and Tool Mapping**

<div class="qMYqUG_convSearchResultHighlightRoot" id="bkmrk-the-client-screen-al" style="text-align: justify;"><div class="" data-is-intersecting="true" data-turn-id-container="ccf44c22-c77c-4910-b910-b63ac5b7d181"><section class="text-token-text-primary w-full focus:outline-none has-data-writing-block:pointer-events-none [&:has([data-writing-block])>*]:pointer-events-auto R6Vx5W_threadScrollVars scroll-mb-[calc(var(--scroll-root-safe-area-inset-bottom,0px)+var(--thread-response-height))] scroll-mt-[calc(var(--header-height)+min(200px,max(70px,20svh)))]" data-testid="conversation-turn-60" data-turn="assistant" data-turn-id="ccf44c22-c77c-4910-b910-b63ac5b7d181" data-turn-id-container="ccf44c22-c77c-4910-b910-b63ac5b7d181" dir="auto">The client screen also provides a verification function.

[![image.png](https://usermanual.vtenext.com/uploads/images/gallery/2026-07/scaled-1680-/T0Dimage.png)](https://usermanual.vtenext.com/uploads/images/gallery/2026-07/T0Dimage.png)

</section></div></div>[![image.png](https://usermanual.vtenext.com/uploads/images/gallery/2026-07/scaled-1680-/bYcimage.png)](https://usermanual.vtenext.com/uploads/images/gallery/2026-07/bYcimage.png)

*Call Result: RESULT*

[![image.png](https://usermanual.vtenext.com/uploads/images/gallery/2026-07/scaled-1680-/8wsimage.png)](https://usermanual.vtenext.com/uploads/images/gallery/2026-07/8wsimage.png)

*Call Result: HEADERS*

[![image.png](https://usermanual.vtenext.com/uploads/images/gallery/2026-07/scaled-1680-/RPSimage.png)](https://usermanual.vtenext.com/uploads/images/gallery/2026-07/RPSimage.png)

*Call Result: RESPONSE*

- The test button checks whether the MCP server responds correctly.
- If the result is successful, vtenext can retrieve the list of available tools.
- From the verification window, you can update the available tools section using the **Map Available Tools** command.

This verification is especially useful when configuring a new server or when you want to check that authentication is working correctly before the final save.

### **Available Tools**

After saving, or after mapping from the verification window, vtenext displays the list of tools retrieved from the MCP server.

[![image.png](https://usermanual.vtenext.com/uploads/images/gallery/2026-07/scaled-1680-/q5pimage.png)](https://usermanual.vtenext.com/uploads/images/gallery/2026-07/q5pimage.png)

For each tool, you can view:

- tool name
- description
- input parameters
- required and optional fields
- structure of the returned output

This information is stored locally, so the tools can then be invoked within agents and processes without having to reinterpret the remote server structure each time.

### **Periodic Synchronization**

If you enable **Synchronize**, a scheduled process can periodically check whether new or modified tools are available on the MCP server.

- If changes are detected, the local tool configuration is updated.
- If no differences are found, the date of the last synchronization is updated anyway.
- If you have also enabled **Notification**, you will receive an alert when the set of tools changes.

<p class="callout warning">**Warning:** when tools change on the MCP server, it may be necessary to check any processes or agents that use them, especially if parameters or outputs have changed.</p>

### **Practical examples**

#### Example 1: Connecting to an external MCP server

You can configure an MCP client that points to an external server published by another system. In this case, enter the URL, the required authentication method, and then verify the available tools.

#### Example 2: Connecting to a vtenext MCP Server

If you have already created an MCP Server in the relevant section, you can connect the client to the same endpoint and use **VTE (Access Key)** authentication to simplify the configuration.

#### Example 3: Controlled tool updates

If the tools on the remote server may change over time, it is recommended to enable periodic synchronization and, if necessary, notifications as well, so that processes and agents remain aligned.

### **Web Search MCP - Exa**

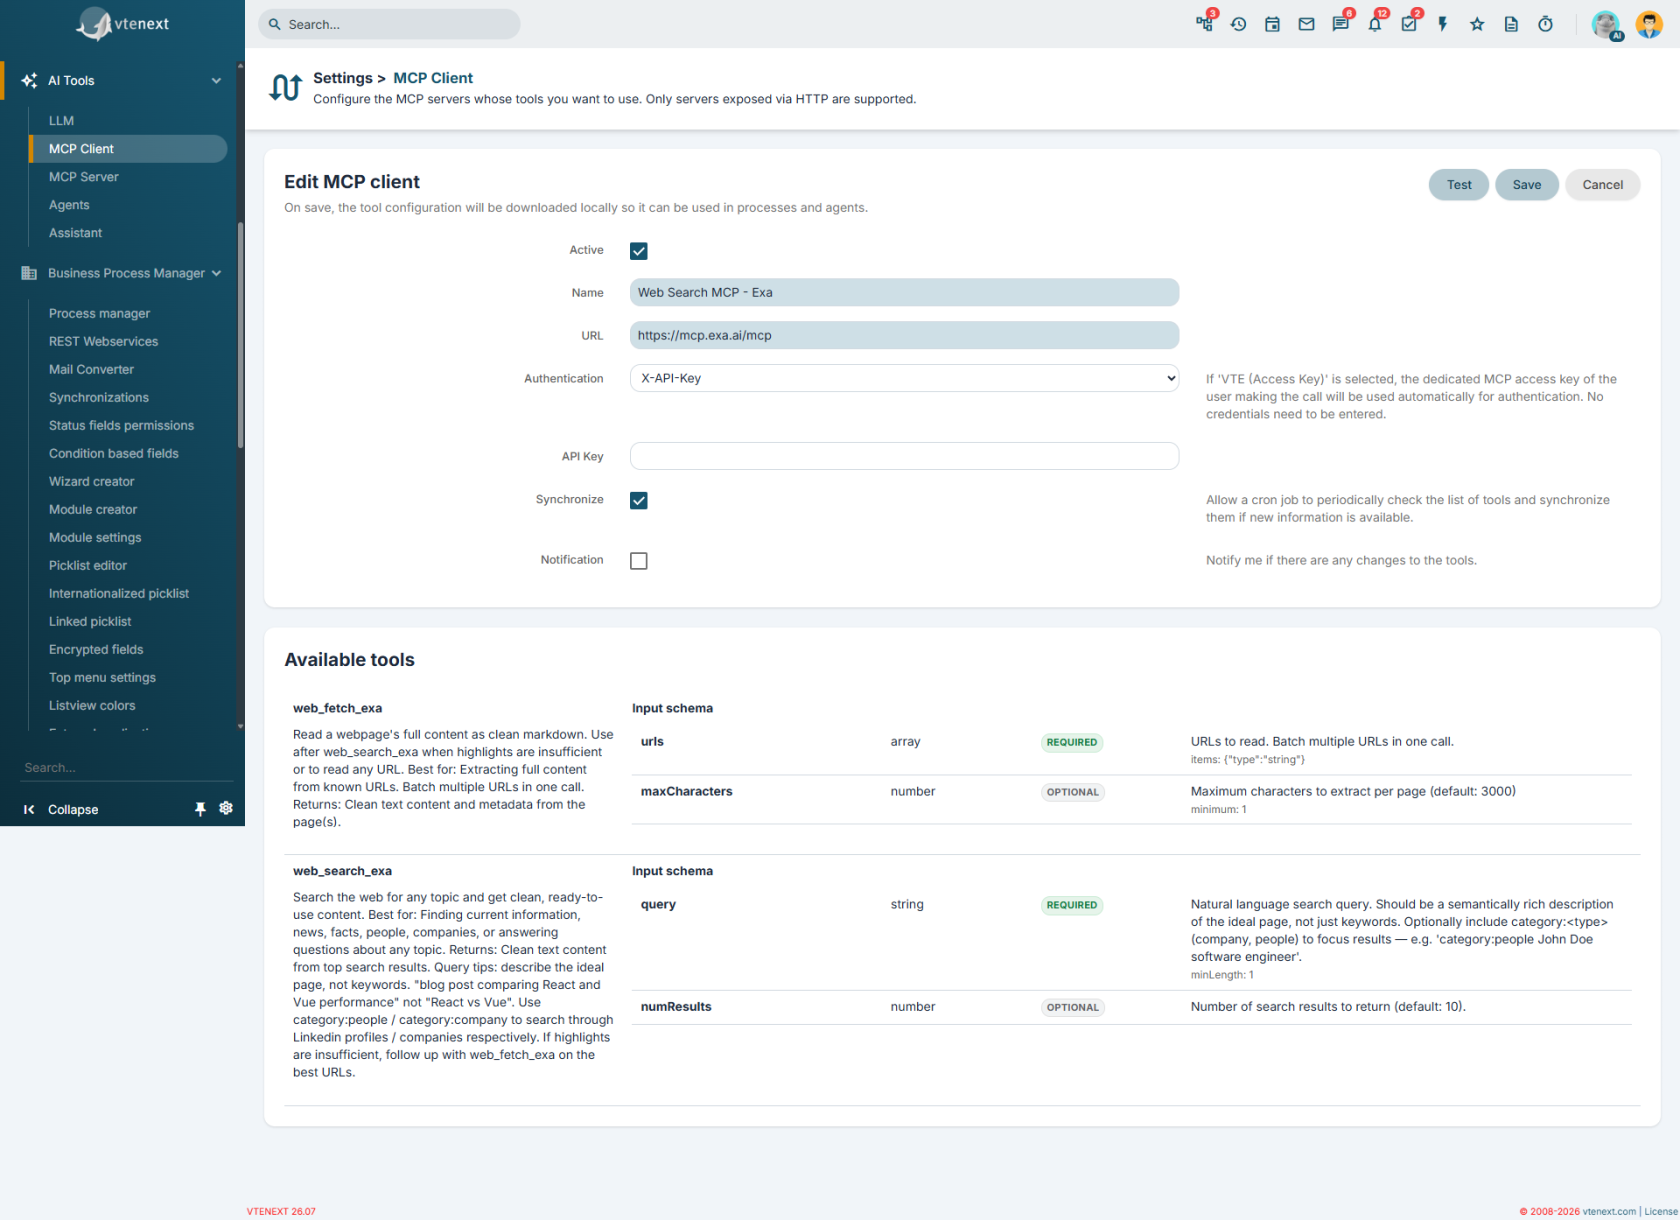
vtenext also provides a preconfigured MCP client called **Web Search MCP - Exa**. This entry is created automatically but remains disabled until you decide to use it.

Exa is a web search service designed for AI agents. It allows real-time web searches, retrieval of content from specific web pages, and provides models with more up-to-date information compared to the knowledge already embedded within the model.

[![image.png](https://usermanual.vtenext.com/uploads/images/gallery/2026-07/scaled-1680-/Xg2image.png)](https://usermanual.vtenext.com/uploads/images/gallery/2026-07/Xg2image.png)
#### How to activate it

1. Open the **Web Search MCP - Exa** entry in the **MCP Clients** list.
2. Leave the preconfigured URL unchanged, as it points to Exa’s public MCP server.
3. Set or complete the **X-API-Key** authentication with the API key from your Exa account.
4. Enable the client.
5. Save and verify the available tools.

In this case, the authentication method expected by vtenext is **X-API-Key**, which is already selected in the initial client configuration.

#### Available Tools with Exa

The MCP server exposes the following tools:

- **web\_search\_exa:** performs web searches and returns content already prepared for use by the agent.
- **web\_fetch\_exa:** retrieves the full content of a web page starting from a known URL.

<p class="callout info">**When it can be useful:** Exa is particularly suitable when you want to provide agents and processes with access to up-to-date web searches, online page analysis, or the rapid collection of external information.</p>

For further details about the service and the features of the Exa MCP server, refer to the official website: [https://exa.ai/mcp](https://exa.ai/mcp).

# 22.4 Agents

The **Agents** section allows you to configure AI agents that combine an **LLM model**, one or more **MCP tools**, and, if required, CRM documents to use as a knowledge base. In practice, this is where you define how the agent reasons, which tools it can use, and which content it can access to perform a task.

<p class="callout info">**In summary:** an **agent** is not just an AI model. It is a complete configuration that combines an **LLM**, **operational tools**, and **document sources**, allowing it to perform tasks in a more controlled and context-aware way within vtenext.</p>

### **Prerequisite: Agent Orchestrator**

To use agents, the [**Agent Orchestrator**](https://usermanual.vtenext.com/books/developers/page/agent-orchestrator) service must be installed and reachable. In the **Agents** list view, there is a dedicated section where you can specify the **Orchestrator Endpoint**, which is the base URL of the service.

[![image.png](https://usermanual.vtenext.com/uploads/images/gallery/2026-07/scaled-1680-/xbGimage.png)](https://usermanual.vtenext.com/uploads/images/gallery/2026-07/xbGimage.png)
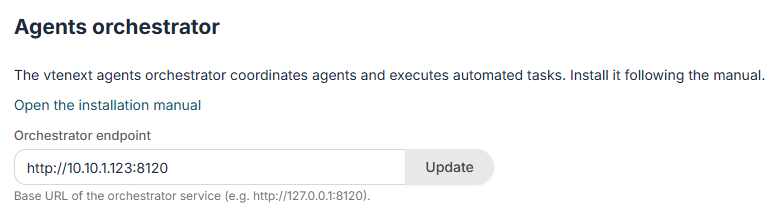
<p class="callout warning">**Important:** if the orchestrator endpoint is not configured correctly, agents cannot be executed.</p>

### **When to use it**

- To configure AI agents to be used in the assistant or within processes.
- To associate a specific LLM with an agent.
- To provide the agent with access to selected MCP tools.
- To enable **RAG** capabilities by selecting CRM documents as knowledge sources.
- To apply control rules before and after response generation (**guardrails**).

### **The List View**

The list displays all previously configured agents.

[![image.png](https://usermanual.vtenext.com/uploads/images/gallery/2026-07/scaled-1680-/2C3image.png)](https://usermanual.vtenext.com/uploads/images/gallery/2026-07/2C3image.png)
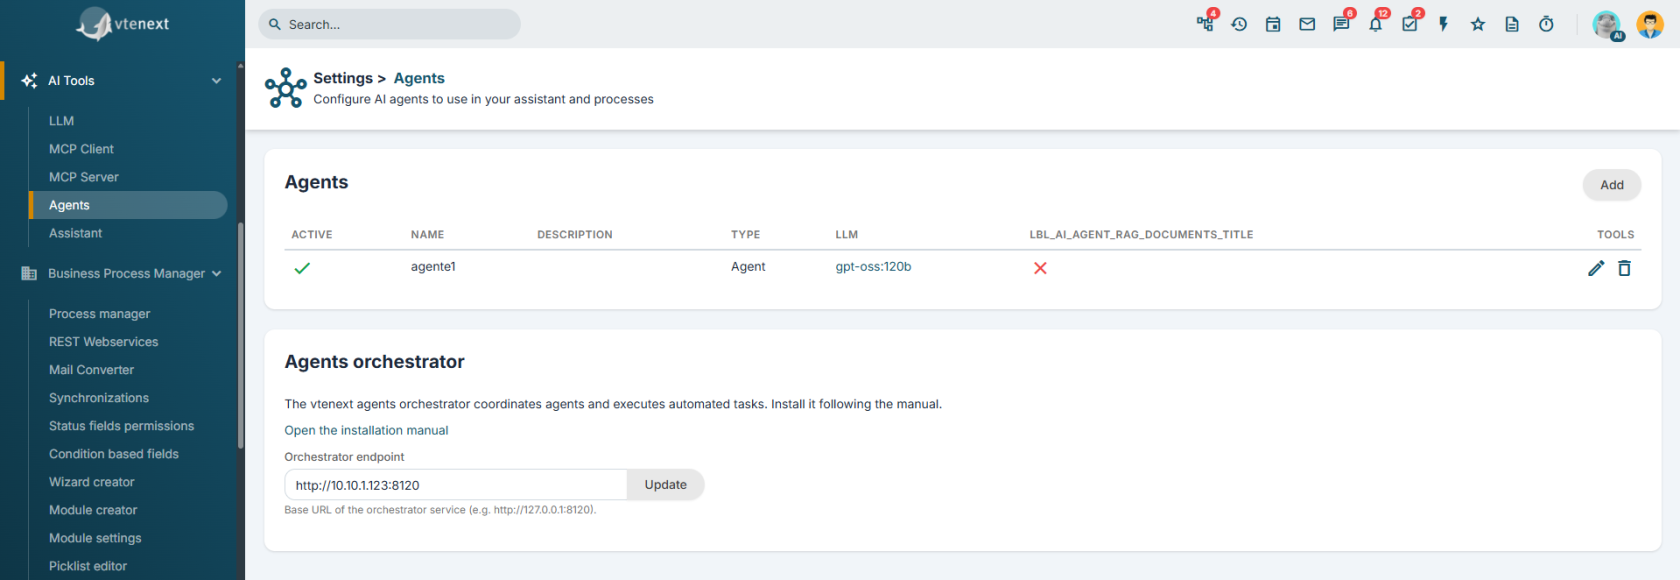
- **Active:** indicates whether the agent is enabled.
- **Name:** name of the agent.
- **Description:** text explaining the purpose of the agent.
- **LLM:** shows the associated model.
- **Documents:** indicates whether the agent has access to RAG documents.

From the list, you can create a new agent, edit it, or delete it.

### **Creating a New Agent**

[![image.png](https://usermanual.vtenext.com/uploads/images/gallery/2026-07/scaled-1680-/7DPimage.png)](https://usermanual.vtenext.com/uploads/images/gallery/2026-07/7DPimage.png)
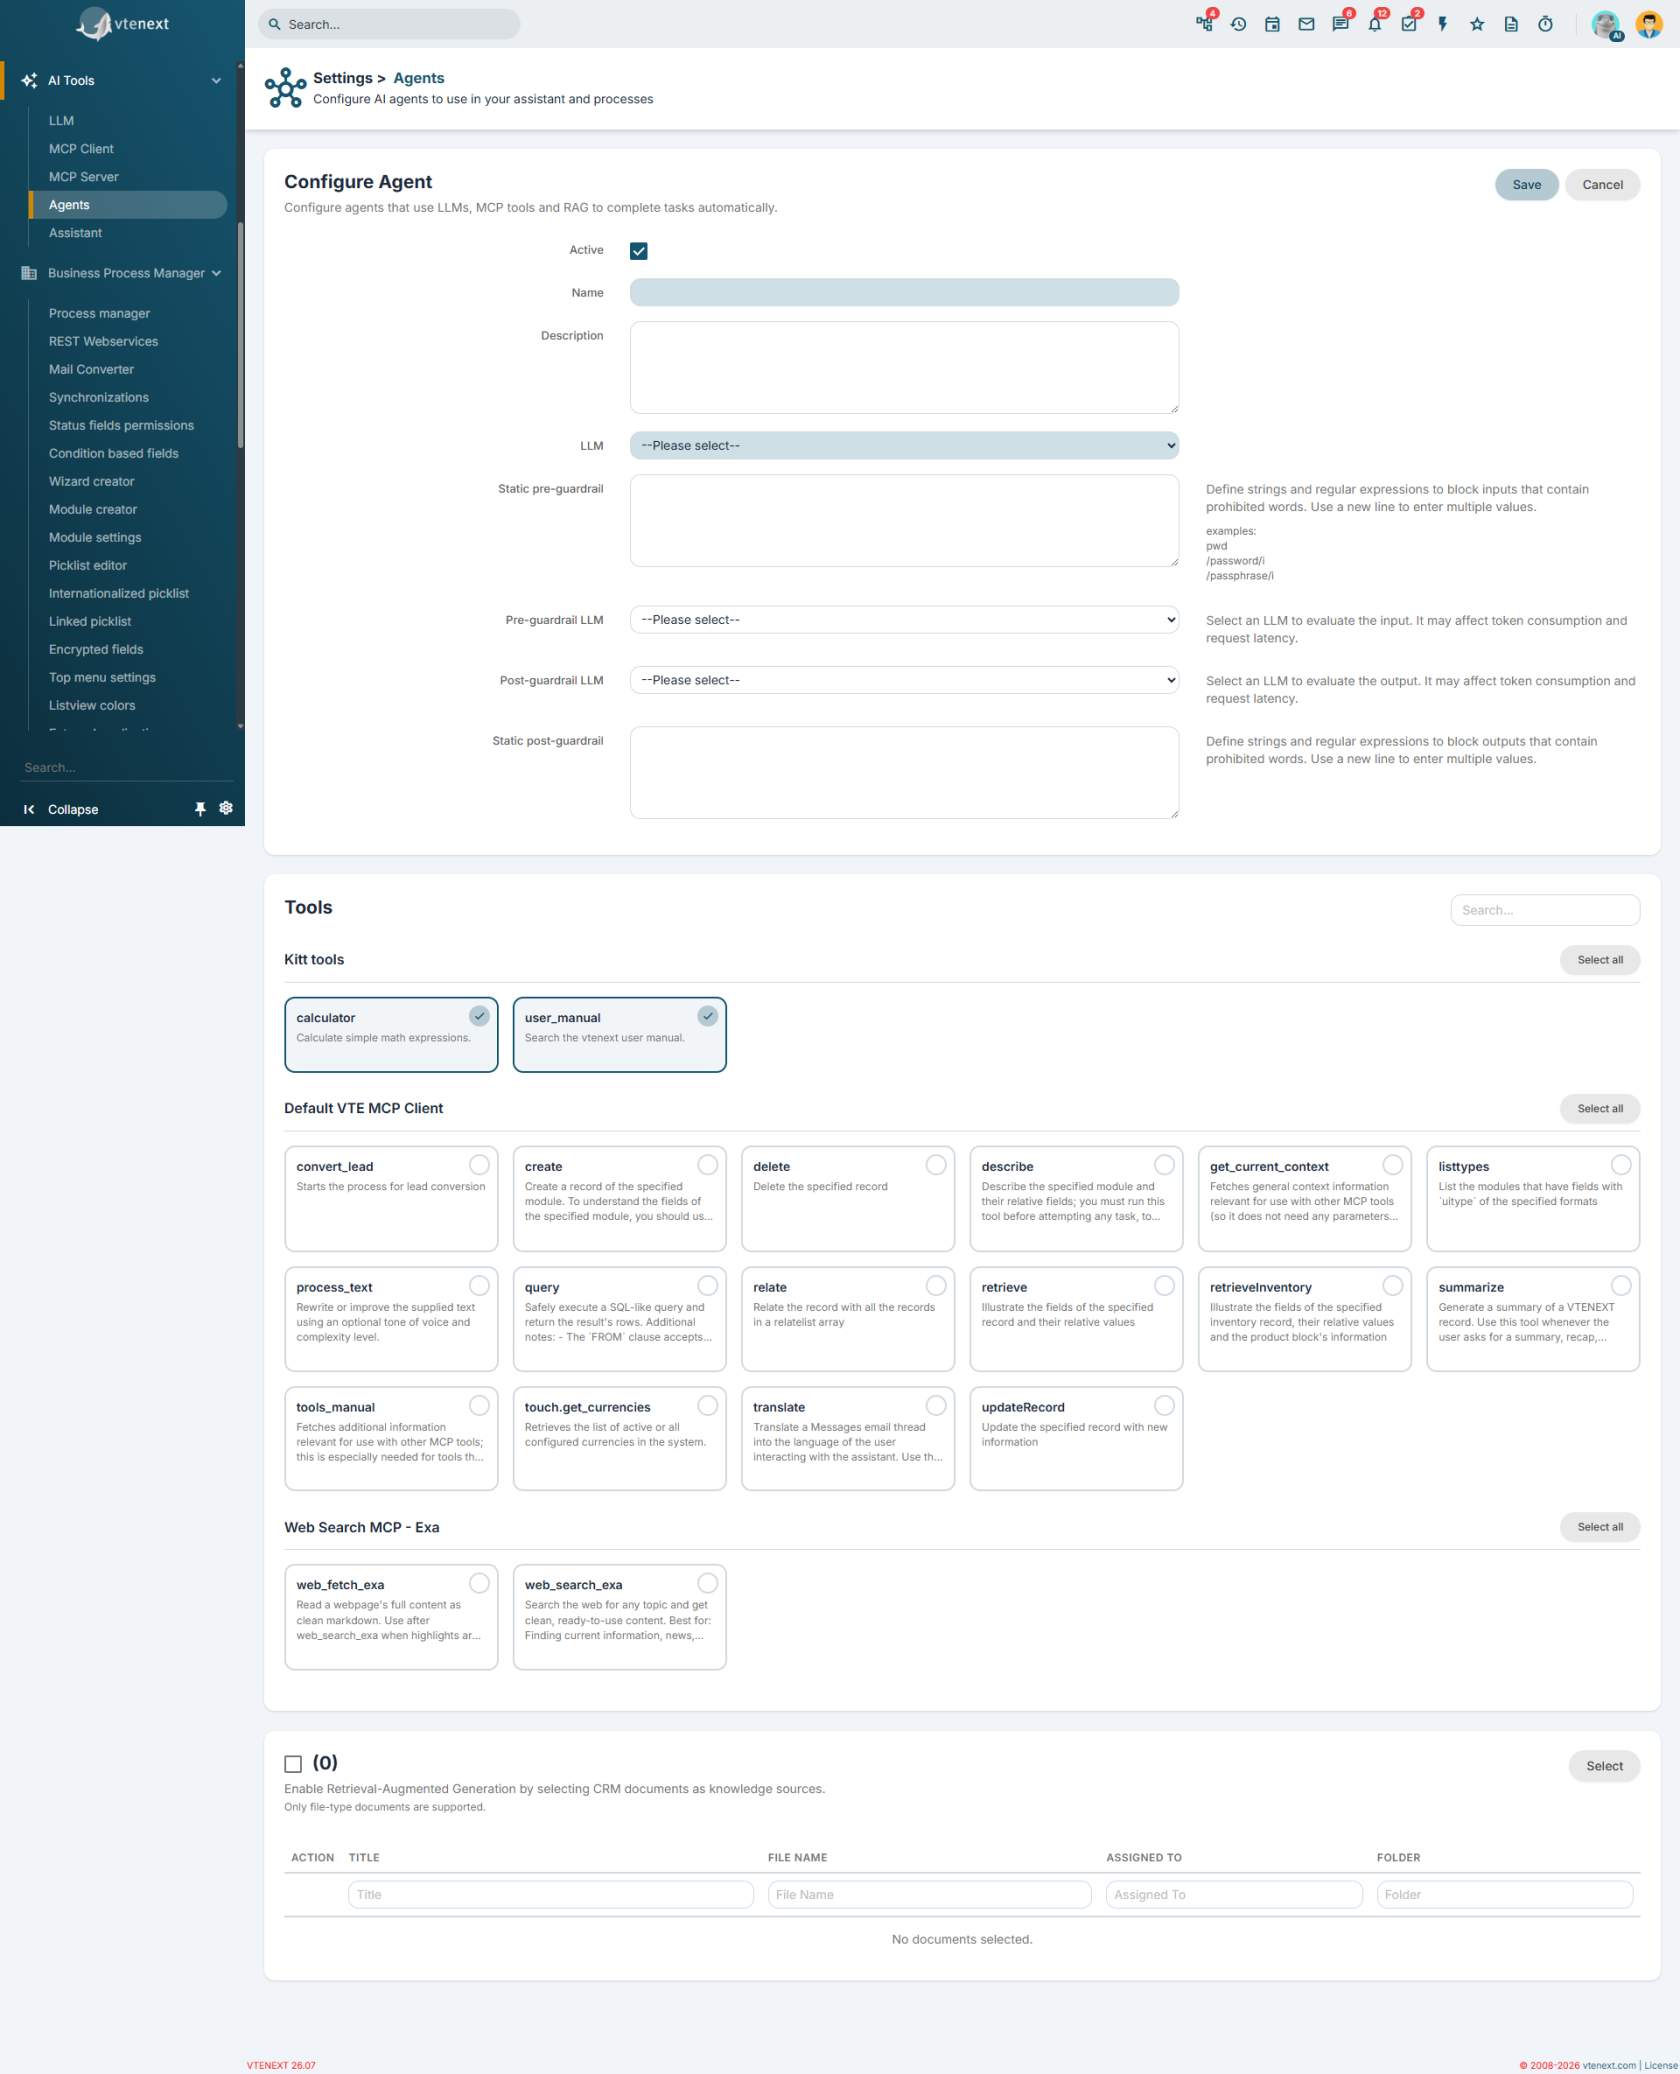
1. Open the **Agents** section.
2. Click **Add**.
3. Enable or disable the agent according to your needs.
4. Enter the **Name** and **Description**.
5. Select the **LLM** to use.
6. Decide whether to keep the LLM system prompt or override it for this specific agent.
7. Select the tools the agent will be able to use.
8. If necessary, enable the **RAG** capability and select the documents.
9. Configure any **guardrails**.
10. Save the configuration.

### **Main Fields**

[![image.png](https://usermanual.vtenext.com/uploads/images/gallery/2026-07/scaled-1680-/jt9image.png)](https://usermanual.vtenext.com/uploads/images/gallery/2026-07/jt9image.png)
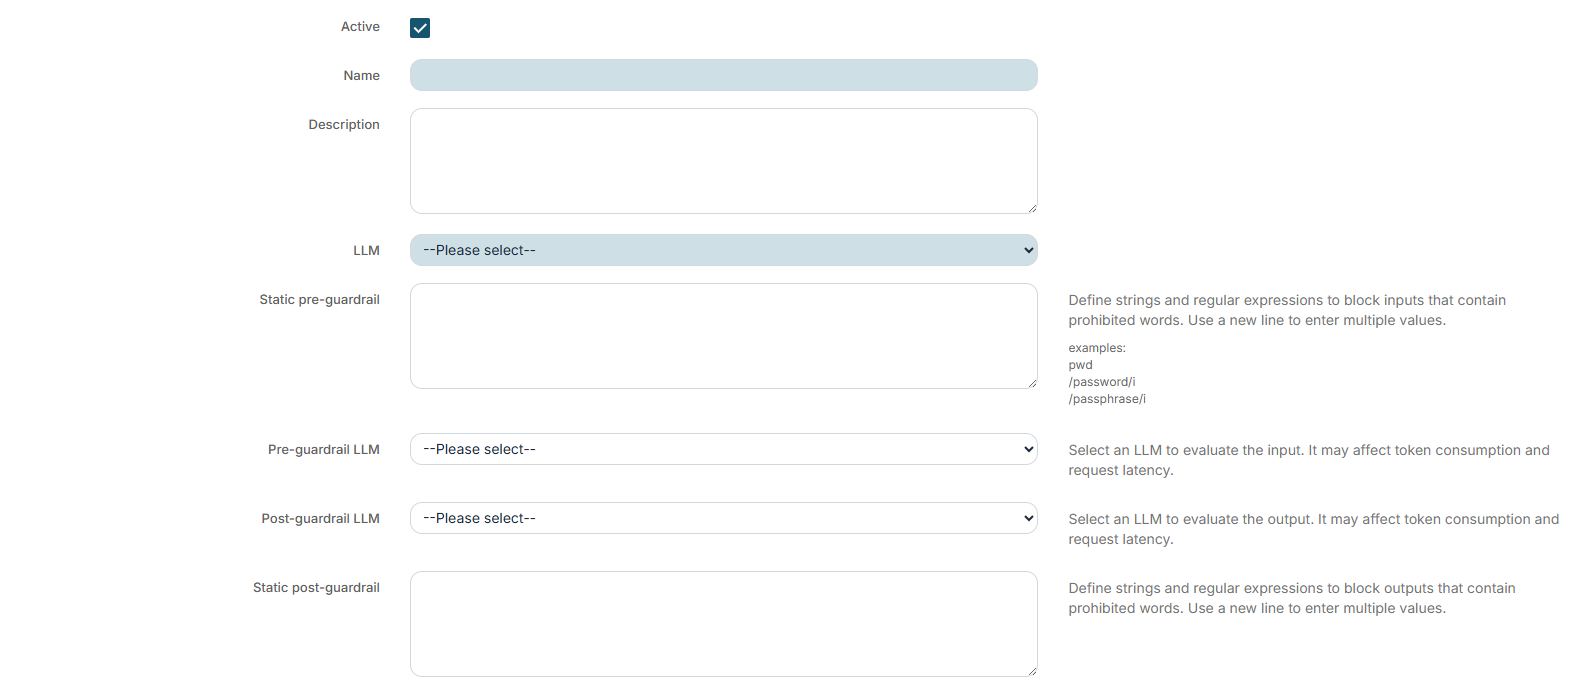
- **Active:** enables or disables the agent.
- **Name:** internal name used to identify the agent.
- **Description:** brief internal description summarizing the agent’s purpose.
- **LLM:** language model used by the agent.
- **LLM System Prompt:** displays the system prompt currently configured for the selected model.
- **Override System Prompt:** when enabled, the agent uses a specific system prompt instead of the LLM’s default one.
- **System Prompt:** agent-specific instructions, visible only when choosing to override the model’s prompt.

<p class="callout info">**When to use system prompt override:** it is useful when you want to keep the same LLM but significantly change the behavior, tone, or responsibilities of a specific agent.</p>

### **Available Tools for the Agent**

<div class="qMYqUG_convSearchResultHighlightRoot" id="bkmrk-below-the-main-field" style="text-align: justify;"><div class="" data-is-intersecting="true" data-turn-id-container="22a5d11a-1209-4d78-bf9f-b85805fc00c3"><section class="text-token-text-primary w-full focus:outline-none has-data-writing-block:pointer-events-none [&:has([data-writing-block])>*]:pointer-events-auto R6Vx5W_threadScrollVars scroll-mb-[calc(var(--scroll-root-safe-area-inset-bottom,0px)+var(--thread-response-height))] scroll-mt-[calc(var(--header-height)+min(200px,max(70px,20svh)))]" data-testid="conversation-turn-96" data-turn="assistant" data-turn-id="22a5d11a-1209-4d78-bf9f-b85805fc00c3" data-turn-id-container="22a5d11a-1209-4d78-bf9f-b85805fc00c3" dir="auto">Below the main fields, you will find the **Tools** section, where you can choose which tools the agent is allowed to use.

</section></div></div>[![image.png](https://usermanual.vtenext.com/uploads/images/gallery/2026-07/scaled-1680-/E4Uimage.png)](https://usermanual.vtenext.com/uploads/images/gallery/2026-07/E4Uimage.png)

The tools are displayed by groups, based on the active MCP clients and the available internal tools.

- **Kitt Tools:** includes basic internal tools such as **calculator** and **user\_manual**.
- **MCP Clients:** for each active MCP client, you can select the synchronized and available tools.

For each group, you can select all tools or quickly deselect them. A search function is also available to filter tools by name or description.

<p class="callout warning">**Warning:** the agent can only use the tools selected in this section. If an MCP client is not configured or has no synchronized tools, it will not appear as an available source.</p>

### **RAG Capability and Documents**

If you want the agent to also work with CRM content, you can enable the **RAG capability**.

[![image.png](https://usermanual.vtenext.com/uploads/images/gallery/2026-07/scaled-1680-/u1oimage.png)](https://usermanual.vtenext.com/uploads/images/gallery/2026-07/u1oimage.png)

- **RAG Capability:** enables the use of documents as knowledge sources.
- **Select:** opens the document selector to add CRM files.
- **Document Table:** displays the title, file, owner, and document folder of the documents already associated.

<div class="qMYqUG_convSearchResultHighlightRoot" id="bkmrk-once-added%2C-document" style="text-align: justify;"><div class="" data-is-intersecting="true" data-turn-id-container="5de3dcff-96fc-40ae-95f0-cfc66b2f2a23"><section class="text-token-text-primary w-full focus:outline-none has-data-writing-block:pointer-events-none [&:has([data-writing-block])>*]:pointer-events-auto R6Vx5W_threadScrollVars scroll-mb-[calc(var(--scroll-root-safe-area-inset-bottom,0px)+var(--thread-response-height))] scroll-mt-[calc(var(--header-height)+min(200px,max(70px,20svh)))]" data-testid="conversation-turn-104" data-turn="assistant" data-turn-id="5de3dcff-96fc-40ae-95f0-cfc66b2f2a23" data-turn-id-container="5de3dcff-96fc-40ae-95f0-cfc66b2f2a23" dir="auto">Once added, documents remain linked to the agent and can be removed at any time from the table.

</section></div></div><p class="callout info">**When to use RAG:** it is useful when the agent needs to answer questions or perform tasks based on documentation, files, or company content stored in the CRM, rather than relying only on generic instructions.</p>

### **Guardrail**

The **Agents** section also allows you to define checks before and after response generation.

[![image.png](https://usermanual.vtenext.com/uploads/images/gallery/2026-07/scaled-1680-/XfMimage.png)](https://usermanual.vtenext.com/uploads/images/gallery/2026-07/XfMimage.png)
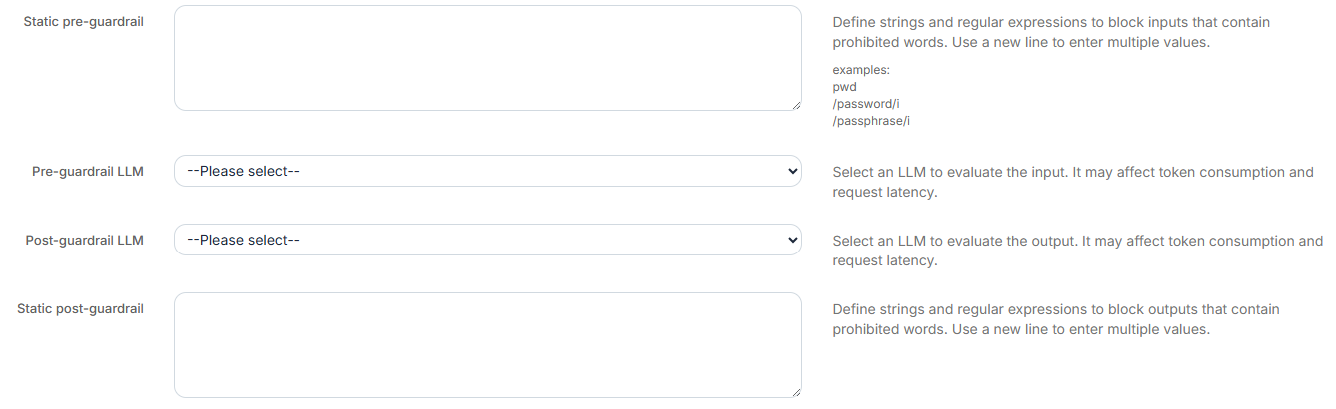
- **Static Pre-Guardrail:** blocks inputs containing prohibited words or expressions.
- **LLM Pre-Guardrail:** uses an LLM to evaluate the input before processing.
- **Pre-Guardrail Prompt:** defines the instructions used by the control mechanism to evaluate the input.
- **Static Post-Guardrail:** blocks outputs containing prohibited content.
- **LLM Post-Guardrail:** uses an LLM to evaluate the response before returning it.
- **Post-Guardrail Prompt:** defines the instructions for the final validation step.

Static rules can include plain text or regular expressions, one per line.

<p class="callout warning">**Warning:** LLM-based guardrails can increase token consumption and response times, as they add additional verification steps.</p>

### **Practical examples**

#### Example 1: Agent with operational tools

You can create an agent that uses an LLM and selected MCP tools to query data, perform permitted actions, or access external services such as web search.

#### Example 2: Document-based agent

You can create an agent focused on internal documents by enabling RAG and selecting only the files relevant to a specific department or process.

#### Example 3: Agent with enhanced controls

<div class="qMYqUG_convSearchResultHighlightRoot" id="bkmrk-if-the-agent-operate"><div class="" data-is-intersecting="true" data-turn-id-container="f12646fb-2ecf-4d79-a42e-eec7a9391ddc"><section class="text-token-text-primary w-full focus:outline-none has-data-writing-block:pointer-events-none [&:has([data-writing-block])>*]:pointer-events-auto R6Vx5W_threadScrollVars scroll-mb-[calc(var(--scroll-root-safe-area-inset-bottom,0px)+var(--thread-response-height))] scroll-mt-[calc(var(--header-height)+min(200px,max(70px,20svh)))]" data-testid="conversation-turn-114" data-turn="assistant" data-turn-id="f12646fb-2ecf-4d79-a42e-eec7a9391ddc" data-turn-id-container="f12646fb-2ecf-4d79-a42e-eec7a9391ddc" dir="auto">If the agent operates on sensitive content, you can apply pre-guardrails and post-guardrails to restrict inappropriate requests or responses.

</section></div></div>

# 22.5 Kitt Assistant

The **Assistant** section allows you to define how the **vtenext Kitt Assistant** should generate its responses. In practice, this is where you choose which response engine to use: a direct **LLM**, a preconfigured **agent**, or a custom **REST Web Service**.

<p class="callout info">**In summary:** the **assistant** is the access point through which the user interacts. Depending on the configuration, it can respond directly using a model, use advanced tools through an agent, or delegate the response to an external service.</p>

### **Prerequisites**

- To use an **LLM**, you must first configure at least one model in the **LLM** section.
- To use an **Agent**, you must first configure at least one agent in the **Agents** section.
- To use a **REST Web Service**, you must first configure the service in the relevant section.
- For the assistant to work correctly, the background task worker must be enabled.

### **Creating or Editing the Assistant**

[![image.png](https://usermanual.vtenext.com/uploads/images/gallery/2026-07/scaled-1680-/kMrimage.png)](https://usermanual.vtenext.com/uploads/images/gallery/2026-07/kMrimage.png)

1. Open the **Assistant** section.
2. Enable or disable the configuration.
3. Select the **Assistant Type**.
4. Fill in the field displayed based on the selected type.
5. Save the configuration.

### **Type: Agent**

If you select **Agent**, the assistant will use one of the agents already configured in vtenext.

[![image.png](https://usermanual.vtenext.com/uploads/images/gallery/2026-07/scaled-1680-/E8uimage.png)](https://usermanual.vtenext.com/uploads/images/gallery/2026-07/E8uimage.png)

- Select an agent from the available list.
- The assistant inherits the capabilities of the selected agent.
- This includes, if configured in the agent, **MCP tools**, **RAG documents**, specific prompts, and **guardrails**.

<p class="callout info">**When to use an agent:** it is the right choice when you want the assistant to do more than provide a simple text response, for example by using tools, consulting documents, or applying more advanced controls.</p>

### **Type: LLM**

<div class="qMYqUG_convSearchResultHighlightRoot" id="bkmrk-if-you-select-llm%2C-t"><div class="" data-is-intersecting="true" data-turn-id-container="62052159-f7e0-4501-bb21-4e8c50c2aeb4"><section class="text-token-text-primary w-full focus:outline-none has-data-writing-block:pointer-events-none [&:has([data-writing-block])>*]:pointer-events-auto R6Vx5W_threadScrollVars scroll-mb-[calc(var(--scroll-root-safe-area-inset-bottom,0px)+var(--thread-response-height))] scroll-mt-[calc(var(--header-height)+min(200px,max(70px,20svh)))]" data-testid="conversation-turn-134" data-turn="assistant" data-turn-id="62052159-f7e0-4501-bb21-4e8c50c2aeb4" data-turn-id-container="62052159-f7e0-4501-bb21-4e8c50c2aeb4" dir="auto">If you select **LLM**, the assistant will use a language model configured directly in the **LLM** section.

</section></div></div>[![image.png](https://usermanual.vtenext.com/uploads/images/gallery/2026-07/scaled-1680-/4vKimage.png)](https://usermanual.vtenext.com/uploads/images/gallery/2026-07/4vKimage.png)

- Select the **LLM model** to use.
- You can view the currently configured **LLM system prompt**.
- You can enable the **Override system prompt** option to use a custom prompt specifically for the assistant.

This mode is simpler than using an agent because it does not involve **MCP tools** or **RAG documents**.

#### Overriding the System Prompt

When the assistant is configured in **LLM mode**, you can decide whether to keep the model’s system prompt or replace it.

[![image.png](https://usermanual.vtenext.com/uploads/images/gallery/2026-07/scaled-1680-/9ctimage.png)](https://usermanual.vtenext.com/uploads/images/gallery/2026-07/9ctimage.png)

- **LLM System Prompt:** displays the standard prompt already configured for the selected model.
- **Override System Prompt:** if enabled, the assistant uses the text specified in the assistant configuration.
- **System Prompt:** field where you define dedicated instructions for the assistant.

<p class="callout info">**When it is useful:** overriding the system prompt is useful when you want to keep the same model but change the assistant’s tone, purpose, or behavior compared to other configurations that use the same LLM.</p>

### **Type: REST Web Service**

If you select **REST Web Service**, the assistant delegates the response generation to an external REST service that has already been configured.

[![image.png](https://usermanual.vtenext.com/uploads/images/gallery/2026-07/scaled-1680-/TYMimage.png)](https://usermanual.vtenext.com/uploads/images/gallery/2026-07/TYMimage.png)
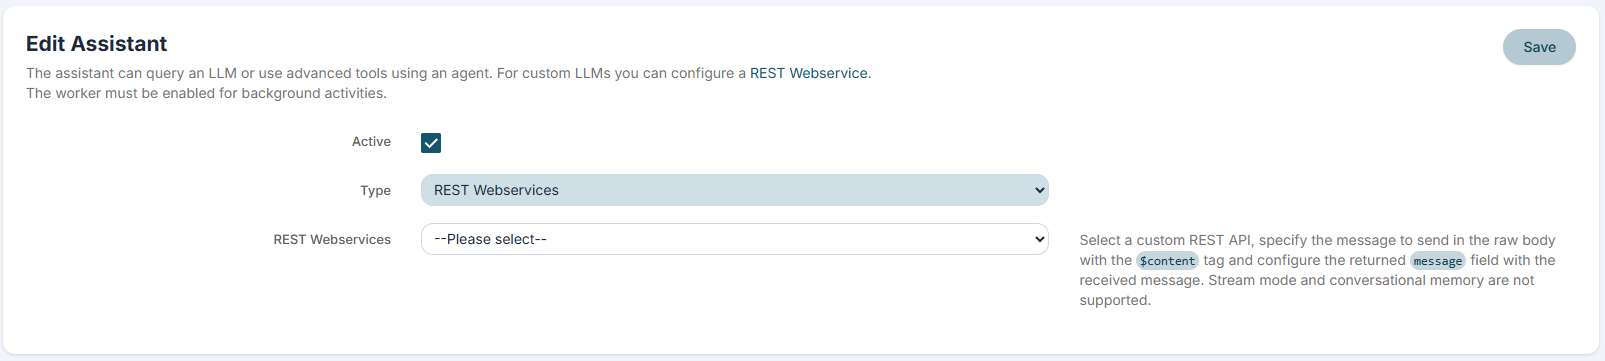
- Select a custom **REST Web Service** from the list.
- The user's message must be passed in the raw request body using the **`$content`** placeholder.
- The expected response must be mapped to the returned **`message`** field.

<p class="callout warning">**Limitation:** in this mode, **streaming** and **conversational memory** are not supported.</p>

This option is useful when you want to connect the assistant to an existing external system or to a custom AI service that is not managed directly as an LLM or agent within vtenext.

### **Practical examples**

#### Example 1: LLM-only assistant

You can configure a lightweight assistant that uses an LLM directly to answer general questions, without additional tools or documents.

#### Example 2: Agent-based assistant

You can use an agent when you want the assistant to have access to web search, company documents, or CRM operational tools.

#### Example 3: Assistant with an external service

You can connect a custom **REST Web Service** if your workflow relies on an external response engine or business logic already developed outside of vtenext.

# 22.6 Examples

Below are some example requests to demonstrate the assistant’s capabilities.

---

### Creating an Account

I can create any record managed by the CRM, such as an account in this case. Any tools used by the assistant are displayed, and for write operations, approval is requested before proceeding.

[![image.png](https://usermanual.vtenext.com/uploads/images/gallery/2026-07/scaled-1680-/7wrimage.png)](https://usermanual.vtenext.com/uploads/images/gallery/2026-07/7wrimage.png) [![image.png](https://usermanual.vtenext.com/uploads/images/gallery/2026-07/scaled-1680-/3ELimage.png)](https://usermanual.vtenext.com/uploads/images/gallery/2026-07/3ELimage.png)
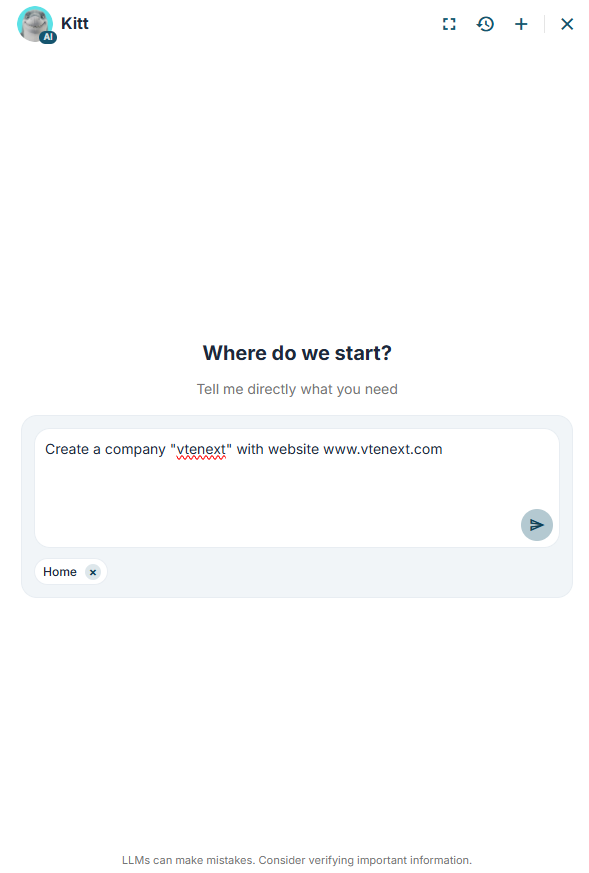
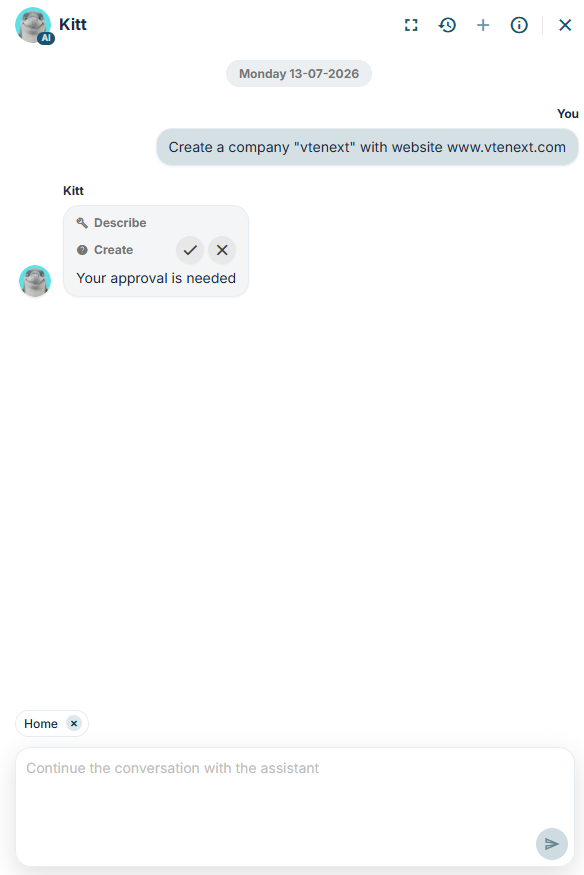
[![image.png](https://usermanual.vtenext.com/uploads/images/gallery/2026-07/scaled-1680-/BMXimage.png)](https://usermanual.vtenext.com/uploads/images/gallery/2026-07/BMXimage.png)
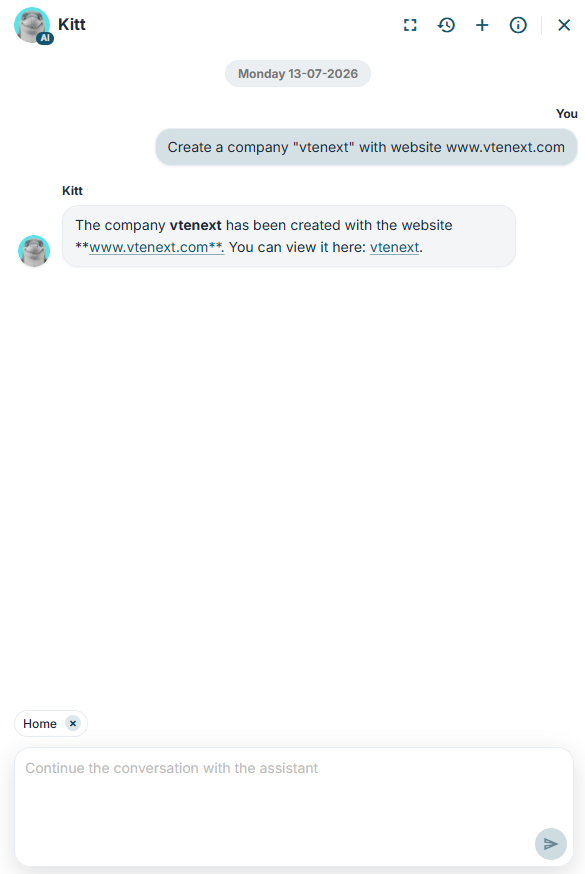
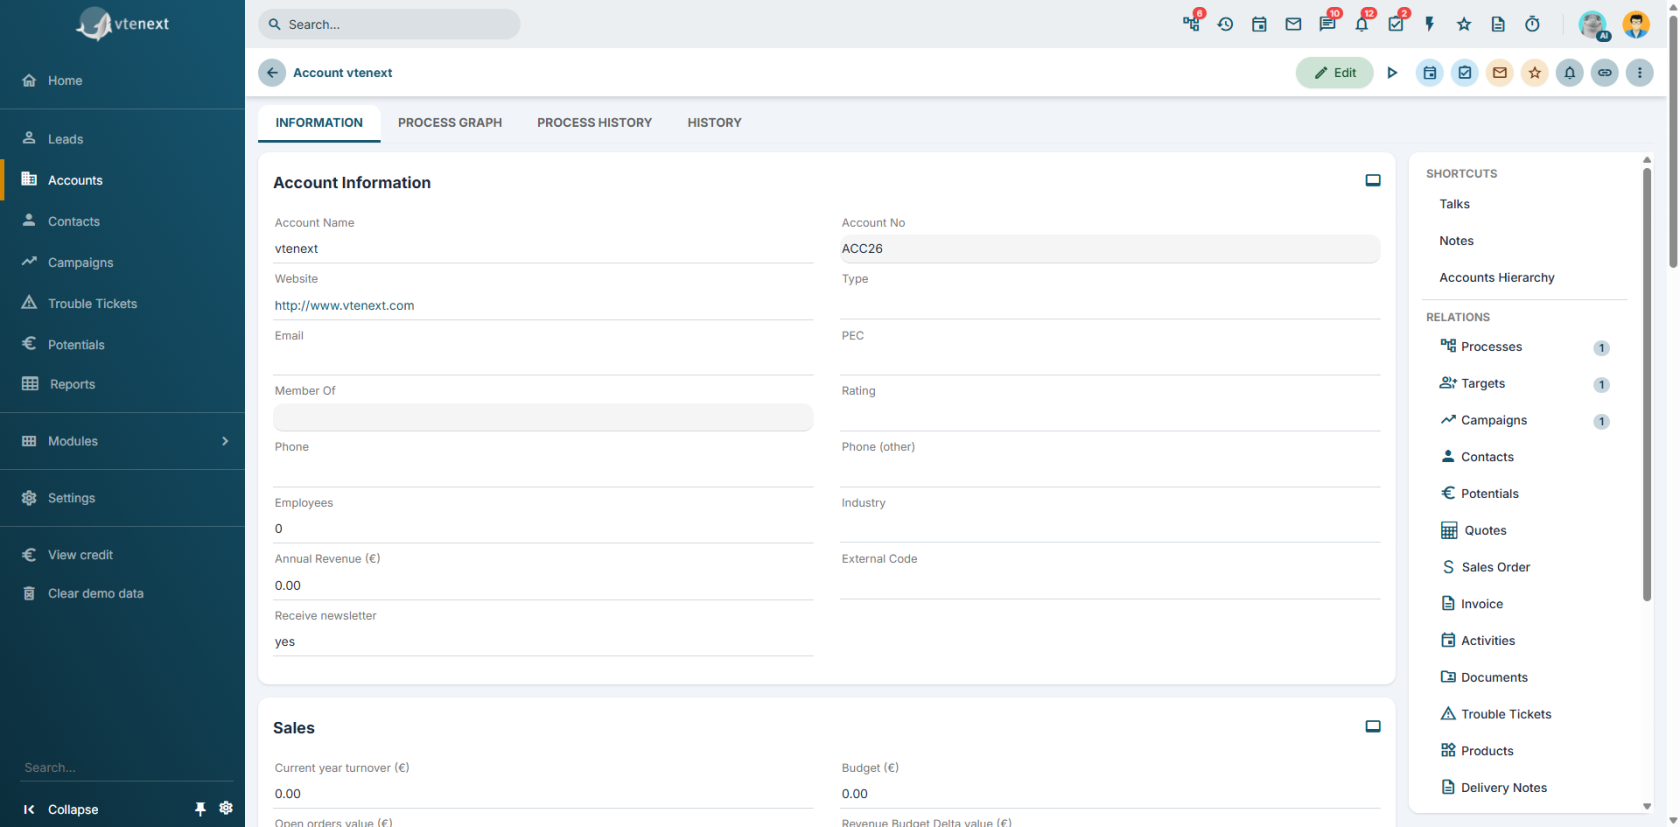
The account is created by triggering any configured processes. In this example, the active process performs web scraping to enrich the information in the company record.

[![image.png](https://usermanual.vtenext.com/uploads/images/gallery/2026-07/scaled-1680-/v0Iimage.png)](https://usermanual.vtenext.com/uploads/images/gallery/2026-07/v0Iimage.png)
---

### Ticket Response Rewording

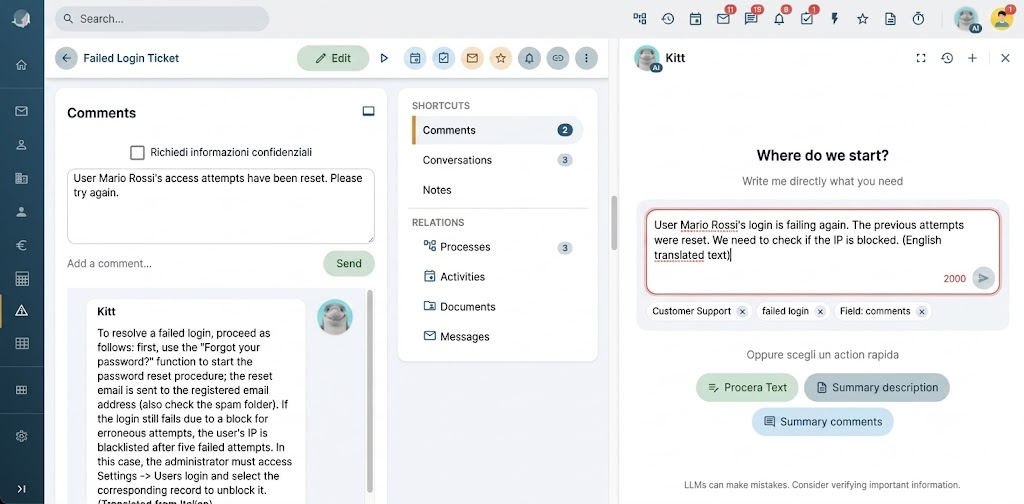
In this example, I need to reply to a ticket where the customer reported login issues. I can create a draft response by typing it directly into the **Add Comment** field.  
By clicking on that field, the content is added to Kitt’s context and the **Process Text** quick action becomes available.

[![image.png](https://usermanual.vtenext.com/uploads/images/gallery/2026-07/scaled-1680-/HBPimage.png)](https://usermanual.vtenext.com/uploads/images/gallery/2026-07/HBPimage.png)
[![image.png](https://usermanual.vtenext.com/uploads/images/gallery/2026-07/scaled-1680-/GXhimage.png)](https://usermanual.vtenext.com/uploads/images/gallery/2026-07/GXhimage.png) [![image.png](https://usermanual.vtenext.com/uploads/images/gallery/2026-07/scaled-1680-/ncdimage.png)](https://usermanual.vtenext.com/uploads/images/gallery/2026-07/ncdimage.png)
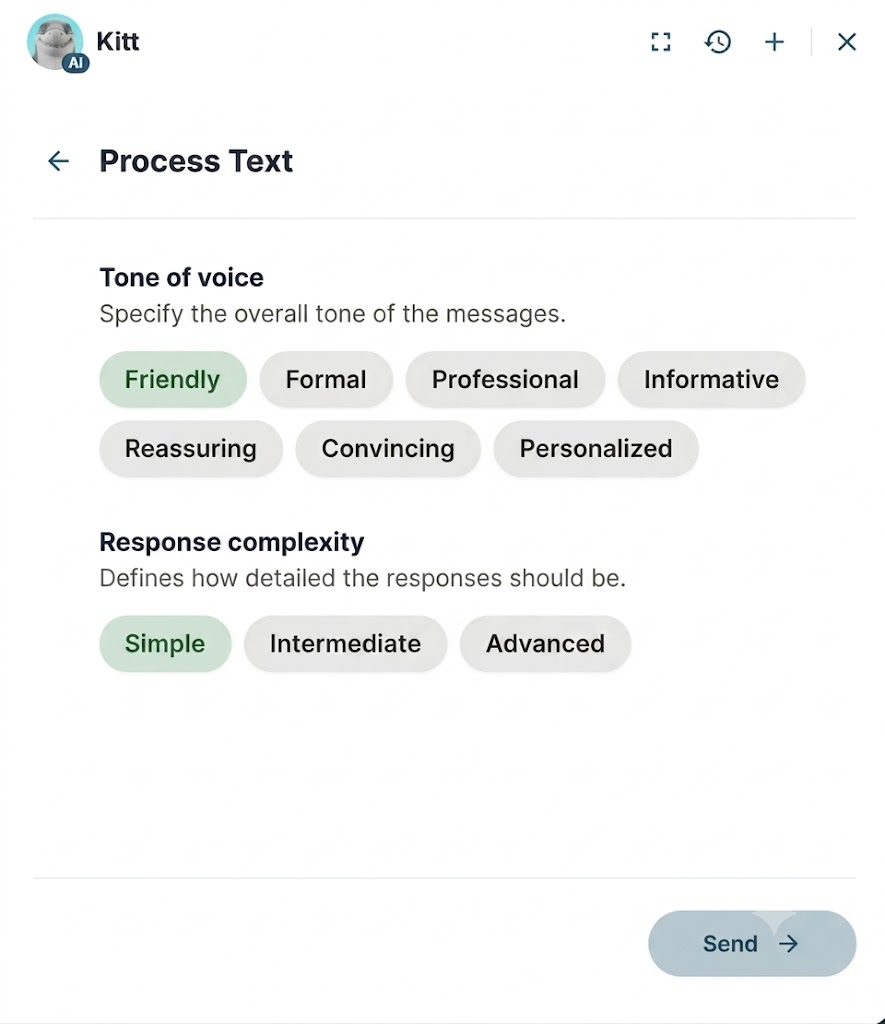
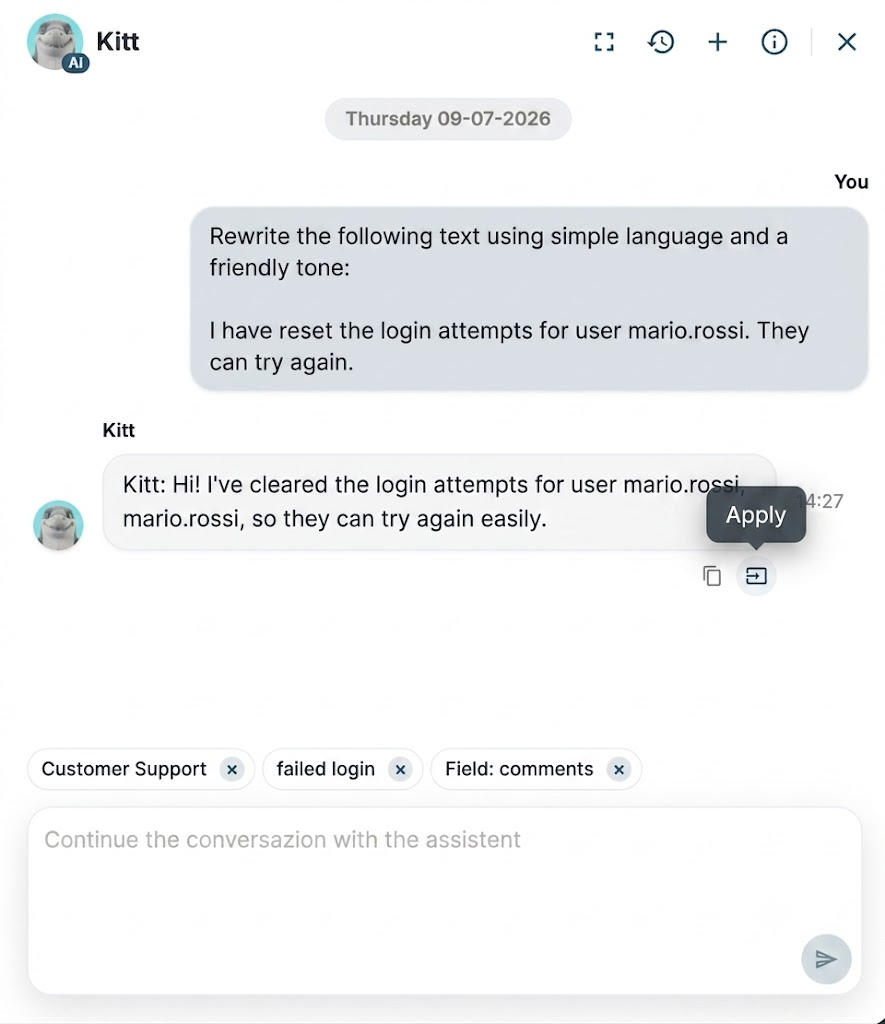
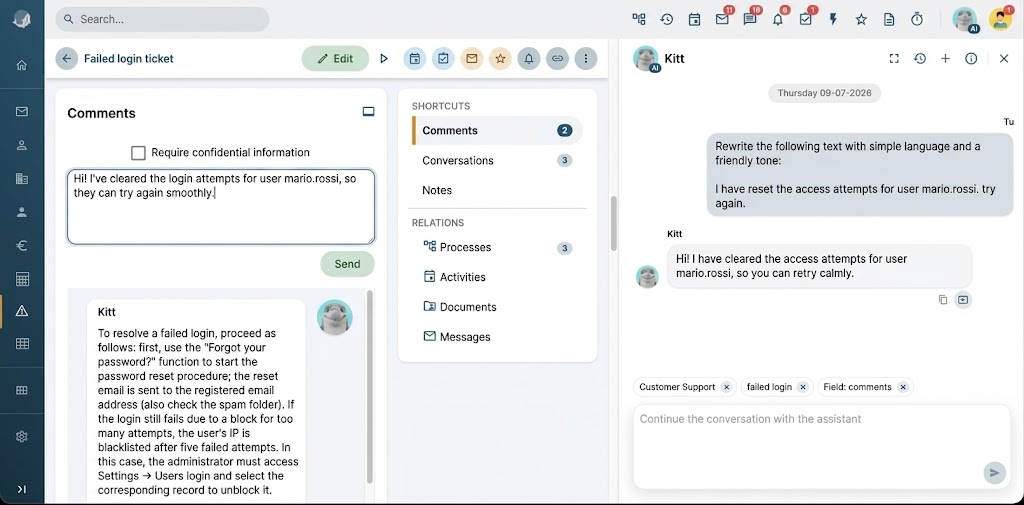
The response will include an **Apply** button, which allows you to replace the text in the field used as context with the processed text. You can then proceed to send the message.

[![image.png](https://usermanual.vtenext.com/uploads/images/gallery/2026-07/scaled-1680-/eEPimage.png)](https://usermanual.vtenext.com/uploads/images/gallery/2026-07/eEPimage.png)
---

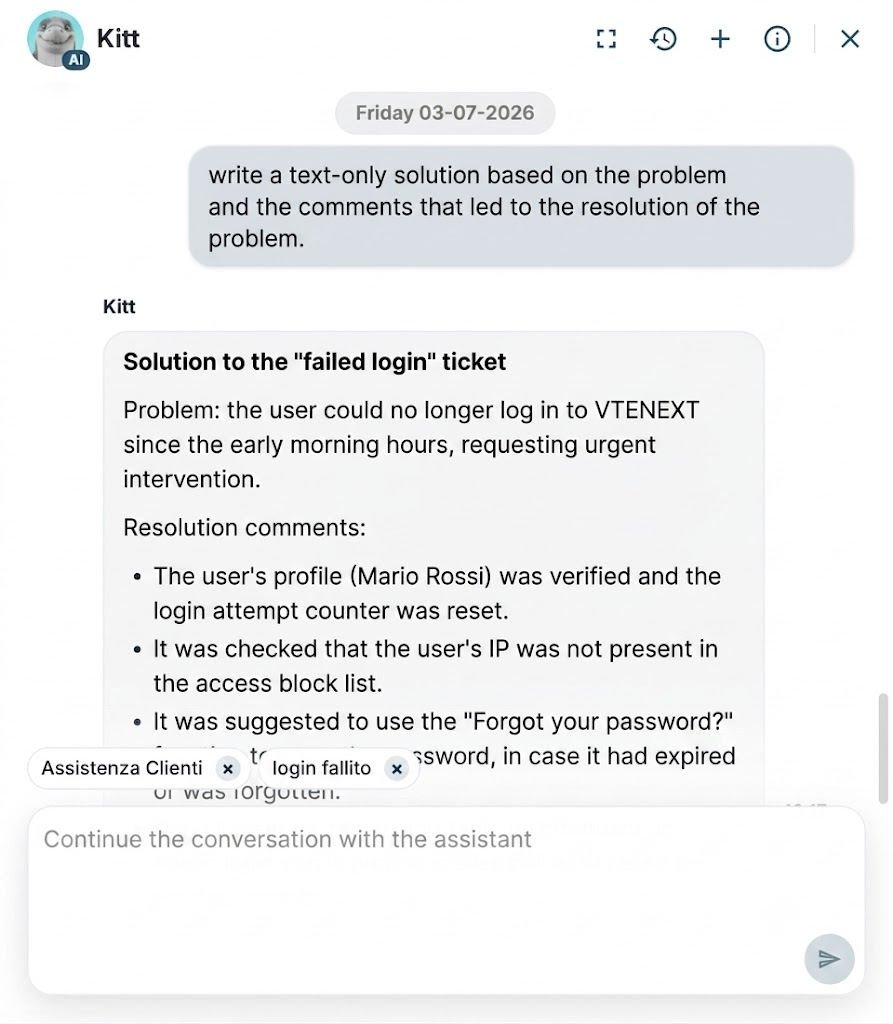
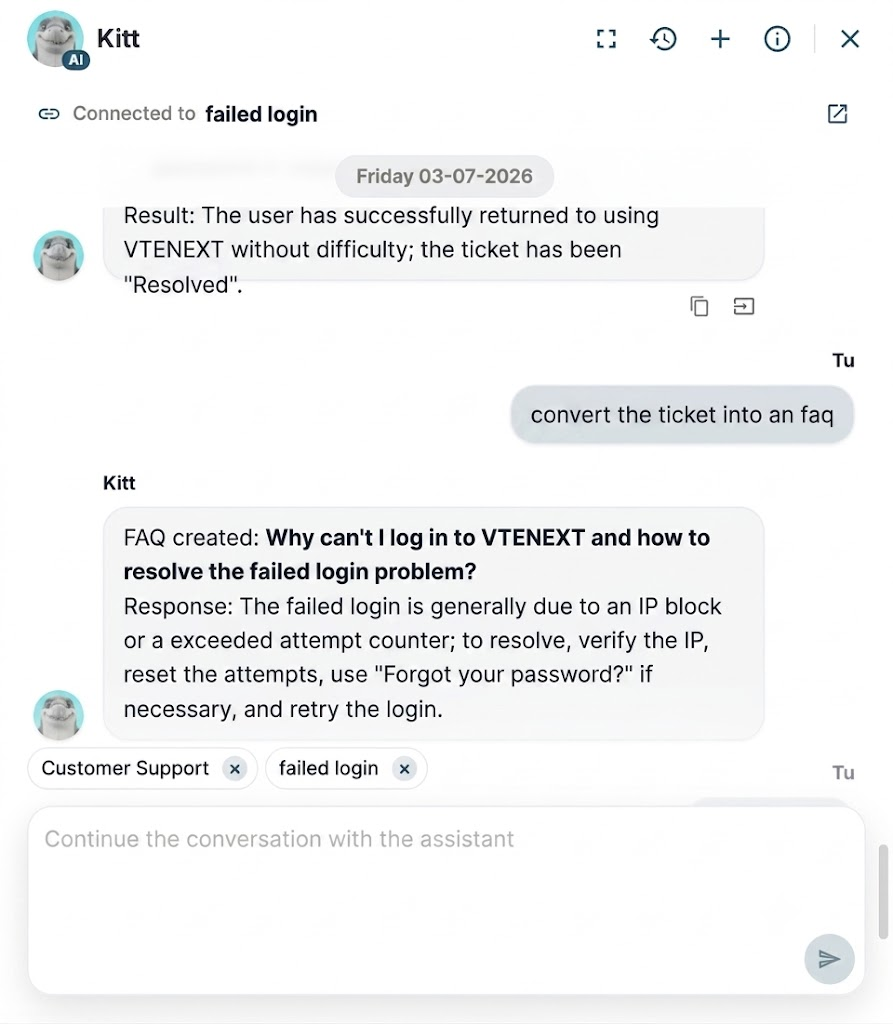
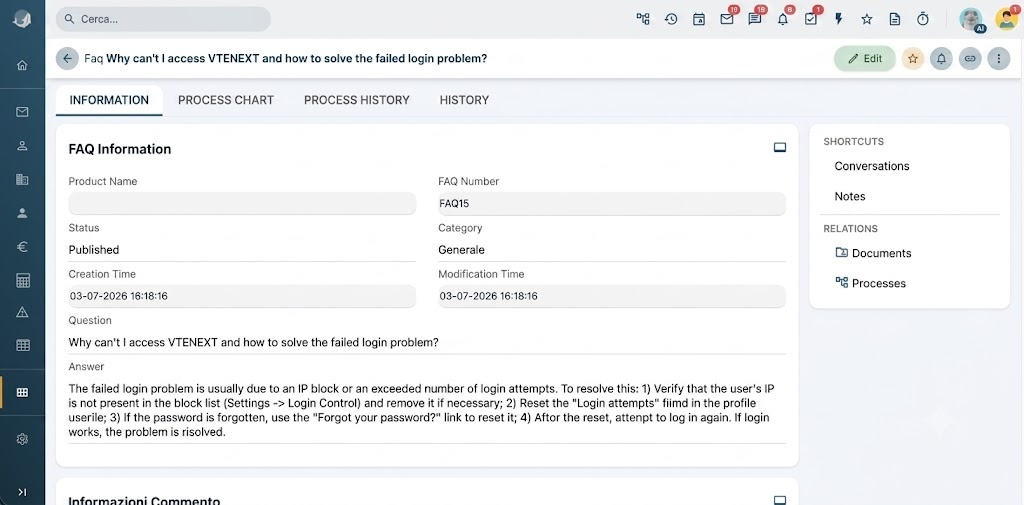
### From Ticket to FAQ

Using the ticket from the previous example, I ask the assistant to write a solution based on the comments and then create an FAQ.

[![image.png](https://usermanual.vtenext.com/uploads/images/gallery/2026-07/scaled-1680-/FySimage.png)](https://usermanual.vtenext.com/uploads/images/gallery/2026-07/FySimage.png) [![image.png](https://usermanual.vtenext.com/uploads/images/gallery/2026-07/scaled-1680-/ZCuimage.png)](https://usermanual.vtenext.com/uploads/images/gallery/2026-07/ZCuimage.png)
[![image.png](https://usermanual.vtenext.com/uploads/images/gallery/2026-07/scaled-1680-/RLzimage.png)](https://usermanual.vtenext.com/uploads/images/gallery/2026-07/RLzimage.png)
---

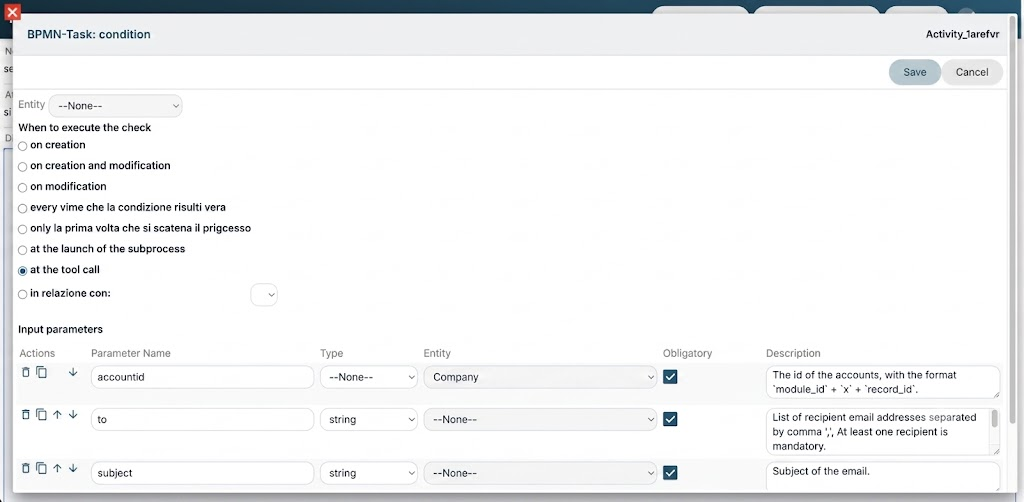
### Sending an Email

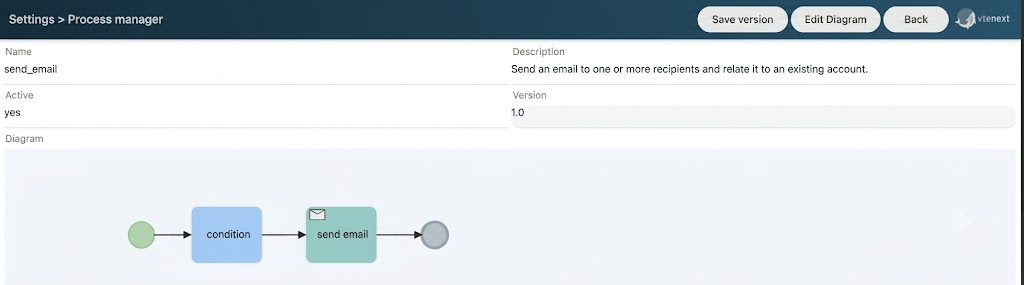
If the assistant uses an agent, all active tools can be used directly within the chat. For example, you can configure a process tool for sending emails and then ask the assistant to send an email.

The process will be configured as shown, and once activated, make sure that the tool is enabled in the agent.

[![image.png](https://usermanual.vtenext.com/uploads/images/gallery/2026-07/scaled-1680-/ldNimage.png)](https://usermanual.vtenext.com/uploads/images/gallery/2026-07/ldNimage.png)
[![image.png](https://usermanual.vtenext.com/uploads/images/gallery/2026-07/scaled-1680-/a2iimage.png)](https://usermanual.vtenext.com/uploads/images/gallery/2026-07/a2iimage.png)
<div class="qMYqUG_convSearchResultHighlightRoot" id="bkmrk-by-asking-the-assist"><div class="" data-is-intersecting="true" data-turn-id-container="request-6a510cca-0070-83eb-aad8-4751006a7543-66"><section class="text-token-text-primary w-full focus:outline-none has-data-writing-block:pointer-events-none [&:has([data-writing-block])>*]:pointer-events-auto R6Vx5W_threadScrollVars scroll-mb-[calc(var(--scroll-root-safe-area-inset-bottom,0px)+var(--thread-response-height))] scroll-mt-[calc(var(--header-height)+min(200px,max(70px,20svh)))]" data-testid="conversation-turn-154" data-turn="assistant" data-turn-id="request-6a510cca-0070-83eb-aad8-4751006a7543-66" data-turn-id-container="request-6a510cca-0070-83eb-aad8-4751006a7543-66" dir="auto">By asking the assistant to send an email to a contact, the **VTE tools** will then be used.

</section></div></div>[![image.png](https://usermanual.vtenext.com/uploads/images/gallery/2026-07/scaled-1680-/hxcimage.png)](https://usermanual.vtenext.com/uploads/images/gallery/2026-07/hxcimage.png) [![image.png](https://usermanual.vtenext.com/uploads/images/gallery/2026-07/scaled-1680-/kUbimage.png)](https://usermanual.vtenext.com/uploads/images/gallery/2026-07/kUbimage.png)