Wilson for vtenext App - User Manual
Wilson for vtenext enables you to work anywhere, just as if you were sitting in your office in front of a computer. The App connects to the VTE service (both Cloud and On Site) and offers direct operation on data to manage diary entries, contacts, potential customers, projects, and much more. With Wilson you do not even need the native smartphone/tablet instruments, like for example the calendar and address book.
- 1. Access and Homepage
- 2. Instruments
- 2.1 Instrument Bar and Icons
- 2.2 NFC Function - Mobile Scans
- 2.3 Barcode Scanning and QR Code Search
- 2.4 Sorting and Filters
- 3. Modules
- 3.1 Calendar and Tasks
- 3.2 Messages
- 3.3 Leads
- 3.4 Accounts
- 3.5 Contacts
- 3.6 Potentials
- 3.7 Quotes
- 3.8 Sales Orders
- 3.9 Invoices
- 3.10 Products
- 3.11 Installations
- 3.12 Services
- 3.13 Service Contracts
- 3.14 Trouble Tickets
- 3.15 Projects
- 3.16 Project Tasks
- 3.17 Milestones
- 3.18 Vendors
- 3.19 Purchase Orders
- 3.20 Visit Reports
- 3.21 Delivery Notes
- 4. Conversations
- 5. Settings
- 5.1 Settings Overview
- 5.2 Applying Changes
- 5.3 Push Notifications
- 5.4 Two-factors Authentication
- 5.5 Mobile Profiles
- 6. Global Research
1. Access and Homepage
Wilson for vtenext allows you to work anywhere, just as if you were sitting in your office in front of a computer. The App connects to the vtenext service (both Cloud and On Site) and offers direct operation on data to manage diary entries, contacts, potential customers, projects, and much more. With Wilson for vtenext you do not even need the native smartphone/tablet instruments, like for example the calendar and address book.
![1-[1].PNG](https://usermanual.vtenext.com/uploads/images/gallery/2022-07/VDa1-1.PNG)
Wilson for vtenext App Access window
Once the App is running on your mobile device, you see the screen illustrated above. You are asked to enter your username and password (the same as those for vtenext) and the address of the cloud service (if you do not specify a protocol, https:// is the default).
After login the Homepage opens immediately, showing all the available modules with the same functions as the desktop version of vtenext. For more information about the purpose and content of each module, refer to the vtenext manual at the website www.vtenext.com, or contact us at the e-mail address info@vtenext.com

Scrolling down from the initial screen reveals all the modules available in the CRM accessible by the user (according to their profile). Clicking on the three short lines at the lower right  gives access to other options and modules as shown in the following illustration.
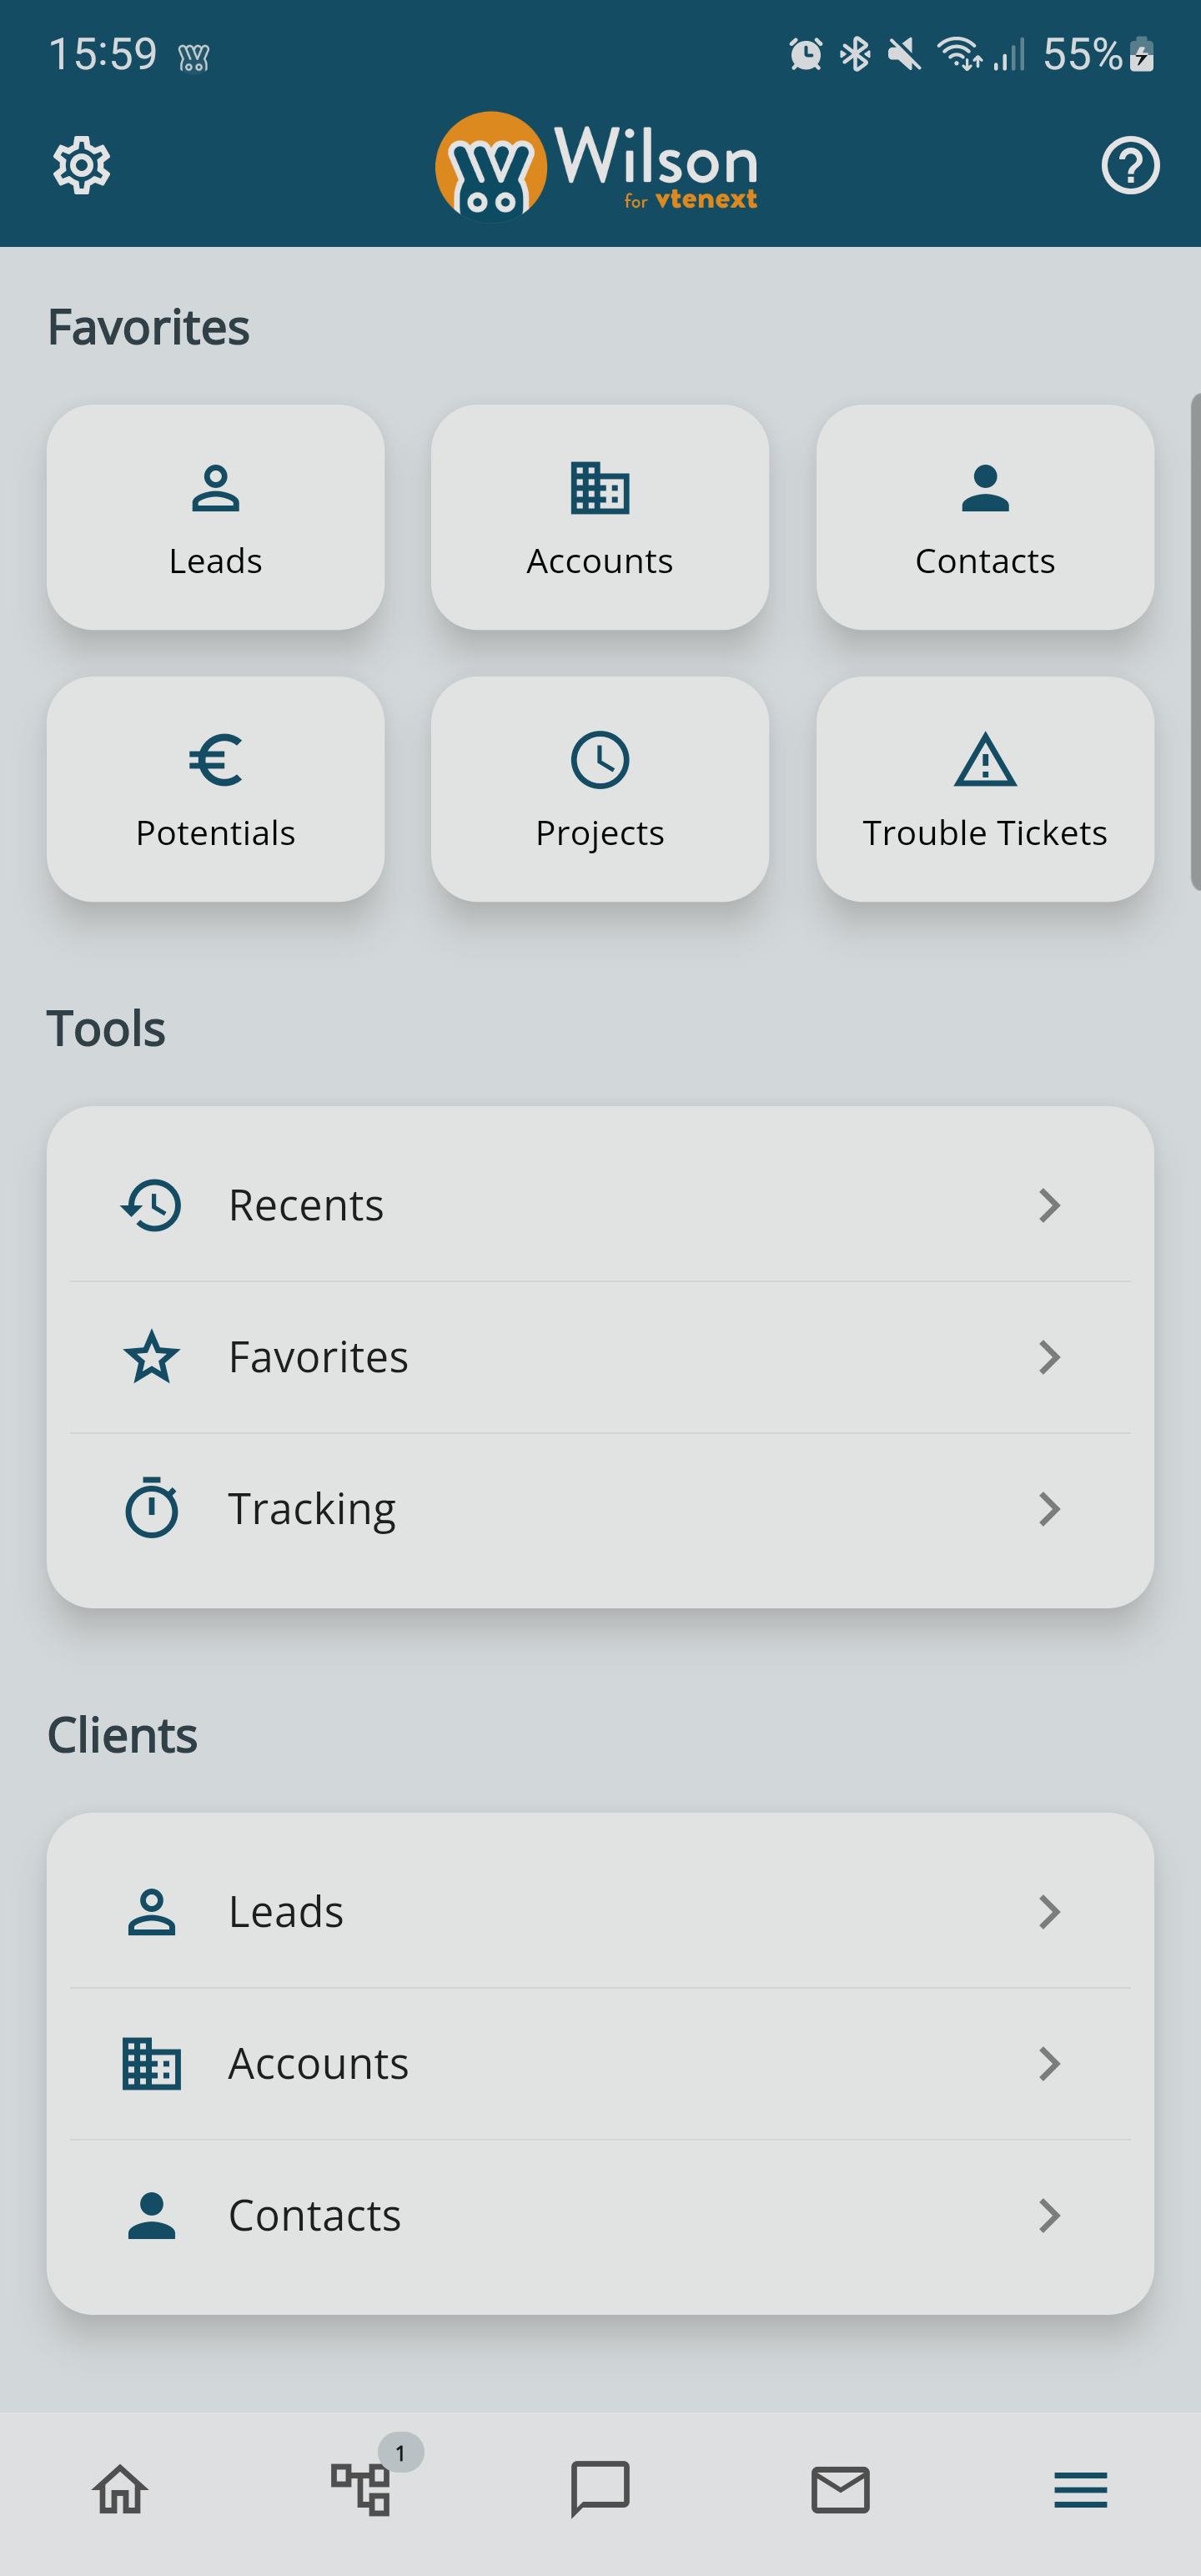
In the Homepage and other modules, three new functions have been added (visible in the tools section):
- Recent (last items viewed in the CRM)
- Favorites (all items marked as favorites with the star icon)
- Tracking (to view all ongoing tracking directly in the app)
Also note the instrument bar at the bottom of every screen, functioning as follows:
|
|
Go to Homepage |
|
|
Display Process notifications |
|
|
See and reply to Conversations |
|
|
See and manage e-mail Messages |
|
|
Button for list of available Modules |


2. Instruments
2.1 Instrument Bar and Icons
The instrument bar on every page of the App has the following icons.

Starting from the left:
- Homepage: to go to the initial page of the App.
- Processes: to display processes underway requiring the attention of the user.
- Conversations: to open the module of the same name and reply to users as required (a notification indicates the number of unread conversations).
- Messages: to open the messages module and read your e-mail (the number of unread messages is indicated).
- Others: to return to the page listing all modules.
Each module also includes a search field and the + button to add a new record in the current module.

Entering a module you might see the following icons at the top alongside the logo (starting from the left):

- Settings: for accessing the settings for connecting the App to the Cloud or On Site CRM.
-
Exit: to logout from the Wilson for vtenext mobile App.
In the list display mode, or when viewing the list of records within a module, there are other icons to help navigate and use the App:
![2.1 [3].PNG](https://usermanual.vtenext.com/uploads/images/gallery/2022-06/2-1-3.PNG) |
Gives access to the list of filters available for the present module |
|
|
Allows creation of a new record within the module |
Inside each card (Company, Contact, Lead, etc.) there is a series of icons that enable different actions:
|
|
Conversations regarding the displayed record |
|
|
Notes about the displayed record |
|
|
Calendar events involving the displayed record |
|
|
Tasks involving the displayed record |
![2.1 [5].PNG](https://usermanual.vtenext.com/uploads/images/gallery/2022-06/2-1-5.PNG) |
Access to the list of available relations in the displayed record
|
|
|
Allows modification of the displayed record |


The cards contain a number of fields that function as follows:


“Assigned to” field: it is possible to select/display the assignee of the item, in other words the CRM owner User or Group

Text field: for inserting a name, number, information, etc.
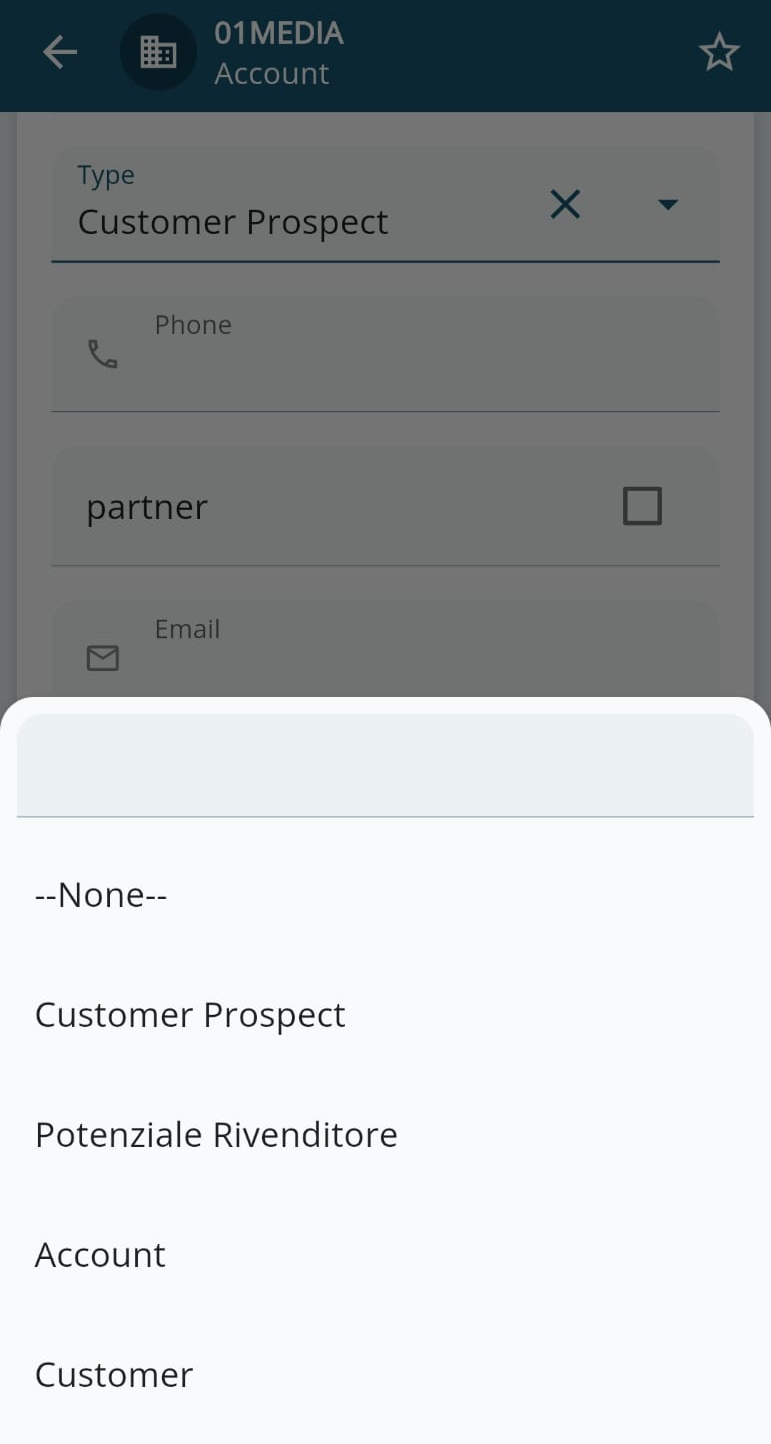
Pick-list field (drop-down menu): allows selection of a single value from those in the list
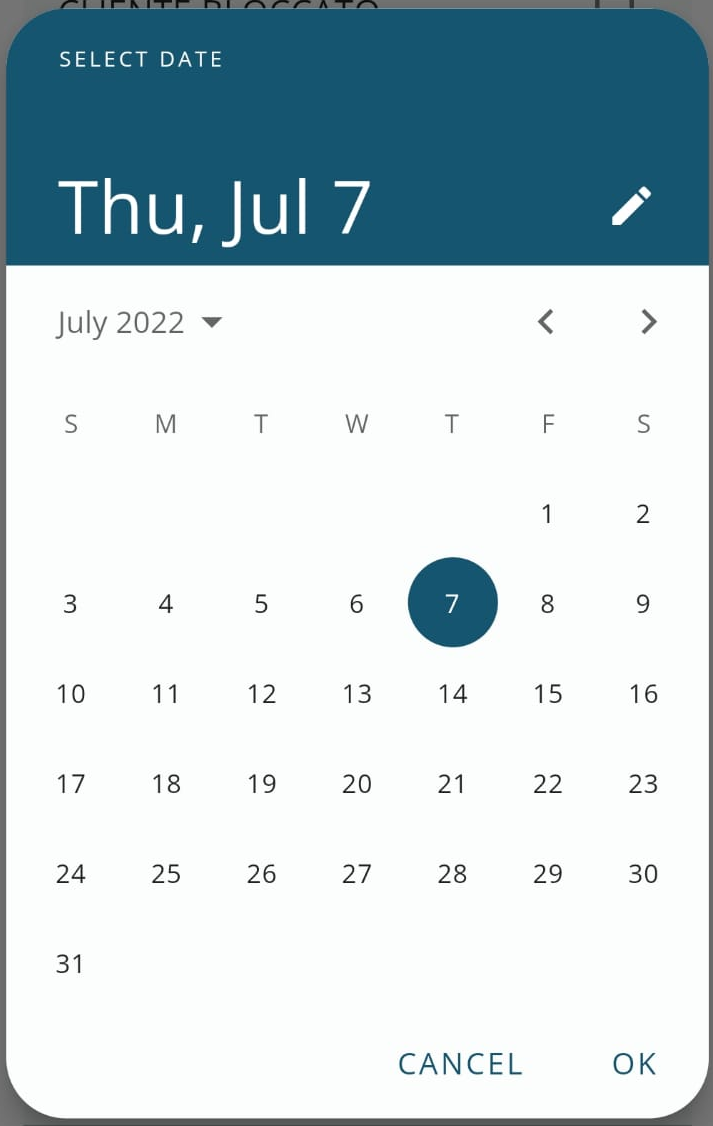
Field for selecting the date
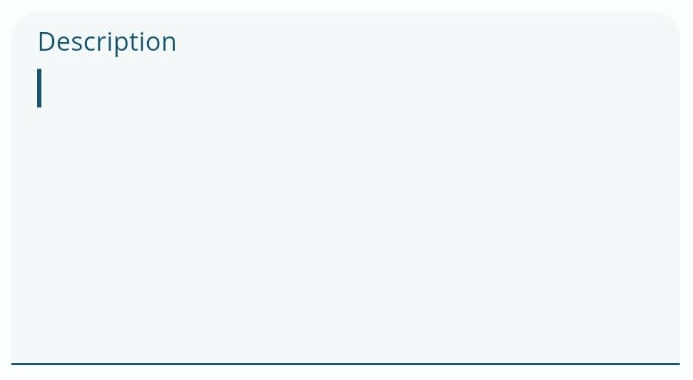
Text Area field: allows, for example, an extended text description
2.2 NFC Function - Mobile Scans
NFC (Near Field Communication) is a short-range wireless communication technology that allows devices to exchange data when they are close to each other, typically within a range of about 4 cm. Here's how it works:
Basic Principles:
- Short-range communication: NFC devices, such as smartphones, card readers, or NFC tags, must be very close to each other to initiate data exchange.
- Frequency: NFC operates at 13.56 MHz, a frequency that allows for fast and secure information exchange over short distances.
- Active and Passive Modes:
- In active mode, both devices generate an electromagnetic field to transmit data.
- In passive mode, only one device generates the electromagnetic field (e.g., a smartphone), while the other device (e.g., an NFC tag) uses it to power itself and respond.
How NFC works in vtenext
To activate and use this feature, a few configuration steps are required. First, from vtenext's administration panel, go to SETTINGS > MODULE MANAGER > COMPANIES (or another relevant module), and add a related field to the Mobile Scans module.
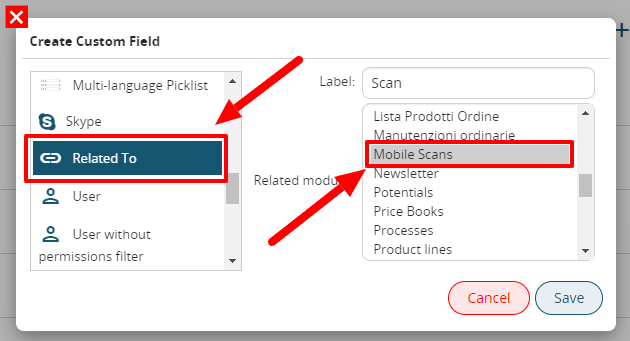
This field will be immediately available on the Wilson App, and by clicking on it, the screen to scan the NFC tag with the mobile phone will be activated.
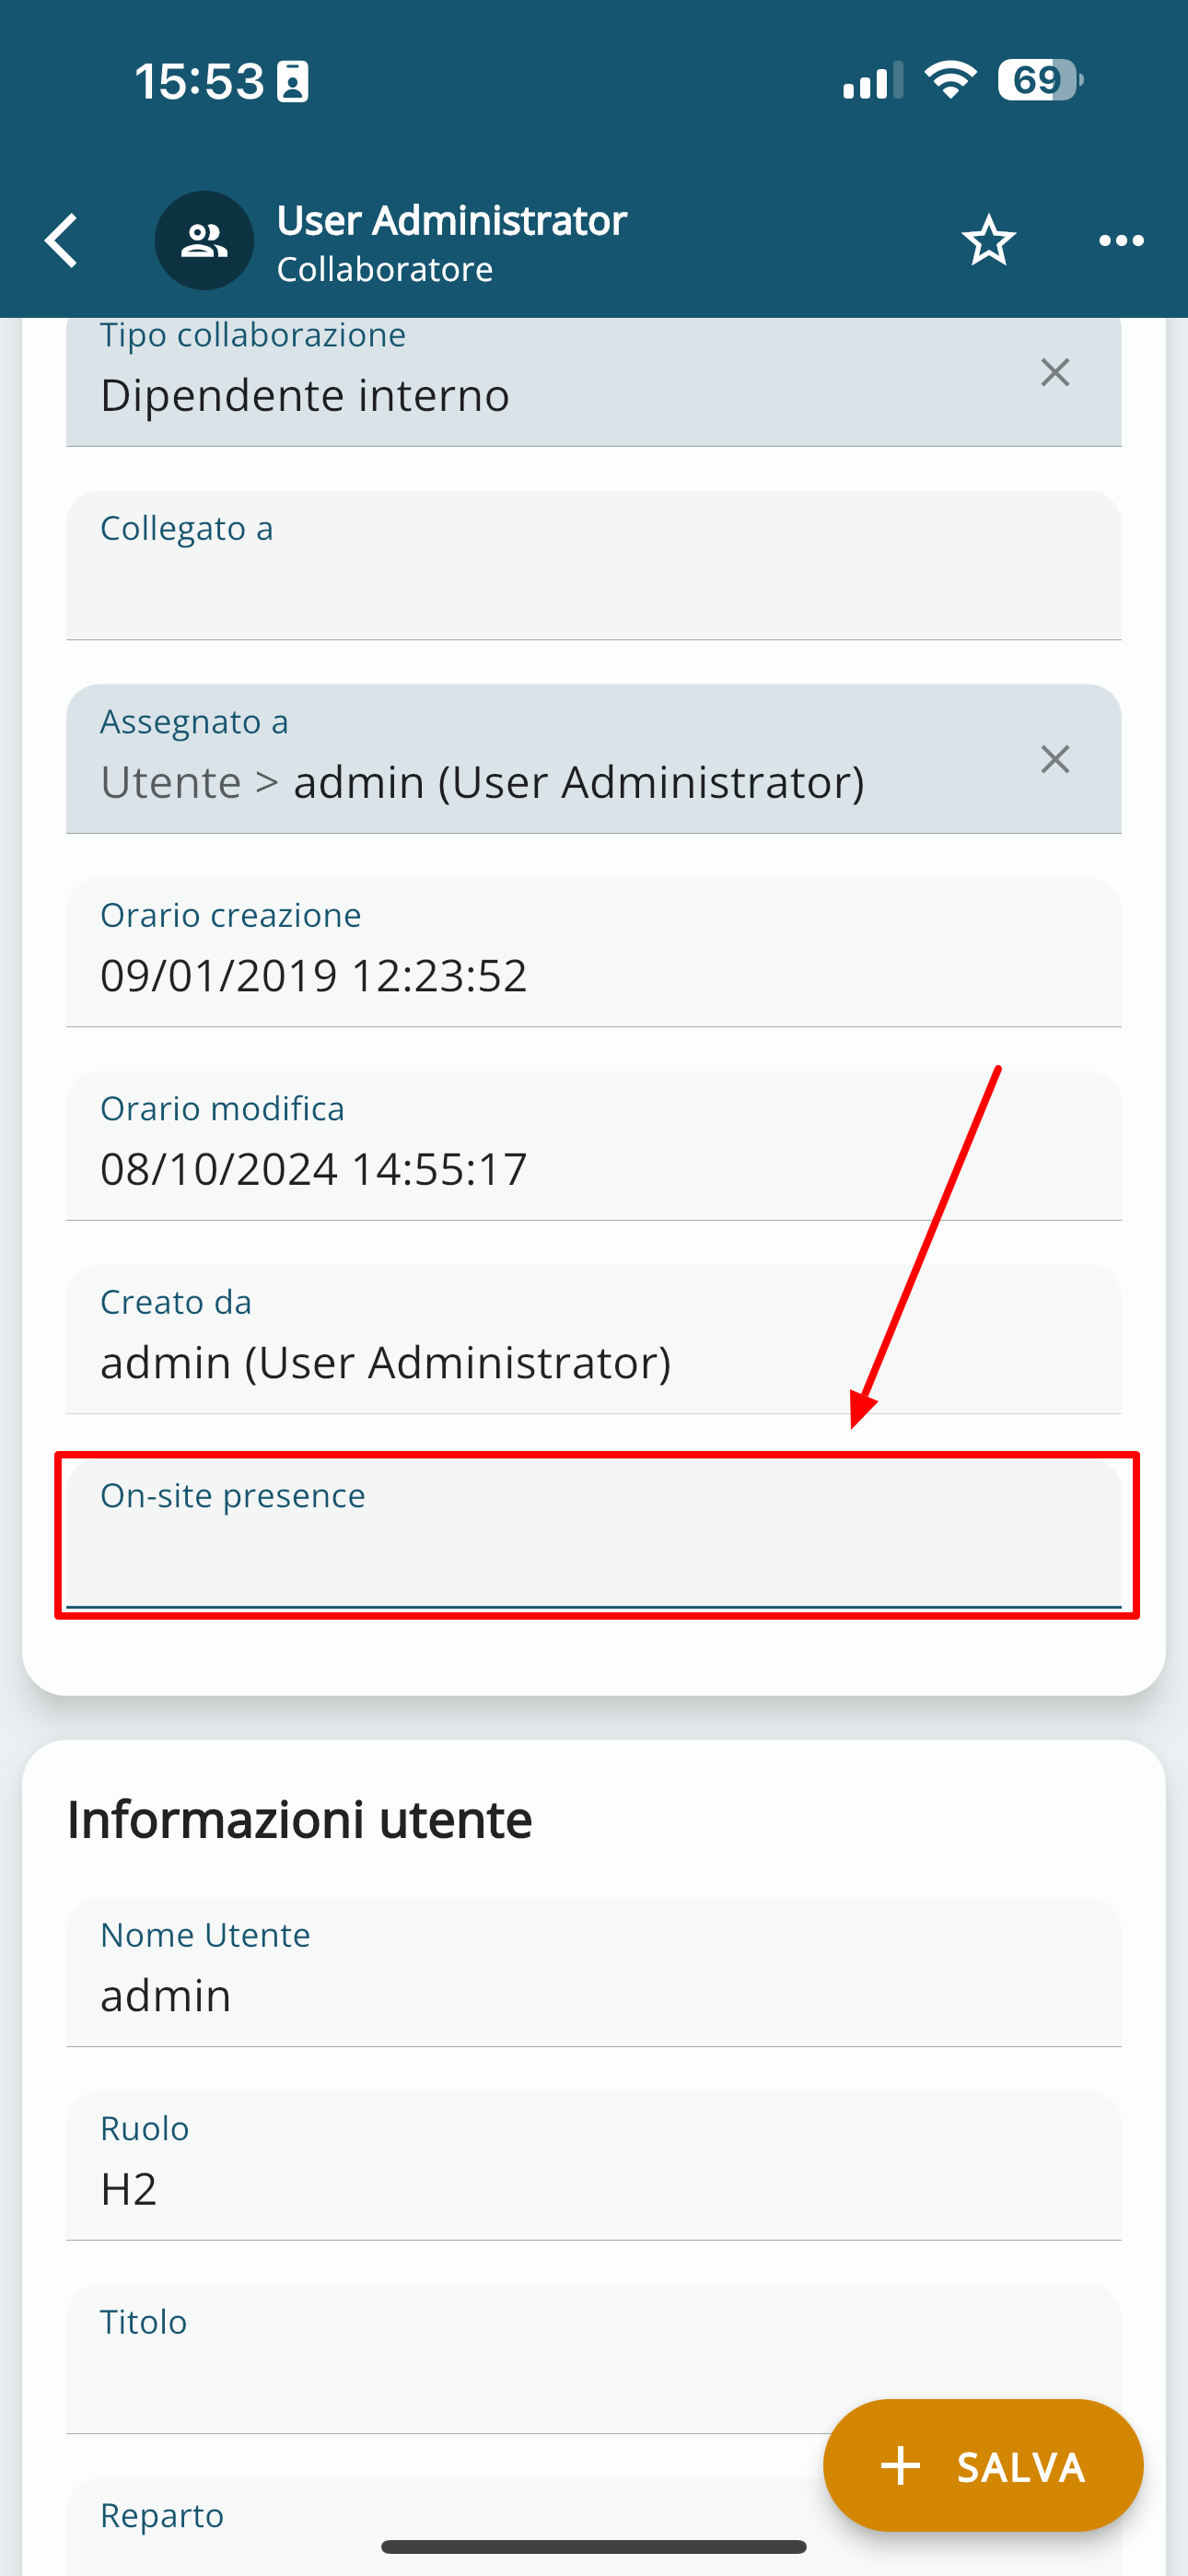
NFC scan field on the Wilson App to click on in order to activate the NFC tag acquisition.
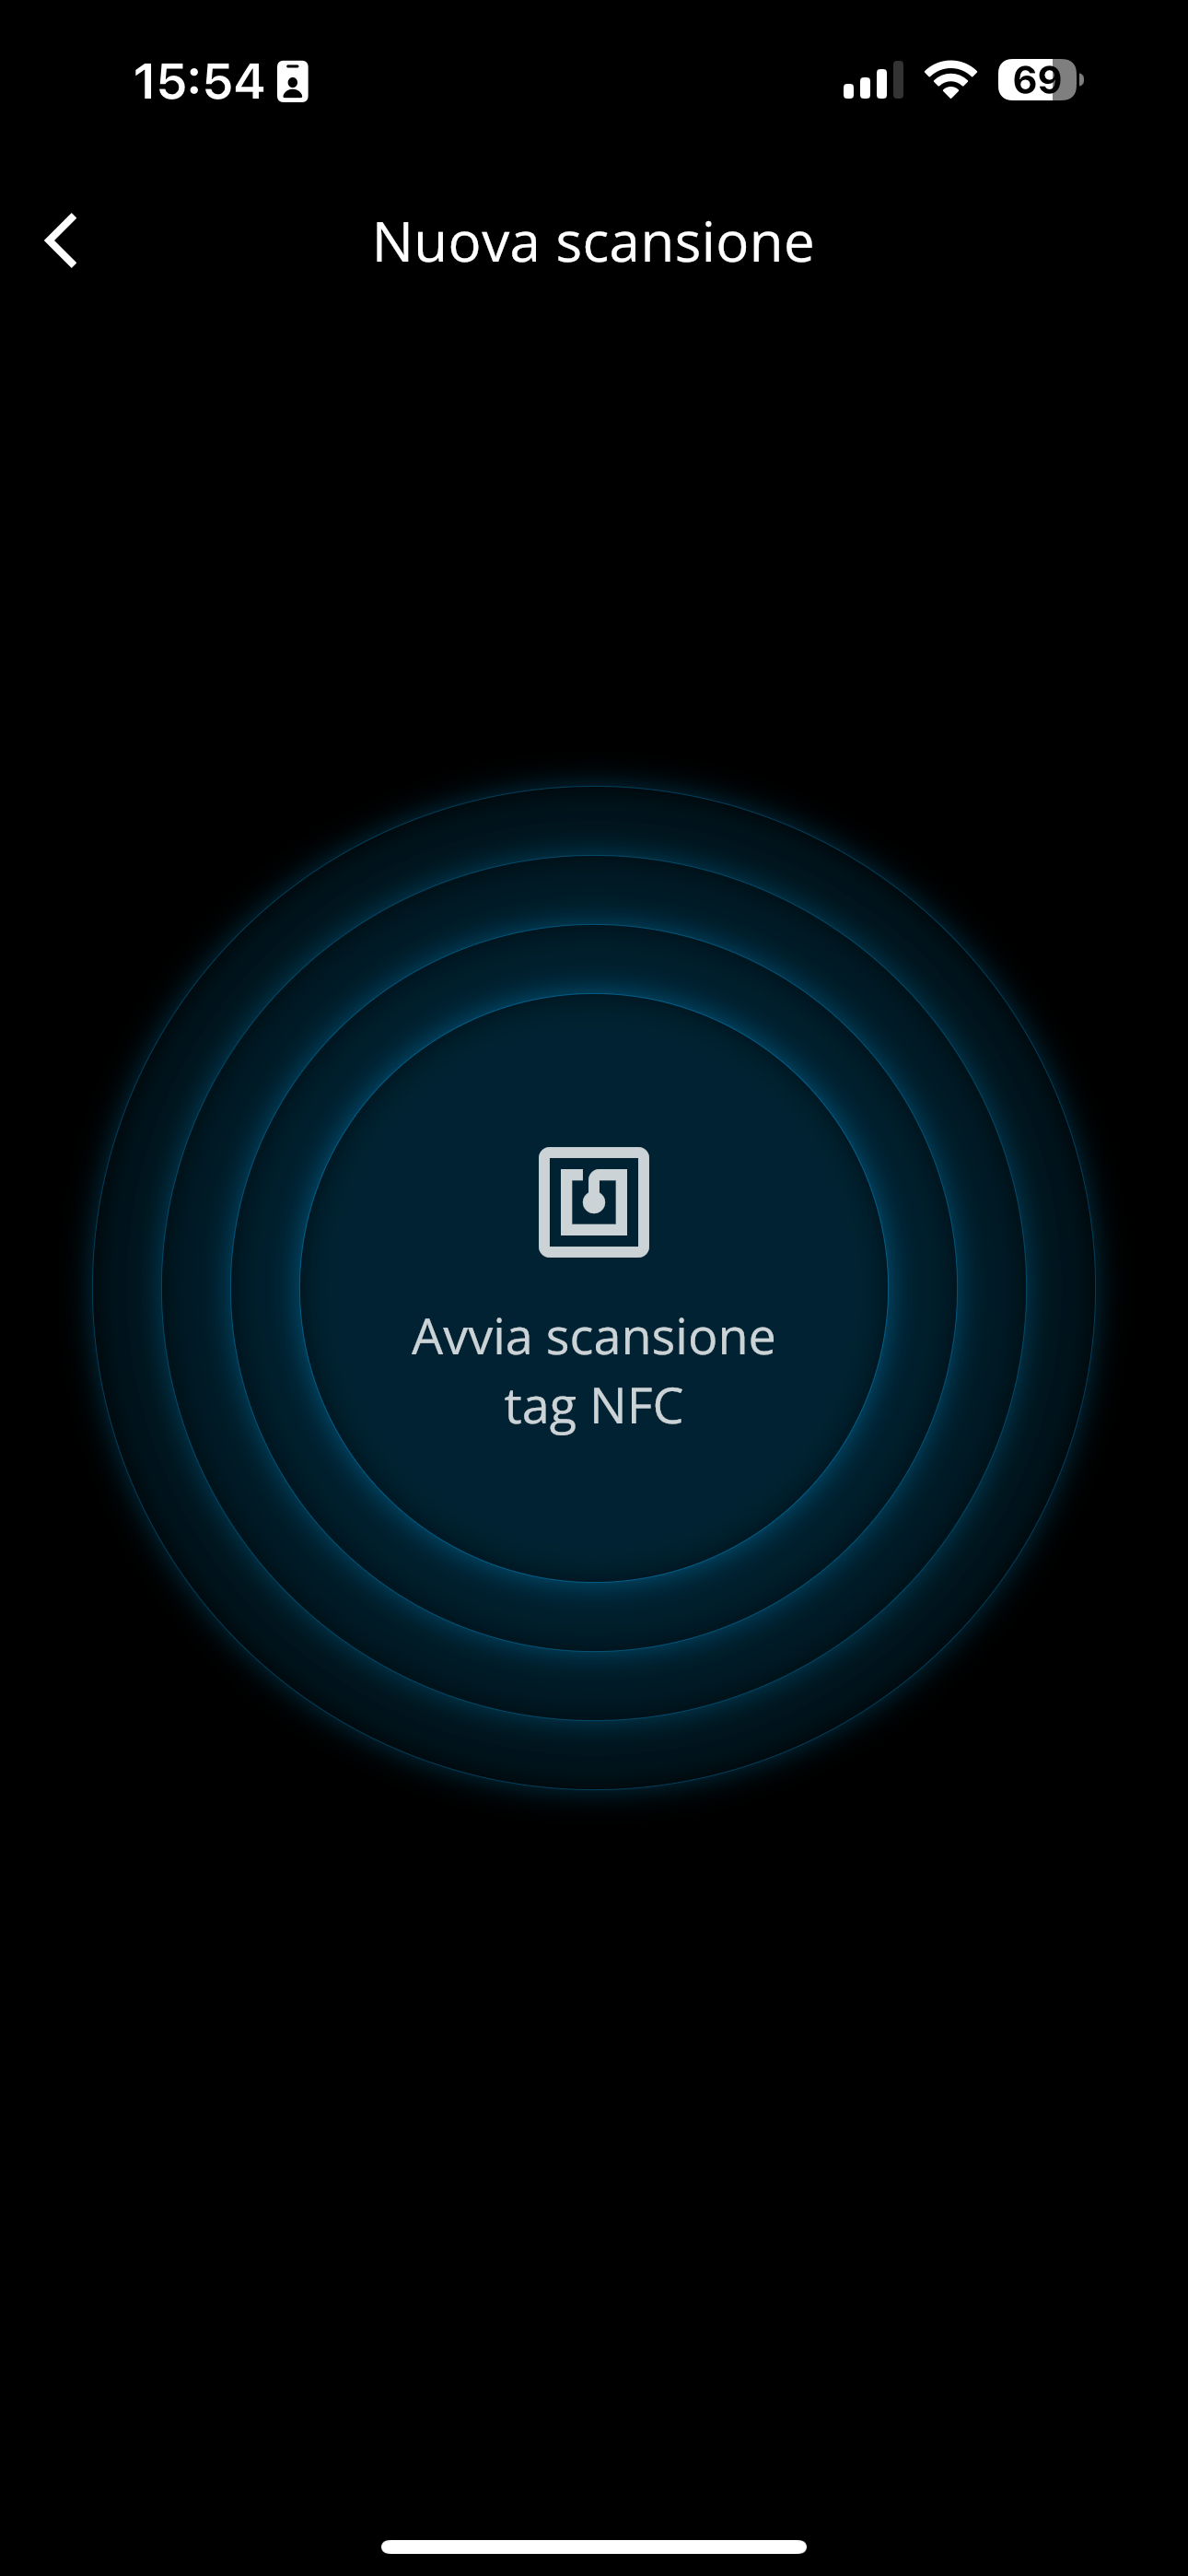
NFC tag scanning startup screen
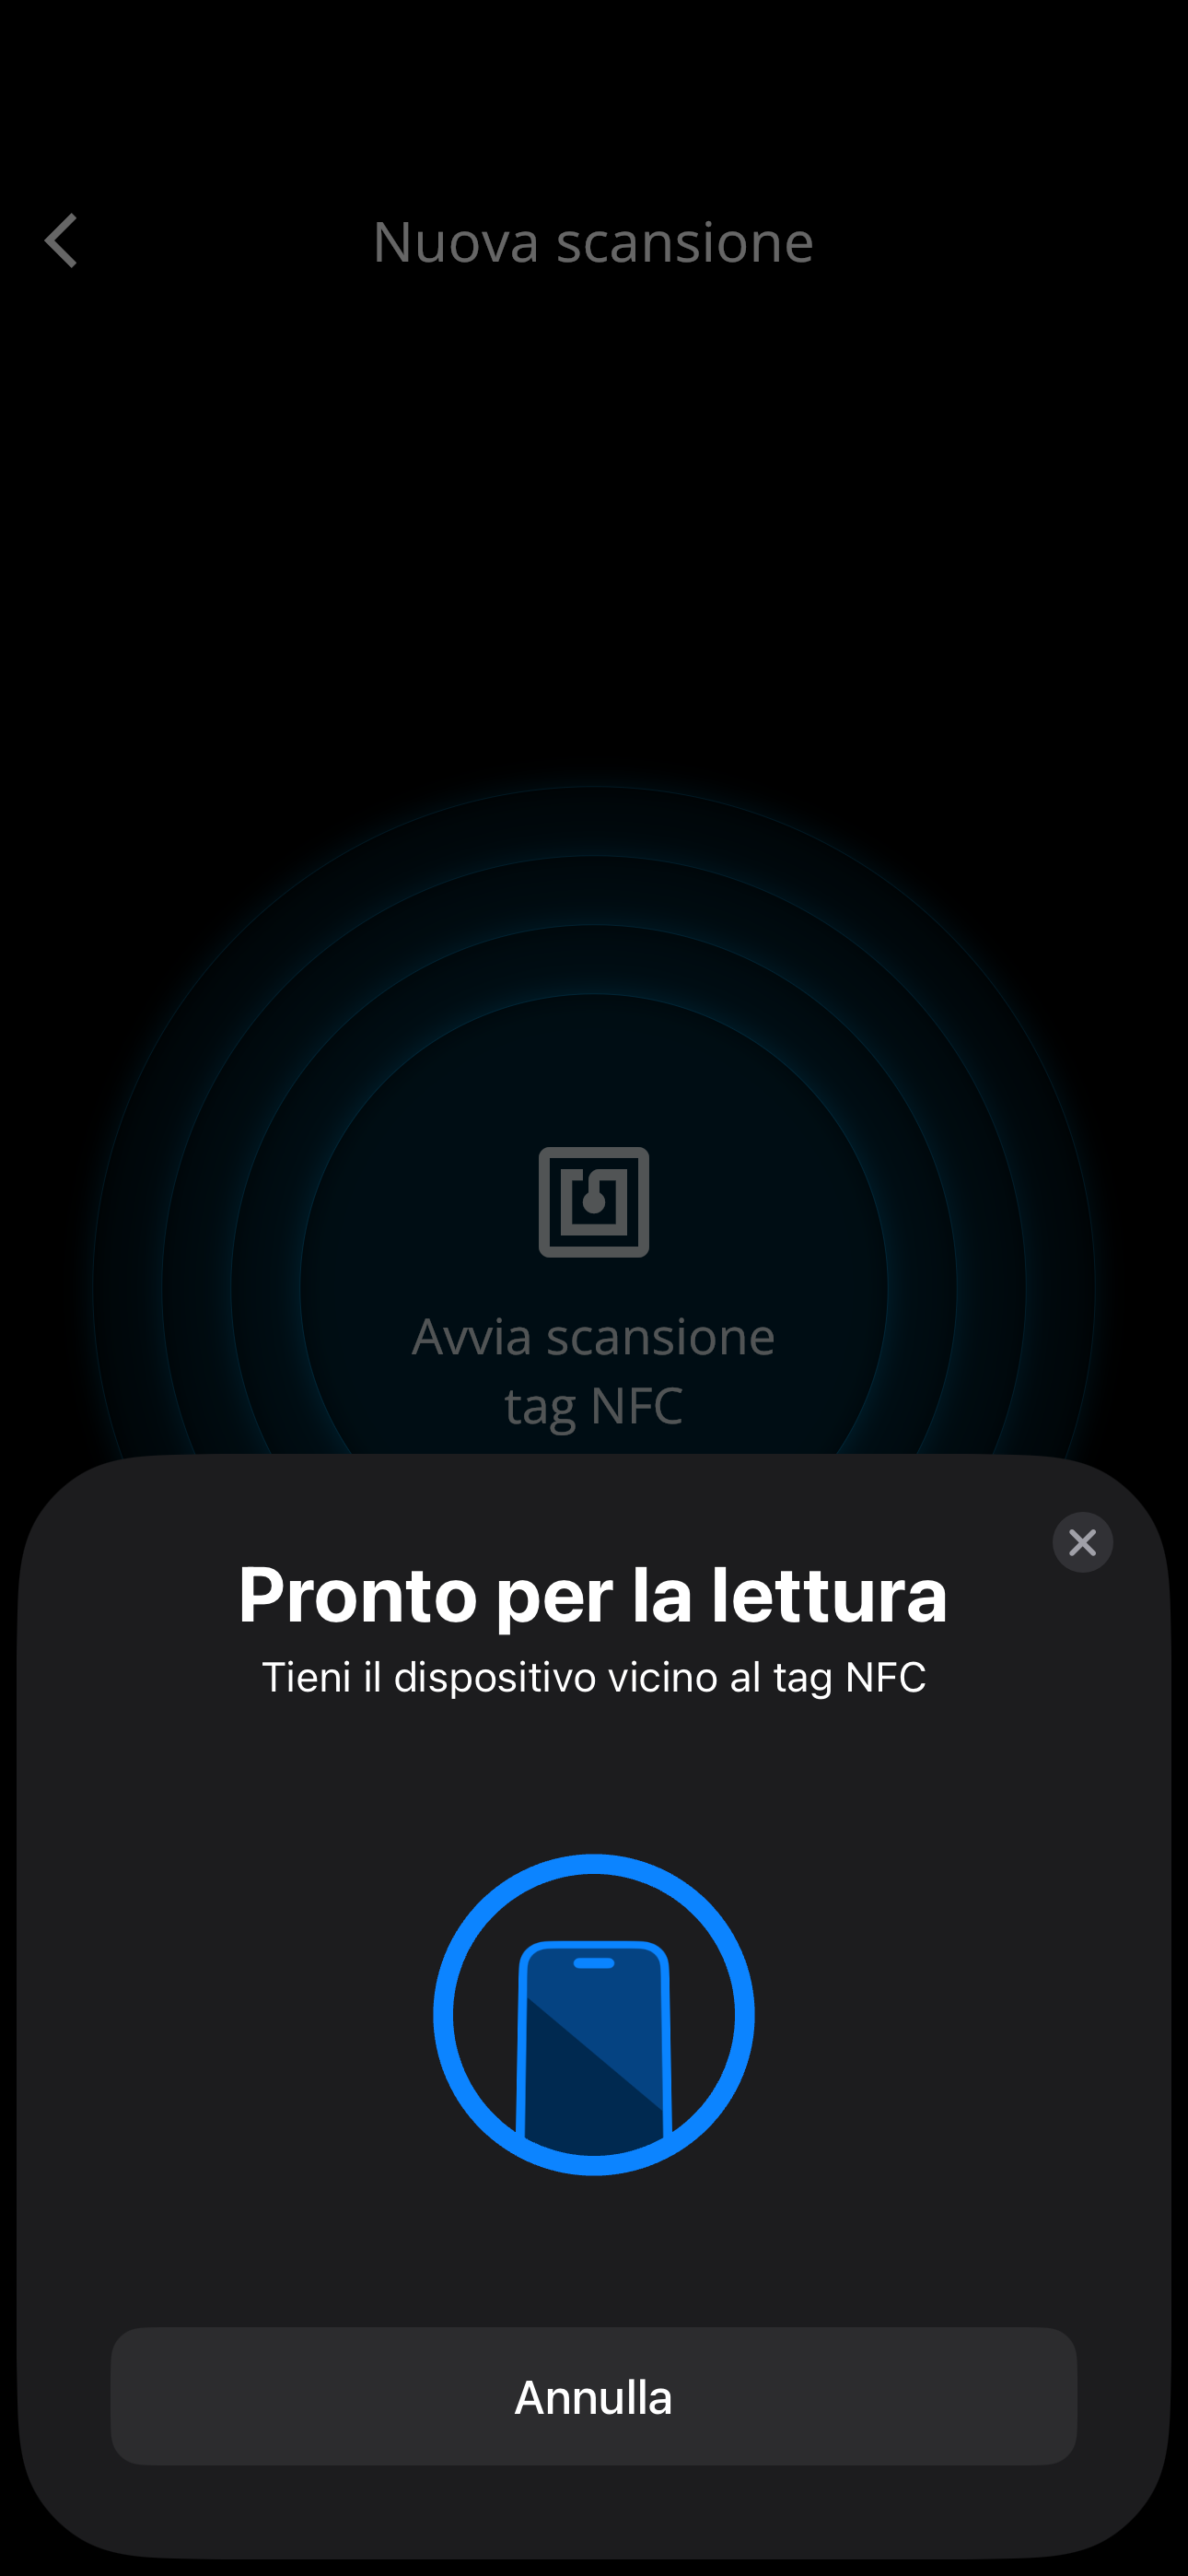
Screen dialog where the system prompts the user to bring the NFC tag closer for reading
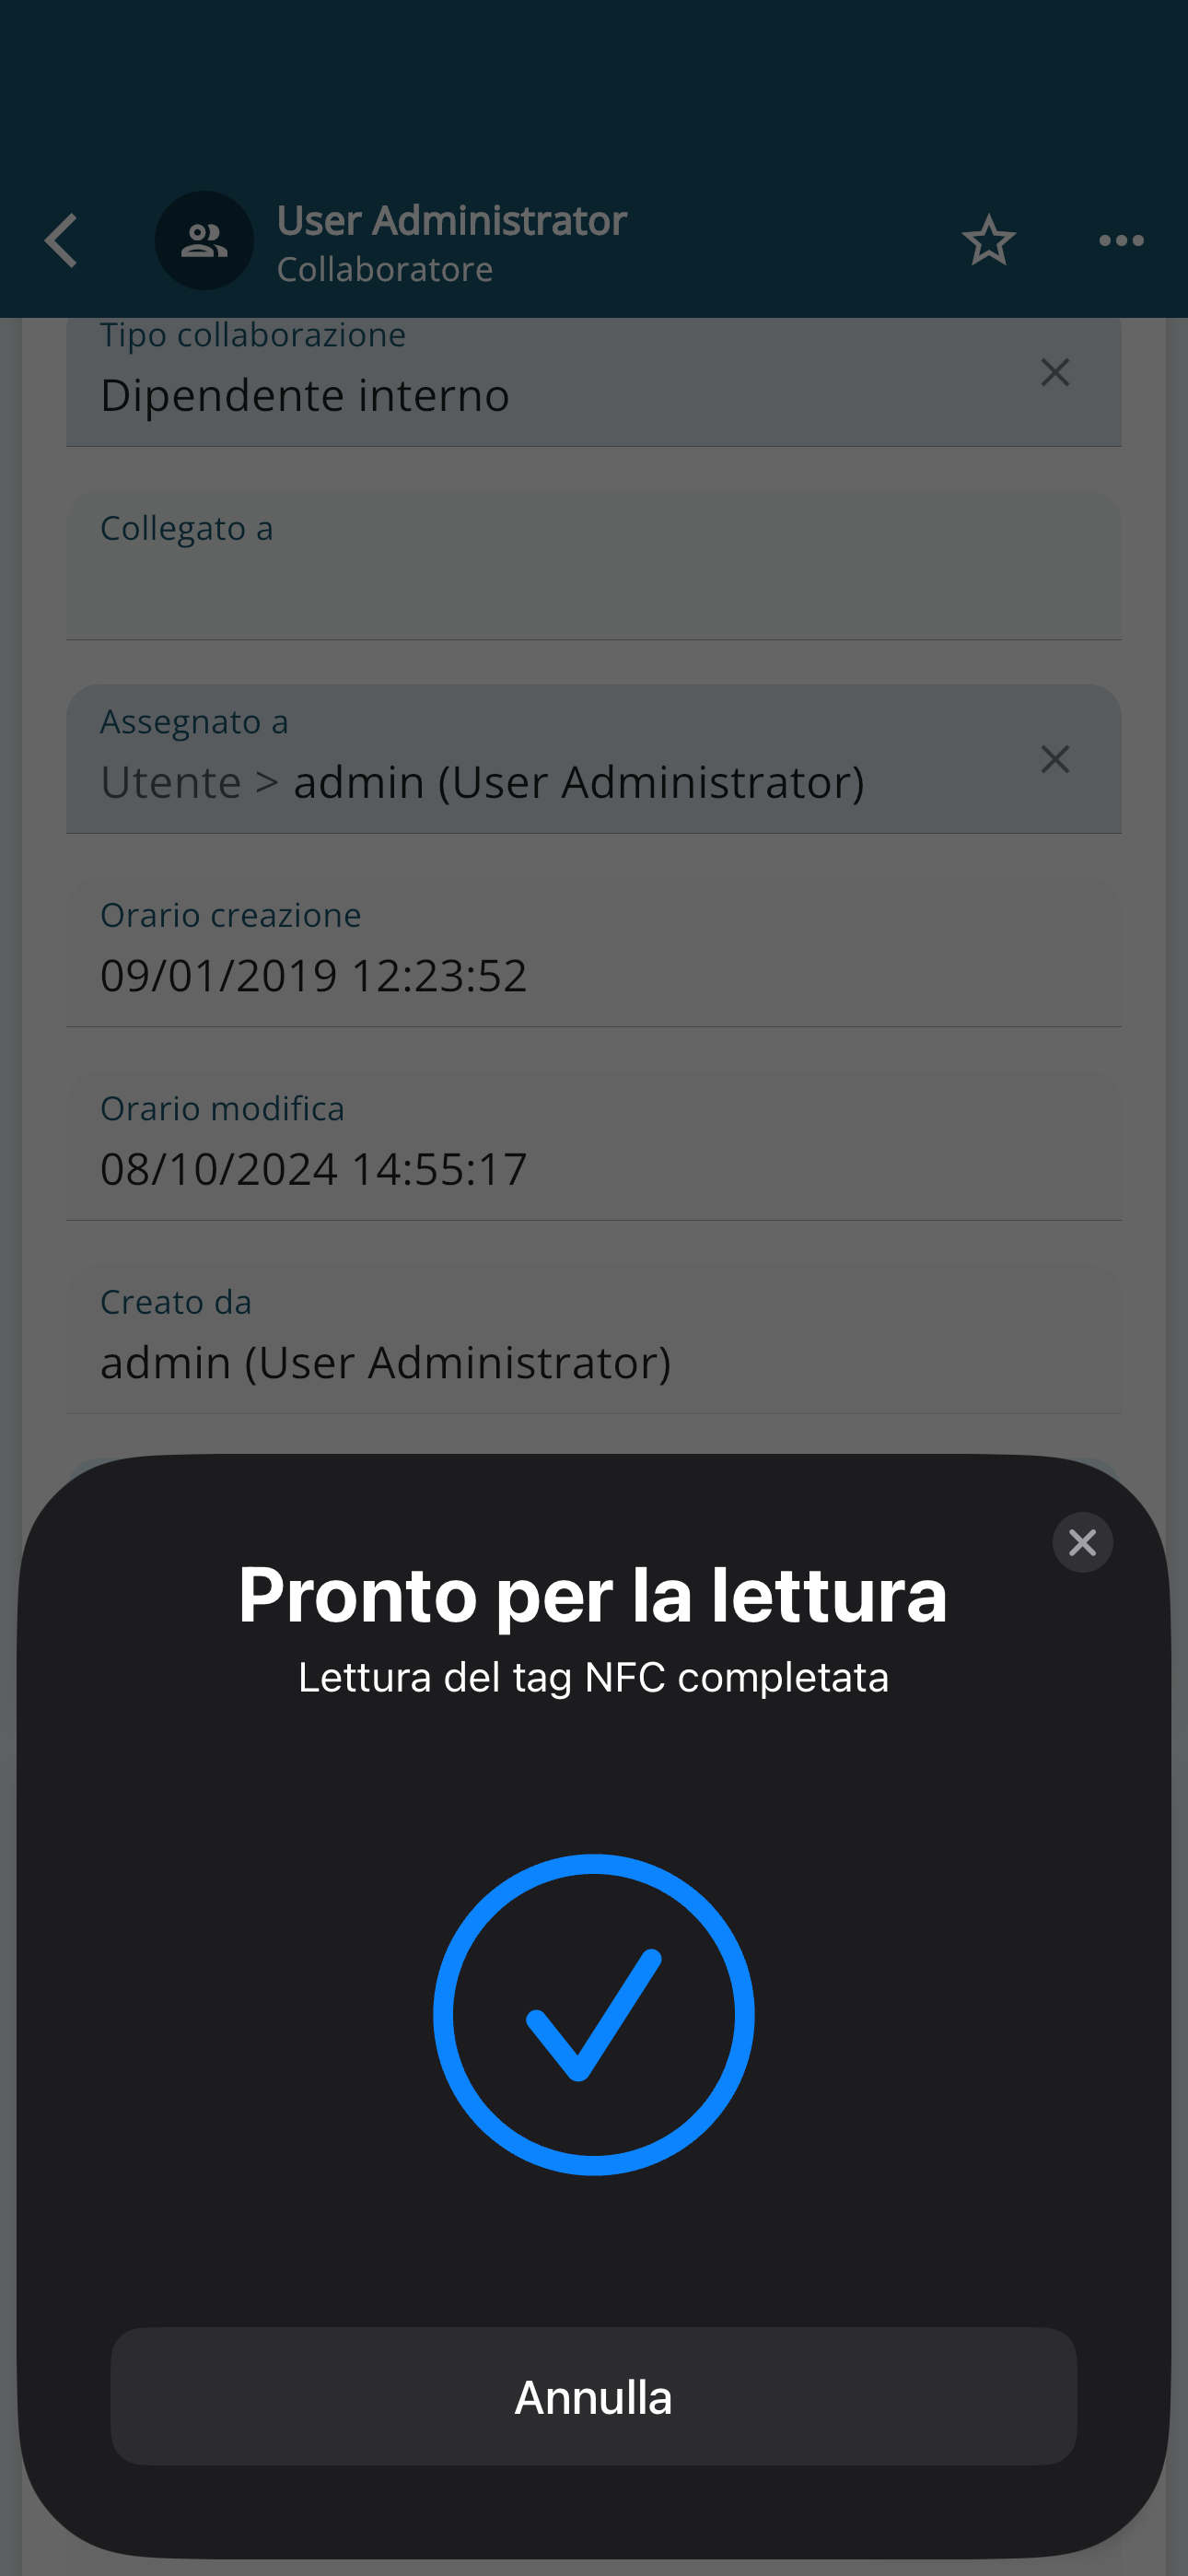
The tag is captured, and a record is also written in the related field that was previously created
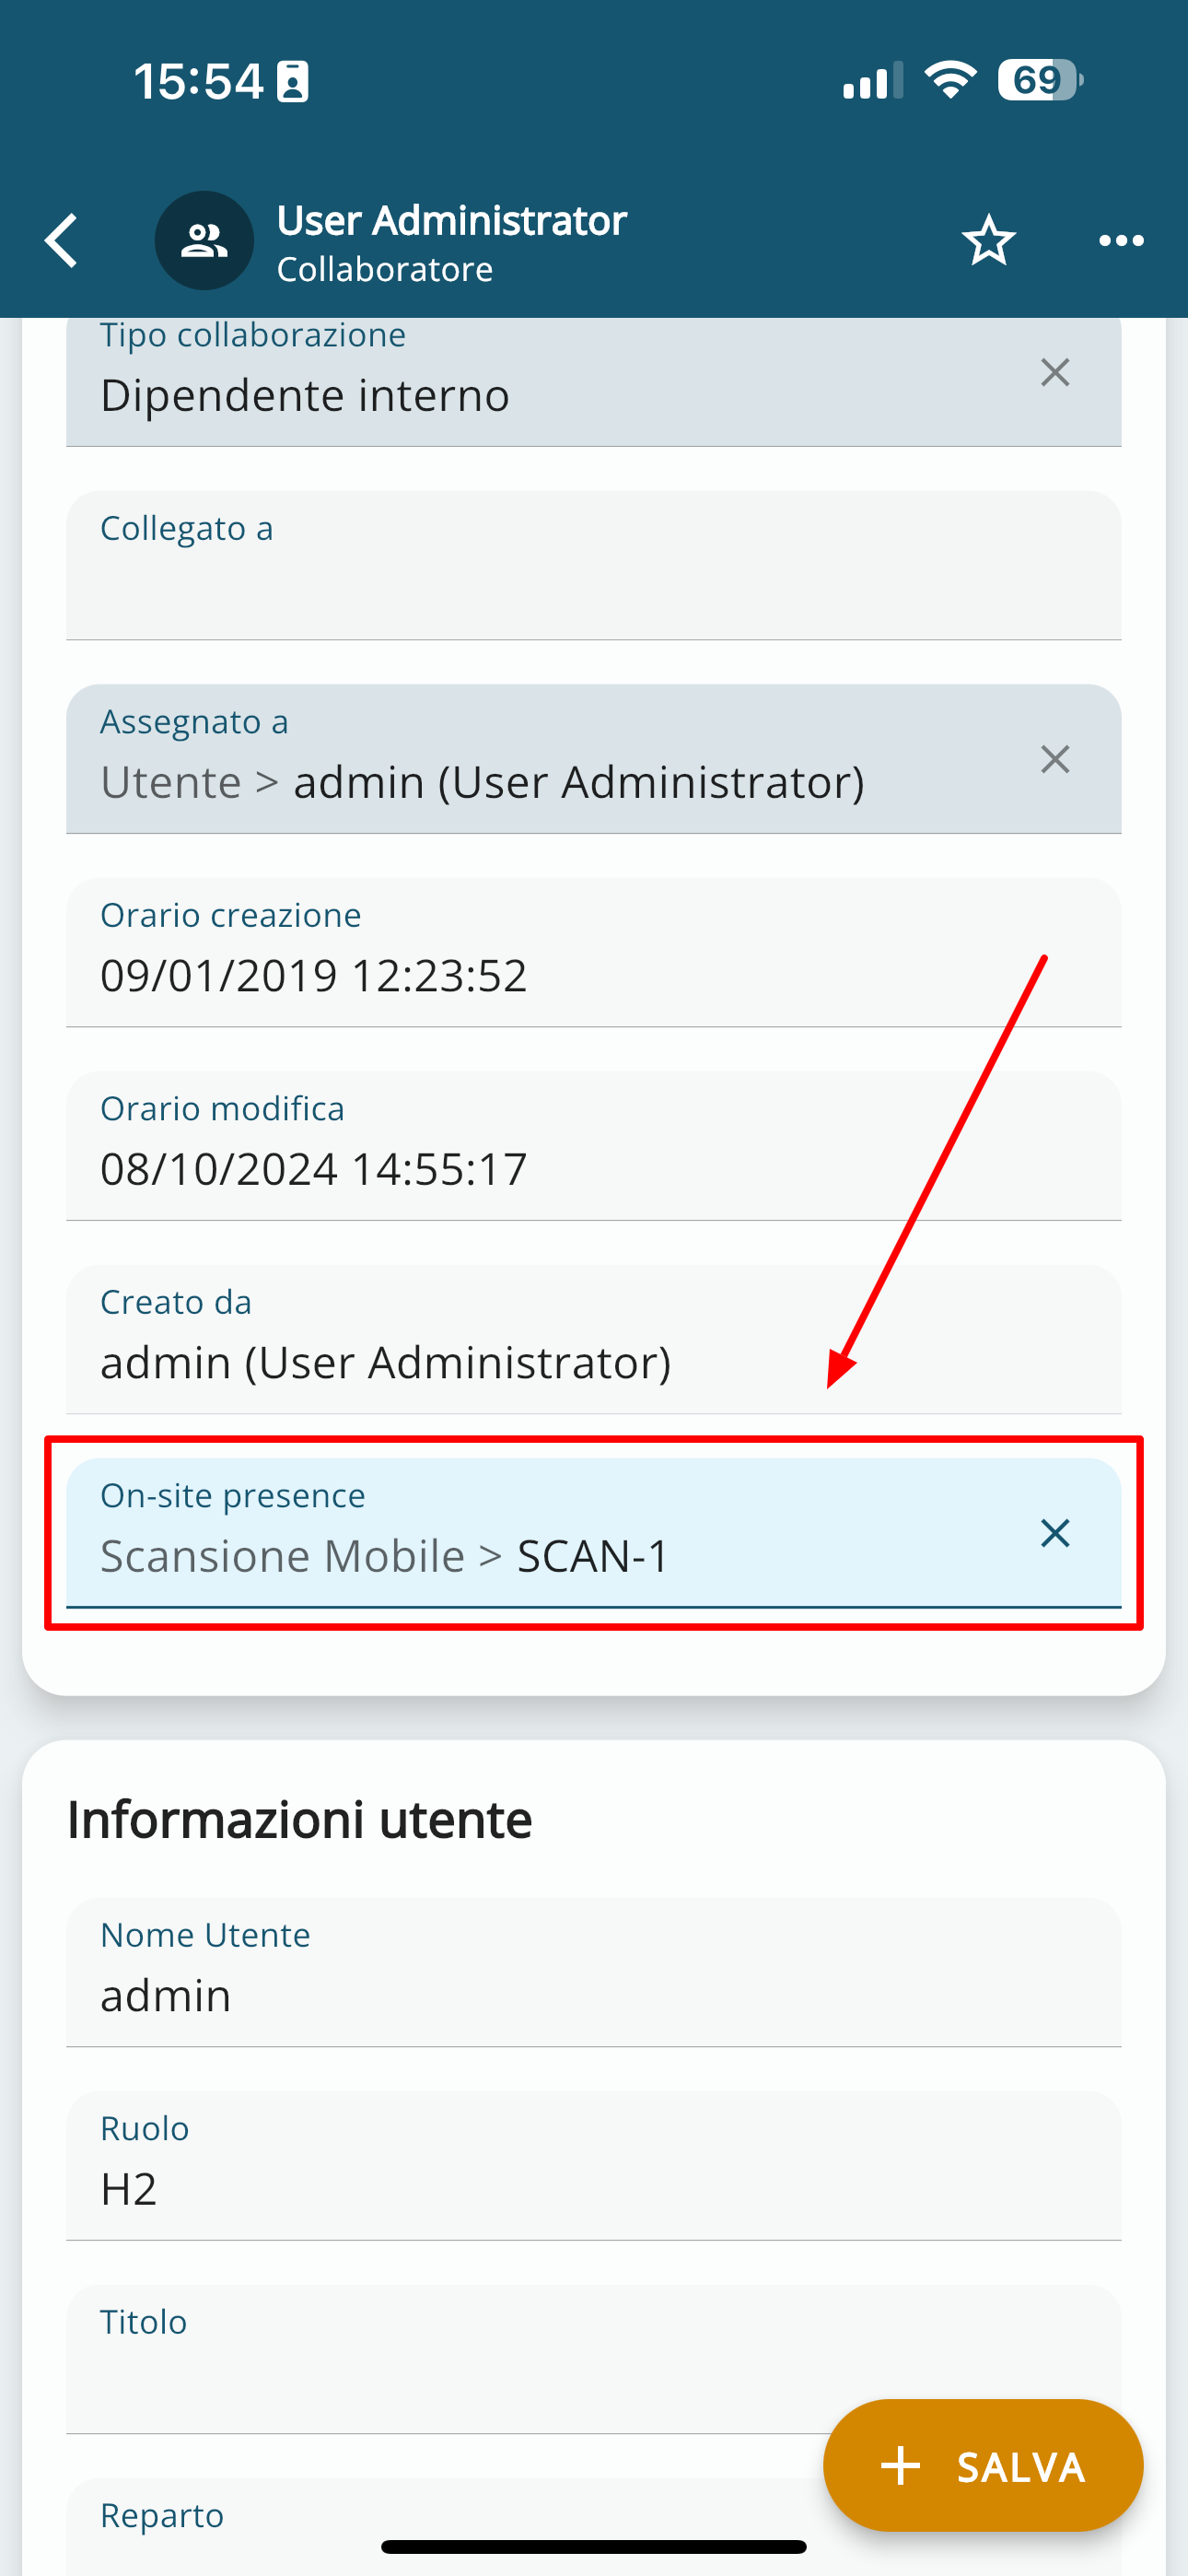
Here is the record as it appears in the related field after being scanned
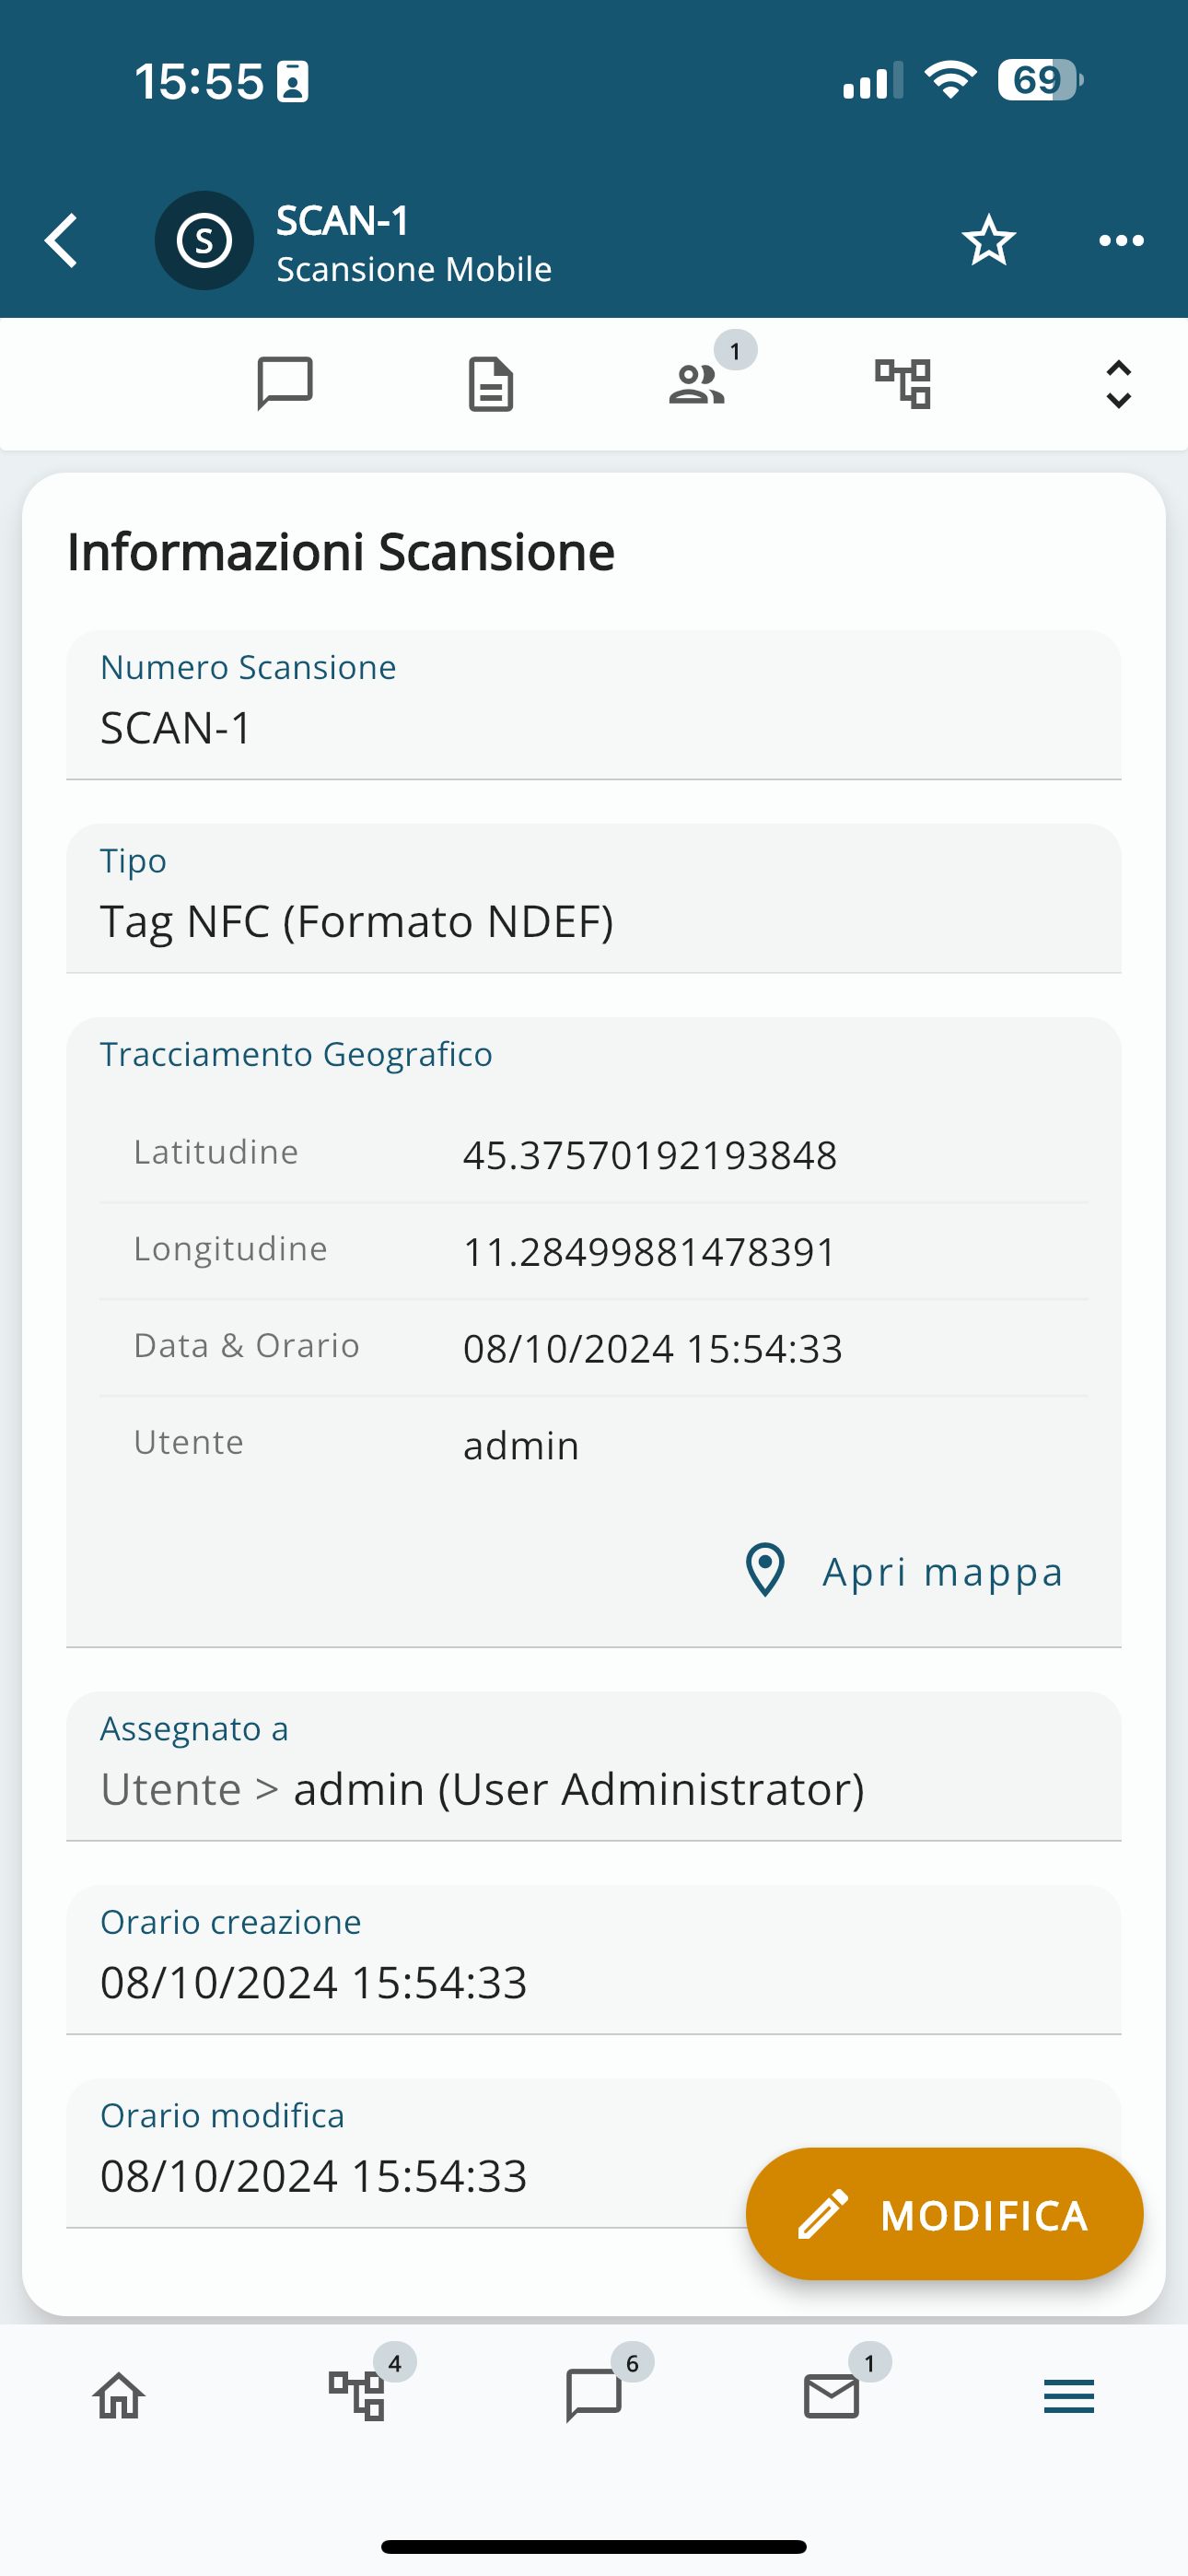
Here is the scanned record in detail (Mobile Scan card as seen from the Wilson App)
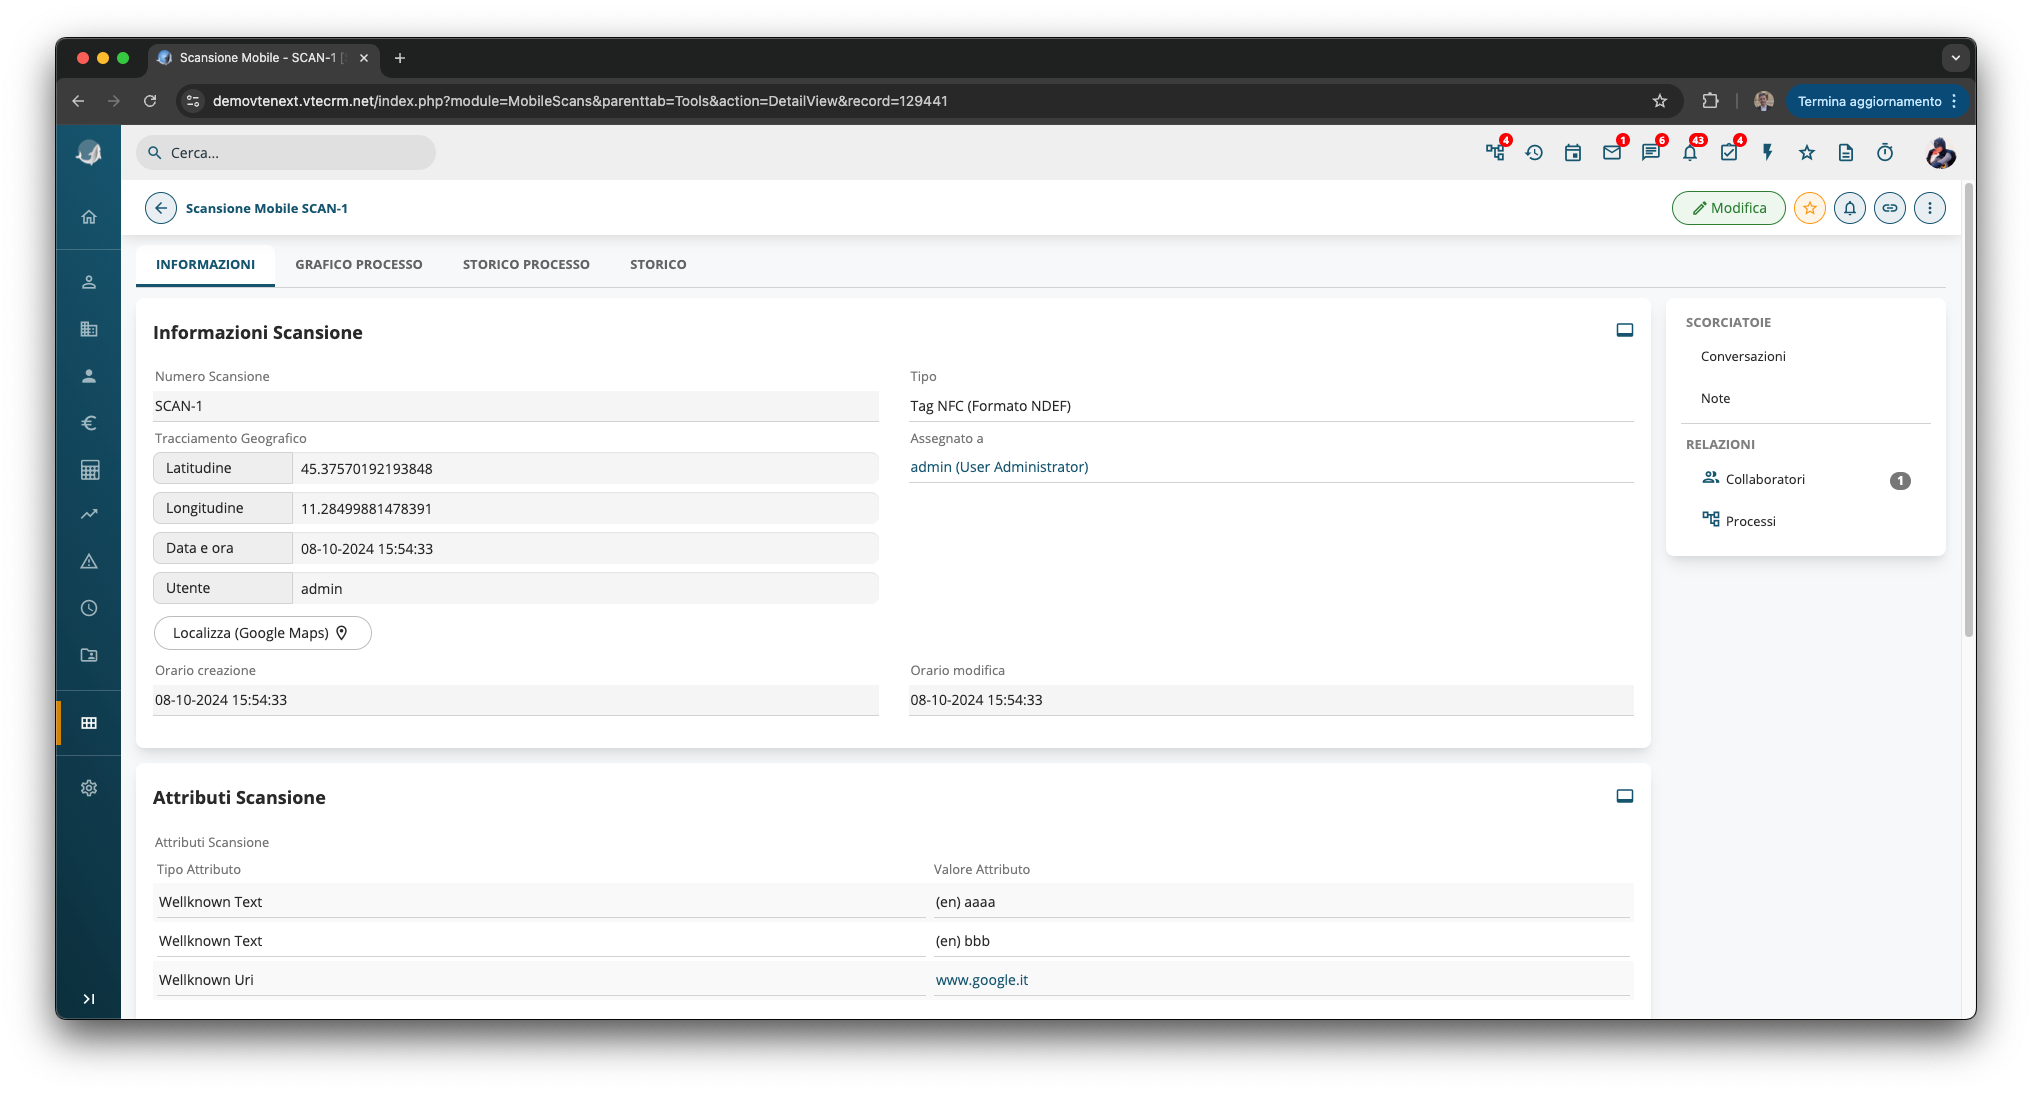
Here is the scanned record in detail (Mobile Scan card as viewed from the vtenext web side)
Note: The NFC function is also available in the Processes module, allowing a process to be initiated from a scan.
2.3 Barcode Scanning and QR Code Search
Introduction
The barcode is an information encoding system that uses a series of lines and spaces of varying widths to represent numerical or alphanumeric data. They are commonly used to identify products, facilitate the tracking of goods, and simplify business transactions.
The QR code (Quick Response code) is a type of two-dimensional barcode that can be quickly read by a device equipped with a camera, such as a smartphone. It was developed in Japan in the 1990s to track parts in manufacturing processes, but today it is used in a wide range of applications.
A QR code can contain information such as URLs, text, phone numbers, contact information, and more. When a user scans the QR code with a reading app, the device decodes the information contained in the code and can perform actions such as opening a website, saving a contact, or sending a message.
How it works in vtenext
Barcode scanning
By going to SETTINGS > MODULE MANAGER > PRODUCTS > LAYOUT EDITOR, you can enable the barcode scanning function for the PRODUCT NAME field. This is clearly just an example; you can activate this feature on any text field. Therefore, you can create a text field, name it as you prefer, and enable the scanning option for that field.
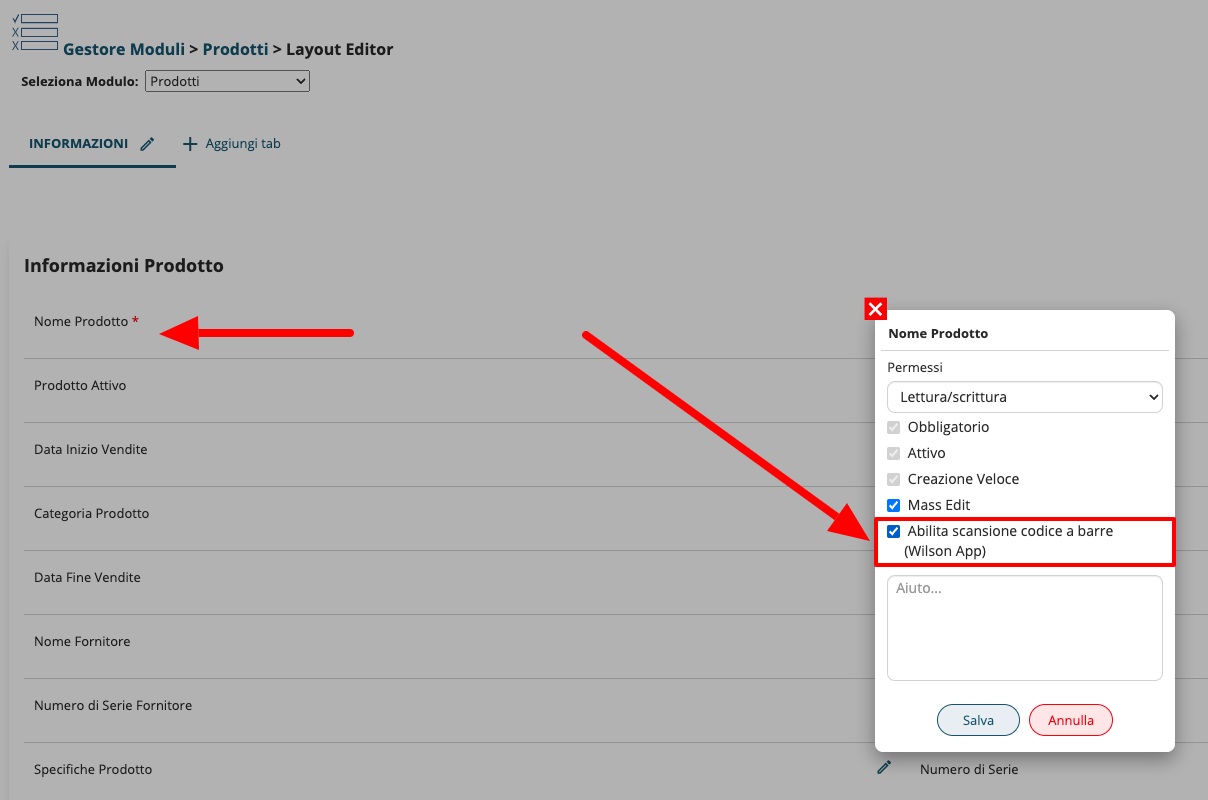
Screen of the Layout Editor (in the example of the Products module), with Barcode Scanning Enabled
Instantly in the Wilson App, the scanning symbol will be enabled directly in that field, and by pressing it, the camera will be activated to perform the scan
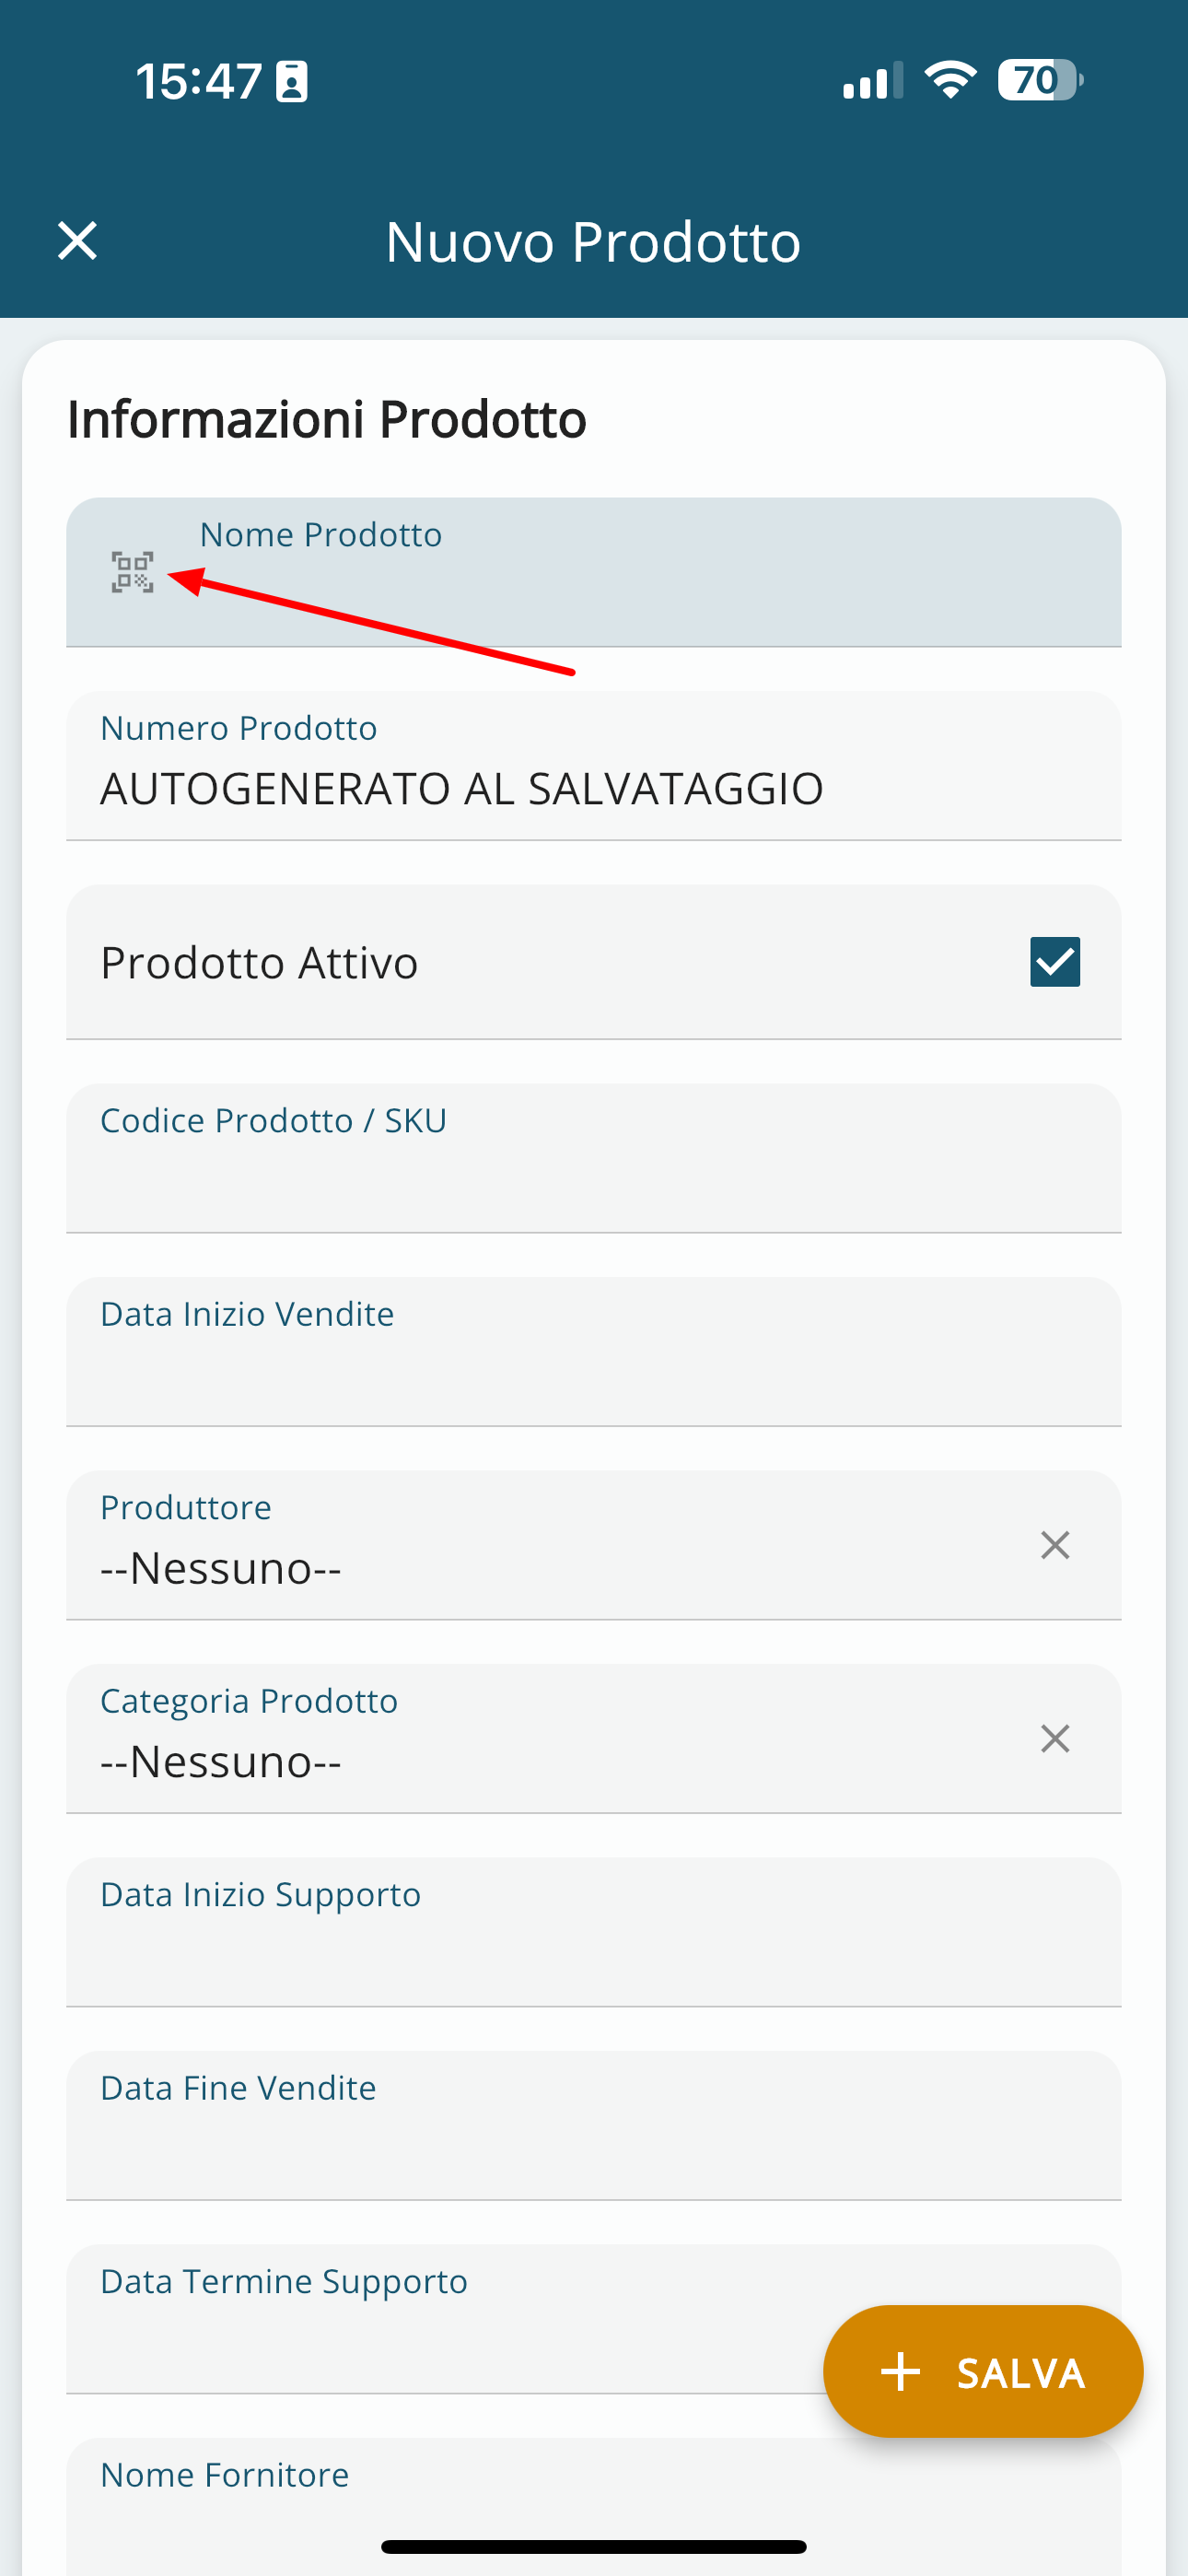
Note the scanning symbol present directly in the relevant field

Acquisition screen, where you are asked to scan the barcode in the highlighted area
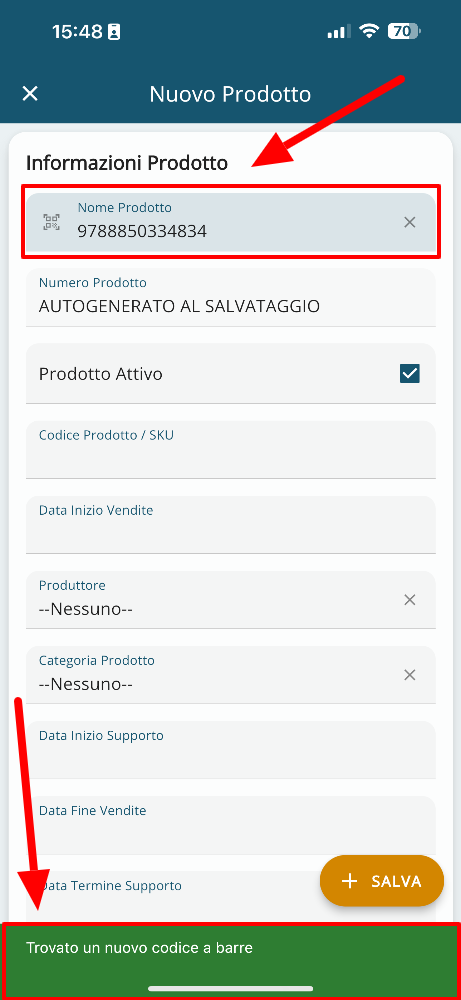
Screen highlighting the acquired code and notifying the user that a new barcode has been found
Search via QR Code
This function is available only upon specific client request.
It is possible to activate a search via QR Code in vtenext. In practice, in any module, I can use the search engine of the Wilson App to scan a QR Code and search for the code associated with a record (e.g., a Lead, a Client, or a Product).
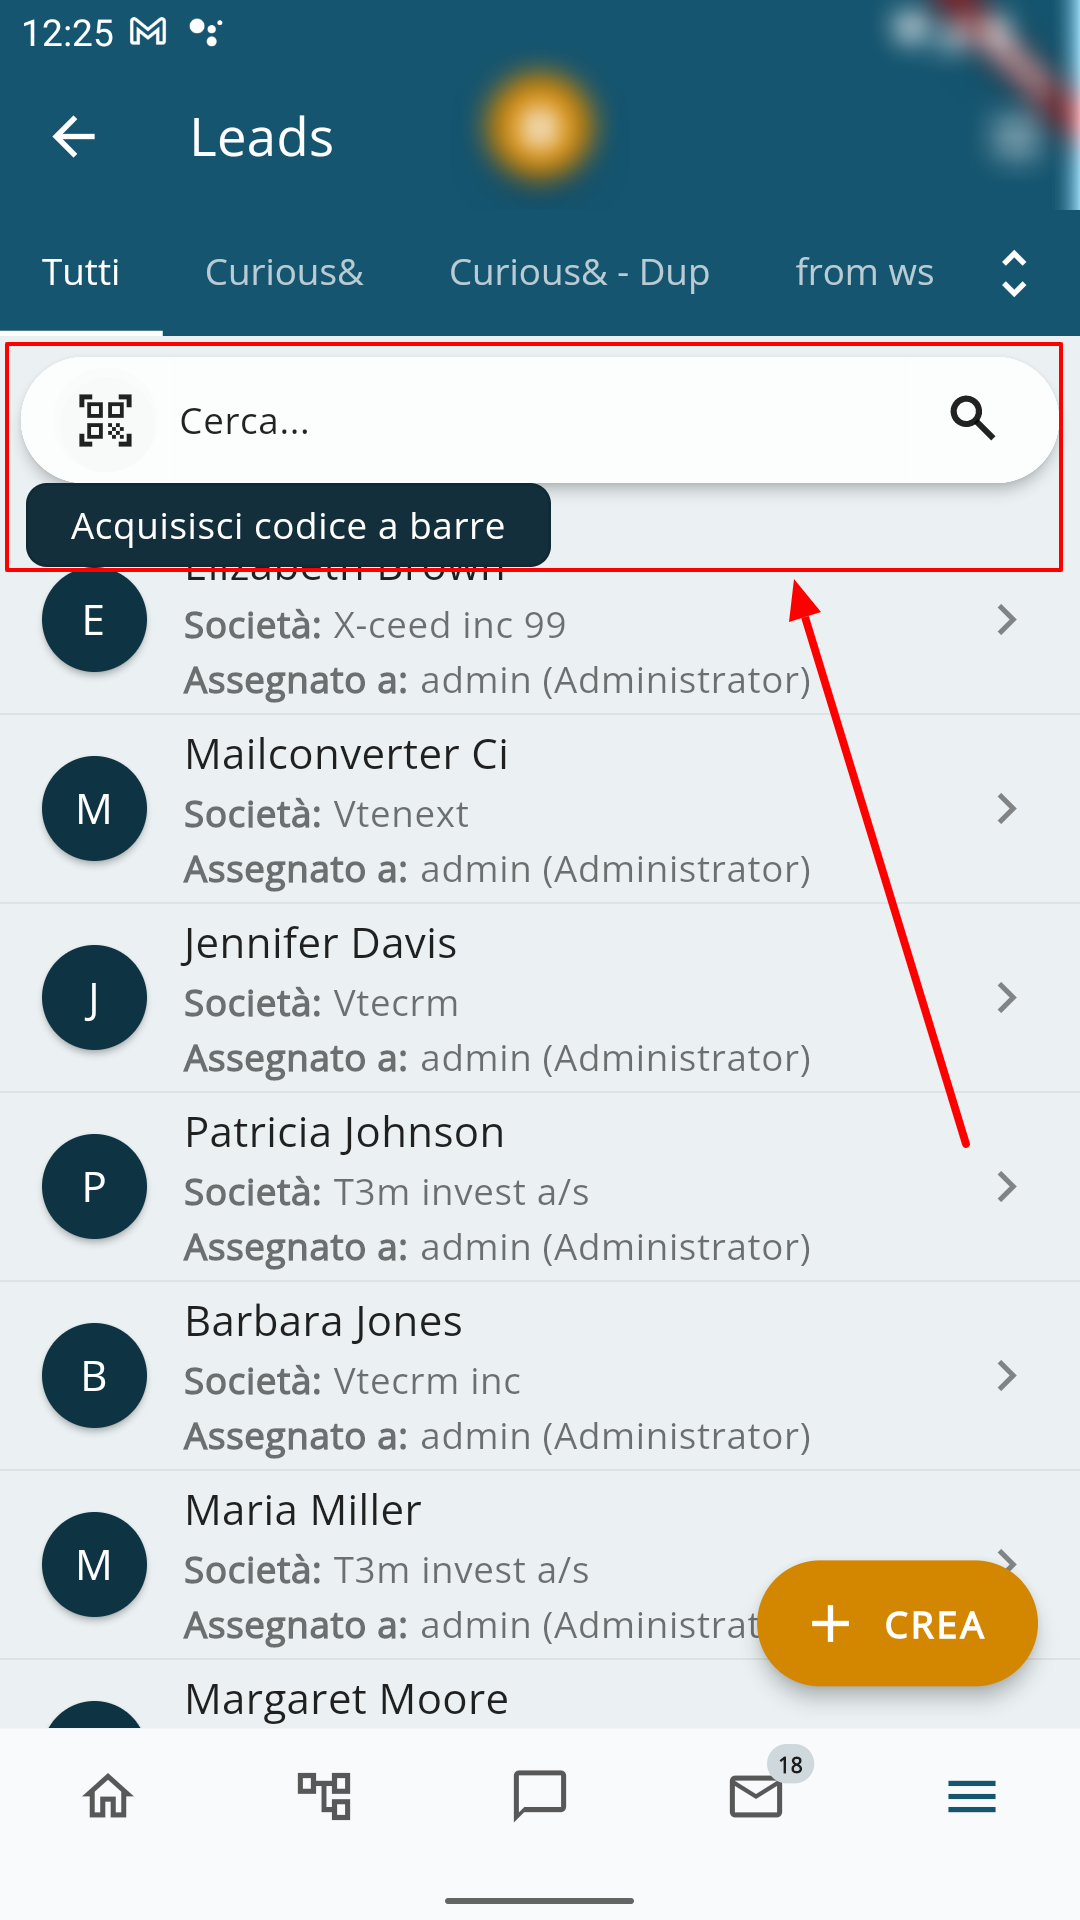
Note that in the search area of the Wilson App, there is a symbol for scanning the QR Code, which will activate the camera to capture the code
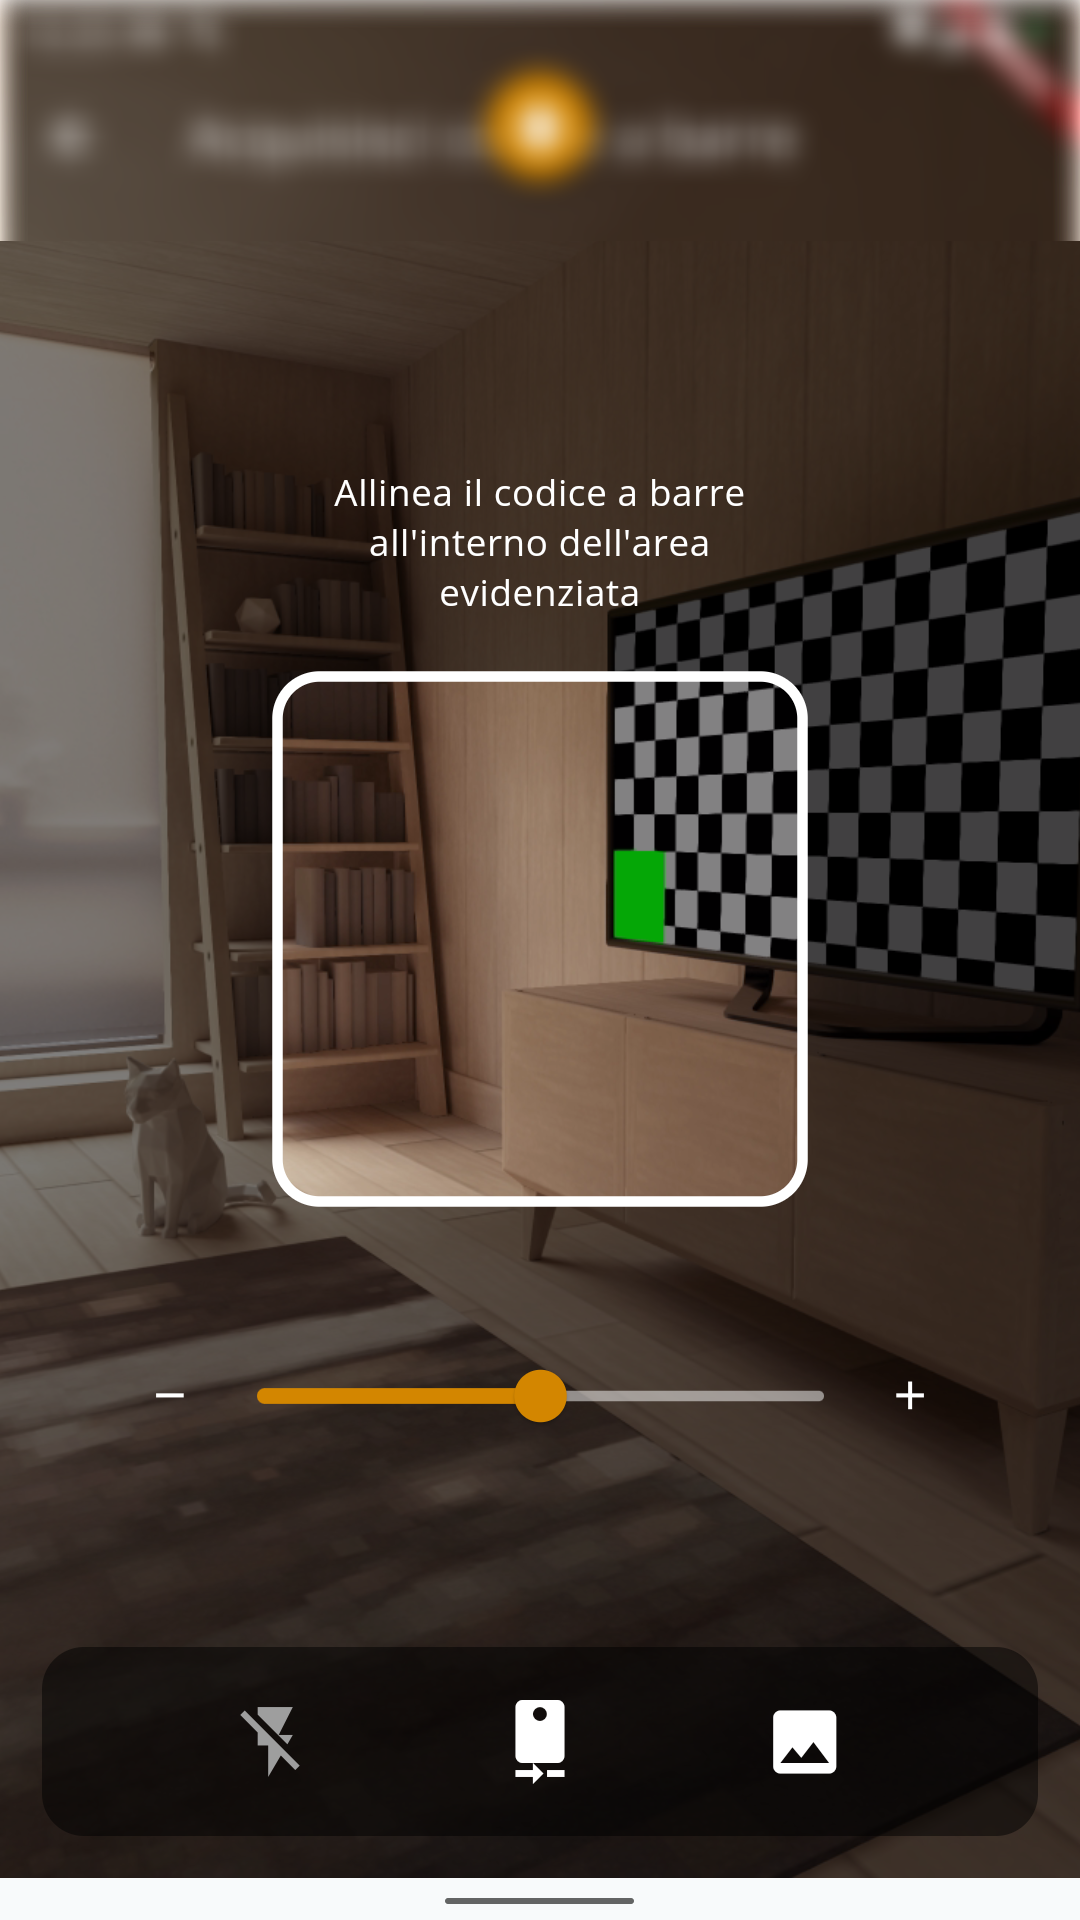
Once the QR Code is framed, the CRM will perform the search and display the result on the mobile app
2.4 Sorting and Filters
In the Wilson App, it is possible to manage the sorting of records and filters. Taking the Accounts module as an example, starting from the top left, you can see a button to view the available filters, a button to select the assigned user to display, and finally, the button for sorting.

FILTERS
By clicking the FILTERS button, you can, as mentioned, view the list of available filters (both created from the web and from the app), and you can also CREATE new ones directly in Wilson. For all filters, whether created from the web or the app, you can click the three dots on the right and select DUPLICATE.
Filters created from the Wilson App have a pencil-shaped icon next to the three dots, which allows you to edit the filter directly in the app. Filters created from the web cannot be edited in Wilson.

When the DUPLICATE or EDIT option is selected, the following screen appears:


On this screen, the following actions are possible:
- View Name: Rename or assign a name to your filter.
- Set as Default: Set the filter as the default for the Wilson app.
- Select Fields to Display: Choose which fields to display, add new ones, and rearrange their appearance order by dragging them.
- Subtitle Display: Decide whether to include a subtitle containing the previously selected fields. These fields can include or exclude their labels for better usability.
- Initially Sort By: Choose the sorting of a field in ascending or descending order.
- Advanced Filters: Define selection criteria for fields other than Date type (e.g., dropdown menus, free text, numbers, etc.).
- Time Filter: Select fields of the Date type, using either dynamic and customizable durations or static ones. You can choose from the dynamic options provided by the app or specify a static date range.
SORTING
Sorting is achieved by clicking the corresponding "Sorting" button located in the top menu of the list view for a record.

- Most Recent: To display records that have been recently managed.
- Module Fields: For example, in the Companies module, you can sort by fields such as Company Number, Company Name, Phone, Email, or Website.
- Others: Allows you to select additional fields from all those available in the specific module.
- Reset: Resets the view to the default display.
3. Modules
3.1 Calendar and Tasks
These two modules are used to add activities and deadlines in the vtenext Calendar. Everything that is entered will appear within a few seconds in the same Calendar but web side.
When a new Calendar record is created it must be assigned to a user (yourself, or another vtenext user) and it can also be associated with a Contact and/or a Company. Other data is also required: the date, start time, status, description, and all other information considered necessary.
In the left-hand column it is possible to navigate to other information (and modules) related to the activity just created.
The list of Tasks is displayed as follows when this item is clicked in the menu:
![3.1 [1].PNG](https://usermanual.vtenext.com/uploads/images/gallery/2022-07/3-1-1.PNG)
Clicking on the icon  allows selection of Calendar view modes:
![3.1 [4].PNG](https://usermanual.vtenext.com/uploads/images/gallery/2022-07/3-1-4.PNG)
![3.1 [5].PNG](https://usermanual.vtenext.com/uploads/images/gallery/2022-07/3-1-5.PNG)
Clicking on the icon  opens the list of available users (who have shared the Calendar with us):
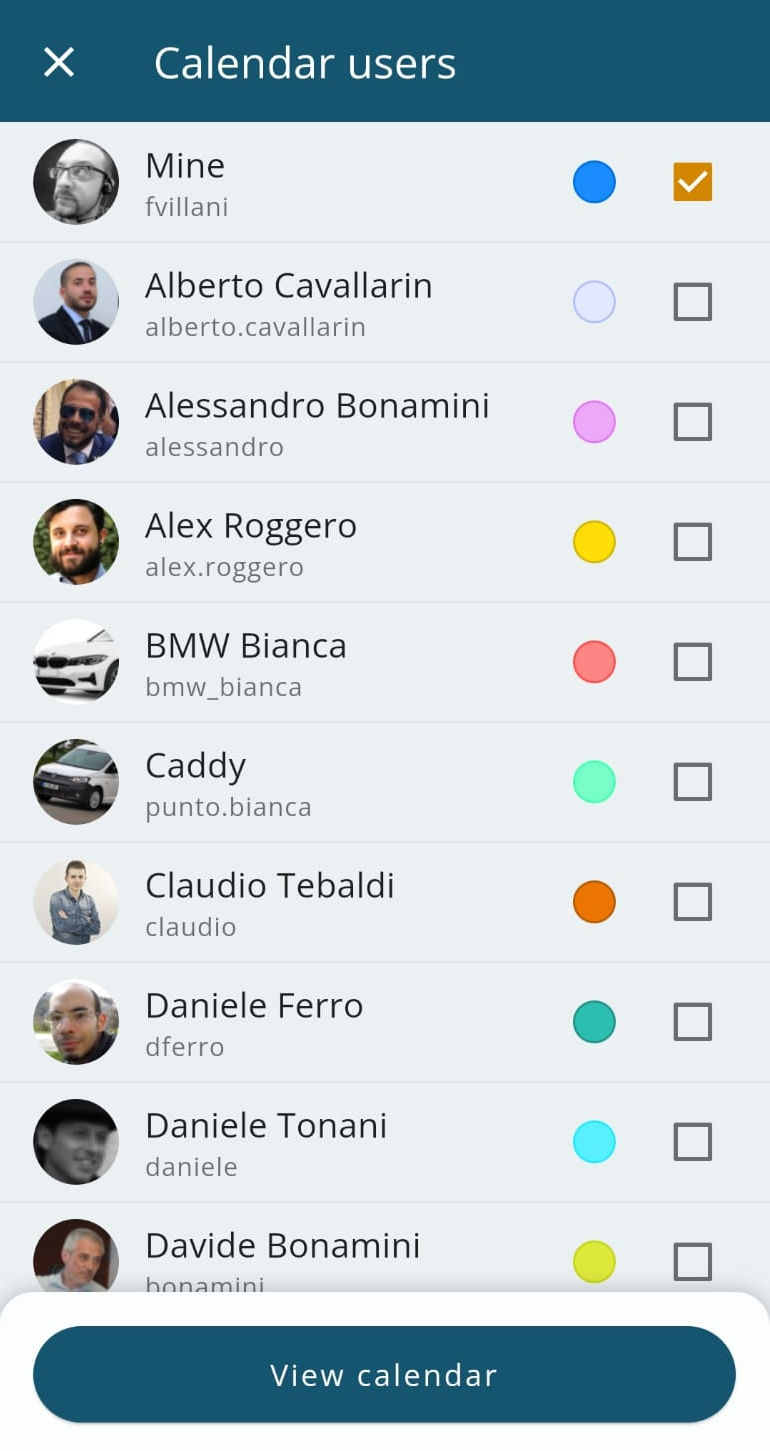
This is how the Calendar appears, opened by clicking this item in the menu. It shows all the appointments for the selected day and their temporal sequence during the day. You can change the view from “Day” to “Month” or view the details of a single task.
![3.1 [2].PNG](https://usermanual.vtenext.com/uploads/images/gallery/2022-07/3-1-2.PNG)
Day View
![3.1 [3].PNG](https://usermanual.vtenext.com/uploads/images/gallery/2022-07/3-1-3.PNG)
Month View
3.2 Messages
The Messages module allows you to read e-mails using the vtenext App. As soon as the module is opened a screen is displayed like the following:
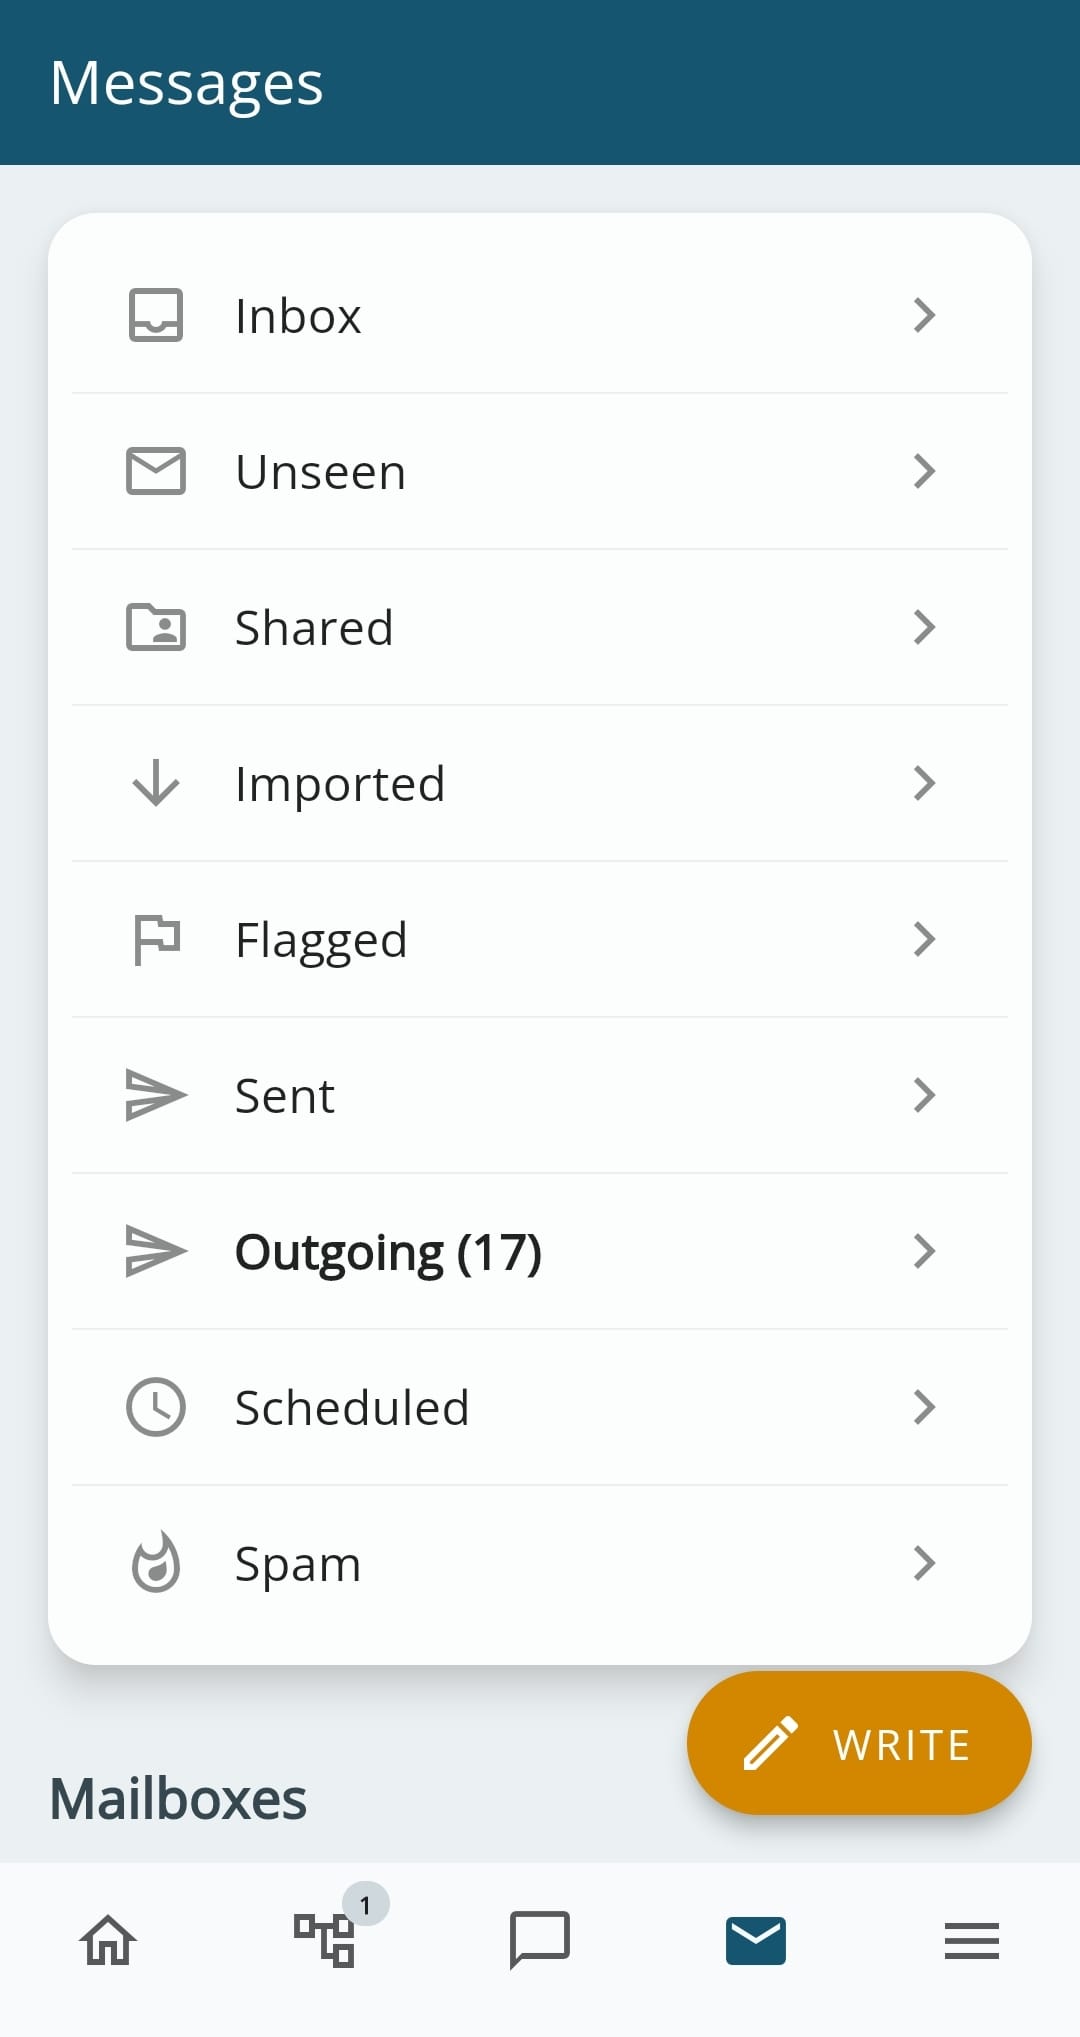
This view shows a list of all folders available for the predefined mailbox and, below, you can choose among the configured Mailboxes.
Clicking the button  opens a dialogue window for writing and sending a new e-mail.

Clicking on the Inbox folder opens the following view with a list of all e-mails in arrival, both read and unread:
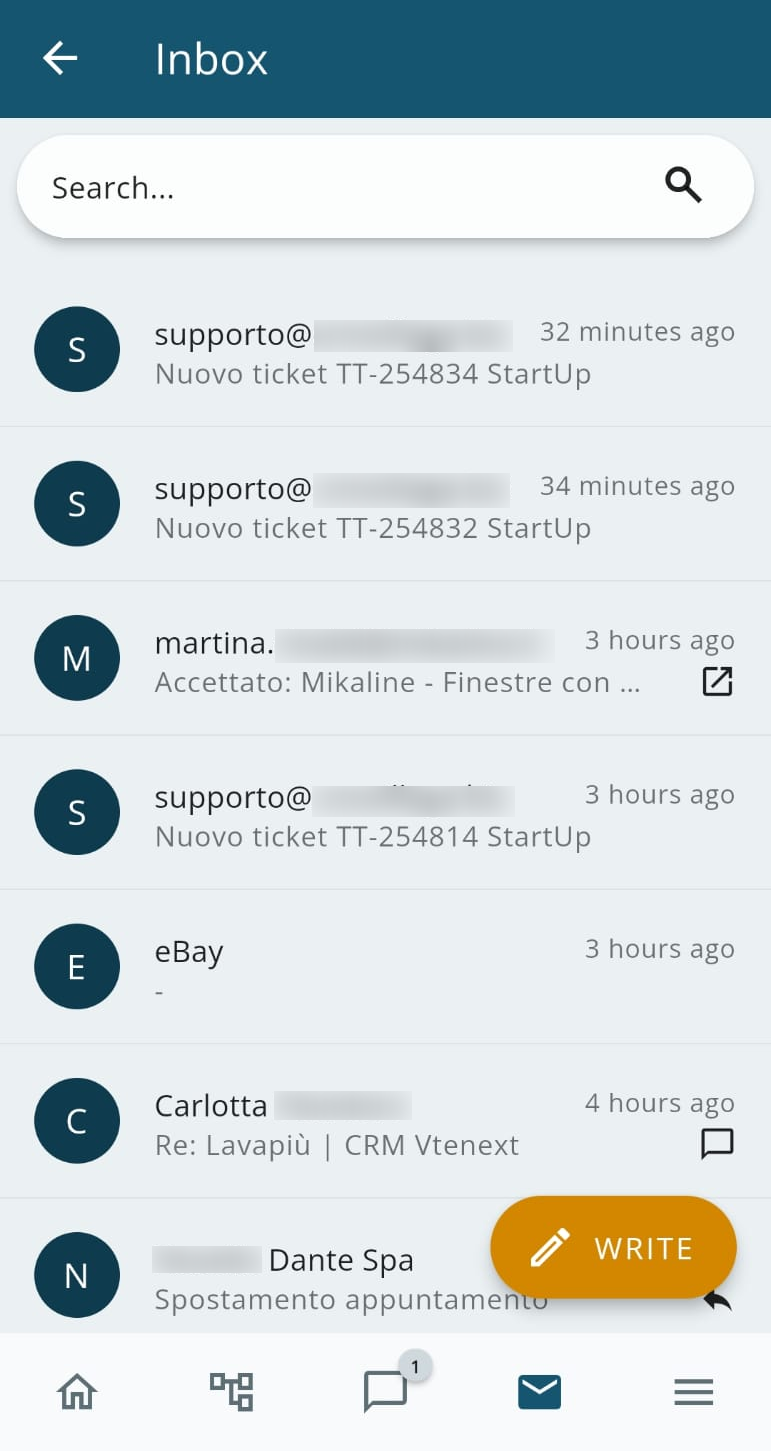
In both the Inbox and other folders, you can search for emails by using the dedicated field in the header. It is also possible to enable the search in SUBFOLDERS or search ACROSS ALL ACCOUNTS by using the corresponding option button.

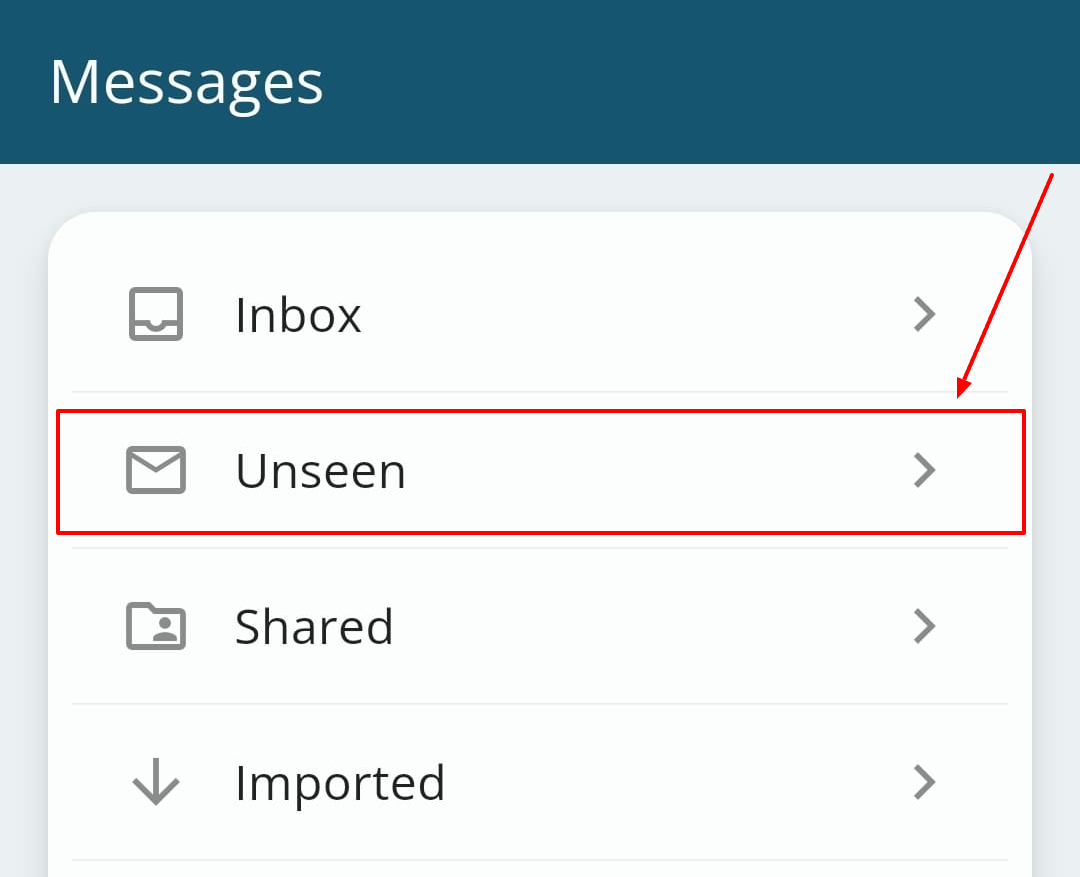
It is also possible to access the 'TO READ' folder to facilitate the use of emails even on mobile:
Clicking on a specific incoming e-mail displays a screen like the following:
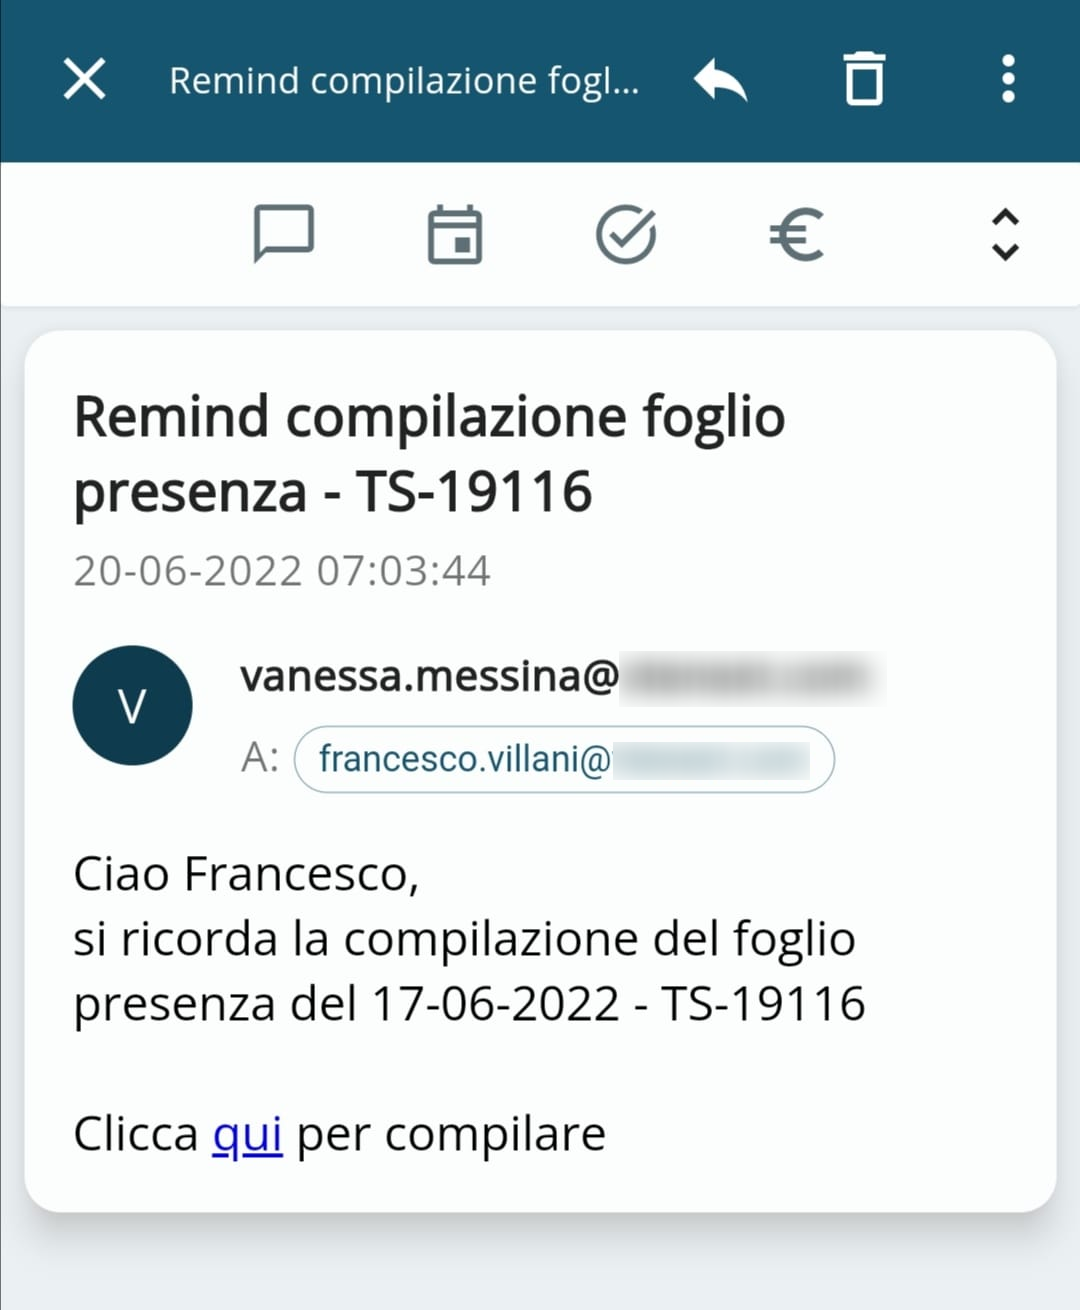
Every e-mail can be associated with vtenext records or can be the starting point for the creation of a new record. The available modules are displayed at the top of the e-mail message display, or by clicking on the icon ![2.1 [5].PNG](data:image/PNG;base64,iVBORw0KGgoAAAANSUhEUgAAADEAAAAwCAYAAAC4wJK5AAAACXBIWXMAAA7EAAAOxAGVKw4bAAACMUlEQVRoge2XMWtaURhAj4lIUomDwSkYpSKkjZD+hAb0D+iQTgFHBwcRId1sSS1JpckQSDJkiI1kEIfqP3DKkG5NQEV8CoIgPIUMMbwrdm67dLiP3MI964V33uE+7nefwxKzOf85C8/9AjLQEaqgI1RBR6iCjlAFHaEKOuJfmM1mdivsjej1elxfX2Oapp0anHY92DAMMpkMhmEwGAzIZDK4XC5bXNIj5vM5hmGQzWa5v/vJ4qKTi4sLnE4n6XTalhDpn1On02F/f5/7+zs2Nl6xu7uLz+fj/Pyc4+NjxuOxbKXcnej3++TzeX7c3vJma4v8h48EAgFehkIUCgXK5TIAqVSKlZUVaV6pEUII2u02rzc3+VT4TCgUAiCRSOB2u8nlcgwGA+knlkP2P3az2cSyLCKRyF9rNzc3rK2t4ff7ZSrlRzwHemKrgo5QBR3xJ9PplEqlQrVa5enp6be1yWTC6ekpjUYDIYRMrdxh1+12OTg4YHl5CWFZ7Oy8AwcMh0OOjr5S+17j7fY2kUgEr9crzSt1J4LBIMlkkrE5plj8wlX5itFoRLFYpF6rsbrqJR6P4/F4ZGrlD7vHx0dOTk4olUrMhEU4HKbVarG0/ILDw0NisZhMHWDTxJ5MJpydnfGtVEIIC//6Ont774lGo7JVgI3XjoeHBy4vL6nX62SzWaLRKAsL9hyGtt6dhBCYponP58PhcNil0RdAZdARqqAjVEFHqIKOUAUdoQo6QhV+ARtz1XQ7ozmsAAAAAElFTkSuQmCC)
3.3 Leads
The Leads module is displayed according to the filters available in the App, which are those defined in your user account via web.
It is therefore possible to choose how to display this list by clicking on the icon ![2.1 [3].PNG](data:image/PNG;base64,iVBORw0KGgoAAAANSUhEUgAAADIAAAAuCAYAAABqK0pRAAAAAXNSR0IArs4c6QAAAARnQU1BAACxjwv8YQUAAAAJcEhZcwAAEnQAABJ0Ad5mH3gAAAJ/SURBVGhD7ZfvS1NRGMf7J3JLW0ElFURRFL0o6UUg+SayzSliP7W90E1vKletrRZ7kUExRlgIZbperKwGEmyECoX9tFcNX5QaZhbXapUu6c7r9Nu5NwYt7otg59ZJzovPhXufcw7nw3POPc9ZstRWh8UAF2ENLsIaXIQ1uAhrcBHW4CJ/gtlai+VlDbox2hgikmOrhcnqwr56H7yhKLZVNWvf9NrSwhARE5n0ruYARt5P4uOsgo7eR7CUN+q2pQV1kTybC8UNPgy/k5ACMDc/T57A9f6n2GJ36PahATURbTkR9oqtuP/qLWQy+aHJKXT3PYSUmMFX8h7sfYzNVSe0dnpjZAM1ETPZEwWiH7HRMSQXgNfjEyhyX8SmCgHe4G3IioIZssyu3hvAusMtumNkAzURE/lD7XZfgqQAT6RpFIrnSZZ+Ziq39Dg81+5ggmSl58VLbDjm0R0jG+iJkAmrWTnkboX9dAAWa01GfG1xJRz+TuwRzmCZ1ZkRowH1zf6v4CKswUVYg4v8jnqOrKoQ4e/qhqczjPzyzHjBEQFtkQeoudCOFaWZMRpQE1HPkCLfFXyeA8a+yTgbDCOvxEXOk2rsdHoRHYzhCzkQI0Mj2Og4pTtGNlAVWXNARKgnApmUKInvMlrCA9hR7cat5zFSPC4gTmquxkAHVrKckTT5B5vQ3jeIRCoFhVS+0odPJA/Am+Qs6i/f0O1DA+oiama2Vzahq/+ZVjwmicR4fArOthBW7/8PyvhfUeuu9UdP4ubdKEbj09pyyrULum1pYYhIGkuZgK3COZhLjJVQMVQkh9wWjb6rpzFU5G/CRViDi7AGF2ENLsIaXIQ1FolIHX4A80T195ge4nIAAAAASUVORK5CYII=) at the top right.
at the top right.
![3.3 [1].PNG](https://usermanual.vtenext.com/uploads/images/gallery/2022-07/3-3-1.PNG)
Filters available for the Leads module
![3.3 [2].PNG](https://usermanual.vtenext.com/uploads/images/gallery/2022-07/3-3-2.PNG)
List of Leads
This is how a Lead page is displayed once saved or when searched for within Wilson fo VTENEXT.
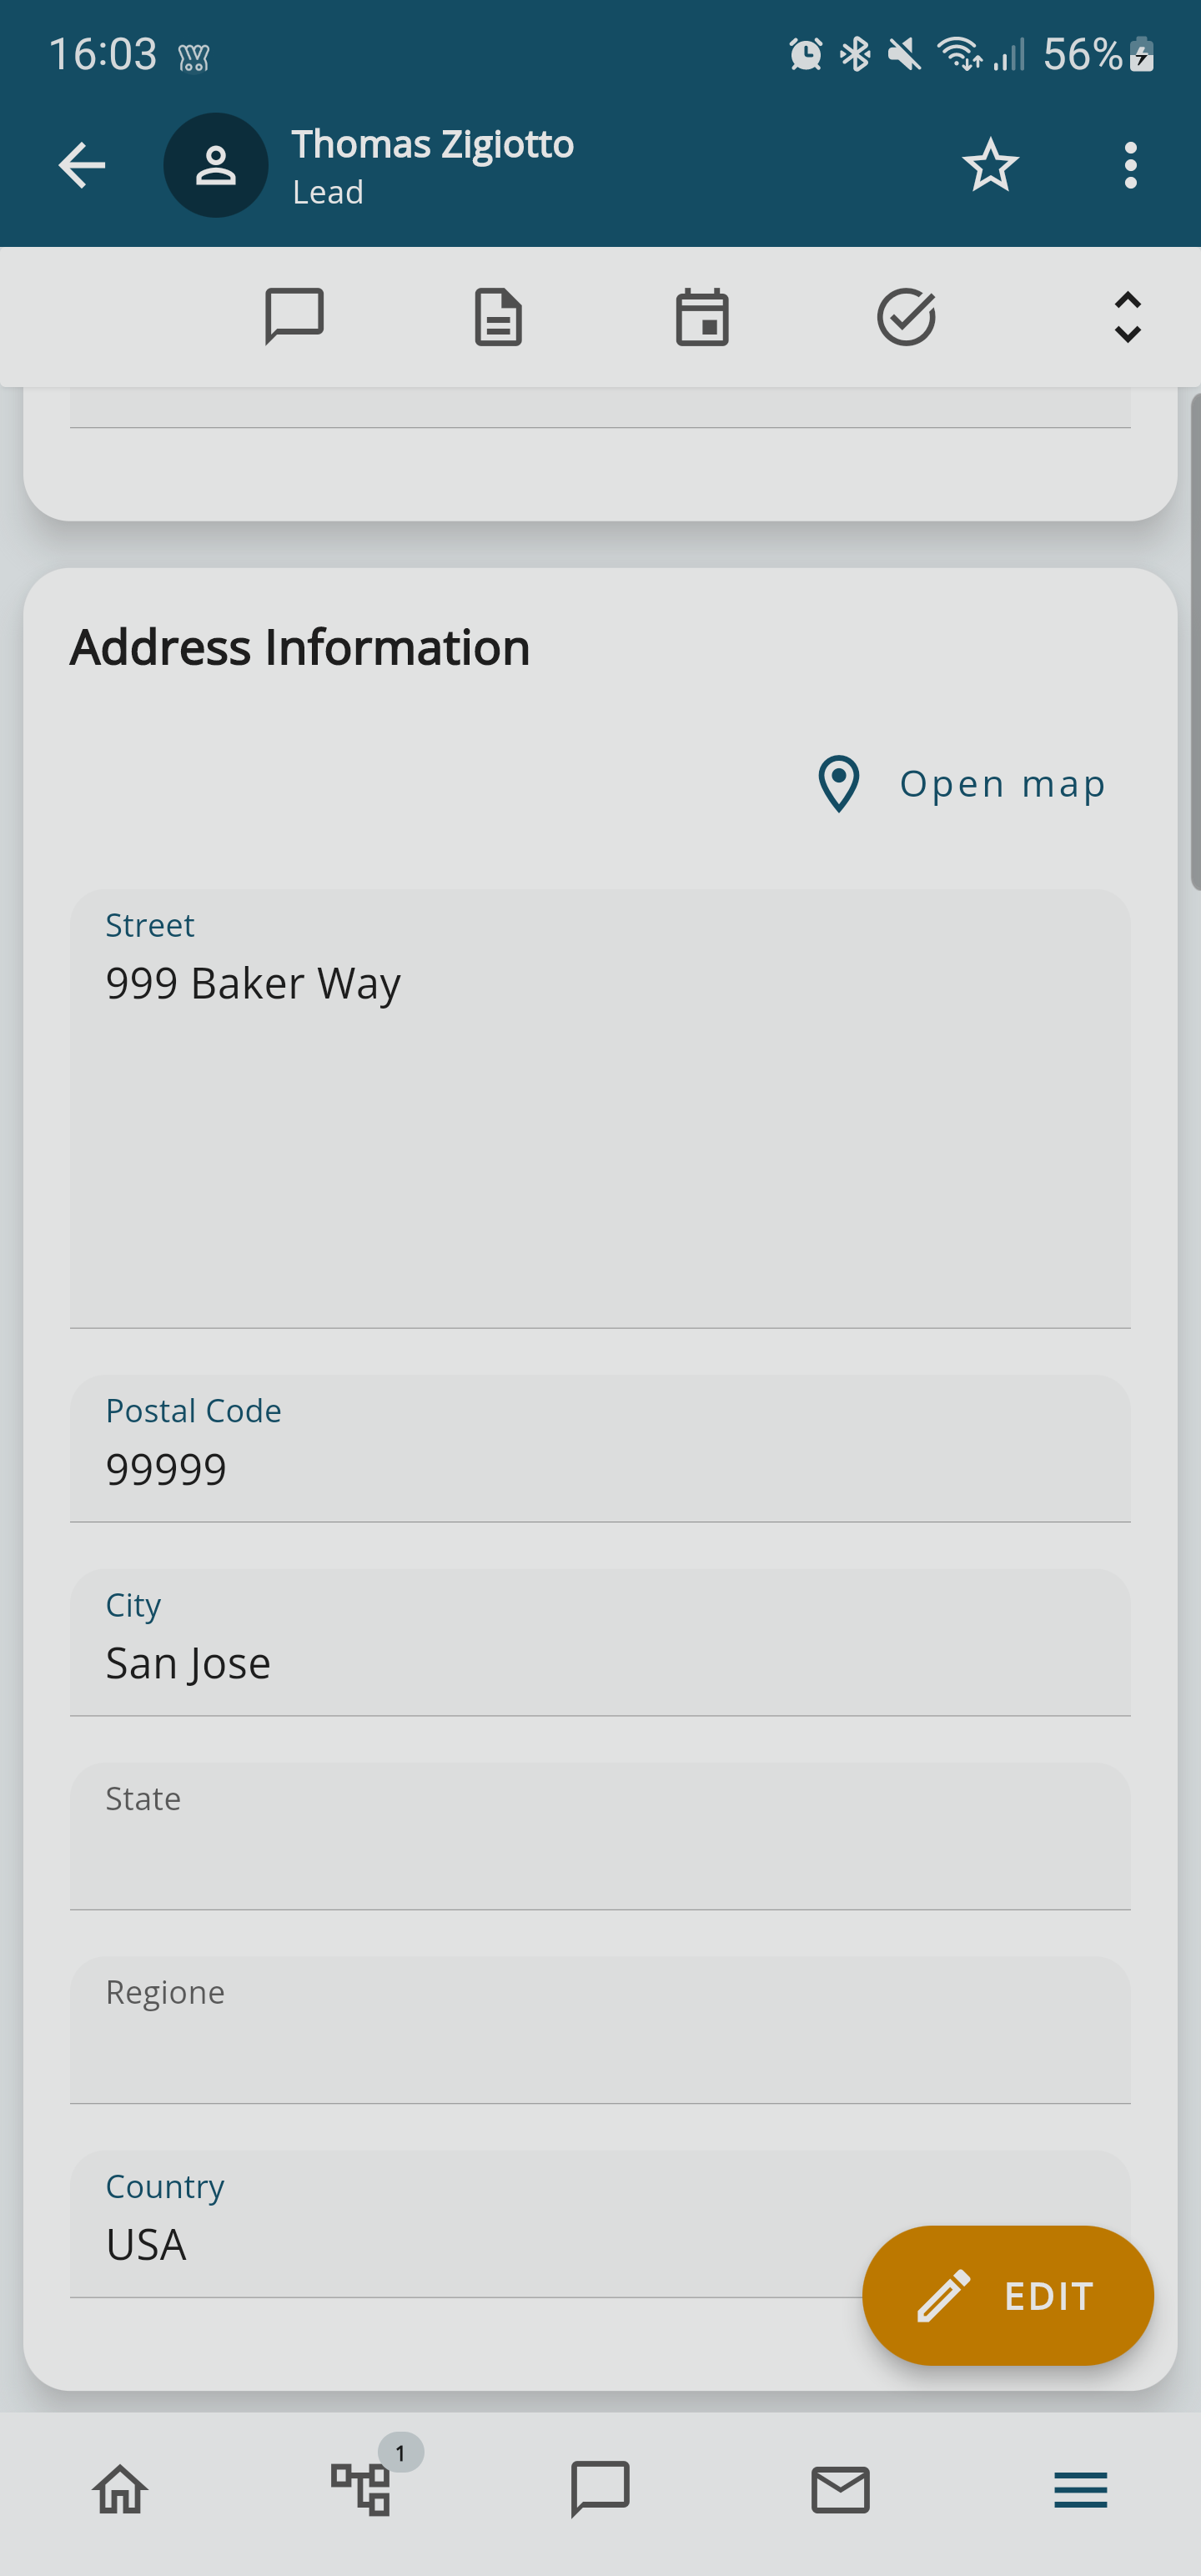
There's a 'Open Map' button that allows you to open Google Maps and locate the Lead

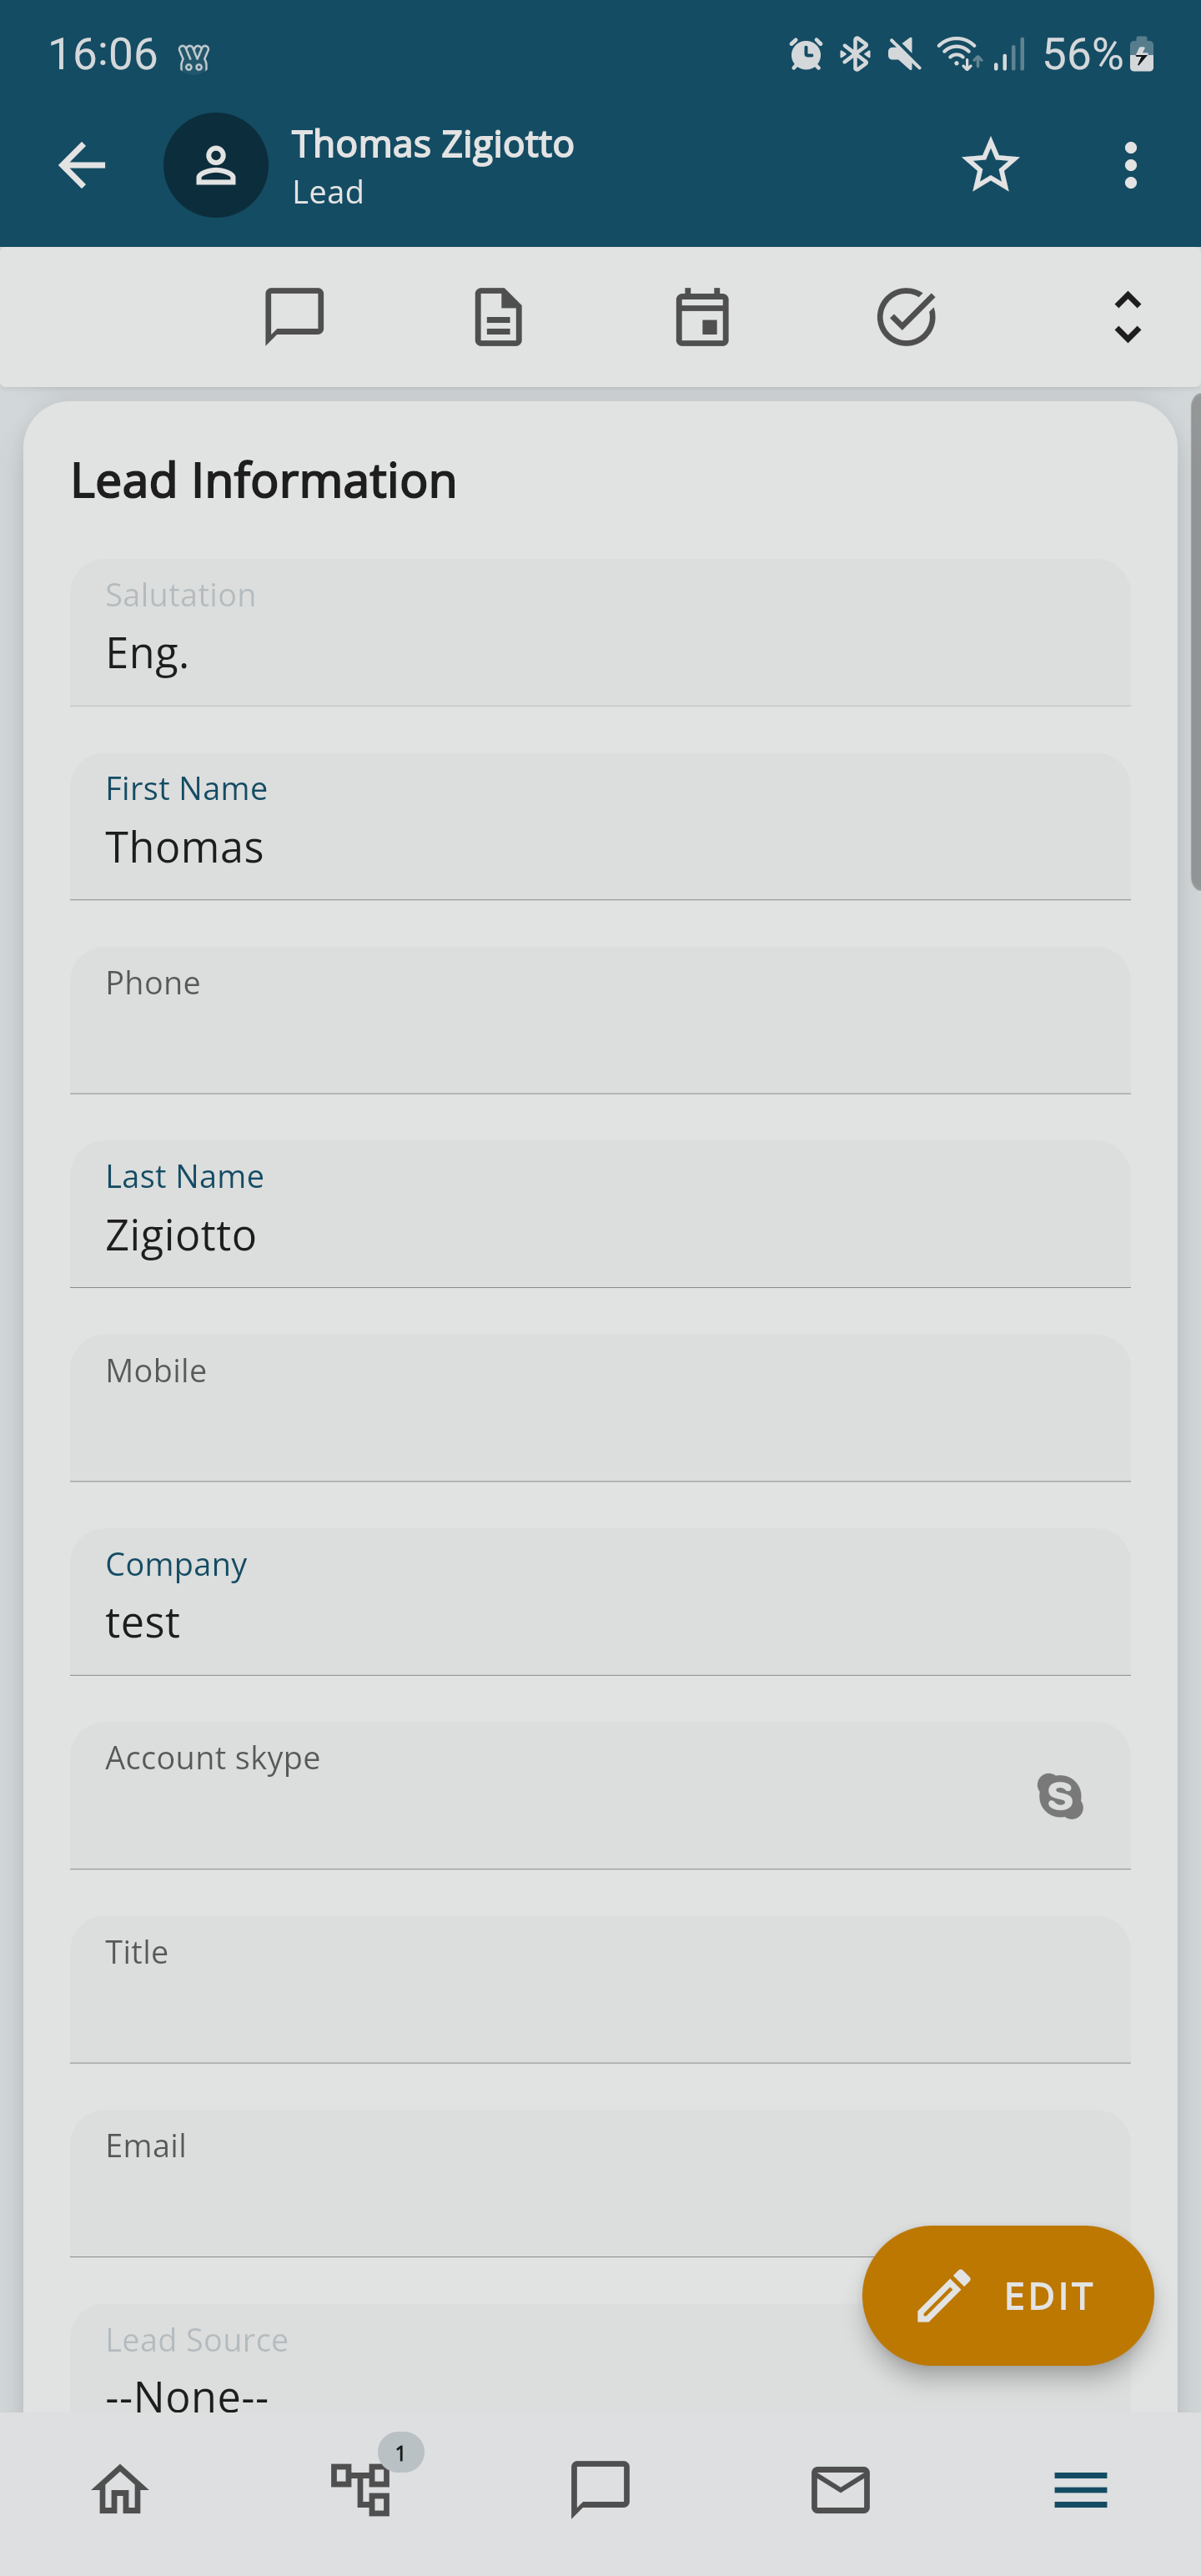
Here is how the lead detail page looks once you have saved or searched for it within VTECRM Mobile:
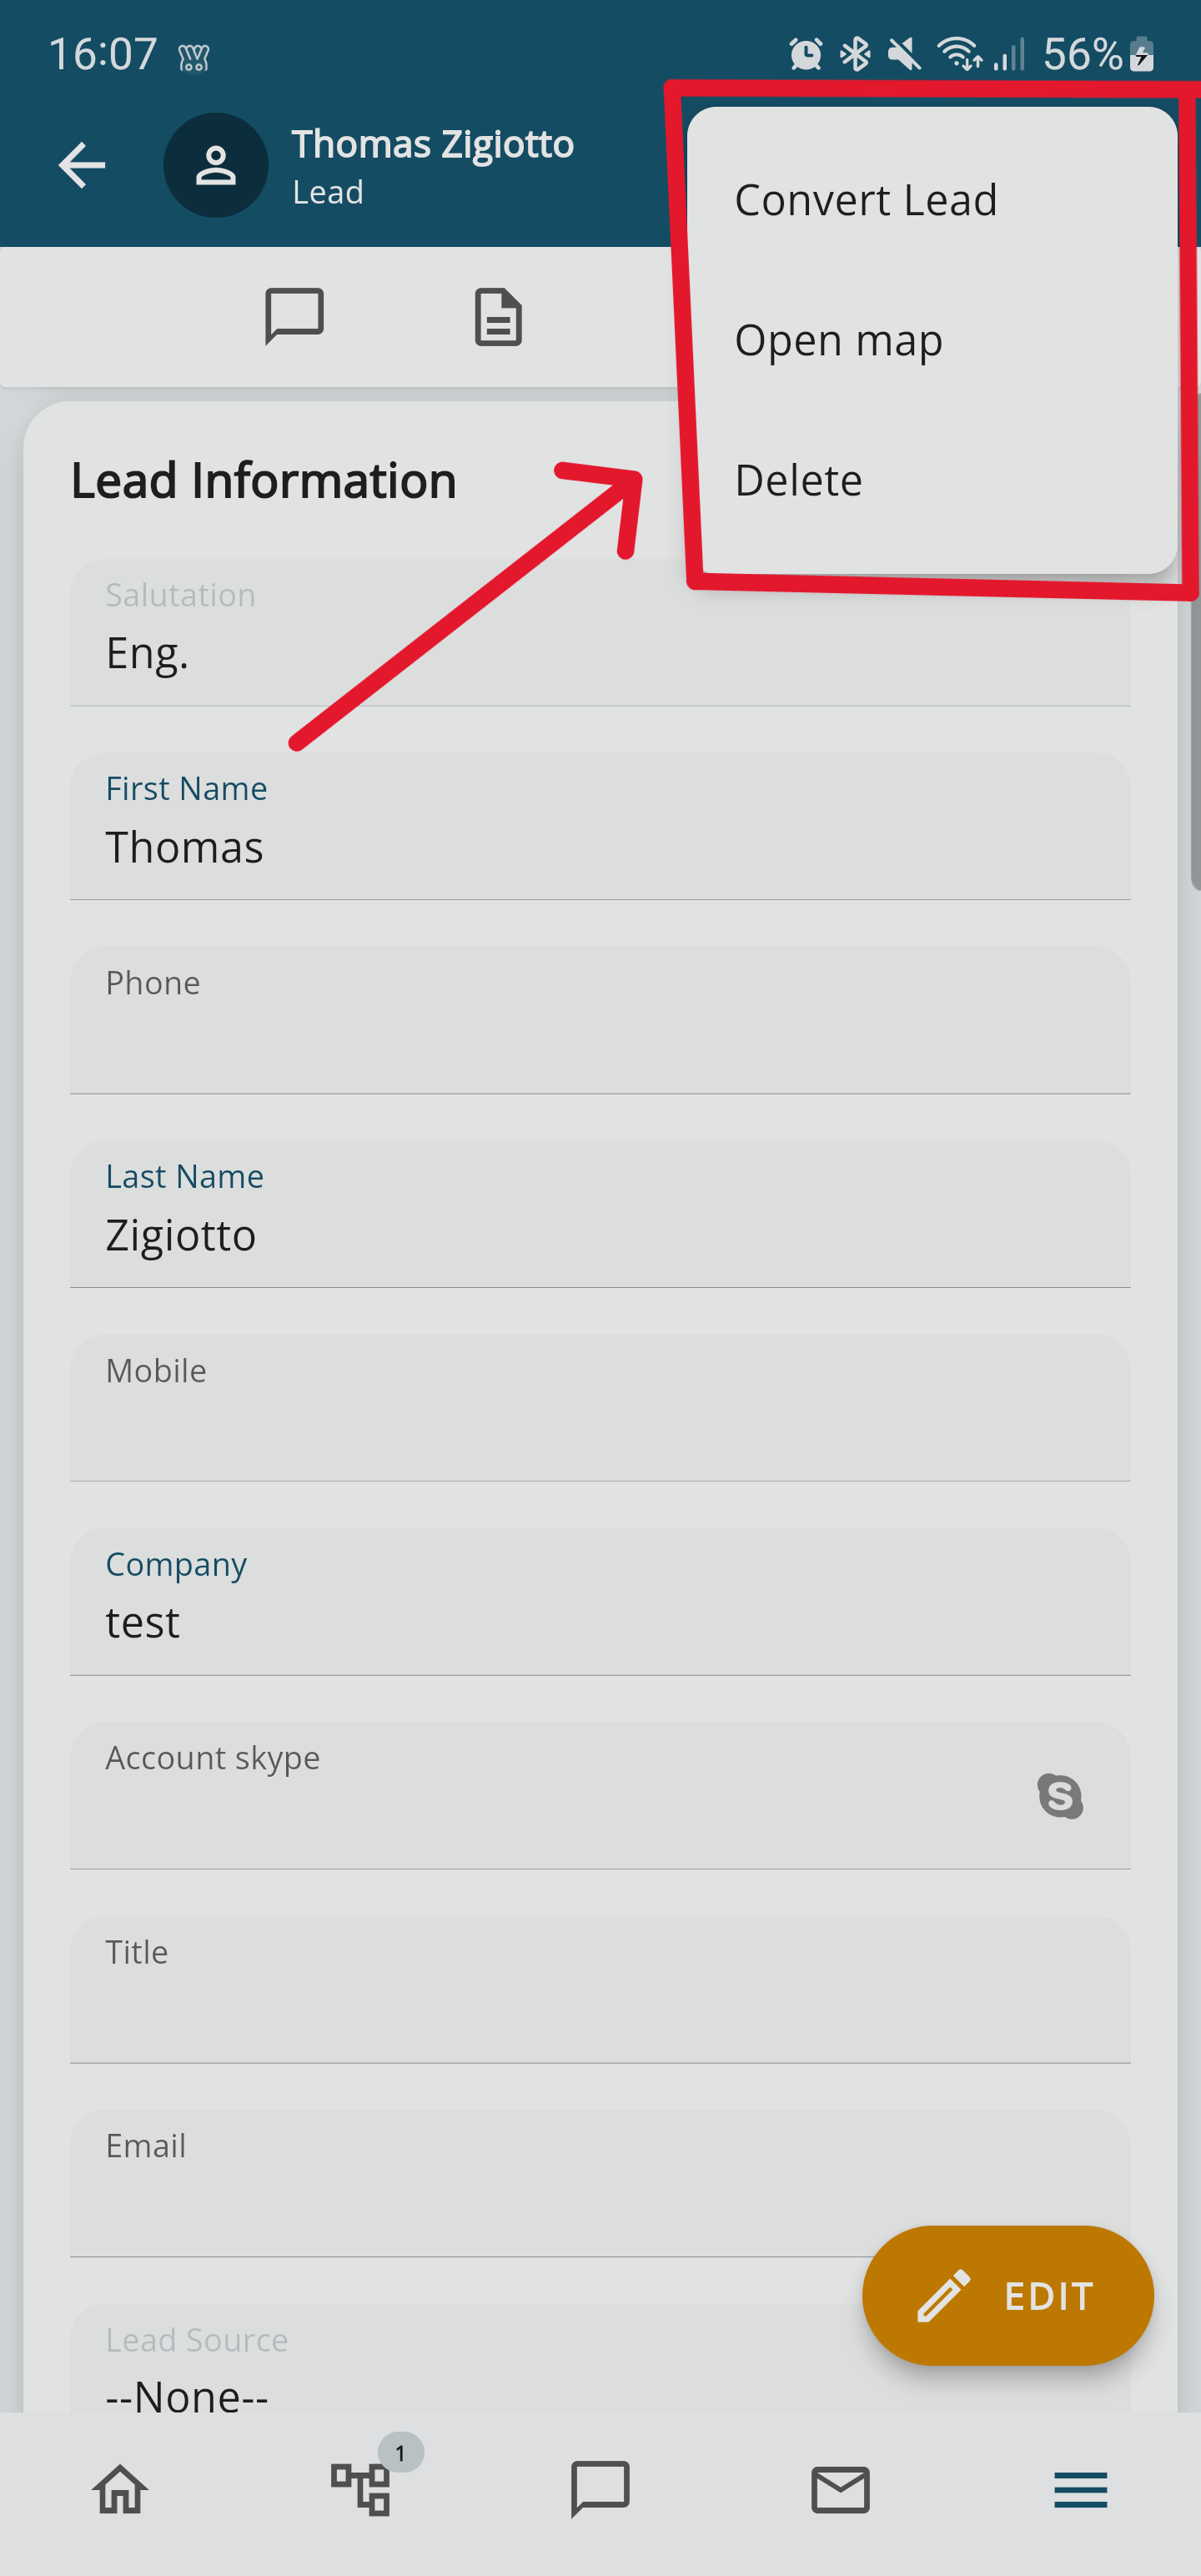
From the Leads module in the Wilson app, you can also perform conversion. Just click on the three dots at the top right, which are present in the details of the relevant record. A popup will appear with the option to CONVERT LEAD.
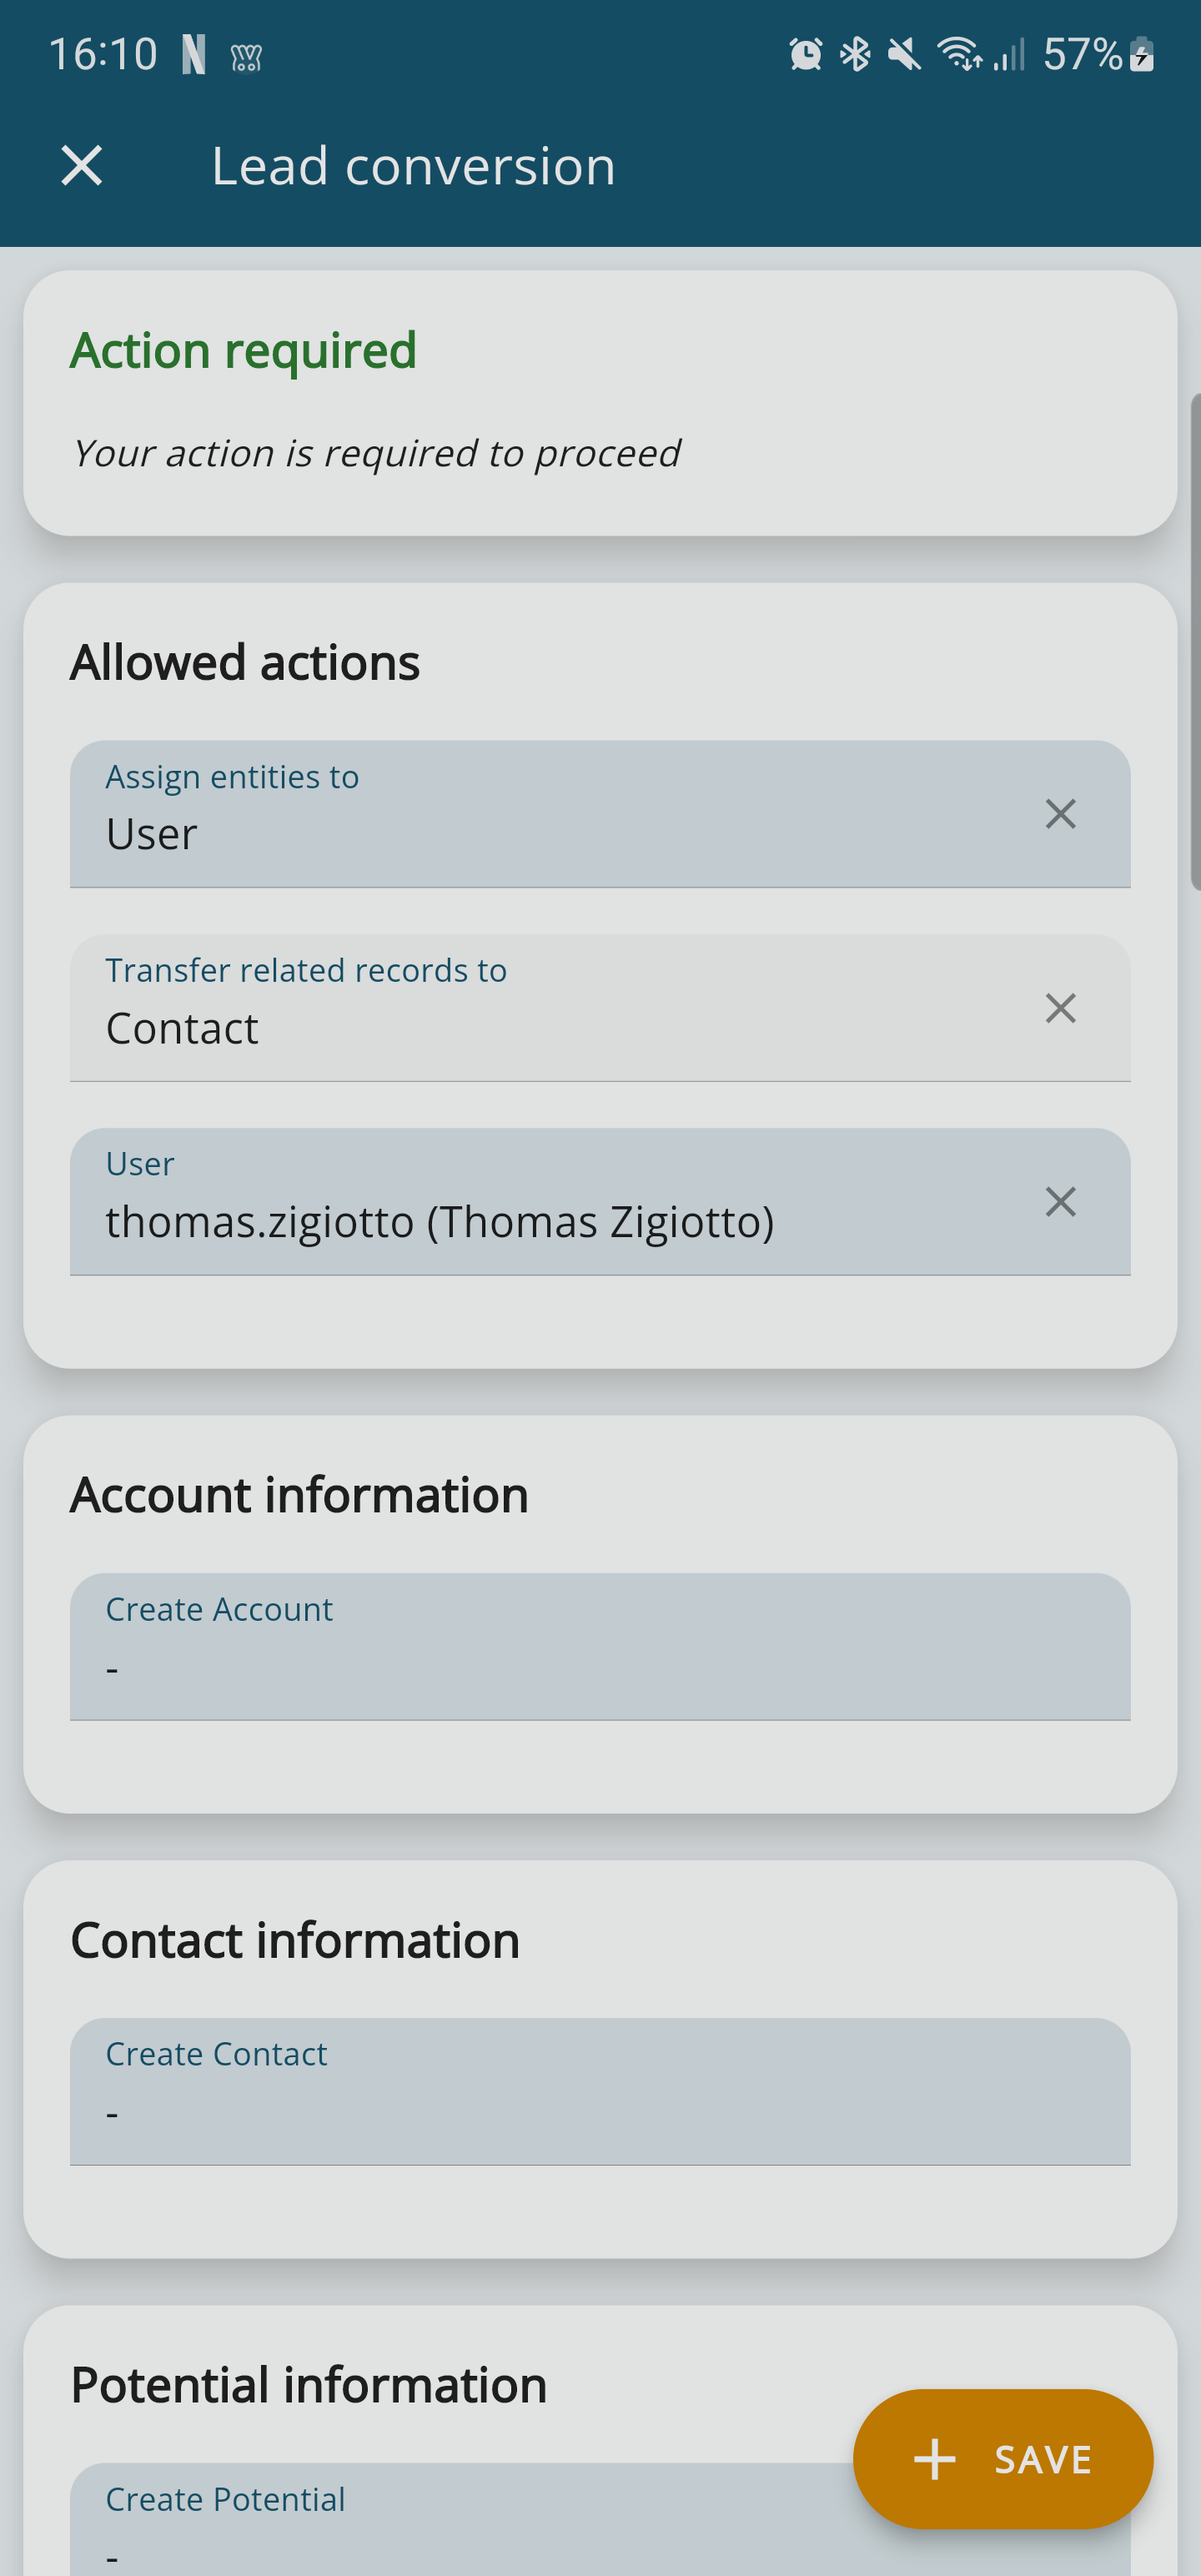
Once you click on CONVERT LEAD, the conversion page opens directly, giving you the option to choose what to convert the Lead into (Company - existing or new - Contact and/or Opportunity) and which fields to fill out.
Logically, clicking on the icon,shows all the relations in the present record, and clicking on them opens the connected records. All the record details are shown in the center of the display.
![3.3 [4].PNG](https://usermanual.vtenext.com/uploads/images/gallery/2022-07/3-3-4.PNG)
| Organizational layout of the modules related to Leads | ||
| Conversations | Notes | PDF Maker |
| Activities (Calendar) | Tasks (Calendar) | Documents |
| Products | Services | Messages |
| Visit Reports | Trouble Tickets | Processes |
3.4 Accounts
As with the Leads, the Companies are also organized with filters and information cards (address, description, etc.). The relations menu at the top right gives access (and allows additions) to various correlated data items.
For example, from the Companies module it is possible to progress to the next stage of the sales cycle, creating a potential automatically correlated with the account information.
![3.4 [1].PNG](https://usermanual.vtenext.com/uploads/images/gallery/2022-07/3-4-1.PNG)
List view showing filter applied App side (fields displayed below each record)
![3.4 [2].PNG](https://usermanual.vtenext.com/uploads/images/gallery/2022-07/3-4-2.PNG)
Account detail view
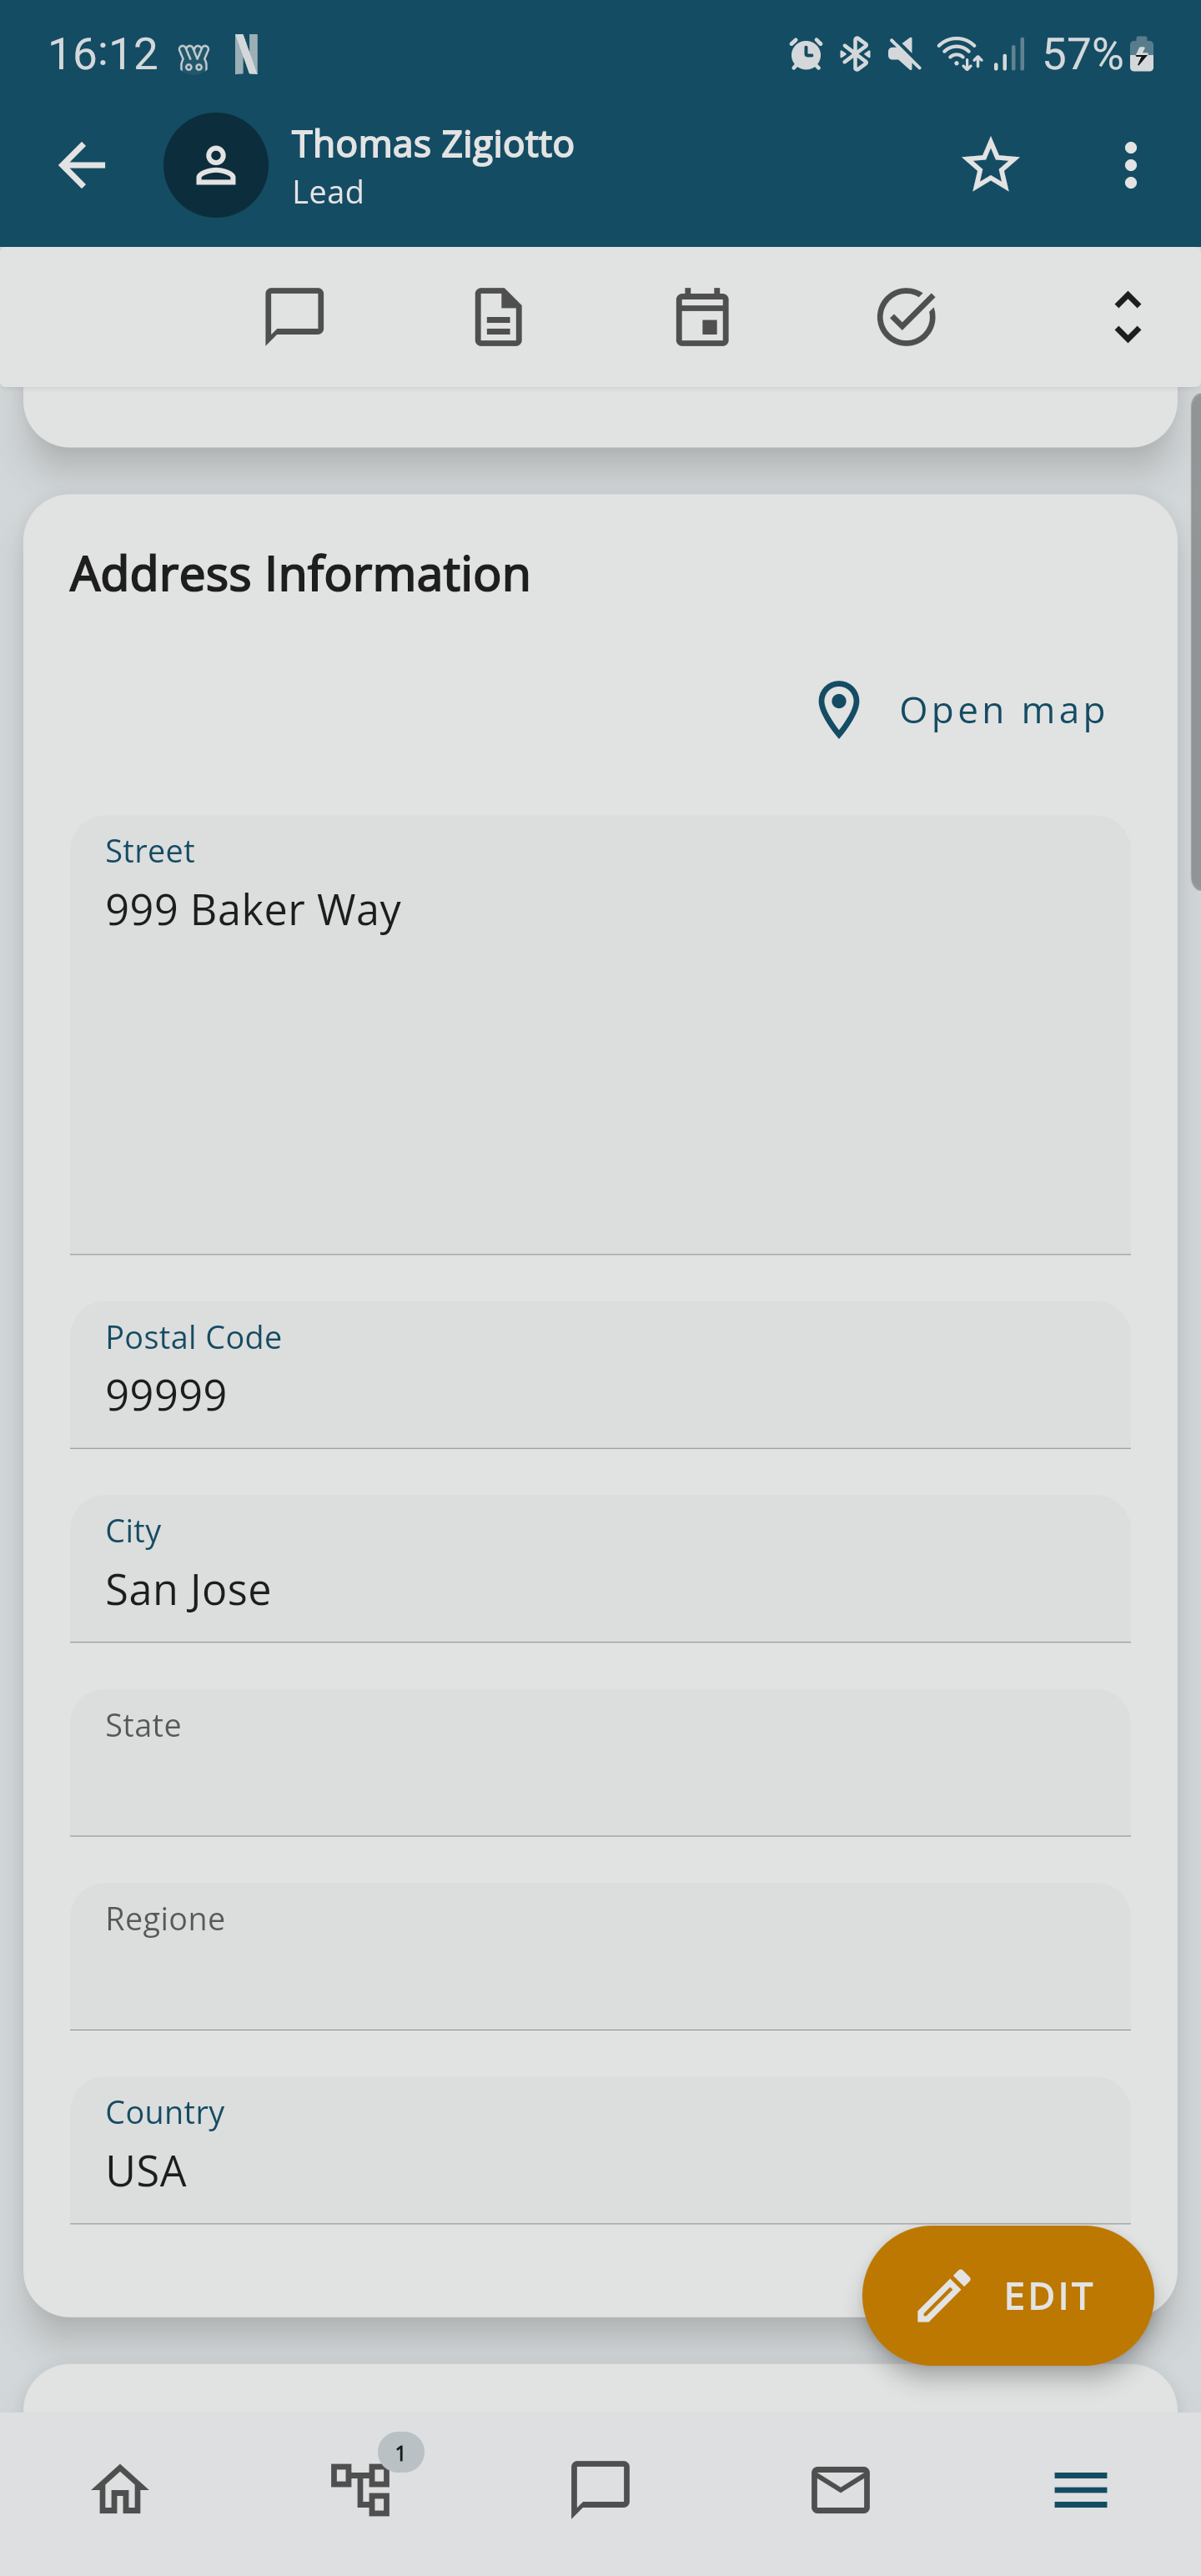
There's a 'Open Map' button that allows you to open Google Maps and locate the Account
| Organizational layout of the modules related to Companies | ||
| Conversations | Notes | PDF Maker |
| Activities (Calendar) | Tasks (Calendar) | Products |
| Contacts | Messages | Sales Order |
| Trouble Tickets | Potentials | Quotes |
| Services | Documents | Invoices |
| Installations | Projects | Project Tasks |
| Service Contracts | Processes | DDT |
| Visit Reports | ||
You can also modify or eliminate the correlated data, for example (as in the figure) the Contact associated with the account. The arrow icon (top right) gives direct access to the Contacts page.
N.B.: The order and presence of related items can be modified in the mobile editor layout (configurable web side).
![3.4 [3].PNG](https://usermanual.vtenext.com/uploads/images/gallery/2022-07/3-4-3.PNG)
Display of a Contact related to a Company
3.5 Contacts
As with Leads and Companies, Contacts are also organized with filters and information cards. The main Contact information includes the relation with the respective Company. The relations menu can be used to access (and add) correlated data.
![3.5 [1].PNG](https://usermanual.vtenext.com/uploads/images/gallery/2022-07/3-5-1.PNG)
Contact Detail view
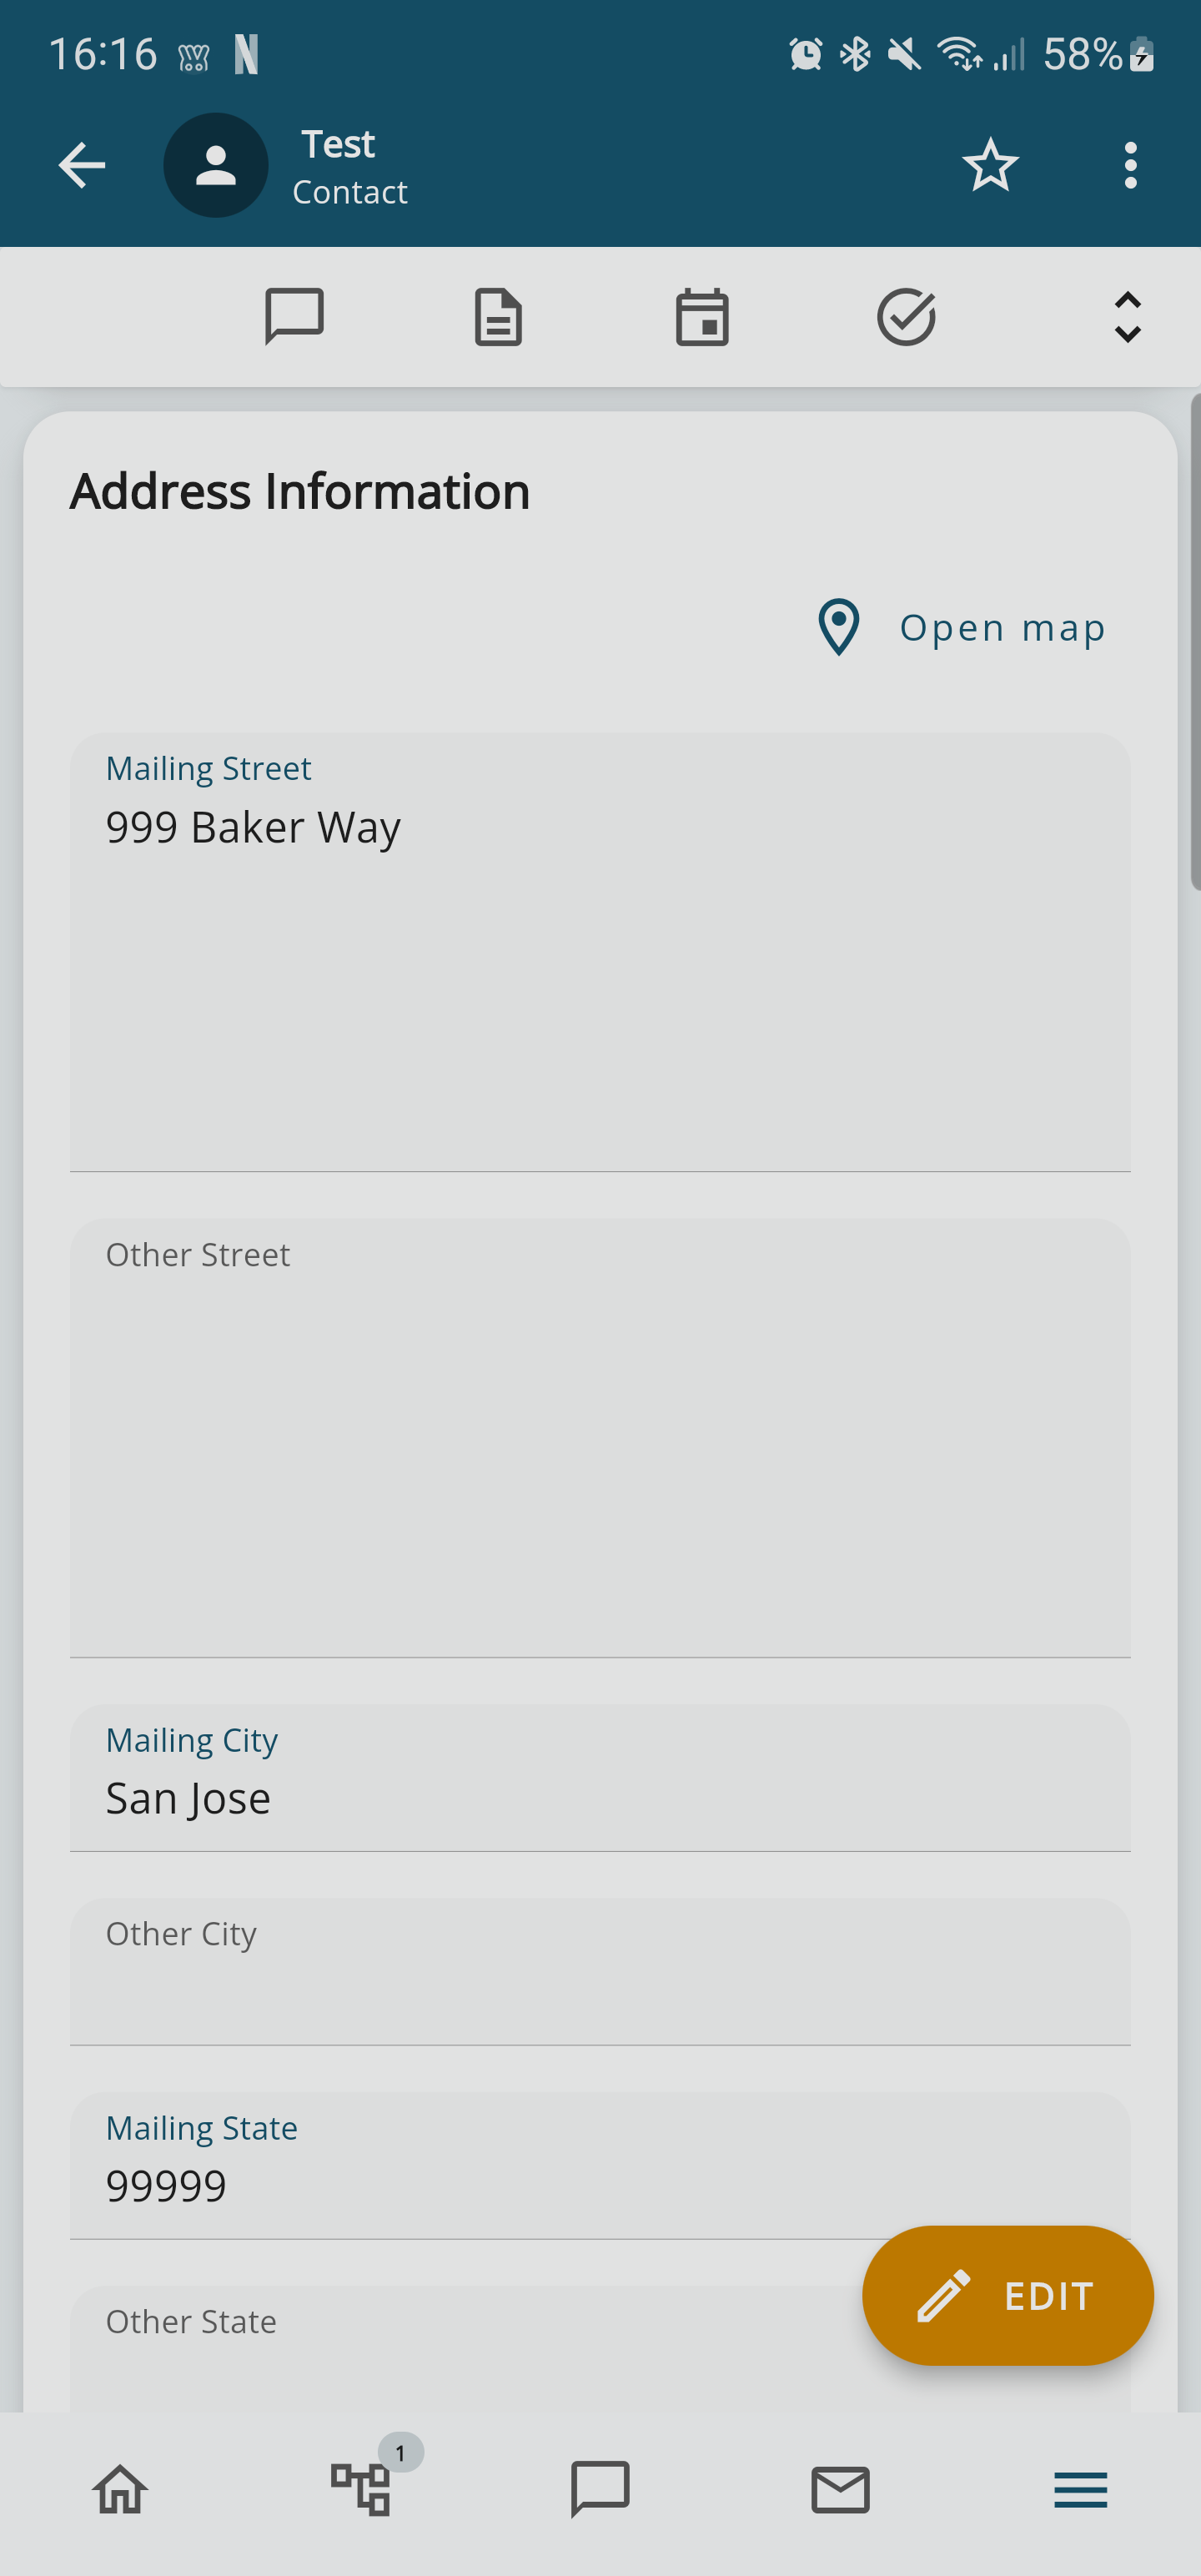
There's a 'Open Map' button that allows you to open Google Maps and locate the contact.
| Organizational layout of related modules | ||
| Conversations | Notes | Activities (Calendar) |
| Tasks (Calendar) | Messages | Potentials |
| Touble Tickets | Quotes | Purchase Orders |
| Sales Orders | Products | Documents |
| Invoices | Services | Service Contracts |
| Projects | Processes | Visit Reports |
3.6 Potentials
Potentials are starting points for negotiations. The module is organized with filters and information cards. Within the main information, a Potential must be correlated with a Company / Contact (so that the commercial information flow is complete).
The relations menu gives access to the data of related modules. As usual, a relation can be added by pushing the relevant button ![2.1 [8].PNG](https://usermanual.vtenext.com/uploads/images/gallery/2022-06/2-1-8.PNG) . For example, from a Potential it is possible to progress to the next stage of the sales cycle by creating a Quotation, which is automatically correlated with the Potential / Account information.
. For example, from a Potential it is possible to progress to the next stage of the sales cycle by creating a Quotation, which is automatically correlated with the Potential / Account information.
![3.6 [1].PNG](https://usermanual.vtenext.com/uploads/images/gallery/2022-07/3-6-1.PNG)
Potential Detail
![3.6 [2].PNG](https://usermanual.vtenext.com/uploads/images/gallery/2022-07/3-6-2.PNG)
The image above shows a Quotation related to a Potential
| Organizational layout of related modules | ||
| Conversations | Notes | PDF Maker |
| Documents | Activities (Calendar) | Tasks (Calendar) |
| Products | Contacts | Quotes |
| Sales Orders | Services | Messages |
| Account | Processes | |
3.7 Quotes
The Quotations module is again organized with filters and information cards (Customized Information, Address, Terms and Conditions, etc.). Within the main information a Quotation must be related to a Company and a Potential (so that the information flow is complete). The Quotation includes products and/or services to be added (+) along with quantity, price, discount, etc. The relations menu gives access to (or addition of) correlated data.
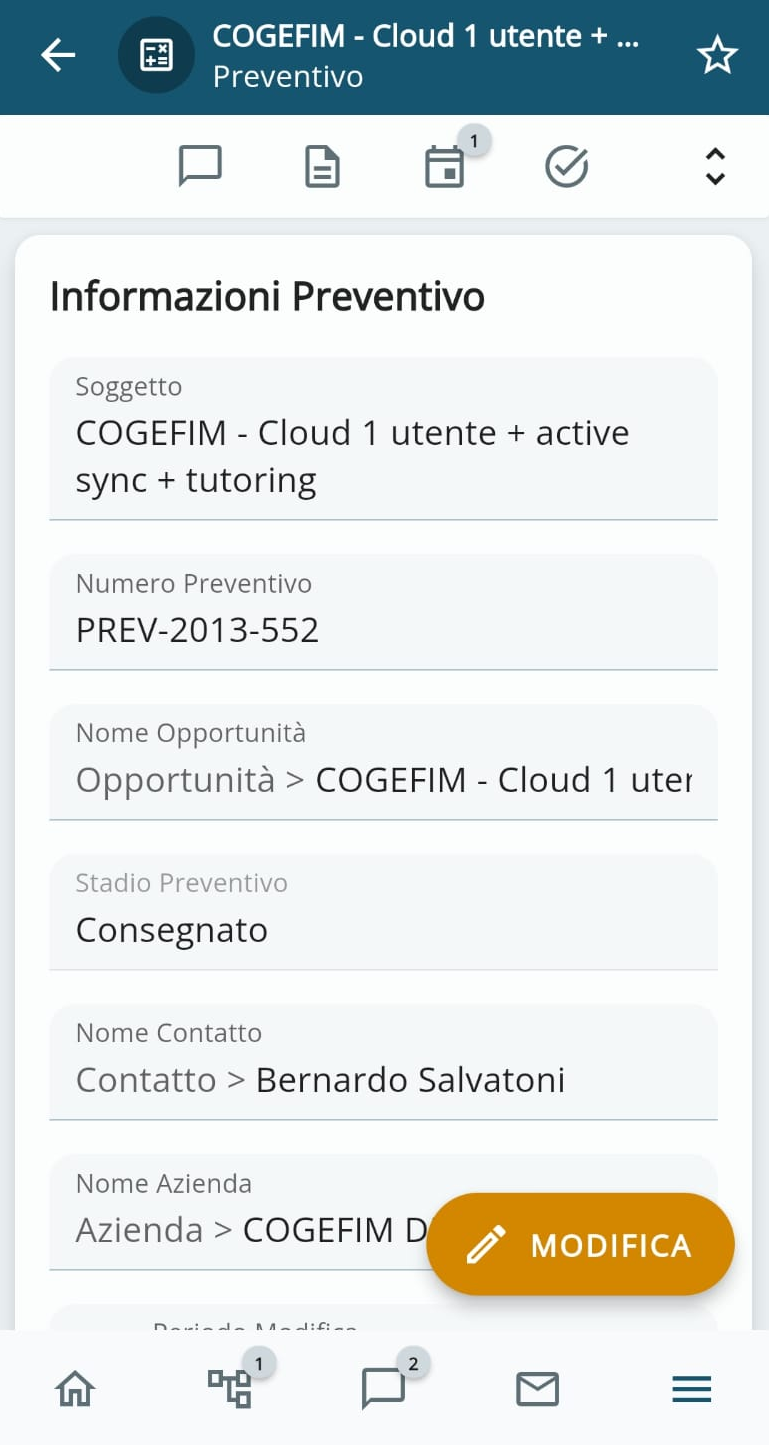
Quote detail
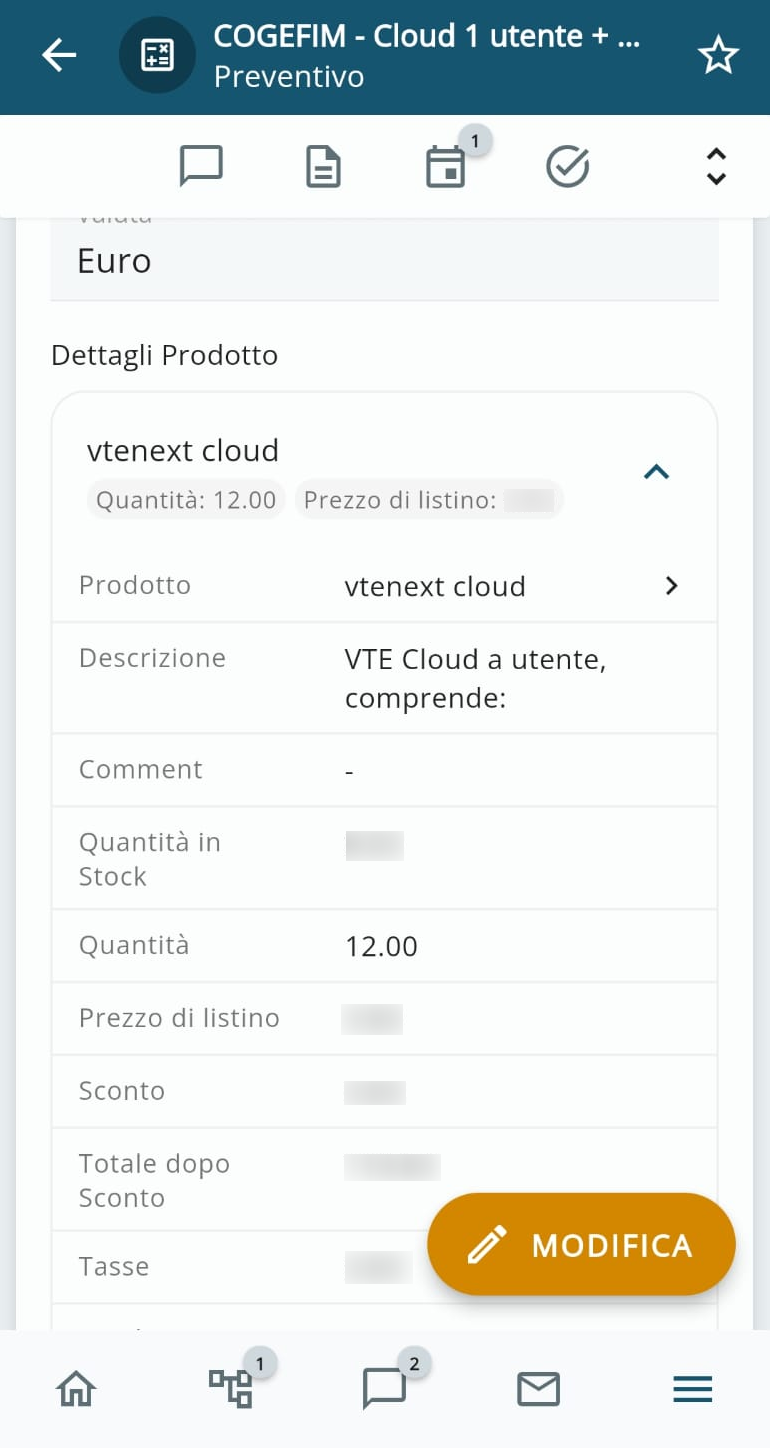 Products in a Quotation
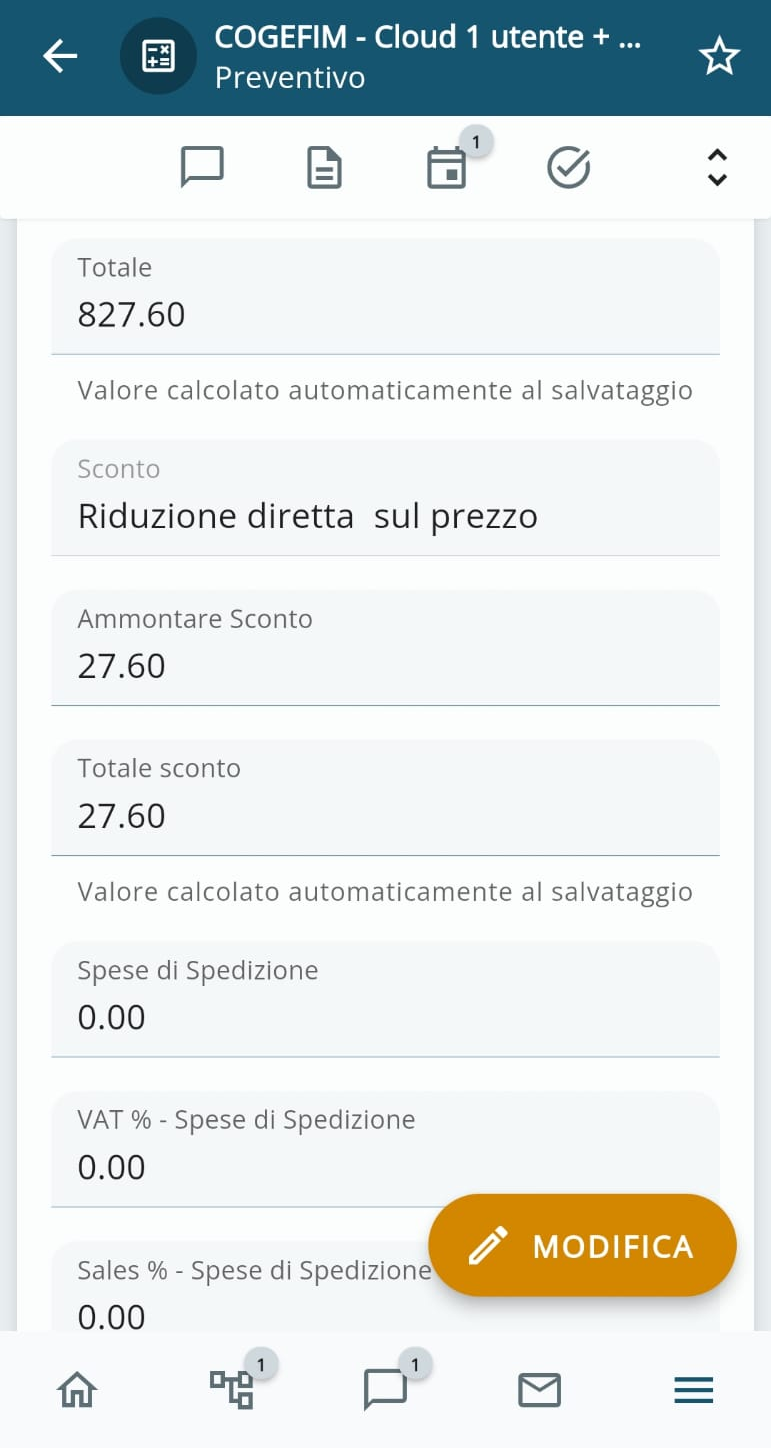
Totals, Taxes, Discounts, and Shipping & Handling Charges
| Organizational layout of related modules | ||
| Conversations | Notes | PDF Maker |
| Messages | Activities (Calendar) | Tasks (Calendar) |
| Sales Order | Documents | Processes |
3.8 Sales Orders
Sales Orders are also organized with filters and information cards. The main information must include a correlation between the Sales Order and a Company/Contact, a Quotation, and also a Potential (so that the information flow is complete).
The relations menu can be used to access and add all correlated data for the modules that appear in the list. For example, from a Sales Order you can progress to the next stage in the sales cycle and create an Invoice.
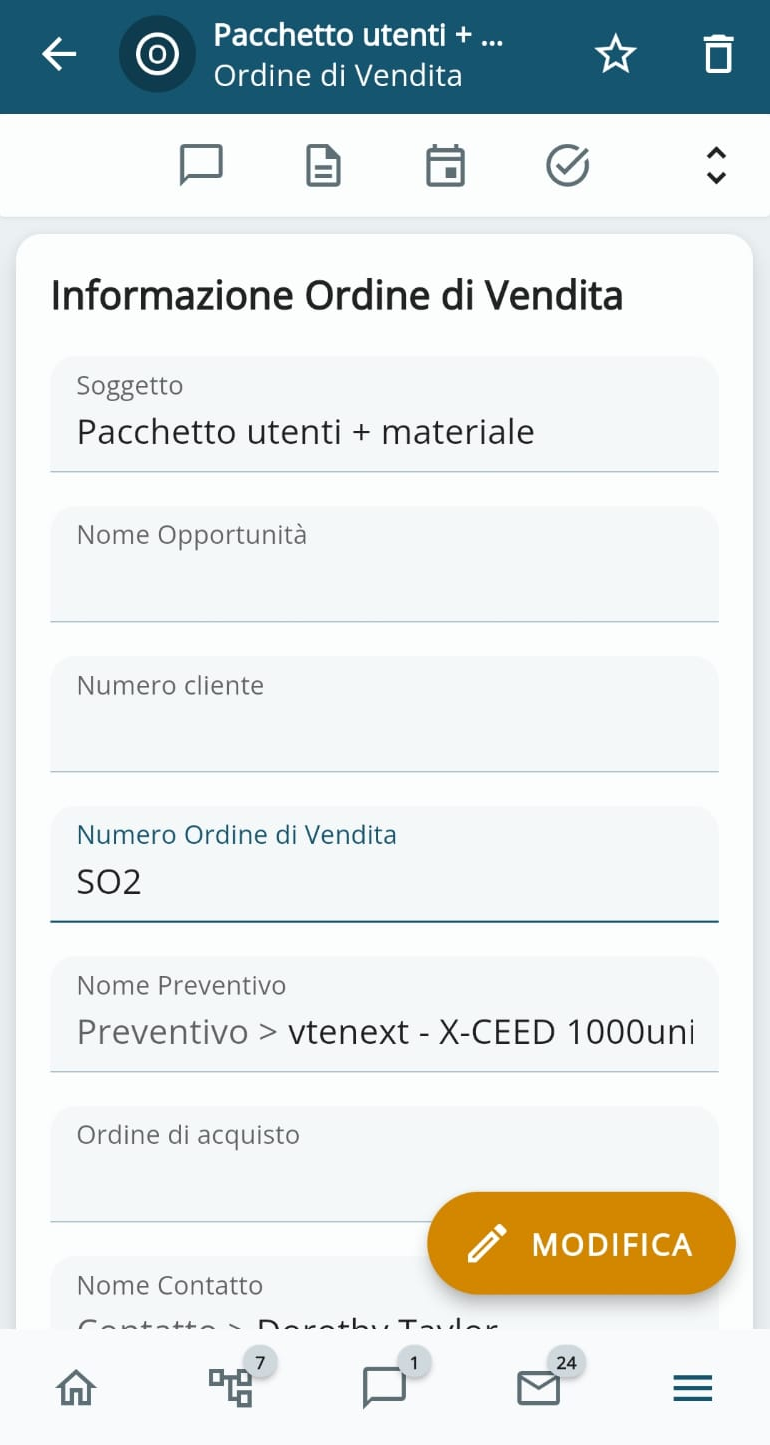
Sales Order Detail
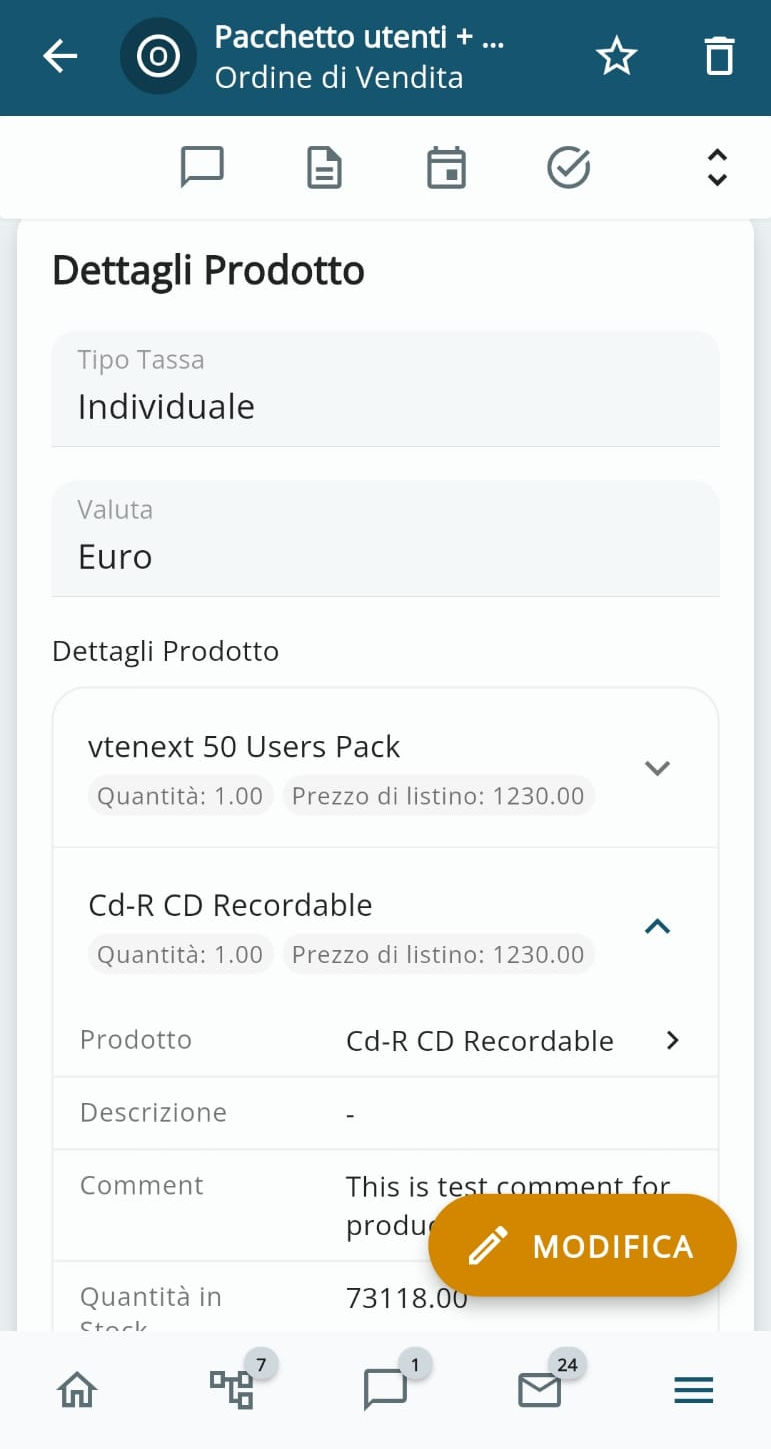
Products in a Sales Order

Sales Order Total, Taxes, Shipping & Handling Charges, Discounts and Rounding off
| Organizational layout of related modules | ||
| Conversations | Notes | PDF Maker |
| Invoices | DDT | Activities (Calendar) |
| Tasks (Calendar) | Documents | Installations |
| Project Tasks | Service Contracts | Messages |
| Processes | ||
3.9 Invoices
Invoices are again organized with filters and information cards. Within the main information an Invoice must be correlated with a Company/Contact and also a Sales Order (so that the information flow is complete). The relations menu gives access and enables addition of correlated data regarding the modules that appear in the list.
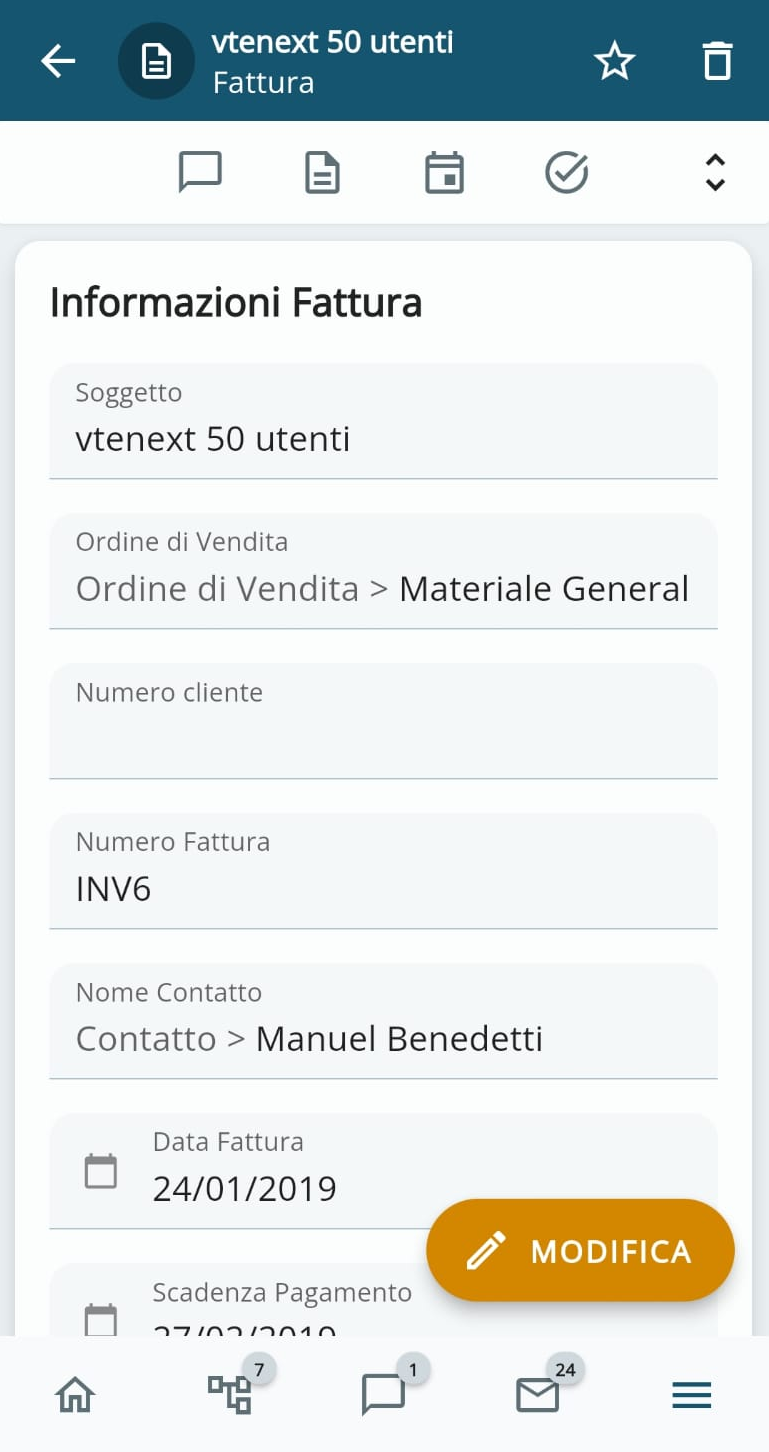
Invoice details

Products in an Invoice
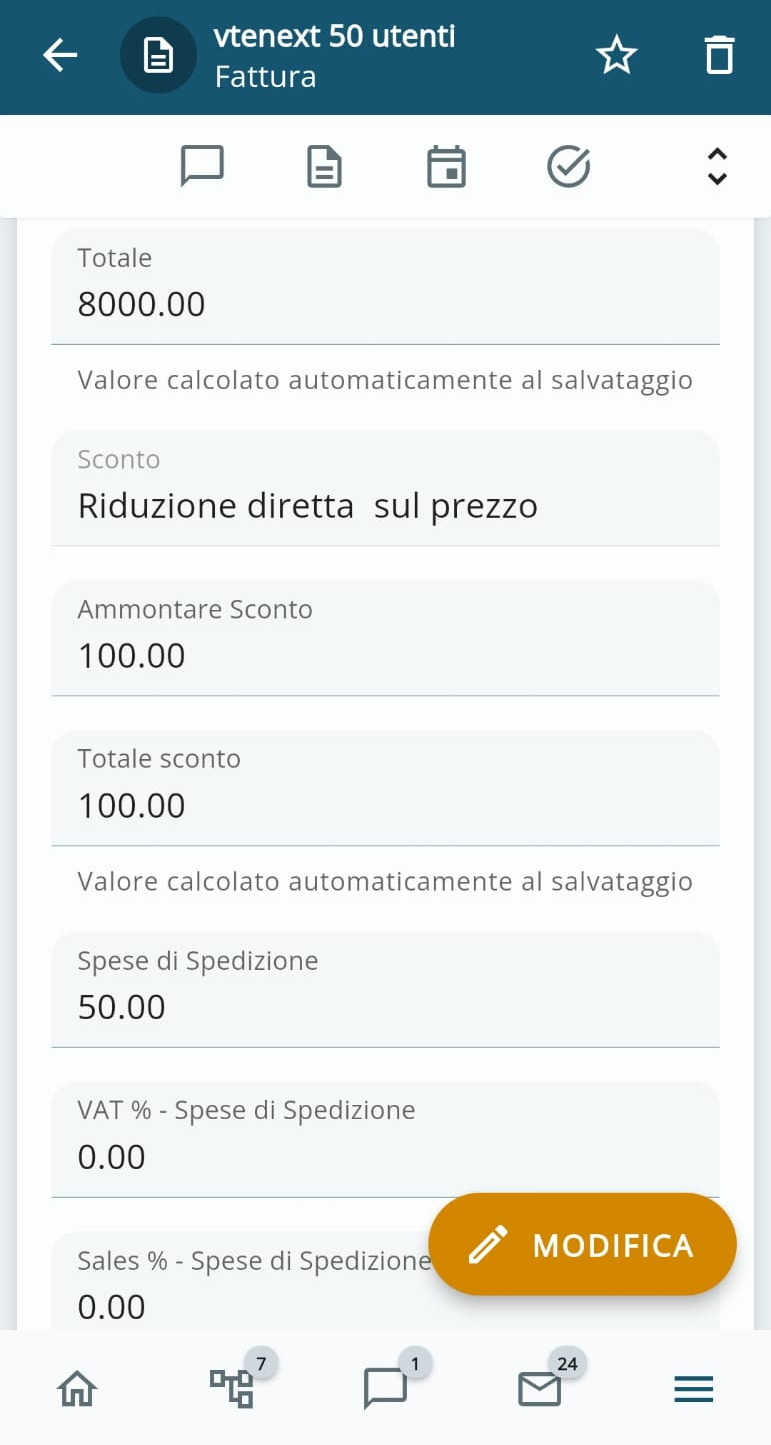
Invoice Total, Discounts, Shipping & Handling Charges, Rounding off
| Organizational layout of related modules | ||
| Conversations | Notes | PDF Maker |
| Activities (Calendar) | Tasks (Calendar) | Documents |
| DDT | Installations | Messages |
| Processes | ||
3.10 Products
In Wilson for vtenext the Products module only exists as a relation for other modules that use it, like Quotations, Sales Orders, Purchase Orders, Invoices, etc.
![3.10 [1].PNG](https://usermanual.vtenext.com/uploads/images/gallery/2022-07/3-10-1.PNG)
Product description
3.11 Installations
Installations are organized with filters and information cards. Within the main information an Installation must be related to a Product and a Company, and also requires a Serial Number. A connection is also required with a Sales Order and an Invoice (so that the information flow is complete).
The relations menu can be used to access and add all correlated data for the modules that appear in the list.
![3.11 [1].PNG](https://usermanual.vtenext.com/uploads/images/gallery/2022-07/3-11-1.PNG)
Installation details
| Schema di organizzazione dei moduli relazionati | ||
| Conversations | Notes | Trouble Tickets |
| Messages | Documents | Processes |
3.12 Services
This module contains the list of services that can be offered to customers. As in the Web version, they differ from Products only by including management of man hours, which is difficult to manage using the Products module. The relations menu can be used to access and possibly add data correlated with the related modules present.
![3.12 [1].PNG](https://usermanual.vtenext.com/uploads/images/gallery/2022-07/3-12-1.PNG)
Service detail
| Organizational layout of related modules | ||
| Conversations | Notes | Quotes |
| Sales Orders | Invoices | Accounts |
| Potentials | Messages | Trouble Tickets |
| Purchase Orders | Leads | Contacts |
| Documents | Service Cotracts | Processes |
3.13 Service Contracts
Service Contracts (services measured in hours/days) are organized with filters and information cards. They include direct relations with Companies, Sales Orders, and Services (so that the information flow is complete).
![3.13 [1].PNG](https://usermanual.vtenext.com/uploads/images/gallery/2022-07/3-13-1.PNG)
Service Contract detail
| Organizational layout of related modules | ||
| Conversations | Notes | Trouble Tickets |
| Messages | Documents | Processes |
3.14 Trouble Tickets
The Help Desk module contains all the Trouble Tickets opened by customers or internally by the Technical Support staff. They can be related to Companies/Contacts, a Product, Project, or Project Activity.
![3.14 [1].PNG](https://usermanual.vtenext.com/uploads/images/gallery/2022-07/3-14-1.PNG)
Trouble Tickets detail
In a Ticket display view there is an area for signing by the customer. This serves for the creation of an Intervention Report that can be sent to the customer in PDF format, containing all the Ticket data including the signature (as shown below).
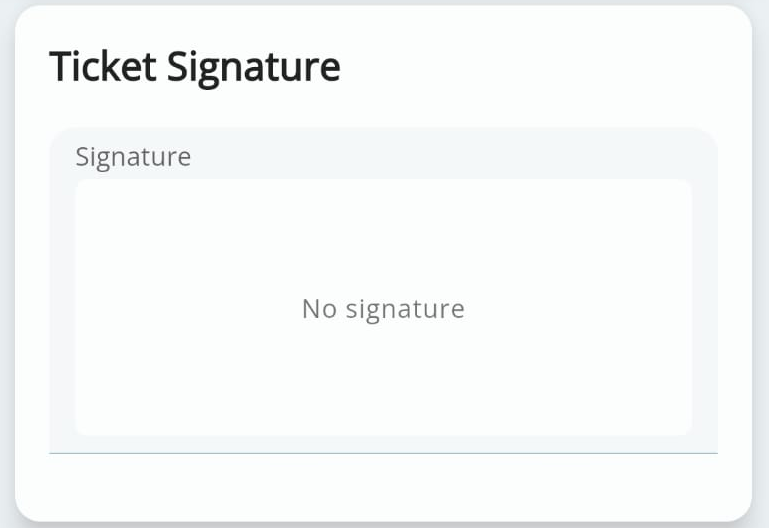
Ticket Signature detail
![3.14 [2].PNG](https://usermanual.vtenext.com/uploads/images/gallery/2022-06/3-14-2.PNG)
Ticket Signature Window detail
| Organizational layout of related modules |
||
| Comments | Conversations | Notes |
| PDF Maker | Messages | Activities (Calendar) |
| Tasks (Calendar) | Documents | Services |
| Service Contracts | Installations | Interventions |
| Processes | ||
3.15 Projects
Projects is the most appropriate place for managing a new project, checking its development, and coordinating resources. A Plan is typically linked to an Account and its Operations.
![3.15 [1].PNG](https://usermanual.vtenext.com/uploads/images/gallery/2022-07/3-15-1.PNG)
Project details
![3.15 [3].PNG](https://usermanual.vtenext.com/uploads/images/gallery/2022-07/3-15-3.PNG)
Operations related to a Plan
| Organizational layout of related modules | ||
| Conversations | Notes | Trouble Tickets |
| Messages | Project Tasks | Milestones |
| Documents | Activities (Calendar) | Tasks (Calendar) |
| Processes | ||
3.16 Project Tasks
Project Tasks are part of a Plan and are important for establishing “who does what” within a project. Each operation contains information regarding a specific work process, including progress as a percentage of completion. This provides a clear overview for Plans.
Like the other modules, Operations is organized with filters and information cards. Within the main information a project activity must be correlated with a Project and a Sales Order (so that the information flow is complete).
![3.16 [1].PNG](https://usermanual.vtenext.com/uploads/images/gallery/2022-07/3-16-1.PNG)
Project Task detail
| Organizational layout of related modules | ||
| Conversations | Notes | PDF Maker |
| Activities (Calendar) | Tasks (Calendar) | Trouble Tickets |
| Messages | Documents | Processes |
3.17 Milestones
Milestones are useful for managing project deadlines or daily/weekly/monthly/annual company Milestones. As in the other modules, Milestones are organized with filters and information cards and must be correlated with a project.
![3.17 [1].PNG](https://usermanual.vtenext.com/uploads/images/gallery/2022-07/3-17-1.PNG)
Milestone detail
| Organizational layout of related modules | ||
| Conversations | Notes | Messages |
| Activities (Calendar) | Tasks (Calendar) | Processes |
3.18 Vendors
This module is for managing the purchasing cycle. Vendors are organized with filters and information cards (main information, address, notes, etc.).
The Purchase Orders module also appears within the Vendors module. This assists management of the purchasing cycle and shows profit margins on Products.
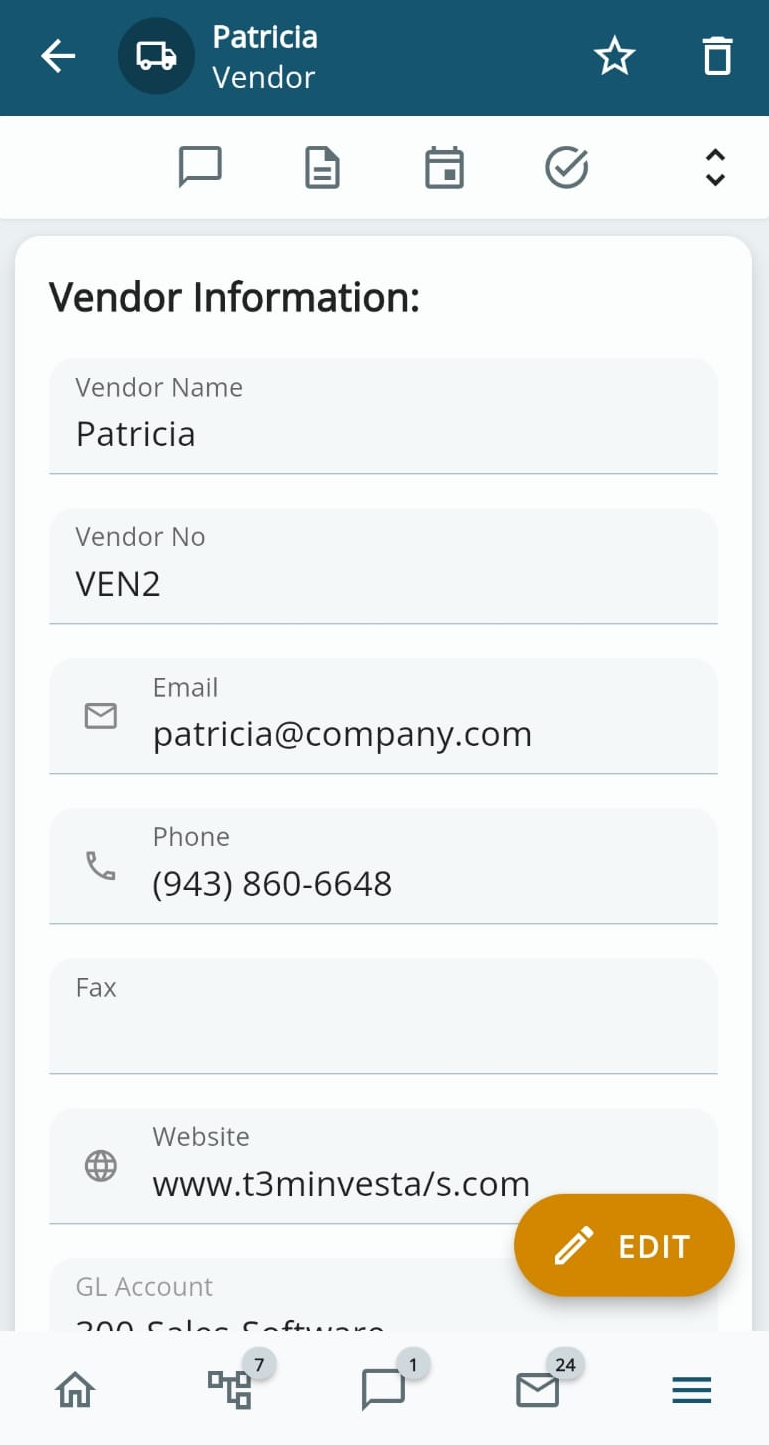
Vendor detail
| Organizational layout of related modules | ||
| Conversations | Notes | Contacts |
| Documents | Messages | Products |
| Purchase Orders | Activities (Calendar) | Tasks (Calendar) |
| Projects | Processes | |
3.19 Purchase Orders
Purchase Orders are again organized with filters and information cards (main information, address, terms and conditions, etc.). Within the main information, a Purchase Order must be related to a Vendor as part of the purchasing cycle.

Purchase Order detail
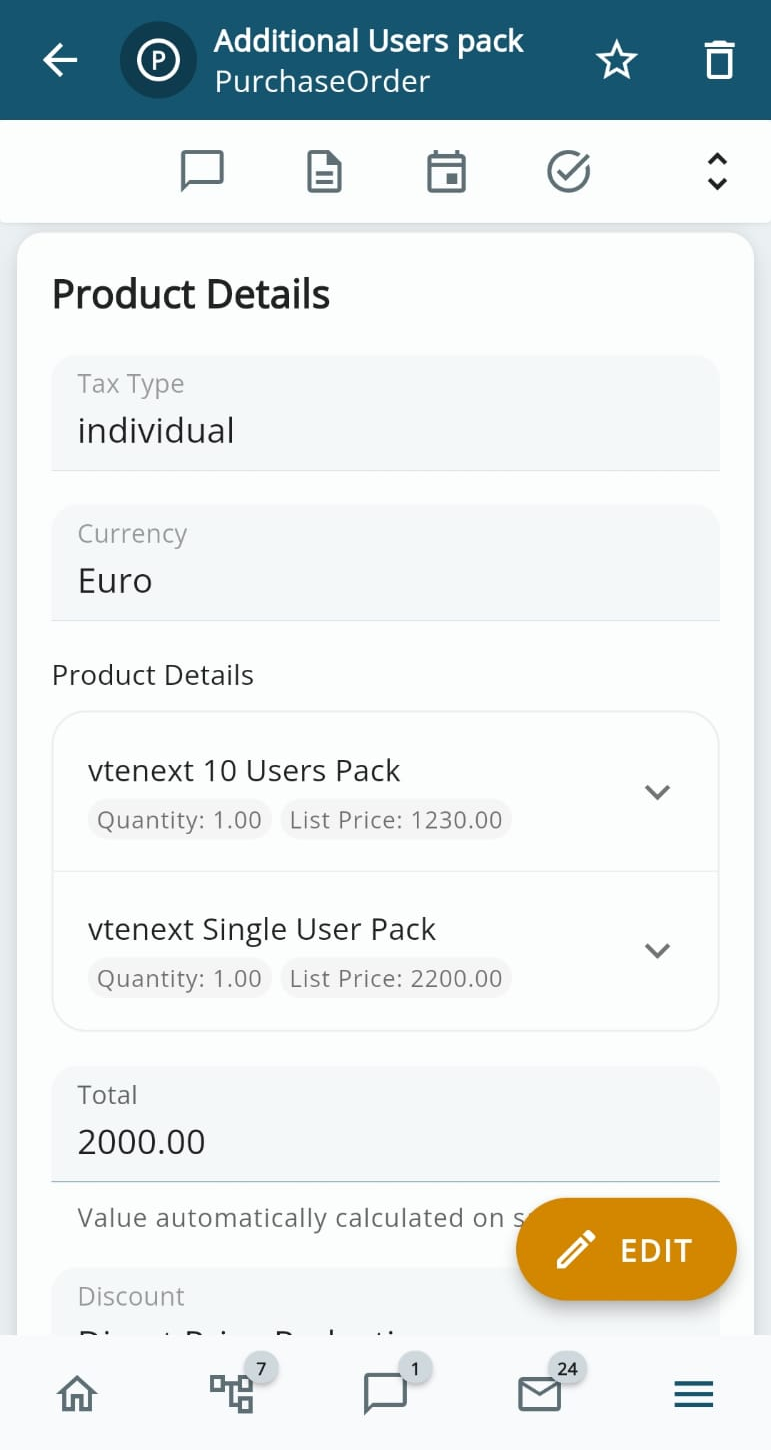
Products in Purchase Order
| Organizational layout of related modules | ||
| Conversations | Notes | PDF Maker |
| Activities (Calendar) | Tasks (Calendar) | Documents |
| Messages | Processes | |
3.20 Visit Reports
This module is for managing visits to potential or established customers. As usual it is organized with filters and information cards, where it is possible to note down the details of a visit (main information, expenses, etc.).
It is also possible to send a PDF document to a potential customer with details of a completed visit. This provides the customer with a reminder of the visit.
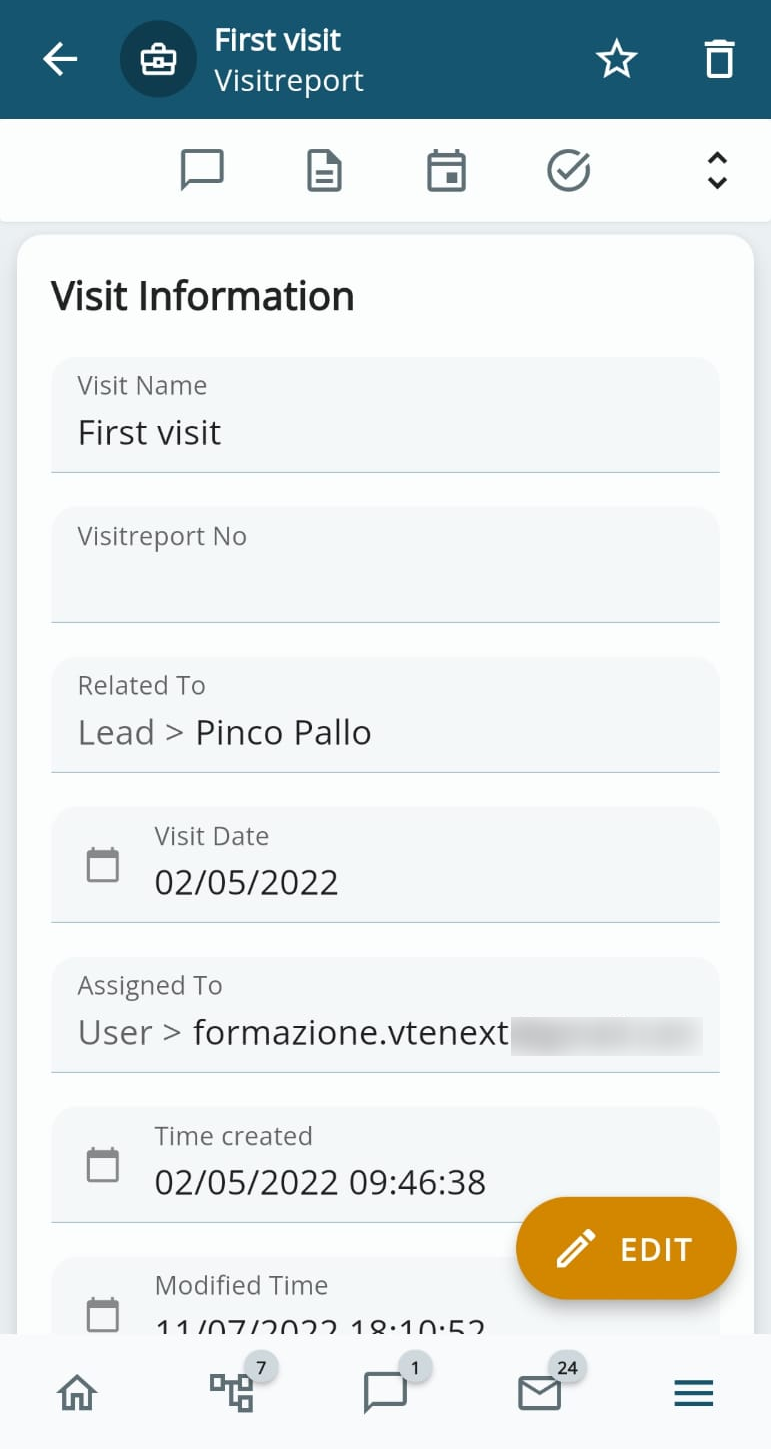
Visit Reports detail
| Organizational layout of related modules |
||
| Conversations | Notes | Products |
| Activities (Calendar) | Tasks (Calendar) | Messages |
| PDF Maker | Processes | |
3.21 Delivery Notes
Like all the VTENEXT modules, Delivery Notes are organized with filters and information cards. They must be related to a customer order and an account.
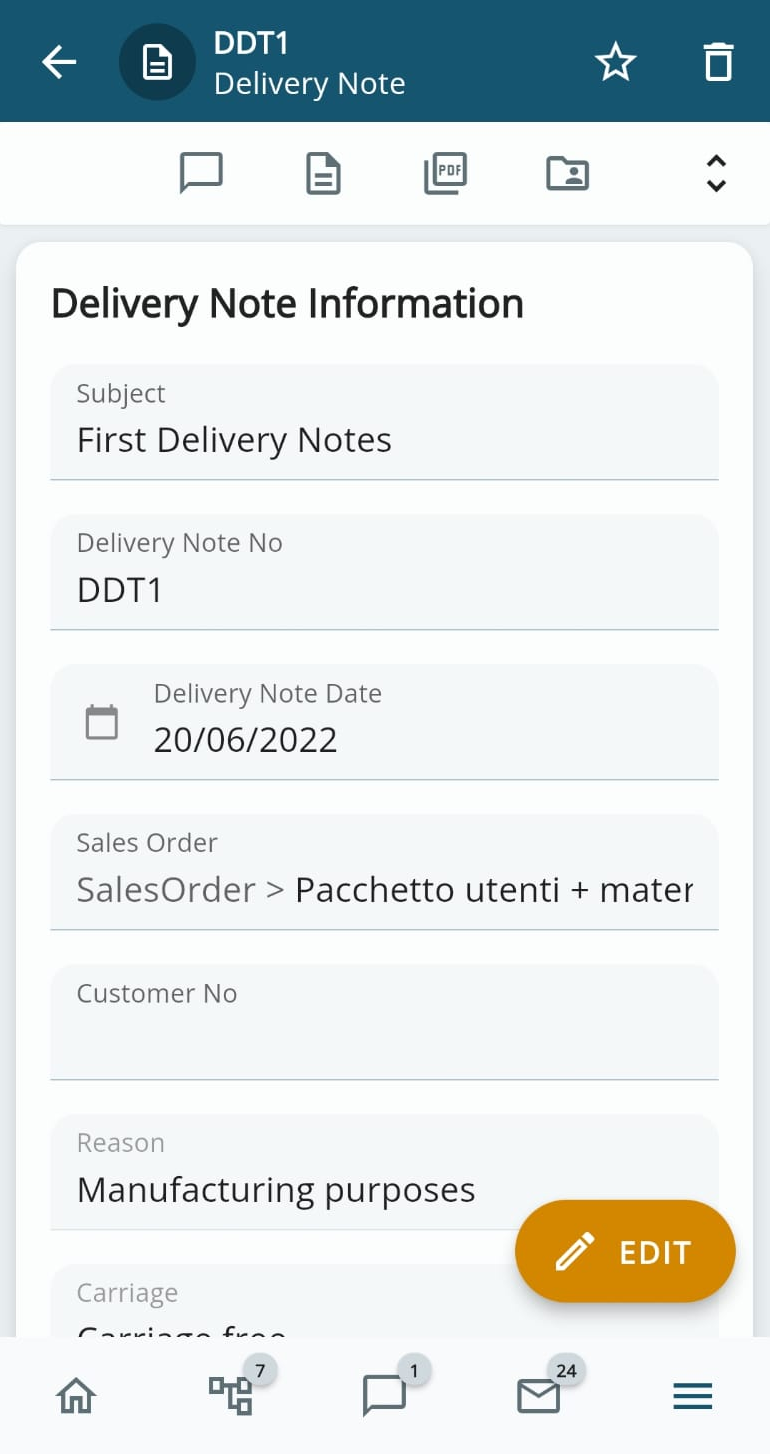
Delivery Notes detail
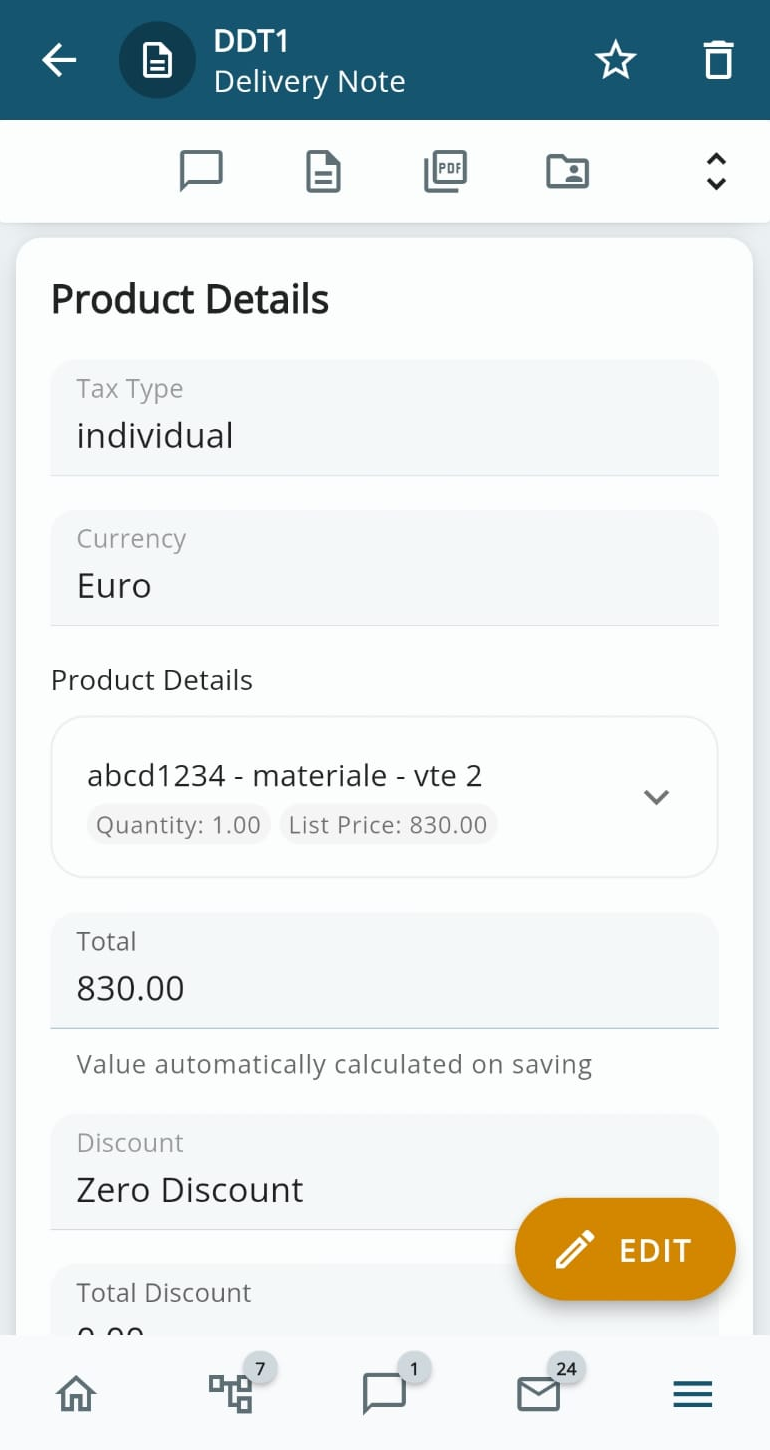
Products in a Delivery Note
| Organizational layout of related modules | ||
| Conversations | Notes | PDF Maker |
| Documents | Invoices | Messages |
| Processes | ||
4. Conversations
4.1 Conversations
Clicking on the relevant icon in the control bar at the bottom opens the Conversations panel as shown below.

Active Conversations detail
The Conversations module allows you to exchange short Messages with other vtenext users on specific subjects. Unread Conversations are highlighted with a darker color while those already read have lighter backgrounds.
When you start a new Conversation or reply to an existing one, a screen opens as shown below, where you can write and select user recipients, as shown below.

Composing a Conversation
When users are selected the following window is displayed. A small pop-up indicates which users are available and those we have already selected.

Choice of user recipients
A Conversation can also be linked to a record. To do this, simply go to the relevant record page, select Conversations in related items, and add by pressing the + button. As usual, the conversation can be started addressed towards everyone, or only to certain specific users.
5. Settings
5.1 Settings Overview
The Settings page can be opened using the icon  at the top right of the Home page, displaying the following information
General Settings (not editable):
- Web address: to which the Wilson for vtenext mobile App connects;
- Username: identity of the user who accessed the App;
- Vtenext version: the currently installed version of vtenext on your server or cloud;
- App version: the version currently in use of the Wilson for vtenext App;
Notifications:
- Receive push notifications: enable or disable push notifications (only if they have been previously activated from the web settings);
- Configure push notifications: you can choose for which modules to receive notifications, set a customized time range to receive them, and choose whether to be simultaneously notified or not when using the web application;
- Open settings: to enable or block notifications and to activate or deactivate the notification badge on the mobile device;
Two-factors Authentication (2FA):
- Biometrics: enable or disable access to the app and other actions that can be performed with the app using fingerprint recognition instead of the device PIN;
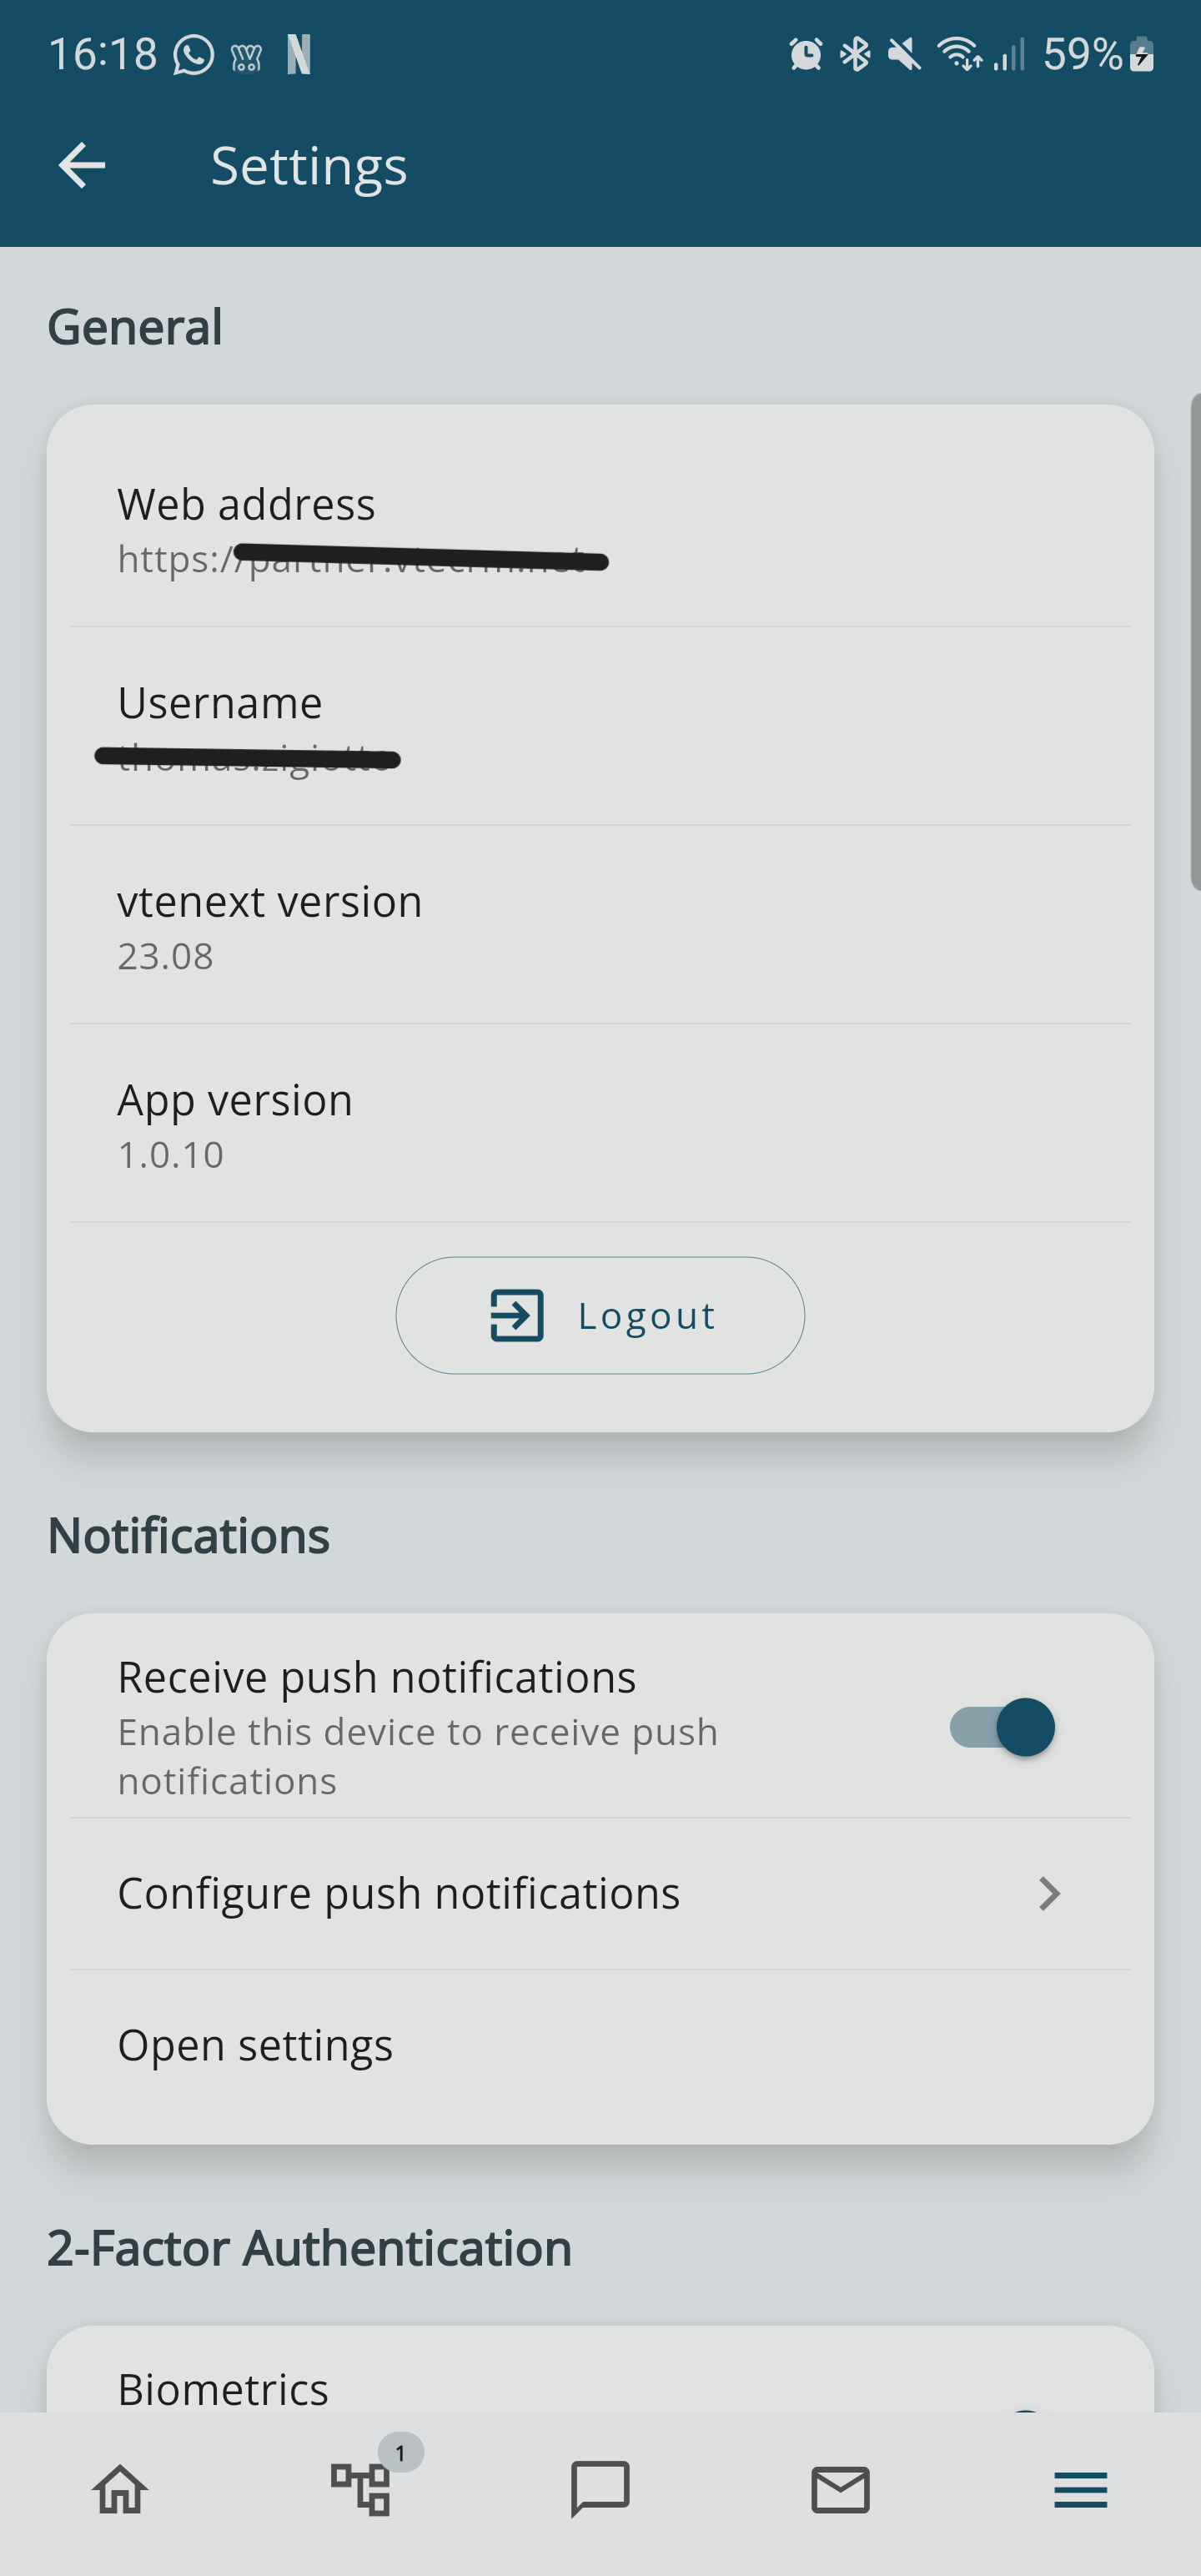
Settings detail view 1

Settings detail view 2
5.2 Applying Changes
When customizations are applied in the CRM (server side), it is necessary to close and then reopen the App in order to see and changes (it is not necessary to Logout/Login).
This mainly involves:
- Changing privileges for modules / fields / profiles
- Creation, modification, or cancellation of users / groups
- Filter changes
- Creation, renaming, cancellation, or modification of visibility of fields / blocks
- Changes in relations between modules
- Language changes
5.3 Push Notifications
When you first open the Wilson app, you will be asked whether to activate Push Notifications:

By enabling Push Notifications in the settings, you can configure for which modules these notifications will be delivered. By clicking on CONFIGURE PUSH NOTIFICATIONS in the settings, you can access the following page:
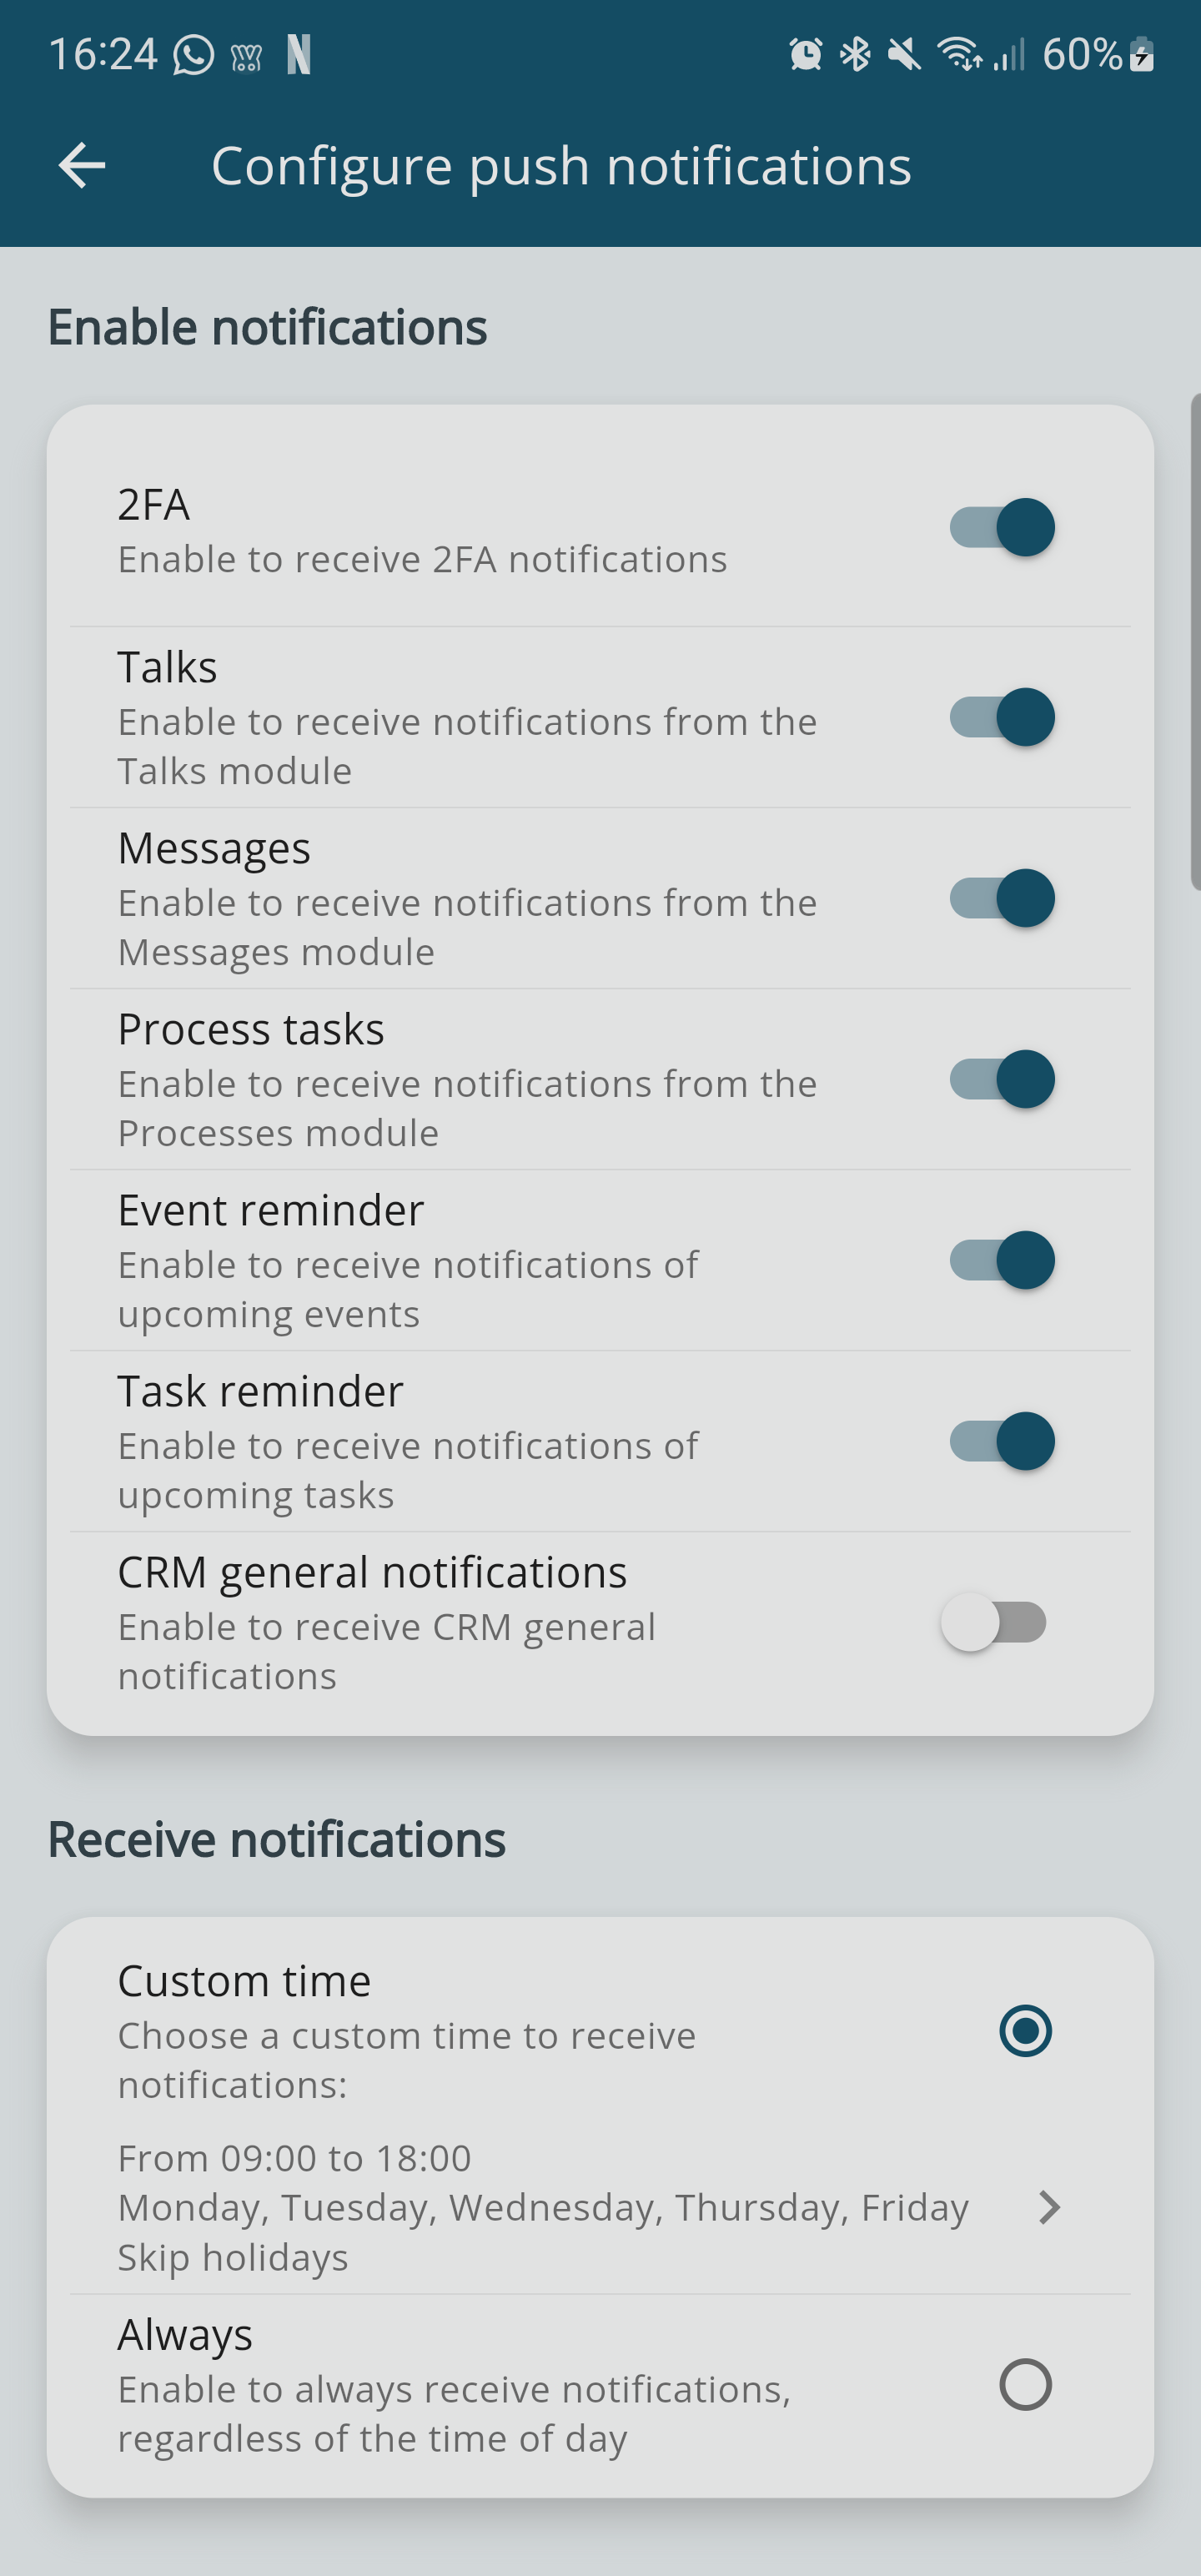
Push notifications settings 1

Push notifications settings 2
ENABLE NOTIFICATIONS
|
2FA |
Enable two-factor authentication notifications |
|
Talks |
Enable conversation notifications |
|
Messages |
Enable email message notifications |
|
Process Tasks |
Enable notifications for process tasks involving the user |
|
Event Reminders |
Enable notifications for upcoming calendar events |
|
Task Reminders |
Enable notifications for upcoming calendar tasks |
|
General CRM Notifications |
Enable all general CRM notifications (those that can be read from the web by clicking the bell icon in the top right) |
|
RECEIVE NOTIFICATIONS |
|
| Custom Schedule | allows you to choose a custom schedule for receiving notifications (time and day) |
|
Always |
allows you to receive notifications at all times regardless of the day and time |
|
ADVANCED |
|
|
Check for concurrent usage |
Push notifications are not sent if the user is concurrently using the web client |
METTERE IN PAUSA LE NOTIFICHE PUSH
It is possible to temporarily stop Push Notifications in the Wilson app. By going into the app's SETTINGS, you can access the page that allows this configuration:
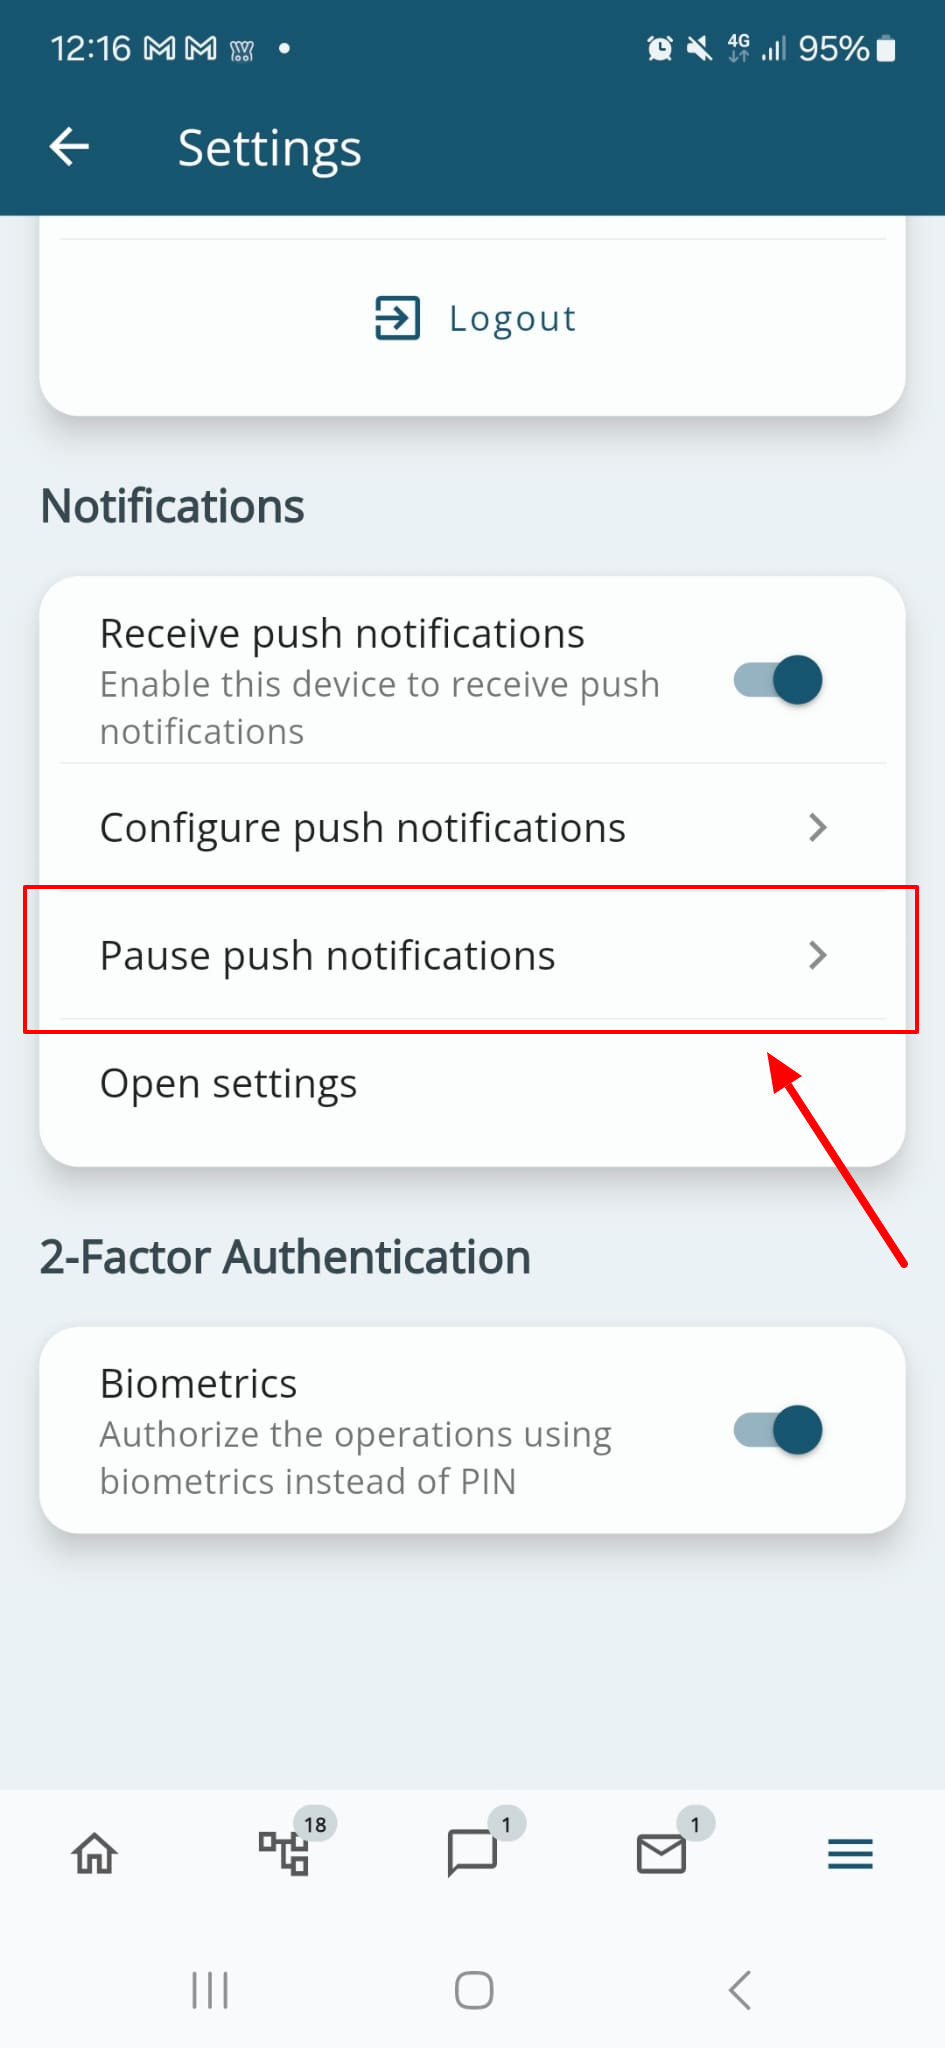
Click on 'Pause Push Notifications' to access the configuration settings.
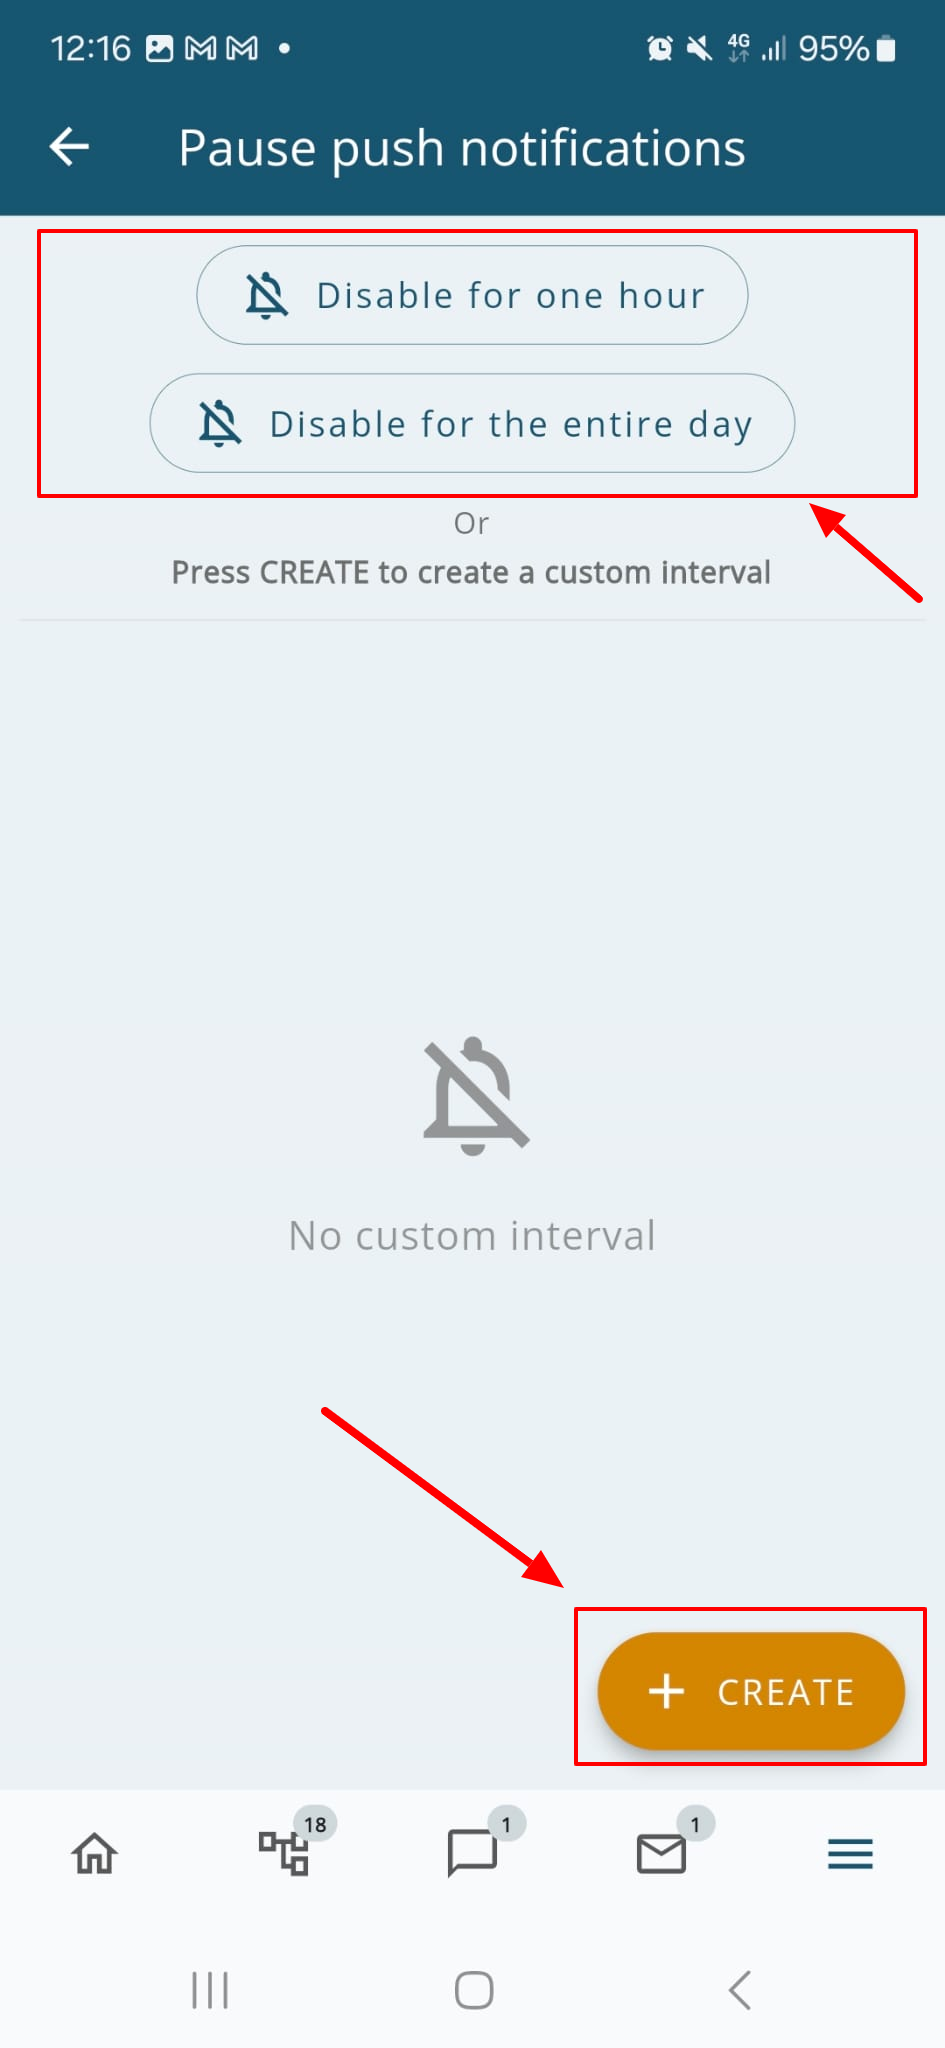
On this page, starting from the top, you can see two buttons to pause notifications for ONE HOUR or for the REST OF THE DAY. Further down, there’s a list of currently ACTIVE pauses, which were previously set. At the bottom of the screen, there’s a CREATE button, which allows you to set up a customized notification pause.
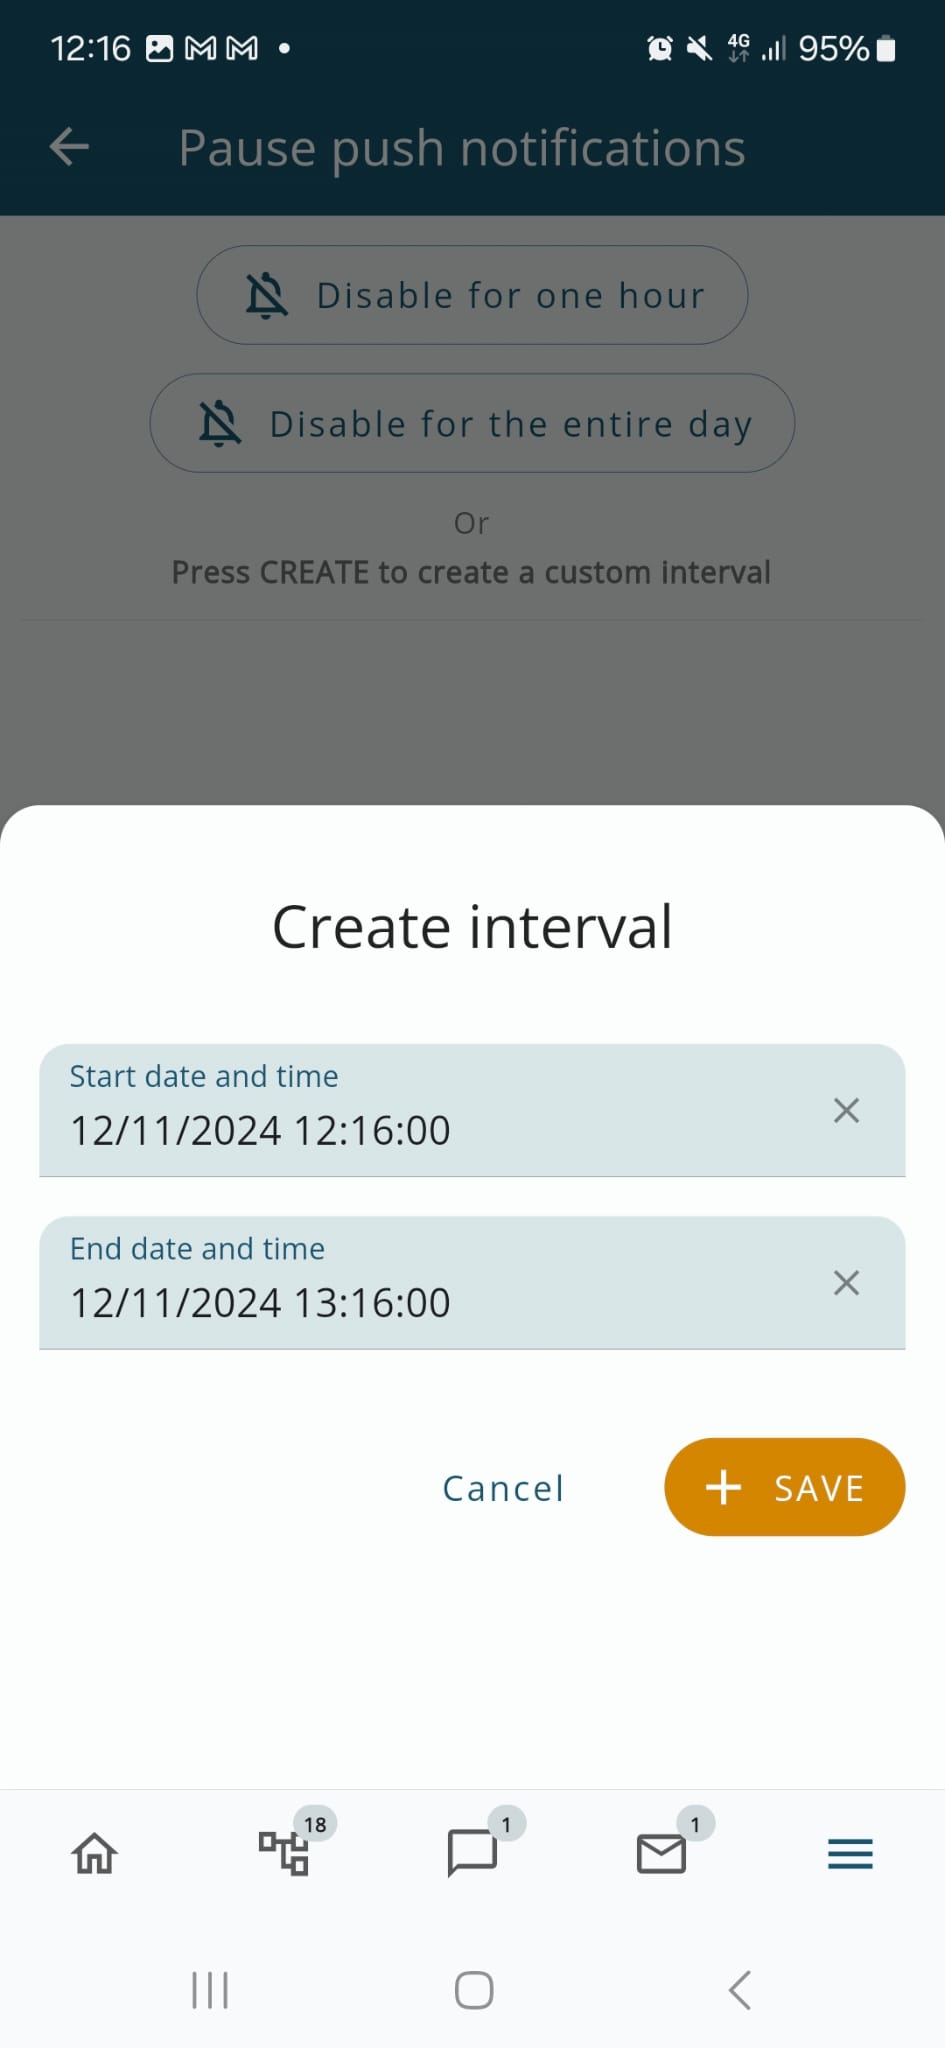
Custom Push Notification Interval Configuration Screen
5.4 Two-factors Authentication
With the Wilson app, you can enable two-factor authentication by first configuring it in the user settings, as explained in Chapter 2.7.2 Two-Factor Authentication (2FA).
Two-factor authentication can be done in two ways:
- via device code sent by email (a 6-digit number to be entered when prompted)
- through biometric fingerprint or face registered on your mobile device
With active two-factor authentication (2FA), when accessing the Wilson app, an action will be required from the user

As a first step, upon login, you will be asked whether to enable biometrics to avoid entering the 6-digit device code that is sent to the user's email address every time.

If you have chosen to access the Wilson app with two-factor authentication from user settings and fingerprint access has not been activated, this is the screen that will appear. In this screen, you need to enter the code that you chose during the activation of the function (ranging from 4 to 8 digits).

If fingerprint access has been activated from the app settings, this is the screen that appears. Click on Biometric Access, and the following screen will appear:
You will then be prompted to place your fingerprint on the sensor of your mobile device to complete the login.
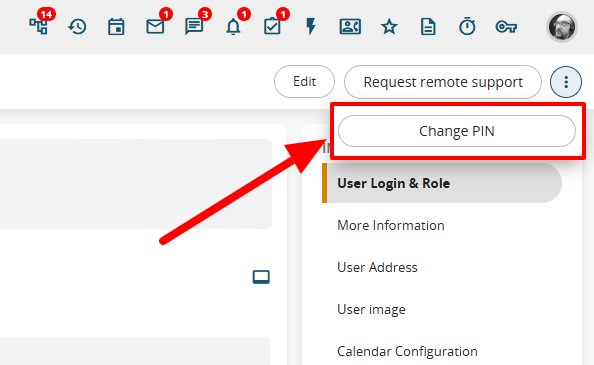
If you wish to reset the PIN for accessing the Wilson App, simply log in from the web interface, go to your User Preferences, click the MORE button at the top right, and then use the CHANGE PIN button, as shown in the figure.
5.5 Mobile Profiles
From the vtenext administration panel, it is possible to set up different profiles that will make work even smarter on the Wilson Mobile App. There is an administration interface for these profiles that allows you to precisely configure the type of display within the app.
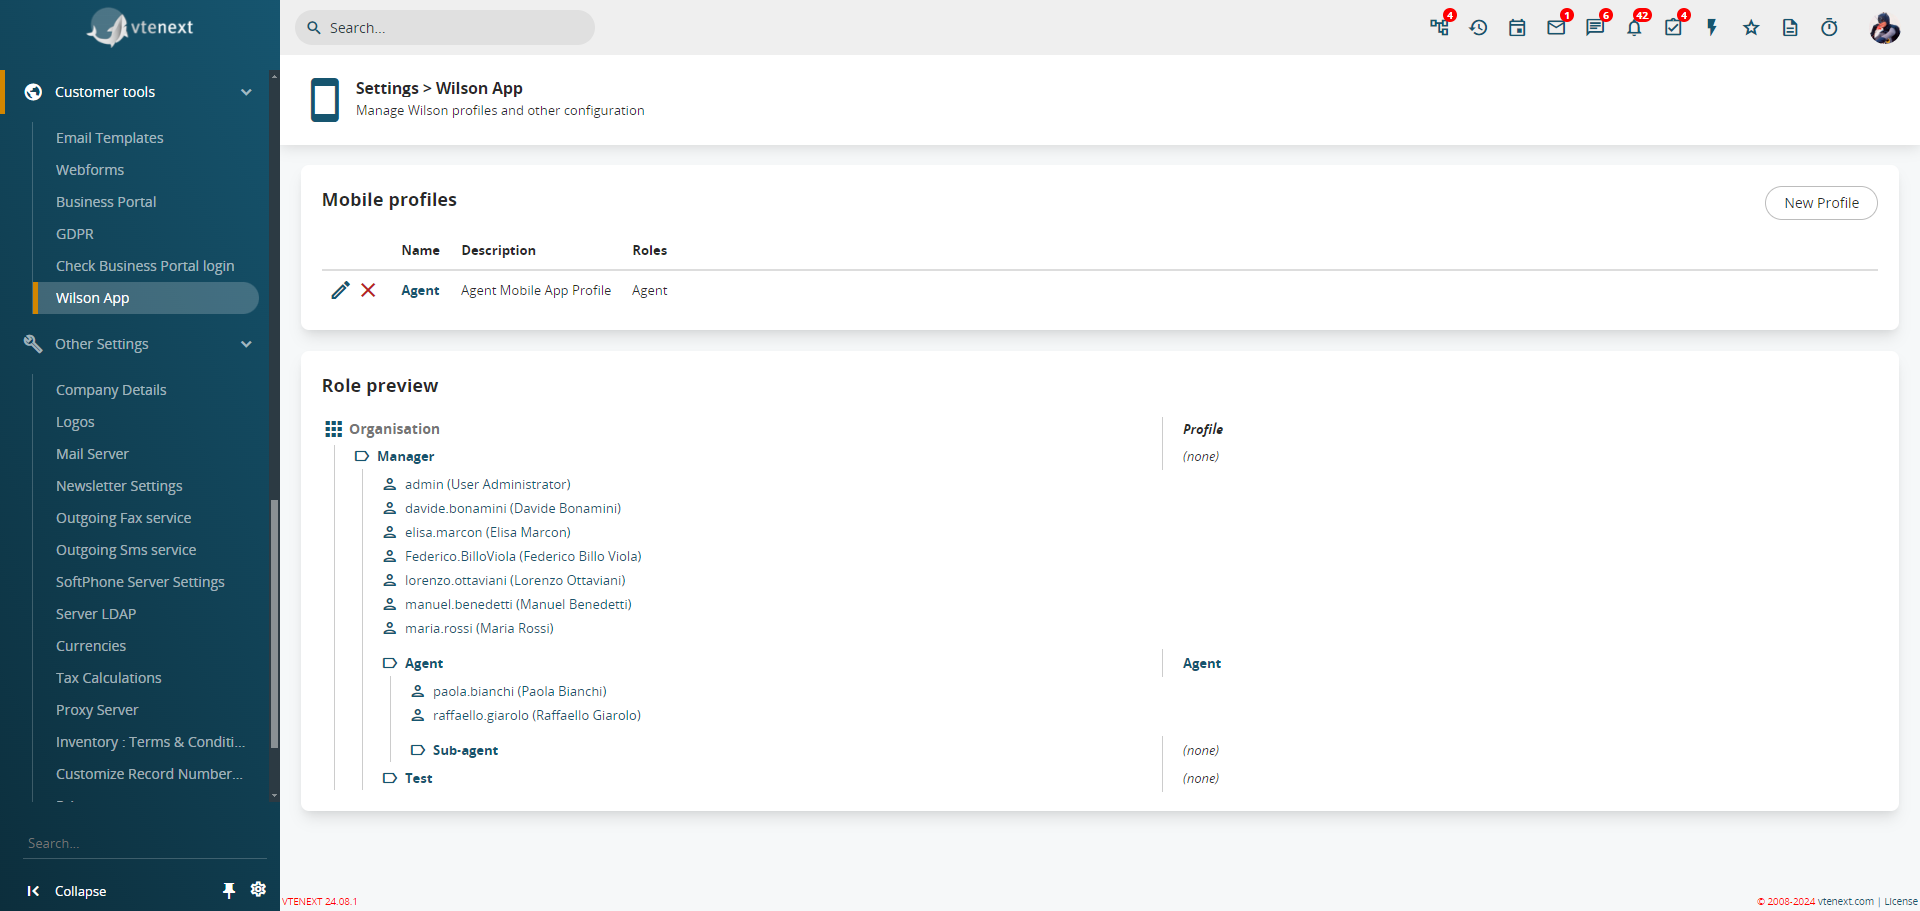
As you can see, there are two sections: one called Mobile Profiles, which will show us the list of profiles set up for the Wilson App, and the other, Role Preview, which will allow us to view the list of all users divided by role, with details of the mobile profile linked to them.
By clicking on the New Profile button in the top right corner, we will access the configuration, which follows the same procedure already explained in Chapter 16.1.1 Creating a New Profile.
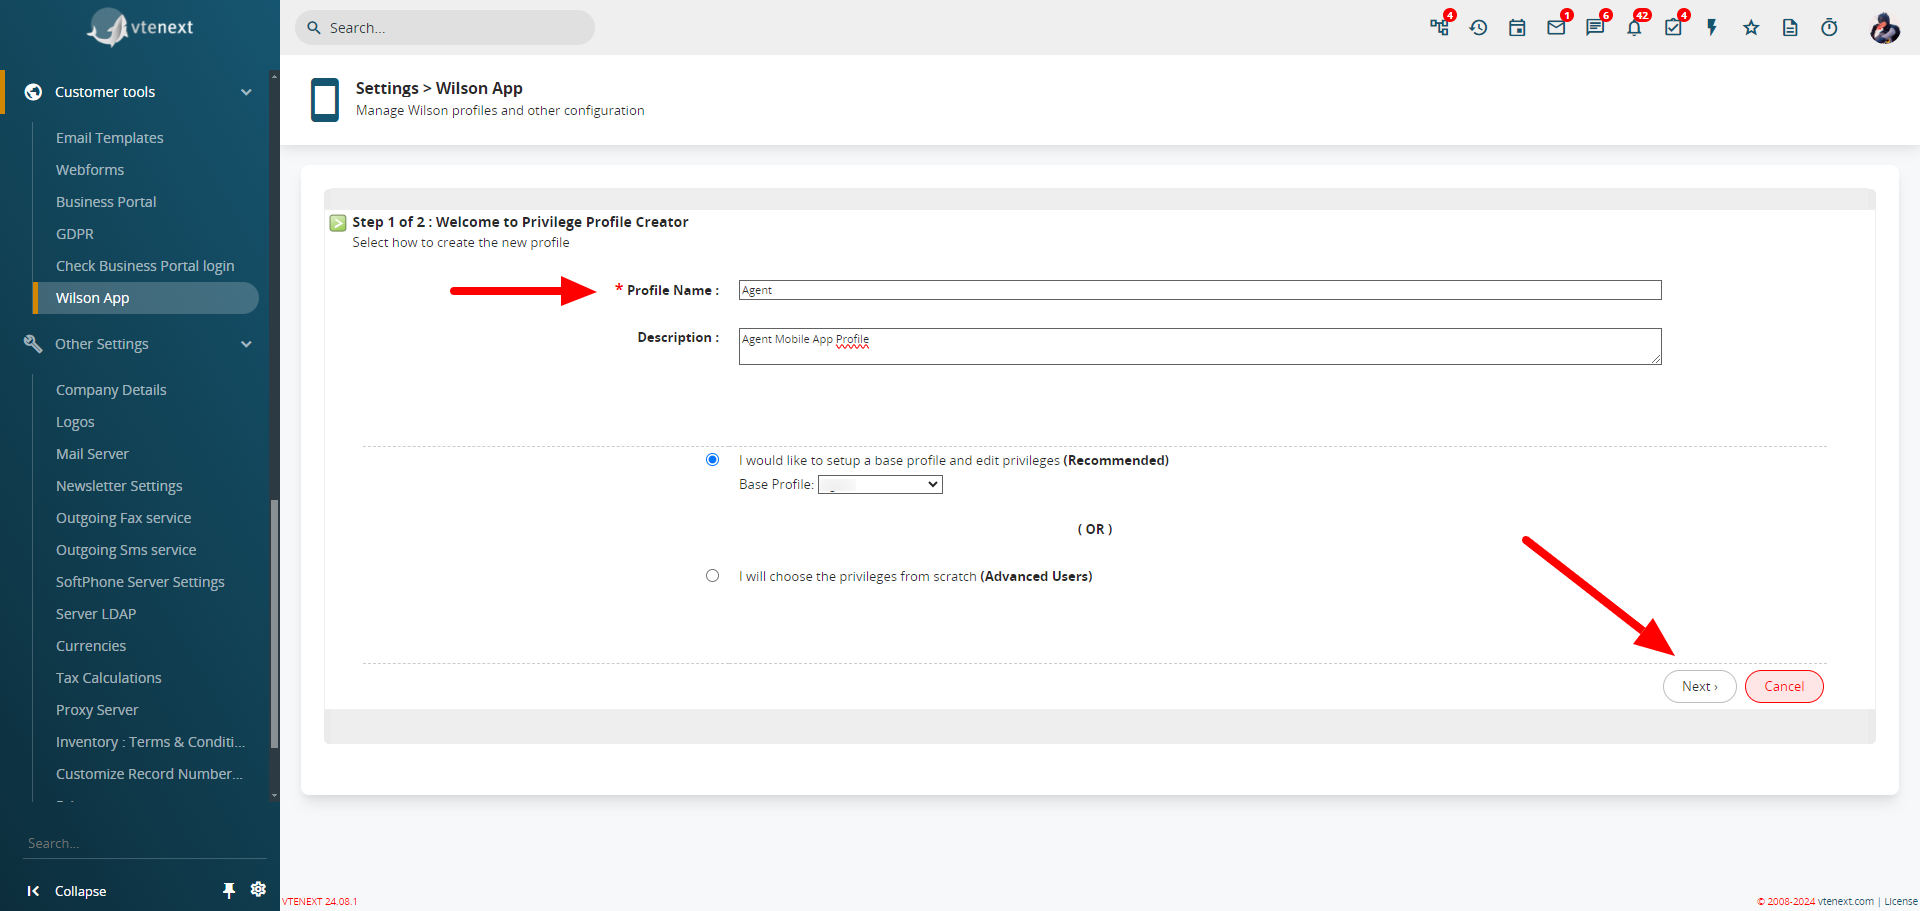
Enter the Mobile Profile name, an optional description, and choose the base profile from which to start the configuration (in case a similar profile has already been set up). Finally, click on the Next button at the bottom right.
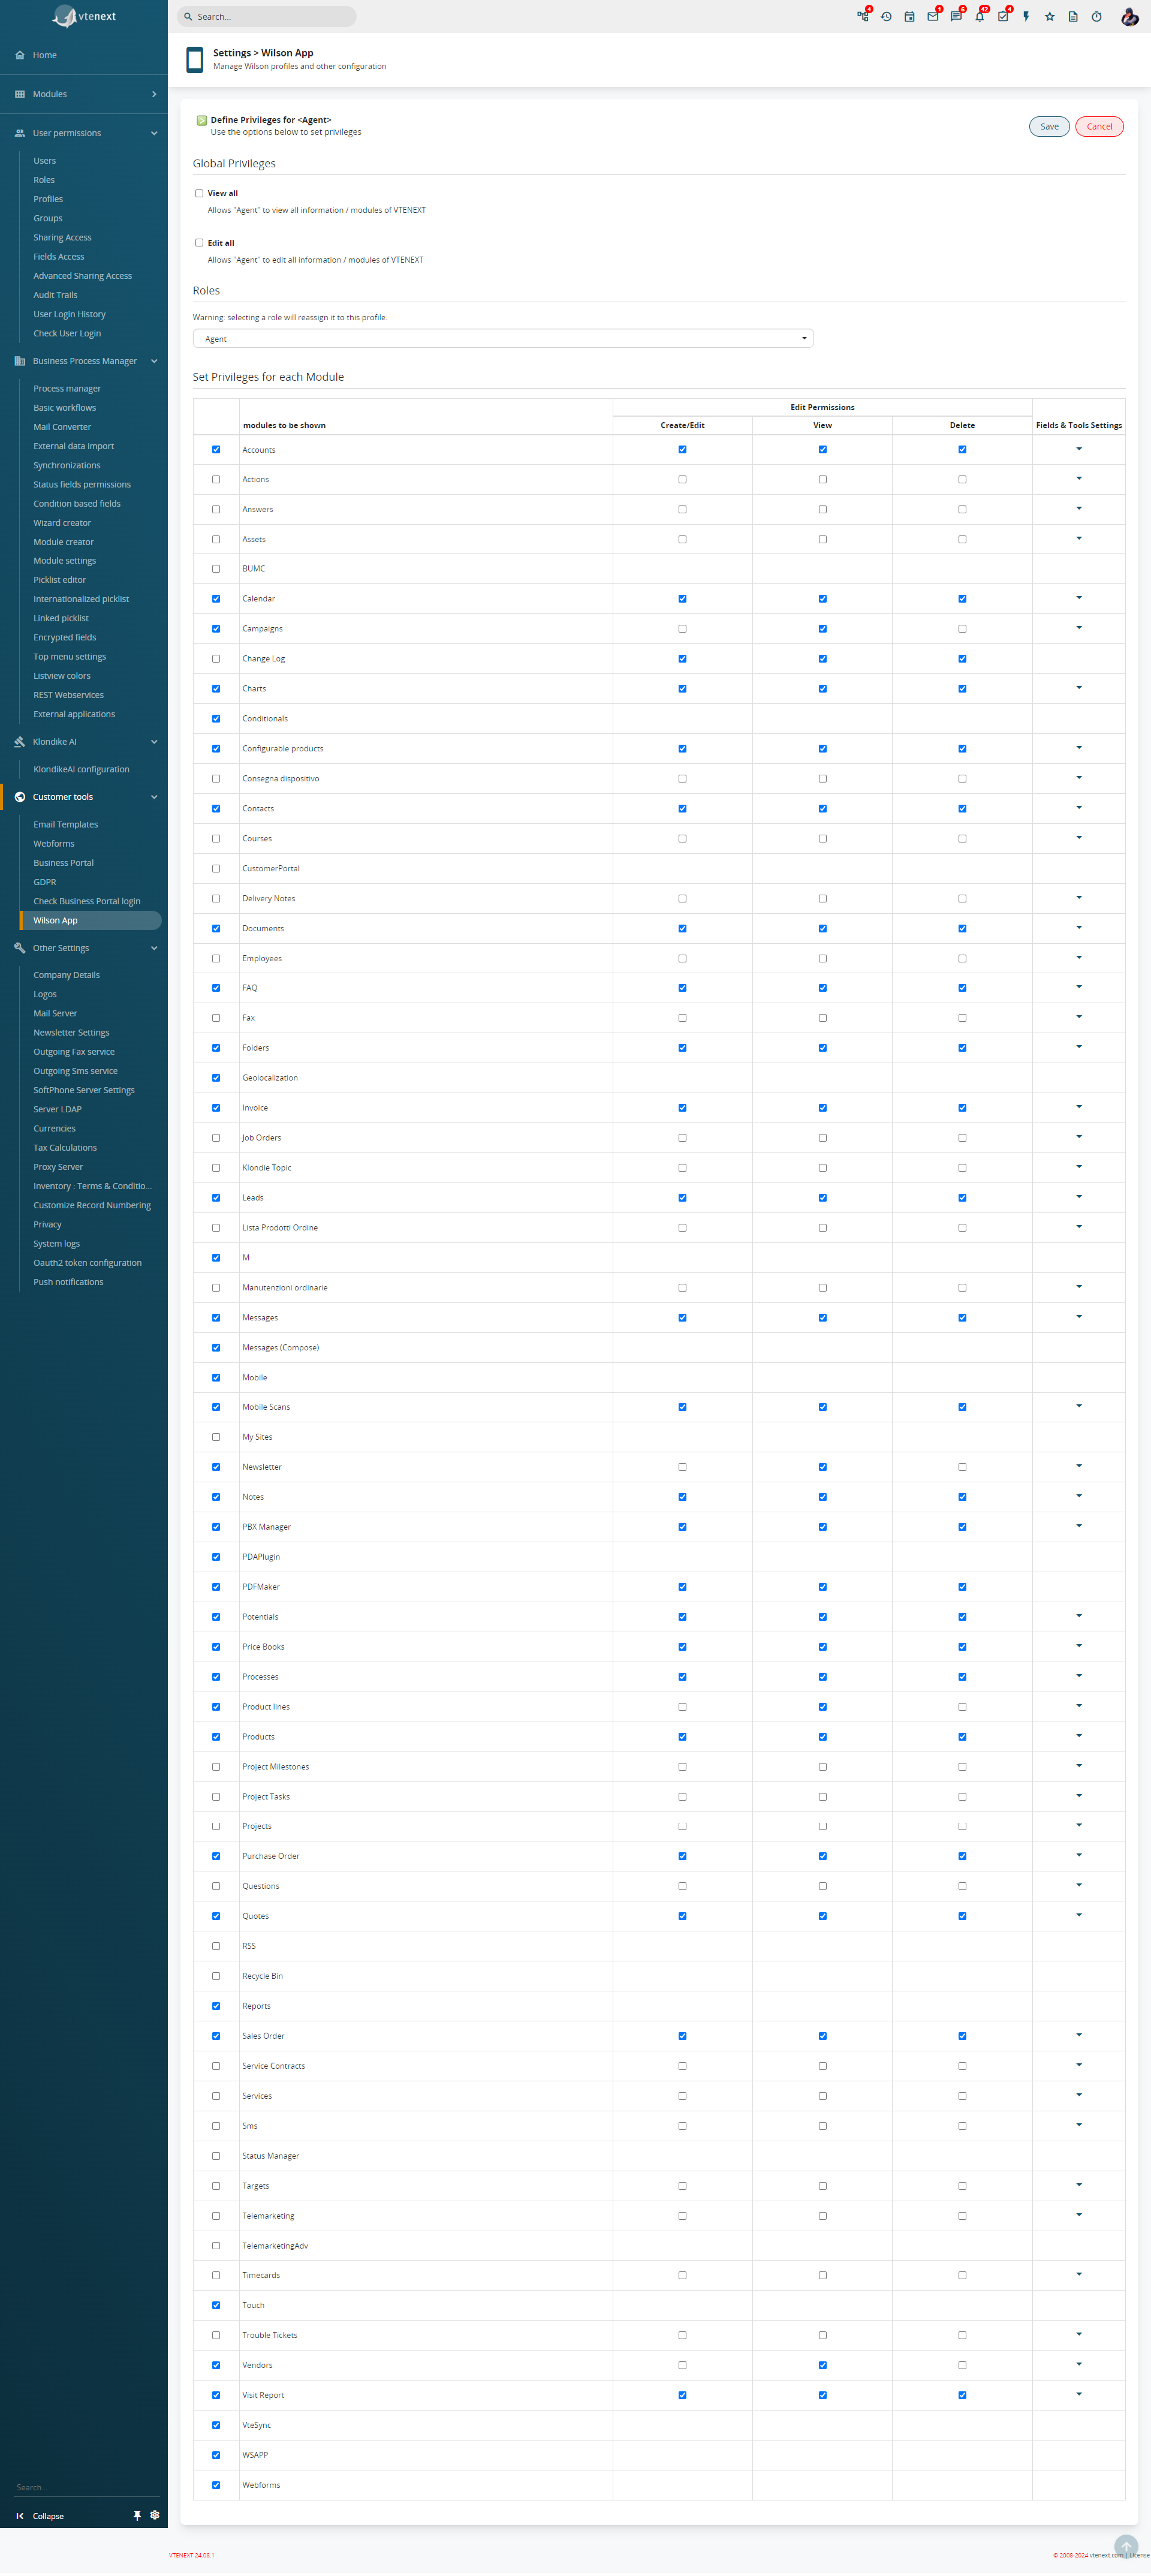
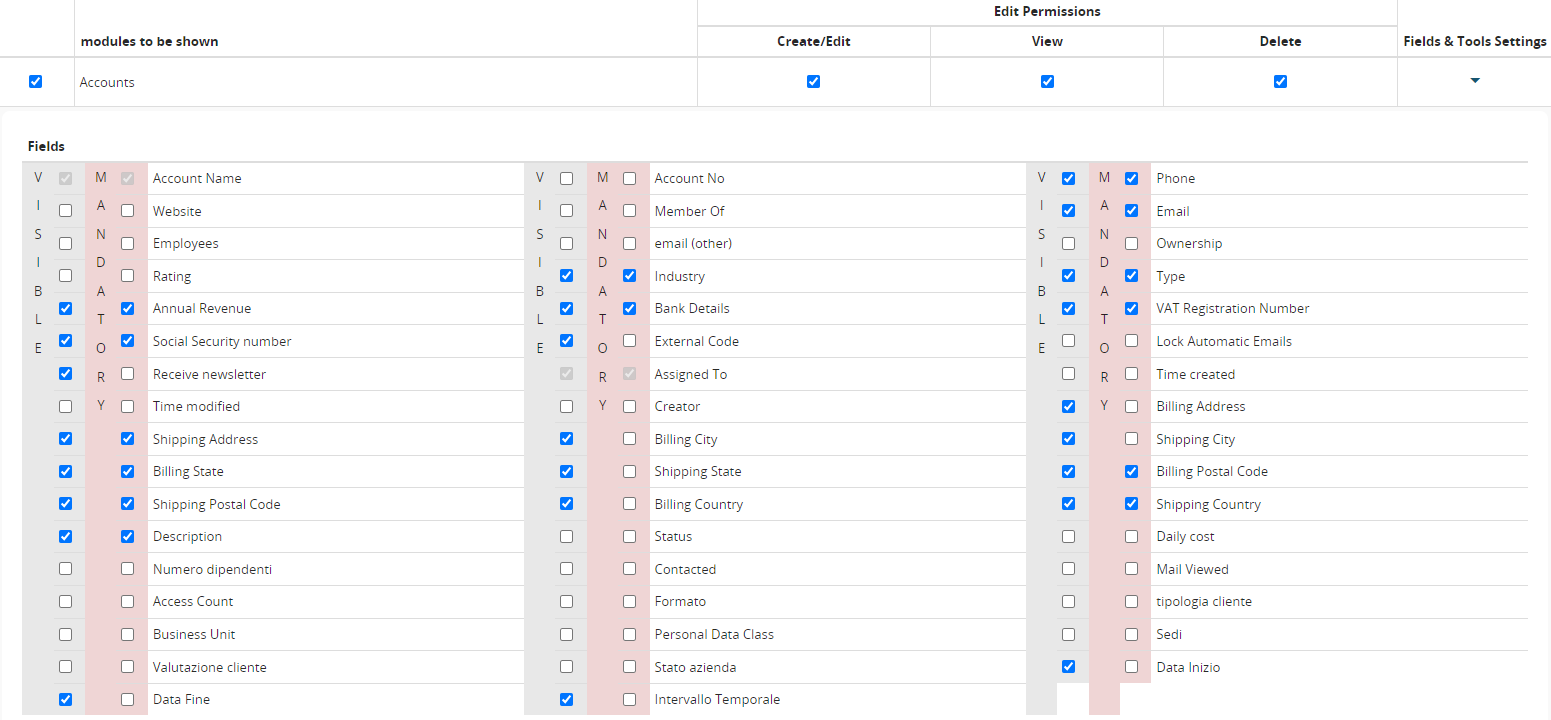
You will then be able to choose which modules to display, which ones to set as read-only, whether a user can create or delete records from that module, which fields are mandatory, and finally, decide which fields of each individual module will be visible from the mobile app.

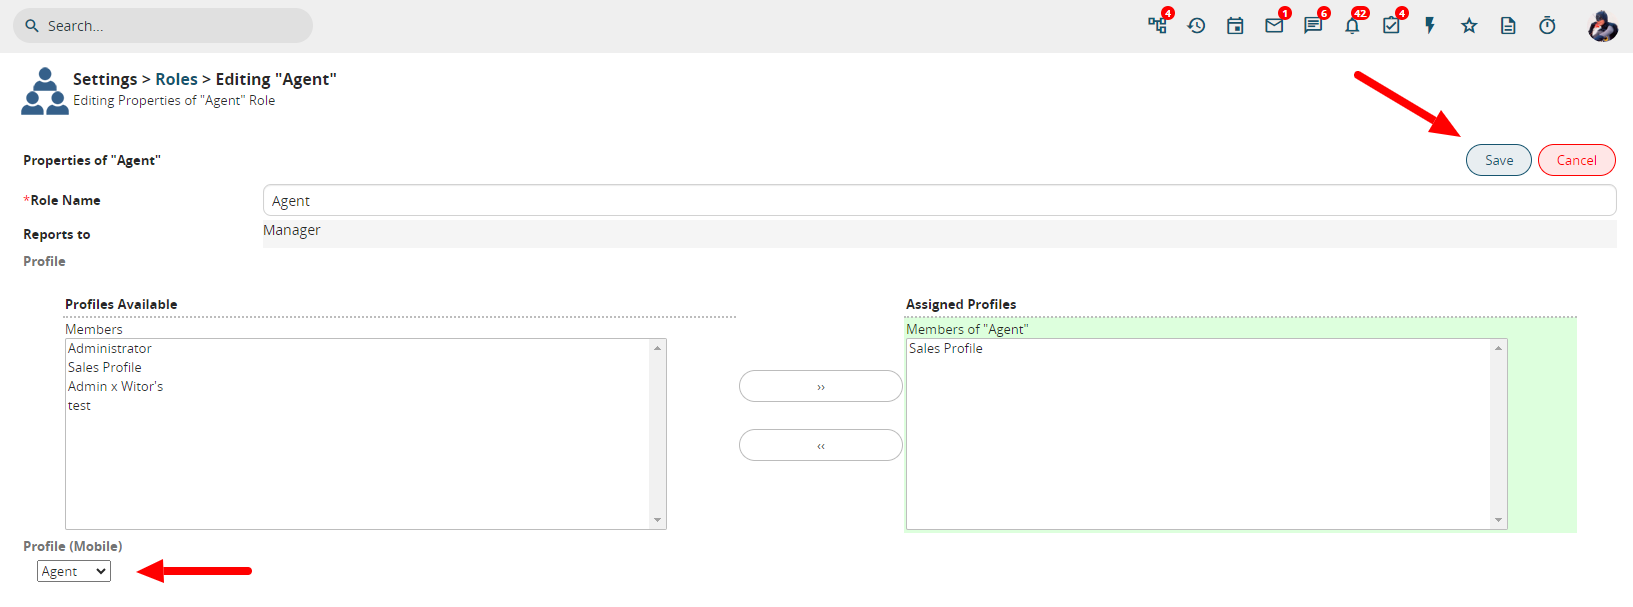
Once saved, the mobile profile will be available in the list of profiles we initially saw. Now it is possible to assign that profile to a specific user. Simply go to SETTINGS > ROLES, click on the desired profile (Agent profile for the example we're using), and modify it by selecting the mobile profile in the bottom left corner. Finally, click the SAVE button in the top right corner.
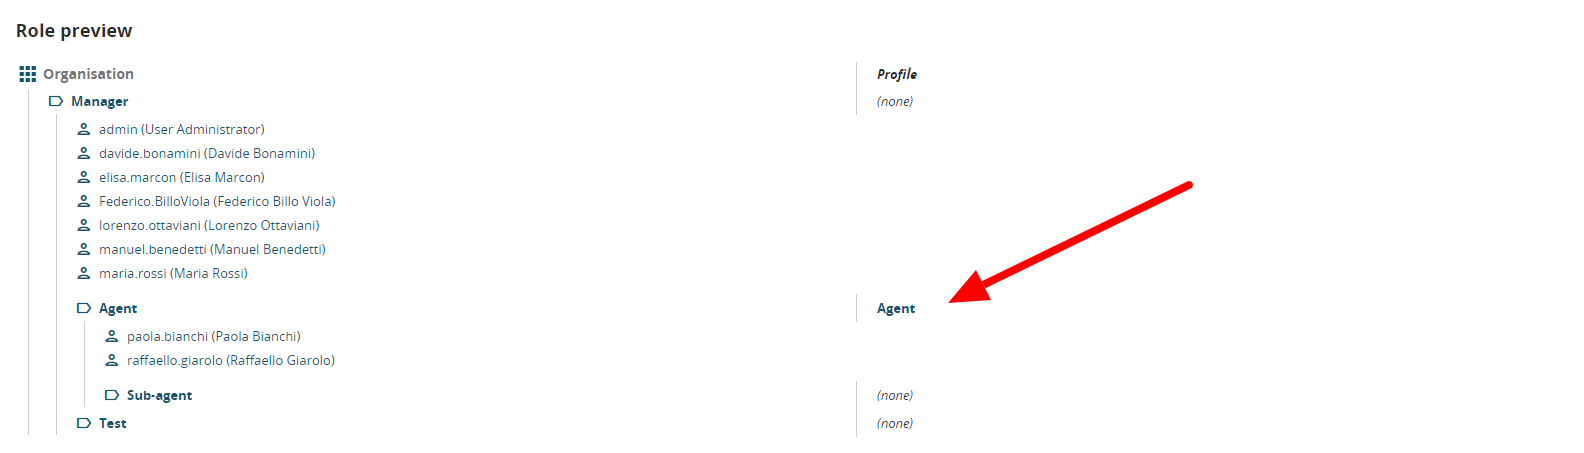
Finally, by returning to SETTINGS > APP WILSON, it is possible to view the Agent's mobile profile connected to their role in the Role Preview section.
6. Global Research
When it is necessary to search for a record across the entire CRM, start by clicking the magnifying glass icon at the top right  . This opens the screen shown below containing some options for refining the search:
- Search entire CRM
- Clients
- Projects
- Sales
- Inventory
- Collaborations
- Others
![6 [2].PNG](https://usermanual.vtenext.com/uploads/images/gallery/2022-07/6-2.PNG)
Global Search detail
How to run a Global Search?
- After typing a search key word, if the “Clients” button is clicked a pop-up opens containing the search results.
- Clicking on “Others” makes it possible to choose to search within other modules (e.g. Plans, Sales Orders, Potentials, Quotations, etc.).
- Pressing the “Search entire CRM” button searches the entire database.