
15.4 Synchronizations
From vtenext settings the crm synchronization function can be accessed with other applications. The synchronizable platforms available are as follows:
- Hubspot
- Salesforce
- SuiteCRM
- Jira
- vtiger
- Magento
- Prestashop
- Shopify
- WooCommerce
The synchronizable modules are different and based on the chosen platform. The following diagram summarizes which modules can be synchronized.
|
Hubspot (only cloud version) |
*record deletions from Hubspot to vtenext are not covered
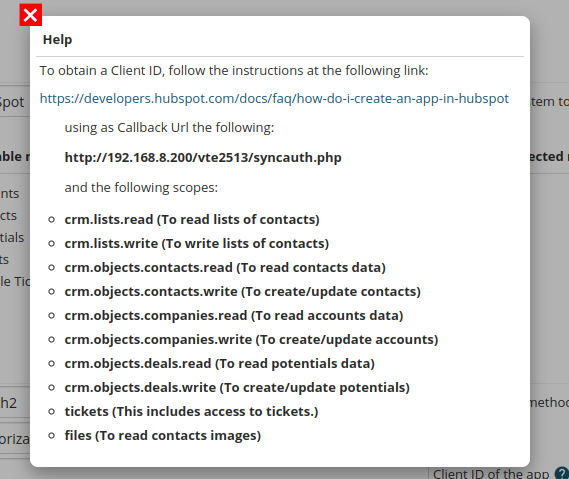
N.B. The "scopes". The crm indicates to insert the following "scopes":
ATTENTION: it is essential to select exactly those indicated, otherwise the synchronization will not work! |
|
Salesforce |
|
|
SuiteCRM (only on-premise version) |
*images are not imported |
|
Jira (only cloud version) |
|
|
vtiger (only cloud version) |
*images are not imported |
|
Magento (only on-premise version 2.4.0) |
*images are not imported |
|
Prestashop (only on-premise version 1.7.6.7) |
*images are not imported |
|
Shopify (only cloud version 2019-20) |
*images are not imported |
|
WooCommerce (only on-premise version 4.4.0) |
*images are not imported |
|
Zendesk |
|
When accessing the configuration page from SETTINGS > BUSINESS PROCESS MANAGER > SYNCHRONIZATIONS the synchronization to be set and towards which system can be configured with a few simple steps. The page is identical to the page shown in the image below.
![15.4 [1].png](https://usermanual.vtenext.com/uploads/images/gallery/2022-06/tCK15-4-1.png)
View of the synchronizations configuration page
Configuration
- The first required action is to choose the External system in the available drop-down menu
- Specify the Instance address to which you wish to connect (where required)
- Now choose the required synchronization modules from those available and take them to the Selected modules column by means of the right-pointing arrow
- Once the operation in step 3 has been completed, a popup will open in which you can select the synchronization method for each of the selected modules (see example in the image below)
![15.4 [2].PNG](https://usermanual.vtenext.com/uploads/images/gallery/2022-06/scaled-1680-/7LZ15-4-2.PNG)
View of the synchronization configuration of the Trouble Ticket module selected in point 3 - Enter the authentication data, stating the authentication mechanism Type, Username and Password for login. By clicking on the
 icon it is possible to have further information to retrieve the data to be entered in the username and password that differ for each synchronizable platform.
![15.4 [2].PNG](https://usermanual.vtenext.com/uploads/images/gallery/2022-06/7LZ15-4-2.PNG)

N.B.: synchronization occurs in accordance with the interval set for the crons, which is every minute by default, but which can be subject to variation depending on the number of synchronizations set, other cron processes, and the machine workload.