
17.15 Mail Converter
The Mail Converter is a tool that allows you to read one or more mailboxes and, when a condition occurs on an email, to activate automatic operations such as archiving the email, linking it to a registry entity, or transforming the email into a Ticket in the HelpDesk module. From vtenext 20.04 it is possible to configure in the mail scanner function also certified mailboxes (PEC).
![17.15 [1].png](https://usermanual.vtenext.com/uploads/images/gallery/2022-06/GX917-15-1.png)
Enter your new mailbox data.
![17.15 [2].png](https://usermanual.vtenext.com/uploads/images/gallery/2022-06/prR17-15-2.png)
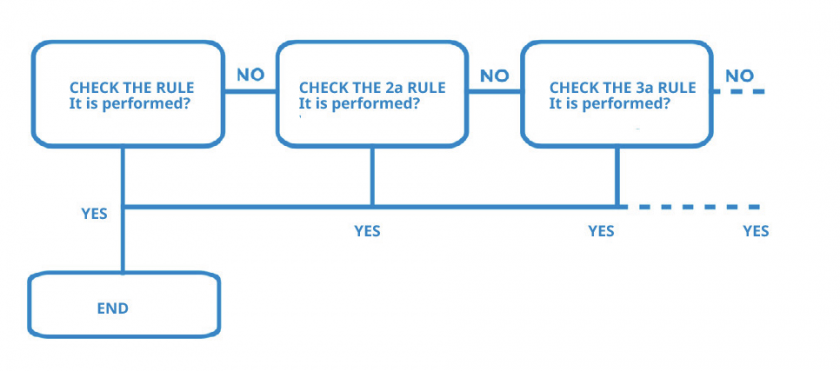
N.B.: if you want the Mail Converter to update the same ticket each time, linking the replies that arrive via email from the client, you need to insert the "Regex" variable in the subject line and both the "Update ticket" variable and the "Ticket ID" Comparison Key as an action(see image). Regex must be in first position, so that the CRM checks if a Ticket with that title already exists, in which case it updates it, or, if it is not present, creates a new one.
|
Scanner Nome |
Indicate the name, as preferred, to be given to the scanner |
|
Server Nome |
Enter the address of the IMAP mail server, for example: mail.dominiocompany.it |
|
Protocol |
Indicate IMAP4 or IMAP2 |
|
User Name |
Enter the User Name to access the inbox; it usually matches the email address |
|
Password |
Enter the inbox access password |
|
SSL Type, SSL Method |
Indicate the access security protocol information if required |
|
Parameters |
It is used to configure advanced parameters for the imap connection, without using the code.
|
|
PEC |
Indicate that the current email address is a PEC By enabling the flag. In this way the ticket will be created using the original email, that is the one contained in the attatched .eml file. |
|
Status |
Enable = mailbox scan is active; Disable = mailbox scan is not active |
|
Find |
Indicate if:
|
|
After Scanning |
Allows you to indicate whether to change the status of the email after scanning:
|
Warning! The mailbox must be accessible in IMAP mode; you cannot configure access in POP3 mode.
After saving the mailbox data you can:
- Decide which folders in your inbox will be read, using the Select Folders button
- Configure the rules of the Mail Converter, using the Setup Rule button
- Manually launch the scan of the box, using the Scan Now button
![17.15 [3].png](https://usermanual.vtenext.com/uploads/images/gallery/2022-06/LQN17-15-3.png)
Select Folders
Activate the flag at the folder to be scanned.
![17.15 [4].png](https://usermanual.vtenext.com/uploads/images/gallery/2022-06/2OE17-15-4.png)
Setup Rule
Through the Setup Rule button, you can configure the actions to be taken after the email check. Click the Add Rule button on the right and then set the rule:
![17.15 [5].PNG](https://usermanual.vtenext.com/uploads/images/gallery/2022-06/Coy17-15-5.PNG)
|
From |
Indicate a condition in the From field: (sender), if not present leave the field blank |
|
To |
Indicate a condition in the To field: (recipient), if not present leave the field blank |
|
Subject |
Indicate a condition in the Object field, if not present leave the field blank |
|
Body |
Indicate a condition in the body of the email, if not present leave the field blank |
|
Match |
Indicate:
|
|
Action |
Indicate the action to be taken when conditions occur.
|
You can set multiple rules and define priorities using the arrows.

Logic:
Scan Now
You can manually launch the scan box by clicking the Scan Now button.
Warning! To activate the automatic check, you need to activate a job in the vtenext server. See the CRONJOB -– Processes to plan chapter.
What happens to the Trouble Tickets module?
At this point all the incoming emails of the preconfigured box for the Mail Converter, will go directly in the Trouble Tickets module. Note that the tickets created in this way are distinguished from those created directly in the CRM by the small flame icon, which allows us to mark that specific email as "spam" and consequently eliminate the ticket.
![17.15 [7].png](https://usermanual.vtenext.com/uploads/images/gallery/2022-06/v6q17-15-7.png)
When we have to answer to one of those email the procedure is simple.
In the button “Other”, present at the top right of each ticket record, there will be 3 new buttons:
![17.15 [8].png](https://usermanual.vtenext.com/uploads/images/gallery/2022-06/1fl17-15-8.png)
|
Mark as Spam |
In this way the email address of the sender will be put in spam. Furthermore, the ticket will be delated. |
|
Answer by mail |
It allows to reply to the email with the email address of the user that is carrying out that operation and not with the email set in the Mail Converter. |
|
Answer by Mail (Info) |
It allows to reply to the customer directly with the email address set in the Mail Converter. In this way, we will be able to track the exchange of communications in the ticket. |
It's possible to reply to a ticket through the comments system, the crm will send the reply via email exactly as it would by clicking on the "Reply via Mail (Info)" button (only for tickets generated by the Mail Converter).
N.B.: if you reply to the ticket with the "Reply via Mail" function, you exit from Mail Converter system. The question and answer will therefore be managed, in a personal way, between the customer's email address and the user's email address.
There is another way to massively mark as spam a group of emails (tickets). Go to the list view, tick the ticets you want to mark as spam, click on the button “Other”, and chose “Mark as spam”.
![17.15 [9].png](https://usermanual.vtenext.com/uploads/images/gallery/2022-06/ndk17-15-9.png)